![[OLD FALL 2017] 15-104 • Introduction to Computing for Creative Practice](https://courses.ideate.cmu.edu/15-104/f2017/wp-content/uploads/2020/08/stop-banner.png)
var underlyingImage; // The image used

var index; //The variable used to loop through the built in pixels array

var pixelation = 10; //The width of each pixel

var colorDiff = 15; //The variable used to compare the colors, and find if
// one color in the RGB spectrum is significantly larger

var r = 0; //the variable that measures the number of clicks you've done

var clickIndex; // The variable that decides if the number of clicks is
// divisible by 1, 2 or 3

function preload() {
    var myImageURL = "https://i.imgur.com/SMNCOc6.jpg";
    //Image of a portrait of me and my girlfriend at a botanical garden 🙂
    underlyingImage = loadImage(myImageURL);
    //Load the image into the variable underlying image
}

function setup() {
    createCanvas(400, 380);
    background(0);
    underlyingImage.loadPixels();
}

function draw() {
    noStroke();

    for (var y = pixelation/2; y <= 1000; y += pixelation) {
        for (var x = pixelation/2; x <= 1000; x += pixelation) {
            //These nested loops move through each and every pixel in the given image
            //They also move with relation to the pixelation intensity

            index = (x*2 + y*3200)*4 - pixelation*width/2;
            //A balancing act on looping through the colors of the image
            //using the built in pixels

            var redish = underlyingImage.pixels[index+0];
            //The red intensity of the current pixel
            var greenish = underlyingImage.pixels[index+1];
            //The green intensity of the current pixel
            var blueish = underlyingImage.pixels[index+2];
            //The blue intensity of the current pixel

            if ((redish > greenish+colorDiff) & (redish > blueish+colorDiff)) {

                fill(255, greenish , blueish);

                //If the red intensity of the observed cell is significantly
                // greater than the blue and green both, then the cell is
                // made much more red

            } else if ((blueish > greenish+colorDiff) & (blueish > redish+colorDiff)) {

                fill(redish, greenish , 255);

                //Same as above, but for the blue intensity

            } else if ((greenish > redish+colorDiff) & (greenish > blueish+colorDiff)) {

                fill(redish, 255 , blueish);

                //Same as above, but for the green intensity

            } else {

                fill(redish, greenish , blueish);
                //if there isn't a significant difference, then the cell
                //color remains normal

            }

            rectMode(CENTER);
            rect(x, y, pixelation, pixelation);
            //Makes the rectangle at each x and y with relation to the pixel intensity

        }
    }
}

function mousePressed () {

    r += 1;
    //Increment r each time you click

    clickIndex = r%3
    // clickIndex will only ever be 0, 1, or 2
    //and so we can set conditionals on it

    if (clickIndex == 0) {
        //if the number of clicks you've done is
        //divisible by three, the difference threshold
        //is much smaller, so more cells are colored
        colorDiff = 15;
    }
    if (clickIndex == 1) {
        //if you've done 3(n) +1 clicks, increase the threshold for less color
        colorDiff = 23;
    }
    if (clickIndex == 2) {
        //if 3(n) +2 clicks, decrease the threshold further for even less color
        colorDiff = 45;
    } //Here, only the most intense colored cells are effected

}
Click it! The “Saturation” decreases and then resets in increments.
This was very interesting, I had trouble balancing the pixels array and looping through it appropriately. But, once I had the pixelation formed correctly, it was easy to affect individual cells, so the setup was important to increase ease of use.
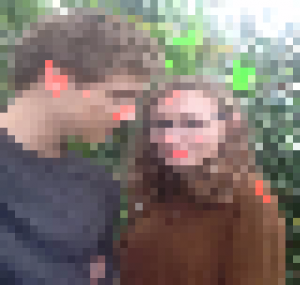
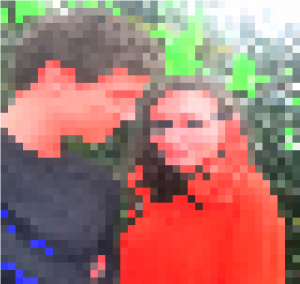
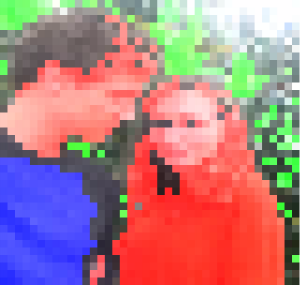
These are the three stages of intensity the image saturates the image of me and my girlfriend.