cduong-Project-07-Curves

sketch

//Name: Colleen Duong
//Email: cduong@andrew.cmu.edu
//Section: D
//Project-07

function setup() {
    createCanvas(480, 480);
}


function draw() {
    background(244, 174, 163);

    // draw the curve
    push();
    translate(width/2, height/2); //makes it rotate from the center
    drawEpitrochoid();
    pop();
}

//--------------------------------------------------
function drawEpitrochoid() {
    //Epicycloid: http://mathworld.wolfram.com/Epicycloid.html
    var n = 1000; //amount of control points

    var x;
    var y;

    var a = constrain(mouseX, 0, 300) //radius of inner circle
    var b = 20; //radius of outer circle
    var h = constrain(mouseY, 0, 300); //distance from the vertice (x, y)

    stroke(255);
    noFill();
    beginShape();
    for (var i = 0; i < n; i++) {
        var t = map(i, 0, n, 0, 100);

        x = (a + b) * cos(t) - h * cos(((a + b) / b) * t); //equation for epicycloid
        y = (a + b) * sin(t) - h * sin(((a + b) / b) * t); //equation for epicycloid

        vertex(x, y);
    }

    endShape(CLOSE);


}

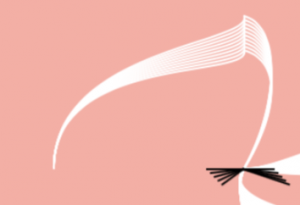
I spent a really long time looking through mathworld trying to figure out what kind of curve I want to use and found several spiral-like shapes that I wanted to originally use, but they used an x, y, and z coordinate so I wasn’t sure how that would turn out with p5js so I decided to use my second choice, which was epitrochoid. It took me a while to figure out what to put in for each variable value in the math equations because it was so confusing but I finally created something that I enjoyed looking at (especially the part that just looks like a circle growing smaller when you go from left to right)

Source: http://mathworld.wolfram.com/Epitrochoid.html

cduong-Looking Outward-07

“Emoto” is an installation that represents the global response around the London 2012 Olympic Games based on millions of twitter messages. Using this data they created a physical sculpture. The sculpture represents message volumes, per hour, and horizontal bands that move up and down according to the amount of tweets they get each time. What I admire about this project is the creativity of it and the physical forms that it creates. It just looks really aesthetically pleasing and so complex at the same time. What captured my attention the most was that I thought they were buildings at first, which they could be seen as from far away since they are just abstract lines based on data collection. People can also look at it and get a vague idea of what kinds of responses were obtained for specific events during the Olympics like a certain person winning a gold medal or breaking a world record.

I’m not sure how the code for this project works but I think that the program is always updating and always being connected to a specific type of tweet that the program looks for to update the physical data sculpture.

This project was specifically made based on people’s reactions to a specific event, which gives a sense of what types of projects this company makes and also gives a gauge of what kinds of interests they like since they picked such a specific event like the 2012 London Olympics.

Project: Emoto – Installation
Creator: Studio Nand
Year: 2012
Link: http://www.nand.io/projects/clients/emoto-installation/


A video of what the project looks like when activated

cduong-looking outward-06

I tried to look up randomness in computation of art through architecture and stumbled upon an interesting article: https://www.fastcodesign.com/3052333/the-value-of-randomness-in-art-and-design

There is a project called “Coding Architecture”, which was done by Linyi Dai. It is under the category “Randomness Projects” http://lostritto.com/risd2015spring-seminar/?cat=6. This project was a result of a challenge that students were given, which was to consider what they can do in order to generate random results. Dai used the value that she was given to generate the rungs of a sphere that seem random but were actually well thought on based on what she might have wanted it the different rungs to look like, which was a sphere. What I admire about this project is that these students, including Lindi, use computation as a medium for art rather than a tool and can use the concept of randomness to create something in art that may not be as random as one may think.

In this particular assignment the way that Linyi used the concept of algorithms and randomness was to just use what she was given, values, and create pretty much anything she wanted, which was a sphere that was cut up. when randomness is used in art and architecture I think a person puts together what they want to put together and thinks seems coherent to themselves, but may look completely random to someone else, which is what I usually feel when I’m in a museum looking at artwork.

Nothing is random, whether it has to do with the design of something or the idea of something, there is always a underlying reason for why something is the way it is even if it may seem random. The article states that “randomness” is not a new concept. In nature random occurrences are easily found, but that’s different in a digital computer where the “randomness” is now quantifiable and known. Although the “applications of randomness in statistics, computer science, finance, and mathematics are well established, it is less so in art and design”. This is why I wanted to look more into the idea of randomness in something like architecture, which I didn’t specifically find but I found that there are cases where they use computational practices like randomness to create architecture. Example: Coding Architecture.

cduong-project-06-abstract clock

sketch

//Name: Colleen Duong
//Class: Section D
//Email: cduong@andrew.cmu.edu
//Project-06-Abstract Clock


//all of the numbers for the x-coordinates of the falling snow
var snowfallx = [400, 300, 200, 100,
                  450, 350, 250, 150, 50,
                  400, 300, 200, 100,
                  450, 350, 250, 150, 50,
                  400, 300, 200, 100,
                  450, 350, 250, 150, 50,
                  400, 300, 200, 100,
                  450, 350, 250, 150, 50,
                  400, 300, 200, 100,
                  450, 350, 250, 150, 50,
                  400, 300, 200, 100,
                  450, 350, 250, 150, 50,
                  400, 300, 200, 100,
                  450, 350];

//All of the numbers for the y-coordinates of the falling snow
var snowfally = [15, 30, 20, 40, 35,
                15, 25, 30, 25,
                30, 20, 30, 20, 30,
                70, 50, 60, 90,
                130, 100, 120, 150, 160,
                150, 160, 130, 170,
                190, 170, 190, 180, 180,
                200, 210, 230, 240,
                210, 240, 260, 210, 220,
                290, 300, 310, 270,
                330, 340, 350, 320, 320,
                350, 360, 340, 340,
                360, 400, 430, 420, 400]

var snowd = 5; //snow diameter

function setup() {
    createCanvas(480, 480);
}

function draw() {
  background(240, 235, 231);

  var H = hour();
  var M = minute();
  var S = second();

//Design Code --> The Mountains
  noStroke();
    //Mountain 5 (Lightest Blue)
      fill(160, 201, 218);
      triangle(50, 500, 400, 500, 230, 180);
      triangle(-50, 500, 300, 500, 110, 100);
      triangle(-50, 500, 150, 500, 50, 130);
      triangle(0, 500, 300, 500, 150, 100);

    //Mountain 4
      fill(71, 153, 190);
      triangle(180, 500, 300, 500, 250, 280);
      triangle(200, 500, 450, 500, 340, 300);
      triangle(350, 500, 450, 500, 400, 320);
      triangle(350, 500, 460, 500, 420, 320);
      triangle(400, 500, 520, 500, 470, 350);

    //Mountain 4
      fill(51, 129, 175);
      triangle(180, 500, 400, 500, 300, 250);
      triangle(300, 500, 450, 500, 380, 280);

    //Mountain 4
      fill(38, 94, 151);
      triangle(300, 500, 450, 500, 360, 370);
      triangle(350, 500, 500, 500, 450, 300);

    //Mountain 3
      fill(31, 66, 120);
      triangle(-30, 500, 100, 500, 50, 200);
      triangle(-30, 500, 100, 500, 10, 250);
      triangle(20, 500, 200, 500, 110, 200);
      triangle(60, 500, 300, 500, 200, 200);

    //Mountain 2
      fill(18, 49, 87);
      triangle(-30, 500, 100, 500, 50, 300);
      triangle(-30, 500, 100, 500, 10, 350);
      triangle(20, 500, 200, 500, 110, 370);
      triangle(60, 500, 300, 500, 200, 440);
      triangle(70, 500, 300, 500, 200, 350);
      triangle(90, 500, 330, 500, 300, 440);
      triangle(160, 500, 400, 500, 300, 300);
      triangle(300, 500, 450, 500, 400, 350);
      triangle(400, 500, 500, 500, 450, 400);

    //Mountain 1 (Darkest Blue)
      fill(0, 7, 18);
      triangle(-30, 500, 100, 500, 50, 400);
      triangle(20, 500, 200, 500, 130, 420);
      triangle(60, 500, 300, 500, 200, 440);

//Design Code --> The mountains

//When it becomes 59 minutes a flag is drawn on the top of the mountain to indicate that the onion has reached the peak (victory!!!)
if(M == 59){
  fill(255);
  rect(130, 100, 15, 10);
  fill(240, 235, 231);
  triangle(130, 110, 130, 100, 135, 105)
  push()
  stroke(0);
  line(145, 100, 145, 120);
  pop()
}

//Sprout climbs up mountain (Minutes)
  var sprout = M * 2
  fill(255);
  ellipse(140, 240-sprout, 10, 10);
  rect(138, 240-sprout, 4, 10, 10);
  fill(129, 188, 179-M);
  ellipse(136, 235-sprout, 8, 5);
  ellipse(144, 235-sprout, 8, 5);


//Changing Moon Shape (Hours)
  for(var moon = 1; moon < H + 1; moon++){
    fill(196, 219, 230);      //blue moon
    ellipse(400, 100, 100, 100);
    fill(240, 235, 231);      //cut moon
    ellipse(450, 100, (moon*3)+70, (moon*3)+70); //changes only the part of the  moon that cuts the moon
    fill(214, 233, 242); //Clouds
    ellipse(300, 120, 25, 10);
    ellipse(330, 140, 70, 20);
    ellipse(360, 130, 70, 20);
    ellipse(400, 150, 60, 15);
  }

//Making snow fall (Seconds) -- Amount of Snow = Number of Seconds
for(var snowfall = 0; snowfall < S; snowfall++){
  fill(255);
  ellipse(snowfallx[snowfall], snowfally[snowfall], snowd, snowd);
}

}

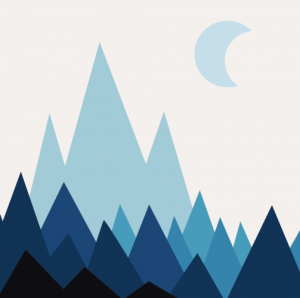
I wanted to create some sort of landscape image and I really wanted to create an image that incorporated receding mountains so I tried to sketch something up on illustrator. I noticed that I also had a big chunk of space on the top right so I wanted to add the moon there to use as the hour indicator since it seemed to fit with the overall mountain theme.

The next part of my thought process was that since my mountains were blue colored they seemed as though they were cold, so I wanted to create a snowy looking scenario, which is why I created something that looked like falling snow with a for loop and an array.

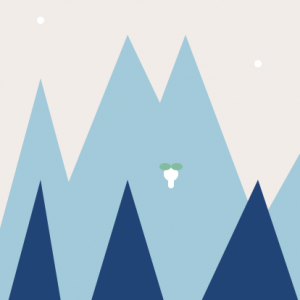
My last thing is that I wanted to incorporate something that I’ve been using in all of my projects so far, which is a white onion (the white circle) with a green sprout coming out of its head.

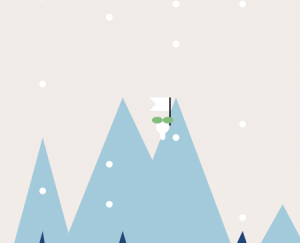
The sprout slowly moves up the mountain as minutes pass and when it finally reaches the peak (59 minutes) it puts a flag on top of it (victory!!).

cduong-assignment05-wallpaper

sketch

function setup() {
    createCanvas(475, 450);
    background(244, 174, 163);

    noLoop();
}

function draw() {

   //White Vertical Lines
   for (var lx = 10; lx <= 470; lx += 45) {
     stroke(255)
     strokeWeight(3);
     line(lx, 0, lx, 480);
  }
  //White Vertical Lines

  //White Circles (Odd Horizontal Lines)
  for(var ssx = 0; ssx < 480; ssx += 90){
    for(var ssy = 0; ssy < 550; ssy += 180){
  stroke(255);
  strokeWeight(2);
  fill(244, 174, 163);
  ellipse(ssx+55, ssy+40, 50, 50);
  }
}
  //White Circles (Odd Horizontal Lines)

  //White Circles (Even Horizontal Lines)
  for(var ssx = 0; ssx < 480; ssx += 90){
    for(var ssy = 0; ssy < 550; ssy += 180){
      stroke(255);
      strokeWeight(2);
      fill(244, 174, 163);
      ellipse(ssx+10, ssy+130, 50, 50);
    }
}
  //White Circles (Even Horizontal Lines)

  //Onion Character (Odd Horizontal Lines)
  for(var onionx = 0; onionx < 450; onionx += 180){
    for(var oniony = 0; oniony <550; oniony += 180){
      fill(255);
      noStroke();
      ellipse(onionx+55, oniony+50, 30, 30);

    for(var leafx = 0; leafx < 540; leafx += 180){
      for(var leafy = 0; leafy < 540; leafy += 180){
        fill(170, 235, 176);
        ellipse(leafx+65, leafy+35, 20, 10);
        ellipse(leafx+45, leafy+35, 20, 10);
        }
      }
    }
  }
  //Onion Character (Odd Horizontal Lines)

  //Lone Sprout (Odd Horizontal Lines)
  for(var sproutx = 0; sproutx < 540; sproutx += 90){
    for(var sprouty = 0; sprouty < 360; sprouty += 180){
  fill(170, 235, 176);
  ellipse(sproutx, sprouty+105, 20, 10);
  ellipse(sproutx+20, sprouty+105, 20, 10);
  }
}
  //Lone Sprout (Odd Horizontal Lines)


}

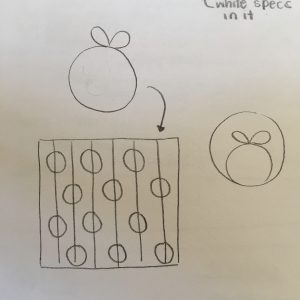
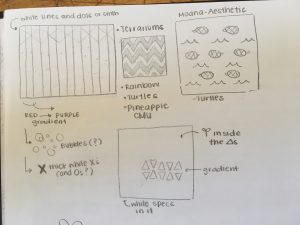
I wanted to incorporate something I’ve been using in my past assignments, which is this white circle with a sprout coming out of the top of its head because I really enjoy drawing that character. I also wanted to make a repetitive pattern in the background so I was playing around with different patterns for a while until I realized that maybe I should keep it consistent with the circluar head of the character and make a background with circles and lines.

cduong-Looking Outward 05

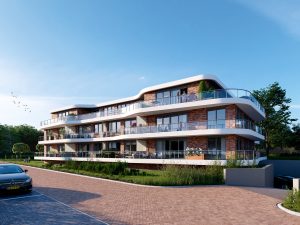
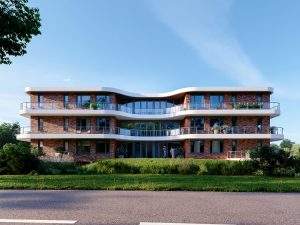
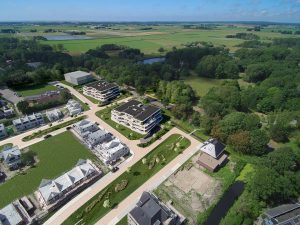
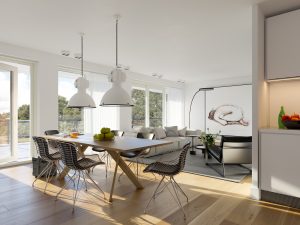
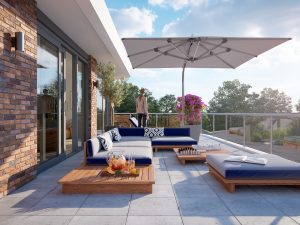
I was looking at George Nijiland’s works (http://www.triple-d.nl/52723/portfolio) and noticed that they were just all so beautiful. The one that really captured my eye was his most recent project, Project: Varne Buiten. This is a project that is a design for an “outside residence” on the edge of Heiloo. The goal of the project it to create a neighborhood for the young and the old and consists of 15 luxury apartments per building. I am unsure if this apartment even exists because it looks so real in the rendering and I haven’t been able to find it on google maps but I found a website selling a housing unit in the building. (https://www.funda.nl/nieuwbouw/heiloo/project-49219271-varne-buiten-fase-5-appartementen/).

What I like about this project is the fact that George Nijiland is designing buildings and instead of only drawing plans, sections, elevations, etc. he creates renderings that make the house just look absolutely breathtaking and real and it really makes the viewer imagine what it would be like if they were at the building. I only recently learned about architectural rendering and I find it really fun and amazing, so George Nijiland’s projects really captured my attention because of just how amazingly real his renderings look.

George Nijiland uses programs like 3dsMax, Vray, and Photoshop with plugins like Forestpack pro, Multiscatter, floor generator, mightytiles, HDRI, etc. When creating his architecture he has to think of the constraints that his building must have while designing, which really holds him back from designing too far ahead. Such constraints include the architectural market in Holland, which is considerably bad so George Nijiland has a difficult time finding projects sometimes and finding people who would want the types of projects that he makes. He also thinks more about what he wants to communicate through his drawings and renders rather than focusing on his render technique.

George Nijiland used to work on office furniture manufactures and design and photography, which are skills that he uses in his current work, architectural renderings. He really likes designing the interiors of his houses, which you can see in his renders because he really focuses on the detail of the house both inside and out, even allowing the audience to see little bits of furniture when they’re just looking at the exterior of the house to make the house look like it’s already being lived in in the renders. He also gets a lot of inspiration from websites like pinterest, architectural books, facebook, magazines, photography, etc. which you can somewhat see in his works because his work does have a sort of aesthetic look to it that just makes you want to look at it forever.

Title of Work: Project Varne Buiten
Created by: George Nijiland
Date: June 2017

Sources
http://www.triple-d.nl/52723/portfolio
https://www.behance.net/Triple-D
http://www.nieuwbouw-varnebuiten.nl/
https://krk.nl/wonen/nieuwbouw/varne-buiten-fase-5-appartementen-heiloo
http://www.3darchitettura.com/george-nijland/

cduong-looking outward 04-FabricKeyboard

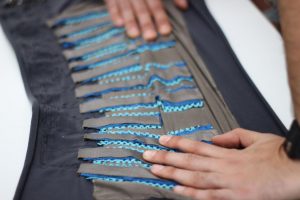
The project is “FabricKeyboard”, which is a stretchable fabric that is used as a musical instrument. It is a physical interaction media based on fabric. The way it functions is that it is a multilayer design that is created in a way to look as though it has different ‘keys” that have extensions that can determine things such as touch, proximity, pressure, stretch, position, etc. The video was honestly so amazing to watch, especially with the range of sounds that they can make and it is just so interesting to think that technology has advanced so far that people can now produce sounds from a piece of fabric.

They used software known as MIDI that allows the FabricKeyboard to “plug and play” and they are currently exploring the OSC protocol to use it wirelessly. The algorithms that were possibly used to develop this work had to be working on different combinations of factors such as pressure, proximity, etc. to produce a specific type of sound and they had to determine exactly what types of sounds they wanted to produce.

They had to develop this fabric to look a specific way and it looks somewhat like a futuristic keyboard or piano, especially with the sounds that it makes. The creator’s had full control of what they wanted the sounds to be and how they wanted every little factor to affect the sounds.

The FabricKeyboard was created by the Responsive Environments team at the MIT Media Lab. This was created this year in 2017.

FabricKeyboard – Stretchable fabric (sensate media) as a musical instrument

cduong-project 04-string art

cduong-project-04

//Name: Colleen Duong
//Section: D
//Andrew ID: cduong@andrew.cmu.edu
//Project-04: String Art

function setup() {
    createCanvas(400, 300);
}

function draw() {
  background(244, 174, 163);

  //Variables
  var x; //x-coordinate
  var y = 100;

//I wanted the lines to be close together so I made the range pretty small


//The Head of a Flamingo
  for(var x = 0; x < 20; x+=2){ //Range: 0 to 20
    stroke(255);

    curve(100, 200, 200, 100, 200, x+20, 73, 61);   //Same y2, y3,and x3 values to make sure that the emerging lines connect at the same point to make a coherent bird head shape
    curve(200, 400, 100, 100, 200, x+20, 73, 10);
  }


//Flamingo Wing1
  for(var x = 0; x < 60; x+=2){ //Range: 0 to 60
    noFill();
    stroke(255);

    curve(0, 0, 200, 100, 400, x+20, 73, 61); //Same x2, y2, and y3 as the head of the flamingo to make sure that the wings connected in the same place as the neck
  }

//Flamingo Wing2
  for(var x = 0; x < 30; x+=2){ //Range: 0 to 30 (I wanted this wing to be shorter than the one that's closer)
    noFill();
    stroke(255);

    curve(200, 0, 200, 100, 350, x+20, 73, 61); //Same x2, y2, and y3 as the head of the flamingo to make sure that the wings connected in the same place as the neck
  }

//Flamingo Body
  for(var x = 0; x < 100; x+=2){ //Range: 0 to 100 (Bigger range because the body is bigger)
    noFill();
    stroke(255);

    curve(400, 0, 200, 100, 300, x+120, 400, 0); //Same x2 and y2 as the head of the flamingo to make sure that the wings connected in the same place as the neck
    curve(400, 0, 500, 180, 300, x+120, 200, 400);
}

//BowTie
  for(var x = 0; x < 10; x+=2){ //Range: 0 to 10
    noFill();
    stroke(0);

    line(199, 100, x+180, x+y);
    line(199, 100, x+215, x+y);
  }

//Orange Water
      for(var x = 0; x < 400; x+=4){ //Range: 0 to 400 (I wanted the river to be gigantic and I made the value in between each x to be larger to spread out the lines more so they wouldn't merge into a solid shape)
        noFill();
        stroke(243, 204, 143);

        curve(400, 400, 20, 200, 390, x+300, 400, 400);
      }

//Blue Water
  for(var x = 0; x < 400; x+=6){ //Range 0 to 400 (To make the water look somewhat multi colored I put blue on top and put a different x+= value so it wouldn't completely overlap)
    noFill();
    stroke(183, 221, 239);

    curve(400, 400, 20, 200, 390, x+300, 400, 400);
  }


}

I wasn’t really sure what I wanted to draw at first so I started to play around with the for loop and curves until I made a really interesting shape, which is the beak/head/neck of the swan that I drew and from there I just continued to draw a swan.  

It was really fun to play around with the curves to try and make an abstract drawing. Hopefully you see what I was trying to draw, which is a swan (who is wearing a bowtie) flying over a river.

cduong-LookingOutward-03

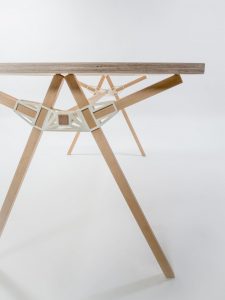
The picture above is from the weurbanist website linked below and shows one of the many 3D-printed connectors that were made for this project.

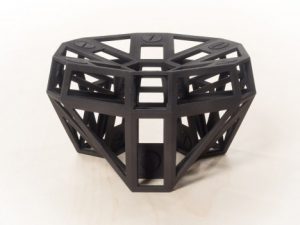
The project is about 3D-Printable Connectors that help make DIY furniture assembly easier. They use 3D printers to create an array of possible connectors that could be used to make all types of furniture. The goal of this project is to allow people to easily make their own furniture into something that fits their needs. I admire how the project is aimed to benefit anyone; it is not just for one specific group of people. I find this really interesting because I worked in woodshop a lot during my last school year and I also love working with 3D printers. I also love the idea of DIYs and do a few of them whenever I find something interesting on pinterest.

I suppose the algorithms they use varies depending on the type of furniture that they are aiming to make, whether it’s a table or a chair or something else. These algorithms have to create different angles and forms to accomplish a connection that could be used to create a table or a chair, since both pieces of furniture are used in very different ways. There is an infinite amount of algorithms that these creators could use and I’m sure they produce all types of connectors, hundreds of unique connectors.

The creator’s artistic sensibilities manifest into the final form by creating a specific type of connector that may force a piece of furniture to look or work a certain way, possibly a way that the creator prefers.

3D-Printable Connectors Make DIY Furniture Assembly Easy

This was created by Studio Minale-Maede (http://www.minale-maeda.com/) in 2012. It was known as the Keystone project.

Another photo from weurbanist that shows another type of connector that was created.

cduong-Project-03-Dynamic-Drawing

project03

/*
Name: Colleen Duong
Lab Section: D
Email: cduong@andrew.cmu.edu
Project-03 Dynamic Drawing
*/

var sunsize = 50;
var BR = 6; //Sky R color
var BG = 6; //Sky G color
var BB = 50; //Sky B color
var BRG = 25; //Ground R color
var BGG = 62; //Ground G color
var BBG = 16; //Ground B color
var SR = 255 //Sun R color
var SG = 255 //Sun G color
var SB = 255 //Sun B color
var sproutstemh = 610; //sprout stem height


function setup() {
    createCanvas(640, 480);
}

function draw() {
  background(BR, BG, BB);
  noStroke();

//Sky   Start
  //Setting the boundaries for the morning colors to appear
  if ((mouseX >= 640) & (mouseX <= 640)){
      mouseX = 640;
  }

  //Setting the boundaries for the night colors to appear
  //background nighttime colors (6, 6, 50)
  //background daytime colors (187, 235, 235)
  if ((mouseX > 0) & (mouseX < 400)){
    BR = mouseX*((187-6)/400) + 6;
  	BG = mouseX*((235-6)/400) + 6;
  	BB = mouseX*((235-50)/400) + 50;
    }
//Sky   End


//The Sun   Start
  fill(SR, SG, SB);

  //Setting a constraint so the sun cannot leave the canvas
  var constrainy = constrain(mouseY, 0, 300);
  var constrainx = constrain(mouseX, 0, 600);

  //Creating the sun shape
  ellipse(constrainx, constrainy, sunsize, sunsize); //The circle

  //Setting the boundaries for sun to change to morning color
  if ((mouseX > 640) & (mouseX < 640)){
      mouseX = 640;
  }

  //Setting the boundaries for sun to change to night color
  //Daytime Grass (255, 199, 5)
  //Nighttime Grass (255, 255, 255)
  if ((mouseX > 0) & (mouseX < 640)){
    SR = mouseX*((255-255)/640) + 255;
    SG = mouseX*((199-255)/640) + 255;
    SB = mouseX*((5-255)/640) + 255;
    }

  //Changing the Sun Size depending on Location
  sunsize = (0.5*(mouseX+mouseY)); 
//The Sun   End


//Grass   Start
  //Ground
  fill(BRG, BGG, BBG);
  rect(0, 400, 680, 100);

  //Setting the boundaries for the morning grass colors to appear
  if ((mouseX > 640) & (mouseX < 640)){
      mouseX = 640;
  }

  //Setting the boundaries for the night grass colors to appear
  //Daytime Grass (78, 174, 55)
  //Nighttime Grass (25, 62, 16)
  if ((mouseX > 0) & (mouseX < 640)){
    BRG = mouseX*((78-25)/640) + 25;
    BGG = mouseX*((174-62)/640) + 62;
    BBG = mouseX*((55-16)/640) + 16;
    }
//Grass   End

//Stems Start
  //Make stems grow as the arrow moves across the x-axis
  push();
  translate(35, -mouseX+200); //Make the stems grow upward
  sproutS = rect(35, sproutstemh, 10, 300, 10);
  sprout2S = rect(105, sproutstemh, 10, 300, 10);
  sprout3S = rect(175, sproutstemh, 10, 300, 10);
  sprout4S = rect(245, sproutstemh, 10, 300, 10);
  sprout5S = rect(315, sproutstemh, 10, 300, 10);
  sprout6S = rect(385, sproutstemh, 10, 300, 10);
  sprout7S = rect(455, sproutstemh, 10, 300, 10);
  sprout8S = rect(525, sproutstemh, 10, 300, 10);
  pop();

  //Leaves that pop out of the stem depending on where your mouse is on the x axis
  //Key: SproutL is the first stem's sprouts, Sprout 2L is the second stem's sprouts, etc
  //Key2: SproutL2 is the second leaf from the ground, etc.
  if ((mouseX > 450)){ //First to pop up
    sproutL = ellipse(60, 380, 25, 20);
    sprout3L = ellipse(200, 370, 25, 20);
    sprout7L = ellipse(480, 360, 25, 20);
  }
  if ((mouseX > 480)){ //Second to pop up
    sprout2L = ellipse(130, 385, 25, 20);
    sprout4L = ellipse(300, 360, 25, 20);
    sprout6L = ellipse(410, 370, 25, 20);
    sproutL2 = ellipse(90, 320, 25, 20);
    sprout3L2 = ellipse(230, 320, 25, 20);
    sprout7L2 = ellipse(510, 330, 25, 20);
  }
  if ((mouseX > 520)){ //Third to pop up
    sprout5L = ellipse(340, 355, 25, 20);
    sprout8L = ellipse(580, 350, 25, 20);
    sprout2L2 = ellipse(160, 325, 25, 20);
    sprout3L3 = ellipse(200, 300, 25, 20);
    sprout4L2 = ellipse(270, 310, 25, 20);
    sprout6L2 = ellipse(440, 320, 25, 20);
    sprout7L3 = ellipse(480, 290, 25, 20);
  }
  if ((mouseX > 540)){ //Fourth to pop up
    sproutL3 = ellipse(60, 260, 25, 20);
    sprout2L3 = ellipse(130, 280, 25, 20);
    sprout3L4 = ellipse(230, 275, 25, 20);
    sprout4L3 = ellipse(300, 255, 25, 20);
    sprout5L2 = ellipse(370, 260, 25, 20);
    sprout6L3 = ellipse(410, 260, 25, 20);
    sprout7L4 = ellipse(510, 250, 25, 20);
    sprout8L2 = ellipse(550, 260, 25, 20);
  }

//Last to pop up: Flowers   Start
  if ((mouseX > 575)){ //Petal 1
    fill(247, 154, 185); //Pink Color
    ellipse(50, 200, 40, 40); //Pink

    fill(255, 180, 0); //Orange Color
    ellipse(190, 200, 40, 40); //Orange

    fill(191, 63, 63); //Red Color
    ellipse(120, 200, 40, 40); //Red

    fill(31, 144, 0); //Green Color
    ellipse(330, 200, 40, 40); //Green

    fill(255, 234, 0); //Yellow Color
    ellipse(260, 200, 40, 40); //Yellow

    fill(136, 73, 189); //Purple Color
    ellipse(470, 200, 40, 40); //Purple

    fill(17, 46, 173); //Blue Color
    ellipse(400, 200, 40, 40); //Blue

    fill(70, 63, 69); //Black Color
    ellipse(540, 200, 40, 40); //Black
}

  if ((mouseX > 565)){ //Petal 2
    fill(247, 154, 185); //Pink Color
    ellipse(100, 200, 40, 40); //Pink

    fill(255, 180, 0); //Orange Color
    ellipse(240, 200, 40, 40); //Orange

    fill(191, 63, 63); //Red Color
    ellipse(170, 200, 40, 40); //Red

    fill(31, 144, 0); //Green Color
    ellipse(380, 200, 40, 40); //Green

    fill(255, 234, 0); //Yellow Color
    ellipse(310, 200, 40, 40); //Yellow

    fill(136, 73, 189); //Purple Color
    ellipse(520, 200, 40, 40); //Purple

    fill(17, 46, 173); //Blue Color
    ellipse(450, 200, 40, 40); //Blue

    fill(70, 63, 69); //Black Color
    ellipse(590, 200, 40, 40); //Black
}

if ((mouseX > 570)){ //Petal 3
    fill(247, 154, 185); //Pink Color
    ellipse(75, 180, 40, 40); //Pink

    fill(255, 180, 0); //Orange Color
    ellipse(215, 180, 40, 40); //Orange

    fill(191, 63, 63); //Red Color
    ellipse(145, 180, 40, 40); //Red

    fill(31, 144, 0); //Green Color
    ellipse(355, 180, 40, 40); //Green

    fill(255, 234, 0); //Yellow Color
    ellipse(285, 180, 40, 40); //Yellow

    fill(136, 73, 189); //Purple Color
    ellipse(495, 180, 40, 40); //Purple

    fill(17, 46, 173); //Blue Color
    ellipse(425, 180, 40, 40); //Blue

    fill(70, 63, 69); //Black Color
    ellipse(565, 180, 40, 40); //Black
}

if ((mouseX > 555)){ //Petal 4
    fill(247, 154, 185); //Pink Color
    ellipse(60, 225, 40, 40); //Pink

    fill(255, 180, 0); //Orange Color
    ellipse(200, 225, 40, 40); //Orange

    fill(191, 63, 63); //Red Color
    ellipse(130, 225, 40, 40); //Red

    fill(31, 144, 0); //Green Color
    ellipse(340, 225, 40, 40); //Green

    fill(255, 234, 0); //Yellow Color
    ellipse(270, 225, 40, 40); //Yellow

    fill(136, 73, 189); //Purple Color
    ellipse(480, 225, 40, 40); //Purple

    fill(17, 46, 173); //Blue Color
    ellipse(410, 225, 40, 40); //Blue

    fill(70, 63, 69); //Black Color
    ellipse(550, 225, 40, 40); //Black
}

if ((mouseX > 560)){ //Petal 5
    fill(247, 154, 185); //Pink Color
    ellipse(90, 225, 40, 40); //Pink

    fill(255, 180, 0); //Orange Color
    ellipse(230, 225, 40, 40); //Orange

    fill(191, 63, 63); //Red Color
    ellipse(160, 225, 40, 40); //Red

    fill(31, 144, 0); //Green Color
    ellipse(370, 225, 40, 40); //Green

    fill(255, 234, 0); //Yellow Color
    ellipse(300, 225, 40, 40); //Yellow

    fill(136, 73, 189); //Purple Color
    ellipse(510, 225, 40, 40); //Purple

    fill(17, 46, 173); //Blue Color
    ellipse(440, 225, 40, 40); //Blue

    fill(70, 63, 69); //Black Color
    ellipse(580, 225, 40, 40); //Black
}

  if ((mouseX > 550)){ //Flower Centers
    fill(211, 86, 115); //Dark Pink Center
    ellipse(75, 205, 25, 25);

    fill(194, 139, 7); //Dark Orange Center
    ellipse(215, 205, 25, 25);

    fill(160, 38, 38); //Dark Red Center
    ellipse(145, 205, 25, 25);

    fill(21, 99, 0); //Dark Green Center
    ellipse(355, 205, 25, 25);

    fill(220, 202, 0); //Dark Yellow Center
    ellipse(285, 205, 25, 25);

    fill(96, 39, 144); //Dark Purple Center
    ellipse(495, 205, 25, 25);

    fill(8, 32, 132); //Dark Blue Center
    ellipse(425, 205, 25, 25);

    fill(33, 30, 31); //Dark Black Center
    ellipse(565, 205, 25, 25);
  }
//Stems   End
}

1) You can only see the flowers fully grow if you’re looking at the code on a full 640×480 canvas

This project was really difficult for me because there were so many options that I could have done and it was hard for me to really decide what I wanted to code for this project.
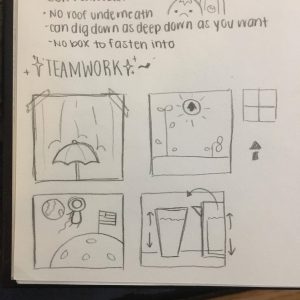
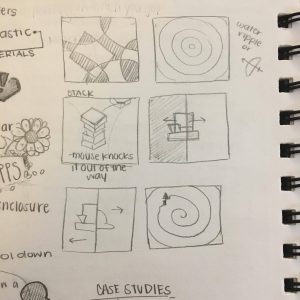
These were some initial sketches I did of possible things that I could have attempted to code (unsure if the drawings even make sense), but I decided to try and stick with my theme that I had in my last project, which is the idea of using sprouts. I wanted to try to make the sprouts look like they were growing depending on where the sun is (on the x-axis) and I wanted to change the color of the sky, grass, and the sun depending on where the mouse is (on the x-axis) and also allowing the sun to grow smaller and bigger depending on where it is on the canvas.

It was difficult for me to try and figure out how to code certain things, especially the growing stems for the plants because I tried to do that for my last project. I figured out a way to do it, but I’m sure there is a more efficient way to do it that I want to try and figure out next time.

Another aspect that I wanted to incorporate in this project was to try and draw different flowers like sunflowers, but I found it too difficult to do sadly. Maybe next time.