daphnel-Project07-Curves

Heart

var nPoints=300;

function setup() {
    createCanvas(480, 480);

}
function draw() {
    background(255, 230, 238, mouseX);
    var angle = mouseX/300;
    //draws the curve
    for(i=1; i<4; i++){
        push();
        translate(width/2,height/2);
        rotate(angle*mouseY/100);
        drawHeartCurve();
        //http://mathworld.wolfram.com/HeartCurve.html
        pop();
    }
}

function drawHeartCurve(){
    var x;
    var y;
    var a = constrain(mouseX/100,0,width);

    fill(255, 230, 238);
    stroke(255, 179, 204);
    strokeWeight(2);

    beginShape();
    for(var i = 0; i<nPoints; i++){
        var t= map(i,0,nPoints,0,TWO_PI);
        x =a * (16 * sin(t)* sin(t)* sin(t));
        y =a * ((13 * cos(t))-(6*cos(2*t))-(2*cos(3*t))-cos(4*t));
        vertex(x,y);
        vertex(x*i*a,y*i*a);
    }
    endShape(CLOSE);
}

I first spent a while trying to find curves that I was interested in. I thought about making a Quadrifolium but after looking around more, I found the Heart Curve. I tried fiddling around with it a little and then got the heart to show up. I then tried to add some other things to it which resulted in the lines next to the heart.

daphnel-Looking Outwards-07

Atlas of Emotions

In 2014, the concept of creating an Atlas of Emotion through data visualization was created. Dalai Lama and Dr. Paul Ekman were inspired by their conversations with each other to create this Atlas. The concept for this was to create a map that would guide emotional travels and try to help them find their state of calm. The 5 main emotions considered are Anger, Sadness, Fear, Disgust and Enjoyment. I find this project very interesting and reflective of the creators themselves because although the map looks fairly simple, there was a lot of data put into this piece of work and it is a lot more meaningful than a regular map. I admire how much detail they put into the meaning of this map. Each of the five continents of emotion contain states which can lead to actions, triggers, moods and so forth. This project aims to bridge together the gap between the academic and personal.

daphnel-Project 06-Abstract Clock

Clock

var petals = 0;
var petals2 = 0;
var ellipseSize=200;
var minuteCircleSize=7;

function setup() {
    createCanvas(480, 480);
}
function draw() {
    background(229, 255, 255);
    var H = hour();
    var M = minute();
    var S = second();

    angleMode(RADIANS);
    petals += 4;
    petals2 += 3;
    strokeWeight(0);
    for(var i=0; i<5; i++){
        //increment based on i and to make the zig zag petal pattern;
        var x = width/13 + 100 * i;
        fill(255, 204, 204, 204);
        arc(x, 30 + petals, 15, 10,PI+QUARTER_PI, QUARTER_PI);
        arc(x, 150 + petals, 15, 10,PI+QUARTER_PI, QUARTER_PI);
        arc(x, 270 + petals, 15, 10,PI+QUARTER_PI, QUARTER_PI);
        var x1 = width/5 + 100 * i;
        arc(x1, 90 + petals2, 15, 10,PI+QUARTER_PI, QUARTER_PI);
        arc(x1, 210 + petals2, 15, 10,PI+QUARTER_PI, QUARTER_PI);
        arc(x1, 330 + petals2, 15, 10,PI+QUARTER_PI, QUARTER_PI);
    }

    if(petals>height){
      petals=-50;
      petals2=-50; //to make the petals loop;
    }

    angleMode(DEGREES);
    noStroke();
    //the flower petals that grow by the hour
    if (H==0){
        H = 12;
      }else if(H < 24 & H > 12){
        H -= 11;
      }else{
        H = hour();
      }
    for(h=1; h<H; h++){ //the petals that increase by the hour;
        push();
        translate(width/2, height/2);
        rotate(h*30);
        fill(255, 204, 204, 204);
        ellipse(width/5, 0, ellipseSize,ellipseSize/2);
        pop();
    }
    for(m = 0; m<M; m++){ //the brown circles representing minutes;
        push();
        translate(width/2,height/2);
        rotate(6 * m);
        fill(230, 77, 0, 50); //4th number is for transparency;
        ellipse(width/8,0, minuteCircleSize, minuteCircleSize);
        pop();
      }

    for(s = 0; s<S; s++){ //the yellow stamens representing seconds;
        push();
        translate(width/2,height/2);
        rotate(6 * s);
        strokeWeight(2);
        stroke(255, 255, 204);
        line(0,0,0,-60);
        pop();
    }
}

The hardest part about this assignment was making my code more efficient. After making the petals and the rest of the flower, something seemed to be a little boring so I tried to create a background that would loop in the back, but I just couldn’t think of how to make it loop more efficiently even though it looks like an easy fix. I found it interesting to see the process of my clock actually changing throughout time. Since I like cherry blossoms and the color of the original pink background, I decided to use those as my inspirations for this project. It was hard for me to work with the arc function as it was my first time using it and there were a lot of components to it as well. The top photo below was something I used as sort of an inspiration of how I wanted my clock to look like. I changed up some of the components to match the number of hours, minutes and seconds.


daphnel-Looking Outwards-06

         Random Number Generated Arcs

Marius Watz and Jer Thorp, a generative and data artist respectively, used pseudo-random compositions of shapes and figures in order to create a set of computational designed artworks for the “Random Number Multiples” series. The photo above is supposed to be a volcano erupting with the molten lava colored as different streaks. I find this piece of work to be very intriguing; how a series of lines and basic colors were able to make a simple yet colorful piece of work. I admire the fact that even though these artists are skilled in computers, they chose instead to screen print their artworks that they created through their computer softwares by hand. I feel that this work of art is very representative of the artists themselves because although randomized to a certain point, the lines still look very uniform, clean-cut and neat.

daphnel-Project 05-Wallpaper

bg

//Daphne Lee
//15-104::1 (9:30am) Section D
//daphnel@andrew.cmu.edu
//Project-05-Background

var spaceX = 60; //controlled distances of circles
var spaceY = 60;//controlled distances of circles
var circleSize=90;
var cirX = 35;
var cirY = 35;

function setup() {
    createCanvas(480, 480);
    background(250, 230, 230);
    var trans = randomGaussian(25,100);
    var widthMore= 50
    var heightMore = 100;

    for (var y = 0; y < 9; y++) {
        for (var x = 0; x < 9; x++) {
            var cy = cirY + y * spaceY;
            var cx = cirX + x * spaceX;
            fill(255, 230, 179, trans);
            stroke(255);
            strokeWeight(5);
            //circles;
            ellipse(cx-circleSize/2, cy-circleSize/2, circleSize, circleSize);
        }
    }
    //added to width and height to make lines stretch more across canvas;
    for(var x = 0; x <= width+widthMore; x+=30){
      for(var y = 0; y <= height+heightMore; y+=50){
      strokeWeight(0.5);
      stroke(255);
      //different increments make the criss cross patterns for the lines;
      var xIncrement = 50;
      var yIncrement1= 20;
      var yIncrement2= 50;
      //line pattern in background;
      line(x-xIncrement,y-yIncrement1,x + xIncrement, y-yIncrement2);
      line(x+xIncrement, y+yIncrement2, x- xIncrement, y+yIncrement1);
    }
  } noLoop();
}

I started off wanting a circle based design. I tried to understand the idea of using loops in more depth so I combined the circles and lines to create a more aesthetic look. At the beginning, my main focus was just to get circles aligned side by side by each other throughout the entire canvas. After experimenting with the function, I realized that having them overlap looked pretty good. The way the loop of lines turned out was coincidental and I liked the way they turned out. I wanted to make the circle designs the main focus so I increased the stroke intensity for the circles and decreased it for the lines. Overall, I think this project was relatively more simple and I think it would be a cute design for a summer dress or skirt!

daphnel-Looking Outwards 05

Cambot-Memory

Dong Liang, designer of Cambot-Memory, is a 3D artist based in Singapore. A lot of his designs are created through Maya, Mari and Photoshop. Images like this greatly remind me of the various animated works I have seen in the past and it enthralls me when I actually get to see who is the one behind all of this. I love the fact that Liang bases his artwork based on a “story”. He says that every piece of artwork has its own story to tell and I think that just allows the finished creative to seem more alive and understandable. Liang starts off with making various sketches in order to obtain the image that he wants, he then moves on to blocking the sketch to make it 3D. Liang, however, did not use use the same manner of sketches and blocking in order to make the rain. He instead used a machine called an nParticle system to attempt to recreate a more realistic look of rain.

daphnel-Project 04-String Art

string

//Daphne Lee
//15-104::1 (9:30am) Section D
//daphnel@andrew.cmu.edu
//Project 04-String Art

function setup() {
    createCanvas(400,300);
}
function draw(){
    background(0);
    strokeWeight(1);
    stroke(255);
    var xCanvas=400;
    var yCanvas=300;
    var x=0;
    var y2=0;
    //anytime the increment is increasing the y coord, it's 3/4*x1 because 
    //the height is less than the width
    for(var x1 = 0; x1 < xCanvas; x1 += 10){
        //bottom left curve
        var y = x1 * 3/4;
        line(x, y, x1, yCanvas);
        //top left curve
        line(x, yCanvas-y, x1, y2);
        //bottom right curve
        line(xCanvas, y, xCanvas-x1,yCanvas);
        //top right curve
        line(x1,y2,xCanvas,y);
      }
}

Since I’ve never done much work with using such lines to create curves, I looked a lot at the 7th grade webpage provided to us. I wanted to do something simple yet nice and thought of this.

It took me a while to get the lines to fit the way I wanted them too especially because the canvas isn’t a square. I had to tinker around with the variables to make them fit better. Additionally, I spent more time probably looking at my paper trying to figure out which points connected to which and how I would get the coordinates of them.

Some screenshots of my process. The first one was just flew out of the canvas literally while the other one was just not having symmetrical halves at all.

daphnel- Looking Outwards 04

The Mesa Musical Shadows is an interactive music playing device that allows people to create music through the use of their shadows. This device was created by Montreal’s Daily Tous Les Jours studio and is located in the north plaza at Mesa Arts Center in Arizona. This singing pavement has four different tracks that changes depending on the time of day–morning, afternoon, evening, and night. Additionally, 47 light sensors are controlled through 6 control nodes and speakers are carefully placed in areas where water could not reach them.

I admire the fact that the workers in the studio wanted to implement the voice of the community members and students who live in Arizona. Through surveys and feedback from those people, the studio bought prototypes to test out what products could most accurately reflect what the public wants. They not only focused on the aspect of people playing around with their shadows to generate music, they also tried to take into consideration the people sitting on the sides, who could also feel more relaxed and happy watching others formulate a joyful tune on the musical cement.

daphnel-Project 03-Dynamic Drawing

Dynamic Drawing

var circleW=150;
var circleH=150;
var circleX=320;
var circleY=240;
var earL=280;
var earR=200;
var earW=70;
var earH=320;
var innerearL=200;
var innerearR=280;
var innerearW=24;
var innerearH=280;
var smallerCircleW=50;
var smallerCircleH=50;
var smallerCircleX=160;
var armR=120;
var armL=360;
var eyes=15;
var eyesR=210;
var eyesL=265;
var pupil=8;
var pupilL=212;
var pupilR=267;
var rectY=165;
var rectW=150;
var rectH=150;
var antennaR=210;
var antennaL=265;
var angle=10;
var x1=50;
var y1=0;
var x2=250;
var y2=25;
var x3=50;
var y3=50;

function setup() {
    createCanvas(480, 480);
}

function draw() {
    background(230, mouseX, mouseY);
    //made the background change based on the mouseX and mouseY positions
    strokeWeight(0);
    fill(255);
    push();
    translate(370,350);

//divided by 50 to make sure it rotates slower
    rotate(mouseX/50);

//ears
    ellipse(mouseX/7,earL,earH,earW);
    ellipse(mouseX/7,earR,earH,earW);

//inside of ears
    fill(255, 204, 204);
    ellipse(mouseX/7,innerearL,innerearH,innerearW);
    ellipse(mouseX/7,innerearR,innerearH,innerearW);

//the face
    fill(255);
    ellipse(mouseX / 7, circleY, circleW, circleH);

//the two circular arms
    ellipse(mouseX / 7, armR, mouseX/7, mouseX/7);
    ellipse(mouseX / 7, armL, mouseX/7, mouseX/7);
//body
    rect(mouseX / 7, rectY, rectW, rectH);
    fill(0);
//the two white eyes in the green blob
    ellipse(mouseX / 8,eyesR,eyes,eyes);
    ellipse(mouseX / 8,eyesL,eyes,eyes);
    fill(255);
    ellipse(mouseX/8,pupilR,pupil,pupil);
    ellipse(mouseX/8,pupilL,pupil,pupil);
//carrot body
    fill(mouseX, 153, 0);
    triangle(x1,y1,x2,y2,x3,y3);
//the greens of the carrot
    fill(102, 204, 0);
    ellipse(40,5,mouseX/7,mouseX/7);
    ellipse(25,15,mouseX/7,mouseX/7);
    ellipse(20,30,mouseX/7,mouseX/7);
    ellipse(50,25,mouseX/7,mouseX/7);
    ellipse(40,40,mouseX/7,mouseX/7);

//blush will show up on the bunny's cheeks when mouse goes past 400 px of
//the canvas
if (mouseX>400){
  fill(255, 153, 153);
  ellipse(mouseX/7,innerearL-5,13,25);
  ellipse(mouseX/7,innerearR,13,25);
}
    pop();
}

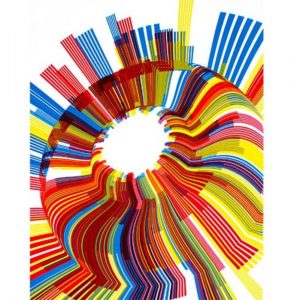
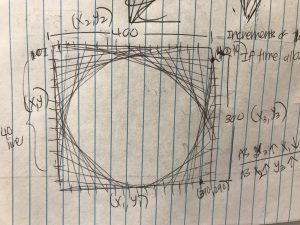
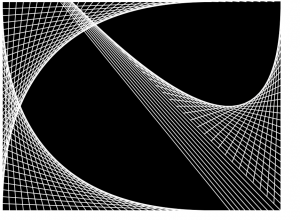
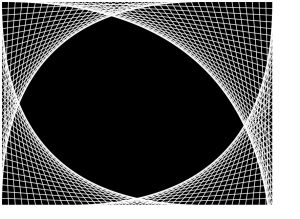
This project was actually extremely hard for me. I had a lot of ideas and inspirations but it was hard for me to actually execute them. I started off with something like this where I wanted the rectangles to move in a clockwise direction. After I got the rectangles moving the direction I wanted, I couldn’t really figure out how to slow down the rate at which they were moving and to make sure they stayed within the canvas, so this idea ended up being scrapped. I then started fiddling with the mouseX and mouseY functions and was able to use that for background in my current project. I threw in a circle since I originally wanted to create something where there was a circle in the middle and as the mouse moved to the left, the circle would split into 4, then 16 and so forth, but then that too was a little too hard for me to comprehend. I ended up connecting to together random shapes that somehow ended up looking like an Android figure. I tried using the translate, push, pop and rotate functions we learned in lab to finish off my project.

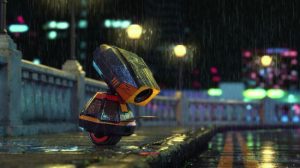
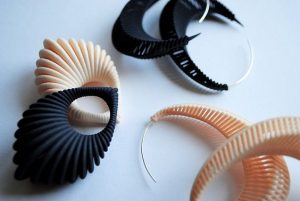
The result was a figure that looked something like this.

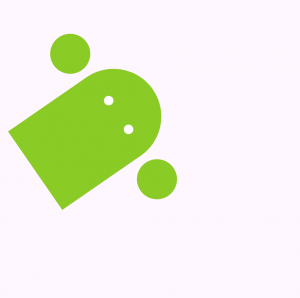
I tried to refine the work and make it look a little more presentable and nicer to look at as well as changed the color scheme a bit. I hope I can learn to use new and different functions to use in my future projects but as of right now, I still don’t have a full grasp of many functions so this was the best I could do.

daphnel-Looking Outwards-03

3D Printed Rings and Earrings

Jewelry can be created through several different forms of arts and devices; however, these pieces of jewelry seen in the photo above were made through 3D printing! I find this incredibly fascinating because I’ve seen many designers and inventors create things such as the Voxel Chair, but I’ve never seen 3D printing used in such a way for fashion. These pieces of jewelry were made by Theresa Burger from Morpheus. There is no specific date or title for these pieces of rings and earrings since Morpheus custom manufactures jewelry based on their client’s needs and wants. These small seashell design based earrings show only a small glimpse what Morpheus’s designers can create. I admire the fact that these designers are learning how to incorporate new machines and tools such as the 3D printers to generate new and different types of fashion into the industry.