nahyunk1 -Project 07 – curves

sketch

//NaHyunKim
//section B
//nahyunk1@andrew.cmu.edu
//Project 07

var numObjects = 500;
var r = 255;
var g = 255;
var b = 255;

function setup() {
createCanvas(380, 380);
ellipseMode(CENTER);
}

function draw() {
var centerX = width/2;
var centerY = height/2;
background(0);
translate(centerX, centerY);
//draw Epicycloid
drawEpi(); //

function drawEpi() {
  noFill();
  stroke(random(0,r), random(0,g), random(0,b)); // stroke is all random colors

  beginShape();
  var x;
  var y;
  var a = mouseY/3; //the increase and the decrease of lines/curves.
  var b = -mouseX/40;//the increase and the decrease of lines/curves.
  for (var i=0; i < numObjects; i++){
    var t = map(i, 0, numObjects, 0, TWO_PI);
    var x = ((a+b)*cos(t) - b*cos(((a+b)/b*t))); // x eq. for the epicycloid
    var y = ((a+b)*sin(t) - b*sin(((a+b)/b*t))); // y eq. for the epicycloid
    vertex(x,y); // starts at the vertex.
  }
  endShape();
}
  beginShape();
  var x;
  var y;
  var a = mouseY/3;//the increase and the decrease of lines/curves.
  var b = mouseX/40;//the increase and the decrease of lines/curves.
  stroke(random(0,g), random(0,r), random(0,b)); //switch up the variables so that each epi. has different types of randomness.
  for (var i=0; i < numObjects; i++){
    var t = map(i, 0, numObjects, 0, TWO_PI);
    var x = ((a+b)*cos(t) - b*cos(((a+b)/b*t))); // x eq. for the epicycloid
    var y = ((a+b)*sin(t) - b*sin(((a+b)/b*t)));// y eq. for the epicycloid
    vertex(x,y);
  }
  endShape();
  beginShape();
  var x;
  var y;
  var a = mouseY/3;//the increase and the decrease of lines/curves.
  var b = mouseX/40;//the increase and the decrease of lines/curves.
  stroke(random(0,b), random(0,g), random(0,r));//switch up the variables so that each epi. has different types of randomness.
  for (var i=0; i < numObjects; i++){
    var t = map(i, 0, numObjects, 0, TWO_PI);
    var x = ((a+b)*cos(t*2) - b*cos(((a+b)/b*t))); // x eq. for the epicycloid
    var y = ((a+b)*sin(t*2) - b*sin(((a+b)/b*t)));// y eq. for the epicycloid
    vertex(x,y);
  }
  endShape();
  beginShape();
  var x;
  var y;
  var a = mouseY/3;//the increase and the decrease of lines/curves.
  var b = mouseX/40;//the increase and the decrease of lines/curves.
  stroke(random(0,b), random(0,g), random(0,r));//switch up the variables so that each epi. has different types of randomness.
  for (var i=0; i < numObjects; i++){
    var t = map(i, 0, numObjects, 0, TWO_PI);
    var x = ((a+b)*cos(t/2) - b*cos(((a+b)/(b/2)*t))); // x eq. for the epicycloid
    var y = ((a+b)*sin(t/2) - b*sin(((a+b)/(b/2)*t)));// y eq. for the epicycloid
    vertex(x,y);
  }
  endShape();
}

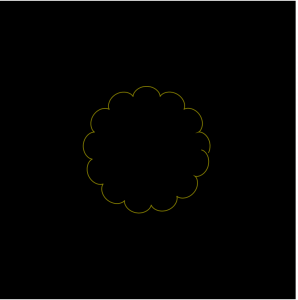
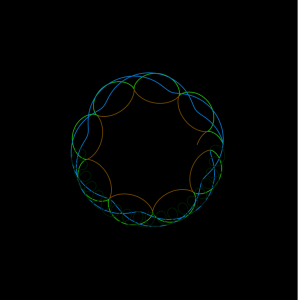
I first played around with the epicycloid itself to see how it gets formed as I move around the mouse. Then, I tried adding more layers of the same epicycloid and change around the equation to see changes occur in the image. I worked with division and multiplication of the variable ‘t’ in order to create shapes that differ from the original epicycloid made with the initial equation. Here are the screenshots of the initial, single epicycloid and my progressional adaptation of the shape through adding the altered versions of the original.

nahyunk1-Abstract Clock

sketch

var numObjects = 6; // number of rect/ellipses that will rotate in a circle.
var centerX; //the center x position of the rotating obj.
var centerY; // the center y pos of rotating obj.
var angle = 0; // starting angle of rotation
var distance = 50;
var redd = 255;
var greenn = 255;
var bluee = 255;
var spacing = 10; // spacing for moving rect in the background
var x = 0; // x pos of the rect
var y = 0; // y pos of the rect

function setup() {
  createCanvas(300, 600);
centerX = width / 2; // vars for rotating circles
centerY = height / 2; // vars for rotating circles
noStroke();
ellipseMode(CENTER); // rotating circles
}


function draw() {
  background(0);
  //for current time
  var Hr = hour();
  var Min = minute();
  var Sec = second();
  //mapping the time frame
  var mH = map(Hr, 0,23, 0, height);
  var mM = map(Min, 0,59, 0, height);
  var mS = map(Sec, 0,59, 0, height);
  var rectHeight =  width / 3; //constant for x distance

  noFill(); //the current hour rocket.
  stroke("red");
  rect(0.5*rectHeight, mH, 100, 95);
  stroke(0,0,255);
  rect(0.25*rectHeight, mH, 60, 55);
  rect(1.125*rectHeight, mH, 60, 55);
  stroke("orange");
  triangle(0.5*rectHeight,95+mH, 0.5*rectHeight+100, 95+mH, 0.5*rectHeight+50, 150+mH);
  stroke("pink");
  ellipse(0.5*rectHeight,mH, 20, 70);
  ellipse(0.5*rectHeight+100, mH, 20, 70);

  stroke("pink"); // minute indicator
  strokeWeight(2);
  rect(1*rectHeight, mM, 50, 50);
  fill("pink");
  text("FLY!", 1.125*rectHeight, mM+30);

  noFill();// solar system indicator of the seconds.
  stroke("cyan");
  ellipse(2.4*rectHeight, mS-200, 30, 30);
  ellipse(2.4*rectHeight, mS-100, 70, 70);
  ellipse(2.4*rectHeight, mS, 100, 100);
  stroke("yellow");
  strokeWeight(2);
  ellipse(2.4*rectHeight, mS, 50, 50);
  stroke(255);
  ellipse(2.4*rectHeight, mS-250, 20, 20);
  ellipse(2.4*rectHeight, mS-300, 10, 10)
  ellipse(2.4*rectHeight, mS-100, 90, 20);
  ellipse(2.4*rectHeight, mS-400, 5, 5)
  ellipse(2.4*rectHeight, mS-500, 2, 2)
  stroke("red");
  ellipse(2.4*rectHeight, mS-200, 40, 40);

  //the rotating clock in the middle.
  var angleObject = 360 / numObjects; //space between each object.
    for (var i = 0; i < numObjects; i++) {
  angle += frameCount*i /20;
  push();
  translate(centerX, centerY); // the obj. rotate around the center.
  rotate(radians(i * angleObject + angle));
  stroke("skyblue"); // the lightblue rectangles rotating around.
  rect(distance-10, mS/6, 15, 15); // rotation indicates the seconds.
  stroke("yellow"); // the dark blue circles rotating around.
  strokeWeight(1);
  ellipse(distance, mM/4, 10, 10); // rotation indicates the minutes.
  stroke(0,255,0); // the green small rects rotating around.
  rect(distance, mH/24, 5, 5); // rotation indicates the hour.
  pop();
  }


}

My abstract clock is based on a space theme. The rocketship indicates the hour, the pink box with the text “FLY!” indicates the minutes, and the linear solar system indicates the seconds as they all descend from the top of the canvas. The rotation that is occurring in the middle of the canvas also indicates the hour, minute, and seconds with the squares and the ellipses. As you can see from the code, the skyblue squares rotation enlarges each time the seconds increase form 0 to 60. Similarly, the rest of the other objects that rotate, enlarge proportionally as the hour and the minutes flow by.

nahyunk1-Looking Outwards 06

https://creators.vice.com/en_us/article/kbnqxx/siebren-versteegs-computer-generated-abstract-paintings

here is the link to a set of artworks created by computers. This is all random in the meaning that these computers “creatively” generated a set of drawings on their own without the guidance of a person. Its randomness does come from a set of codes that a generator initially put into its system, however, its abstract paintings get formed through the computer itself without any help of the creator. This signifies the fact that humans create a way for computers to think and self-generate art, however, it’s something that I do not admire or encourage to be advanced to have them accomplish more complex tasks later on in the future.

nahyunk1 – Looking Outwards 07

Out of the list one of the projects that particularly inspired me was Aaron Koblin and Chris Milk’s WITHIN. It was created for people to share personal stories or works in the form of virtual reality which also became a new way for viewers to experience works on a new level. Virtual reality, being a highly interactive and realistic form of expression, signified the creators’ purpose of WITHIN as creating a place for artists and people to express and interact within the area of virtual reality. When I downloaded and tried the app, I was able to download or stream videos of people and view them under a virtual reality setting and move and turn my phone around to see the surroundings and feel like I was really inside the story setting.

https://www.digitaltrends.com/virtual-reality/life-of-us-developer-interview-vr-multiplayer/
you can watch this but download the app to interact with the VR.

nahyunk1-Wallpaper 05

sketch

function setup() {
    createCanvas(480, 480);
    background("lavender");
}
function draw() {
  for (var x=0; x<7; x++){
   for (var y=0; y<7; y++){
      strokeWeight(0.5);
      stroke("skyblue");
      fill(255);
      push();
      rotate(radians(0));
      arc((x*70)+30, (y*70)+30, 30, 30, 0, PI+QUARTER_PI, PIE);
      pop();
      noStroke();
      fill("lavender");
      ellipse((x*70)+31, (y*70)+27,20,20);
      stroke("pink");
      strokeWeight(0.5);
      fill("white");
      ellipse((x*70)+31, (y*70)+28,10,10);

    }
  }
}

I wanted to create a wallpaper pattern that could potentially look nice as a glow-in-the-dark, so I made a crescent moon shape with the fill and avoided the stroke color with vivid colors.

nahyunk1-Looking Outwards 05: 3D Graphics

Similar to generating 3D graphics with 2d images through Photoshop and Illustrator, this piece of animation story made by Disney used two dimensional art to create a third dimensional world on screen. First by drawing the characters and the setting, the computer then generates each of the motions to create a set of animated scenes into film. What I admire about this is Disney’s high regard of manual skills and the collaboration of the hand-drawn and the computer. Short films like these from Disney hold significance in that they originate from the artistic skills of the artist more than the artist’s ability to handle machines and softwares. That itself is a quality in this film that I admire and believe a commendable work that sticks to the older practice of creating animation.

nahyunk1-Project04-String Art

sketch

function setup() {
    createCanvas(400, 300);
    background("lavender");
}
function draw() {
    for (var i = 1; i < 300; i += 6) { // first set of chrome lines;
      strokeWeight(2);
      stroke(mouseX-1, mouseX-5, mouseY-10);
      line(i, 0, i*10, 500);
    }
    for (y = 10; y < 300; y += 10) { //the yellow lines;
      stroke(255,250,205);
      strokeWeight(1.2);
      line(-i, y/400 + 30, 400, y*2);
    }
    for (i =0; i < 40; i++) { // white beams and orange beams;
      stroke("white");
      strokeWeight(0.2);
      line(1, i*1.5, i+200, 400);
      stroke("orange");
      line(i+400, 300, i*1.5, i*3.5);
    }
    for (i = 10; i <300; i += 3) { // coral pink lines at the bottom;
      var y1 = i*(30/400);
      stroke("pink");
      strokeWeight(0.5);
      line(i, y1*9, 90, 400);
    }
    for (h =0; h < 100;h +=8) { // floating blue lines;
      stroke("skyblue");
      var y1 = 170;
      var y2 = 23;
      line(h+20, y1, h*5 ,y2);
      y2 += y2
    }
}

I basically played around with the codes to get a better understanding of how each of the equations affect the shape and size of each set of line drawings. I also used color to identify each set of strings to show more distinction from one another.

nahyunk1-Looking Outwards 04 : Sound Art

The computational sound art that I’m most familiar with is the sound looper that many artists and composers use when they create instrumentals or the background music for most songs. Because I enjoy listening to music and is very much interested in knowing about the mechanism of some musical productions, the loops used for each measure is a quality in music that I admire and also aspire to learn the techniques later on. This looper is used with an artist adding a few notes in a rhythmical series as an input and keeps on adding more notes and other sound effects by adding layers of loops on top of each other.

here is the link to an artist who sings and creates music through looping sound.

Sarah Kim – Dynamic Drawing

sketch

// the height of the moon&lines stay constant.
//the lines and day and night should change colors.
var start = 20;
var angle = 0;
var y = 100;
var night = (0, 0, 0);
var r = 25; // colors for the background.
var g = 25;
var b = 112;

function setup() {
    createCanvas(640, 480);
}

function draw() {
    background(r,g,b);
    noStroke();
    //largest ring
    fill(255);
    ellipse(pmouseX, y, 700, 700);
    fill(night);
    ellipse(pmouseX, y, 698, 697);
    //pink ring
    fill("pink");
    ellipse(pmouseX, y, 310, 310);
    fill(night);
    ellipse(pmouseX, y, 303, 303);
    //smaller white ring
    fill(255);
    ellipse(pmouseX, y, 300, 300);
    fill(night);
    ellipse(pmouseX, y, 299, 299);
    //blue ring
    fill("skyblue");
    ellipse(pmouseX, y, 150, 150);
    fill(night);
    ellipse(pmouseX, y, 149, 149);
    //moon
    fill(255,250,205);
    ellipse(pmouseX, y, 50, 50);
    fill(night);
    arc(pmouseX+30, y-10, 50,50,0,PI+QUARTER_PI, PIE);
    //mountains at night. some change colors randomly.
    fill(pmouseX, pmouseY, 255);
    triangle(120, 300, 0, 480, 240, 480);
    fill(pmouseX, pmouseY, 210);
    triangle(520, 480, 620, 205, 700, 500);
    fill("blue");
    triangle(400, 480, 520, 210, 640, 480);
    fill("skyblue");
    triangle(520, 210, 520, 480, 640, 480);
    fill("white");
    triangle(140, 480, 250, 225, 500, 480);
    fill("lavender");
    triangle(250, 225, 250, 480, 500, 480);
    //bug in left
    push();
    translate(300,250);
    rotate(radians(angle+90));
    fill("yellow")
    ellipse(-start, start, 3, 3);
    pop();
    angle = angle + 1;
    start = start + .05;
    //bug in the middle
    push();
    translate(100,100);
    rotate(radians(angle));
    fill("white")
    ellipse(start, -start, 5, 5);
    pop();
    angle = angle + 1;
    start = start + .05;
    //bug on the right
    push();
    translate(500,80);
    rotate(radians(angle));
    fill("yellow")
    ellipse(start, start, 5, 5);
    pop();
    angle = angle + 0.2;
    start = start + .0003;
    //bugs with changing colors with mouse movement.
    push();
    translate(320,200);
    rotate(radians(angle));
    fill(pmouseX, pmouseY, 213);
    ellipse(-start, start, 5, 5);
    pop();
    angle = angle + 0.2;
    start = start + .001;

    push();
    translate(600,76);
    rotate(radians(angle));
    fill(pmouseX, pmouseY, 143);
    ellipse(start, -start, 5, 5);
    pop();
    angle = angle + 0.2;
    start = start + .00001;
    // as mouse moves to the right, night changes to day.
    if (pmouseX >= night+320) {
     night = night + 5;
    }
    if (pmouseX < night+320) {
     night = night - 2;
    }
    //background changes color along with the movement of the moon.
    if (pmouseX >= 320) {
     r = 230;
    }
    if (pmouseX >= 320) {
     g = 230;
    }
    if (pmouseX >= 320) {
     b= 250;
   }
    if (pmouseX < 320) {
     r = 25;
   }
   if (pmouseX < 320) {
    g = 25;
   }
   if (pmouseX < 320) {
    b = 112;
  }

}

I used color transitions and the spiral rotation that we learned this week to create the image. The moon is created with an arc and ellipse.

nahyunk1-Looking Outwards 03


The project that I’ve come up with is called Light Barrier by Kimchi and Chips.
The reason why I admire this project is because of its use of diverse mediums and the usage of algorithmic functions to create shapes that suspend in the air. The combination of light and water and the usage of mirrors to reflect the water that shine off through light seemed to be a challenging but very successful way of making an artwork so mystical and precisely calculated. The algorithm, which doesn’t seem so obvious at first, is the set of times in which the light, the mist, and the mirror goes into function all at once, thus creating the artwork of suspending shapes and vanishing altogether as a whole. The shape thereby forms with structure and doesn’t fall into pieces.

http://www.kimchiandchips.com/#lightbarrier

‘The artwork was performed at New Media Night Festival in Russia, 2014. Composed in a room full of mist with mirrors, as light appears in a series of repeated patterns, the artwork creates a series of structured shapes and vanishes as each set finishes in the algorithm’.