![[OLD FALL 2017] 15-104 • Introduction to Computing for Creative Practice](https://courses.ideate.cmu.edu/15-104/f2017/wp-content/uploads/2020/08/stop-banner.png)
Taking inspiration from old De Stijl works, Kyuha Shim is able to input images as well as type into code to create “RASTER” (2017). Shim is a computational designer and researcher at CMU and his work “RASTER” has been funded by CMU. By utilizing p5 Shim has been able to create images ranging from literal to more abstract interpretations. I admire this work as Shim is able to combine both an advanced knowledge of De Stijl work both technically but visually. She is able to balance both of their contexts and combine them creating this work that can applied to our world. Other works by Shim also relate to “RASTER” as manipulating images and type through generative code is common through his work. Users who utilize “RASTER” and range in understanding of De Stijil work will be able to understand at a deeper level their proportions as well as aesthetic that is apparent through the amount of work.
Category: Section A
hschung-Looking Outwards-1
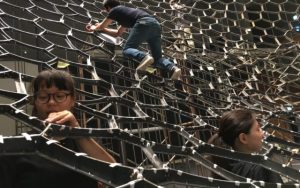
I saw a very interesting project a few weeks ago in Jersey City at an exhibition featuring a range of arts, including interactive art, paintings, etc. In this project, there is a camera that picks up people’s faces and recreates them using squiggly, long, noodle-like shapes, and projects them on a wall.
At first, I didn’t know what the piece was doing, but after stepping back a bit I could see that the camera was picking up faces and recreating them in a fun, creative way. I appreciated it because it made people curious and gave them a laugh after looking at their silly, distorted reflections.
I’ve seen interactive art that has similar principles of using camera recognition and distorting or changing the information it picks up. I knew it involved code, and I was in a state of awe, wondering how it did that, how the artist made this happen.
Something that might have been cool would be if the distorted image stayed put together for a bit longer; once the face(s) in front of the camera moved, the squiggly noodle-faces would fall apart almost instantly. That encouraged people to stay still and watch the squiggly portrait appear, however, so I think the fact that the art was so ephemeral was also a point of interest that gathered an audience.
I think the artist’s inspiration probably came from their ability to make creatively with code, and to encourage their audience to explore, interact, and question.
IMG_3103.MP4
hschung-Project 01
//Heidi Chung
//Section A
//hschung@andrew.cmu.edu
function setup() {
createCanvas(600,600);
background(145, 193, 191);
noStroke();
fill(31, 34, 13); //hair
quad(200, 195, 400, 185, 425, 375, 180, 375);
fill(234, 178, 117); //neck
rect(263, 380, 78, 78);
fill(235, 207, 155); //face
ellipse(300, 260, 210, 260);
fill(234, 175, 152); //left blush
ellipse(235, 265, 60, 60,);
fill(234, 175, 152); //right blush
ellipse(365, 265, 60, 60);
fill(61, 44, 23); //left eye
ellipse(250, 240, 24, 22);
fill(61, 44, 23); //right eye
ellipse(350, 240, 24, 22);
fill(255); //mouth
ellipse(width/2, height/2 +10, 60, 60);
fill(235, 207, 155);//eclipse over mouth
rect(width/2 -30, height/2 -15, 60, 30);
fill(234, 178, 117); //nose
triangle(300, 267, 320, 290, 280, 290);
fill(76, 54, 36); //more hair
quad(222, 159, 345, 129, 420, 220, 391, 230);
fill(76, 54, 36); //more hair
quad(371, 398, 391, 228, 421, 219, 433, 340);
fill(76, 54, 36); //more hair
quad(215, 156, 183, 234, 206, 245, 247, 163);
fill(76, 54, 36); //more hair
quad(183, 234, 174, 345, 237, 400, 207, 244);
fill(76, 54, 36); // top part of hair
quad(216, 157, 275, 123, 377, 132, 420, 219);
fill(76, 54, 36);
triangle(183, 235, 207, 149, 275, 122);
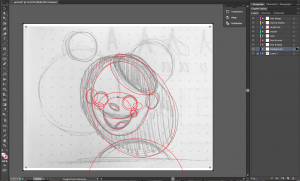
}Before I started coding, I made a sketch in Illustrator, so I could keep it simple and cute. Sketching it first helped me ground myself so I wouldn’t be lost immediately trying to code shapes without an image in mind first. It took a lot of time plotting points and getting used to the fashion of “drawing shapes” in this way. My friend helped me save some time; we took a screenshot of some of my existing work and dropped it into a 600×600 Illustrator doc, so I could find the points easily and insert them into my code.
I regret not starting earlier and rushing myself, because I think I would have had more fun if I utilized my time better so I could experiment more. Next time, I’ll manage myself better instead of being afraid to dive in.
Also, I thought I drew my portrait centered but I guess not?? Oops.
Project-01-Face
function setup(){
    createCanvas(495,495);
    background(255,224,189);
    fill(255);
    rect(33,99,165,165);
    rect(297,99,165,165);
    noStroke();
    fill(66,33,11);
    rect(66,132,99,99);
    rect(330,132,99,99);
    fill(0);
    rect(33,33,165,33);
    rect(297,33,165,33);
    rect(99,165,33,33);
    rect(363,165,33,33);
    rect(231,264,33,33);
    rect(198,297,99,33);
    fill(255,0,0);
    rect(99,396,297,33);


}

function draw() {

}
I wanted to create an extremely simplified, pixelated self portrait. I created it first in illustrator and then placed into photoshop to easily see the placement of each shape.
Hannahk2 – Looking Outwards – 01
The project that I chose is a light installation project by the Seoul based duo artists, Kimchi and Chips. The project creates volumetric drawings in the air, using hundreds of coordinated video projections. In this sculptural work, light projections are made to merge in a field of fog to form animated, physical shapes. 8 video projectors are split into 630 sub-projectors using a combination of concave mirrors– designed using artificial nature algorithms, and each mirror is computationally generated to create a group that comes together to form the single shape in the air. What inspires me about this project is the fact that these artists are basically materializing objects from light, something that is not exactly tangible. The result is surreal and visceral, due to the addition of sound and the set up of the installation. I also respect the exactness of the calculations required to make the projections work: to merge the light beams together, the path of each of the 16 million pixel beams had to individually be measured. The project could have been more effective maybe if they were able to create more complex shapes and movements, but it is extremely impressive already in the way that it is playing with the boundary between material and non-materials, and existence and absence. This project was part of a series of 3 works which materialize 3 dimensional sculptures through different uses of light. Other works in the series include showing depth with many illuminated nylon strings.
Here is the link: http://www.creativeapplications.net/vvvv/the-light-barrier-third-edition-drawings-volumes-in-the-air-with-light/
the team attaching tape to the mirror structure
farming windows

the view of the mirror structure
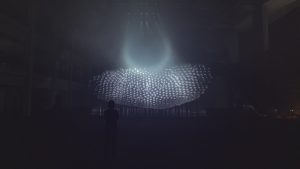
a view of the light projections
thlai-Project-01-Face
I constructed my portrait mainly using ellipse shapes. I started by sketching my idea on paper, then bringing it into Illustrator to see tidy up the composition. I couldn’t decide on a background color, so I just made an ever-changing background with some of my favorite colors.
// Tiffany Lai
// 15-104 Section A
// thlai@andrew.cmu.edu
// Project-01

function setup() {
    createCanvas(600, 600);
    frameRate(1.5);
    noStroke();
    angleMode(DEGREES);
}

function draw() {
    background(random(35, 62), random(145,182), random(140, 178));

    // WHITE OUTLINE
    fill(255);
    push();
    translate(230, -194);
    rotate(40);
    ellipse(371, 201, 235, 146); // bangs
    pop();

    ellipse(386, 671, 383, 432); // body
    ellipse(196, 291, 64, 71); // left ear

    // HAIR
    push();
    translate(467, -149);
    rotate(58);
    fill(82, 69, 64);
    stroke(255);
    strokeWeight(8);
    ellipse(367, 346, 473, 337);
    pop();

    // BODY
    fill(74, 193, 187);
    ellipse(386, 671, 366, 417);

    // LEFT EAR
    fill(220, 172, 138);
    ellipse(196, 291, 49, 60);

    // FACE
    fill(229, 182, 149);
    ellipse(317, 302, 240, 310); // face
    ellipse(445, 313, 51, 63); // right ear

    // MOUTH
    fill(82, 69, 64);
    ellipse(303, 361, 120, 134); // opening

    fill(229, 182, 149);
    ellipse(305, 330, 159, 110); // cover

    push();
    translate(-105, 106);
    rotate(-17);
    fill(201, 113, 98);
    ellipse(317, 412, 45, 20); // tongue
    pop();

    // EYES
    fill(82, 69, 64);
    ellipse(235, 310, 54, 54);
    fill(229, 182, 149);
    ellipse(232, 316, 65, 56); // left

    fill(82, 69, 64);
    ellipse(365, 325, 56, 56);
    fill(229, 182, 149);
    ellipse(367, 331, 65, 56); // right

    // CHEEKS
    fill(226, 169, 150);
    ellipse(226, 328, 39, 27); // left

    fill(226, 169, 150);
    ellipse(387, 342, 39, 27); // right

    // NOSE
    push();
    translate(200, -100);
    rotate(30);
    fill(196, 148, 116);
    ellipse(290, 340, 35, 12);
    pop();

    // BANGS
    push();
    translate(230, -194);
    rotate(40);
    fill(82, 69, 64);
    ellipse(371, 201, 222, 131);
    pop();

}
thlai-LookingOutwards-01
Oskar & Gaspar is a collective team of visual artists and multimedia professionals (originally two Portuguese twins) who specialize in video mapping and 3D projection. I first saw them on America’s Got Talent and was intrigued by their work.
One of their projects involved video mapping projections on tattoos, which resulted in tattoos being beautifully brought to life. They were fascinated by tattoos and used the human body as a canvas in a unique way that could be demonstrated live and have a deeper impact that seeing it on a screen. The process involved scanning then animating the tattoos, then projecting the animations directly onto the original models. They first showcased their work at the first live tattoo video mapping event in Lisbon, Portugal.
In the video description, they emphasize that no post production was used, so all the effects seen were also seen live. Many have critiqued their performance, saying it isn’t interesting enough, and I agree that the performance would be improved with the actor moving, even if it is difficult to sync the projection.
There are tons of previous projects of projection mapping that may have inspired Oskar and Gaspar, so the concept is not new. They took the concept of projection art and put their own special twist on it. This sort of project opens up infinite opportunities of using the human body to portray artwork in a technologically advanced way, and I can see performance artists of any sort using it to enhance their stage presence in a more visual way.
haewanp – Project 01 – Self Portrait
//Hae Wan Park
//15104-A
//haewanp@andrew.cmu.edu
//Assignment-01

function setup() {
    createCanvas (600, 550);
}

function draw() {
    background (95, 197, 191);
    stroke (92, 52, 103);
    strokeWeight (2.5);
    //Ear
    fill (255, 239, 201);
    ellipse (200, 280, 50, 50);
    ellipse (400, 280, 50, 50);
    //Face
    ellipse (300, 280, 206, 250);
    //Eyebrows
    line (278, 235, 237, 225);
    line (316, 235, 359, 225);
    //Eyes
    fill (255);
    ellipse (255, 270, 40, 20);
    ellipse (345, 270, 40, 20);
    fill (92, 52, 103);
    ellipse (255, 270, 12, 12);
    ellipse (345, 270, 12, 12);
    //Eyelash
    line (260, 260, 264, 249);
    line (250, 260, 245, 249);
    line (350, 260, 354, 249);
    line (340, 260, 335, 249);
    //Nose
    noFill ();
    beginShape ();
    vertex (299, 288);
    vertex (295, 308);
    vertex (281, 315);
    vertex (298, 322);
    endShape ();
    //Mouth
    fill (239, 65, 54);
    strokeJoin (ROUND);
    beginShape ();
    vertex (280, 358);
    vertex (288, 344);
    vertex (295, 354);
    vertex (300, 347);
    vertex (313, 358);
    vertex (297, 374);
    vertex (280, 358);
    vertex (313, 358);
    endShape ();
    //Hair
    fill (255, 231, 102);
    beginShape ();
    vertex (295, 115);
    bezierVertex (340, 140, 300, 205, 250, 200);
    bezierVertex (220, 200, 210, 240, 210, 260);
    bezierVertex (210, 300, 160, 290, 140, 270);
    bezierVertex (170, 280, 160, 260, 155, 240);
    bezierVertex (140, 160, 200, 140, 220, 150);
    bezierVertex (210, 130, 255, 90, 295, 115);
    endShape ();
    beginShape ();
    vertex (315, 130);
    bezierVertex (280, 170, 320, 205, 350, 200);
    bezierVertex (380, 200, 390, 240, 390, 260);
    bezierVertex (390, 300, 440, 290, 450, 270);
    bezierVertex (420, 280, 425, 260, 430, 240);
    bezierVertex (450, 160, 400, 170, 390, 160);
    bezierVertex (390, 160, 385, 160, 375, 140);
    bezierVertex (370, 130, 345, 100, 315, 130);
    endShape ();
    //cheek
    fill (250, 188, 150);
    noStroke ();
    ellipse (245, 310, 40, 40);
    ellipse (355, 310, 40, 40);
    //glasses
    noFill ();
    stroke (92, 52, 103);
    strokeWeight (6);
    ellipse (255, 270, 70, 66);
    ellipse (345, 270, 70, 66);
    line (290, 270, 310, 270);
    //body
    strokeWeight (2.5);
    fill (236, 0, 240);
    beginShape ();
    vertex (171, height);
    vertex (178, 500);
    bezierVertex (179, 500, 180, 450, 235, 450);
    vertex (380, 450);
    bezierVertex (380, 450, 415, 450, 420, 490);
    vertex (425, height);
    endShape ();
    fill (255, 239, 201);
    beginShape ();
    vertex (295 ,490);
    vertex (260, 450)
    vertex (275, 450);
    vertex (285, 405);
    vertex (310, 405);
    vertex (315, 450);
    vertex (335, 450);
    vertex (295 ,490);
    endShape();
}
It was fun to explore various methods in drawing shape with p5.js. Certain shapes were more difficult to control. Those shapes has more complicated rules than other simpler ones. Also, in the process, I had to understand and utilize geometry to place graphic elements to the exact spot that I want.
mjeong1-Project-01-Face
//Min Young Jeong
//Section A 9:30am
//mjeong1@andrew.cmu.edu
//Project-01

function setup() {
    createCanvas(500,500);
    background(99,82,129);
}

function draw() {

	fill(137,100,61);
	noStroke();
	rect(80,150,330,300,20);
	//hair

	var c = color(255,235,205);
	fill(c);
	noStroke();
	ellipse(250,250,270,360);
	//face
	ellipse(120,250,60,80);
	//ear

	fill(137,100,61);
	noStroke();
	rect(110,150,10,150);
	arc(245,170,330,260,PI,0,CHORD);
	fill(255,235,205);
	ellipse(265,150,100,100);
	fill(137,100,61);
	ellipse(300,150,100,100);
	fill(255,235,205);
	rect(250,170,100,30);
	//hair

	fill(78,61,54);
	noStroke();
	quad(145,205,175,185,175,200,145,208);
	quad(175,185,175,200,220,200,220,185);
	//left eyebrow
	quad(270,185,270,200,315,200,315,185);
	quad(315,200,315,185,345,205,345,208);
	//right eyebrow

	noFill();
	strokeWeight(3);
	stroke(82,63,35);
	beginShape();
	curveVertex(250, 250);
	curveVertex(250, 250);
	curveVertex(230, 290);
	curveVertex(230, 300);
	curveVertex(260, 305);
	curveVertex(260, 320);
	endShape();
	//nose

	fill(255,128,128);
	noStroke();
	arc(235,360,50,25,PI,0,CHORD);
	arc(265,360,50,25,PI,0,CHORD);
	arc(250,random(362,370),80,30,0,PI,CHORD);
	//lips

	fill(255,195,195);
	noStroke();
	ellipse(180,300,70,30);
	ellipse(320,300,70,30);
	//blush

	noFill();
	strokeWeight(2);
	stroke(74,44,0);
	curve(160,230,160,240,150,220,170,200);
	curve(170,230,170,240,160,220,180,200);
	curve(340,230,340,240,350,220,330,200);
	curve(330,230,330,240,340,220,320,200);
	//eyelashes

	fill(255,249,250);
	strokeWeight(2);
	stroke(82,63,35);
	ellipse(180,240,60,25);
	ellipse(320,240,60,25);
	fill(74,44,0);
	noStroke();
	ellipse(160,240,22,22);
	ellipse(300,240,22,22);
	fill(0);
	noStroke();
	ellipse(160,240,15,15);
	ellipse(300,240,15,15);
	fill(255,249,250);
	noStroke();
	ellipse(155,235,5,5);
	ellipse(295,235,5,5);
	//eyes

	fill(250,250,250);
	noStroke();
	ellipse(10,10,200,200);
	triangle(100,100,70,70,50,100);
	//textbubble

	fill(0,102,153);
	textSize(15);
	text("Hi My name is",5,30);
	textSize(24);
	text("Min",20,60);
	//text
}
I drew face and ear using ellipse as foundation of my portrait. And I simply used rectangle and semi-circle to illustrate my hair. Eyebrows were a bit more tricky since I had to find exact x and y coordinates to draw the geometry. Nose was created by simple curve. For my portrait, I wanted to put some text in text bubble and make it animated by making bottom lip move based on random y coordinate.
HaeWanPark-LookingOutwards-1
Ok Go Tour Visual by Reza Ali
Reza Ali, a computational designer and engineer was asked to create six pieces of music videos by Ok Go, a rock band from Chicago. These videos were planned to be presented in OK Go’s summer/spring 2014-2015 concert. So, Reza created the motion graphic sequence videos that go along with the Ok Go’s music during a month. The sequences display geometric shape and pattern within generative systems. He utilized his custom software called ‘Rezanator’ in this project. His works were inspired by optical illusion, visual music, OP Art, hyper-sensory immersive media, and synaesthesia.
Reza took a special process to design these videos based on the context. In the concert, Two large V shape of project screen was installed behind the band. He tried to accord with this screen arrangement. So, during this project, he worked on not only a regular screen but also two screens that he put together in a V. As a result, he created a design that V screen enhances the visual effects in a music video.
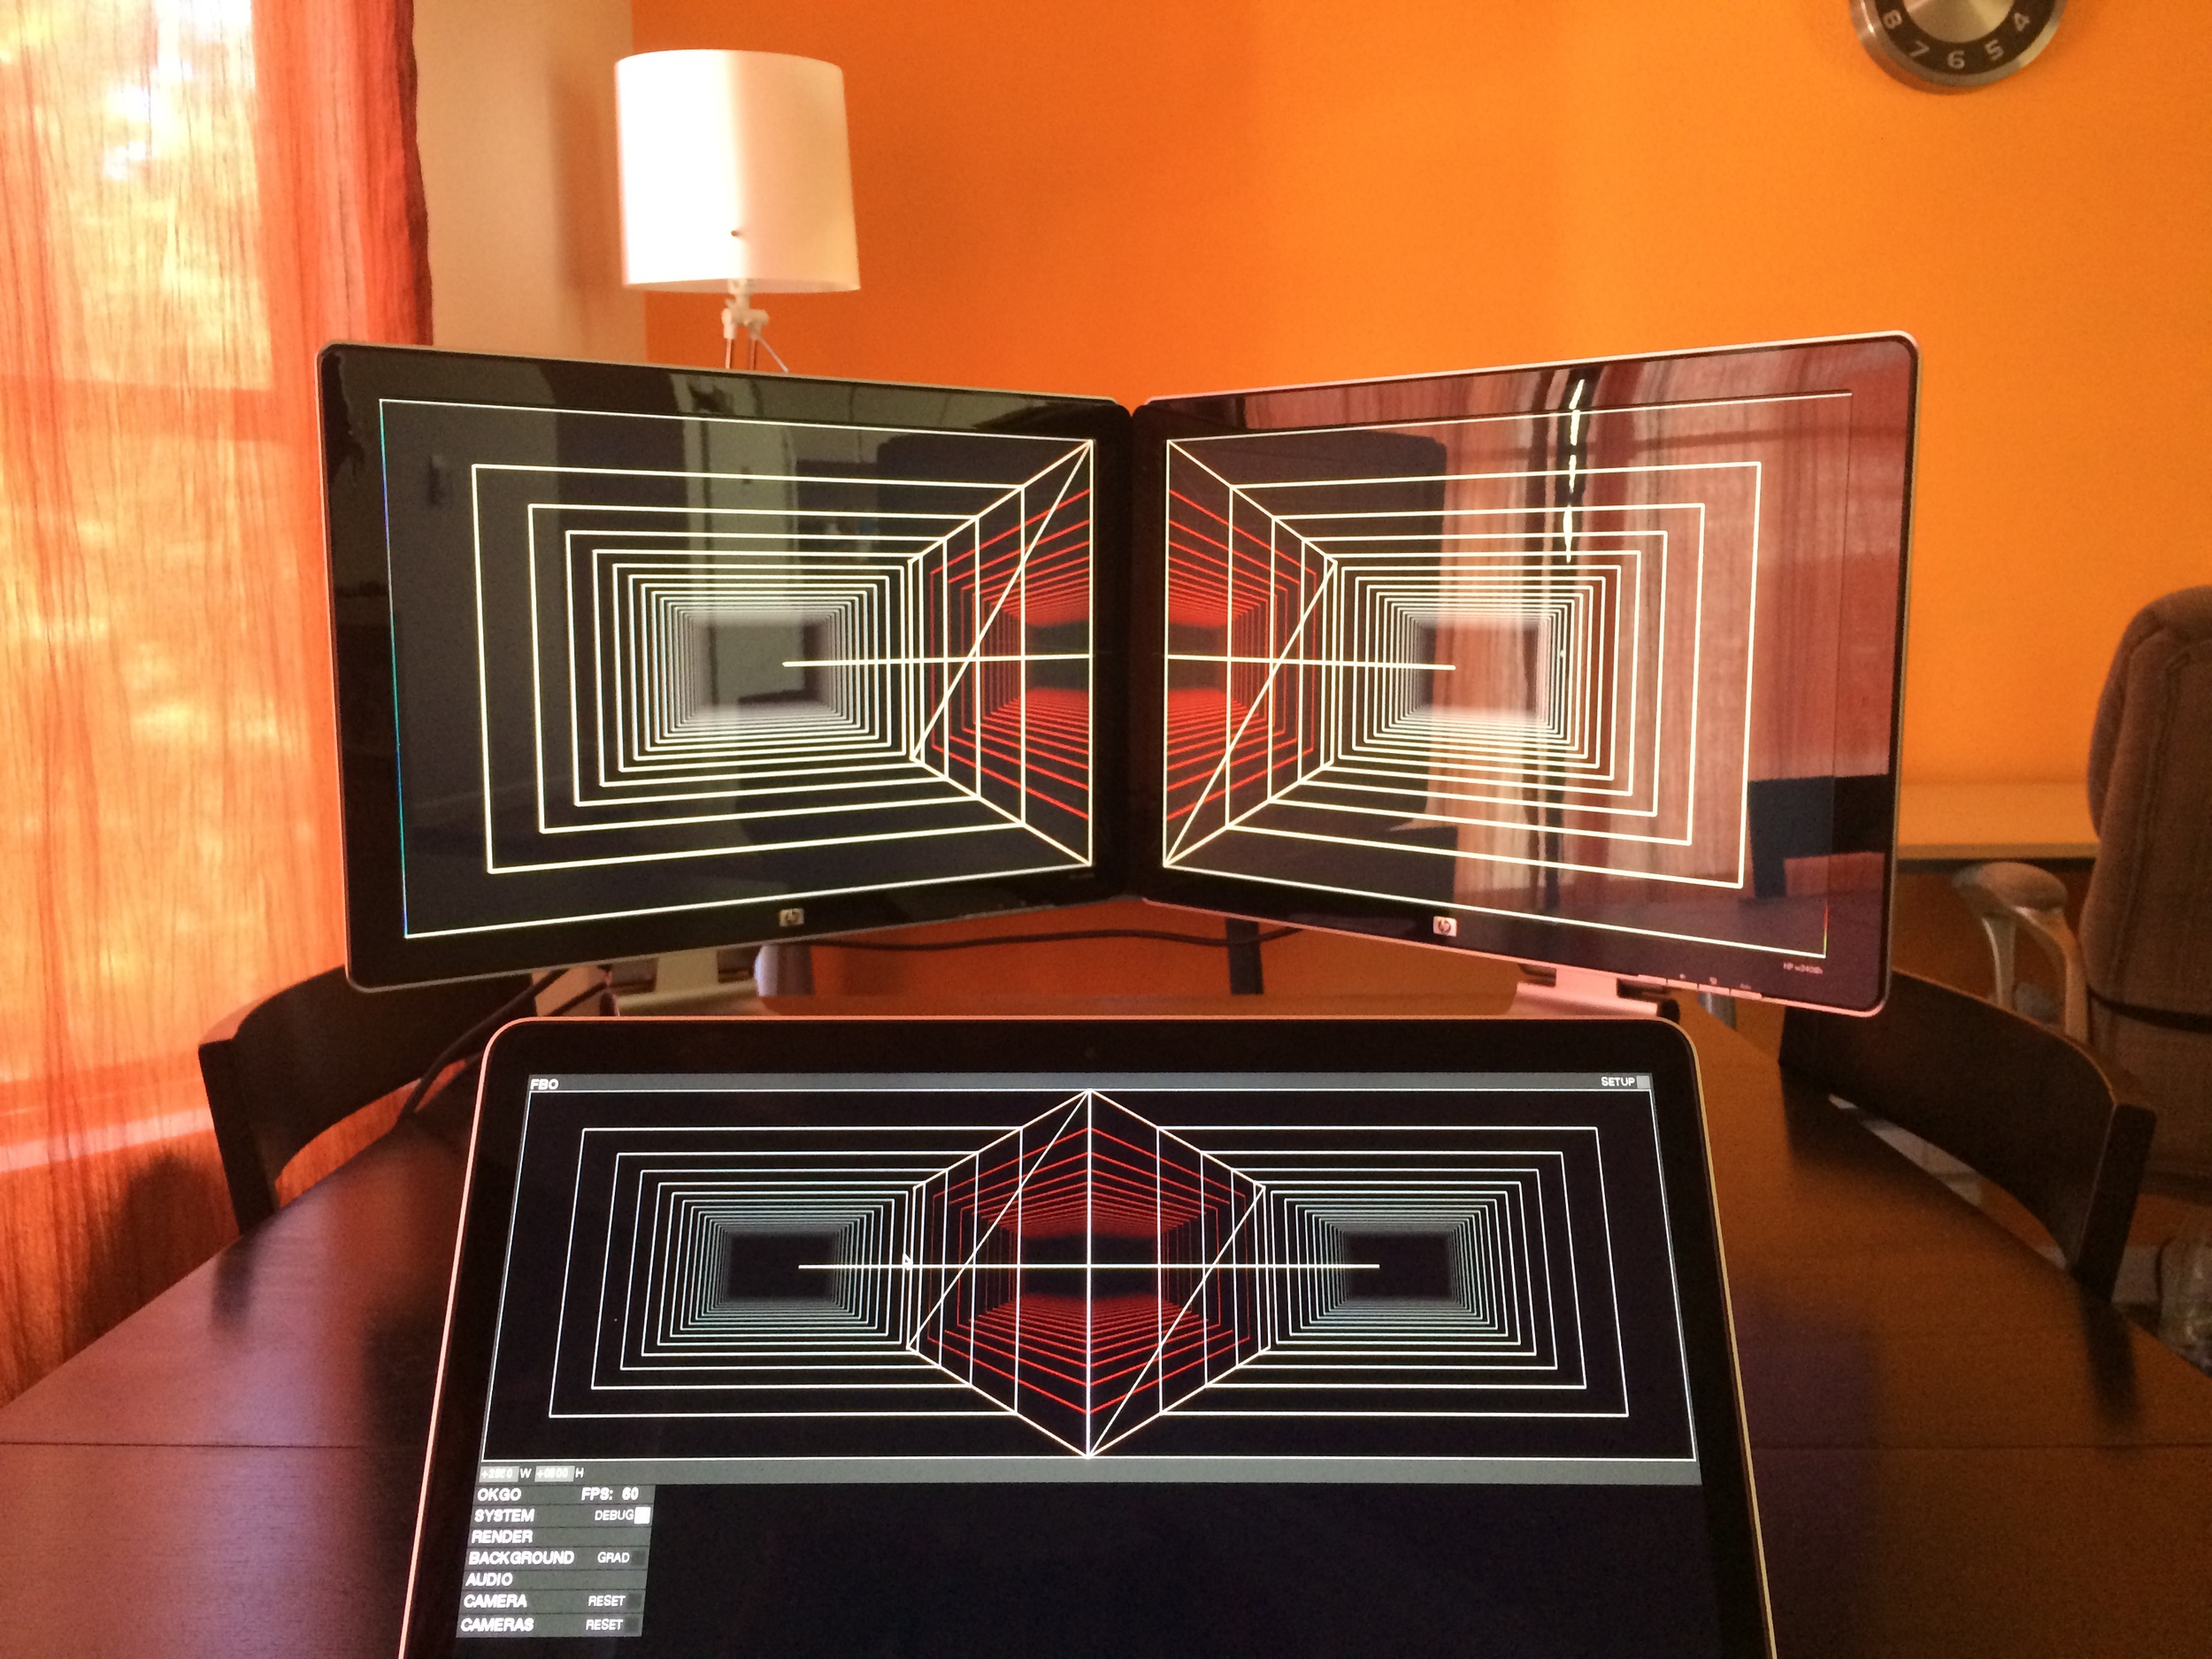
I pretty much enjoyed how those simple geometric elements in his videos create decent visual effects. For me, the one with optical illusion is especially mesmerizing. All the video pieces even go along with this their music really well.
http://www.syedrezaali.com/#/okgo/