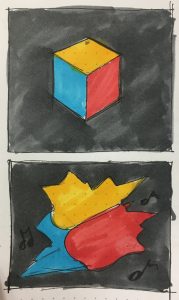
For this project, we (Elena Deng and Dani Delgado) wanted to collaborate and create something that synthesizes user interaction, sound, and generative visuals in order to create an interesting digital experience. Our plan is to start by displaying a still image (we are thinking of it being a graphic cube but are currently entertaining other possibilities) which changes a little bit when the user presses certain keys. The whole interaction would work as so: Each key has an assigned sound and “cube distortion” to it. So, when the user presses a key, a note will play and the visual will change slightly, so that when the user plays a full “song” the visual would have morphed a lot. A possible idea we had was with lower pitches the visual could retain the change that the lower pitch enacted, while with a higher pitch, the visual would go back to its original state before the key was enacted.
A possible way for the cube to changeanother possible way the cube would change
The two projects I looked at this week focus on combining sound with visuals and generative work. The first project is called “Ichographs I”. This project, created by Yiannis Kranidiotis, is an audio visual computation that explores the relationship between these two components by transforming colors into sound frequencies. They took they colors from classical paintings and transformed them into visual audio, which I think is a super interesting concept. Website .
Screencap of the code generating audio waves from the painting’s colors
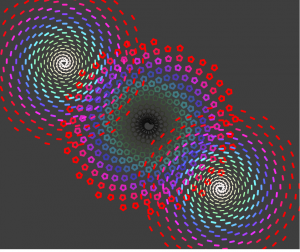
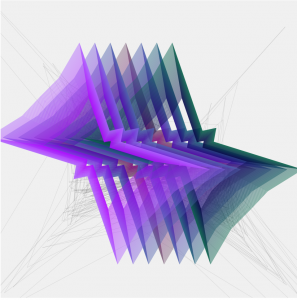
The second project I looked at is a generative work for the rock group NAFF Chusma. This piece, created by Thomas Sanchez Lengeling, uses real time graphics and the sound to create visually stunning animations. Website
A screencap of the animation
Both projects were coded (at least in part) using C++ and created visual artwork by using sound frequencies. I’m very interested in this intersection of audio and visual, not only because I find the ability to make the invisible soundwaves somehow tangible fascinating, but also because code allows us to this in such seamless and vibrant ways. These projects have both visual and intellectual intrigue, which is something that I think would be nice to reflect within my final project as well.
/*
Dani Delgado
Section E
ddelgad1@adnrew.cmu.edu
Project 11
*/

//set global variables
var trl;
var trlSet = 1;

function poly(){
	//create the first polygon to iterate
	for (var i = 0; i < 6; i ++) {
		trl.penDown();
		trl.forward(4.5);
		trl.left(60);
		trl.penUp();
	}
}

function poly2() {
	//create the second polygon to iterate
	for (var j = 0; j < 5; j++) {
		trl.penDown();
		trl.forward(5);
		trl.left(70);
		trl.penUp();
	}
}

function poly3() {
	//create the third polygon to iterate
    for (var j = 0; j < 1; j++) {
		trl.penDown();
		trl.forward(6);
		trl.left(180);
		trl.penUp();
	}
}

function poly4() {
	//create the fourth polygon to iterate
	for (var p = 0; p < 50; p++){
		trl.penDown();
		trl.forward(0.1);
		trl.left(360/50);
		trl.penUp();
	}
}

function setup() {
	//setup canvas dimensions
    createCanvas(480, 400);
    frameRate(20);
}

function draw() {

    var set = int(trlSet);
    //the following if statements creates a list of possible turtle screens
    //draw the first turtle screen
    //this turtle is basic, cream background and gray spiral
    if (set === 1) {

    	background(255, 240, 230);
	    //create the turtle
        trl = makeTurtle(width / 2, height / 2);
        trl.setColor(60);
        trl.setWeight(1.25);
        trl.penUp();
        //draw the spiral
    	for (var j = 0; j < mouseY / 1.25; j ++){
      	    trl.penUp();
    	    var dist = 1  + j  * 0.7;
    	    trl.forward(dist)
    	  	poly();
    	    trl.left(180);
    	    trl.forward(dist);
    	    trl.left(180);
            //rotate
    	    trl.left(mouseX / 25);
    	    constrain(mouseX, 0, 480);
    	    //change the widths as the turtle increases
    	    if (j > 100) {
    		    trl.setWeight(1.75);
    	    }
    	    if (j > 125) {
    		    trl.setWeight(2.25);
    	    }
    	    if (j > 150) {
    		    trl.setWeight(2.75);
    	    }
        }

    }
    //draw the second turtle screen
    //this turtle is slightly modified from the first
    //the colors are inverted and the spacing has changed
    if (set === 2) {
    	background(60);
	    //create the turtle
        trl = makeTurtle(width / 2, height / 2);
        trl.setColor(255, 190, 180);
        trl.setWeight(1.25);
        trl.penUp();

        for (var j = 0; j < mouseY * 1.1; j ++){
        	//draw a turtle spiral
        	var dist = 1  + j  * 0.25;
    	    trl.forward(dist)
    	 	poly();
    	    trl.left(180);
    	    trl.forward(dist);
    	    trl.left(180);

            //rotate
    	    trl.left(mouseX / 25);
    	    constrain(mouseX, 0, 480);
    	    //change the widths as turtle increases
    	    if (j > 100) {
    	        trl.setWeight(1.75);
    	    }
    	    if (j > 125) {
    		    trl.setWeight(2.25);
    	    }
    	    if (j > 150) {
    		    trl.setWeight(2.75);
    	    }
        }
    }
    //create the third turtle screen
    //for this one, I changed the color mode to HSB to get a rainbow
    if (set === 3) {
    	background(240);
	    //create the turtle
	    trl = makeTurtle(width / 2, height / 2);
	    //set colors
	    push();
	    colorMode(HSB, 255);
        var col = 0;
        trl.setWeight(1.5);
        trl.penUp();
        //create spiral
        for (var j = 0; j < mouseY / 1.5; j ++){
       	    trl.penUp();
    	    var dist = 1  + j  * 2;
    	    trl.forward(dist)
    	    col = col + 255 / (mouseY / 1.25);
            trl.setColor(color(col, 255, 255));
    	    poly();
    	    trl.left(180);
    	    trl.forward(dist);
    	    trl.left(180);
            //rotate
    	    trl.left(mouseX / 20);
    	    constrain(mouseX, 0, 480);
    	    //make the variable weights
    	    if (j > 100) {
    		    trl.setWeight(2);
    	    }
    	    if (j > 125) {
    	    	trl.setWeight(2.5);
    	    }
    	    if (j > 150) {
    		    trl.setWeight(3);
    	    }
        }
        pop();
    }
    //create the fourth trutle screen
    //this screen has multiple turtle spirals
    if (set === 4) {
    	push();
        background(60);
	    //create the turtle
	    trl = makeTurtle(width / 2, height / 2);
	    //set colors
	    colorMode(HSB, 255);
        var col = 0;
        trl.setWeight(1.5);
        trl.penUp();
        //create the first spiral
        for (var j = 0; j < mouseY / 1.10; j ++){
       	    trl.penUp();
          	var dist = 1  + j  * 0.25;
    	    trl.forward(dist);
    	    col = col + 255 / (mouseY / 1.25);
            trl.setColor(color(col, col, col));
    	    poly2();
        	trl.left(180);
    	    trl.forward(dist);
    	    trl.left(180);
            //rotate
    	    trl.left(mouseX / 15);
    	    constrain(mouseX, 0, 480);
    	    //variable wieghts
    	    if (j > 100) {
    		    trl.setWeight(2);
    	    }
    	    if (j > 125) {
    	    	trl.setWeight(2.5);
    	    }
    	    if (j > 150) {
    		    trl.setWeight(3);
    	    }
        }
        pop();
        //create the second turtle spiral
        //this one is dashed lines and on the top left
        trl = makeTurtle(0, 0);
	    //set colors
	    push();
	    translate(100, 100)
	    colorMode(HSB, 255);
        var col = 0;
        trl.setWeight(1.5);
        trl.penUp();
        //make the spiral
        for (var j = 0; j < mouseY; j ++){
       	    trl.penUp();
    	    var dist = 1  + j  * 0.5;
    	    trl.forward(dist)
        	col = col + 255 / (mouseY / 1.25);
            trl.setColor(color(col, col, 255));
    	    poly3();
    	    trl.left(180);
    	    trl.forward(dist);
    	    trl.left(180);
            //rotate
    	    trl.left(mouseX);
    	    constrain(mouseX, 0, 480);
    	    //variable widths
    	    if (j > 100) {
    		    trl.setWeight(2);
    	    }
    	    if (j > 125) {
    	    	trl.setWeight(2.5);
    	    }
    	    if (j > 150) {
    		    trl.setWeight(3);
    	    }
        }
        pop();
        //create the third spiral
        //this one is dashed lines and on the bottom right
        trl = makeTurtle(0, 0);
	    //set colors
	    push();
	    translate(350, 300)
	    colorMode(HSB, 255);
        var col = 0;
        trl.setWeight(1.5);
        trl.penUp();
        //spiral draw
        for (var j = 0; j < mouseY; j ++){
       	    trl.penUp();
        	var dist = 1  + j  * 0.5;
    	    trl.forward(dist)
    	    col = col + 255 / (mouseY / 1.25);
            trl.setColor(color(col, col, 255));
    	    poly3();
    	    trl.left(180);
    	    trl.forward(dist);
    	    trl.left(180);
            //rotate
    	    trl.left(mouseX);
    	    //varaible widths
    	    if (j > 100) {
    		    trl.setWeight(2);
    	    }
    	    if (j > 125) {
    	    	trl.setWeight(2.5);
    	    }
    	    if (j > 150) {
    		    trl.setWeight(3);
    	    }
        }
        pop();
    }
    //create the fifth turtle screen
    //this one is a thick spiral that gets darker in the center
    if (set === 5) {
    	push();
        background(255);
	    //create the turtle
	    trl = makeTurtle(width / 2, height / 2);
	    //set colors
	    colorMode(HSB, 255);
        var col = 0;
        trl.setWeight(30);
        trl.penUp();
        //draw the spiral
        for (var j = 0; j < mouseY; j ++){
       	    trl.penUp();
            var dist = 1  + j  * 0.2;
    	    trl.forward(dist)
        	col = col + 255 / (mouseY / 1.25);
            trl.setColor(color(255, col, col));
    	    poly4();
    	    trl.left(180);
    	    trl.forward(dist);
    	    trl.left(180);
            //rotate
    	    trl.left(mouseX / 25);
    	    constrain(mouseX, 0, 480);
    	}
        pop();
    }
}

function mousePressed() {
	//this function runs trhough all of the screens
	trlSet += 1;
	//if you reach the last screen, it reseats to the first
	if (trlSet > 5) {
		trlSet = 1;
	}
}

//////////////////////////////////
function turtleLeft(d){this.angle-=d;}function turtleRight(d){this.angle+=d;}
function turtleForward(p){var rad=radians(this.angle);var newx=this.x+cos(rad)*p;
var newy=this.y+sin(rad)*p;this.goto(newx,newy);}function turtleBack(p){
this.forward(-p);}function turtlePenDown(){this.penIsDown=true;}
function turtlePenUp(){this.penIsDown = false;}function turtleGoTo(x,y){
if(this.penIsDown){stroke(this.color);strokeWeight(this.weight);
line(this.x,this.y,x,y);}this.x = x;this.y = y;}function turtleDistTo(x,y){
return sqrt(sq(this.x-x)+sq(this.y-y));}function turtleAngleTo(x,y){
var absAngle=degrees(atan2(y-this.y,x-this.x));
var angle=((absAngle-this.angle)+360)%360.0;return angle;}
function turtleTurnToward(x,y,d){var angle = this.angleTo(x,y);if(angle< 180){
this.angle+=d;}else{this.angle-=d;}}function turtleSetColor(c){this.color=c;}
function turtleSetWeight(w){this.weight=w;}function turtleFace(angle){
this.angle = angle;}function makeTurtle(tx,ty){var turtle={x:tx,y:ty,
angle:0.0,penIsDown:true,color:color(128),weight:1,left:turtleLeft,
right:turtleRight,forward:turtleForward, back:turtleBack,penDown:turtlePenDown,
penUp:turtlePenUp,goto:turtleGoTo, angleto:turtleAngleTo,
turnToward:turtleTurnToward,distanceTo:turtleDistTo, angleTo:turtleAngleTo,
setColor:turtleSetColor, setWeight:turtleSetWeight,face:turtleFace};
return turtle;}
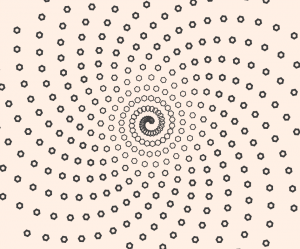
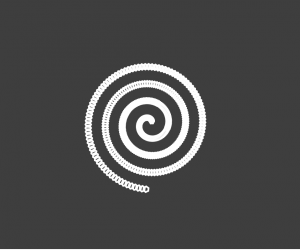
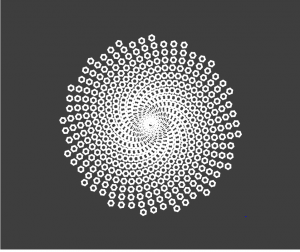
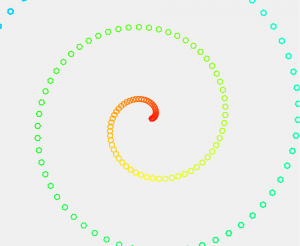
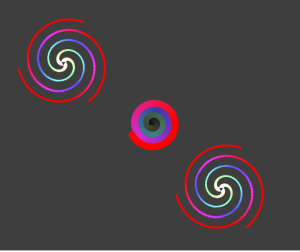
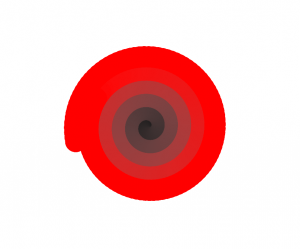
Spirals have always given me a great deal of difficulty to figure out, so I wanted to take advantage of this project to get some practice in playing around with some turtle spirals.
There were a lot of different variations I went through, so I decided that instead of choosing and over-complicating one, I should just put them all into one program which can flip through the different iterations to explore the process and play around with each one (as I find it kinda mesmerizing to see what placing your mouse on different parts of the page will do).
first turtle screensecond turtle screen (mouse X to the left)second turtle screen (mouseX to the right)third turtle screenfourth turtle screen (mouseX to the right)fourth turtle screen (mouseX in the middle)fifth and final turtle screen
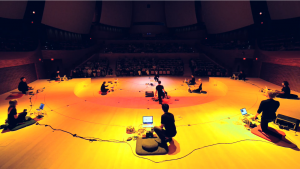
The project I chose to research this week was the Stanford Laptop Orchestra (or SLOrk for short). This orchestra, which creates full performances by having people using controllers to generate music from more than laptops, was founded in 2008 by Ge Wang and other students, faculty, and staff at Stanford University’s Center for Computer Research in Music and Acoustics. They use the ChucK programming language in order to create/ synthesize sounds and design the instruments.
The controllers that can be used to generate music. The knobs at the end can be pulled and twisted by the performers which then communicates to the laptops
I find this project to be fascinating, as it requires similar skills as a normal orchestra does (in terms of cohesion, practice, and performance) but utilizes a completely new medium. I was honestly very excited to stumble across this because I was expecting to find a sole person composing music, but instead, I found this entire group working to synthesize music live which is impressive.
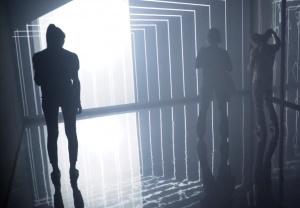
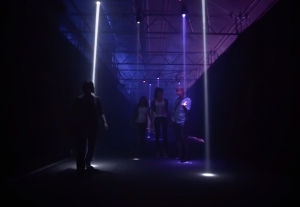
The project I chose this week is called Kontinumm – an “immersive 3-floor underground interactive multimedia installation” which incorporates lights, projections, and sensors to create a unique experience for the visitor. It was created in 2017 for the 150th anniversary of Canada’s confederation. I am in awe of this project, as it required so much planning, mapping, wiring, and coding that I cannot begin to comprehend how they created such an experience.
Yael Braha was the multimedia director for this project, which meant she directed content, set design, UI and UX, interactivity, lighting, and sounds (so, essentially, she dictated the who experience). Yael studied Graphic Design in the European Institute of Design in Rome and later earned a Master of Fine Arts in Cinema at San Francisco State University. She was a professor at multiple universities before becoming the Multimedia Director of Moment Factory. Her work combines the fields of art, science, technology, and entertainment in order to create immersive experiences. I admire her ability to create complex systems of interactions to create a truly fabricated environment.
var tS1 = 0.0002;
var tD1 = 0.009;
var tS2 = 0.0005;
var tD2 = 0.0008;
var tS3 = 0.0006;
var tD3 = 0.001;

var balloons = [];
var frame  = 1;

function setup() {
    createCanvas(480, 340);
    // draw the balloons
    for (var b = 0; b < 20; b++) {
        var bx = random(width);
        var by = random(0, height / 2 + 30);
        balloons[b] = makeBalloons(bx, by);
    }
    frameRate(10);
}

function draw() {
    background(255, 220, 200);
    drawSand();
    drawWater();
    water2();
    foam();


    updateBalloons();
    addNewBalloonsWithSomeRandomProbability();

}

function drawSand() {
    beginShape();
    stroke(235, 200, 180);
    for (var x = 0; x < width; x++) {
        var t = (x * tD1) + (millis() * tS1);
        var y = map(noise(t), 0, 1, height / 6, height / 3);
        line(x, y, x, width);
    }
    endShape();
}

function drawWater() {
    beginShape();
    stroke(153, 221, 255, 99);
    for(var i = 0; i < width; i++) {
        var t = (i * tD2) + (millis() * tS2);
        var y = map(noise(t), 0, 1, 20, height);
        line(i, y, i, width);
    }
    endShape();
}

function water2() {
    beginShape();
    stroke(90, 194, 255, 50);
    for(var j = 0; j < width; j++) {
        var t = (j * tD3) + (millis() * tS3);
        var y = map(noise(t), 0, 1, 40, height);
        line(j, y, j, width);
    }
    endShape();
}

function makeBalloons(originX) {
    var balloon = {
             xP: originX,
             yP: random((height / 2 + 50), height),
             speedX: random(-1.5, 0.25),
             speedY: random(-0.5, 0.5),
             sizes: random(15, 30),
             draw: drawballoons,
             move: balloonsMove
        }
    return balloon;
}

function updateBalloons() {
    for (var o = 0; o < balloons.length; o++){
        balloons[o].draw();
        balloons[o].move();
    }
}

function drawballoons(x, y){
    fill(255, 255, 255, 90);
    noStroke();
    ellipse(this.xP, this.yP, this.sizes, this.sizes);
}

function balloonsMove() {
    this.xP += this.speedX;
    this.yP += this.speedY;
    if (this.xP < 0 || this.yP > height) {
        xPos = width;
        this.speedX = random(-2.5, -0.5);
        this.speedY = random(-0.25, 1.5);
    }
}


function addNewBalloonsWithSomeRandomProbability() {
    var newBalloonLikelihood = 0.01;
    if (random(0,1) < newBalloonLikelihood) {
        balloons.push(makeBalloons(width));
    }
}

function foam() {
    beginShape();
    stroke(255, 255, 255, 90);
    for (var f = 0; f < width; f++) {
        var t = (f * tD3) + (millis() * tS3);
        var Y = map(noise(t), 0, 1, 40, height);
        vertex(f, Y - 5);
        vertex(f, Y + 5);
    }
    endShape();
}
This project was fun for me, but also proved to be challenging as I tried to make everything move the way I wanted to (this is primarily because I find it hard to “control” a fairly randomized generative piece).
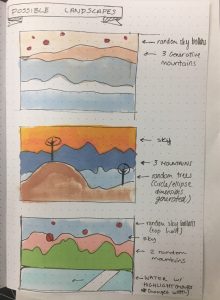
After making a few quick sketches as to what I wanted the landscape to look like, I ultimately chose this layout. I wanted to make a landscape reminiscent of watching the waves crash on the beach but can be seen in two different ways: if you view it with the blue facing down, it looks like waves with wet sand in the back, but if you view it with the tan facing down, it looks like a mountain range and a sky.
Sketches of possible landscapes
I would like to revisit this idea of a generative landscape, as I didn’t quite get this piece where I wanted it to be and want to explore it more.
/* Dani Delgado
Section E
ddelgad1@andrew.cmu.edu
Project-09
*/

//global variable for calling image
var sunset;
//global variables for adjusting the frame rate and size of the rects
var pixNo = 0;
var fr = 15;

function preload() {
	//load the underlaying image into the canvas
    var picture = "https://i.imgur.com/BBnFAII.jpg";
    sunset = loadImage(picture);
}

function setup() {
	//set the overall canvas settings
    createCanvas(480, 320);
    background(250, 240, 230);
    frameRate(fr);

    //draw the underlaying image
    sunset.loadPixels();
}

function draw() {
    //first set variables to draw the rects at random locations
    var rx = random(width);
    var ry = random(height);
    //constrain these rectangles to the canvas
    var pixx = constrain(floor(rx), 0, width - 1);
    var pixy = constrain(floor(ry), 0, height - 1);
    //create this variable to call the colors from the underlaying image
    var colPix = sunset.get(pixx, pixy);
    //create the variables for size and roundness adjustments
    var size;
    var round;
    //create the variable that sets the objects at diff angles
    var pixAng = random(radians(360));

    //these if statements change the size and roundness of the rects based on quantity
    if (pixNo < 600) {
        size = 20;
        round = 1;
    } else if (pixNo < 1200) {
       	size = 16;
       	round = 2;
    }else if (pixNo < 1800) {
    	size = 12;
    	round = 4;
    } else if (pixNo < 2400) {
    	size = 8;
    	round = 6;
    } else {
    	size = 5;
    	round = 5;
    }

    pixNo ++;

    //set rect color and stroke
    noStroke();
    fill(colPix);

    //draw the rects
    push();
    translate(rx, ry);
    rotate(pixAng);
    rect(0, 0, size, size, round);
    pop();
}

function mousePressed() {
	//this function will increase frame rate whenever mouse is pressed
	fr += 10;
	fr = constrain(fr, 15, 125);
	frameRate(fr);
}
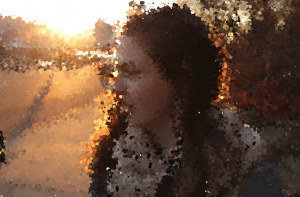
For this project, I decided to use a picture I took of my friend Margot last year! I enjoyed the project, despite struggling with it at first (my colors were all messed up and flashing for a while). I played around with a few ideas, including using different shapes and having the pixels be denser in certain areas, but I ultimately decided on making it a quantity based portrait where the more “pixels” appear, the smaller and rounder they get (however, this was done in a step-down sort of way rather than a smooth way). I also added the “click to increase frameRate” feature because of how impatient I was to see the final product appear and I figured other people would get impatient too.
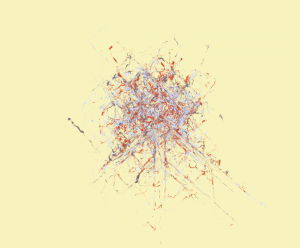
For this Looking Outwards, I looked to Eunice Choe’s week 6 post on Matt Deslauriers‘s randomly generated line work called Color Wander (2016). This artwork generates a new composition of lines randomly with every click, expressing unique patterns and color palettes.
I agree with Eunice that this work is very pleasing since the growing abstractions are not overwhelming or large to the point of them being uncomfortable. However, I would add that he way he used Simplex noise to make the objects move is arguably the most pleasing part of this work. There is something so wonderful about the way that you never know what line or color will appear next, what direction or form it will take, or at what speed it complete those two actions at. It is as if someone is painting on your computer screen and it is simply mesmerizing to watch.
One of James Paterson’s projects – a VR model of a tree that grows with sound. He created it to express how ridiculous you can look while be immersed in a VR world.
The person I chose to hear speak is James Paterson, a Montreal based software developer who has deep roots in drawing and animation (a background which heavily manifests within his work). Inspired by the sci fi books he read in his youth, he is immensely interested in spatial and interactive computational art.
In the past, Paterson has used his art as a way to express his thoughts and emotions, allowing his mind to travel where it wanted to and draw in a stream of conscious style as a way of therapy (He explained this a lot within his lecture, and it did strike me as a very memorable and useful way of coping with anxiety). From this, he began to generate these seemingly random doodles and rendered them using 3D software to create experimental artwork. This opened the door for him to partner with the Google Creative Lab and create Norman – a 3D drawing and animating software created through JavaScript and used by using Oculus Rift VR gear.
A screen capture of a Norman made animation. This was made with only VR gear
This project is absolutely mind blowing for me – the concept of drawing in 3D seems to be complex and out of reach, however, to be able to step into a drawing or an animation that you made and interact with it must be such a visceral experience that I one day hope to experience it.
Despite having created such amazing things, during his lecture he kept a very conversational tone and explained things in a way that even I, someone with limited CS experience, could fully understand and engage with him. I feel like this is an important skill to have in any situation of conceptual sharing and I wish to apply it to my presentations as well.
var nPoints = 100;

function setup() {
    createCanvas(480, 480);

}

function draw() {
	background(60);

	//in this for loop, we draw the bakcground element of the randomized curve
    push();
	translate(width / 2, height / 2);
	for (r = 0; r < nPoints; r ++) {
		stroke(200);
		drawRandomDevil(r);
	}
	pop();

    //in this loop, we draw the primary forground element
    //which is the center devil's curve
	push();
	translate(width / 2, height / 2);
	rotate(mouseX / mouseY);
    for (v = 0; v < nPoints; v ++) {
    	stroke(mouseX - 200, v, mouseY - 300);
    	drawDevilBoi(v);
    }
	pop();

    //this loop is to create the six rotating deveil's vurves
    for ( c = 0; c < 6; c ++) {
    	push();
    	translate(width / 2, height / 2);
    	rotate(radians(60 * c));
	    translate(width / 4, height / 4);
	    rotate(mouseX / mouseY);
            for (v = 0; v < nPoints; v ++) {
    	    stroke(mouseX - 100, v, mouseY - 100);
    	    drawDevilBoi(v);
         }
	    pop();
    }
}


function drawDevilBoi (x) {
    //draw the devil's curve in this function
    //first declare all the variables
    var x;
    var y;

    var c = constrain((mouseX / width), 0, 1);
    var co = constrain((mouseY / height), 0.0, 1.0);

    var a = c * ((mouseX - 200) / 3 * (100 + v) / 100);
    var b = co * ((mouseY - 200) / 3 * (100 + v) / 100);

    //set desire stroke
    noFill();
    strokeWeight(0.25);
    //draw the curve
    beginShape();
    for (var i = 0; i < nPoints; i += 5) {
    	var t = map(i, 0, nPoints, 0, TWO_PI);
    	x = cos(t) * sqrt ((pow(a, 2) * pow(sin(t), 2) - pow(b, 2) * pow(cos(t), 2)) / (pow(sin(t), 2) - pow(cos(t), 2)));
    	y = sin(t) * sqrt ((pow(a, 2) * pow(sin(t), 2) - pow(b, 2) * pow(cos(t), 2)) / (pow(sin(t), 2) - pow(cos(t), 2)));
    	vertex(x, y + 10);
    }
    endShape(CLOSE);
}

function drawRandomDevil (x) {
	//draw another devil's curve, this time there is an element of randomness with it

	var x;
    var y;

    var c = constrain((mouseX / width), 0, 1);
    var co = constrain((mouseY / height), 0.0, 1.0);

    var a = c * ((mouseX - 200) / 3 * (100 + r) / 100);
    var b = co * ((mouseY - 200) / 3 * (100 + r) / 100);

    //set the desired stroke
    noFill();
    strokeWeight(0.075);
    //start to draw the curve
    //this curve will be in the background and looks like noise
    beginShape();
    for (var i = 0; i < nPoints; i += 7) {
    	var t = map(i, 0, nPoints, 0, random(radians(350, 360)));
    	x = cos(t) * sqrt ((pow(a, 2) * pow(sin(t), 2) - pow(b, 2) * pow(cos(t), 2)) / (pow(sin(t), 2) - pow(cos(t), 2)));
    	y = sin(t) * sqrt ((pow(a, 2) * pow(sin(t), 2) - pow(b, 2) * pow(cos(t), 2)) / (pow(sin(t), 2) - pow(cos(t), 2)));
    	vertex(x, y + 10);
    }
    endShape(CLOSE);
}
This project was a bit of a mixed bag for me, as I did struggle to implement the curve into my work at first and make it appear in a way that I wanted it to. (Also choosing the curve I wanted to pursue took me a while, but I ultimately settled on The Devil’s Curve because I thought that it’s shape was very unique and could produce some nice variation). However, once I figured that out and began to play around I really enjoyed myself. I never really knew what changing the variables would make my code look like, so it was an exciting process of trial and error to create a nice form.
The initial Devil’s CurveExploring withe the for loop functions and variables of the curveFirst noise and expanding loop ideafirst try at repeating the curve and changing the color
![[OLD FALL 2018] 15-104 • Introduction to Computing for Creative Practice](https://courses.ideate.cmu.edu/15-104/f2018/wp-content/uploads/2020/08/stop-banner.png)