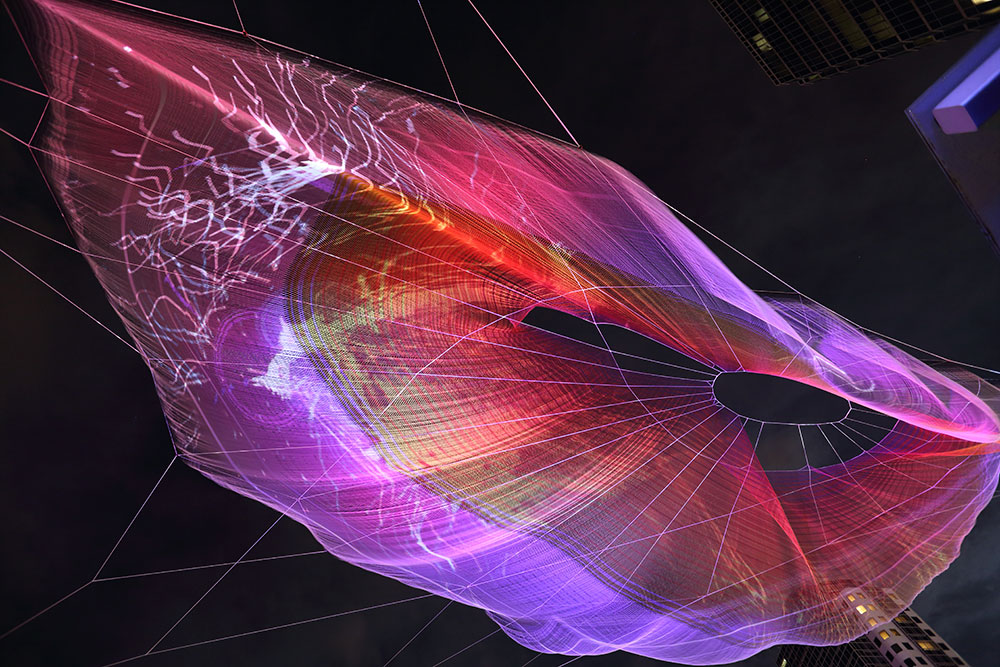
LookingOutwards-07: Sec C Sophia Kim

“Unnumbered Sparks” is an interactive sculpture that was created by Janet Echelman, Aaron Koblin and his team at the Google Creative Lab. This massive sculpture in the sky is mainly crowd-controlled, because the users are the ones who create the visuals, which are projected from their mobile devices. Ever since I studied fine arts and transitioned into design, I always had a passion for interactive, digital, and societal art. “Unnumbered Sparks” is a perfect example of the type of art I enjoy, combining digital and interaction. I love how Echelman and Aaron achieved their goal of making this project mainly run by the common people. Users are able to draw different lines and shapes with various colors just on their phone. I admire how each interaction a person has is very different and personal. Seeing their own art floating in the sky gives the user a celestial-like experience. Also, I enjoy how there are other elements like sound that is part of this experience, which also adds ambience to the environment.

This sculpture mainly uses a website that’s on a browser. This interactive art is very easy to use. The user only needs to connect to the WIFI to get access to a “remote control”-like website to draw. The Google Creative team used projection mapping to visualize the drawings. To allow this collaboration, the team used a program, which they created, called “Go.” It is similar to two coding programs: Python and C. “Go” is useful for high throughput networking. To create a 3D model, the team used Chrome and WebGL. These programs allowed the team to perfectly project onto the complex sculpture. With all these complex steps, all the designers had to consider other elements like weather, temperature, and wind change.

Sophia Kim-Project 6-Abstract Clock/Sec C

sketch

// Sophia S Kim
// Section C 1:30
// sophiaki@andrew.cmu.edu 
// Project-06-Abstract Clock


function setup() {
  createCanvas(480, 480); 
}

function draw() {
  //time variables 
  var H = hour();
  var M = minute();
  var S = second();

  //gets darker by the HOUR
  background (233 - (2*H), 237 - (2*H), 255 - (2*H));

  // variables for objects 
  var lemonWidth; //width of lemon
  var lemonHeight; //height of lemon 
  var liquidY = 190; //liquid Y psition
  var liquidH = 210; //liquid height
  var dropX = []; //water drop X
  var dropY = []; //water drop Y


  //static table 
  noStroke();
  fill(140, 94, 3);
  rect(0, 350, 480, 100); //top of table

  noStroke();
  fill(102, 69, 2);
  rect(0, 450, 480, 30); //side of table

  //static beach sand 
  noStroke();
  fill(242, 211, 148); 
  rect(0, 240, 480, 110);

  //beach water
  //water gets darker ever hour 
  noStroke();
  fill(62 - (2*H), 214 - (2*H), 255 - (2*H));
  ellipse(240, 240, 600, 130);
  rect(0, 140, 480, 80);

  //lemon 
  //changes lemon width and height every SECOND 
  //pattern of not squeezed and squeezed
  fill(226, 239, 48);
  if((S%2) > 0) {
    lemonWidth = 70;
    lemonHeight = 70;
  } 
  else {
    lemonWidth = 60;
    lemonHeight = 40;
  }
  ellipse(295, 180, lemonWidth, lemonHeight);

  //drink glass
  noStroke();
  fill(161, 235, 255);
  rect(185, 180, 110, 220);
  ellipse(width/2, 398, 110, 60);

  //drink liquid
  noStroke();
  fill(234, 117, 117);
  ellipse(width/2, 398, 100, 50);
  rect(190, liquidY + (3*M), 100, liquidH - (3*M));
  //allows liquid to decrease every MINUTE
}

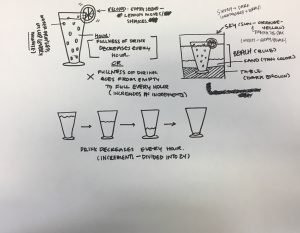
I wanted to make an illustration that relaxed the viewers and made them not too anxious about time. The possible settings I was thinking about were beaches, mountains, and waterfalls. I was craving bubble tea this whole week, so I decided to make a drink with a beach view. At the beginning of sketching, I got very excited with my concept. However, overtime, I decided to change the original parts of the abstract clock to something new. At first, I wanted to make water droplets to form on the glass every minute. Instead, I made the liquid level to decrease by every minute. For every hour, I changed the sky color and the ocean water color to become darker. At first, I had a hard time with how the time variables would interact with the shapes and colors. Midway through the process, I started to get the hang of where the time variables can be used in the code. I had a lot of fun with this assignment, because seeing the colors and the liquid height change were very satisfying.

Sophia Kim – Looking Outward 06 – Sec C

Ici, 1992 - Joan Mitchell

As a member of the American abstract expressionist movement, Joan Mitchell was one of the few female artists of this movement to gain acclaim for her work. In this painting “Ici,” Mitchell used oil paint to show emotion through color, brush stroke, and movement. I can sense a variety of emotions through the random brush strokes, specifically through angles and the amount of pressure on the brush.

Image result for Joan Mitchell

Playing sports as a child, Mitchell took her passion for diving and skating into her works. I believe her athleticism led her to have no restrictions in her art. For example, in all her pieces, especially in “Ici,” she does not use rulers, but uses her movements to create. She embraced the randomness and flexibility of the paint brush to create symbolic works of art. I really admire “Ici” the most out of all her paintings, because she balances the use of saturated and desaturated colors perfectly. Also, I love how random Mitchell’s lines and shapes are in this painting, which oddly harmonize together.

Sophia Kim – Project 05 Wallpaper – Sec C

sketch

// Sophia S Kim
// Section C 1:30
// sophiaki@andrew.cmu.edu 
// Project-05-Wallpaper


function setup() {
  createCanvas(450, 600); 
}

function draw() {
  background (255, 232, 187);
  //arc for RED part of rainbow
  for(var i = 20; i < height+40; i += 65) {
    for(var a = 20; a < width+30; a += 105) {
      strokeWeight(7);
      stroke(255, 67, 67);
      noFill(); 
      arc(a, i, 80, 85, PI, 0, OPEN);
    }
  }
  //arc for ORANGE part of rainbow
  for(var i = 20; i < height+40; i += 65) {
    for(var a = 20; a < width+30; a += 105) {
      strokeWeight(7);
      stroke(255, 177, 56);
      noFill(); 
      arc(a, i, 70, 75, PI, 0, OPEN);
    }
  }
  //arc for YELLOW part of rainbow
  for(var i = 20; i < height+40; i += 65) {
    for(var a = 20; a < width+30; a += 105) {
      strokeWeight(7);
      stroke(247, 238, 82);
      noFill(); 
      arc(a, i, 60, 65, PI, 0, OPEN);
    }
  }
  //arc for GREEN part of rainbow 
  for(var i = 20; i < height+40; i += 65) {
    for(var a = 20; a < width+30; a += 105) {
      strokeWeight(7);
      stroke(112, 232, 160);
      noFill(); 
      arc(a, i, 50, 55, PI, 0, OPEN);
    }
  }
  //arc for BLUE part of rainbow 
  for(var i = 20; i < height+40; i += 65) {
    for(var a = 20; a < width+30; a += 105) {
      strokeWeight(7);
      stroke(124, 209, 232);
      noFill(); 
      arc(a, i, 40, 45, PI, 0, OPEN);
    }
  }
  //arc for INDIGO part of rainbow 
  for(var i = 20; i < height+40; i += 65) {
    for(var a = 20; a < width+30; a += 105) {
      strokeWeight(7);
      stroke(124, 142, 229);
      noFill(); 
      arc(a, i, 30, 35, PI, 0, OPEN);
    }
  }
  //arc for VIOLET part of rainbow 
  for(var i = 20; i < height+40; i += 65) {
    for(var a = 20; a < width+30; a += 105) {
      strokeWeight(7);
      stroke(154, 125, 226);
      noFill(); 
      arc(a, i, 20, 25, PI, 0, OPEN);
    }
  }
  for(var i = 23; i < height+40; i += 65) {
    for(var a = 20; a < width+30; a += 105) {
      fill(0);
      noStroke();
      textStyle(BOLD);
      textSize(8);
      text("HAPPY", a-14, i + 10);
    }
  }
}

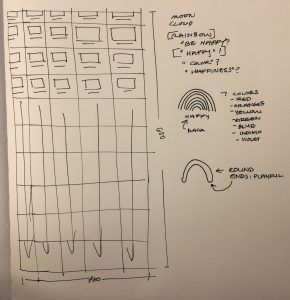
Utilizing the ‘wallpaper’/pattern into clothing, I was inspired by the iconic Paul Frank tees and the Happy Bunny t-shirts from my childhood. I wanted to fuse text and graphics together like the Happy Bunny t-shirts. I narrowed down the graphic to look simple so that the viewer can comprehend both the graphic and text together. The main objects I thought of were weather related: rain, clouds, sun, moon, rainbow. I chose to use the rainbow to give a positive mood to the viewer. At first, I had a really hard time spacing each block (graphic+text) from each other. However, after a while I got the hang of spacing and creating arcs for the rainbow. The assignments really assisted me to handle the for loops well for this project!

Image result for paul frank tee

Image result for happy bunny t shirt

Sophia Kim – Looking Outwards 05 – Sec C

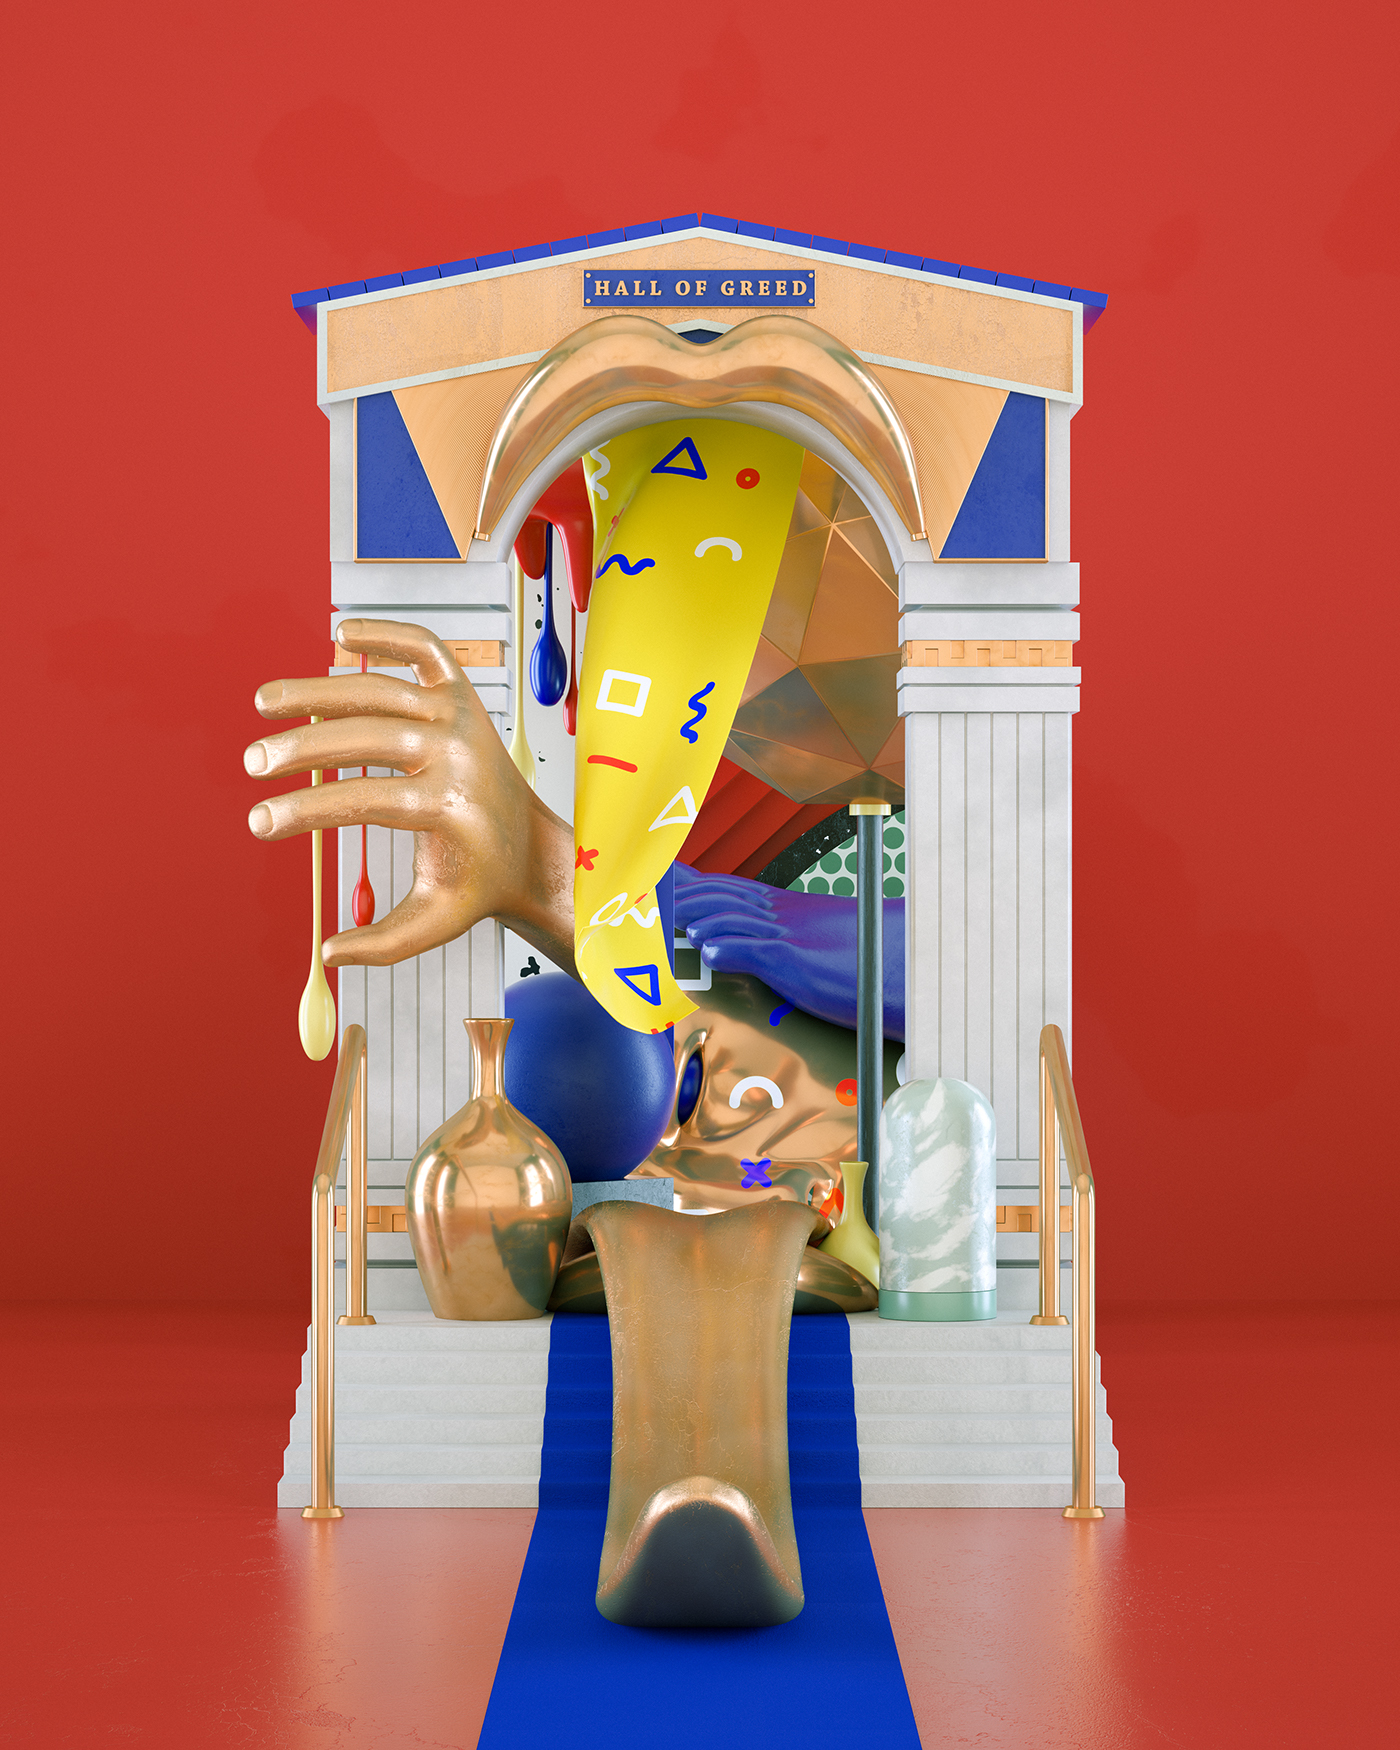
Within the “Portals” series, this piece was my favorite by Owe Martirez. Owe Martirez is a 3-D artist and motion designer from Sweden. It is most likely Martirez used Adobe Illustrator and JavaScript to create the “Portals” series. I really admire this 3D computer graphic among all of his pieces, because there is a message to this specific one. Also, I really admire how he mainly uses primary colors throughout the canvas and gold as an accent color. Alongside it being aesthetically pleasing, he uses text (“Hall of Greed”) to give a hint of what this graphic is about. In my opinion, within the ‘hall,’ the hand is reaching to grab different objects, symbolizing how people in society want the newest products. I believe Martirez’s goal was to make a series on human anatomy intertwining with different types of spaces using complimentary colors.

Portals


Sophia Kim Project-04 String Art- Sec C

sketch

// Sophia S Kim
// Section C 1:30
// sophiaki@andrew.cmu.edu 
// Project-04-StringArt

var x1
var y1 
var x2
var y2 

function setup() {
	createCanvas(400, 300); 
	var x1 = 400;
	var y1 = 100;
	var x2 = 50; 
	var y2 = 300;
}

function draw() {
	background(0);
	//white line
	x1 = 600;
	y1 = 0;
	x2 = 500;
	y2 = 200;

	for (var i = 0; i < 150; i += 1) {
		stroke(255)
		line(x1, y1, x2, y2)
		x1 -= 10
		y2 += 10
	}
	//white 2 line
	x1 = 0;
	y1 = 0;
	x2 = 600;
	y2 = 5;

	for (var i = 0; i < 150; i += 1) {
		stroke(90)
		line(x1, y1, x2, y2)
		x2 -= 10
		y1 += 50
	}
		// light yellow curve line
	x1 = 200;
	y1 = 600;
	x2 = 400;
	y2 = 0;

	for (var i = 0; i < 100; i += 1) {
		stroke(251, 255, 132)
		line(x1, y1, x2, y2)
		x1 -= 30
		y2 += 7
	}
	// light blue curve line
	x1 = 0;
	y1 = 0;
	x2 = 400;
	y2 = 0;
	for (var i = 0; i < 50; i += 1) {
		stroke(148, 191, 255)
		line(x1, y1, x2, y2)
		x1 += 13
		y2 += 10
	}
	// light green curve line
	x1 = 350;
	y1 = 0;
	x2 = 0;
	y2 = 0;

	for (var i = 0; i < 70; i += 1) {
		stroke(155, 255, 124)
		line(x1, y1, x2, y2)
		x1 -= 8
		y2 += 10
	}
	//light red curve line
	x1 = 500;
	y1 = 300;
	x2 = 0;
	y2 = 400;

	for (var i = 0; i < 100; i += 1) {
		stroke(255, 124, 124)
		line(x1, y1, x2, y2)
		x1 -= 8
		y2 -= 7
	}
	//blue curve line
	x1 = 0;
	y1 = 0;
	x2 = 500;
	y2 = 0;
	for (var i = 0; i < 50; i += 1) {
		stroke(11, 34, 255)
		line(x1, y1, x2, y2)
		x1 += 13
		y2 += 10
	}
	//green curve line
	x1 = 250;
	y1 = 0;
	x2 = 0;
	y2 = 0;

	for (var i = 0; i < 70; i += 1) {
		stroke(60, 239, 5)
		line(x1, y1, x2, y2)
		x1 -= 8
		y2 += 10
	}
	//red curve line
	x1 = 400;
	y1 = 300;
	x2 = 0;
	y2 = 400;

	for (var i = 0; i < 100; i += 1) {
		stroke(255, 63, 11)
		line(x1, y1, x2, y2)
		x1 -= 8
		y2 -= 7
	}
	//yellow curve line
	x1 = 400;
	y1 = 600;
	x2 = 400;
	y2 = 0;

	for (var i = 0; i < 100; i += 1) {
		stroke(255, 252, 11)
		line(x1, y1, x2, y2)
		x1 -= 30
		y2 += 7
	}
}

For this project, I focused on using tones of green, blue, yellow, and red. At first, I had trouble with organizing how to make the curves and how to align it to the edges of the canvas, but after many trials, I was able to understand how each line point worked. I had a lot of fun making string art with code, and I hope to make more complex and creative works like this.

Sophia Kim – LookingOutwards-04: Sec C

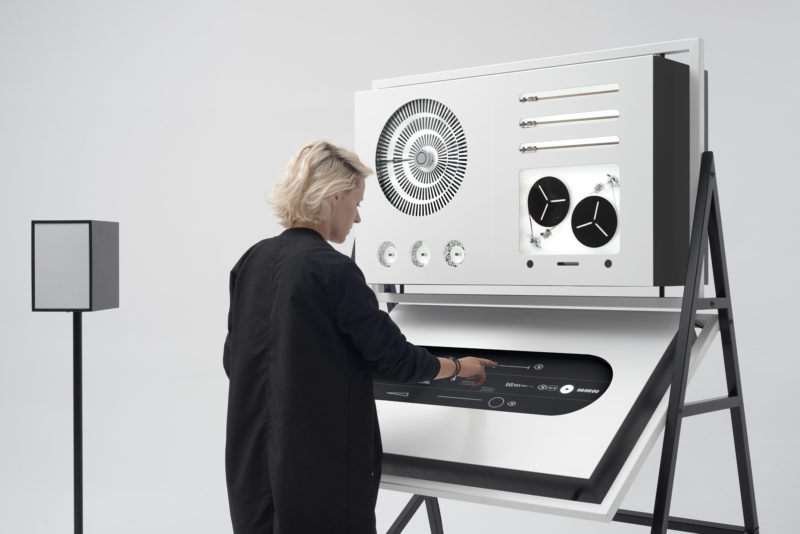
Inspired by the production of electroacoustic music and the “Symphony – electronic music” composed by Bogusław Schaeffer, the panGenerator team created the “Apparatum” to purely produce analogue sounds. The panGenerator team used two 2-track loops and three one-shot linear tape samplers as primary mediums. Along with these primary mediums, spinning discs with graphic patterns were used to obtain noise and basic tones.

I appreciate how sound design was fused with product design and communication design to make a personal experience for each user. At the end of each recording, your audio file is uploaded to a server and a ‘receipt’ is printed to show the sound patterns. The server is linked to a code/website to download the uploaded file. This experience allows the user to take something back home to remind them of this experience. I like how this machine gives freedom to people through customization of different types of sounds.

LookingOutwards-03 Sophia Kim-Sec C

One of Sean Ahlquist’s doctoral works that used Java based framework showing mutli-layer membrane systems.

This piece is one of many pieces in Sean Ahlqiust’s “Textile Morphologies.” Sean Ahlqiust did the scientific research while there were many collaborators for the design of the project, using Javascript and 3D printing. Among all the different computational fabrication projects, this one stuck out to me the most because it fuses design, science, and coding. I like this one specifically in the “Textile Morphologies” because it reminded me of the DNA molecules I learned in high school. I thought this piece focused on creating a relationship between all viewers and biology by showing wires connecting these “membranes” together. Using all his scientific research, Ahlqiust was able to approach all people with different skills/knowledge.


Textile Morphologies

Project-03 Sophia Kim – Sec C

sketch

// Sophia S Kim
// Section C 1:30
// sophiaki@andrew.cmu.edu 
// Project-03: Dynamic Drawing

function setup() {
    createCanvas(640, 480);
}
 
function draw() {

    var bR = 140 + mouseX * .6; 
    var bG = 255 + mouseX * .2;
    var bB = 100 + mouseX * .3;
    //variables for background color change

    background(bR, bG, bB);

    var size1 = mouseX * .4; 
        //changes size of text for mortal/immortal
    var size2 = mouseX * .15; 
        //changes size of text for forever/dead
    var size3 = mouseX * .1;
        //change size of text for talk/silent
    var size4 = mouseX * .17;    
        //change size of text for fake/real
    var textColor = 255-(mouseX*255/640); 
        //change of for any RGB color value 

    fill(0);
    noStroke();
    ellipse(mouseX-50, mouseY-100, 140, 140);
    /*changes position by following the mouseX and Y
    (image element)*/

    fill(0);
    noStroke();
    ellipse(mouseX+100, mouseY, 70, 70);
    /*changes position by following the mouseX and Y
    (image element)*/

    fill(0);
    noStroke();
    ellipse(mouseX+200, mouseY-40, 100, 100);
    /*changes position by following the mouseX and Y
    (image element)*/

    fill(0);
    noStroke();
    ellipse(mouseX+240, mouseY-180, 120, 120);
    /*changes position by following the mouseX and Y
    (image element)*/

    fill(6, textColor, mouseX*255 / 640);
        //changes color of texts (image element)  
    textFont('old english'); 
    textSize(size1); //changes text size (image element)
    if (mouseX < 200)
        text("MORTAL", mouseX, mouseY);
    else
        text("IMMORTAL", mouseX, mouseY); 
        //changes text when mouseX < 200 (image element)
        /*changes position by following the mouseX and Y
        (image element)*/

    fill(255, textColor, mouseX*255 / 640); 
        //changes color of texts (image element)
    textFont('old english'); 
    textSize(size2); //changes text size (image element)
    if (mouseX < 320)
        text("FOREVER", mouseX - 100, mouseY - 100);
    else
        text("DEAD", mouseX - 100, mouseY - 100); 
        //changes text when mouseX < 320 (image element)
        /*changes position by following the mouseX and Y 
        (image element)*/


    fill(textColor, mouseX*255 / 640, 140);
        //changes color of texts (image element)
    textFont('old english');
    textSize(size3);//changes text size (image element)
    if (mouseX < 300)
        text("TALK", mouseX - 150, mouseY - 50);
    else 
        text ("SILENT", mouseX - 150, mouseY - 50);
        //changes text when mouseX < 300 (image element)
        /*changes position by following the mouseX and Y
        (image element)*/

    fill(160, mouseX*255 / 640, textColor);
        //changes color of texts (image element)
    textFont('old english');
    textSize(size4);//changes text size (image element)
    if (mouseX < 200)
        text("FAKE", mouseX + 200, mouseY - 140);
    else
        text("REAL", mouseX + 200, mouseY - 140);
        //changes text when mouseX < 200 (image element)
        /*changes position by following the mouseX and Y
        (image element)*/
}

I was inspired by one of the links that were offered in the Deliverables (Moving Art at SmaPhoArt.com-Floating Figures). I had a really hard time with conditions, but after awhile, I was able to make the text change using different conditions.

Sophia Kim Project-02 Variable Face Sec C

sketch

//Sophia S Kim 
//Section C 1:30 
//sophiaki@andrew.cmu.edu
//Project-02-Face Variable

var eyeSize1 = 50; 
var eyeSize2 = 30; 
var faceWidth = 250;
var faceHeight = 275; 
var eyebrow1 = 238; 
var eyebrow2 = 372;
var mouthWidth = 135; 
var mouthHeight = 15; 
var earWidth = 25;
var earHeight = 55;
var faceColor = 46;
var earColor = 73;
var eyeColor = 47;
var eyebrowColorLX = 95;
var eyebrowColorRX = 94; 
var mouthColor = 213; 


function setup() {
	createCanvas(640, 480); /// width,height
}

function draw() {
	noStroke(); 
	background(142, 223, 88); ///background reference to RGB (R,G,B)

	var earLocation = (height/2)-20; // varible - ear location 

    fill(37, earColor, 255); 
    rect((width/2)-(faceWidth*0.57), earLocation, earWidth, earHeight); //left ear 

    fill(37, earColor, 255); 
    rect((width/2)+(faceWidth*0.47), earLocation, earWidth, earHeight); //right ear 

	fill(255, 253, faceColor); //skin color
	ellipse(width/2, height/2, faceWidth, faceHeight); //head shape

	var eyeLX = (width/2) - (faceWidth*0.27); // varible - left eye location 
    var eyeRX = (width/2) + (faceWidth*0.27); // variable - right eye location 

    fill(255, 164, eyeColor); 
    ellipse(eyeLX, (height/2), eyeSize1, eyeSize1); //left eye 

    fill(255, 164, eyeColor);
    ellipse(eyeRX, (height/2), eyeSize2, eyeSize2); //right eye

    fill(89, eyebrowColorLX, 233);
    triangle(eyebrow1, (height/2)-30, eyebrow1+15, (height/2)-45, eyebrow1+30, 
    	(height/2)-30); 
    	//left eyebrow

    fill(194, eyebrowColorRX, 215);
    triangle(eyebrow2, (height/2)-30, eyebrow2+15, (height/2)-70, eyebrow2+30, 
    	(height/2)-30); 
    	//right eyebrow

    var mouthLocation = (height/2)+45 // variable for mouth location

    fill(255, 124, mouthColor);
    rect(eyeLX, mouthLocation, mouthWidth, mouthHeight); //mouth 
 }

function mousePressed() {
	// when the mouse is clicked on, random values within specified ranged are rearranged. 
	eyeSize1 = random(25, 60);
	eyeSize2 = random(10,50);
	faceWidth = random(200, 300);
	faceHeight = random(250,300);
	eyebrow1 = random(225, 260);
	eyebrow2 = random(360, 385);
	mouthWidth = random(130, 140);
	mouthHeight = random(13, 17); 
	earWidth = random(22, 28);
	earHeight = random(53, 57);
	faceColor = random(0, 300);
	earColor = random(45, 200);
	eyeColor = random(25, 150);
	eyebrowColorLX = random(15, 200);
	eyebrowColorRX = random(25, 150); 
	mouthColor = random(140, 330);
} 

At first, I struggled with how I would replace common factors with variables. After I started to fill in the numbers, I got the hang of how to use variables. I made these faces based on simple shapes. Maybe next time I could do more detailed features to make it look realistic.