E-Volver

one generative design that looks like organic matter

E-Volver is a site work from 2006 that was done as work for the Research Labs of LUMC in Leiden. They named their softwares ‘image breeding units’ which works by generating artificial pixels. They use 13 different genes that together make an agent act randomly and behave differently on screen. I like how this project is meant to generate and create images that look like they could be from inside a microscope, or even look like fungus forming while still being computed randomly. What I think is really cool about this installation is that touch can randomly affect the code. These images are displayed on screens and when tapped it will randomly deactivate some of the animations. The process will begin again and again regenerating and changing after a certain number of taps. I have not looked into code that can change based on user-experience and I think that this is a project that is not just important to the software developers of it, but to the people who went to experience the site.

https://notnot.home.xs4all.nl/E-volverLUMC/E-volverLUMC.html

A print of one of the randomly generated designs hanging up at the site

Project 5, Modern Wallpaper

At first I was thinking of making a really old type of Renaissance wallpaper design with line flowers, but then I came across a few photos of modern wall paper designs and liked them much better. I decided to model my work after this photo specifically because I liked the simple pattern with the colors.

Reference

I mapped it out in my notebook in order to keep track of which blocks I had already made. As I made one color block and looped it correctly, I would color it in in my notepad. I also made a shape and color code to keep my code easier for myself to read.

sketchfile>

//Georgia Miller
//Section D
//ghmiller@andrew.cmu.edu
//Project-05-A
function setup() {
    createCanvas(600, 600);
    background(220);
}

function draw() {
    for(let row = 1; row <= 10; row += 3){
        for(let col = 1; col <= 10; col += 3){
            blockArcRYB((50 * col)- 50, (50 * row)- 50);
        }
    }
    for(let row = 1; row <= 10; row += 3){
        for(let col = 2; col <= 11; col += 3){
            blockArcTCR((50 * col)- 50, (50 * row)- 50);
        }
    }
    for(let row = 1; row <= 10; row += 3){
        for(let col = 3; col <= 12; col += 3){
            blockArcBBY(( 50 * col)- 50,( 50 * row)- 50);
        }
    }
    for(let row = 3; row <= 12; row += 3){
        for(let col = 1; col <= 10; col += 3){
            blockArcBYW((50 * col)- 50,(50 * row)- 50);
        }
    }
    for(let row = 2; row <= 12; row += 3){
        for(let col = 1; col <= 10; col += 3){
            blockArcLCB((50 * col)- 50,(50* row)- 50);
        }
    }
    for(let row = 2; row <= 11; row += 3){
        for(let col = 2; col <= 11; col += 3){
            blockArcLRW((50 * col)- 50,(50 * row)- 50);
        } 
    }
    for(let row = 3; row <= 12; row += 3){
        for(let col = 2; col <= 11; col += 3){
            blockArcTCB((50 * col)- 50,(50 * row)- 50);
        }
    }
    for(let row = 2; row <= 12; row += 3){
        for(let col = 3; col <= 12; col += 3){
            blockArcTWB((50 * col)- 50,(50 * row)- 50);
        }
    }
    for(let row = 3; row <= 12; row += 3){
        for(let col = 3; col <= 12; col += 3){
            blockArcLCR((50 * col)-50,(50 * row)- 50);
        }
    }
}
function blockArcRYB(x,y) { //block with arc on the right side with yellow rect blue arc
    strokeWeight(0);
    fill(255, 245, 0); //yellow
    rect(x, y, 50, 50);
    fill(117, 135, 255); //blue
    arc(x + 50, y + 25, 50, 50, PI/2,(3 * PI)/2);
}

function blockArcTCR(x,y) { //block with arc on the top with cream rect red arc
    strokeWeight(0);
    fill(255, 225, 190); //cream
    rect(x, y, 50, 50);
    fill(255, 177, 126); //red
    arc(x + 25, y, 50, 50, 0, PI);
}

function blockArcBBY(x,y) { //block with arc on the bottm with blue rect yellow arc
    strokeWeight(0);
    fill(117, 135, 255); //blue
    rect(x, y, 50, 50);
    fill(255, 245, 0); //yellow
    arc(x + 25, y + 50, 50, 50, PI, 0);
}
function blockArcBYW(x,y) { //block with arc on the bottm with yellow rect white arc
    strokeWeight(0);
    fill(255, 245, 0); //yellow
    rect(x, y, 50, 50);
    fill(255); //white
    arc(x + 25, y + 50, 50, 50, PI, 0);
}
function blockArcLCB(x,y) { //block with arc on the left with blue rect cream arc
    strokeWeight(0);
    fill(117, 135, 255); //blue
    rect(x, y, 50, 50);
    fill(255, 225, 190); //cream
    arc(x, y + 25, 50, 50, (3 * PI)/2, PI/2);
}
function blockArcLRW(x,y) { //block with arc on the left with blue rect cream arc
    strokeWeight(0);
    fill(255, 177, 126); //red
    rect(x, y, 50, 50);
    fill(255); //white
    arc(x, y + 25, 50, 50, (3 * PI)/2, PI/2);
}
function blockArcTCB(x,y) { //block with arc on the top with cream rect blue arc
    strokeWeight(0);
    fill(255, 225, 190); //cream
    rect(x, y, 50, 50);
    fill(117, 135, 255); //blue
    arc(x + 25, y, 50, 50, 0, PI);
}
function blockArcTWB(x,y) { //block with arc on the top with white rect blue arc
    strokeWeight(0);
    fill(255); //white
    rect(x, y, 50, 50);
    fill(117, 135, 255); //blue
    arc(x + 25, y, 50, 50, 0, PI);
}
function blockArcLCR(x,y) { //block with arc on the left with blue rect cream arc
    strokeWeight(0);
    fill(255, 225, 190); //cream
    rect(x, y, 50, 50);
    fill(255, 177, 126); //red
    arc(x, y + 25, 50, 50, (3 * PI)/2, PI/2);
}

notebook sketch

Week 5 LO Slug Race

Fully rendered design
Render before color

When looking for 3D computer Graphics I found Fabricio Moraes and Guilherme Formeti’s project Slug Race that they were able to make from scratch. As someone who has a love for animals I found the project funny and compelling to look at. I really had no idea how something so realistic was possible, especially because it looked like the whole landscape was actually real and the light looked so realistic as well. I was able to watch a video on the making of it, and even without the words containing words it helped to know that the artists did field work and were able to find images of the background to work with after going out into the woods themselves. I thought this was very cool to see especially because from my experience people do not comprehend how hard it is to create images without reference. I thought the 3d sculpting that was done for the characters and the slugs especially was very detailed and time consuming. I like how whimsical this piece is compared to some of the artist’s typical works.

https://fabriciomoraes.com/slug-race

Short video of work

Random Lines Spin Art

I spent a good amount of time trying to decide what to make. I ended up moving certain variables to fit between my triangular sides to make a star or compass shape. To keep it more simple for myself to move between to points I made it so I was not changing all of the line points. I think this helped a lot to understand the movement of the lines better. I tried to condense my code as much as I could.

file

var dx1; //variables for each triangle 1= triangle 1, 2= triangle 2
var dy1;
var dy2;
var dx3;
var dy3;
var dx4;
var numLines = 35;
function setup() {
    createCanvas(400, 400);
    background(200);
    dx1 = (100 - 50) / numLines; //x2-x1/number of lines(thick or thin)
    dy1 = (300 - 100) / numLines; //makes line lenght shorter or longer(higher,lower)
    dy2 = (100 - 300) / numLines; //some of the movement could stay the same or be switched
    dx3 = (250 - 50) / numLines;
    dy3 = (100 - 150) / numLines;
    dx4 = (50 - 250) / numLines;
}
    
function draw() { //per 1 line stroke
    strokeWeight(.5);
    var x1 = 200; //variables for each line, every triangle has 2
    var y1 = 0; //must have different variables or will not run correctly
    var x2 = 150;//even if numbers are the same
    var y2 = 200;
    var x3 = 200;
    var y3 = 400;
    var x4 = 150;
    var y4 = 200;
    var x5 = 0;
    var y5 = 200;
    var x6 = 200;
    var y6 = 250;
    var x7 = 200;
    var y7 = 250;
    var x8 = 400; 
    var y8 = 200;

    for (var i = 0; i <= numLines; i += 1) { 
        line(x1, y1, 150, 200); //top tri, left line
        x1 += dx1;
        y1 += dy1;
        line(x2, y2, 250, 200); //top tri right line
        x2 += dx1;
        y2 += dy2;
        line(x3, y3, 150, 200); //bottom tri, left line
        x3 += dx1;
        y3 += dy2;
        line(x4, y4, 250, 200); //bottom tri right line
        x4 += dx1;
        y4 += dy1;
        line(x5, y5, 200, 250); //left tri, bottom line
        x5 += dx3;
        y5 += dy3;
        line(x6, y6, 200, 150); //right tri, top line
        x6 += dx3;
        y6 += dy3;
        line(x7, y7, 200, 150); //left tri, top line
        x7 += dx4;
        y7 += dy3;
        line(x8, y8, 200, 250); //right middle tri, bottom line
        x8 += dx4;
        y8 += dy3;
    }
    noLoop();
 }   

LO week 4-The Sugarcube

https://www.instructables.com/Sugarcube-MIDI-Controller/

video of button pressing and whole form
Demo of Arpeggiator, just one of the sound functions of this creation

Looking on Vimeo, I found the Sugarcube controller. I thought it was unique because of the button pressing and I have seen familiar things before online with a connected mouthpiece. I really like the ease of this project and how you can connect it to different apps to do different sound related tasks. I liked how hands on it was with movement and shaking to erase work or play with the buttons. I thought this would make a really cool kids toy for kids who like music, without having a screen. It has a lot of different connections and apps to use; you can generate polyrhythms based on tilt and control the velocity. It also had a step sequencer which allowed it to go through different patterns of sound and tempo. The creator went through a lot of work for the parts and to make it on arduino and make it have a clean box packaging.The creator also goes through the motions of saying how they made the whole set up so you can too.They also attached their code in arduino, and I appreciate how they were able to program the buttons to do so many different commands.

Dynamic Drawing

file

//Georgia Miller
//15-104 Section D
//mouse controls change from moving along x axis
function setup() {
    createCanvas(450, 600);
    background(220);
    text("p5.js vers 0.9.0 test.", 10, 15);
}

function draw() {
background(0);
translate(225,mouseX); //center //mouseX changes position
var sqrWidth = 50;
if(mouseX<225){ //clockwise rotation
rectMode(CENTER);
rotate(radians(frameCount)); //typically 10 frameRate
}
if(mouseX>225){ //counterclockwise rotation
rectMode(CENTER);
rotate(radians(-frameCount)); //typically 10 frameRate
}
srqWidth = sqrWidth + 10 * mouseX; //for size change
if (mouseX<225) {//Color change to greys on left
    fill(255);
    rect(0,0,mouseX/2+120,mouseX/2+120); //mouse for size change
    fill(220);
    rect(0,0, mouseX/2+100,mouseX/2+100);
    fill(185);
    rect(0,0,mouseX/2+80,mouseX/2+80);
    fill(150);
    rect(0,0,mouseX/2+60,mouseX/2+60);
    fill(115);
    rect(0,0,mouseX/2+40,mouseX/2+40);
    fill(80);
    rect(0,0,mouseX/2+20,mouseX/2+20);
    fill(45);
    rect(0,0,mouseX/2,mouseX/2);
}
if (mouseX > 225){ //colorchange to rainbow on right
    fill(255,0,255);
    rect(0,0,mouseX/4+120,mouseX/4+120);
    fill(255,0,0);
    rect(0,0, mouseX/4+100,mouseX/4+100);
    fill(255,150,10);
    rect(0,0,mouseX/4+80,mouseX/4+80);
    fill(255,255,0);
    rect(0,0,mouseX/4+60,mouseX/4+60);
    fill(0,255,0);
    rect(0,0,mouseX/4+40,mouseX/4+40);
    fill(10,215,255);
    rect(0,0,mouseX/4+20,mouseX/4+20);
    fill(0,0,255);
    rect(0,0,mouseX/4,mouseX/4);
} 

}

I had an idea coming in and got really stuck so I decided after a while to change my idea. I struggled trying to work around my translation for a while especially when considering up and down motions. It was weird to see all my mistakes before I put my background in because everything kept looping over each other because of my frameRate, which created this cool circle around my rotating square.

LO week 3 Troche

Image of finished insulation. Nodes are black.

I ended up coming across Christan Troche’s Radiolaria Project. The project was intended to rethink architectural design, but I think it can also be stretched to environments design because of how it changes the feeling of the space that the Structural Tessellation is in. I think it is cool to see people creating things based on nature.Troche explains that its design is based on the skeletons of radiolarians. Troche most likely used generated forms for the individual nodes. Because this project is based on something organic, the skeleton, I would imagine that he had many elements of his computation obey flocking behavior. What I find especially cool is how the form supports itself and can transform its shape.

http://www.uni-kassel.de/fb12/wwtwl/projekte/RadiolariaProject/index.html

Variable Faces

sketchfile

var eyeSize = 20;
var pupilSize = 10;
var faceWidth = 100;
var faceHeight = 150;
var earSize = 30;
var eyeColor = 0;
var hairHeight = 300;
var hairWidth = 200;
var mouth = 1;

function setup() {
    createCanvas(480, 640);
    background(0,200,0);
    text("p5.js vers 0.9.0 test.", 10, 15);
}

function draw() {
    background(150,50,25);
    fill(100);
    ellipse (width / 2, height / 2, hairWidth, hairHeight);
    fill(255,200,162);
    var earRX = (width / 2.1) + (faceWidth * .625);
    var earLX = (width / 1.9) - (faceWidth * .625);
    ellipse(earRX, height/2, earSize, earSize);
    ellipse(earLX, height /2, earSize, earSize);
    ellipse(width / 2, height / 2, faceWidth, faceHeight);
    fill(100)
    arc(width / 2, height / 2.1, hairWidth, hairHeight, PI, 0); //bangs
    fill(eyeColor);
    var eyeLX = width / 2 - faceWidth * 0.25;
    var eyeRX = width / 2 + faceWidth * 0.25;
    noFill();
    strokeWeight(2);
    arc(width / 2, height / 1.9, faceWidth / 4, faceHeight / 4, 0, PI); //nose
    if (faceHeight <= 150){ // mouth 1
        arc(width / 2, height / 1.8 , faceWidth /3.5 * 2, faceHeight / 5 , 0, PI);
    } else if (faceHeight <= 170){ //mouth 2
        arc(width / 2, height / 1.7, faceWidth /3.5 * 2.2, faceHeight / 5 , PI, 0);
    } else { //mouth 3
        line(220, height / 1.7, 240, height / 1.7);
     }
    fill(eyeColor);
    ellipse(eyeLX, height / 2, eyeSize, eyeSize);
    ellipse(eyeRX, height / 2, eyeSize, eyeSize);
    fill(0);
    ellipse(eyeLX, height / 2, pupilSize, pupilSize);
    ellipse(eyeRX, height / 2, pupilSize, pupilSize);
     if(hairHeight <faceHeight){ //for no bald head
    hairHeight = 250};
}

function mousePressed() {
    faceWidth = random(75, 150);
    faceHeight = random(100, 200);
    eyeSize = random(10, 30);
    pupilSize = random(5, 15);
    earSize = random(20, 30);
    eyeColor = random(0, 255, 0, 255, 0, 255);
    hairWidth = random(150, 225);
    hairHeight = random(125, 225);
    mouth = random(0.1);
}
 

This project was a lot easier for me than the last. I however, spent a lot of time stuck on my if else statements due to a }. Regardless, I made a changing face with eyes that turn different shades of grey and has different smiles. My person kinda looks like an old lady to me.

Dorfelt works on Grief

I found Matthais Dorfelt’s work interesting because of how real it looked compared to a human hand. Specifically in his computer-generated drawings of grief, which reminds me of art from the show Adventure Time. All the works kept the same style and crying aspect with an open mouth, but all were still different. I found it spooky that it looked human-made and not coded. I would assume that whatever algorithm was used had a lot of if-then statements because I would think they ran the same code multiple times to get all the images. Perhaps they had if the body is pink then the mouth has these measurements and colors, etc. I feel that the artists are present in the algorithm because all of his work is displayed with a certain art style that is very contemporary, none of it seems to stray too far from that path. I like the way he specifies spontaneity as a part of his process.

https://www.mokafolio.de/works/Grief

Project 1: My Self Portrait

file

//Georgia Miller 
//Section D
function setup() {
    createCanvas(800,1000,);
    background(229,255,204);
    text("p5.js vers 0.9.0 test.", 10, 15);
}

function draw() {
    fill(204,102,0);
    strokeWeight(0);
    ellipse(315,490,480,720); //back of hair
    ellipse(340,340,440,430); //mid piece
    fill(255,229,191); 
    ellipse(500,525,240,200); //cheek
    ellipse(215,520,50,150); //ear
    ellipse(425,400,400,380); //forehead
    beginShape(QUADS); //chin and jaw
    vertex(255,580);
    vertex(320,695);
    vertex(530,720);
    vertex(555,710);
    endShape(CLOSE);
    beginShape(QUADS); //chin and jaw
    vertex(320,695);
    vertex(530,720);
    vertex(555,710);
    vertex(580,590);
    endShape(CLOSE);
    beginShape(QUADS); //chin and jaw
    vertex(230,460);
    vertex(255,580);
    vertex(500,690);
    vertex(525,570);
    endShape(CLOSE);

    fill(88,45,0);
    beginShape(); //eyebrows
    vertex(600,380)
    bezierVertex(480,330,540,365,510,357);
    bezierVertex(540,300,590,335,600,380);
    endShape();
    beginShape();
    vertex(480,370);
    bezierVertex(455,430,460,350,295,410);
    bezierVertex(330,350,435,346,480,370);
    endShape();

    fill(204,102,0); //bangs
    beginShape();
    vertex(450,155);
    bezierVertex(760,100,675,435,625,475);
    bezierVertex(560,230,610,345,450,155);
    endShape();
    beginShape();
    vertex(450,155);
    bezierVertex(645,100,610,380,570,430);
    bezierVertex(530,230,610,400,450,155);
    endShape();
    beginShape();
    vertex(450,155);
    bezierVertex(530,205,550,400,515,430);
    bezierVertex(500,200,530,345,450,155);
    endShape();
    beginShape();
    beginShape();
    vertex(400,200);
    bezierVertex(390,250,350,300,380,440);
    bezierVertex(340,350,315,234,400,200);
    endShape();
    beginShape();
    vertex(385,130);
    bezierVertex(320,360,230,100,330,490);
    bezierVertex(380,370,300,300,385,130);
    endShape();
    beginShape();
    fill(250)
    vertex(300,130);
    bezierVertex(260,360,170,100,240,490);
    bezierVertex(300,370,220,300,300,130);
    endShape();
    strokeWeight(0);


    fill(0) //eyeliner
    beginShape(QUADS);
    vertex(330,430);
    vertex(450,435);
    vertex(500,465);
    vertex(410,465);
    endShape();
    beginShape(QUADS);
    vertex(610,430);
    vertex(545,435);
    vertex(530,465);
    vertex(580,450);
    endShape();
    beginShape(TRIANGLES); //eyelashes
    vertex(395,465);
    vertex(400,470);
    vertex(380,475);
    endShape();
    beginShape(TRIANGLES);
    vertex(410,475);
    vertex(425,475);
    vertex(405,490);
    endShape();
    beginShape(TRIANGLES);
    vertex(580,470);
    vertex(585,470);
    vertex(590,465);
    endShape();
    beginShape(TRIANGLES);
    vertex(590,460);
    vertex(595,450);
    vertex(600,465);
    endShape();


    fill(250)
    ellipse(430,450,85,40) //white of eyes
    ellipse(560,450,60,40);
    stroke(0);
    strokeWeight(2);
    line(525,450,570,525); //nose bridge
    line(535,550,560,550);
    line(560,550,570,525);

    strokeWeight(0) //lips
    fill(243,176,176)
    beginShape();
    vertex(490,630);
    vertex(520,590);
    vertex(540,600);
    vertex(555,590);
    vertex(570,605);
    vertex(565,630);
    vertex(530,640);
    endShape();
 
    stroke(100) //cheekbone
    strokeWeight(1)
    line(250,520,405,590);
    line(405,590,450,665);

    strokeWeight(0);  //cheekbone
    fill(255,229,191); 
    beginShape();
    vertex(255,580);
    vertex(280,800);
    vertex(230,885);
    vertex(420,940);
    vertex(580,910);
    vertex(515,870);
    vertex(490,710);
    endShape();

    strokeWeight(2);//jawline
    stroke(0);
    line(530,720,555,710);
    line(320,695,530,720);
    line(555,710,580,590);
    line(230,460,255,580);
    line(255,580,320,695);

    ellipseMode(RADIUS); //eyeballs
    fill(171,228,242);
    strokeWeight(0)
    ellipse(425, 450, 20, 20); // Outer white ellipse
    ellipseMode(CENTER);
    fill(0);
    ellipse(425, 450, 18, 18); // Inner gray ellipse
    fill(171,228,242);
    ellipseMode(RADIUS); 
    ellipse(560, 450, 17, 17); // Outer white ellipse
    ellipseMode(CENTER);
    fill(0);
    ellipse(560, 450, 15, 15); // Inner gray ellipse

    fill(255,44,199,50); //blush
    ellipse(515,505,300,36);

    fill(255); //nose shine
    ellipse(550,520,20,20);
    noLoop();

}

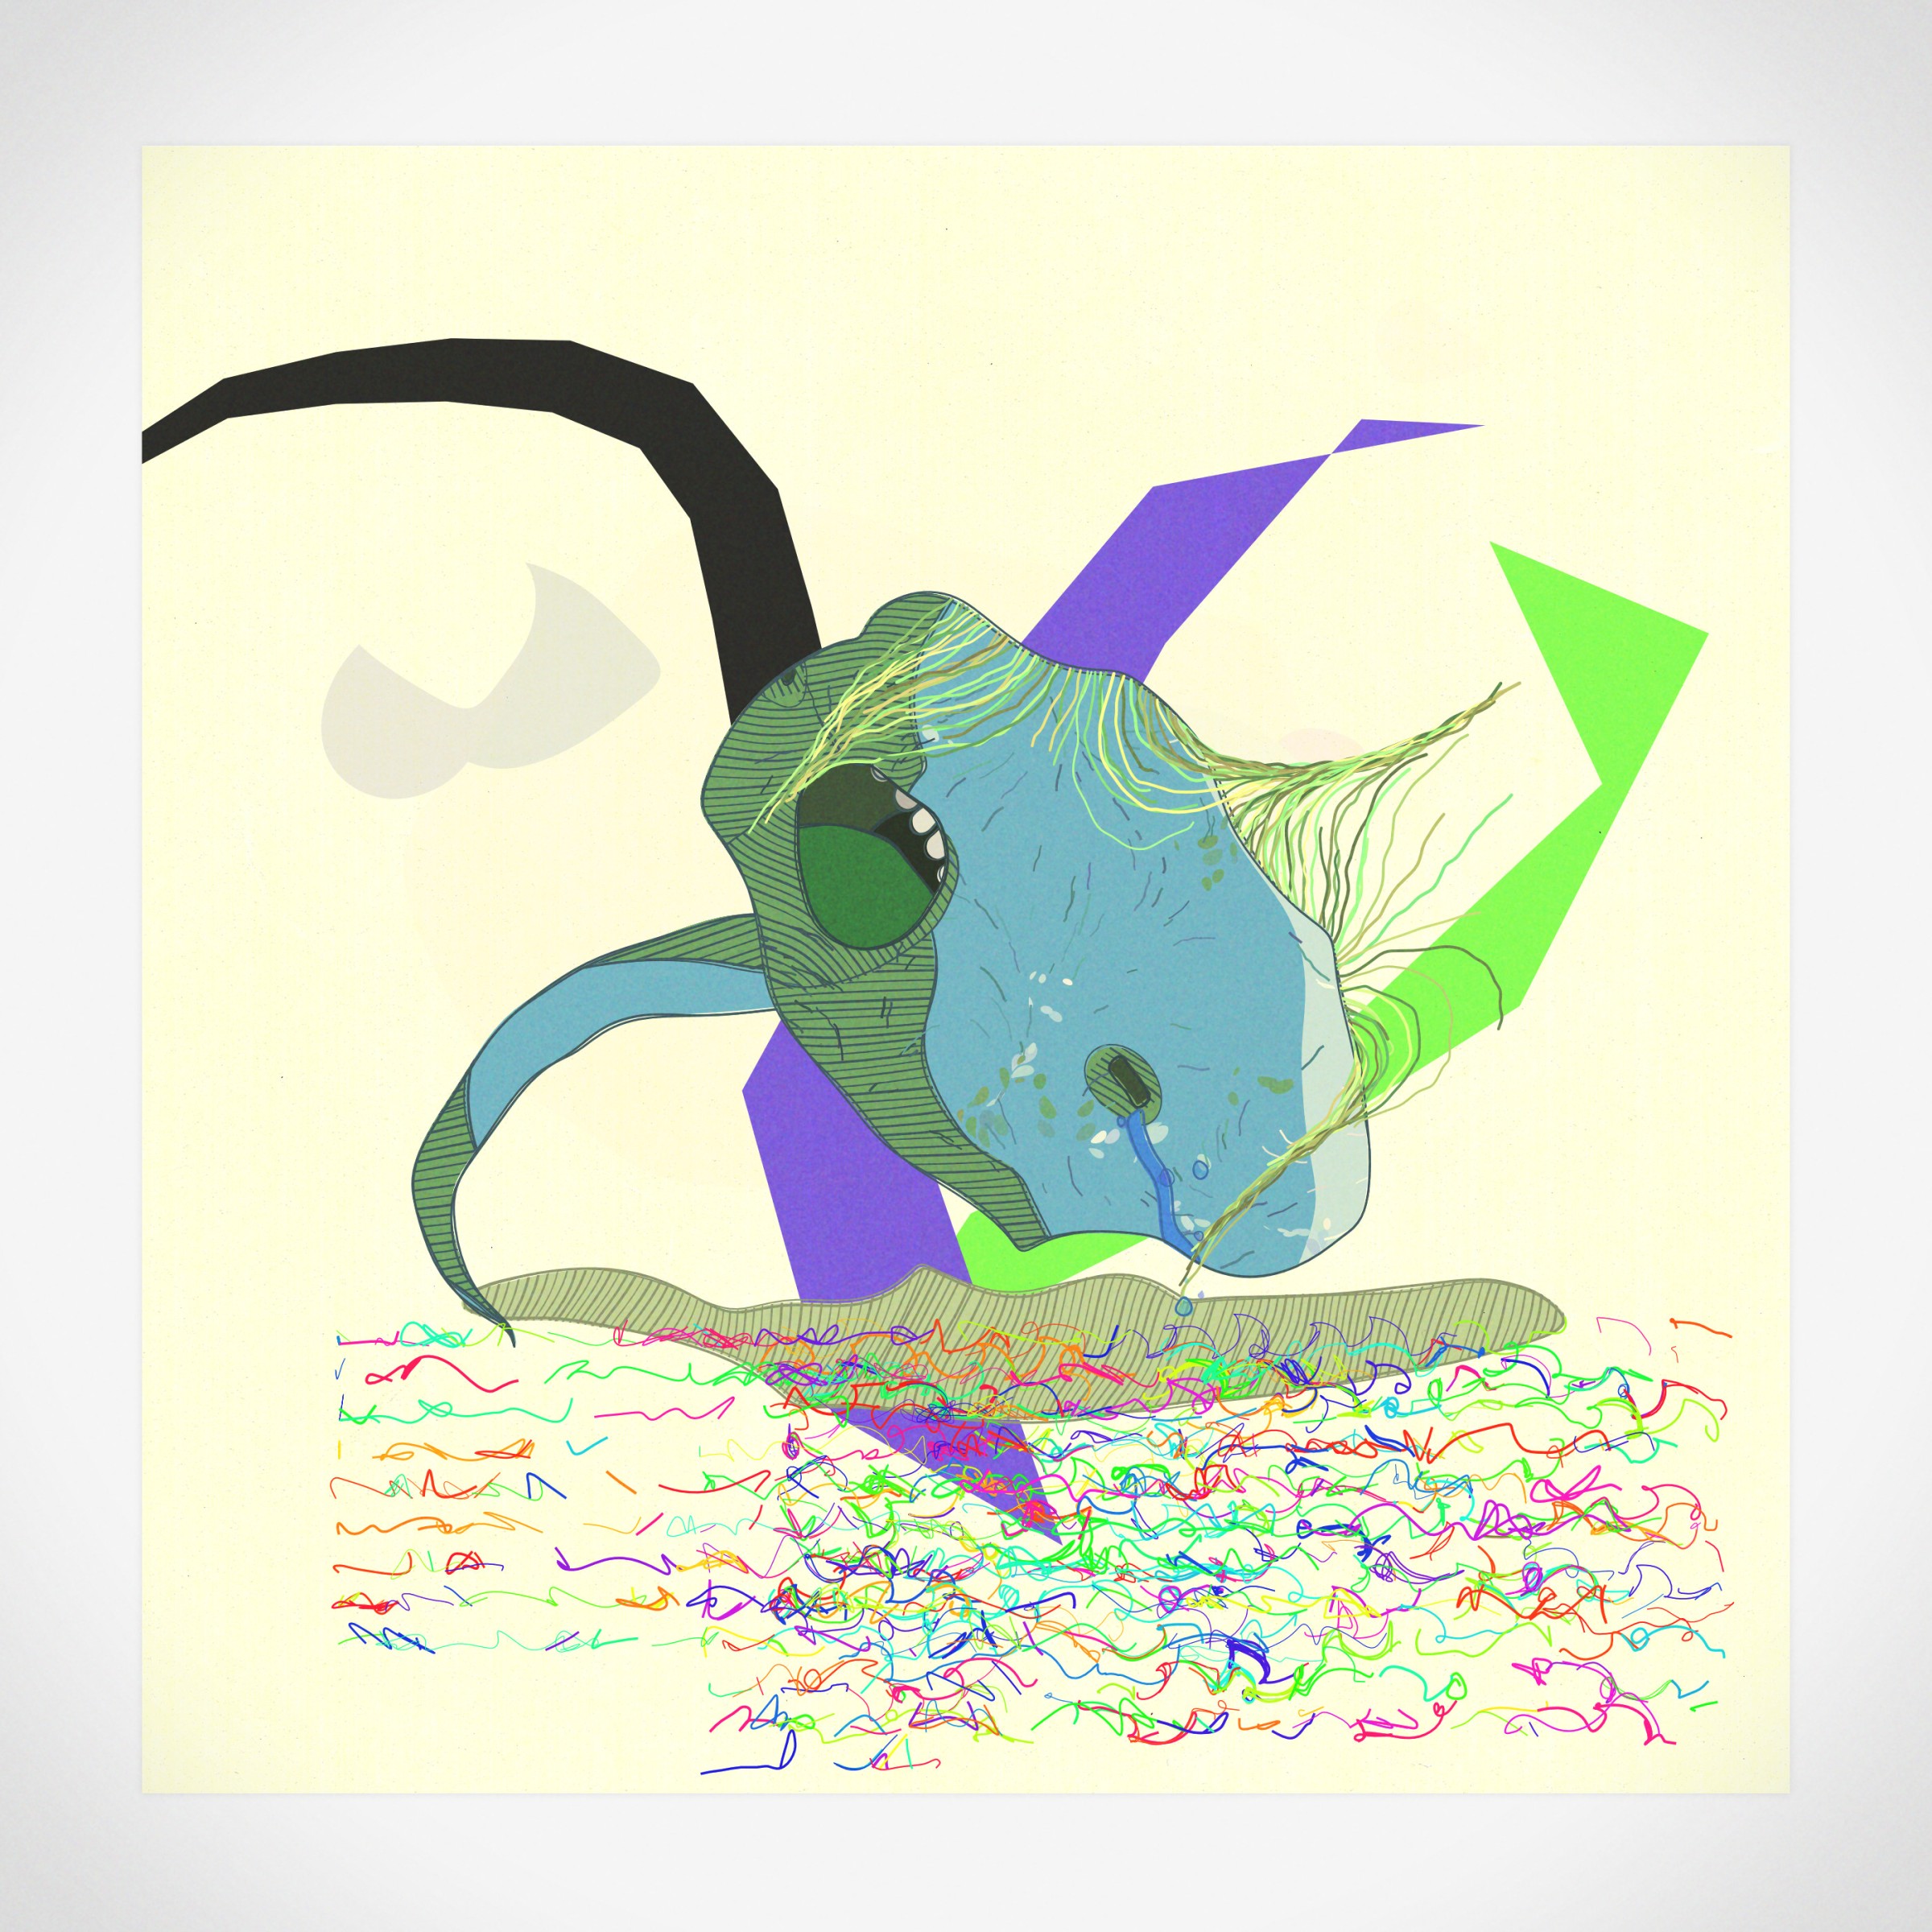
The most challenging thing about this project was trying to find a way to create my bangs. I ended up using really long code.