![[OLD SEMESTER] 15-104 • Introduction to Computing for Creative Practice](../../../../wp-content/uploads/2023/09/stop-banner.png)
For this LO, I decided to look at the fashion website Dress-X which features digital clothing and is founded by Daria Shapovalova and Natalia Modenova. All the clothes are generated through 3D computer graphics instead of being physically manufactured so you will have to send them a photo of yourself, which will be sent back to you with the clothes photoshopped onto it. Some of the brands featured on the website do not use 3D digital design methods, so Dress-X has to create digital graphics for them. Since designers spend a lot of time creating intricate details on their physical clothes, the 3D artists have to also be careful in how they capture those physical properties and translate them into a digital space. They focus on creating 3D models that could also work in reality, keeping track of function and form. However, what I find the most interesting about this service is that you can try on the clothes using the Dress-X app, where AR is used to morph the clothes to your body as you move around. I supposed the app heavily relies on AI to identify the body and morph the clothes around it. Dress-X aims to reduce waste that comes from physical clothing production, such as the carbon footprint of manufacturing and increasing textile waste.
Author: Camel
Project 04- String Art
//Catherine Liu
//jianingl
//Section D

var strokeColorR = 255
var strokeColorG = 165
var strokeColorB = 0

var dx1;
var dy1;
var dx2;
var dy2;

var dx3;
var dy3;
var dx4;
var dy4;

var dx5;
var dy5;
var dx6;
var dy6;

var dx7;
var dy7;
var dx8;
var dy8;

var dx9;
var dy9;
var dx10;
var dy10;

var numLines = 50;

function setup() {
    createCanvas(400, 300);
    background(0);

    //draws line that curves downward
    line(0,0,width/2,height);
    line(width/2,height,width,0);
    dx1 = (width/2-0)/numLines;
    dy1 = (height-0)/numLines;
    dx2 = (width-width/2)/numLines;
    dy2 = (0-height)/numLines;

    //draws line that curves upward
    line(0,height,width/2,0);
    line(width/2,0,width,height);
    dx3 = (width/2-0)/numLines;
    dy3 = (0-height)/numLines;
    dx4 = (width-width/2)/numLines;
    dy4 = (height-0)/numLines;

    //draws line that curves left
    line(0,0,width,height/2);
    line(width,height/2,0,height);
    dx5 = (width-0)/numLines;
    dy5 = (height/2-0)/numLines;
    dx6 = (0-width)/numLines;
    dy6 = (height-height/2)/numLines;

    //draws line that curves right
    line(width,0,0,height/2);
    line(0,height/2,width,height);
    dx7 = (0-width)/numLines;
    dy7 = (height/2-0)/numLines;
    dx8 = (width-0)/numLines;
    dy8 = (height-height/2)/numLines;
}

function draw() {
    background(0);
    stroke(strokeColorR, strokeColorG, strokeColorB);

    //draws line that curves downwards
    var x1 = 0;
    var y1 = 0;
    var x2 = width/2;
    var y2 = height;
    for (var i = 0; i <= numLines; i += 1) {
        line(x1, y1, x2, y2);
        x1 += dx1;
        y1 += dy1;
        x2 += dx2;
        y2 += dy2;
    }

    //draws line that curves upward
    var x3 = 0;
    var y3 = height;
    var x4 = width/2;
    var y4 = 0;
    for (var i = 0; i <= numLines; i += 1) {
        line(x3, y3, x4, y4);
        x3 += dx3;
        y3 += dy3;
        x4 += dx4;
        y4 += dy4;
    }

    //draws line that curves left
    var x5 = 0;
    var y5 = 0;
    var x6 = width;
    var y6 = height/2;
    for (var i = 0; i <= numLines; i += 1) {
        line(x5, y5, x6, y6);
        x5 += dx5;
        y5 += dy5;
        x6 += dx6;
        y6 += dy6;
    }

    //draws line that curves right
    var x7 = width;
    var y7 = 0;
    var x8 = 0;
    var y8 = height/2;
    for (var i = 0; i <= numLines; i += 1) {
        line(x7, y7, x8, y8);
        x7 += dx7;
        y7 += dy7;
        x8 += dx8;
        y8 += dy8;
    }
}

function mousePressed() {

    //checks for R value of color and switches
    if (strokeColorR == 255) {
        strokeColorR = 0
    } else {
        strokeColorR = 255
    }

    //checks for G value of color and switches
    if (strokeColorG == 165) {
        strokeColorG = 191
    } else {
        strokeColorG = 165
    }

    //checks for B value of color and switches
    if (strokeColorB == 0) {
        strokeColorB = 255
    } else {
        strokeColorB = 0
    }
}
It took me a while to figure out how to use the string to create patterns but once I had a good idea of what I wanted to create it was relatively easy to add strings. I also included the ability for the string to change color when you press the mouse.
Looking Outwards 04
There is a YouTube channel called “ELECTRONICOS FANTASTICOS!” that features people playing music by scanning barcodes of various lengths and widths. I was amazed by how such a simple tool can be reimagined to create music, and curious about how the scanner was reprogrammed to recognize different barcodes as different sounds. In fact, factors such as pitch and speed appear to be affected by how fast the scanner is moving and how far from the barcode it is.
Ei Wada, a Japanese artist and musician, reinvents such electrical appliances as tools to create electromagnetic music. He modifies the barcode scanners to generate sounds by connecting scanned signals directly to an audio terminal. When hovering over a printed backdrop with different variations of “barcodes”, the scanner senses changes in light patterns between the black and white lines to turns those signals into computer text. The computer recognizes the specific light patterns and emits a beep sound. It is likely that Wada created an algorithm that sets different light patterns to specific sounds so when the scanner goes over different barcodes, it produces a variety of beeps. However, to create music, the artist still has to physically scan the barcodes in a rhythmic way, moving throughout the different barcodes systemically in order to produce a set of sounds with musical qualities.
Looking Outwards 03
For this blog post on computational fabrication, I’m interested in talking about fashion designer Iris Van Herpen’s work. As a designer, she is consistently pushing the boundaries of textile materials and silhouettes, blending together nature and technology to create intricate pieces. The inspiration for her SS18 collection Ludi Naturae was the natural and manmade landscapes of our world from a bird’s-eye view, surveying the intricate aerial photography by Thierry Bornier, Andy Yeung, etc. Through the collection process film, it seems that a computer program was used to analyze the natural landscape’s curves and create an organic pattern that the designers could then refine. A 3D printer was also used to create individual physical pieces that are then hand-sewn together for the final garment. I was fascinated by the array of patterns and silhouettes Herpen created for this collection and how the organic forms flow together. While some of the designs were most organic, others were composed of simple geometric shapes arranged in different patterns and groups. Every dress was made up of many small pieces of 3D printed material so great attention to detail was placed on how they came together as a whole fabric to create an illusion of movement.
Project 03- Dynamic Drawing
//Catherine Liu
//jianingl@andrew.cmu.edu
//Section D
// bee follows cursor and creates flowers when it gets near stems
var x = 300;
var y = 200;
var dx = 0;
var dy = 0;
var angle = 0;
function setup() {
createCanvas(600, 450);
background(204,255,255);
}
function draw() {
noStroke()
//bee follows mouse
dx = mouseX - x;
dy = mouseY - y;
x = x + 1*dx;
y = y + 1*dy
background(204,255,255);
//sun rotates according to mouse
fill(0,153,0)
push();
fill(255,128,0);
translate(300,450/2);
rotate(radians(abs(mouseX/3)));
ellipse(-200,-70,100,100)
pop();
rect(0,height-40,width,40);
fill(0,255,0); //flower stems
rect(445,370,10,80);
rect(295,370,10,80);
rect(145,370,10,80);
if (dist(mouseX, mouseY, 450, 350) < 50) {
if (dist(mouseX, mouseY, 450, 350) < 25) {
fill(255,153,255); // flower petal is pink
} else {
fill(255,0,0) // flower petal is red
}
ellipse(450, 350, max(mouseX-340,mouseY-340), max(mouseX-340,mouseY-340));
fill(255,255,0); // flower center
ellipse(450, 350, max(mouseX-380,mouseY-380), max(mouseX-380,mouseY-380)); //make right flower bigger
fill(255,0,0); // flower petal
ellipse(300, 350, 250-(max(mouseX-250,mouseY-250)), 250-(max(mouseX-250,mouseY-250)));
fill(255,255,0); // flower center
ellipse(300, 350, 180-(max(mouseX-290,mouseY-290)), 180-(max(mouseX-290,mouseY-290))); //make middle flower smaller
fill(255,0,0); // flower petal
ellipse(150, 350, 250-(max(mouseX-250,mouseY-250)), 250-(max(mouseX-250,mouseY-250)));
fill(255,255,0); // flower center
ellipse(150, 350, 180-(max(mouseX-290,mouseY-290)), 180-(max(mouseX-290,mouseY-290))); //make left flower smaller
} else if (dist(mouseX, mouseY, 300, 350) < 50) {
if (dist(mouseX, mouseY, 300, 350) < 25) {
fill(255,128,0); // flower petal is orange
} else {
fill(255,0,0) // flower petal is red
}
ellipse(300, 350, max(mouseX-250,mouseY-250), max(mouseX-250,mouseY-250));
fill(255,255,0); // flower center
ellipse(300, 350, max(mouseX-290,mouseY-290), max(mouseX-290,mouseY-290)); // make middle flower bigger
fill(255,0,0); // flower petal
ellipse(450, 350, 170-(max(mouseX-250,mouseY-250)), 170-(max(mouseX-250,mouseY-250)));
fill(255,255,0); // flower center
ellipse(450, 350, 100-(max(mouseX-290,mouseY-290)), 100-(max(mouseX-290,mouseY-290))); //make right flower smaller
fill(255,0,0); // flower petal
ellipse(150, 350, 170-(max(mouseX-250,mouseY-250)), 170-(max(mouseX-250,mouseY-250)));
fill(255,255,0); // flower center
ellipse(150, 350, 100-(max(mouseX-290,mouseY-290)), 100-(max(mouseX-290,mouseY-290))); //make left flower smaller
} else if (dist(mouseX, mouseY, 150, 350) < 50) {
if (dist(mouseX, mouseY, 150, 350) < 25) {
fill(178,102,255); // flower petal is purple
} else {
fill(255,0,0) // flower petal is red
}
ellipse(150, 350, max(mouseX-250,mouseY-250), max(mouseX-250,mouseY-250));
fill(255,255,0); // flower center
ellipse(150, 350, max(mouseX-300,mouseY-300), max(mouseX-300,mouseY-300)); // make left flower bigger
fill(255,0,0); // flower petal
ellipse(450, 350, 170-(max(mouseX-250,mouseY-250)), 170-(max(mouseX-250,mouseY-250)));
fill(255,255,0); // flower center
ellipse(450, 350, 100-(max(mouseX-290,mouseY-290)), 100-(max(mouseX-290,mouseY-290))); //make right flower smaller
fill(255,0,0); // flower petal
ellipse(300, 350, 170-(max(mouseX-250,mouseY-250)), 170-(max(mouseX-250,mouseY-250)));
fill(255,255,0); // flower center
ellipse(300, 350, 100-(max(mouseX-290,mouseY-290)), 100-(max(mouseX-290,mouseY-290)));//make middle flower smaller
}
fill(255)
ellipse(x-20,y-30,20,40); //bee wing
ellipse(x-10,y-30,20,40); //bee wing
fill(255,174,66);
ellipse(x-15,y,50,25); //bee body
fill(0)
ellipse(x,y,5,5); // bee eye
rect(x-55,y-5,20,10); // bee stinger
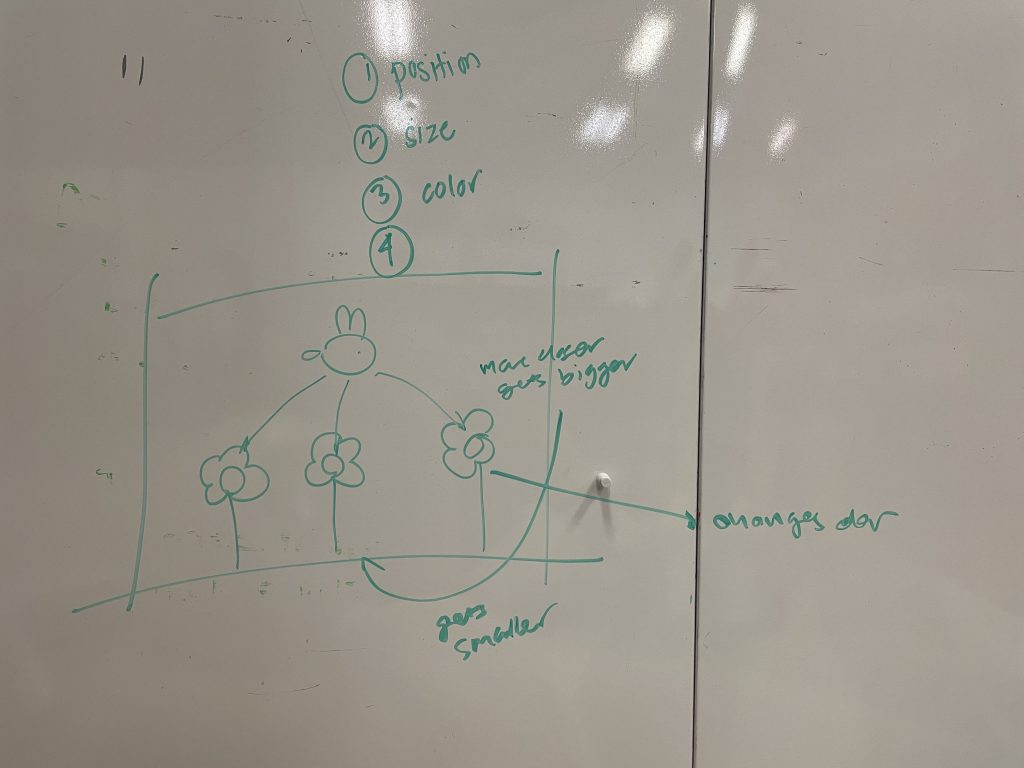
}It took a while coming up with an idea but in the end I decided to do something fun and interactive like a game. When you move the bee close to the flower stems, a flower “blooms” while the others get smaller. I spent a long time making sure the sizes and numbers were correct but I’m happy with the end result.
Looking Outwards 02
I visited a gallery that had an artwork by Ian Brill, a new media artist who specializes in computer-generated light installations. The installation featured a curved screen with colored pixels that moved and changed colors. The viewer would sit on a long bench and look at the screen, which was accompanied by a monotone background noise. While the viewer sat on the bench, most of their view would be filled with the screen and be enveloped in the color-changing visuals. What I admire about this artwork and his other exhibitions, is its ability to completely change the viewer’s perception of the space around them. While sitting in the gallery, while I knew where I was, the screen which I was looking at was capturing most of my awareness, changing the environment in my head. I suppose that the algorithm has some form of a random function in it to continuously generate changing visuals, as well as a set palette of colors that the algorithm can choose from randomly to show. I think where Brill’s artistic sensibilities manifest are in his choice of color and size of the screen. I observed that for each exhibition, he uses a specific color palette to invoke different emotions and feelings of space from the viewer. At the same time, the size and number of screens control how much of the space is altered. While one singular screen only controls a small portion of the space, larger and more screens can possibly alter an entire room.
2 people viewing Ian Brill’s artwork at the gallery
Variable Faces 02
It was a lot of fun deciding what to change and what style to approach this project with. It was little challenging finding the right places to put random face features but I was able to use the sample code to infer how to make changes.
//Jia Ning Liu
//jianingl@andrew.cmu.edu
//Section D

var eyeSize = 20;
var faceWidth = 100;
var faceHeight = 150;
var mouthLength = 30
var colorR = 200
var colorG = 200
var colorB = 200
var mouthStart = 30
var mouthHeight = 30 //controls the y coordinate of the mouth
var hairRadius = 40 //controls size of hair
var noseLength = 30

function setup() {
    createCanvas(480, 640);
}

function draw() {
    noFill()
    background(204, 255, 204);
    strokeWeight(5); //increases stroke weight to give face a more graphic feel
    fill (colorB, colorG, colorR); //generated a random RGB color
    ellipse(width / 2, height / 2 - 80, hairRadius); // creates hair of different sizes
    fill (colorR, colorG, colorB);
    ellipse(width / 2, height / 2, faceWidth, faceHeight);
    var eyeLX = width / 2 - faceWidth * 0.25;
    var eyeRX = width / 2 + faceWidth * 0.25;
    fill (colorG, colorB, colorR);
    ellipse(eyeLX, height / 2, eyeSize, eyeSize);
    ellipse(eyeRX, height / 2, eyeSize, eyeSize);
    //generates a random length of line for the mouth
    line(width / 2 - mouthStart, height / 2 + mouthHeight, width / 2 + mouthLength, height / 2 + mouthHeight);
    fill(colorB, colorG, colorR);
    rect(width / 2, height / 2, 5, noseLength); // generates different nose lengths
}

function mousePressed() {
    faceWidth = random(75, 150);
    faceHeight = random(100, 200);
    eyeSize = random (10, 30)
    mouthLength = random (20,80)
    colorR = random(1,256)
    colorG = random(1,256)
    colorB = random (1,256)
    mouthStart = random (20,80)
    mouthHeight = random (20,50)
    hairRadius = random (100,200)
    noseLength = random (10,40)
}Project 1: My Self Portrait
function setup() {
    createCanvas(670, 750);
    background(232,228,130);
}

function draw() {
    noStroke();

    fill(0,0,0);
    rect(70,50,450,480,200); //back hair

    fill(255,160,122);
    rect(140,150,310,350,150); //head

    fill(188,143,143);
    rect(0,550,600,800,150); //body

    fill(255,160,122);
    rect(255,450,90,150,80); // neck

    fill(0,0,0);
    rect(110,65,200,200,100); //left bang

    rect(280,65,200,200,100); //right bang

    rect(120,230,40,300,30); //left stroke

    rect(430,230,40,300,30); //right stroke

    rect(480,200,100,200,70); //clip

    ellipse(520,170,80); //clip piece

    ellipse(237,330,30); // left eye

    ellipse(355,328,30); // right eye

    fill(255,127,80);
    rect(280,330,30,70,30); //nose

    fill(220,20,60);
    ellipse(300,430,50); //mouth

    fill(255,160,122);
    rect(250,400,120,20);

    fill(240,128,128,100);
    ellipse(200,400,100); // left blush
    ellipse(395,400,100); // right blush

    fill(255,160,122);
    rect(500,510,150,160,50); //palm
    rect(542,600,80,210); //wrist
    //rect(450,590,80,40,50); //thumb
    rect(510,420,32,130,50); //index finger
    rect(550,410,32,130,50); //middle finger
    //rect(580,410,32,130,50); //ring finger
    //rect(615,450,32,100,50); //little finger


    strokeWeight(5);
    stroke(218,165,32);
    fill(255,255,255,50);
    ellipse(230,330,100); // left frame
    ellipse(365,328,100); // right frame
    line(280,330,310,330); // frame connector

    noLoop();
}
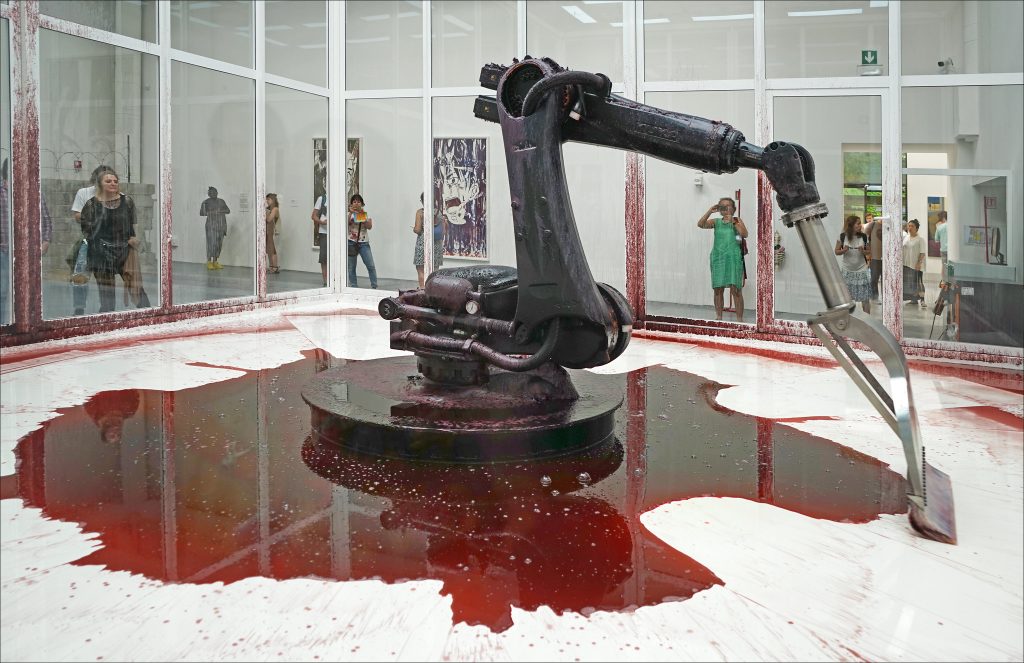
LO: My inspiration
I recently came upon an exhibition piece called “Can’t Help Myself” (2016) by artists Sun Yuan and Peng Yu. It is a robotic arm that mimics animated movements while constantly wiping a blood-like liquid within an area around it. The artists worked with robotic engineers to program the specific movements and repurpose the robotic arm, creating code for 32 movements that the robot will perform. The more the robot wipes the liquid, the more messy the room becomes, creating a sense of helplessness. What I admire about the project is how movements can be coded into the robot to give it lifelike characteristics. Although the robot is a machine with no emotions, we as humans are able to place emotions onto it just by observing its movements. I’m curious about human interaction with robotics and computers, especially how we create emotional connections with them, which is why this artwork caught my attention. This artwork sprouted from the artists’ wish to explore how machines can be used to replace an artist’s place in performative work, broadening the boundaries of performance art. “Can’t Help Myself” was also Guggenheim’s first robotic artwork, and presented new possibilities for combining technology with exhibition art.