Day 2: (Wed Aug 28) Clearances, Arduino Basics, Hobby Servos
Notes for 2019-08-28. See also the Fall 2019 Calendar.
Notes from Day 1
It’s become clear I made a naïve assumption about Fridays; let’s assess the conflicts and work out a solution.
Agenda
Administrative
Note: Monday Sep 2 is Labor Day, no class.
Note: Wednesday Sep 4 is our next class, but I will be slightly late. Please arrive no later than 9:45AM.
Please test your ID card on the door lock and let me know if it doesn’t work.
Details on laser cutter training: see IDeATe Laser Cutter Policy, including current BioRaft links.
Note that no sign-up is required for the new IDeATe training, just show up at 4:30PM on Sep 4, 5, 6, 9, 10, or 11, or talk to Cody Soska.
Assignments
I am not issuing the first formal class assignment until next Wednesday. However:
If you are new to programming, I highly recommended that you read through more of my own Lecture Sample Code and the Arduino IDE examples.
If you are new to SolidWorks 3D modeling, I highly recommend you go through the beginner tutorial available via CMU LinkedIn Learning (formerly Lynda). (Note that it does appear possible to use this without a LinkedIn account.) Here’s a starting point: Learning SOLIDWORKS (two hours). Windows clusters and IDeATe Dell laptops have SolidWorks 2018 Academic.
In-class
Child Clearances session with Holly Ryan, Background Clearance Coordinator.
Review of basic Arduino terminology.
Electronics show and tell.
Hobby servos.
Lecture code samples
(See also Lecture Sample Code).
I used the term ‘bit-banging’, here’s an example of what that could mean:
1 2 3 4 5 6 7 8 9 10 11 12 13 14 | // 1. generate complex waveform on a speaker on pin 5
// 2. demonstrate execution speed, firmware clocks, bit-banging logic
void setup()
{
pinMode(5, OUTPUT);
}
void loop()
{
long now = micros();
bool square1 = (now % 2274) < 1136;
bool square2 = (now % 1516) < 758;
digitalWrite(5, square1 ^ square2);
}
|
A major limitation of an embedded platform is the difficulty of observing program state and debugging output, but we do have a Serial console:
1 2 3 4 5 6 7 8 9 10 | // 1. demonstrate use of Serial port for debugging output
// 2. demonstrate IDE graphing: see Tools/Serial Plotter
void setup()
{
Serial.begin(115200);
}
void loop()
{
Serial.println(sin(4 * 6.28 * 0.001 * millis()));
}
|
The Arduino has a 16 MHz main clock which is divided down to create various
timing references. The micros() function (see micros()) has a
resolution of 4 microseconds:
1 2 3 4 5 6 7 8 9 10 11 12 13 14 15 16 17 18 19 20 21 22 23 24 25 | // 1. measure execution time
// 2. demonstrate the firmware clock
// 3. demonstrate debugging on the serial port
void setup()
{
Serial.begin(115200);
}
long last_time = 0;
void loop()
{
long now = micros();
Serial.print(millis());
Serial.print(" ");
Serial.print(micros());
Serial.print(" ");
Serial.println(now - last_time);
last_time = now;
}
|
Figures

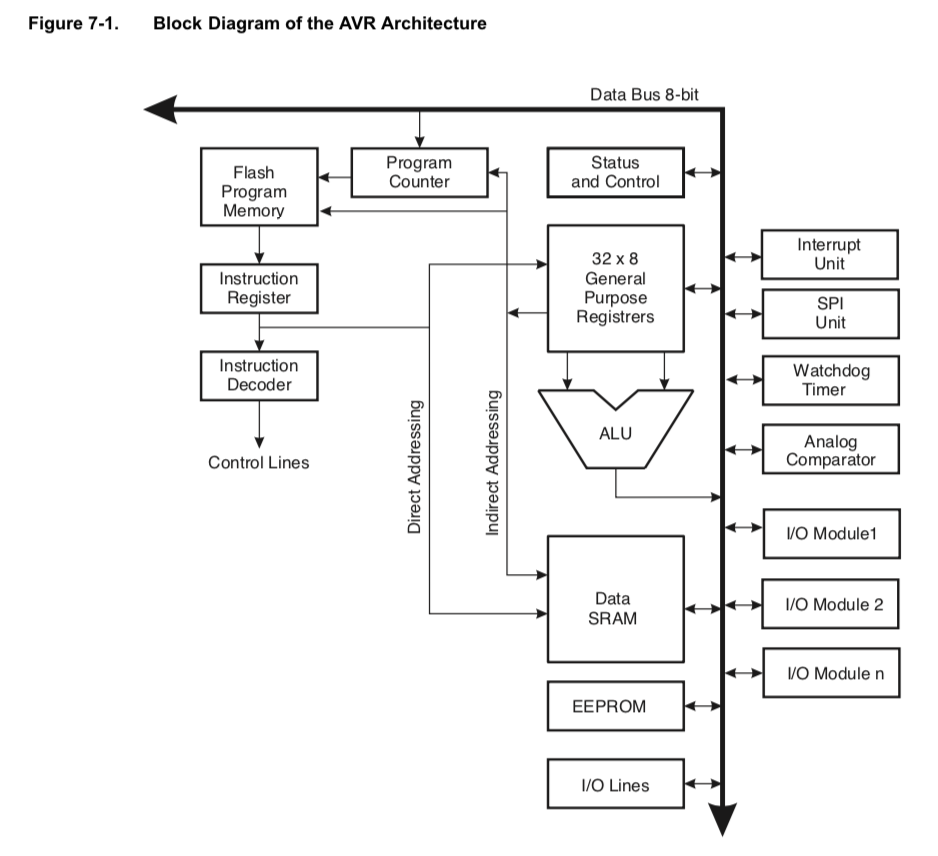
The Arduino UNO uses an Microchip/Atmel ATmega328P. Figure 7-1 from the datasheet shows the ‘Harvard’ architecture with separate program and data memory.

Micro-size hobby servo, a feedback-controlled device with integral driver.
More lecture code samples
The next examples use a micro hobby servo attached directly to the Arduino; that’s about the largest actuator we can safely run off USB power. The samples use pin D9 but any should work. See also Servo library reference.
1 2 3 4 5 6 7 8 9 10 11 12 13 14 15 16 17 18 | // demo use of a library, hobby servo output
#include <Servo.h>
Servo your_chosen_servo_name;
void setup()
{
your_chosen_servo_name.attach(9);
}
void loop()
{
your_chosen_servo_name.write(45);
delay(500);
your_chosen_servo_name.write(135);
delay(500);
}
|
1 2 3 4 5 6 7 8 9 10 11 12 13 14 15 16 17 18 19 20 | // demo use of a lookup table
#include <Servo.h>
const int SERVO_PIN = 9;
Servo svo;
void setup(void)
{
svo.attach(SERVO_PIN);
}
const int angles[12] = { 45, 0, 135, 0, 90, 0, 90, 45, 135, 90, 180, 0 };
void loop(void)
{
for (int idx = 0; idx < 12; idx = idx + 1) {
svo.write(angles[idx]);
delay(500);
}
}
|
1 2 3 4 5 6 7 8 9 10 11 12 13 14 15 16 17 18 19 20 21 22 23 24 25 26 27 28 29 30 31 32 33 34 35 36 37 38 39 40 41 42 43 44 45 46 47 | // demo use of a differential equation generator function
#include <Servo.h>
const int SERVO_PIN = 9;
Servo svo;
// ================================================================
// Simple Harmonic Motion oscillator, e.g. unit-mass on spring with damping.
const float k = 4*M_PI*M_PI; // 1 Hz; freq = (1/2*pi) * sqrt(k/m); k = (freq*2*pi)^2
const float b = 1.0; // damping
const float q_d = 90.0; // neutral spring position
const float dt = 0.01; // integration time step
float q = 0.0; // initial position
float qd = 0.0; // initial velocity
// ================================================================
void setup(void)
{
Serial.begin(115200);
svo.attach(SERVO_PIN);
}
// ================================================================
void loop()
{
// calculate the derivatives
float qdd = k * (q_d - q) - b * qd;
// integrate one time step
q += qd * dt;
qd += qdd * dt;
// update the servo
svo.write(q);
// logic to reset the oscillator after a cycle has completed
if (fabs(qd) < 0.1 && fabs(q_d - q) < 0.1) q = 0.0;
// print the output for plotting
Serial.println(q);
// delay to control timing
delay((int)(1000*dt));
}
|