Abstract
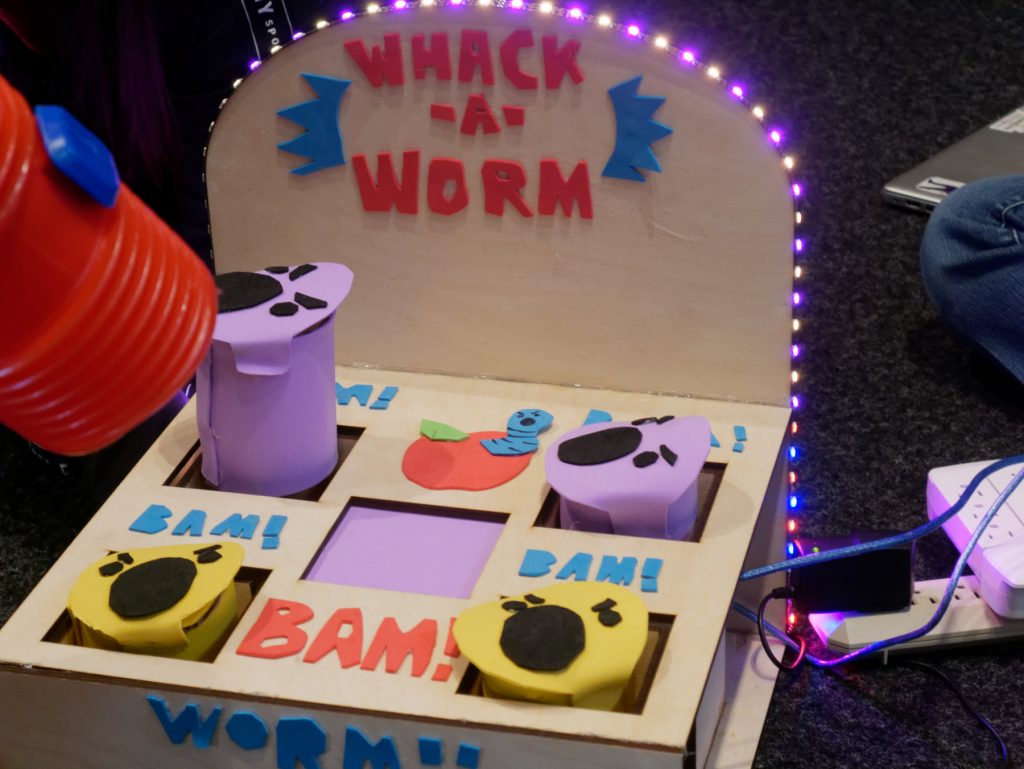
For our final project, we decided to make a whack-a-mole game, called Whack-a-Worm. The goal is to have children hit worms with a plastic hammer that pop up from a platform and have the worms go back down, ready to come back up when called by the code. We wanted to make it engaging and attractive to the kids so they stay for a long time. We also needed the structure and mechanisms to be robust so they can endure heavy forces from the hammer. Overall, the end result was a success. The children at the museum had fun with the game, and the mechanisms held up to the end with some intervention. However we had to leave out some elements in the interest of time.
Objectives
Our goal was to create a fun whack-a-mole game. To do so, we needed to answer some conceptual and some technical questions. Conceptual questions we needed to figure out included determining what elements of whack-a-mole made it a fun game, what elements to keep and emphasize and what to change. We also needed to find what learnings, ideas, and successes from previous projects that we could incorporate into this project to make it appealing to young children. In terms of technical questions, we needed to make sure the machine wouldn’t break when hit and make sure we can complete it in a limited time. In the beginning, the features we thought were in the scope of this project was five worms, lights, and a scoreboard. However, as the project went on, we realized that not all of our goals were attainable due to time constraint, so we eventually decided to do four worms and lights.
Implementation
The most important design choice was using spring wires to help alleviate the force felt by the servo. The servo goes underneath the worm, pushing it up and letting it come down. The primary appeal of this game was the feeling of hitting something and having it react to the action. So, we focused on making the up and down motion of the worms robust and reactive. We did this by attaching spring wires to the servo horns so that when the children hit the worms, the spring wire will bend, taking most of the force instead of the servo itself.
Another design choice was using switches to sense when the worms are hit. The switches communicate with the servos, letting them know to come down when hit. There are four switches and four servos, one of each for each worm. We put the switch in between a piece of cardboard and the top layer of foam of the worm. This way, they are hidden from view, and an angry face can be drawn on the worm to make them more fun to hit. The switches and servos connected to one shield board attached to an Arduino.
Third, we decorated our project with lights and colorful foam cutouts to make it attractive. The lights were neopixel strips programmed in different color patterns that change quickly, and we put them on the outer edge of the back of our project. The pixels were attached to another shield board and an Arduino, since they might take too much power if we attached them to the first Arduino that was already driving four large servos.
Outcome
Our project was successful in being a fun experience for kids at the Children’s Museum. We found that the colors and lights were eye-catching, and children intuitively understood what they were supposed to do when facing the game. The project also mostly stood up to the childrens’ hitting. The key components such as the switches and the servos did not break, and we had backups for the spring wires that ended up bending due to the immense amount of force that was put on them by the children whacking the worms as hard as they could.
The main question about the success of our project lies in the childrens’ responses. There were three main types of responses that happened pretty equally. The first one was reacting to the game “correctly”. These children waited for a worm to go up and hit it down as fast as they can. They seemed to be focused on being fast. The second type was rhythmic playing. This group hit the worms that go up, but they seem to be more absorbed in the rhythm of completing a task than trying for speed. Lastly, there was violent playing, which was paying little or no attention to which worms were actually going up and only focused on hitting the worms as fast or hard as possible.
It seemed that no matter how a child played, they still had fun and were engaged with the game. This makes us think of our project as a success, even though it was less of an arcade-style game and more of a toy. During critique on Wednesday, we heard several good ideas about how to either gamify the project or run with the response we are currently getting. However, our brainstorming for future work will focus on how to gamify the project and incentivising precision and skill.
Future Work
We believe we need to include incentives to use skill in this game. One way to do so is to implement a scorekeeping system, which could decrease the amount of violent playing we saw. First, it would de-incentivise random hitting. It would also add more challenge and therefore more replayability with practice. One negative aspect of a scorekeeping system is that it could make the project less accessible for young kids. However, the scorekeeping would also add a new dimension of the game for older children, while not detracting from the experience for younger children if they ignore or do not see it.
Another element we could add is more worms and different patterns for the worms to add extra challenge. More worms could vary the kinds of movements the players make while playing, and the patterns can make the game more rewarding for those who practice more and pick up on the patterns.
Contribution
Katherine drew and laser cut parts, did most of the soldering and wiring, and designed the spring system. Xiang did the coding, decorating, and documentation. Both designed and assembled the project.
Supporting Material
#include <Servo.h>
Servo servo1;
Servo servo2;
Servo servo3;
Servo servo4;
// up down angles
int upPos = 130;
int downPos = 200;
// all switches + lists of switches and states
const int switch1= A2;
int switchState1 = 0;
bool isUp1 = false;
const int switch2= A3;
int switchState2 = 0;
bool isUp2 = false;
const int switch3= A4;
int switchState3 = 0;
bool isUp3 = false;
const int switch4= A5;
int switchState4 = 0;
bool isUp4 = false;
int listOfSwitches[4] = {switch1, switch2, switch3, switch4};
int listOfStates[4] = {switchState1, switchState2, switchState3, switchState4};
bool listOfIsUps[4] = {isUp1, isUp2, isUp3, isUp4};
Servo listofServos[4] = {servo1, servo2, servo3, servo4};
int count = 0;
void setup() {
Serial.begin(9600);
servo1.attach(8);
servo2.attach(7);
servo3.attach(4);
servo4.attach(2);
pinMode(switch1, INPUT);
pinMode(switch2, INPUT);
pinMode(switch3, INPUT);
pinMode(switch4, INPUT);
}
void checkHit(void)
{
switchState1 = digitalRead(switch1);
switchState2 = digitalRead(switch2);
switchState3 = digitalRead(switch3);
switchState4 = digitalRead(switch4);
Serial.println(switchState1);
Serial.println(switchState1);
Serial.println(switchState2);
Serial.println(switchState3);
Serial.println(switchState4);
if (switchState1 == 1)
{
Serial.println("switch 1 hit");
servo1.write(downPos);
listOfIsUps[0] = false;
return;
}
if (switchState2 == 1)
{
Serial.println("switch 2 hit");
servo2.write(downPos);
listOfIsUps[1] = false;
return;
}
if (switchState3 == 1)
{
Serial.println("switch 3 hit");
servo3.write(downPos);
listOfIsUps[2] = false;
return;
}
if (switchState4 == 1)
{
Serial.println("switch 4 hit");
servo4.write(downPos);
listOfIsUps[3] = false;
return;
}
}
void raiseMole(void)
{
int randomMole = random(0, 4);
Serial.println("random mole is");
Serial.println(randomMole);
if (listOfIsUps[randomMole] == true) //if this random mole is already up
{
return;
}
//int switchState = listOfStates[randomMole]
//int activeSwitch = listOfSwitches[randomMole]
// raise this new mole
Servo randomServo = listofServos[randomMole];
randomServo.write(upPos);
listOfIsUps[randomMole] = true;
}
void loop() {
// every 2s
count = count + 1;
if (count == 30){
count = 0;
raiseMole();
}
checkHit();
}
// neopixel code reff'd from https://create.arduino.cc/projecthub/glowascii/neopixel-leds-arduino-basics-126d1a
#include <Adafruit_NeoPixel.h>
#ifdef __AVR__
#include <avr/power.h>
#endif
#define PIN 13
#define NUMPIXELS 60
Adafruit_NeoPixel lights = Adafruit_NeoPixel(NUMPIXELS, PIN, NEO_GRB + NEO_KHZ800);
int delayval = 50;
void setup() {
// put your setup code here, to run once:
lights.begin();
}
void turnoff(){
for(int i=0;i<NUMPIXELS;i++){
lights.clear();
delay(delayval); // Delay for a period of time (in milliseconds).
}
}
void redblue(){
for(int i=0;i<NUMPIXELS;i++){
// pixels.Color takes RGB values, from 0,0,0 up to 255,255,255
if (i%2 == 0) {
lights.setPixelColor(i, lights.Color(0,0,150)); // blue
}
else {
lights.setPixelColor(i, lights.Color(150,0,0)); // red
}
lights.show(); // This sends the updated pixel color to the hardware.
delay(delayval); // Delay for a period of time (in milliseconds).
}
}
void purpleyellow(){
for(int i=0;i<NUMPIXELS;i++){
// pixels.Color takes RGB values, from 0,0,0 up to 255,255,255
if (i%2 == 0) {
lights.setPixelColor(i, lights.Color(150,0,150)); // blue
}
else {
lights.setPixelColor(i, lights.Color(150,150,0)); // ylw
}
lights.show(); // This sends the updated pixel color to the hardware.
delay(delayval); // Delay for a period of time (in milliseconds).
}
}
}
void loop() {
// put your main code here, to run repeatedly:
//rainbow();
purpleyellow();
redblue();
}
Leave a Reply
You must be logged in to post a comment.