Abstract
For our project, we made a tilting spiral board, in which children could press buttons to tilt the board in different directions and attempt to get marbles in the center of a spiral on the board. We wanted kids to be able to explore the contraption and gradually figure out how it works without verbal facilitation. We believed that this exploration would invoke children’s sense of creativity and innovation. On demo day, it was clear that, despite technical difficulties, children engaged well with the contraption. They quickly learned what each button represented, and how to tilt the board to get the marbles in the middle. In fact, some children were able to compete with each other using the contraption, gamifying the board even more.
Objectives
One of our main goals was to make a game which grasps the children’s attention and excites them. Other important objectives included making the entire project aesthetically pleasing, as well as making the tilts smooth and controllable. Furthermore, we wanted to implement the project in such a way that all the wires and components were integrated inside. This would make our Tilting Spiral much more approachable. The important features we focused on were the spiral, the pivot on which the board tilted, the tilting mechanism incorporating servo motors and lastly, the interface for the children.
Implementation
The big components of the project include the tilting box, the lid, the servos and the pivot. Each of these components were made out of smaller subcomponents, outlined in the paragraphs below.
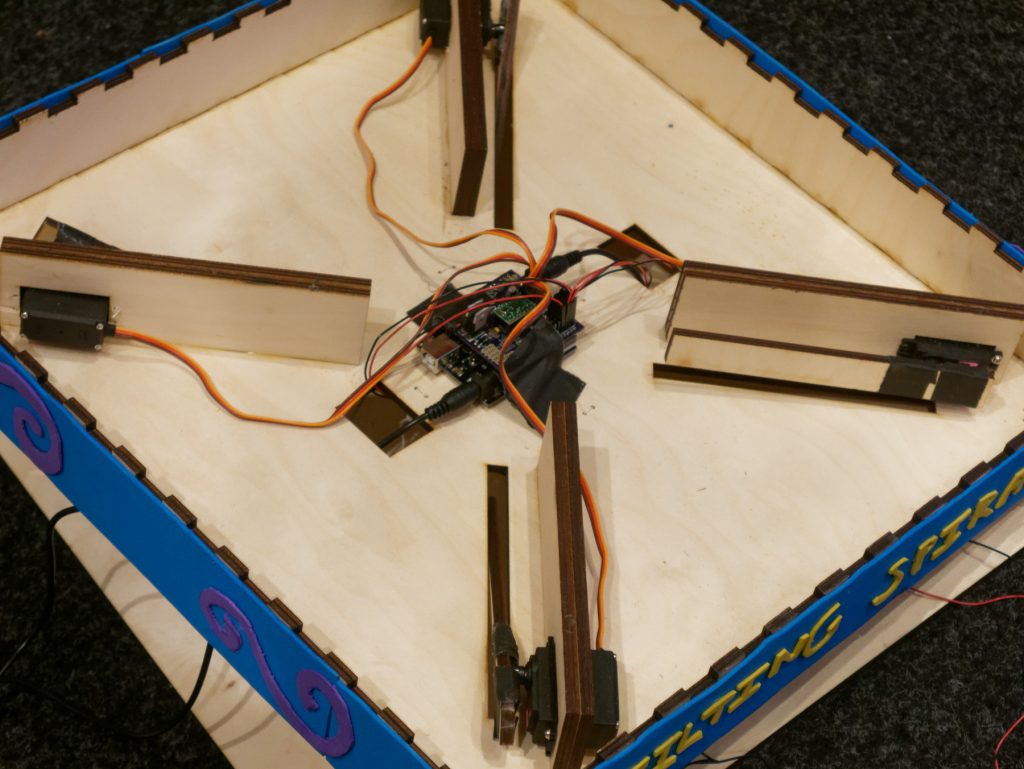
For the pivot, we made a hole on the base of the tilting box which rested on a big metal pinball. The box was free to tilt around this ball. The ball in turn was attached to a box stuck to the bottom stationary layer of wood. Strings were tied from each corner of the stationary base to the corresponding corner of the tilting box to minimize rotational movement and emphasize the tilting movement.
The tilting box incorporated four rectangles with servos screwed to them. These four rectangles were diagonally spread out from the center to each corner. The servo horns are in turn attached to long levers which come out through slits in the base of the box underneath them. These levers come out and push the stationary base to tilt the box. The arduino with shield is placed around the center where all the servos, buttons and power cords are connected.
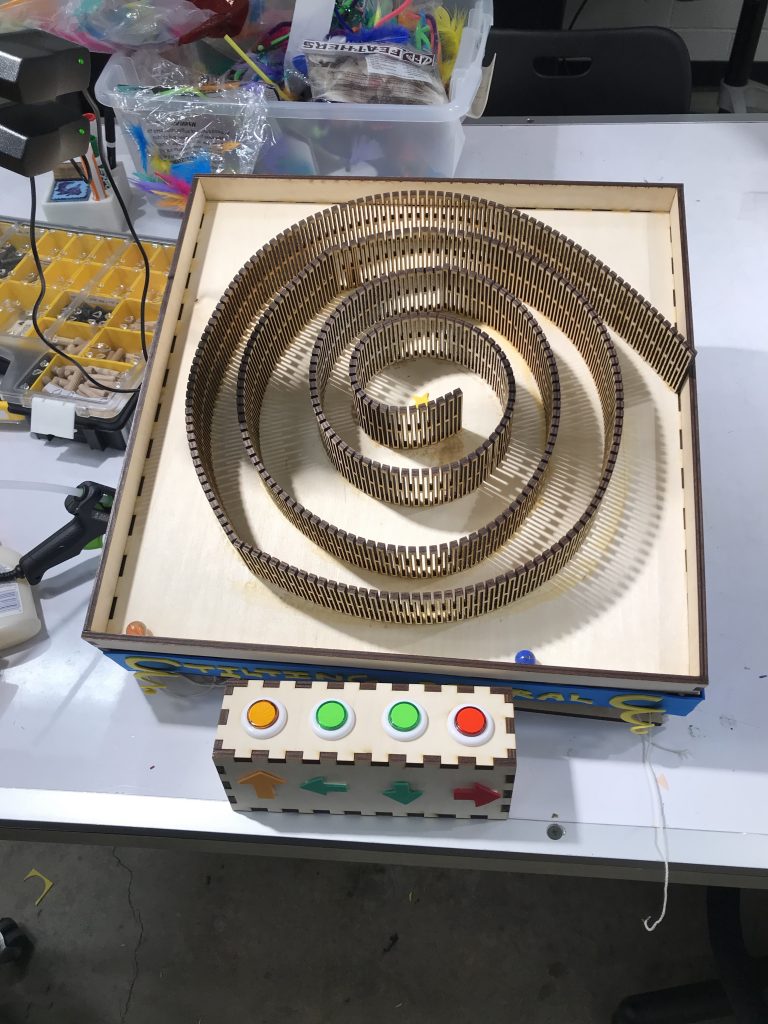
The interface included a simple set of four buttons for tilting in four directions. We realized from our first prototype that the photo-sensors were not attractive and quite complicated for the kids. Sticking to simple buttons were clearly a superior choice in terms of aesthetic and understanding. Furthermore, the order they were placed was simple and the exact pattern the kids needed to follow to win the game. This was done as the strategy to the game seemed a little hard for the kids in our first prototype run. Pressing a certain button causes two of the diagonal levers to come out and push down, resulting in the board tilting up from that side. Two servos contributing to lift the board up helped us to not overload the servos. The code used to implement this was straightforward. We received inputs from the arcade buttons. When a certain button was pressed, we would activate the corresponding two servos. We made initialized the servos at 0 degrees, and then experimented with different angles to find the right amount needed to make the board tilt.
Lastly, the lid is what implemented the game with the underlying mechanisms described above. The spiral was initially made from cardboard for the first prototype. Realizing that it did not look pretty or strong, we ended up laser cutting wood intricately to allow for bending. This was inspired by a well cut bent wooden piece in the reusable scrap. This spiral proved to be beautiful and rigid. This was stuck on top of the lid along with walls around it. Two marbles were then put outside the spiral but inside the walls. The goal of the game was to tilt the board correctly using the buttons to get the marbles to the center of the spiral which had a star.
Most of the project was assembled using wood glue and a bit of hot glue. The implications of this are discussed in the outcomes. However, we made sure to screw in the servos, as these were the components taking the load of the structure and needed to be fastened properly. As for the aesthetics, we used foam paper with spiral designs to decorate the tilting box. We also cut the name of our project ‘Tilting Spiral’ using foam paper and stuck it on the front wall of the box. Moreover, we made sure the arcade buttons were labelled properly and colorfully with arrows signifying the directions of tilt each button corresponded to.
Outcomes
Starting with the failures, on the final day of the demo, two of the levers got detached from the servo horns. This suggested that the adhesives we used for this purpose weren’t strong enough. Fortunately, there was a glue gun available for a temporary fix. One of the levers started working properly after that. However, one lever not working meant that two the directions could not be properly lifted. Therefore, with some manual facilitation, the Tilting Spiral started working like it should have. Despite the directions being labelled near the buttons, they were often overlooked. The children tried to figure out the buttons by experimenting instead of looking at the directions. Furthermore, the movement for tilting was quite rough and happened in jerks instead of being smooth like we intended. This is also be because of the unnecessarily big angle of tilt. To make marbles roll on the wood, the angle of tilt needed was much less than what we implemented resulting in rough motion of the box and the marbles.
Moving on to the successes, the purpose of the game was properly achieved. The children were able to play the game and enjoy it while it worked properly. As mentioned in the abstract, it got competitive as well. The children were trying to see who can get the marbles to the center the fastest. The children who had figured out the simple pattern were able to do so. Moreover, the designs using foam paper and the wood cut spiral certainly attracted a lot of children as well as adults, even while we tried to fix the detached levers. Even though the tilting mechanism was rough, it worked pretty well and the motion did seem appealing to the kids. Overall, the game was a certain success.
Future Work
In the future, we would like to decrease the height of the box that the ball bearing is glued on, to allow for less tilt and more smooth movement. Adding limit stoppers to limit the tilt and load on servos would also be a good idea. In addition, instead of a spiral, we would like to have a maze of the board, to make children try to problem solve a complex situation rather than pressing the same pattern of buttons to get inside the spiral. Moreover, instead of having the buttons all together, we would want to have the buttons all separated, one on each side, to make for a more collaborative and easy-to-understand experience. Furthermore, to fix the levers which were constantly getting detached from the servo horns, we would like to screw them to each other instead of using glue and tape. This would ensure secure fastening and eliminate the possibility of it coming off like it did in the demo.
Contributions
Tushhar completed most of the CAD designs as well as the soldering. Omisa worked on connecting the parts together, whether that be gluing or wiring, and crimping the wires. Both Tushhar and Omisa worked on the rest of the project together.
Videos
Photos
Required Supporting Material
CAD Files: Most of the structure included boxes made from makercase.com. The levers and walls were simple rectangles. The CAD file for the spiral is attached below.
Code:
#include <Servo.h>
const int SERVO1_PIN = 8;
const int SERVO2_PIN = 7;
const int SERVO3_PIN = 4;
const int SERVO4_PIN = 2;
const int SENSOR1_PIN = A2;
const int SENSOR2_PIN = A3;
const int SENSOR3_PIN = A4;
const int SENSOR4_PIN = A5;
Servo s1;
Servo s2;
Servo s3;
Servo s4;
int sensorValue1;
int sensorValue2;
int sensorValue3;
int sensorValue4;
void setup() {
Serial.begin(9600);
pinMode(A2,INPUT);
pinMode(A3,INPUT);
pinMode(A4,INPUT);
pinMode(A5,INPUT);
s1.attach(SERVO1_PIN);
s2.attach(SERVO2_PIN);
s3.attach(SERVO3_PIN);
s4.attach(SERVO4_PIN);
s1.write(10);
s2.write(30);
s3.write(30);
s4.write(30);
delay(500);
}
void loop() {
// put your main code here, to run repeatedly:
//button2 goes to servo1 and servo2
sensorValue1 = digitalRead(SENSOR1_PIN);
sensorValue2 = digitalRead(SENSOR2_PIN);
sensorValue3 = digitalRead(SENSOR3_PIN);
sensorValue4 = digitalRead(SENSOR4_PIN);
Serial.print(sensorValue1);
Serial.print(sensorValue2);
Serial.print(sensorValue3);
Serial.print(sensorValue4);
Serial.println();
if (sensorValue1 == 0)
{
s4.write(75);
s1.write(75);
delay(100);
}
else if (sensorValue2 == 0)
{
s1.write(75);
s2.write(75);
delay(100);
}
else if (sensorValue3 == 0)
{
s2.write(75);
s3.write(75);
delay(100);
}
else if (sensorValue4 == 0)
{
s3.write(75);
s4.write(60);
delay(100);
}
else
{
s4.write(30);
s1.write(10);
s2.write(30);
s3.write(30);
delay(100);
}
}
Leave a Reply
You must be logged in to post a comment.