Capacitive μPiano: Cultivating an ear for music

Problem: Today, many children are taking music lessons. They learn to read notes and play them on different instruments. But is it enough to learn notes and scores by heart in order to cultivate an ear for music? Or to recognise notes both auditory and visually to compose them into pleasant melodies that make sense?

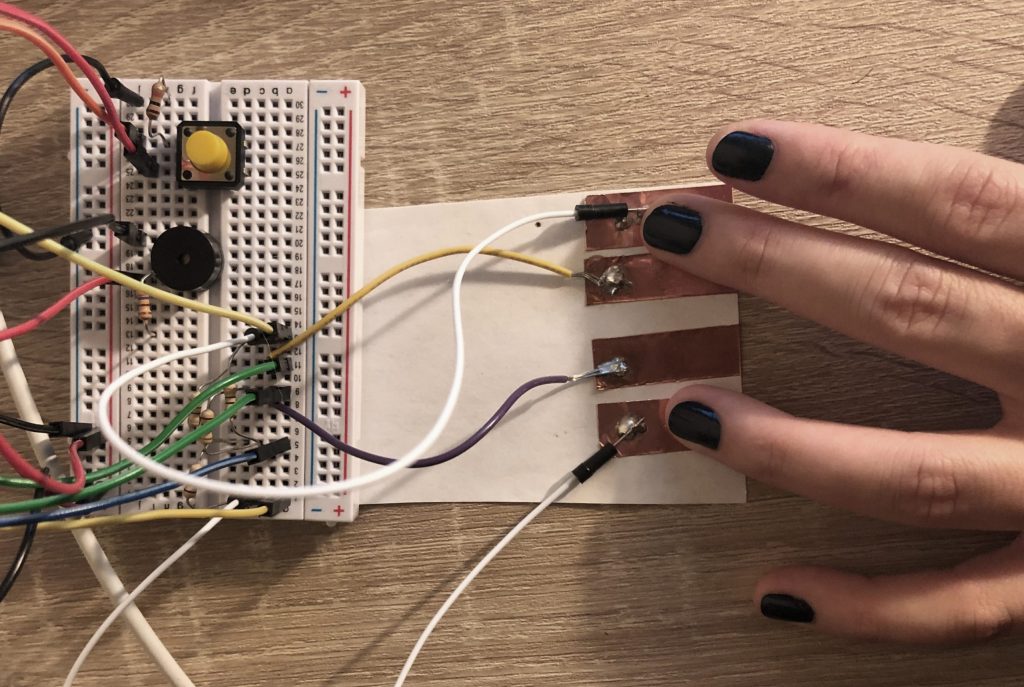
Solution: Capacitive μPiano helps beginners to do exactly that. You can repeat your favourite melody as many times you want, until you finally perceive how to reproduce it. Each capacitive sensor represents a different note. The melody’s reading becomes an auditory experience for the user, who previously used visual scores. This process helps new practitioners to train an ear for music from the early beginning.

Demo:

https://www.youtube.com/watch?v=L1W8SxbK3Og

Code:

# include <CapacitiveSensor.h>
#include <pitches.h>

// Capacitive Sensors
CapacitiveSensor cs1 = CapacitiveSensor(6, 9);
bool cs1Touched = true; long cs1Val;
CapacitiveSensor cs2 = CapacitiveSensor(6, 7);
bool cs2Touched = true; long cs2Val;
CapacitiveSensor cs3 = CapacitiveSensor(6, 5);
bool cs3Touched = true; long cs3Val;
CapacitiveSensor cs4 = CapacitiveSensor(6, 8);
bool cs4Touched = true; long cs4Val;

// Speaker + Music
#define speakerPin 4
int melody1[] = {NOTE_E4, NOTE_G3, NOTE_G3, NOTE_C4, NOTE_G3, 0, NOTE_B3, NOTE_C4};
int noteDurations[] = {4, 8, 8, 4, 4, 4, 4, 4};

// Switch
#define switchPin 2

typedef struct switchTracker {
  int lastReading;       // last raw value read
  long lastChangeTime;   // last time the raw value changed
  byte pin;              // the pin this is tracking changes on
  byte switchState;      // debounced state of the switch
} switchTrack;

void initSwitchTrack(struct switchTracker &sw, int swPin) {
  pinMode(swPin, INPUT);
  sw.lastReading = digitalRead(swPin);
  sw.lastChangeTime = millis();
  sw.pin = swPin;
  sw.switchState = sw.lastReading;
}

switchTrack switchInput;
bool practiseTime = false;

void setup() {
  Serial.begin(9600);
  pinMode(speakerPin, OUTPUT);
  initSwitchTrack(switchInput, switchPin);
  attachInterrupt(digitalPinToInterrupt(switchPin), changeMode, RISING);
}

void loop() {
  Serial.println(practiseTime);

  if (practiseTime) {
    practise();
  } else {
    playMelody();
    delay(3000);
  }

}

void changeMode() {
  practiseTime = !practiseTime;
}

void practise() {
  capacitiveSensor1();
  capacitiveSensor2();
  capacitiveSensor3();
  capacitiveSensor4();

}
void capacitiveSensor1() {

  cs1Val = cs1.capacitiveSensor(80); // resolution
  if (cs1Touched) {
    if (cs1Val > 1000) {
      Serial.println(cs1Val);
      cs1Touched = false;
      tone(speakerPin, NOTE_E4);
    }
  }

  if (!cs1Touched) {
    if (cs1Val < 100) {
      Serial.println(cs1Val);
      noTone(speakerPin);
      cs1Touched = true;
    }
  }
}

void capacitiveSensor2() {

  cs2Val = cs2.capacitiveSensor(80); // resolution
  if (cs2Touched) {
    if (cs2Val > 1000) {
      Serial.println(cs2Val);
      cs2Touched = false;
      tone(speakerPin, NOTE_G3);
    }
  }

  if (!cs2Touched) {
    if (cs2Val < 100) {
      Serial.println(cs2Val);
      noTone(speakerPin);
      cs2Touched = true;
    }
  }
}

void capacitiveSensor3() {

  cs3Val = cs3.capacitiveSensor(80); // resolution
  if (cs3Touched) {
    if (cs3Val > 1000) {
      Serial.println(cs3Val);
      cs3Touched = false;
      tone(speakerPin, NOTE_C4);
    }
  }

  if (!cs3Touched) {
    if (cs3Val < 100) {
      Serial.println(cs3Val);
      cs3Touched = true;
      noTone(speakerPin);
    }
  }
}

void capacitiveSensor4() {

  cs4Val = cs4.capacitiveSensor(80); // resolution
  if (cs4Touched) {
    if (cs4Val > 1000) {
      Serial.println(cs4Val);
      cs4Touched = false;
      tone(speakerPin, NOTE_B3);
    }
  }

  if (!cs4Touched) {
    if (cs4Val < 100) {
      Serial.println(cs4Val);
      noTone(speakerPin);
      cs4Touched = true;
    }
  }
}

void playMelody() {
  for (int thisNote = 0; thisNote < 8; thisNote++) {

    int noteDuration = 1000 / noteDurations[thisNote];

    tone(speakerPin, melody1[thisNote], noteDuration);

    // to distinguish the notes, set a minimum time between them.

    // the note's duration + 30% seems to work well:

    int pauseBetweenNotes = noteDuration * 1.30;

    delay(pauseBetweenNotes);

    // stop the tone playing:

    noTone(1);
  }
}

boolean switchChange(struct switchTracker & sw) {
  const long debounceTime = 100;
  // default to no change until we find out otherwise
  boolean result = false;
  int reading = digitalRead(sw.pin);

  if (reading != sw.lastReading) sw.lastChangeTime = millis();
  sw.lastReading = reading;
  // if time since the last change is longer than the required dwell
  if ((millis() - sw.lastChangeTime) > debounceTime) {
    result = (reading != sw.switchState);
    // in any case the value has been stable and so the reported state
    // should now match the current raw reading
    sw.switchState = reading;
  }
  return result;
}


Funky Music Maker

After watching the videos on changes and developments in music in class, I got to thinking about what would be a cool, funky way to make music with electronics. I decided that a fun experimental music making idea would combine the ability to change the type of sound quickly on a speaker (frequency) as well as add in the taps that could go with a beat based on your leg moving up and down. This being triggered by your leg would leave a hand open to change out what is being tapped by the solenoid and thus change the sound heard from it. As someone who knows nothing about music and notes, I chose for someone to just change the frequency so that there would be no barriers from someone trying it out. For this proof of concept, I chose to have the speaker turn off when the IR beam is broken and the solenoid moves as it overpowers the sound otherwise.

int solenoidPin = 9;
const int IRpin = 3;
int IRstate;
int potPin = A0;
int potVal;
int speakerPin = 13;
int frequency;

void setup()
{
  pinMode(solenoidPin, OUTPUT);
  pinMode(IRpin, INPUT);
  digitalWrite(IRpin, HIGH);
  pinMode(potPin, INPUT);
  pinMode(speakerPin, OUTPUT);
  Serial.begin(9600);
}

void loop()
{
  potVal = analogRead(potPin);
  frequency = map(potVal, 0, 1023, 1, 1000);
  IRstate = digitalRead(IRpin);
  Serial.println(IRstate);
  static int start = millis();
  digitalWrite(solenoidPin, !IRstate);
  if (IRstate == 1) {
    tone(speakerPin, frequency);
  }
  else { //broken
    noTone(speakerPin);
  }
}


Shadow Boxing Partner

Problem

I have just started practicing boxing a few weeks ago and every week we work on a new drill. During class I can work with a partner and get familiar with the hits and rhythm of the drill. After I am familiar with drill, I will have to react to the movement made by my partner and execute the drill accordingly. When I shadow-box in home and without a partner, however, there is no hint or reminder on the next hit as I try to get familiar with the drill again. In addition, shadow-boxing also lacks the reacting aspect of s?m.parring. Therefore, a device that acts as the shadow boxing partner is designed.

Solution

The design of the devices

The device is made up by six speakers that sticks to the wall. Each square in the diagram above represents a speaker. The diagram shows the default arrangement of the speakers. The number written near the speakers  represents the number for the hit the speakers are responsible for. For example, when a jab needs to be thrown, the speaker on the top left-corner will play the sound effect because the number of jab is 1. The middle speakers are responsible to upper cut to chin and body shots to the middle. The device will connect to phone, and the sound effect player by the speakers depending on what drill is being practiced. The one of the navy drills, for example, includes a left hook (3), a straight punch (2), and then a left hook (3). The speaker that is responsible for left hook will play the sound effect for left hook, and the speaker responsible for straight punch will play the sound effect for straight punch. The sound effects of each type of punches are recorded from actual punches. They might not be that distinct comparing to each other but the position of the speaker already gives a big hint on the next hit and the user should at least know what hits are included in the drill. When the user gets comfortable with the drill, the device can be switched to difficult mode. Only the first punch or the “hit” from the partner is given and the user has to react to it. The user can also change the drill through the smart phone.

Proof of Logic

The demo of the device

Because of the lack of materials, I cannot make the full device with 6 speakers. Instead, I will use speaker, solenoid, and vibration motor to stimulate the sound effects for hook, straight punch/ jab, and body shoots. The first button on the right hand side is to switch between drills and the second button is to switch between normal mode and difficult mode.

Code:

//libary
#include "pitches.h"


//Defining the pins
#define solenoide 12
#define motor 13
#define speaker 7

#define drill_pin 3
#define hint_pin 2

//Global varibales
//For interrupt
const bool isInterrupt = true;
int drill;
int drill_number = 1;
bool hint_status = true;
bool solenoid = true;
int delay_in_between = 350;

//Functions
void move_solenoid() {
  if (solenoid == true) {
    digitalWrite(solenoide, HIGH);
    solenoid = false;
  }

  else {
    digitalWrite(solenoide, LOW);
    solenoid = true;
  }
}

void vibrate_motor() {
  digitalWrite(motor, HIGH);
  delay(300);
  digitalWrite(motor, LOW);
}

void DrillSwitchPressed() {
  if (digitalRead(drill_pin) == LOW) {
    drill == drill_number ? drill = 0 : drill ++;
  }
}


void HintSwitchPressed() {
  if (digitalRead(hint_pin) == LOW) {
    hint_status = !hint_status;
  }
}

//Functions for the drill
void Navy_drill(int random_numb) {
  if (hint_status == true) {
    if (random_numb == 1) {
      //NOTE_A4 is the note for hook
      tone(speaker, NOTE_A4,200);
      delay(delay_in_between);
      move_solenoid();
      delay(delay_in_between);
      tone(speaker, NOTE_A4,200);
     
      
    }

    if (random_numb == 2) {
      move_solenoid();
      delay(delay_in_between);
      tone(speaker, NOTE_A4,200);
      delay(delay_in_between);
      move_solenoid();
    }

    if (random_numb == 3) {
      //Upper cut
      vibrate_motor();
      delay(delay_in_between);
      move_solenoid();
      delay(delay_in_between);
      //NOTE_A4 is the note for hook
      tone(speaker, NOTE_A4,200);
      
    }

    if (random_numb == 4) {
      //Upper cut
      //tone(speaker, NOTE_C4);
      //delay(200);
      //tone(speaker, NOTE_D4);
      //delay(100);
      //tone(speaker, NOTE_E4, 100);
      vibrate_motor();
      delay(delay_in_between);
      //hook
      tone(speaker, NOTE_A4, 200);
      delay(delay_in_between);
      move_solenoid();
    }
  }

  else {
    if (random_numb == 1) {
      //NOTE_A4 is the note for hook
      tone(speaker, NOTE_A4, 200);
      
    }

    if (random_numb == 2) {
      //NOTE_A4 is the note for hook
      tone(speaker, NOTE_A4, 200);
    }

    if (random_numb == 3) {
      //Body shot coming in
      vibrate_motor();
    }

    if (random_numb == 4) {
      //Body shot coming in
      vibrate_motor();
    }
  }   
}


void Dodge_drill(int random_numb) {
  if (hint_status == true) {
    if (random_numb == 1) {
      //NOTE_A4 is the note for hook
      tone(speaker, NOTE_A4,200);
      delay(delay_in_between);
      move_solenoid();
    }

    if (random_numb == 2) {
      tone(speaker, NOTE_A4,200);
      delay(delay_in_between);
      move_solenoid();
      
    }
  }

  else {
    delay(random(0,2000));
    if (random_numb == 1) {
      //NOTE_A4 is the note for hook
      tone(speaker, NOTE_A4, 200);
      
    }

    if (random_numb == 2) {
      //NOTE_A4 is the note for hook
      tone(speaker, NOTE_A4, 200);
    }
  }   
}
void setup() {
  // Setup the pin modes
  pinMode(solenoide, OUTPUT);
  pinMode(motor, OUTPUT);

  //When the buttons are pushed, digitalRead shows 0

  pinMode(drill_pin, INPUT_PULLUP);
  pinMode(hint_pin, INPUT_PULLUP);


  //Initiate the serial monitor
  Serial.begin(9600);


  // attach the interrupt pin to a method
  if (isInterrupt) {
    attachInterrupt (digitalPinToInterrupt(drill_pin), DrillSwitchPressed, FALLING);
    attachInterrupt (digitalPinToInterrupt(hint_pin), HintSwitchPressed, FALLING);
  }


  //vibrate_motor();
  //tone(speaker, NOTE_C4);
  //delay(200);
  //tone(speaker, NOTE_D4);
  //delay(100);
  //tone(speaker, NOTE_E4, 100);
}


void loop() {
  if (drill == 0) {
    //randomSeed(analogRead(A0));
    int random_numb = random(1,4);
    Navy_drill(random_numb);
    delay(3000);
  }

  if (drill == 1) {
    //randomSeed(analogRead(A0));
    int random_numb = random(1,2);
    Dodge_drill(random_numb);
    delay(4000);
  }
}


Surfing Paddling Metronome

I learned surfing for the first time this past weekend and paddling was one of the hardest part of it. Here are some of the common mistakes/mistakes that I made:

    1. Starts increasing paddling “faster”(in quotations because by faster, it does not mean moving your arms faster but paddle the water stronger with the same tempo so that the surfboard moves faster) too late
    2. Not paddling “fast” enough
    3. Arms are moved too fast and lost the tempo
    4. Stop paddling too early

So I thought what kind of device can offer some cues to beginners like me? Auditory cue is a great idea here because there is already a lot to look at and strength requirement does not really allow haptic cues.

Here is the device that uses an acceleration sensor as input, and a speaker as output. The device always make sounds with the same tempo like a metronome, but depending on how close the wave is(acceleration), the pitch of the sound it makes is different.

Users can listen to the sounds to decide when to paddle faster, how fast, and when to stop while maintaining the rhythm.

I couldn’t accurately simulate the change acceleration change, so for demoing purpose, I’m swinging the acceleration sensor back and forth, but you can still hear the different pitches when swinging at different speeds.

Singing toilet but make it less obvious

As Jet briefly mentioned in class, in some countries including Korea/Japan, the “singing toilets” can be commonly found. Even the toilet at my house not only plays music but also it has a speaker and a microphone that connects to the doorbell, so you can answer someone outside the door while you are using the toilet.

I wondered, why does it play music? why not just a sound? Is it also a way to show the luxury of listening to classical music even while you do your business? I asked around many people, but I couldn’t really get an answer. Therefore, I called the interior consultant who installed this at my home.

He says it is more of a cultural thing. Not only the calm music lets you concentrate better on your business, but basically, for the toilets that are located in a shared area such as a public bathroom/my parent’s room, it is considered “rude” to let others hear the sound that your stuff makes. Therefore, there’s music to stealth the sound so that you don’t feel embarrassed. It is not always music, too; for example, the Incheon airport toilets have buttons next to them that you press when you use the toilet, and it makes a flush sound — no, it doesn’t flush the toilet, it only makes a flushing sound (you flush your toilet after pressing the flush sound button.

Therefore, I wondered again. While I use the microphone in the bathroom, classical music doesn’t stop. However, everyone in this building has the same toilet installed, so I was always afraid that the delivery guys can hear the music while I talk. The fact that the music doesn’t stop while talking on the microphone is defeating the whole purpose of that music.

So I designed a singing toilet module that fulfills all of the purposes.

https://drive.google.com/file/d/1pMVpjTm3tO2JzSIfYPkowj36UpNh8F3g/view?usp=sharing

It plays the intro of “Spring” by Vivaldi. (this is where my musical talent came in handy) The full jingle can be played here:

https://drive.google.com/file/d/1cWwLkompyNM6D4IXzH8UUfemVE9Hp2lo/view?usp=sharing

From the left: speaker, photocell resistor, button, and a blue LED
While the photocell is blocked (the equivalent of someone sitting on the toilet) the music plays and the blue LED comes on.
Someone presses the doorbell at the door! The music pauses, and the LED turns off as well to alert the person that it is paused.

+

What’s up with the LED? Why is it necessary?

  • According to the interior design consultant, he says that so that the “visual” bothers the person less.

Assignment 8 – Sound is spatial

Sound to me is spatial and that because it triggers my spatial modalities of perception such as vision, touch and proprioception. Through the latter ones, a person perceives space and its properties such as shapes, relations, textures, materiality, as well as his/her body’s relation to space and particular objects. Therefore, when I hear a sound, I have the tendency to visualise, spatialise and make kinaesthetic projections onto my body.

For example, when hearing the workers building on the construction site, I particularly focus on the sounds being produced using their tools. Those make me visualise materials being transformed; I try to understand the nature of the material itself, how rigid that is, what kind of texture it may have and the kinds of visual transformations that take place when it collides with different tools.

Or when hearing the echo of a person walking or talking in a space, I close my eyes and visualise how spacious and tall this room is. Or when raining, I render spatial the rain’s strength or the environment’s humidity degree. Finally, because of my dancing experience and the effect of neural mirroring on me, when hearing to music such as the sleeping beauty, I visualise famous dancing patterns and sometimes I perceive the difficulty to execute them.

Assignment 9: Make sounds with an Arduino

For this assignment, using an Arduino, generate sound-over-time and sound-by-interrupt that conveys meaning, feeling, or specific content. You can generate sound with a speaker or a kinetic device (ex: door chime) or some other novel invention.

This is a good time to use push buttons or other inputs to trigger sound and another input to define the type of sound.

This is also where interrupts are very useful.

My example in class was how my phone *doesn’t* use interrupts well. If I am listening to music and someone rings my doorbell at home, my phone continues to play music *and* the doorbell notification app at the same time.  If I need to talk to the person ringing the bell, their voice is mixed in 50/50 with the music I’m listening too.

What the app should do is stop the music, play the notification, then give me the opportunity to talk to the person at the door, then continue playing music.

Use of Sound in Physical Interaction

Akousmaflore: The Sound of Plant

The interaction installation is composed of plants that react to gentle contact by producing a computer-synthesized sound. The texture and volume of the sound depends on movements and gestures made by the person.

Taiko no  Tatsujin

This is a arcade/video game that based on music and rhyme. Players can recognize if they are doing a good job by listening to the rhyme of the music, the rhyme made by the drum, and feedback lines like “50 strikes”.

Augmented Drilling Machine

The device makes pulsing sound of different pitches if the drill is deviated from the ideal angle to different angles.

I’m your fan

In counter-clockwise order, a fan, accelerometer, gas detector, and a PIR sensor.

To an artist, one’s respiratory health is one of the priorities. Spray paint, paint fume, melting plastic… even with a mask on, the fume still enters my lungs. Right now, being able to work on my projects from home, I had to make a compromise with my parents and trade my ventilation with an at-home studio. The room has no windows other than a door. However, to have a fan in the room, the foam particles will fly everywhere and stick to my sculptures or get into my eyes, which is not an ideal situation. But just leaving a door open doesn’t do much to ventilation either.

Therefore, I came up with a fan that interacts with my presence, action, and the gas level.

Video demonstration:

https://drive.google.com/file/d/1VG5g9sS6BtFTEqqUuGJY6JN5LMpSzvyK/view?usp=sharing

If people had a hard time understanding since I was struggling to talk, film, move an accelerometer, and light a candle all at the same time, basically the fan works in this way:

Fan gets activated:

  • when it detects no movement in the room and the doorknob was pulled
  • when the toxic gas level (flamable gas) is too high in the room, no matter of my presence in the room.

Fan is off when:

  • when it detects a movement in the room with a low gas level

Now it is time to get real.


The first demonstration is activating the fan with no movement and the door knob.

So this is my dusty, non ventilated studio. Since I am moving in the room, the fan is off.

Currently, there is a movement detected in the PIR sensor, so the fan is off.

So I opened the door, AKA activated the accelerometer.

The fan turns on and ventilates the room.


Now it’s time to test the flamable gas detecting interaction.

Now I am in the room again, and moved infront of the PIR sensor. The fan is off.

I give the toxic gas detector (flamable gas detector) a whiff of my spray foam,

The fan turns on, even though there is movement detected in the room.


<Schematics>

<Code>

int GasPin = A0;
int PIR = 7;
int motorPin = 8;
int Ypin = A1;


int yVal;
int oldY;
int dif;

void setup()
{
pinMode(GasPin, INPUT);
pinMode(PIR, INPUT); 
pinMode(Ypin, INPUT);
pinMode(motorPin, OUTPUT);
Serial.begin(9600);
analogWrite(motorPin, 0);
}
void loop()
{
oldY= yVal;
yVal = analogRead(Ypin);
dif = abs(oldY - yVal);
// delay(250);
//Serial.println(dif);


if (digitalRead(PIR) == LOW && dif>5){ 

/*Serial.println(dif);
Serial.println("PIR OFF");
Serial.println(analogRead(GasPin));
Serial.println();
delay(1000);*/
analogWrite(motorPin, 255);
}
if(digitalRead(PIR) == HIGH){
/*Serial.println(dif);
Serial.println("PIR: ON");
Serial.println(analogRead(GasPin));
Serial.println();
delay(1000);*/
analogWrite(motorPin, 0);
//delay(4000);
}
if(analogRead(GasPin) > 330){
/*Serial.println(analogRead(GasPin));
Serial.println("PIR: ON");
delay(1000);*/
analogWrite(motorPin, 255);
//delay(4000);
}
}

<Reflection>

Hardships:

  • initially I had an LCD display, yet for some reason it was glitching not by itself, but also making the whole arduino glitch, and even my computer. The wiring was correct and everything, and that gave me a hardship of setting the range of gas level, because the serial monitor was already showing so many values from different sensors.
  • the both ground and vcc wire of my fan got detached. I didn’t have soldering equipments or anything so I took a knife and peeled some of the wire and used a piece of tape to hold them together.

For future:

  • Buy a bigger fan and actually use it.