setPixelColor
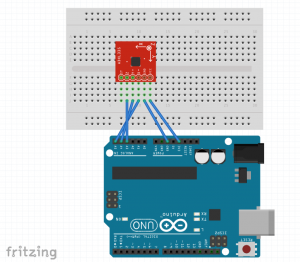
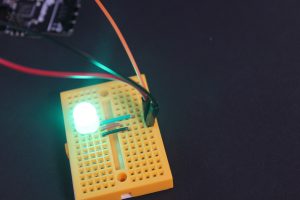
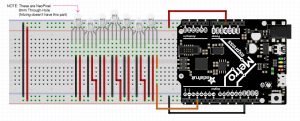
For this assignment, I wanted to further explore the serial protocol between p5.js and Arduino. Specifically, how to send more complex information from p5 (long strings) and read multiple values on the Arduino. I created a sketch that acts as a NeoPixel color picker where you can slide along and set the color, then click on the corresponding box to light that exact NeoPixel on the Arduino.
***This project will be updated shortly to include gyro sensor***
Arduino Code:
//--------NEOPIXEL SETUP --------
#include
#ifdef __AVR__
#include
#endif
static const int PIN = 3;
static const int NUMPIXELS = 7;
Adafruit_NeoPixel pixels = Adafruit_NeoPixel(NUMPIXELS, PIN, NEO_GRB + NEO_KHZ800);
static const int buttonPin = 4;
int buttonState = 1;
//-----STRING TEST-----
int pos1; // comma one
int pos2; // comma two
int pos3; // comma three
int r;
int g;
int b;
//-----INCOMING VALUES-----
String incomingString; // setting string from p5.js
//-----OUTGOING-------
String sendState;
//--------TIME--------
unsigned long lastSampleTime = 0;
unsigned long sampleInterval = 500; // in ms
void setup() {
// put your setup code here, to run once:
Serial.begin(115200);
pinMode(buttonPin, INPUT);
pixels.begin();
pixels.show();
}
void loop() {
unsigned long now = millis();
if (Serial.available() > 0) {
// "A,100,20,5" ADD COMMENTS
incomingString = Serial.readStringUntil('\n'); // takes the incoming string sent from p5 and puts into incomingString
pos1 = incomingString.indexOf(",");
pos2 = incomingString.indexOf(",", pos1 + 1);
pos3 = incomingString.indexOf(",", pos2 + 1);
String letter = incomingString.substring(0, pos1);
String red = incomingString.substring(pos2, pos1 + 1);
r = red.toInt();
String green = incomingString.substring(pos3, pos2 + 1);
g = green.toInt();
String blue = incomingString.substring(pos3 + 1);
b = blue.toInt();
if (letter == "A") { // LED POSITION 1
pON(0, g, r, b); // 1
} else if (letter == "B") { // LED POSITION 2
pON(1, g, r, b); // 2
} else if (letter == "C") { // LED POSITION 3
pON(2, g, r, b); // 3
} else if (letter == "D") { // LED POSITION 4
pON(3, g, r, b); // 4
} else if (letter == "E") { // LED POSITION 5
pON(4, g, r, b); // 5
} else if (letter == "F") { // LED POSITION 6
pON(5, g, r, b); // 6
} else if (letter == "G") { // LED POSITION 7
pON(6, g, r, b); // 7
}
}
}
void pOFF(int n) {
pixels.setPixelColor(n, pixels.Color(0, 0, 0));
pixels.show();
delay(2000);
// pixelOff = true;
}
void pON(int n, int g, int r, int b) {
pixels.setPixelColor(n, pixels.Color(g, r, b));
pixels.show();
// pixelOn = true;
}
p5 Code:
// color picker based on jasmine c. lee's sketch https://gist.github.com/jasmineclee/86236bc2bd16cb279b52
//-----SERIAL VARIABLES-----
var serial;
var portName = '/dev/cu.usbmodem1411';
//-----WINDOW DIMENSIONS-----
var windW = 600;
var windH = 400;
//-----Color Picker-----
var x; // where the spectrum starts (X)
var y; // where the spectrum starts (Y)
var end; // where the spectrum ends (X)
var totalWidth; // width of the spectrum
var totalHeight; // height of the spectrum
var incStart; // setting where the incrementing values will start, using X, but this will NOT change
//-----Color Values-----
var rd;
var gr;
var bl;
//-----Picker Variables-----
var colChange;
var colRecWidth = 1;
// array of colors in spectrum
var colorAtTime;
var array;
var arrayR;
var arrayG;
var arrayB;
// the colors at the specific time (what you're hovering over)
var rNow;
var gNow;
var bNow;
var colNow;
// the colors you've selected
var rChoice;
var gChoice;
var bChoice;
// setting up LED boxes
var squares = [];
var counter = 1;
var latestData;
function setup() {
//-----Serial Setup-----
serial = new p5.SerialPort();
serial.on('list', printList);
serial.on('connected', serverConnected);
serial.on('open', portOpen);
serial.on('data', gotData);
serial.on('error', serialError);
serial.on('close', portClose);
serial.list();
serial.open(portName);
//----------------------
createCanvas(windW, windH);
smooth();
background(245);
x = 100; // where the spectrum starts on X
y = 250; // where the spectrum starts on Y
end = windW - x; // where the spectrum ends (y)
totalWidth = windW - x*2;
totalHeight = 75;
incStart = x;
rd = 255;
gr = 0;
bl = 0;
rChoice = 0;
gChoice = 0;
bChoice = 0;
array = [rd + ", " + gr + ", " + bl];
arrayR = [rd];
arrayG = [gr];
arrayB = [bl];
// initial text at the top (where your color's RGB will be)
push();
textSize(20);
textAlign(CENTER);
noStroke();
text("NeoPixel Color Picker", windW / 2, 50);
pop();
for (var i = 0; i y && mouseY = incStart && mouseX <= incStart + totalWidth) {
push();
fill(245);
noStroke();
rect(0, y - 30, windW, 32);
stroke(0);
strokeWeight(1.5);
line(mouseX, y - 20, mouseX, y + 1);
fill(rNow, gNow, bNow);
ellipse(mouseX, y - 20, 15, 15);
noFill();
rect(incStart, y + 2, totalWidth, totalHeight - 2);
pop();
}
}
}
// function for whole color picker spectrum; increments represent the six segments of color changing
function colorPicker(increment1, increment2, increment3, increment4, increment5, increment6) {
colChange = 4; // 3.825;
while (x = increment1 && x = increment2 && x = increment3 && x = increment4 && x = increment5 && x 200 && mouseX = 100 && mouseY y && mouseY = incStart && mouseX < incStart + totalWidth) {
value = mouseX - 100 // this is to get determine where in the array you are (because at mouseX = 100, you're at the 0 index of the array)
rNow = arrayR[value]; // sets the red value of what you're hovering over, from the array
gNow = arrayG[value]; // sets the green value of what you're hovering over, from the array
bNow = arrayB[value]; // sets the blue value of what you're hovering over, from the array
if (rNow 255) { // this is to deal with any math that made the value greater than 255
rNow = 255;
}
if (gNow 255) {
gNow = 255;
}
if (bNow 255) {
bNow = 255;
}
colNow = array[value];
stroke(255);
//fill(0); // this is here just in case I want to add a darker color option/slider later
// rect(200, height - 200, 100, 25);
fill(rNow, gNow, bNow);
}
}
// else{
// fill(255);
// }
// rect(width / 2 - 50, 350, 100, 25); // this creates the rectangle at the bottom (but now, it's filled in w/ the color you're hovering over OR you have selected)
}
function mousePressed() {
// this is to say: if you press on any part of the spectrum, you will make display the selected color at the rectangle AND fill in the rectangle at the bottom
if (mouseX >= incStart && mouseX y && mouseY < y + totalHeight) {
push();
fill(245);
noStroke();
rect(0, windH - 70, windW, 100);
pop();
textSize(18);
noStroke();
fill(0);
text("R: " + round(rNow), incStart, windH - 50);
text("G: " + round(gNow), incStart, windH - 33);
text("B: " + round(bNow), incStart, windH - 16);
// push();
// fill(0);
// rect(width / 2 - 50, 350, 100, 25);
// fill(rNow, gNow, bNow);
// rect(width / 2 - 50, 350, 100, 25);
// pop();
// setting the color so that it can be used on the drawing pad
rChoice = round(rNow);
gChoice = round(gNow);
bChoice = round(bNow);
}
}
for (var i = 0; i < squares.length; i++) {
squares[i].clicked(mouseX, mouseY,rChoice,gChoice,bChoice);
}
}
//-----SERIAL FUNCTIONS-----
function printList(portList) {
// for (var i = 0; i 5)
// {
// aNum = aString[1];
// aOff = aString[3];
// aSize = aString[5];
// }
// console.log("aNum: " + aNum + "aOff: " + aOff + "aSize: " + aSize);
}
function serialError(err) {
// print('serialError ' + err);
}
function portClose() {
// print('portClose');
}
p5 Object Code:
function Square(){
this.w = 65;
this.h = 25;
this.col = 200;
this.display = function(x,y,i){
this.x = x;
this.y = y;
this.index = i;
noStroke();
fill(this.col);
rect(this.x, this.y, this.w, this.h,1.5);
}
this.clicked = function(px,py, r, g, b){
var sendLED;
var red;
var green;
var blue;
if (px > this.x && px this.y && py < this.y + this.h){
this.col = color(r, g, b);
red = r.toString();
green = g.toString();
blue = b.toString();
if (this.index == 0) {
serial.write( "A," + red + "," + green + "," + blue);
} else if (this.index == 1) {
serial.write( "B," + red + "," + green + "," + blue);
} else if (this.index == 2) {
serial.write( "C," + red + "," + green + "," + blue);
} else if (this.index == 3) {
serial.write( "D," + red + "," + green + "," + blue);
} else if (this.index == 4) {
serial.write( "E," + red + "," + green + "," + blue);
} else if (this.index == 5) {
serial.write( "F," + red + "," + green + "," + blue);
} else if (this.index == 6) {
serial.write( "G," + red + "," + green + "," + blue);
}
}
}
}