Use an input or output that uses a complex serial protocol on the SDA/SLC pins, tied to a p5.js sketch. Read a sensor and generate a useful or interesting interface in p5.js or use a p5.js interface to control a stepper or series of NeoPixel LEDs. [Edit: The goal here was to use SDA/SCL, if you didn’t, please use it in a future project.]
Category: Assignments
Assignment 5
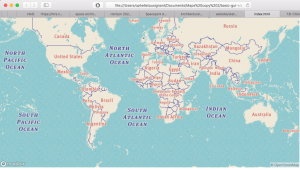
My plan was to use the wind turbines in the united states as my data input, and display their location on a map of the world. I was then going to have the little location dots change colors when clicked (just to get some more object programming in).
I got the map to appear:
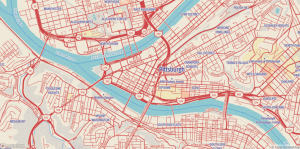
and I can zoom in and out and that’s kind of fun:
but whenever I try to load data onto the page I get this lovely display:
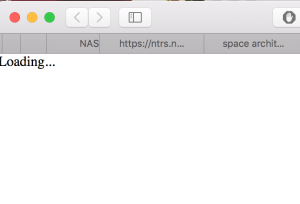
forever and ever.
So here’s my code.
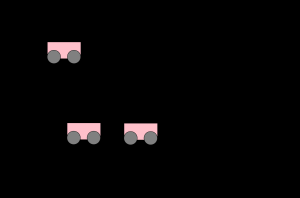
Assignment Five
Simple Shapes
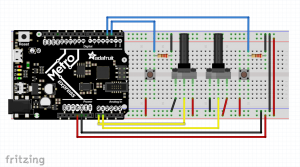
For this, I wanted to investigate different Arduino inputs and how that might control elements of my objects in p5. I used two pots and two tact switches. The pots control size and spacing, while the switches can add and subtract a rectangle element. Right now there are two circles, however I’d like to work and see more ways to add an object.

Arduino Code:
//--------NEOPIXEL SETUP --------
#include <Adafruit_NeoPixel.h>
#ifdef __AVR__
#include <avr/power.h>
#endif
static const int PIN = 40;
static const int NUMPIXELS = 1;
Adafruit_NeoPixel pixels = Adafruit_NeoPixel(NUMPIXELS, PIN, NEO_GRBW + NEO_KHZ800);
//--------POT & TACT LEFT--------
static const int potLeft = A0;
int potValLeft;
int mapValLeft;
static const int switchLeft = 2;
int switchStateLeft = 0;
int lastStateL = LOW;
//--------POT & TACT RIGHT--------
static const int potRight = A1;
int potValRight;
int mapValRight;
static const int switchRight = 3;
int switchStateRight = 0;
int lastStateR = LOW;
int count = 2;
const bool isInterrupt = true;
//--------TIME--------
unsigned long lastSampleTime = 0;
unsigned long sampleInterval = 500;
//------------------------------------------------------------------------------------
void setup() {
// put your setup code here, to run once:
Serial.begin(115200);
pinMode(switchLeft, INPUT);
pinMode(potLeft, INPUT);
pinMode(potRight, INPUT);
pinMode(switchRight, INPUT);
pixels.begin();
}
void loop() {
unsigned long now = millis();
potValLeft = analogRead(potLeft);
potValRight = analogRead(potRight);
switchStateLeft = digitalRead(switchLeft);
switchStateRight = digitalRead(switchRight);
if (lastSampleTime + sampleInterval < now) {
lastSampleTime = now;
mapValLeft = map(potValLeft, 0, 1023, 20, 350); // sends offset
mapValRight = map(potValRight, 0, 1023, 20, 300); // sends size
if (switchStateLeft && switchStateLeft != lastStateL) {
if (count <= 12 && count > 2) {
count -= 1;
} else {
count = 2;
}
} else if (switchStateRight && switchStateRight != lastStateR) {
if (count < 12) {
count += 1;
} else {
count = 12;
}
}
lastStateL = switchStateLeft;
lastStateR = switchStateRight;
Serial.print("N,");
Serial.print(count);
Serial.print(",O,");
Serial.print(mapValLeft);
Serial.print(",S,");
Serial.print(mapValRight);
Serial.print("\r\n");
}
}
/* //-----DEBUGGING-----
Serial.print("count: ");
Serial.println(count);
Serial.print("Left Pot Send: ");
Serial.println(mapValLeft);
Serial.print("Right Pot Send: ");
Serial.println(mapValRight);
*/
p5.js Code:
/*
//-----ATTRIBUTION-----
Based on "Sea Shell" by Michael Pinn
https://www.openprocessing.org/sketch/402526
*/
var serial;
var portName = '/dev/cu.usbmodem1411';
var xLen = 1200;
var yLen = 700;
var bubbles;
var bubbles2;
var latestData;
var aNum = 0; // number of squares from arduino
var aOff = 0; // offset number from arduino
var aSize = 0; // size number from arduino
function setup() {
serial = new p5.SerialPort();
// now set a number of callback functions for SerialPort
serial.on('list', printList);
serial.on('connected', serverConnected);
serial.on('open', portOpen);
serial.on('error', serialError);
serial.on('close', portClose);
// serial.on('data', serialEvent);
serial.on('data', gotData);
serial.list();
serial.open(portName);
// set up our drawing environment
createCanvas(xLen, yLen);
background(240);
ellipseMode(CENTER);
rectMode(CENTER);
bubbles = new Bubble(240,0); // sets the location
bubbles2 = new Bubble(240,5); // sets the location
}
function draw() {
background(240);
bubbles.show(40,100, 8, aOff); // sets up the size, offset, rotational controller (mouse position here
bubbles2.show(aSize/2, aOff, aNum, mouseX); // sets up the size, offset, rotational controller (mouse position here)
}
class Bubble {
constructor (l, w){
this.l = l;
this.w = w;
}
show(s, o, n, m){
this.s = s;
this.offset = o;
this.n = n;
this.m = m;
push();
translate(width/2, height/2);
for (var i = 0; i < 360; i += 360/this.n) {
this.x = sin(radians(i)) * this.offset;
this.y = cos(radians(i)) * this.offset;
push();
translate(this.x, this.y);
rotate(radians(+i + this.m));
stroke(this.l);
strokeWeight(this.w);
fill(sin(radians(i / 2)) * 255, 50, 100);
rect(0,0,this.s,this.s,2);
pop();
}
pop();
}
}
//-----SERIAL FUNCTIONS-----
function printList(portList) {
for (var i = 0; i < portList.length; i++) {
print(i + " " + portList[i]);
}
}
function serverConnected() {
print('serverConnected');
}
function portOpen() {
print('portOpen');
}
function gotData() {
var stringRead = serial.readLine(); // read the incoming string
trim(stringRead); // remove any trailing whitespace
if (!stringRead) return; // if the string is empty, do no more
// console.log(stringRead); // println the string
latestData = stringRead; // save it for the draw method
var aString = latestData.split(",");
if (aString.length>5)
{
aNum = aString[1];
aOff = aString[3];
aSize = aString[5];
}
// console.log("aNum: " + aNum + "aOff: " + aOff + "aSize: " + aSize);
}
function serialError(err) {
print('serialError ' + err);
}
function portClose() {
print('portClose');
}
Assignment 5
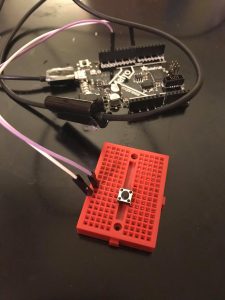
Car Driver
Description:
For this assignment, I made a car animation. The user can click anywhere on the black background to place a car. The cars start at speed = 0 and add 10 each time the button is pressed.
Basic GUI:
Breadboard:
Video demo:
Code:
**Code/idea is a combination of alterations from class 10 notes and http://coursescript.com/notes/interactivecomputing/objects/index.html **
Assignment5 – Interactive Map
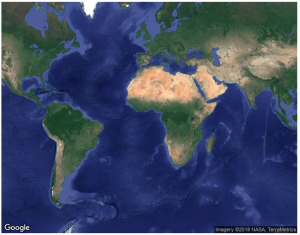
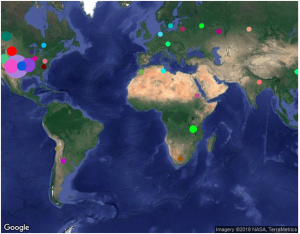
I worked with Mappa.js to visualize a dataset on Google Maps. I found Mappa.js useful for quickly getting interactive online maps running. I tweaked one of the example code so that the objects get updated by the user’s mouse click.
I used NASA’s open data portal and took the meteorite dataset as input. Each row is the history of meteorite landings with latitude/longitude information. Every time the user clicks, it reads the new row and visualizes on Google Maps where it landed. It calls Google Maps API to map latitude/longitude to a city and creates an object for each city. If data with the previously appeared city is observed, it increments the size of the circle. Since there are cases where the city is not included in the API response, I used try/catch to ignore unidentifiable data.
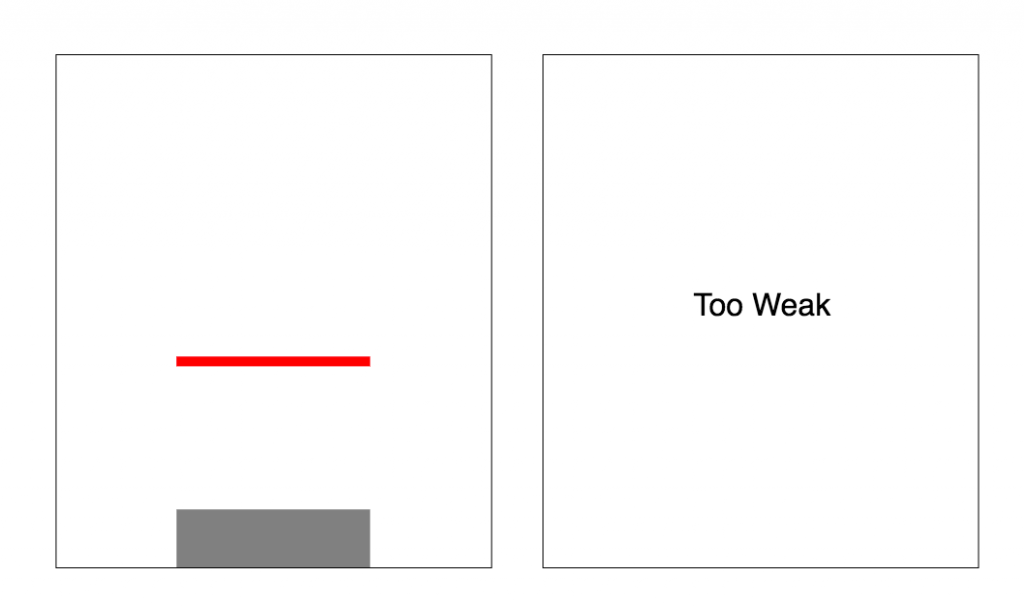
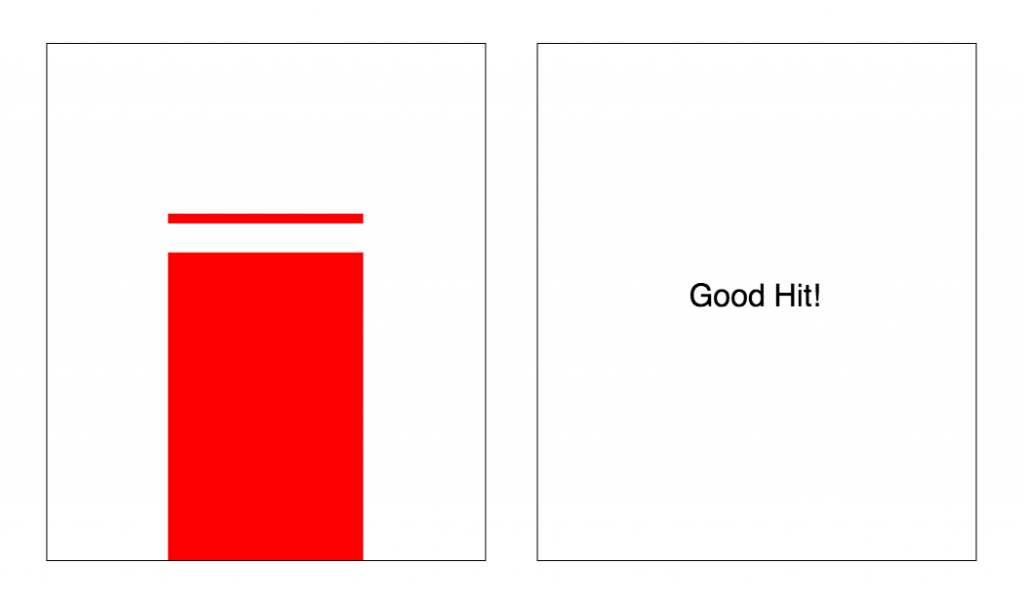
Assignment4 – Visual Support for Drummers
Motivation:
When I think of human assistance, a topic that comes to my mind relates to music or rhythm since I’m poor at singing and playing instruments. In this project, I explored an approach to extract sound information from an instrument and to provide real-time visual feedback to the player so that he is always making an ideal sound.
Process:
Using the knock sensing interface from Assignment2, I built an assistive interface for drummers. A piezo sensor attached to a drum captures the strength of hit which is sent to P5JS to visualize whether or not the strength is within an appropriate range. The red line indicates the ideal strength and the gray bar is the actual hit value. The red bar continuously changes as the music progress.
Proof-of-Concept Demo:

Assignment 5: p5.js skills test + IFTTT
Use object oriented programming to visualize some sort of input, from your Arduino or from an online source (no weather nor stock prices).
Create an IFTTT sketch that does something to make your life better and that you’re willing to use for a few days. We’ll work with IFTTT on a future assignment.
Assignment Four
The pomodoro technique
Password: MakingThingsInteractive
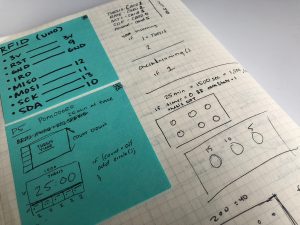
This was a bit of a tricky project for me. I had several idea’s that seemed to bypass either the Arduino or p5.js completely. So, after my board kicked the bucket at 3 in the morning, I went back to the drawing board. Lately, I’ve been struggling with task management in terms of mustering up the courage to even begin. I was researching memory and multitasking for another class, when I stumbled upon something called The Pomodoro Technique. This is a technique that uses a timer to break down tasks into intervals of 25 minutes. The idea is to focus on something for 25 minutes straight, take a short break, then tackle another 25 minutes.
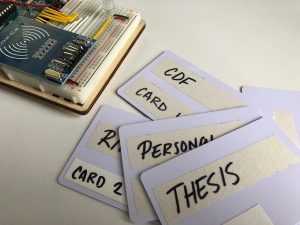
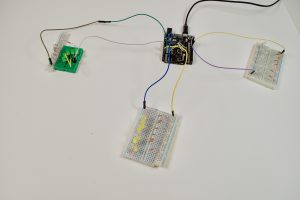
Using an RFID reader and tags, I sought to physicalize the interaction of changing tasks to intentionally bring awareness to the switch. These tags are labeled with my current class schedule, plus a personal passion project. You can scan in the task you want to focus on and a full screen time will take over the browser window. When 25 minutes have passed, the user will be notified by LED light. In addition, a small accomplishment dot is added to the task. You can collect up to three right now, however if you switch tasks in the middle of another, you will not get a dot.
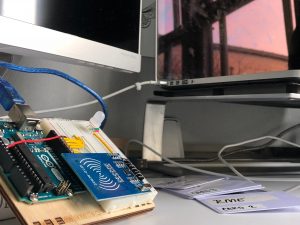
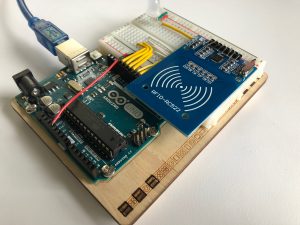
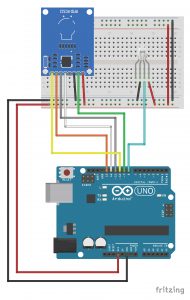
Arduino Code:
#include <SPI.h>
#include <MFRC522.h>
#define SS_PIN 10
#define RST_PIN 9
MFRC522 newReader(SS_PIN, RST_PIN); // Create MFRC522 instance.
String id = "";
//--------NEOPIXEL SETUP --------
#include <Adafruit_NeoPixel.h>
#ifdef __AVR__
#include <avr/power.h>
#endif
static const int PIN = 8;
static const int NUMPIXELS = 1;
Adafruit_NeoPixel pixels = Adafruit_NeoPixel(NUMPIXELS, PIN, NEO_GRBW + NEO_KHZ800);
//--------INCOMING CASE STATE--------
int caseState;
//--------OUTGOING CASE STATE--------
static const int neutralState = 0;
static const int thesisState = 1;
static const int rmeState = 2;
static const int mtiState = 3;
static const int cdfState = 4;
static const int personalState = 5;
int sendState = neutralState;
//--------TIME--------
unsigned long lastSampleTime = 0;
unsigned long sampleInterval = 300000; // in ms 5 minutes
void setup() {
Serial.begin(9600); // Initialize serial communications with the PC
SPI.begin(); // Init SPI bus
newReader.PCD_Init(); // Init MFRC522 card
Serial.println("Scan PICC to see UID and type...");
pixels.begin();
}
void loop() {
unsigned long now = millis();
pixelOff();
if (Serial.available() > 0) {
caseState = Serial.read();
}
getID();
if (lastSampleTime + sampleInterval < now) {
lastSampleTime = now;
if (caseState == 6) {
pixelBlink();
} else {
pixelOff();
}
}
}
void pixelBlink() {
pixels.setPixelColor(0, pixels.Color(138, 70, 215));
pixels.show(); // This sends the updated pixel color to the hardware.
delay(500);
pixels.setPixelColor(0, pixels.Color(0, 0, 0));
pixels.show(); // This sends the updated pixel color to the hardware.
delay(500);
}
void pixelOff() {
pixels.setPixelColor(0, pixels.Color(0, 0, 0));
pixels.show(); // This sends the updated pixel color to the hardware.
}
void getID() {
// Getting ready for Reading PICCs
if ( ! newReader.PICC_IsNewCardPresent()) { //If a new PICC placed to RFID reader continue
return 0;
}
if ( ! newReader.PICC_ReadCardSerial()) { //Since a PICC placed get Serial and continue
return 0;
}
// Serial.print("Card UID:");
for (byte i = 0; i < newReader.uid.size; i++) {
// Create a RFID Hexdecimal String
id += String(newReader.uid.uidByte[i], HEX);
// Serial.print(newReader.uid.uidByte[i] < 0x10 ? " 0" : " ");
}
// Convert to Uppercase
id.toUpperCase();
// If it is this card, do something
if (id == "B0A167A") {
sendState = thesisState;
// Serial.println("Card One: Thesis");
// Serial.print("State: ");
// Serial.println(sendState);
}
if (id == "B0DECE7A") {
sendState = rmeState;
// Serial.println("Card Two: Responsive Mobile Environments");
// Serial.print("State: ");
// Serial.println(sendState);
}
if (id == "702E89C") {
sendState = mtiState;
// Serial.println("Card Three: Making Things Interactive");
// Serial.print("State: ");
// Serial.println(sendState);
}
if (id == "3078E49B") {
sendState = cdfState;
// Serial.println("Card Four: Communication Design Fundamentals");
// Serial.print("State: ");
// Serial.println(sendState);
}
if (id == "50611A9C") {
sendState = personalState;
// Serial.println("Card Five: Personal Projects");
// Serial.print("State: ");
// Serial.println(sendState);
}
Serial.write (sendState);
// Reset Id
id = "";
// Serial.println();
newReader.PICC_HaltA();
newReader.PCD_StopCrypto1();
}
p5.js Code:
//---Serial---
var serial;
var portName = '/dev/cu.usbmodem1411';
//---Incoming Case State---
var caseState;
//---Outgoing Case State---
var accomplishState;
//---Color---
var c;
var thesisColor;
var rmeColor;
var mtiColor;
var cdfColor;
var personalColor;
//---Canvas---
var xLen = 1000;
var yLen = 700;
//---Squares & Grid---
let squares = [];
let bubbles0 = [];
let bubbles1 = [];
let bubbles2 = [];
let bubbles3 = [];
let bubbles4 = [];
//---Time---
var time = 1500;
var timer0 = time;
var timer1 = time;
var timer2 = time;
var timer3 = time;
var timer4 = time;
//---Counter---
var count0 = 0;
var count1 = 0;
var count2 = 0;
var count3 = 0;
var count4 = 0;
//---Converts Time to minutes and seconds---
function convertTime(s){
var minutes = floor(s / 60);
var seconds = s % 60;
return nf(minutes,2) + "m " + nf(seconds,2) + "s"; // formats to look like "00m 00s"
}
function setup() {
createCanvas(xLen, yLen);
serial = new p5.SerialPort();
// now set a number of callback functions for SerialPort
serial.on('list', printList);
serial.on('connected', serverConnected);
serial.on('open', portOpen);
serial.on('data', serialEvent);
serial.on('error', serialError);
serial.on('close', portClose);
serial.list();
serial.open(portName);
// setting task squares as well as accomplished "dots" through objects
for (let i=0; i<5; i++){
for(let j =0; j<3; j++){
let x = 0 + 200 * i;
let y = 550;
let w = 200;
let h = 150;
let gridX = 50;
let gridY = 625;
let offset = 50;
let gridR = 10;
squares[i] = new Square(x,y,w,h);
bubbles0[j] = new Bubble(gridX + offset*j, gridY, gridR);
bubbles1[j] = new Bubble(200 + gridX + offset*j, gridY, gridR);
bubbles2[j] = new Bubble(400 + gridX + offset*j, gridY, gridR);
bubbles3[j] = new Bubble(600 + gridX + offset*j, gridY, gridR);
bubbles4[j] = new Bubble(800 + gridX + offset*j, gridY, gridR);
}
}
}
function draw() {
// put drawing code here
// background(255);
checkIncoming(); // checks the incoming state and runs the proper timer
statusBar(); // keeps the tabs with what tasks, right now classes
bubbleKeeper(); // keeps the circles that tick when time has been accomplished
}
function bubbleKeeper(){
for(let i=0; i < bubbles0.length; i++){ // accomplish bubbles for thesis
noStroke();
// bubbles[i].show(0);
if (count0 == 1){
bubbles0[0].show(0);
}
if (count0 == 2){
bubbles0[0].show(0);
bubbles0[1].show(0);
}
if (count0 == 3){
bubbles0[0].show(0);
bubbles0[1].show(0);
bubbles0[2].show(0);
}
}
for(let i=0; i < bubbles1.length; i++){ // accomplish bubbles for RME
noStroke();
// bubbles[i].show(0);
if (count1 == 1){
bubbles1[0].show(0);
}
if (count1 == 2){
bubbles1[0].show(0);
bubbles1[1].show(0);
}
if (count1 == 3){
bubbles1[0].show(0);
bubbles1[1].show(0);
bubbles1[2].show(0);
}
}
for(let i=0; i < bubbles2.length; i++){ // accomplish bubbles for MTI
noStroke();
// bubbles[i].show(0);
if (count2 == 1){
bubbles2[0].show(0);
}
if (count2 == 2){
bubbles2[0].show(0);
bubbles2[1].show(0);
}
if (count2 == 3){
bubbles2[0].show(0);
bubbles2[1].show(0);
bubbles2[2].show(0);
}
}
for(let i=0; i < bubbles3.length; i++){ // accomplish bubbles for CDF
noStroke();
// bubbles[i].show(0);
if (count3 == 1){
bubbles3[0].show(0);
}
if (count3 == 2){
bubbles3[0].show(0);
bubbles3[1].show(0);
}
if (count3 == 3){
bubbles3[0].show(0);
bubbles3[1].show(0);
bubbles3[2].show(0);
}
}
for(let i=0; i < bubbles4.length; i++){ // accomplish bubbles for Passion Projects
noStroke();
// bubbles[i].show(0);
if (count4 == 1){
bubbles4[0].show(0);
}
if (count4 == 2){
bubbles4[0].show(0);
bubbles4[1].show(0);
}
if (count4 == 3){
bubbles4[0].show(0);
bubbles4[1].show(0);
bubbles4[2].show(0);
}
}
}
function statusBar(){
textSize(20);
textAlign(CENTER);
textStyle(BOLD);
var textY = 575;
//---Using these to change the color of the timer background based on the class
thesisColor = color(236,195,211);
rmeColor = color(247,161,171);
mtiColor = color(250,116,86);
cdfColor = color(252,195,135);
personalColor = color(242,240,181);
//---Setting up the squares based on color
for(let i =0; i<squares.length; i++){
noStroke();
squares[0].show(thesisColor);
squares[1].show(rmeColor);
squares[2].show(mtiColor);
squares[3].show(cdfColor);
squares[4].show(personalColor);
}
fill(0);
noStroke();
text("THESIS", 100, textY);
text("RME", 300, textY);
text("MTI", 500, textY);
text("CDF", 700, textY);
text("PASSION", 900, textY);
}
function checkIncoming(){
textSize(200);
textAlign(CENTER);
if (caseState == 1){ // THESIS
if (frameCount % 60 == 0 && timer0 > 0) { // if the frameCount is divisible by 60, then a second has passed. it will stop at 0
timer0 --;
}
if (timer0 == 0){ // if time reaches zero, task accomplished
timer0 = time; // timer resets to 25minutes (1500 seconds)
count0++; // counter adds one
accomplishState = 6; // sends notification to arudino to light up light
} else{
accomplishState = 5;
}
if (count0 > 3){
count0=0; // resets after three rounds
}
background(color(236,195,211));
fill(0);
noStroke();
text(convertTime(timer0), width/2, height*.5);
}
if (caseState == 2){ //RME
if (frameCount % 60 == 0 && timer1 > 0) { // if the frameCount is divisible by 60, then a second has passed. it will stop at 0
timer1 --;
}
if (timer1 == 0){
timer1 = time;
count1++;
accomplishState = 6;
} else{
accomplishState = 5;
}
if (count1 > 3){
count1=0;
}
background(color(247,161,171));
fill(0);
noStroke();
text(convertTime(timer1), width/2, height*.5);
}
if (caseState == 3){ // MTI
if (frameCount % 60 == 0 && timer2 > 0) { // if the frameCount is divisible by 60, then a second has passed. it will stop at 0
timer2 --;
}
if (timer2 == 0){
timer2 = time;
count2++;
accomplishState = 6;
} else{
accomplishState = 5;
}
if (count2 > 3){
count2=0;
}
background(color(250,116,86));
fill(0);
noStroke();
text(convertTime(timer2), width/2, height*.5);
}
if (caseState == 4){ // CDF
if (frameCount % 60 == 0 && timer3 > 0) { // if the frameCount is divisible by 60, then a second has passed. it will stop at 0
timer3 --;
}
if (timer3 == 0){
timer3 = time;
count3++;
accomplishState = 6;
} else{
accomplishState = 5;
}
if (count3 > 3){
count3=0;
}
background(color(252,195,135));
fill(0);
noStroke();
text(convertTime(timer3), width/2, height*.5);
}
if (caseState == 5){ // PERSONAL
if (frameCount % 60 == 0 && timer4 > 0) { // if the frameCount is divisible by 60, then a second has passed. it will stop at 0
timer4 --;
}
if (timer4 == 0){
timer4 = time;
count4++;
accomplishState = 6;
} else{
accomplishState = 5;
}
if (count4 > 3){
count4=0;
}
background(color(242,240,181));
fill(0);
noStroke();
text(convertTime(timer4), width/2, height*.5);
}
serial.write(accomplishState);
}
class Square{ // object class for bottom squares
constructor(x,y,w,h){
this.x = x;
this.y = y;
this.w = w;
this.h = h;
}
show(c){
fill(c);
rect(this.x, this.y, this.w, this.h);
}
}
class Bubble { // onject class for dots
constructor(x, y, r) {
this.x = x;
this.y = y;
this.r = r;
}
show(c) {
// stroke(90);
// strokeWeight(1);
fill(c);
ellipse(this.x, this.y, this.r * 2);
}
}
//-----SERIAL FUNCTIONS-----
function printList(portList) {
for (var i = 0; i < portList.length; i++) {
print(i + " " + portList[i]);
}
}
function serverConnected() {
print('serverConnected');
}
function portOpen() {
print('portOpen');
}
function serialEvent() {
var incoming = serial.read();
caseState = incoming;
}
function serialError(err) {
print('serialError ' + err);
}
function portClose() {
print('portClose');
}
Assignment 4
Room Light Controller
Background:
My idea for this project stemmed from my own room here in Pittsburgh. I currently turn on three different lights to get the ideal lighting in my room. There are two lamps and a string of starry lights. This past weekend, I was about to watch a movie and found myself wishing that I didn’t have to keep getting up and down to adjust the various lights according to my tv activity (movie, video games, tv, etc…). I’ve also been finding that the dark winter mornings have been making it difficult for my body to want to wake up. These problems were my inspiration for this light system project.
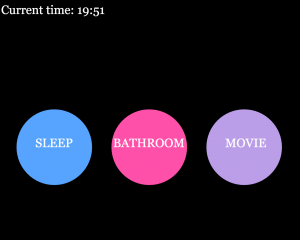
Description:
My light system starts with a simple GUI with three big buttons. The modes are sleep, bathroom, and movie. The idea behind the sleep button is that you would click it and the lights would turn on however many hours later you wish to sleep. The idea behind the bathroom mode is that the lights would turn on for about 3-5 minutes to guide you to the bathroom at night when you need to go in the middle of the night and then turn off, eliminating your need to touch a switch. The movie lights will turn on for about two hours and then turn off for ideal movie lighting. My vision is that there would be one long strand of lights lining my room ceiling. My demo is a prototype that I hope to further develop.
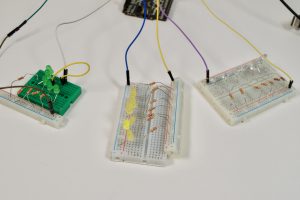
Photo of Arduino set-up
Closer view of the three bread boards–they are all wired the same way
Screenshot of simple GUI
Final physical output
Process:
I started by using Javascript to create these buttons. I drew out the dimensions and figured out what if statements I needed to write to catch each click in the three distinct circles. Next, I sent a distinct serial key for each button to the Arduino to turn on three corresponding lights. I found that drawing the GUI and having them each turn on a single light was a smooth and promising process for me. I tried to remain aware of color blindness as I chose colors for the buttons and LEDs. My next step would turn out to be my most time consuming: figuring out how to program three different timer settings.
Problems:
It turns out there isn’t a particularly easy way to run timed programs on the Arduino. After many hours of reading various Arduino community threads and forums, I realized that there wouldn’t be a library to do what I wanted. I tried a few timer libraries, but many of them used strange loop formats that would not work with my p5.js set-up. Setting up three LED bread boards also posed issues as some of LEDs were different shades and overall they were not especially bright. I knew this issue would most likely remain unresolved until the next prototype due to material and time constraints.
Solution:
After class on Tuesday, I wrote the timer into the javascript which turned out to be a much easier fix. I created functions for each mode, as well as functions to turn off each mode. I utilized a javascript function called setTimeout to turn off the LEDs after an amount of time. I used the same simple LEDs because this was our first prototype.
Result:
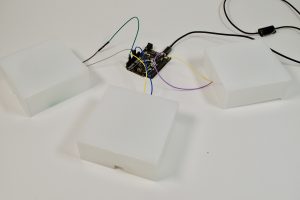
My project is a prototype of system for a much bigger room. Each button controls a light square. Sleep is green, bathroom is white, and movie is yellow. Sleep turns on after 8000ms, bathroom turns on for 2000ms and movie turns on for 5000ms. I scaled back the time because if the timing works for seconds, it will work if I multiply it out and set it for hours. This also made it able for me to debug and run tests quickly. I laser cut three boxes to try and enhance the weak LED lighting. I chose frosted acrylic because I had used it in a previous project and it created a glowing effect.
Videos:
The left button is ‘Sleep’, the middle button is ‘Bathroom’, and the right button is ‘Movie’. The LEDs are very dim and hard to see when the room is not dark. The buttons can be clicked at the same time and they will run their respective timers. The bathroom light is on for the shortest amount of time, the movie light is on for about double the bathroom light time, and the sleep light process is the longest. It is turned off for “8 hours” (in my simulation, it is 8000 ms) and then turns on indefinitely. I decided to leave it on because it is meant to wake the user up, so the timing will vary depending on the user and their morning schedule.
Light system with GUI.
Closer view of the light boxes
Future Work:
I hope to scale this project up a lot. My dream would be to connect it to a long bright LED strand and fix up the GUI control system. Each mode should be able to enter custom times and there should be a reset/all off button. I would want to add a few more sensors that would provide other assistance, as well.
Code:
Assignment 4 – Assistance
Design and make an interactive system with Arduino and p5.js that assists someone in a task.
We will discuss in class on Tuesday and also consider ways to document it for the web.
Due for class demonstration 13 Feb, post documentation by 15 Feb.