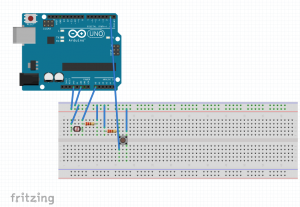
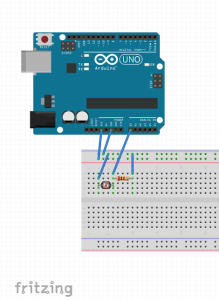
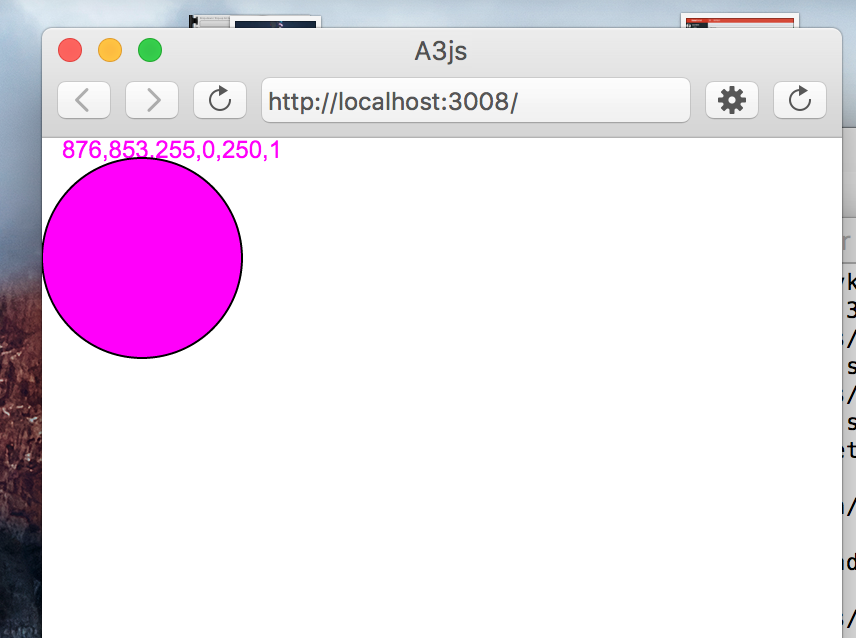
For this assignment I moved the switch button functionality for state changes to the p5 sketch. Through the web browser you can change the state from start screen to play mode and back again. The Arduino sets the target value and then sends five states back to p5 in order to determine how close the player is to the target. The status of the player, hot/cold/warmer/colder/winner, is then displayed on screen instead of the LED in the previous version.
//--------NEOPIXEL SETUP --------
#include
#ifdef __AVR__
#include <avr/power.h>
#endif
static const int PIN = 40;
static const int NUMPIXELS = 1;
Adafruit_NeoPixel pixels = Adafruit_NeoPixel(NUMPIXELS, PIN, NEO_GRBW + NEO_KHZ800);
//--------ULTRASONIC PINS N'AT--------
static const int trigPin = A0;
static const int echoPin = A1;
long duration;
int distance;
//--------INCOMING CASE STATE--------
int caseState;
//--------OUTGOING CASE STATE--------
static const int neutralState = 0;
static const int winState = 1;
static const int hotState = 2;
static const int warmerState = 3;
static const int colderState = 4;
static const int iceState = 5;
int sendState = neutralState; // current state of the button
//--------TIME--------
unsigned long lastSampleTime = 0;
unsigned long sampleInterval = 30000; // in ms
unsigned long lastSampleTime2 = 0;
unsigned long sampleInterval2 = 250; // in ms
int target;
void setup() {
// put your setup code here, to run once:
Serial.begin(115200);
pinMode(trigPin, OUTPUT);
pinMode(echoPin, INPUT);
randomSeed(analogRead(2));
pixels.begin();
}
void loop() {
unsigned long now = millis();
unsigned long now2 = millis();
if (Serial.available() > 0) {
caseState = Serial.read();
}
switch (caseState) {
case 0:
pixelBlinkGreen();
if (lastSampleTime + sampleInterval < now) {
lastSampleTime = now;
target = random(10, 150);
// pixelOff();
// Serial.print("Target Set");
}
break;
case 1:
pixelBLUE();
if (lastSampleTime2 + sampleInterval2 < now2) {
lastSampleTime2 = now2;
Serial.write(target);
// Serial.print("T,");
// Serial.println(target);
}
// Serial.print("Find ");
// Serial.println(target);
hotCold(target);
break;
default:
pixelBlinkYellow();
// Serial.println("Push Button For New Game");
// statements
}
}
void hotCold(int x) {
digitalWrite(trigPin, LOW);
delayMicroseconds(2);
digitalWrite(trigPin, HIGH);
delayMicroseconds(10);
digitalWrite(trigPin, LOW);
duration = pulseIn(echoPin, HIGH);
distance = duration / 10 / 2 ;
unsigned long now2 = millis();
if (lastSampleTime2 + sampleInterval2 < now2) {
lastSampleTime2 = now2;
pixelOff();
if ((distance <= (x + 5)) && (distance >= (x - 5))) {
pixelState1();
sendState = winState;
// Serial.write("ON FIRE!");
} else if ((distance <= (x + 15)) && (distance >= (x - 15))) {
pixelState2();
sendState = hotState;
// Serial.println("Things are heating up");
} else if ((distance <= (x + 25)) && (distance >= (x - 25))) {
pixelState3();
sendState = warmerState;
// Serial.println("Warmer..."); // instead of print line, then you can do score value
} else if ((distance <= (x + 35)) && (distance >= (x - 35))) {
pixelState4();
sendState = colderState;
// Serial.println("Cooler...");
} else if ((distance <= (x + 45)) && (distance >= (x - 45))) {
pixelState5();
sendState = iceState;
// Serial.println("Pretty Cold");
} else {
pixelOff();
//Serial.println("Something is wrong");
}
Serial.write (sendState);
}
}
void pixelChange (int y) {
}
void pixelBlinkGreen() {
pixels.setPixelColor(0, pixels.Color(0, 255, 0));
pixels.show(); // This sends the updated pixel color to the hardware.
delay(500);
pixels.setPixelColor(0, pixels.Color(0, 0, 0));
pixels.show(); // This sends the updated pixel color to the hardware.
delay(500);
}
void pixelBlinkYellow() {
pixels.setPixelColor(0, pixels.Color(255, 200, 0, 75));
pixels.show(); // This sends the updated pixel color to the hardware.
delay(250);
pixels.setPixelColor(0, pixels.Color(0, 0, 0));
pixels.show(); // This sends the updated pixel color to the hardware.
delay(250);
}
void pixelState1() {
pixels.setPixelColor(0, pixels.Color(255, 0, 100));
pixels.show(); // This sends the updated pixel color to the hardware.
}
void pixelState2() {
pixels.setPixelColor(0, pixels.Color(215, 13, 138));
pixels.show(); // This sends the updated pixel color to the hardware.
}
void pixelState3() {
pixels.setPixelColor(0, pixels.Color(150, 55, 150));
pixels.show(); // This sends the updated pixel color to the hardware.
}
void pixelState4() {
pixels.setPixelColor(0, pixels.Color(138, 70, 215));
pixels.show(); // This sends the updated pixel color to the hardware.
}
void pixelState5() {
pixels.setPixelColor(0, pixels.Color(100, 0, 255));
pixels.show(); // This sends the updated pixel color to the hardware.
}
void pixelBLUE() {
pixels.setPixelColor(0, pixels.Color(0, 0, 255));
pixels.show(); // This sends the updated pixel color to the hardware.
}
void pixelOff() {
pixels.setPixelColor(0, pixels.Color(0, 0, 0));
pixels.show(); // This sends the updated pixel color to the hardware.
}
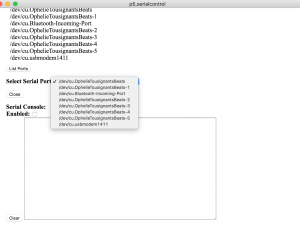
var serial;
var portName = '/dev/cu.usbmodem1411';
var button;
var count = 0;
var buttonCount;
var findState;
var targetSet;
var target;
var time1 = 30000;
var time2 = 20;
var noiseScale = 0.01;
var caseState;
var lineMap;
var redVal;
var blueVal;
var testRect;
var ranVal;
var lastSampleTime = 0;
var sampleInterval = 250; // in ms
function setup() {
serial = new p5.SerialPort();
// now set a number of callback functions for SerialPort
serial.on('list', printList);
serial.on('connected', serverConnected);
serial.on('open', portOpen);
serial.on('data', serialEvent);
serial.on('error', serialError);
serial.on('close', portClose);
serial.list();
serial.open(portName);
colorMode(RGB);
createCanvas(windowWidth, windowHeight);
testRect = new Rectangle();
}
function draw() {
background(255); // set the background to white
startScreen();
ranVal = random(0,150);
}
function startScreen(){
fill(0); // fill with black
textSize(32);
textStyle(BOLD);
textAlign(LEFT);
text("The Hot/Cold Game", 75, 100);
startButton();
if (count % 2 == 1){
playScreen();
}
}
function playScreen (){
var startX = windowWidth -200;
var startY = 75;
var endX = windowWidth -200;
var endY = windowHeight - 75;
var topWall = startY+5;
var bottomWall = endY-5;
var xc = constrain(ranVal, topWall, bottomWall);
var lineLength = endY - startY;
// console.log("line length: " + lineLength);
// var mapVal = map(xc, topWall, bottomWall, 0, 150);
// lineMap = int(mapVal);
background(255);
fill(0); // fill with black
textSize(32);
textStyle(BOLD);
textAlign(LEFT);
text("The Hot/Cold Game", 75, 100);
if (target > 6 && target < 150) {
fill(0);
textSize(20);
textStyle(NORMAL);
textAlign(LEFT);
text("Target Set", 400, 100);
}
/*
stroke(0);
strokeWeight(2);
line (startX, startY, endX, endY);
line (startX - 10, startY, startX+10, startY);
line (endX - 10, endY, endX+10, endY);
ellipse(startX, xc, 10, 10);
// text ("map val " + mapVal, startX+75, xc);
*/
rectColor();
hotColdLevel();
// winnerWinner();
backButton();
if (count % 2 == 0){
startScreen();
}
}
function rectColor() {
var from = color(255, 0, 100);
var to = color(100, 0, 255);
var interA = lerpColor(from, to, 0.25);
var interB = lerpColor(from, to, 0.5);
var interC = lerpColor(from, to, 0.75);
var textX = windowWidth - 230;
var textY = windowHeight - 60;
// testRect.display();
noStroke();
textSize(24);
textStyle(NORMAL);
textAlign(CENTER);
if (findState == 1) {
fill(from);
testRect.display();
fill(255);
text("WINNER", textX, textY);
} else if (findState == 2) {
fill(interA);
testRect.display();
fill(255);
text("hot", textX, textY);
} else if (findState == 3) {
fill(interB);
testRect.display();
fill(255);
text("warmer", textX, textY);
} else if (findState == 4) {
fill(interC);
testRect.display();
fill(255);
text("colder", textX, textY);
} else if (findState == 5) {
fill(to);
testRect.display();
fill(255);
text("ice cold", textX, textY);
}
}
function hotColdLevel() {
// var printTarget = int(targetSet);
// console.log(printTarget);
var startX = windowWidth -200;
var startY = 100;
var endX = windowWidth; -150
var endY = windowHeight - 140;
var topWall = startY+5;
var bottomWall = endY-5;
var lineLength = endY - startY;
for (var x = 0; x < windowWidth; x++) {
var noiseVal = noise((ranVal + x) * noiseScale, mouseY * noiseScale);
var alpha1 = noiseVal * 255 + 50;
var from = color(255, 0, 100, alpha1);
var to = color(100, 0, 255, alpha1);
var interA = lerpColor(from, to, 0.25, alpha1);
var interB = lerpColor(from, to, 0.5, alpha1);
var interC = lerpColor(from, to, 0.75, alpha1);
var xc;
var increase1 = startY +100;
var increase2 = startY +200;
var increase3 = startY +300;
if (findState == 1) {
stroke(from);
xc = constrain(startY, topWall, bottomWall);
} else if (findState == 2) {
stroke(interA);
xc = constrain(increase1, topWall, bottomWall);
} else if (findState == 3) {
stroke(interB);
xc = constrain(increase2, topWall, bottomWall);
} else if (findState == 4) {
stroke(interC);
xc = constrain(increase3, topWall, bottomWall);
} else if (findState == 5) {
stroke(to);
xc = constrain(endY - 100, topWall, bottomWall);
}
// stroke(colorVal, 0, 100, alpha1);
line(x, xc + noiseVal * 30, x, endY);
// line(x, xc + noiseVal * 30, x, endY);
}
}
function winnerWinner(){
if (mouseY <= (target+5) && mouseY >= (target-5)){
background (255);
fill(0); // fill with black
textSize(32);
textStyle(BOLD);
textAlign(LEFT);
text("The Hot/Cold Game", 75, 100);
fill(0); // fill with black
textSize(60);
textStyle(BOLD);
textAlign(CENTER);
text("Winner Winner!", windowWidth*.5, windowHeight*.5);
}
}
function Rectangle() {
this.x = windowWidth-380;
this.y = windowHeight - 90;
this.width = 300;
this.height = 40;
this.corner = 3;
this.display = function() {
rect(this.x, this.y, this.width, this.height, this.corner);
// stroke(0);
// line(75,100, windowWidth-75, 100);
}
}
function startButton(){
var x = 80;
var y = 125;
var buttonWidth = 200;
var buttonHeight = 40;
var startY = 100;
var endY = windowHeight - 200;
fill(255, 0, 110);
rect(x, y, buttonWidth, buttonHeight,2);
fill(255);
noStroke();
textSize(24);
textStyle(NORMAL);
textAlign(CENTER);
text("Start Game", x + 100 , y + 30);
// if (mouseIsPressed){
// caseState = 1;
// serial.write(caseState);
// console.log(caseState);
// }
/*
if (count % 3 == 1){
noStroke();
fill(255, 0, 89);
} else if (count % 3 == 2){
noStroke();
fill(177);
} else {
noStroke();
fill(255);
}
ellipse (windowWidth*.5, windowHeight*.5, 100,100);
*/
}
function backButton(){
var x = 80;
var y = windowHeight - 90;
var buttonWidth = 200;
var buttonHeight = 40;
var startY = 100;
var endY = windowHeight - 200;
fill(225);
noStroke();
rect(x, y, buttonWidth, buttonHeight,3);
fill(0);
noStroke();
textSize(24);
textStyle(NORMAL);
textAlign(CENTER);
text("Back", x + 100 , y + 30);
//
// if (mouseIsPressed){
// target = int(random(startY,endY));
// }
}
function mousePressed(){
var backHeight = windowHeight - 60
var r1 = dist(mouseX, mouseY, 180, 155);
var r2 = dist(mouseX, mouseY, 180, backHeight - 30);
if (r1 < 100){
button = 1;
caseState = 1;
console.log("start button pressed");
count ++;
} else if(r2 <100){
button = 2;
caseState = 0;
console.log("back button pressed")
count ++;
}else {
button = 0;
console.log("button NOT pressed");
}
serial.write(caseState);
}
//-----SERIAL FUNCTIONS-----
function printList(portList) {
for (var i = 0; i < portList.length; i++) {
print(i + " " + portList[i]);
}
}
function serverConnected() {
print('serverConnected');
}
function portOpen() {
print('portOpen');
}
function serialEvent() {
// TODO now here's a problem. What if we want to read both
// the blueLed and redLed values? All we know in p5.js is
// that there is same data to be read, we don't have a context
// for this value
//
// this is where a state machine represented by an integer is
// valuable, we just just pass the state up as an int then
// p5.js can switch/caes that integer
// distanceRead = Number(serial.read());
// button = Number(serial.read());
// var inByte = serial.read();
// inData = inByte;
//
var incoming = serial.read();
if (incoming > 6){
targetSet = incoming;
} else if (incoming < 6){
findState = incoming;
}
/*
// now we're reading a string
// TODO how does a string end?
var stringRead = serial.readStringUntil('\r\n');
// TODO now we're off in object oriented programming
// what type is stringRead? Note we didn't define it
if (stringRead.length > 0 ) {
var potString = split(stringRead, ',');
// potString[0] B
// potString[1] 159
// potString[2] R
// potString[3] 60
if (potString.length == 2) { // ignore any tiny strings
targetSet = potString[1];
}
}
*/
}
function serialError(err) {
print('serialError ' + err);
}
function portClose() {
print('portClose');
}