It’s not adjusted for our lenses*
]]>- upload your code
- wait for it to compile
- download it
- Flash it back to the photon
- Sometimes… this makes me angry.
This post is a walks through the process to completely bypass those steps. After the walkthrough, you should be able to:
- Write / Develop Code on your machine
- Compile that code on your machine
- Flash the compiled code to your photon over usb
Use
- No need to use the particle dev editor
- Alternatively, no need to copy and paste the files over and over
- At the end of the compilation, before the firmware is flashed, the code is validated
- If you don’t have internet, you can still check your code
- If your code breaks and your photon won’t boot, you can factory reset (sortof)
- Run the make clean all command at the bottom
- There is a way to completely bypass the entire cloud api
- Run the rest api locally on a computer
Photon -> Router -> Telcom -> Some Server at the NSA -> Particle- Photon -> Router -> Your Laptop
- This means no need for outbound internet (particle rest api etc)
- I might post a walkthrough if someone wants it
- Run the rest api locally on a computer
- You hate the man
I Have not tested this walkthrough…
Let me know if anything breaks or doesn’t work, and I can help you fix it.
Requirements
This assumes you have git as well as command line tools / xcode.
If you don’t know them, you can just ask me or something.
You can follow the confusing version here, or…
OS X users can install the toolchain with Homebrew:
brew install cmakebrew tap PX4/homebrew-px4brew updatebrew install gcc-arm-none-eabi-49arm-none-eabi-gcc --version(should now say v4.9.x)brew install dfu-util
- GCC
- Make
- Device Firmware Upgrade Utilities
- Zatig (for windows users only)
- Git
If you’re on Windows… may the odds be ever in your favor…
No Mercy :*(
Step 1: Get the firmware
The firmware contains the code that makes the photon operate, the libraries, routines, etc. You need to download the firmware so your computer has access to all the files necessary to compile the binaries that will be written to the photons memory.
- Open the Terminal app
- Enter the following
# working_dir is whatever directory you want to develop in

cd "<working_dir>"

git clone https://github.com/spark/firmware.git

cd firmware/modules

git checkout latest
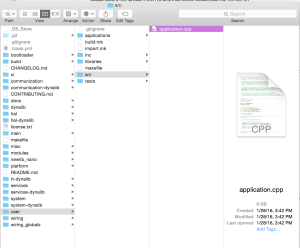
The directories should look something like this
Step 2: Nice Environment Vars
This is one I found recently, if you add the following env variable, make will automatically put the photon in dfu mode.
# /dev/tty.usbmodem12345 is the usb connected photon port

export PARTICLE_SERIAL_DEV=/dev/tty.usbmodem12345

# Set the platform default

export PLATFORM=photon
If you want them to stay after you close the terminal, ask someone how to add them to your bash profile.
Step 3: First Build
This will clean and build the file at firmware/user/src/application.cpp which should contain the default tinker app. It will build the system firmware as well as the app.
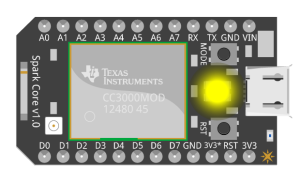
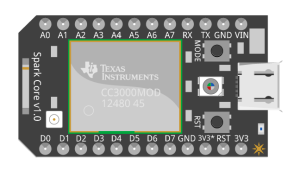
PUT THE BOARD INTO DFU MODE
If you didn’t put in the env variables above, or it didn’t automatically put the board into dfu mode ( orange ish yellow ), or you just wanna do it manually because you’re a badass and nobody tells you what to do…
- Press both buttons
- let go of one
- Wait… Should immediately turn purple… Wait…
- Should blink orange-ish yellow
make clean all PLATFORM=photon -s program-dfu

# This will transfer the code to the photon

make program-dfu
# EXAMPLE OUTPUT

[snow@snow modules]$ make all PLATFORM=photon APP=test program-dfu
/Users/snow/Documents/dev/hardware/particle/firmware/modules/photon/system-part1/makefile /Users/snow/Documents/dev/hardware/particle/firmware/modules/photon/system-part2/makefile /Users/snow/Documents/dev/hardware/particle/firmware/modules/photon/user-part/makefile
/Applications/Xcode.app/Contents/Developer/usr/bin/make -C /Users/snow/Documents/dev/hardware/particle/firmware/modules/photon/system-part1/ all program-dfu APP=test PLATFORM=photon

.....
..... Cut out the middle man
.....

Copyright 2011-2012 Stefan Schmidt, 2013-2014 Tormod Volden
This program is Free Software and has ABSOLUTELY NO WARRANTY
Please report bugs to dfu-util@lists.gnumonks.org

Suffix successfully added to file
Serial device PARTICLE_SERIAL_DEV : not available
Flashing using dfu:
dfu-util -d 0x2B04:0xD006 -a 0 -s 0x80A0000:leave -D ../../../build/target/user-part/platform-6-m/test.dfu
dfu-util 0.8

Copyright 2005-2009 Weston Schmidt, Harald Welte and OpenMoko Inc.
Copyright 2010-2014 Tormod Volden and Stefan Schmidt
This program is Free Software and has ABSOLUTELY NO WARRANTY
Please report bugs to dfu-util@lists.gnumonks.org

Opening DFU capable USB device...
ID 2b04:d006
Run-time device DFU version 011a
Claiming USB DFU Interface...
Setting Alternate Setting #0 ...
Determining device status: state = dfuIDLE, status = 0
dfuIDLE, continuing
DFU mode device DFU version 011a
Device returned transfer size 4096
DfuSe interface name: "Internal Flash "
Downloading to address = 0x080a0000, size = 6812
Download [ ] 0%
Download [ ] 0%
Download [=============== ] 60% 409
Download [=========================] 100% 6812 bytes
Download done.
File downloaded successfully
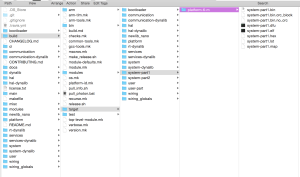
The Compiled Files
Step 4: Build Options
You can use any/all of these clean all of these
make
- clean – will remove the compiled firmwares, for (re)compile system
- all – compile all the changed code
- program-dfu – flash the firmware to a photon
- -s – stands for silent, if you’re having issues take it out
- APPDIR – an external directory containing code to compile
OR - APP – an app stored in “firmware/user/applications/< app_name>“
make clean all program-dfu PLATFORM=photon -s APPDIR=~/app_name
DON’T TRY AT HOME
SUPER MEGA ADVANCED
To Escape the Hardware Abstraction Layer (enabling direct hardware calls)
make clean

make APPDIR=~/app_name SPARK_NO_PLATFORM=y
More
There are more detailed docs at:
github wiki It’s hard to navigate, and I imagine it’s a bit confusing.
gettingstarted Other potentially helpful github wiki
]]>
Computational Design of Linkage-Based Characters
EXPLAINED: A system for designing linkage based characters using a catalog of linkage types.
CHOSEN: I chose this project because it shows a new approach to designing complex linkages. This gives users without large amounts of domain knowledge solutions to a challenging and complex problem. The UI itself could be used to help design my whiteboard drawing robot.
CRITIQUED: This project does a fantastic job of providing an interface and process for the design of complex linkages based on an input motion. This works well as animators design motion without regard for physical fabrication and this tool would allow those same users to design their own linkages based on the aesthetic choices of an animator.
RELATED: This work falls within a broader field of animation, computer graphics, and physical prototyping. A few notable examples are:
- BACHER ¨ , M., BICKEL, B., JAMES, D. L., AND PFISTER, H.
2012. Fabricating articulated characters from skinned meshes.
In Proc. of ACM SIGGRAPH ’12. - http://robot-kingdom.com/dog-quadruped-robot/
LINK: https://www.disneyresearch.com/publication/computational-design-of-linkage-based-characters/
]]>It’s also available as a Gist on Github.
#include "simple-OSC/simple-OSC.h"

// create OSC object
UDP osc;

// set IP addresses and ports for I/O
IPAddress outIp(128, 237, 246, 8);
unsigned int outPort = 9000;
unsigned int inPort = 3000;

// creat named variables for pins
int leftMotorPin = D1;
int rightMotorPin = D0;

int ledPin = D7;


// runs once at the beginning of the program
void setup() {

	// start serial & OSC
	Serial.begin(115200);
	osc.begin(inPort);

	pinMode(leftMotorPin, OUTPUT);
	pinMode(rightMotorPin, OUTPUT);
	pinMode(ledPin, OUTPUT);

	// You can view Serial.print() commands sent from the Photon via your computer's console (while it's plugged in to the computer).
	// Do `ls /dev/tty.usb*` in terminal to find the address of the Photon,
	// then do `screen ADDRESS BAUD` to make a serial monitor.
	// For example, if my Photon is "/dev/tty.usbmodem331", I'd do 'screen /dev/tty.usbmodem331 115200'.

	// while waiting for connection to be set up
	while (!WiFi.ready()) {
		// wait and print to console
		delay(500);
		Serial.print(".");
	}
	// print to console when connection is started
	Serial.println("");
	Serial.println("WiFi connected");
	// get Photon's IP:PORT and print it to console
	IPAddress ip = WiFi.localIP();
	Serial.print(F("ip : "));
	Serial.print(ip);
	Serial.print(F(" : "));
	Serial.println(inPort);
}


// continuously runs throughout the life of the program, after setup()
void loop() {


	// RECEIVE ===

	// create message object
	OSCMessage inMessage;

	// if the incoming OSC packet is larger than 0 bytes
	int size = 0;
	size = osc.parsePacket();
	if (size > 0) {

		// copy each byte from the incoming packet to the message object
		while (size > 0) {
			inMessage.fill(osc.read());
			size--;
		}

		// if the message can be parsed
		if (inMessage.parse()) {

				Serial.println("Message Received");

			// route it to a callback function
			inMessage.route("/A", leftCallback);
			inMessage.route("/B", rightCallback);
		}
	}


	// SEND ===

	// To test sending messages, you can use `nc -ul PORT` in terminal to listen to incoming messages on localhost.
	// For example, if outIp is my computer's IP address (128.237.246.8), and outPort is the port I'm sending to (9000),
	// then I'd run `nc -ul 9000` in terminal, and send a message from the Photon using the following example.
	//
	// For TouchOSC, you'd want to send the appropriate route to your mobile device's IP. Follow instructions [here](http://hexler.net/docs/touchosc)

	// create an outgoing message object
	OSCMessage outMessage("/sensor");

	// add parameters to the object
	outMessage.addString("test");
	outMessage.addFloat(-3.14);
	outMessage.addInt(-1);

	// send the object
	outMessage.send(osc, outIp, outPort);
}


// callbacks are run asynchronously from the main loop()
void leftCallback(OSCMessage &inMessage) {
		Serial.println("LEFT CALLBACK");

		if (inMessage.getInt(0) == 0) {
			Serial.println("LEFT OFF");
			digitalWrite(leftMotorPin, LOW);
			digitalWrite(ledPin, LOW);
		} else {
			Serial.println("LEFT ON");
			digitalWrite(leftMotorPin, HIGH);
			digitalWrite(ledPin, HIGH);
		}

}

void rightCallback(OSCMessage &inMessage) {
		Serial.println("RIGHT CALLBACK");
		Serial.println(inMessage.getInt(0));

		if (inMessage.getInt(0) == 0) {
			Serial.println("RIGHT OFF");
			digitalWrite(rightMotorPin, LOW);
			digitalWrite(ledPin, LOW);
		} else {
			Serial.println("RIGHT ON");
			digitalWrite(rightMotorPin, HIGH);
			digitalWrite(ledPin, HIGH);
		}

}
]]>