Today we continued to develop our platform game by making our camera smoothly follow the player throughout the environment, implementing our ruleset for how the player can move through the environment (forward only, please!) and finally we added an enemy controller and gave it a patrolling “behavior” through the use of triggers (a special variation of colliders).
Part 1: Camera Control
Now we have created a player object and let him run through our level, but very quickly the player runs out of view. There are a number of ways to address this. The simplest way to let the camera follow our player is to make the camera a child of the player object. This way, any movement of the player was automatically reflected in the camera. The end result is that the player remains perfectly still as the rest of the world moves around it.
This solution is OK, but does not really fit what we are going for. This should be a side scroller, meaning we move our camera to the side, and so we need a better solution.
Our first step is to move the camera horizontally with the player, but not vertically. We accomplish this by placing a script on the Camera object that would mirror the X value of the player object, like so:
public GameObject player;
void Update () {
    Vector3 playerposition = player.transform.position;
    Vector3 cameraposition = transform.position;
    cameraposition.x = playerposition.x
    transform.position = cameraposition;
}
IMPORTANT NOTE: Although our game is 2D, our transforms are still very much 3D. This means when working with position, we always need to use Vector3 rather than Vector2 structures.
We set a public game object and assign the Player object to it in the Inspector. Then on each frame, we find the X position and match it. The result was just OK. The side motion worked but things feel a little jittery. We want to give our player a little room to move away from the center and have the camera catch up, as though it were controlled by some camera person trying to keep up with the action. To facilitate that, we used Mathf.SmoothDamp( ), a dampening function to create a gentle curve to the updating X values, giving the camera an eased, elastic feel.
public GameObject player;
private float xVelocity = 0.0f;
// Update is called once per frame
void Update () {
    Vector3 playerposition = player.transform.position;
    Vector3 cameraposition = transform.position;

    cameraposition.x = Mathf.SmoothDamp (cameraposition.x, playerposition.x, ref xVelocity, 0.5f);
    transform.position = cameraposition;
}
SmoothDamp ( ) is part of the float math libraries, and takes 4 parameters – the start value, the end value, the current velocity (as a reference), and the time the smoothing should occur. Velocity here is tricky, as SmoothDamp ( ) will modify it each time it runs. In order to let that persist, we pass the velocity variable as a “ref”, which is the closest we will get to pointers in this class. Normally when we call a method we say “here is a value” but in this case by declaring “ref” we say “here is access to the variable itself”. SmoothDamp ( ) will update velocity each time it runs.
Playing this again, this is getting better. My player runs away and the camera catches up again. Since I’ve decided to use “Mario” rules, I want to make sure that the player can only advance, not move backwards. I’ll do that by defining two rules.
Rule #1: Any time the player moves right of the midpoint on the screen, the camera will follow.
Rule #2: The player can only move as far left as is currently visible on the screen.
Rule #1 is easy enough to implement. To do this, we set a condition around the SmoothDamp and transform position update that test to see if playerposition.x is greater than cameraposition.x and if so, it will let the camera follow.
public GameObject player;
// ref value for smoothDamp
private float xVelocity = 0.0f;
// Update is called once per frame
void Update()
{
    // match the player x position
    Vector3 playerposition = player.transform.position;
    Vector3 cameraposition = transform.position;
    if (playerposition.x > cameraposition.x) {
        // cameraposition.x = playerposition.x;
        cameraposition.x = Mathf.SmoothDamp(cameraposition.x, playerposition.x, ref xVelocity, 0.5f);
        transform.position = cameraposition;
    }
}
Rule #2 is a little trickier, as we don’t really know where the left edge is. We could do all kinds of math to figure this out, casting rays and such, but we are going to do this the lazy way.
OPTION 1: (the complicated way) In a previous semester, we included a value called “leftSideOffset” that held the distance in x units that corresponded with the left edge of the screen from the center of the camera. Since the camera is always the same z-distance from the player, this number can be a constant. In our update loop, we then check the offset as a bounding x-value for the player, with the following code:
    Vector3 checkposition = transform.position;
    float leftx = gameCamera.transform.position.x - leftSideOffset;

    if (checkposition.x < leftx) {
        checkposition.x = leftx;
        transform.position = checkposition;
    }
OPTION 2: (the cheap way) For this class, I have implemented a much more rudimentary system. I create an object and assign it a BoxCollider 2D. I size this to span beyond the vertical length of my camera view, and move it to the very left of the camera. Finally, I make this object a child of the Main Camera, meaning that it will follow along wherever our camera goes. This prevents our player from being able to run beyond the edge of the screen. (Once we place enemy objects, you will want to adjust your Collision Matrix in the Physics 2D panel in your Project Settings, just like we did with our 3D collisions in Astral Attackers, so that your non-player objects can pass through unimpeded.)
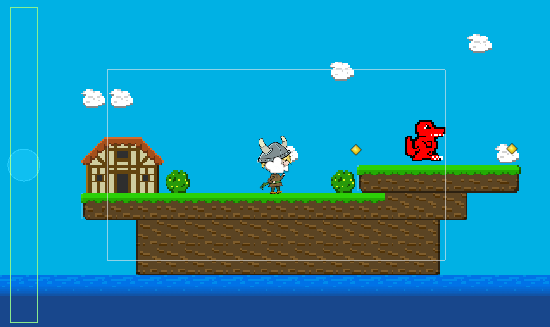
Part 6 – Enemies and Triggers
Now that we’re moving and jumping, let’s create some enemy objects to interact with. We won’t worry about colliding with them right now, but let’s at least get them in the scene and behaving the way we expect them to behave (patrolling their platforms)!
We created an object similar to our player but with our Enemy sprite. We added CharacterController2D, Circle Collider 2D, and Rigidbody 2D component to it, and gave it a simplified version of our script to automate its movement. We use a simple boolean in our script called “FaceLeft” which will indicate if our enemy is facing left or right, and uses that value to pass that direction into the CC2D move command.
To create behaviors, we will use Triggers to give our Enemy the illusion of intelligently patrolling its platform. Triggers are a variation of colliders that don’t actually collide – they simply define a volume, and that volume will create a collison-like event when another object’s collider enters it.
For our purposes, we are going to create a “turn around” box – a cube volume that our enemy will enter, register, and react by reversing direction. First, create an empty object, add a Box Collider 2D, and check the Is Trigger box. Create a tag called “TurnAround” and assign it to this box. Make this object a prefab so that we can place them throughout the level. Then we add this to the Enemy script:
private void OnTriggerEnter2D(Collider2D collision)
{
    if (collision.gameObject.tag == "TurnAround")
    {
        Debug.Log("Hit the Collider");
        faceLeft = !faceLeft;
    }

}
Once the Enemy object enters the trigger object, it checks for the “TurnAround” tag, and if it finds one, it will invert the “faceLeft” value of the Enemy causing him to walk in the other direction. This will only fire when the enemy first enters the volume as OnTriggerEnter2D only occurs at the first point of overlap. You can use OnTriggerExit2D to register when the overlap has ended, or OnTriggerStay2D to confirm that an overlap is ongoing.
NOTE: Trigger’s use the OnTrigger commands, as opposed to the OnCollision commands. Unity treats these differently, so they will only apply to the corresponding setting for isTrigger. Also, because this is 2D physics, note the 2D designation at the end of each of these. OnCollisionEnter and OnCollisionEnter2D use different physics systems and are not interchangeable, so if your collisions are not registering, check that you are using the proper command.
Part 7: Pixel Perfect Camera
When working with pixel art, you may notice some tearing or flickering lines in your game. This is often due to the slight artifacts created by the camera sampling the artwork at an incorrect distance. Thankfully, Unity includes a package to help correct for this – the 2D Pixel Perfect Camera. Rather than run through all of the features here, check out the Unity Manual which does an excellent job breaking down exactly how this works.
Unity Manual: 2D Picture Perfect
CameraFollow.cs
using System.Collections;
using System.Collections.Generic;
using UnityEngine;

public class CameraFollow : MonoBehaviour
{

    public GameObject player;

    // smoothing velocity
    private float xVelocity = 0.0f;


    // Update is called once per frame
    void Update()
    {
        Vector3 playerPosition = player.transform.position; // get the player position
        Vector3 cameraPosition = transform.position; // get our (camera) position

        // cameraPosition.x = playerPosition.x;

        if (playerPosition.x > cameraPosition.x)
        {
            // smooth the camera transition
            cameraPosition.x = Mathf.SmoothDamp(cameraPosition.x, playerPosition.x, ref xVelocity, 0.5f);
        }

        //update our position
        transform.position = cameraPosition;
    }
}
EnemyScript.cs
using System.Collections;
using System.Collections.Generic;
using UnityEngine;

public class EnemyScript : MonoBehaviour
{
    public float speed;
    public bool faceLeft = true;

    private CharacterController2D controller;

    // Start is called before the first frame update
    void Start()
    {
        controller = GetComponent<CharacterController2D>();
    }

    void FixedUpdate()
    {
        float horizontalMove = speed * Time.fixedDeltaTime;
        if(faceLeft) { horizontalMove *= -1.0f; }
        controller.Move(horizontalMove, false, false);
    }

    private void OnTriggerEnter2D(Collider2D collision)
    {
        if (collision.gameObject.tag == "TurnAround")
        {
            // hit the collider, turn around
            Debug.Log("Enemy hit a collider");
            faceLeft = !faceLeft;
        }
    }

}