Often times, we want to add a little punch to our games – something to increase the “juice” of an action, event, or object. One way to do that is to add special effects using the “particle” system – a speedy way to generate visual effects. These particles are designed to render hundreds or even thousands of little objects quickly and efficiently so that you can build out stunning visuals without too much overhead.
A lot of creating a good particle effect involves trial-and-error, so make sure to leave yourself some time for experimentation. Unity’s particle system is quite powerful, with a number of settings and features that can be combined in interesting ways. Rather than cover all aspects of it here, I will recommend that you watch the recording of today’s class if you want to follow along, and instead here just give a brief overview of some of the more commonly used systems
Creating a Particle System
First, you must generate a particle system in your scene. You start by creating a Particle System (Create > Effects > Particle System), and this will place a Particle System object in your scene hierarchy. You will see this default particle spray of little white dots in your scene and in your game window. This preview will run while you have the object selected in your hierarchy, and you can pause, stop, and restart the simulation with the UI that appears in your scene window.
In the Inspector you will find the Particle System Component. As you can see, there are a TON of options:
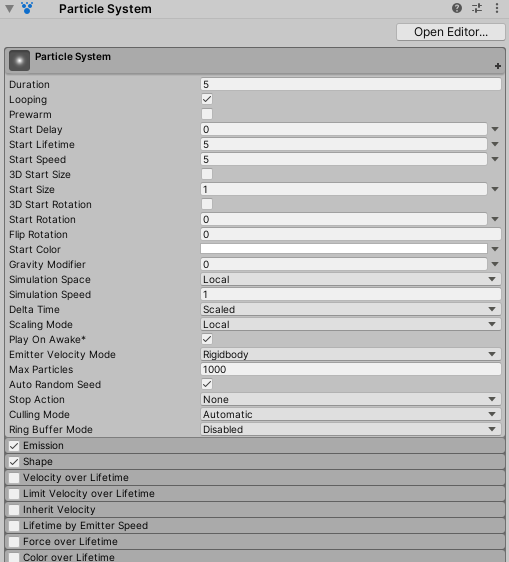
In addition to the main properties, there are a number of features that can be activated, each with their own settings. In this way, they operate somewhat like components inside of the component.
Important Properties
Timing Properties
The Duration property defines the length of this particle effect measured in seconds. If Looping is selected, then this effect will run again once the duration has passed. The Duration refers only to the timing of the emission of particles themselves. Particles also have a Lifetime property that is set at the start that determines the amount of time that the particle will exist. Finally, a Start Delay property set the amount of time to wait before the launch of the effect.
Combined, these make the overall length of an effect equal to Start Delay + Duration + Lifetime.
Emission Shape, Speed & Direction
The Start Speed indicates the speed that the particles are travelling when they are emitted. By default this holds a single value, but note the small dropdown arrow to the right of this field. Many of these fields have additional options available. For this value, you can designate a steady float value, have a random value chosen between two numbers, designate a “curve” that plays out across the duration of the effect, or randomly choose between the values of multiple curves. Lots of options!
Position and Direction of emission are managed by the Shape feature. The default shape is a conical volume, with the particle emitted from the base, outward at an angle, but there are many options for shapes that can be used, such as Sphere, Box, Edge, or even Mesh. Each shape type has its own properties for how particles can emit.
The Gravity Modifier controls how much effect your scene gravity has on particles. By default this is set to 0, meaning that particles will just travel along their initial direction at speed. A value of 1 will cause your particles to be fully effected by gravity, but you can also set this higher for a faster fall, or to a negative number if you want your particles to rise and accelerate (like a “bubble” effect).
The Simulation Space option lets you choose how the particles should transform. The default setting is Local which treats the system as a parent object, so the particles move with the parent. Setting this to World puts the particles into world space, so they will maintain their original position/trajectory even if the emitter moves. (Very useful for things like smoke trails)
Color
The Start Color value controls the color value of a particle at emission. This can be set a single value, or a Gradient that plays out over time, or you can randomly choose from along a gradient. This way you can introduce variation into your particles.
Also of interest, the Color over Lifetime lets you alter the color (although this is additive rather than a full change, so it well blend your colors. This works similar to the Tint Color property on sprites). This is particularly useful if you want to adjust transparency or brightness over time.
Objects and Size
The default particle is a fuzzy dot, but you can create your own particle material by creating a new Material and then changing the shader type to Particle > Standard Unlit. Then you can add a texture to the Albedo channel. You can use a transparent texture (such as from a PNG), or set the type to Additive if you want the lighter parts to overlay the scene.

Start Size lets you set the initial size of the particle that is created, and this can be a steady value or adjust based on random values or curves.
Size over Lifetime is especially useful for particles that change, such as fire that become billowing smoke.
Sub Emitters
One more powerful tool is the SubEmitter which allows your particles to emit particles of their own. These can be scheduled to happen at the birth or death of your particle, or manually configured to other events such as collisions and targets.
Chaining together these sub-emitters allows you to create complex effects from a single particle system, such as these fireworks that we demonstrated in class. A single particle emitter with a Trail also spawns sparks as it raises up. Upon the death of the rocket particle, a burst of particles with their own trails are emitted to create the firework effect.