Today we made a better version of our game in a fraction of the time thanks to Unity’s physics engine, and had enough time left over to recreate our paddles using prefab scripts.
Part 1: Starting Over
Our first step for today was to repurpose our existing game. As our game had very few components to it, we used Save As… to create a copy of our scene, and removed the original “Ping” script component from our Main Camera. Now we have all of the parts, but none of the action. Physics to the rescue!
Part 2: Rigidbody Physics
Physics in Unity rely on three main components. The “Rigidbody”, which gives control of the object over to the physics system and allows forces such as collisions and gravity to apply; the “Collider”: a procedural or mesh volume that determines the physical “shape” of an object for collision detection; and the Physic Material which defines the physical properties of objects and determines how they should react during collisions.
In Unity, most meshes (including all primitive objects) come with a Collider component already defined. This allows objects that are controlled by the physics systems to react and respond to the rest of our world, without having to subject them to the arduous calculations that would be required if they were moveable objects, each subject to forces and gravity.
In our case, we only need to apply physics to one object here, our ball. We do this by adding a Rigidbody component, available by selecting Add Component > Physics > Rigidbody. As soon as we add this, we can run our game and if our ball is located outside of our plane, we see it fall away very slowly. (Or at least, it feels slow. The speed here is accurate as Unity’s default gravity accelerates at 9.8 m/s2 just like real life. The “slow” here comes from our expectations of size – remember that our ball is 3 units in diameter, meaning it is ~10 feet high – but we expect it to be small like a ping pong ball and so our visual perception is that it is falling slowly).
Now, reposition the ball to the origin point (0,0,0) and run the game again. Hmm… it just sits there. And of course it does – we haven’t done anything to make it move. Previously, we had to tell the ball to move in every frame. This time, we are going to give the ball one big push and let physics do the rest. Time to create a new script, again placed as a component on the Main Camera. I called this one “EasyPing” to reflect the simplicity with which we will build this new game.
public class EasyPing : MonoBehaviour
{
    public GameObject ballObject;
    private Rigidbody ball;

    public float force;
    public Vector3 direction;

    void Start()
    {
        ball = ballObject.GetComponent<Rigidbody>();

        direction.Normalize();

        // launch the ball
        ball.AddForce((direction * force), ForceMode.VelocityChange);
    }

}
Here we create a public GameObject so that we can link the ball object to our script in the Inspector. Then we declare a private Rigidbody variable which will link us to the ball’s Rigidbody component via GetComponent<Rigidbody> ( ).
At the end of our Start( ) function we call the AddForce( ) command to give our ball’s rigidbody a big push. (“force” and “direction” are also made public, so that we can adjust the force of that push in our Inspector. Note the second parameter in our AddForce( ) command – ForceMode.VelocityChange – this is an “enumerated type”, a data type consisting of named values. We will look at these more in a future lesson, but they are a helpful way of storing options in a readable format. The “ForceMode” tells unity how you want that force to be applied. There are 4 types:
- Force – the default type, and the one closest to the definition we remember from physics class. The force indicated is applied to the object and takes mass and time of application into consideration. The time of application can can be VERY small, due to the short interval of FixedUpdate that is used by the Physics system, usually around 5ms, so this option is best used for applying constant force across a number of frames, for effects such as thrust or wind.
- Acceleration– still applies the force across only the interval of time it is called in, but does not take mass into consideration, so objects are equally effected regardless of a difference in weight. Gravity in the game is applied as a constant accelerative force (just like in real life)
- Impulse – applies the full value of the force in one instant, taking mass into consideration. Great for uses like jumping, or handling the effects of explosions. (Small objects fly fast and far, large heavy objects are less effected).
- VelocityChange – instant application of “force” and mass does not matter. This creates an instant adjustment to the velocity of the object.
When we hit play, the ball starts moving. It collides with the wall, then sort of sits there. If you watch this through the side view (I recommend selecting the ball object so that you can use the collision sphere widget to see how it is moving) you’ll notice it is rolling over to the paddle, then gaining some friction and rolling slightly up the side of the paddle before falling down and coming to rest.
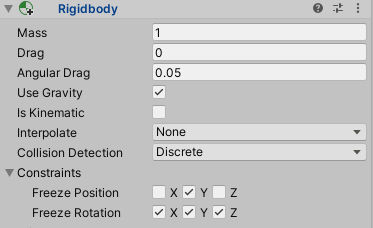
Obviously this is not the behavior we want, so we need to make a few changes. First, we should restrict the motion of our ball to the XZ plane to make sure we don’t fly off the board. Do this by setting the Constraints in the Rigidbody controller of the ball. While you are there, restrict all rotation as well.
Next, we need to control how our object interacts with others. We do this by creating a Physic Material (in Assets > Create > Physic Material). Friction is what made the ball move, so we want to get rid of both Dynamic Friction (the friction that slows objects in motion) and the Static Friction (the friction that prevents objects from moving in the first place). Set both of these values to 0. Next, set our “Bounciness” to 1, and our “Friction Combine” to Minimum and our “Bounce Combine” to Maximum. The “Combines” are used to determine how to calculate these forces when multiple materials are present. “Minimum” uses the smaller value of the two, “Maximum” uses the larger. “Average” and “Multiply” apply a combination of both. Apply this Physic Material to the ball by dragging it into the Material slot in the Sphere Collider.
Now when we hit play, our ball slides smoothly from paddle to paddle. Changing our direction lets us try a few more scenarios. Looking good! Now all we need to do is move the paddles
Part 3: Scripting Prefabs
Instead of using the one script to interpret various buttons and control the paddles as we did last time, I am going to create a new script direction on the prefab object itself. This script will perform the same task, using the Update( ) method to test to see whether a particular set of buttons is being pressed, and then move the object accordingly.
First, I define two public strings, to hold the key codes for the keyboard buttons I intend to use for “up” and “down” motion.
public string upButton;
public string downButton;
Next I define two private variables – one to regulate the speed of the paddles, and the other to create an offset value to restrict movement beyond a certain amount.
private float speed = 50.0f;
private float offset = 20.0f;
Then I edit the Update( ) method to include the following code:
    void Update()
    {
        Vector3 currentPosition = transform.position;
        if (Input.GetKey(upButton))
        {
            currentPosition.z += speed * Time.deltaTime;
        }
        if (Input.GetKey(downButton))
        {
            currentPosition.z -= speed * Time.deltaTime;
        }
        currentPosition.z = Mathf.Clamp(currentPosition.z, -offset, offset);
        transform.position = currentPosition;
    }
Walking through this line by line, first we get the position of the paddle by creating a Vector3 called currentPosition and assign it a value of “transform.position” which is shorthand for “this.transform.position”. This returns the current XYZ coordinates of the object.
Next, we test to see if the “upButton” and “downButton” keys are pressed. We test both, using separate if statements, to make sure that we capture situations where both up and down are pressed at the same time. (If they are, their movements will cancel each other out and the paddle will remain still.) If we determine one of the buttons to be pressed, we either increase or decrease the “z” value of the position by an increment of (speed * Time.deltaTime). If you are curious why we do not just multiply by speed, it is because unlike the ball which is now being managed at a regular interval like the Physics system, we are still moving the paddles frame by frame and framerates are often not steady. So we treat our “speed” variable as a “units per second” value, and Time.deltaTime returns the number of seconds that have passed since the previous frame. (If you are running at a steady 60fps, Time.deltaTime will return a float value of 1/60, or approx 0.0167s)
Closing this out, we have this line:
currentPosition.z = Mathf.Clamp(currentPosition.z, -offset, offset);
Here we introduce the Mathf library (a library of math functions for floating point numbers) and the Clamp method, which allows us to set a minimum and maximum value and see if our value falls within that range, and if not returns one of those values instead. Now the paddle position will be constrained to move no farther than “offset” number of units from the 0 position.
Finally, we set transform.position to be equal to currentPosition. Note that we have to pass this value back – transform.position is not an object that can be passed and held as reference, you can only perform a “get” or “set” to it.
Now in your paddles, assign the left paddles buttons to “w” and “s”, and the right paddle to “up” and “down” (which translate to the up and down arrows on the keypad), and we should be good to go.
EasyPing.cs
using System.Collections;
using System.Collections.Generic;
using UnityEngine;

public class EasyPing : MonoBehaviour
{
    public GameObject ballObject;
    private Rigidbody ball;

    public float force;
    public Vector3 direction;

    void Start()
    {
        ball = ballObject.GetComponent<Rigidbody>();

        direction.Normalize();

        // launch the ball
        ball.AddForce((direction * force), ForceMode.VelocityChange);
    }

}
Paddle.cs
using System.Collections;
using System.Collections.Generic;
using UnityEngine;

public class PaddleScript : MonoBehaviour
{
    public string upButton;
    public string downButton;

    private float speed = 50.0f;
    public float offset = 10.0f;


    // Start is called before the first frame update
    void Start()
    {

    }

    // Update is called once per frame
    void Update()
    {
        // get the current position
        Vector3 currentPosition = transform.position;

        // check the "up" key
        if (Input.GetKey(upButton))
        {
            currentPosition.z += speed * Time.deltaTime;
        }

        // check the "down" key
        if (Input.GetKey(downButton))
        {
            currentPosition.z -= speed * Time.deltaTime;
        }

        // check the range of the z position
        currentPosition.z = Mathf.Clamp(currentPosition.z, -offset, offset);


        // replace the adjusted position
        transform.position = currentPosition;


    }
}