Today we take a look at collisions – when objects bump into one another. These are some of the most commonly used events because so much of our game mechanics depend on whether or not two things have touched. We use them to determine if a hit was successful, if an enemy has touched us, if we are on the ground, if we should be making a sound. Understanding how collision events are generated and how to interpret them is incredibly important. And today, we will use them to generate game feedback in the form of sounds.
It’s fun to watch our ball bounce around, but we should add some sound to really make this pop. I’ve uploaded a few sounds to use for this demo (you can find them on Canvas), feel free to use those or a noise of your own creation. Just remember, the sound should be quick, and the noise should start at the very beginning of the file, otherwise you’ll have a brief period of dead air and it will appear as though the sound is delayed. Import your sounds using Assets > Import New Asset…, or simply drag the files into the Assets folder.
Since the only thing in our current design that should make a noise is when the ball collides with something, I’ve decided to assign all noise making duties to the ball itself.
In order to make sounds, an object must have the AudioSource Component attached to it, so I add one to the “ball” object. When you add this component, you will notice an empty AudioClip property which is the audio file to be played – leave this empty, as we will fill it later using our script.You will also notice that, by default, Play On Awake is checked. De-select this option, as we will control when we want things to play.
We want our clip to play whenever the ball hits the paddle, so we need to figure out when that event occurs. To do this, we will test every collision that the ball experiences.
Whenever a collision occurs, the game generates a Collision Event. We can set our scripts to listen for these events and use them to perform actions, in this case playing our sound. Add a new script to the Ball object (I called mine BallScript. Add the following code for the variable declaration and Start ( ) function:
private AudioSource audio;
// Start is called before the first frame update
void Start()
{
    audio = GetComponent<AudioSource>();
}
Just like we created a Rigidbody typed variable, here we create an AudioSource type variable and assign it using GetComponent<AudioSource> ( ). Notice, however, that before we used a reference to a separate game object (“ballobject”) as our source, and here we simply use “this”. This gives us access to the object which it is running through. It is self-referential, so no extra association steps required.
Our next step is to identify when a collision occurs, then look to see if we have hit the right type of collision.
private void OnCollisionEnter(Collision collision)
{
    if(collision.gameObject.tag == "Wall")
    {
        audio.Play();
    }
}
OnCollisionEnter ( ) runs when a collision event occurs involving this object – meaning that this object’s collider has initiated contact with another object’s collider. It is only called one time per collision. When the objects separate / stop touching, there is an OnCollisionExit ( ) message that will be called. If objects remain in contact, OnCollisionStay ( ) messages will issue once per frame.
Our collision event has a parameter that is of the type Collision, which here we assign to a variable “collision”. This Collision object contains data about the collision, such as the point of contact, the object that was hit, and the relative velocity of the two objects. Here we test the Tag of the other object against a known value, and if it returns as true, we tell the audioSource to run the Play( ) command.
Unity projects have a few pre-existing tags that you can use, but I recommend creating your own.
Select your paddle prefab, and in the inspector look for the Tag dropdown near the top. In there, select Add New Tag… and add a new named tag. Call this one “Wall”. Now select your paddle again and from the dropdown give it the tag Wall. Now play your game and you should get a satisfying “bonk” noise when your ball hits a wall. Let’s look a little closer at the Audio Source component:
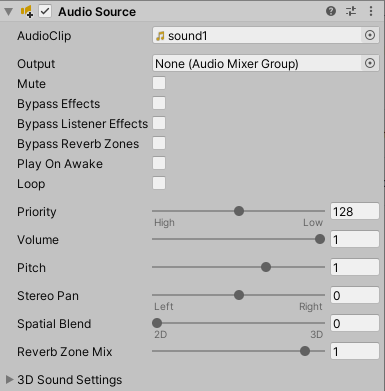
As the name suggests, this component makes our object the “source” of a bit of audio, by having it emit a sound. The sound that will be emitted is defined using the AudioClip setting, which gives us access to the AudioSource.clip property. Once a clip has been set, we can use AudioSource.Play( ) to play the sound, and AudioSource.Stop( ) to stop it.
But the AudioSource is only one half of the equation. We also need to have an AudioListener in our scene, to act as our “ears”. By default, the AudioListener is added as component on the Main Camera.
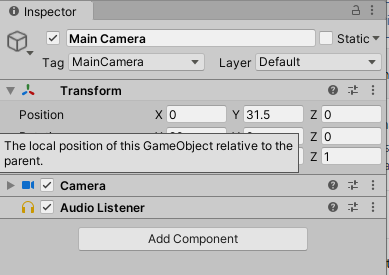
The reason this configuration makes sense is that your Main Camera is usually your best representation of where you as the observer are in relation to the world of the game itself. The Spatial slider in your AudioSource component allows you to set the sound to be:
- “3D” – meaning that the sound is interpreted as emitting from that point in space in relation to your camera. Volume is attenuated based upon distance to the source, and the balance between your speakers is based upon the heading. (Unity’s audio source is set to Stereo by default, but can support other configurations such as Mono or 5.1 Surround Sound.) This is useful for diegetic sounds – those that are happening inside our game like enemy footsteps or a character voice calling to you.
- “2D” – meaning that the sounds emanates from everywhere, or according to the balance set in the source such as through Stereo Pan. This is useful for non-diegetic sounds – those that are not implied to occur inside the game world such as background music, or voice-overs, or UI sounds.
- Blend – the slider lets you adjust your sound to a combination of these. This is especially useful if you want something to always be audible at a certain level even if the source is distant. Important character dialogue may fall into this category.
One important note about an AudioSource – it can only play one clip at a time. If you have multiple clips that need to play simultaneously, you need multiple AudioSources, which means multiple objects.
In a future class, I will show you methods for creating a more sophisticated Sound Manager, but for now, we are going to make our different sounds by switching the clip on our ball’s AudioSource.
In our BallScript.cs script, we declare the following public AudioClip variables. This will create three audio clip slots in our script component in the Inspector, which we will fill with sounds from our Assets folder.
public AudioClip wallSound;
public AudioClip paddleSound;
public AudioClip deathSound;

Next, we create a script to play the Paddle sound (as opposed to the default Wall sound)
private void MakeWallSound()
{
    audio.Stop(); // stop the audio if it is already playing
    audio.clip = wallSound; // set the new clip
    audio.Play(); // play the new clip
}
Here we first issue a Stop( ) command, in case something else is already playing. Next we set the clip for this AudioSource to be the sound we wish it to make, in this case the paddle sound. Finally, we issue the Play( ) command which will cause the sound to start playback at the beginning.
private void OnCollisionEnter(Collision collision)
{
    if (collision.gameObject.tag == "Wall")
    {
        // make the paddle sound
        MakeWallSound();
    }
}
Next we add similar functions for the paddle and back wall sounds. For these functions, we will use another method of AudioSource – PlayOneShot( )
private void MakePaddleSound()
{
    audio.PlayOneShot(paddleSound); // play the paddle sound once
}
public void MakeDeathSound()
{
    audio.PlayOneShot(deathSound); // play the death sound once
}
PlayOneShot( ) will load and play the included clip one time and immediately stop once it is complete. It is important to note that this will NOT change the value of our AudioSource.clip. If you ran the Play( ) command after PlayOneShot( ) the audio clip playing would be the same clip that was loaded before.
Finally, just for fun, we added increase in the Rigidbody.velocity of our ball object so that the ball speeds up each time it is hit by a paddle, and we also increased the value of AudioSource.pitch which will make the sounds move to a higher tone and reinforce that effect of more speed.
BallScript.cs
using System.Collections;
using System.Collections.Generic;
using UnityEngine;

public class BallScript : MonoBehaviour
{
    private AudioSource audio;
    private Rigidbody rb;

    public AudioClip wallSound;
    public AudioClip paddleSound;
    public AudioClip deathSound;

    // Start is called before the first frame update
    void Start()
    {
        audio = GetComponent<AudioSource>();
        rb = GetComponent<Rigidbody>();
    }

    private void OnCollisionEnter(Collision collision)
    {
        if (collision.gameObject.tag == "Wall")
        {
            MakeWallSound();

        } else if (collision.gameObject.tag == "Paddle")
        {
            MakePaddleSound();

            if (audio.pitch <= 2.0f) {
                // increase the pitch
                audio.pitch += 0.1f;

                // increase the speed
                rb.velocity *= 1.1f;
            }

        } else if (collision.gameObject.tag == "BackWall")
        {
            // audio.pitch = 1.0f;
            // MakeDeathSound();
        }

    }

    private void MakeWallSound()
    {
        audio.PlayOneShot(wallSound);
    }

    private void MakeDeathSound()
    {
        audio.PlayOneShot(deathSound);
    }

    private void MakePaddleSound()
    {
        audio.PlayOneShot(paddleSound);
    }


}