P7 – Spatial music

For this project you will develop an electro-acoustic performance piece that will be presented using a multi-channel speaker array. You will be using Ableton and Max for Live to develop a system in which the spatial arrangement and development of sound plays a significant role in the composition. There are many tools and techniques for working with surround/spatial/3D sound in Ableton, including the simple “Surround Panner” which we demonstrated in class: feel free to combine as many of these as you like in your project.

As always be sure to organize your Ableton project thoughtfully with meaningfully named tracks. Before submitting your project do “Collect all and save” to make sure all your files are copied into the project folder. Zip your entire project folder and upload to Google Drive. In Google Drive set your permissions so that “Anyone with the link can view” your zip file. Submit the Google Drive link via Canvas.

Your project will also be presented in class so we can enjoy it in its full surround-sound glory. So be sure to have it tested out for performance/playback in the Media Lab’s speaker system.
P5 – An unfaithful rendition

For this project you will create an interpretation of your song from our Punk White Elephant playlist. Your interpretation should be playable by a small group ranging from two to six musicians, using instruments from our roster. Your performers can also perform with electronics (MIDI controllers, etc) rather than traditional instrumentation.

Your interpretation can be as faithful or unfaithful to the source material as you like. You can create a classical-style rendition of the tune for orchestral instruments, an acappella cover with vocal harmonies, an electronic or electro-acoustic update, or a straight-ahead punk banger.

Your submission will be in the form of an Ableton project that is can be used for the performance of your song. There should be audio tracks for all live instruments with thoughtful processing for your interpretation. You may also use samples, loops, and programmed sequences but you should practice how you would plan to use these in a live performance. Be sure to name your tracks so we all know what tracks are what, and so that you create audio files with meaningful file names!

In addition to your project files, prepare materials your musicians will need to perform the piece. This should includes lyrics (assuming you plan to have vocals) and written parts or a “lead sheet”. Include these in your project folder in a subdirectory named parts.

Before submitting do “Collect all and save” in Ableton to make sure all your files are copied into the project folder. Zip your entire project folder and upload to Google Drive. In Google Drive set your permissions so that “Anyone with the link can view” your zip file. Submit the Google Drive link via Canvas.

P4 – Field Recordings

Create an electro-acoustic piece that makes use of field recordings to create a narrative or spatial journey. Your field recordings may be of natural or built environments and should be use to augment the musical elements of your composition. Explore techniques discussed in class that blur the line between musical and non-musical sound.

Upload to Google Drive your final mix as a stereo WAV file along with all your project files (don’t forget to do “Collect All and Save” in Ableton). Make your sharing permissions on Google Drive are set so that anyone with the link can view the files. Submit the Google Drive link on Canvas.

P3 – Adding video

P3 will be identical to P2 in terms of the technical prompt, with one addition: you will be delivering a high-quality video that includes your final sound mix. We recommend checking out a DSLR or GoPro camera from IDeATe lending to get the best image quality, but using a smartphone for video is also OK if you can make it look nice.

Record an electro-acoustic performance using Ableton Live for live processing of one more instruments mic’d with DPA instrument microphones. You may perform the instrument(s) yourself or recruit colleague/friends while you perform live electronics. After you’ve recorded the performance, refine the recording using Automation editing in Ableton. Polish the mix as best you can using effects we’ve covered and others you explore on your own.

You will be delivering your entire Ableton session as well as a Video with the normalized mix of the piece. Save your Ableton session as YOURANDREWID-P3. Make sure all your media files are included in this project directory – for example you should see all the recorded audio files in the Samples/Recorded sub-directory. If not everything is in there you do “File/Collect All and Save” – this command will move all the dependencies into your project folder.

Combine the final sound mix with your video using either a video editor such as Adobe Premiere, or the video exporting tools within Ableton (we will do a quick demo of both approaches in class). Put the final video in your project’s root directory with the file-name YOURANDREWID-P3.

Upload the project folder to Google Drive and submit the link via Canvas. Be sure that sharing is enabled for the folder in Google Drive.

P2 – An electro-acoustic performance

Record an electro-acoustic performance using Ableton Live for live processing of one more instruments mic’d with DPA instrument microphones. You may perform the instrument(s) yourself or recruit colleague/friends while you perform live electronics. After you’ve recorded the performance, refine the recording using Automation editing in Ableton. Polish the mix as best you can using effects we’ve covered and others you explore on your own.

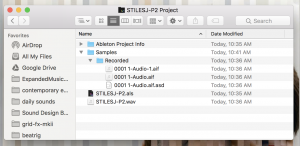
You will be delivering your entire Ableton session as well as a normalized mix of the piece. Save your Ableton session as YOURANDREWID-P2. Make sure all your media files are included in this project directory – for example you should see all the recorded audio files in the Samples/Recorded sub-directory. If not everything is in there you do “File/Collect All and Save” – this command will move all the dependencies into your project folder.

Now export your final mix into the project root directory as a normalized WAV file named YOURANDREWID-P2.wav. Your project folder should now look like this, for example:

Zip the project folder and deliver via Canvas. The zip file should be named YOURANDREWID-P2.zip

P1: Augmented performance

For this project you will video-record a live music performance that is augmented in any way you can imagine. Your augmentation could be:

Acoustic: playing in a reverberant space, playing underneath a blanket, playing underwater, etc.

Electronic: using software, electronic instruments, etc.

Visual: deploying costumes, lighting decor, etc.

Conceptual/compositional: playing a composition backwards, etc.

…or whatever twists you can dream up.

Your video should be shoot well with high-quality audio (no built-in mics from phones please). You are encouraged to make use of the GoPro cameras and Zoom audio recorders from IDeATe lending. The IDeATe Macbook Pros have Adobe Premiere, which can be used for adding high quality audio to a video recording with poor audio (i.e. video shot on a phone or a GoPro).

Submit your video via Canvas. Your file should be named YOURANDREWID-P1.mov.