This set of deliverables has 3 parts, and is due Wednesday 9/9 at the beginning of class:
- An optional fun reading about loops;
- A brief reading-response;
- A brief Looking Outwards
- A looping GIF using arcs.
0. Optional Fun Reading about Loops
Check out the article “On Repeat: How to Use Loops to Explain Anything” by Lena V. Groeger, a journalist/developer/information-designer at ProPublica. This article is purely for your edification/entertainment; there’s no deliverable. It should take about 10-15 minutes to view this elegant stack.
1. Looking Outwards #02: Generative Art Deep Dive
For each of the following 4 computational artists, spend a solid 5 minutes (each) looking at their generative projects:
- Helena Sarin, instagram • twitter
- Zachary Lieberman, instagram
- Manolo Gamboa Naon, behance
- Sofia Crespo, instagram
Now:
- Create a blog post titled nickname-LookingOutwards02
- Select one artwork by one of the above three artists that you find appealing or intriguing.
- Grab an image of the artwork (use a screengrab if necessary); embed this image in the post.
- Write a sentence about why you selected this project.
- Include a link to the project’s URL.
- Categorize your blog post LookingOutwards-02
2. Reading #02: First Word Art, Last Word Art
Please read the one-page essay, “First Word Art / Last Word Art” by Michael Naimark. A backup PDF of this article can be found here. You are asked to write a brief (two-paragraph) response to this essay.
Please contemplate technical novelty in relation to the arts. The author of this reading, Michael Naimark, is a new-media artist who has been active in experimental cinema and virtual reality since the mid-1970s. The duality Naimark describes is one attempt to understand how culture accommodates new technologies, delineating a spectrum from the well-understood to the utterly novel.
Make a new blog post in this WordPress site. In your blog post, please write about 150-200 words reflecting on Naimark’s article. Some possible starting points for your reflection could include (but are not limited to):
- Where do you locate your interests along this spectrum?
- What are some ways in which new technologies shape culture?
- What are some ways in which culture shapes technological development?
- We might aspire to make stuff of lasting importance, but when our work is technologically novel, it doesn’t always age well. Discuss.
When you are done, please give your blog post the title: nickname-Reading02, and categorize your blog post with the WordPress category, 02-Reading.
3. Living Wallpaper: A Looping, Animated Environment for Zoom.
This is the “main” part of Deliverables #2, and will be the only part of this week’s assignment which is critiqued in class. In this project, you will create a looping, animated graphic, and produce this in two versions:
- An animated GIF, uploaded to this site
- A video loop which will be used as your background in Zoom during Wednesday’s class
Your GIF must be uploaded to this site before the beginning of class Wednesday, 9/9. So:
-
- SKETCH FIRST! Before doing anything, make some (real) sketches in your notebook. Try to develop a graphic concept.
- Your canvas must have 16:9 dimensions. It is recommended that your canvas be 1280×720. Be aware that Zoom has a minimum background size of 640×360.
- Write code which generates a (seamlessly) looping animation. You may use the code template below to get started.
- It is recommended that you restrict yourself to just a few, well-chosen colors. Remember, an animated GIF must represent all of its frames with a single a palette of just 256 colors. You may find this resource helpful: tips for making animated GIFs.
- Limit the duration of your GIF to approximately 30-300 frames long (~1-10 seconds).
- Export your animation frames from your code computationally (i.e. from code), and then use a tool (such as one of these) to assemble the animated GIF from the frames. It is strongly recommended that you NOT use a screencapture program to make your GIF! Also:
- be sure to design your GIF so that it loops infinitely, with a duration of forever. Make sure it loops without a “hiccup”. Please note: If your loop has a hiccup, you will get an “F”. Did you read that?
- be sure to create your GIF so that it plays back at least 20 frames per second (preferably 30 FPS). These are options you can set with proper GIF creation tools. You may need to specify the frame rate using milliseconds per frame (e.g. 30 FPS = 33 ms/f).
- be sure your GIF is under 10MB in filesize, preferably under 5MB. You can optimize (compress) your GIF with a tool like https://ezgif.com/.
- OH HEY WAIT. You are required to use an easing function to create a nuanced articulation of animated form. (Why? because you’ll learn a ton.) Select an easing function from p5-func (p5.js/JavaScript) 0r the Pattern_Master grab-bag (Processing/Java). These easing functions take a number from 0…1, and return an altered number from 0…1, which has a different character or quality.
- In a blog post, upload and embed your animated GIF. Important: Embed the GIF at its original resolution. Be sure not to embed any version that has been automatically resized by WordPress; it will not be animated! Also important: please upload your GIF directly to this WordPress site. GIFs embedded from Giphy or elsewhere in the cloud are not acceptable and will receive zero credit.
- Write a paragraph about the experience of creating the piece. Which easing function did you select, and why? Critique your work: where you feel you succeeded, where you feel you fell short of what you’d hoped to achieve.
- Make sure your project is uploaded to the online editor.p5js.org.
- Include a scan or photo of your pen-and-paper sketches.
- Label your blog post with the Category, 02-LivingWallpaper.
- Title your blog post, nickname-LivingWallpaper.
Some Help: Code Templates for Generating Looping GIFs
Below is a p5.js template for exporting frames to make an animated GIF loop. If you decide to use the template code, you’ll need to rewrite the renderMyDesign() method, which takes a percentage from 0..1 (NOTE: this is not a frame number!) as its argument.
- Code template for GIF loop generation, in p5.js at Github (JavaScript) or at the p5.Editor
If you’re using the JavaScript version, in order to export the frames, you’ll need to set bEnableExport to true, and you will probably need to be running a local server; for help, see this explanation/instruction Wiki and this Shiffman video.
The template below exports individual frames. You will need to be resourceful about finding a way to convert these frames into a GIF and into a video for Zoom. EZGif.com has tools to help, such as an image-batch-to-GIF maker, and a GIF-to-MP4 converter.
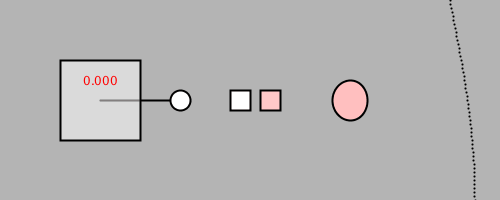
Here is an animated GIF, and the code template (in JS and Java) that produced it. Observe how the small pink square is moving nonlinearly, using one of the Pattern_Master functions. It has some character!
// This is a template for creating a looping animation in p5.js (JavaScript).
// When you press the 'F' key, this program will export a series of images into
// your default Downloads folder. These can then be made into an animated gif.
// This code is known to work with p5.js version 0.6.0
// Prof. Golan Levin, 28 January 2018

// INSTRUCTIONS FOR EXPORTING FRAMES (from which to make a GIF):
// 1. Run a local server, using instructions from here:
//    https://github.com/processing/p5.js/wiki/Local-server
// 2. Set the bEnableExport variable to true.
// 3. Set the myNickname variable to your name.
// 4. Run the program from Chrome, press 'f'.
//    Look in your 'Downloads' folder for the generated frames.
// 5. Note: Retina screens may export frames at twice the resolution.


//===================================================
// User-modifiable global variables.
var myNickname = "nickname";
var nFramesInLoop = 120;
var bEnableExport = false;

// Other global variables you don't need to touch.
var nElapsedFrames;
var bRecording;
var theCanvas;

//===================================================
function setup() {
  theCanvas = createCanvas(500, 200);
  bRecording = false;
  nElapsedFrames = 0;
}

//===================================================
function keyTyped() {
  if (bEnableExport) {
    if ((key === 'f') || (key === 'F')) {
      bRecording = true;
      frameRate(2); // while we're exporting
      nElapsedFrames = 0;
    }
  }
}

//===================================================
function draw() {

  // Compute a percentage (0...1) representing where we are in the loop.
  var percentCompleteFraction = 0;
  if (bRecording) {
    percentCompleteFraction = float(nElapsedFrames) / float(nFramesInLoop);
  } else {
    percentCompleteFraction = float(frameCount % nFramesInLoop) / float(nFramesInLoop);
  }

  // Render the design, based on that percentage.
  // This function renderMyDesign() is the one for you to change.
  renderMyDesign(percentCompleteFraction);

  // If we're recording the output, save the frame to a file.
  // Note that the output images may be 2x large if you have a Retina mac.
  // You can compile these frames into an animated GIF using a tool like:
  if (bRecording && bEnableExport) {
    var frameOutputFilename = myNickname + "_frame_" + nf(nElapsedFrames, 4) + ".png";
    print("Saving output image: " + frameOutputFilename);
    saveCanvas(theCanvas, frameOutputFilename, 'png');
    nElapsedFrames++;

    if (nElapsedFrames >= nFramesInLoop) {
      bRecording = false;
      frameRate(60);
    }
  }
}

//===================================================
function renderMyDesign(percent) {
  //
  // THIS IS WHERE YOUR ART GOES.
  // This is an example of a function that renders a temporally looping design.
  // It takes a "percent", between 0 and 1, indicating where we are in the loop.
  // Use, modify, or delete whatever you prefer from this example.
  // This example uses several different graphical techniques.
  // Remember to SKETCH FIRST!

  //----------------------
  // here, I set the background and some other graphical properties
  background(180);
  smooth();
  stroke(0, 0, 0);
  strokeWeight(2);

  //----------------------
  // Here, I assign some handy variables.
  var cx = 100;
  var cy = 100;

  //----------------------
  // Here, I use trigonometry to render a rotating element.
  var radius = 80;
  var rotatingArmAngle = percent * TWO_PI;
  var px = cx + radius * cos(rotatingArmAngle);
  var py = cy + radius * sin(rotatingArmAngle);
  fill(255);
  line(cx, cy, px, py);
  ellipse(px, py, 20, 20);

  //----------------------
  // Here, I use graphical transformations to render a rotated square.
  // Notice the use of push(), pop(), translate(), etc.
  push();
  translate(cx, cy);
  var rotatingSquareAngle = percent * TWO_PI * -0.25;
  rotate(rotatingSquareAngle);
  fill(255, 128);
  rect(-40, -40, 80, 80);
  pop();

  //----------------------
  // Here's a linearly-moving square
  var squareSize = 20;
  var topY = 0 - squareSize - 2;
  var botY = height + 2;
  var sPercent = (percent + 0.5) % 1.0; // shifted by a half-loop
  var yPosition = map(sPercent, 0, 1, topY, botY);
  fill(255, 255, 255);
  rect(230, yPosition, 20, 20);

  //----------------------
  // Here's a sigmoidally-moving pink square!
  // This uses the "Double-Exponential Sigmoid" easing function
  // ripped from From: https://idmnyu.github.io/p5.js-func/
  // Really, you should just include this library!!
  var eased = doubleExponentialSigmoid(percent, 0.7);
  eased = (eased + 0.5) % 1.0; // shifted by a half-loop, for fun
  var yPosition2 = map(eased, 0, 1, topY, botY);
  fill(255, 200, 200);
  rect(260, yPosition2, 20, 20);

  //----------------------
  // Here's a pulsating ellipse
  var ellipsePulse = sin(3.0 * percent * TWO_PI);
  var ellipseW = map(ellipsePulse, -1, 1, 20, 50);
  var ellipseH = map(ellipsePulse, -1, 1, 50, 30);
  var ellipseColor = map(ellipsePulse, -1, 1, 128, 255);
  fill(255, ellipseColor, ellipseColor);
  ellipse(350, cy, ellipseW, ellipseH);

  //----------------------
  // Here's a traveling sine wave
  stroke(0, 0, 0);
  for (var sy = 0; sy <= height; sy += 4) {
    var t = map(sy, 0, height, 0.0, 0.25);
    var sx = 450 + 25.0 * sin((t + percent) * TWO_PI);
    ellipse(sx, sy, 1, 1);
  }

  //----------------------
  // Include some visual feedback.
  fill(255, 0, 0);
  noStroke();
  textAlign(CENTER);
  var percentDisplayString = "" + nf(percent, 1, 3);
  text(percentDisplayString, cx, cy - 15);
}


// Symmetric double-element sigmoid function ('_a' is the slope)
// See https://github.com/IDMNYU/p5.js-func/blob/master/lib/p5.func.js
// From: https://idmnyu.github.io/p5.js-func/
//===================================================
function doubleExponentialSigmoid(_x, _a) {
  if (!_a) _a = 0.75; // default

  var min_param_a = 0.0 + Number.EPSILON;
  var max_param_a = 1.0 - Number.EPSILON;
  _a = constrain(_a, min_param_a, max_param_a);
  _a = 1 - _a;

  var _y = 0;
  if (_x <= 0.5) {
    _y = (pow(2.0 * _x, 1.0 / _a)) / 2.0;
  } else {
    _y = 1.0 - (pow(2.0 * (1.0 - _x), 1.0 / _a)) / 2.0;
  }
  return (_y);
}
To get this working, you may find the following video helpful: