This set of Deliverables is due Wednesday, February 9th at 9am, and has 4 parts:
- 2A.Viewing/Research: Loops as Art — 10%
- 2B. Rhythm Loop Mini-Project — 20%
- 2C. Readings/Viewings: Timekeeping — 10%
- 2D. Timepiece — 60%
2A. Viewing/Research: Loops as Art
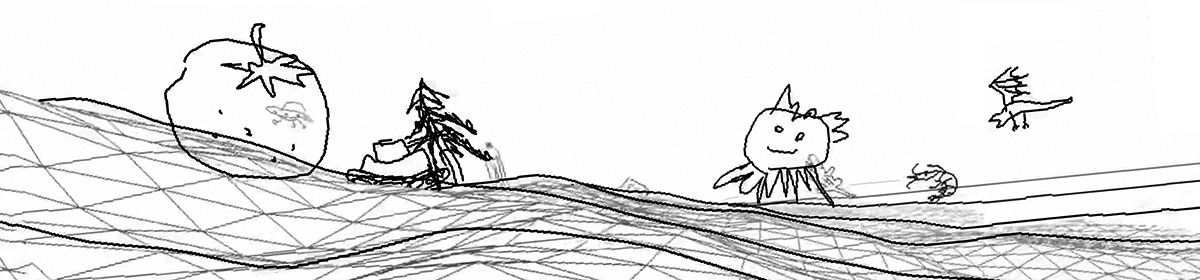
(<1 hour, 10%) In this exercise, you are asked to spend time examining GIF projects by Dave Whyte (Bees and Bombs), Cindy Suen, and Lucas Zanotto or Andreas Wannerstedt. Please spend 5-10 minutes per artist. You can find their work at these links:
- Bees and Bombs (David Whyte): Instagram • Twitter • Tumblr
- Cindy Suen: Website • Tumblr
- Lucas Zanotto or Andreas Wannerstedt
Now:
- In a brief blog post, embed one project by each artist (three embeds total) that caught your attention. Don’t just pick the first thing you come across, it breaks my heart.
- In just a single sentence or two, please write: What did you find interesting/successful, and why?
- Title your blog post Nickname-LoopResearch
- Categorize your blog post 02-LoopResearch.
E.g. by Cindy Suen:

E.g. by Andreas Wannerstedt:
2B. Rhythm Loop

(2 Hours, 20%) In this mini-project, you will explore visual rhythm— by creating a seamlessly looping, animated GIF using computationally generated graphics. This is a mini-project, so KEEP IT SIMPLE. There are several important constraints:
- Your looping gif must be seamless. Abrupt temporal hiccups and stutters will not be tolerated. Ideally, it should be impossible to determine where your loop “begins”.
- Your canvas must be square, with dimensions of exactly 640×640 pixels.
- You are restricted to using exactly 2 or 3 colors. Ultra-flat, folks: no transparency blending. One possibility is to have a background, foreground, and spot (highlight) color.
- You are strictly limited to using the p5.js rect() command. (You may not use any other p5.js drawing commands, such as line, arc, triangle, etc.!) Keep in mind that the rect() command is quite versatile, owing to its corner-rounding options. Remember that you can also make it skinny (to create line-like shapes), and rotate it into other orientations. Here’s a (live) demonstration sketch; all of these shapes were made exclusively with the rect() command:
Now:
- SKETCH FIRST! Before doing anything, do some visual thinking in your notebook. Try to develop a graphic concept.
- Write code which generates a seamlessly looping animation. Be sure to use the p5.createloop addon to make your life easier. The templates below will be helpful.
- You are encouraged to limit the duration of your GIF to approximately 30-300 frames long (~1-10 seconds).
- OPTIONAL: You are encouraged to use an easing function to create a nuanced articulation of animated form. (Why? because you’ll learn a ton.) If you can, select an easing function from p5-func (p5.js/JavaScript). These easing functions take a number from 0…1, and return an altered but related number from 0…1, which has a different character or quality. Note, you’ll need to add the p5-func library to your sketch.
- Export your GIF using the provided code structure. Do NOT use a screencapture program to make your GIF! Also:
- be sure that your GIF loops infinitely, with a duration of forever. Make sure it loops without a “hiccup”.
- be sure to create your GIF so that it plays back at least 20 frames per second (preferably 30 FPS). These are options you can set with proper GIF creation tools. You may need to specify the frame rate using milliseconds per frame (e.g. 30 FPS = 33 ms/f).
- be sure your GIF is under 10MB in filesize, preferably under 5MB. You can optimize (compress) your GIF with a tool like https://ezgif.com/.
- In a blog post, upload and embed your animated GIF. Important: Embed the GIF at the original resolution of 640×640 pixels. Be sure not to embed any version that has been automatically resized by WordPress; it will not be animated! (It’s always good idea to check your post after you publish it, to make sure it looks correct.) Also important: please upload your GIF directly to this WordPress site. GIFs that are cross-site embedded from Giphy.com or elsewhere on the web are not acceptable.
- Write a paragraph about the experience of creating the piece. Critique your work: in what ways do you feel you succeeded? Where you feel you fell short of what you’d hoped to achieve?
- Make sure your project is uploaded to OpenProcessing (Exercise #23), and link to it from your blog.
- Include a scan or photo of your pen-and-paper sketches.
- Categorize your blog post with the Category, 02-Loop.
- Title your blog post, nickname-Loop.
Here’s a template project for a seamless loop:
- At OpenProcessing: https://openprocessing.org/sketch/1461691
- At Editor.p5js.org: https://editor.p5js.org/golan/sketches/KAF80owRC

Here’s a template for a Lissajous-inspired loop using sin() and cos():
- At OpenProcessing: https://openprocessing.org/sketch/1461727
- At Editor.p5js.org: https://editor.p5js.org/golan/sketches/iTE-QYKLZ

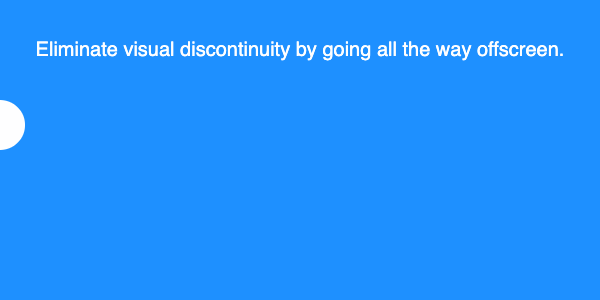
Here’s a reminder that you can eliminate visual discontinuity by going all the way offscreen:
- At OpenProcessing: https://openprocessing.org/sketch/1464781
- At Editor.p5js.org: https://editor.p5js.org/golan/sketches/s42vcR_pO
2C. Readings and Viewings: Timekeeping
(<1 hour, 10%) You are asked to enrich your concept of clocks and timekeeping by reviewing and/or examining the following resources. Taken together, these readings and viewings should take less than half an hour.
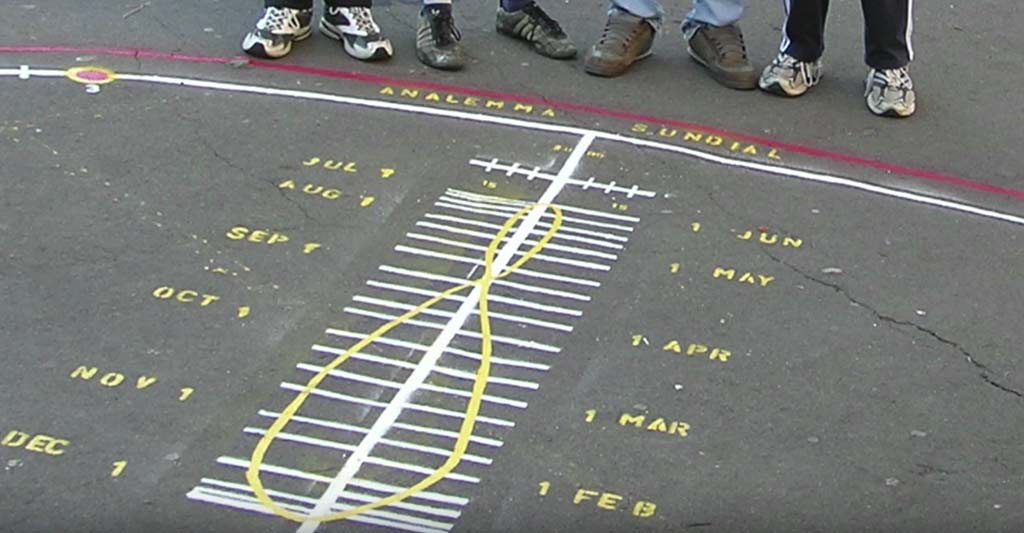
- Please read this this 5-page text about timekeeping (PDF) by design theorist Johanna Drucker, from her book Graphesis: Visual Forms of Knowledge Production (Harvard Press, 2014).
- Please watch this excellent 6-minute YouTube video on the history of timekeeping devices.
- If you didn’t already see it in class, please watch the first 13 minutes of A Brief History of the Calendar and Timekeeping, a YouTube lecture by Dr. Donna Carroll, Lecturer of Physics, Maastricht University.
- Browse or skim the Wikipedia History of Timekeeping Devices.
- Check out https://yourcalendricalfallacyis.com/. (It’s awesome!)
Now:
- In a blog post, please write two sentences about something that stuck with you from any of these readings/viewings. What did you see that was interesting? Why was it interesting to you?
- Title your blog post, nickname-timeresearch
- Categorize your post 02-TimeResearch
2D. Timepiece

(6 hours; 60%) The interactive and dynamic control of visual media over time is a core concern in new media arts. In this project, you are asked to design a visualization that displays a novel or unconventional representation of the time. Your timepiece should appear different at all times of the day, and it should probably repeat its appearance every 24 hours (or other relevant cycle, if desired). You are discouraged from using Roman, Arabic, or Chinese numerals; instead, you are encouraged to make the time readable through other means, such as by visualizing numeric bit patterns, or using iteration to present countable graphic elements.
Learning Objectives:
Through completion of this assignment, you will:
-
- Become acquainted with the history of systems and devices for timekeeping
- Devise technologies and graphic concepts for representing time that go beyond conventional methods of visualization and mediation
- Refine craft skills in the use of code to govern a spatiotemporal design, by effectively and expressively controlling shape, color, form, and motion
Try to devise a novel graphic concept. I encourage you to question basic assumptions about how time is represented. Feel free to experiment with any of the graphical tools at your disposal, including color, shape, transparency, etc. You’ll probably need to use the hour(), minute(), second(), and millis() functions, but you’re also welcome to use day(), month(), and year() functions in order to build a clock that evolves over longer timescales, lifetimes, etc. If your timepiece measures other phenomena, that’s fine too.
Requirements:
- Sketch first in your paper sketchbook. Consider things like biological time (chronobiology), ultradian rhythms and infradian rhythms, solar and lunar cycles, celestial time, geological time, decimal time, historical time, psychological time, and subjective time. (This list is not exclusive.)
- Create your clock using p5.js at OpenProcessing (Exercise #24). You may choose the dimensions and aspect ratio of your canvas, but your design must be no larger than 840 × 840 pixels, please.
- In your blog post, embed at least two images of your clock, showing what it looks like or how it behaves at different times of day. If your clock involves animation, embed an animated GIF or a brief video recording, which you can make with the OpenProcessing screen-recording feature.
- In your blog post, provide a link to your p5 sketch at the OpenProcessing web site.
- Write a paragraph that describes you project (what is the concept, how is it made, how is a person meant to experience it).
- Write another paragraph reflecting on your work (what was successful, what was a struggle).
- Document your work by embedding images of paper sketches from your notebook. These could be as simple as photos of your sketches, captured with your phone.
- Label your project’s blog post with the Category, 02-Timepiece.
- Title your project’s blog post with the title, nickname-timepiece.
- Submit the Checklist below.
Below are some code templates you can use to get started. This p5.js example shows milliseconds that roll-over correctly, in synchrony with the advancing seconds.
// Simple p5.js (JavaScript) Clock Template
// Golan Levin, 2016-2018

var prevSec;
var millisRolloverTime;

//--------------------------
function setup() {
  createCanvas(300, 300);
  millisRolloverTime = 0;
}

//--------------------------
function draw() {
  background(255, 200, 200); // My favorite pink

  // Fetch the current time
  var H = hour();
  var M = minute();
  var S = second();

  // Reckon the current millisecond,
  // particularly if the second has rolled over.
  // Note that this is "more correct" than using millis()%1000;
  if (prevSec != S) {
    millisRolloverTime = millis();
  }
  prevSec = S;
  var mils = floor(millis() - millisRolloverTime);

  noStroke();
  fill('black');
  var currTimeString = "Time: "+ (H%12)+ ":" + nf(M,2)+ ":"+ nf(S,2)+ ((H>12) ? "pm":"am");
  text(currTimeString, 10, 25);
  text("Hour: "   + H, 10, 40);
  text("Minute: " + M, 10, 55);
  text("Second: " + S, 10, 70);
  text("Millis: " + mils, 10, 85);

  var hourBarWidth   = map(H, 0, 24, 0, width);
  var minuteBarWidth = map(M, 0, 60, 0, width);
  var secondBarWidth = map(S, 0, 60, 0, width);

  // Make a bar which *smoothly* interpolates across 1 minute.
  // We calculate a version that goes from 0...60,
  // but with a fractional remainder:
  var secondsWithFraction   = S + (mils / 1000.0);
  var secondsWithNoFraction = S;
  var secondBarWidthChunky = map(secondsWithNoFraction, 0, 60, 0, width);
  var secondBarWidthSmooth = map(secondsWithFraction,   0, 60, 0, width);

  fill(40);
  rect(0, 100, hourBarWidth, 50);
  fill(80);
  rect(0, 150, minuteBarWidth, 50);
  fill(120);
  rect(0, 200, secondBarWidthChunky, 50);
  fill(160);
  rect(0, 250, secondBarWidthSmooth, 50);
}