depth mirror: final

Overview:

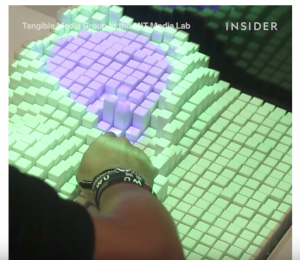
I intended to create an 2D array of solenoids that would respond to changes in depth input through a kinect. It would essentially reflect the depth in the image captured by the kinect. However, I found it very difficult to take input from the kinect and send this data to the arduino simultaneously, so instead I first record a history of depth data from the kinect, and then send it to the arduino via bluetooth, which it then uses to move the solenoids.

video showing this process: https://www.youtube.com/watch?v=fpj6dSkBT7g


Hardware and form:

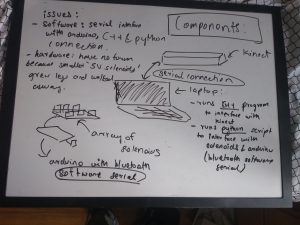
I created CAD models (in the files attached with this submission), which consisted of three acrylic tiles per solenoid. The two below would have had holes in them to allow the solenoid to move. However, the 5V solenoids I had planned using grew legs and walked away, and this design was inapplicable to the 7V solenoids I ended up using.  (the brainstorming process and design is attached with this submission)
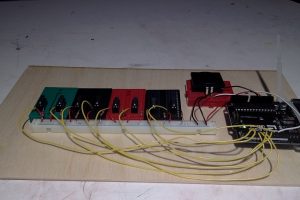
Circuitry:

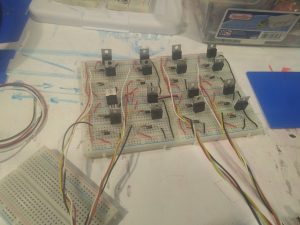
circuit board I made for 4×4 array of 5V solenoids:

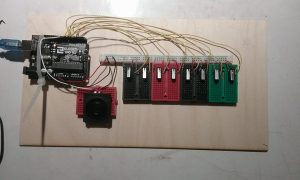
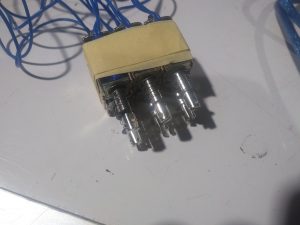
finished  2×3 array of 7V solenoids I was forced to use:


Issues I faced:

  • I spent a lot of time trying to figure out how to get depth values from the kinect. I also had a lot of issues with serial connection between my laptop (mac)and the arduino. I finally somewhat resolved this by using software serial with bluetooth. However, as previously mentioned, I had to write another script in python to send the data across the serial connection.
  • I was scavenge for and use 7V solenoids instead of the 5V ones as I had initially planned. This took additional time and configuring.

Acknowledgements:

I would like to thank ideate for providing me with the parts, Akshat Prakash for helping me with the software serial, and Bolaji Banakole for giving me his spare arduino when I fried mine.

link for other documentation, code and CAD files: https://drive.google.com/file/d/13e1UmHgjkUIJSzP44gxqSoUB4iE-ZnXS/view?usp=sharing

final project: 3D mirror (Aditi Hebbar)

Abstract / concept statement

inspiration is from a project from the MIT tangible media group titled “Moving Blocks Mimic Human Movements” (https://www.youtube.com/watch?v=PTm1e-tJJEg) . I intend to create an 2D array of movable blocks as in the picture below:

Each block would have a single neo pixel LED on top of it. The goal of the project would be to use this array to create a sort of “3D mirror” (the LED’s create the color; the blocks move up or down to add depth) reflecting objects/people front of it. In contrast to the MIT lab project which aims to mimic human movement, this project aims to mimic human appearance.

Hardware

  • Kinect camera (depth sensing is easy with this)
  • Raspberry pi (uses open cv to detect objects/humans, moves blocks/ add colour to LED’s accordingly)
  • Acrylic blocks, have to laser cut (number depends on size of array, TBD)
  • Singular adafruit neopixel LED’s (number depends on size of array, TBD)
  • Multiplexing hardware (need to be able to control numerous blocks and LED’s, unsure of how many/what type)
  • Solenoids/vacuum tubes? to move the blocks, unsure what hardware to use to facilitate easy vertical movement

Software

I’ll need some software that’s able to identify the contours of a person’s body (so I can do cool stuff like add depth with the blocks only to image person’s body), and openCV is perfect for this.

Order of construction and testing

  1. Figure out how to make a single acrylic piece move up and down at different levels, and add the neo pixel LED on top controlling both simultaneously.
  2. Figure out how to multiplex several blocks.
  3. Create a 2D array of blocks with LED’s on top.
  4. Create the multiplex and attach to rpi. Control the movement of the blocks/LEDs efficiently with RPI. Ask for help if required.
  5. Debug, and get feedback at this point.
  6. Figure out how to use the Kinect and openCV to get desired input.
  7. Control Blocks and LEDs with input
  8. show it to someone who isn’t in phys comp and ask them to try it out
  9. incorporate feedback, add aesthetic and make a case if required.
  10. make an information poster for the final show.
  11. write up my artist’s statement for the final show.

Piano (Assignment 5, Aditi Hebbar)

This is a makeshift wooden piano, with a solenoid that moves when a key is played to create rhythm.

I had originally intended to create a self playing piano, with the solenoids moving each key when required. However, that seemed to pose too many mechanical issues (the solenoid moved up and down too much, and required a lot of room to move etc) so I gave up and used a working solenoid to create some beats instead. 🙂

link to video and files:

https://drive.google.com/file/d/0BxDLW7cgDfWoSWZVX28tNUNTRlE/view?usp=sharing

Assignment 5: piano (Aditi Hebbar)


My initial idea was to create a self playing piano (I thought that this could come off as creepy and add to the halloween vibe). However, I had to descope for the prototype since I did not know how to make the piano buttons move automatically.

I had initially wanted to created a nice case for the piano, and laser cut the buttons, but dince I did not know how to make the buttons move automatically, and adding these finishing touches would make adding elements to move the piano automatically more difficult. (after asking a few friends, I realized I could use solenoids to achieve this effect).

The piano itself wasn’t too hard to make, except the wiring took a while. Also, the first key does not work, and I’m not entirely sure why. The rest of the piano works fine.

For the finished project, I’d like to add the following features:

  1. Case for the piano, and acrylic button pieces on the switches.
  2. solenoid under each button
  3. black keys in addition to the white ones (maybe)

video: https://www.youtube.com/watch?v=hSPD0Txw7kI

fritz and sketch: https://drive.google.com/file/d/0BxDLW7cgDfWoU3lXaDU5TTJzaW8/view?usp=sharing

Two Fish : assignment 4 (Aditi Hebbar)

The project is supposed to depict two fish in water, with the big fish eating the small fish.

I used an h-bridge and motor for the small fish, and a servo for the big fish. There are three states in a loop:

  1. small fish moving
  2. small fish and big fish
  3. only big fish (big fish ate small fish, small fish is dead)

The main challenge was that I did not plan well, and did not have enough time to make it look as nice as I would have liked, hence the jankiness. I would have liked to laser cut acrylic, instead of using cardboard and thermocol.

zip: https://drive.google.com/file/d/0BxDLW7cgDfWoWHdMVk54UlpTWkU/view?usp=sharing