For the Halloween centered project, I wanted to make a project that was an homage to Scooby Doo: I wanted a monster (with flashing red LED eyes) to “run” towards the gang (using two servos) while the gang all while the gang “runs” away (using two servos and a mechanical mechanism to connect their legs together), all underscored with the Scooby Doo theme song playing from a speaker. Therefore, for my prototype, I wanted to make sure that I was able to run electronics for the sound system, LEDs, and servos together.
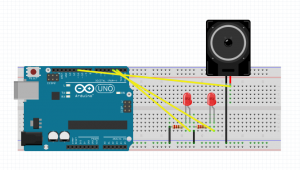
As we were already well versed in getting LEDs and servos to work properly, I wanted to start off with the sound system, which turned out to be a lot more work than I thought. As it turns out, the most common way to play actual audio from the Arduino is to use an SD card and an SD card Arduino board to play audio. However, I wanted to see if there was a way to play audio straight from the Arduino, which was a surprisingly difficult task. After some searching, I found this instruction guide, http://highlowtech.org/?p=1963, which I followed to get the audio working. However, this system clipped the length of the audio much more than I wanted, but I figured this might be something I could work with. I then tried to also add basic LED and servo testing to make sure there were no clashes. Unfortunately, while the LEDs worked fine, the new library I had to add for audio actually conflicts with the inbuilt servo library.
After executing this prototype, I realize my options are 1) try using the SD card, SD card reader method for playing audio and having LEDs and servos working for my project
2) keep this audio method and do something only with LEDs, which is still a viable possibility for a good project
I’m leaning towards trying to see how hard the SD card method is; otherwise, just committing to LEDs and audio.
Video of Prototype Working:
Arduino Code: https://www.youtube.com/watch?v=PDpSdZlpHu0&feature=youtu.be