
Description: A fidget device to help me focus by giving my hands a mindless task to do.
Process:
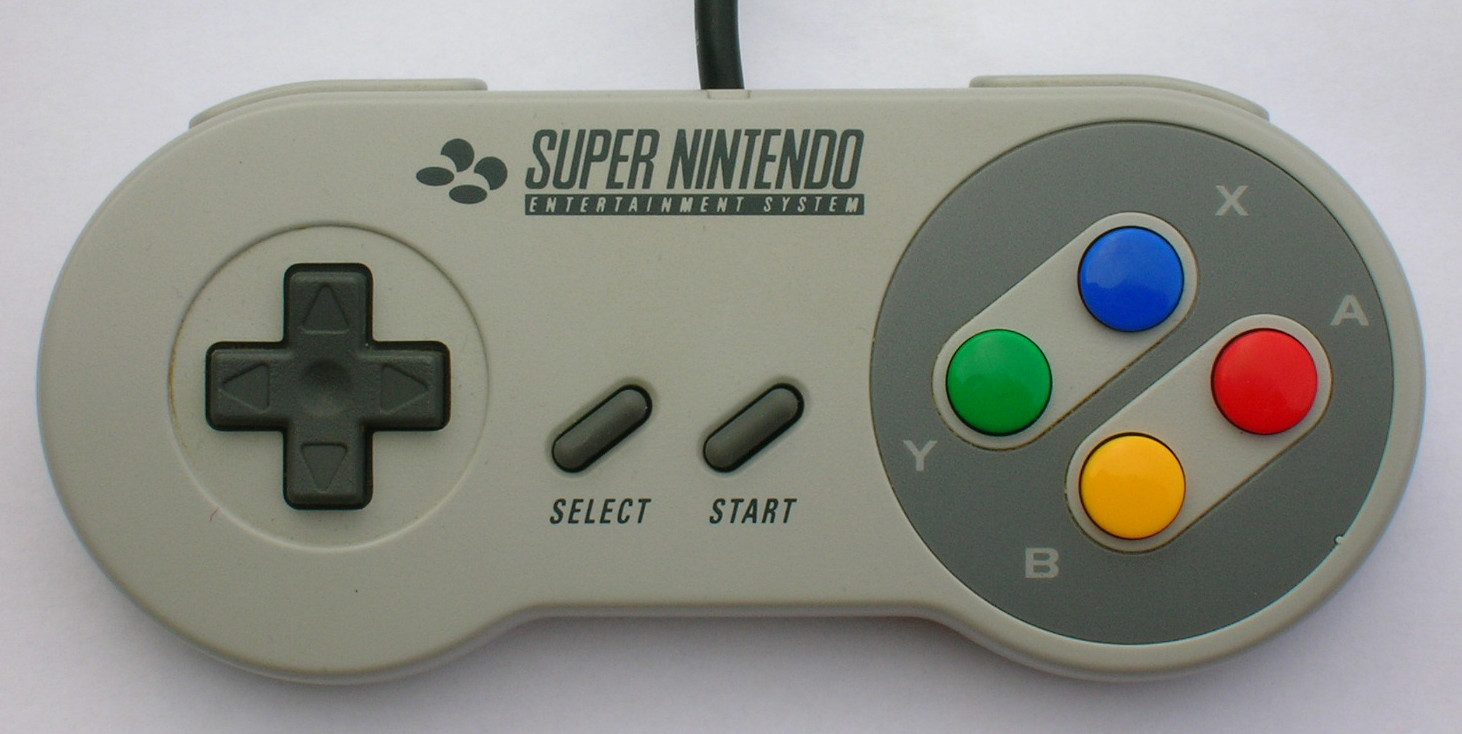
My visual inspiration: a Super Nintendo Entertainment System controller
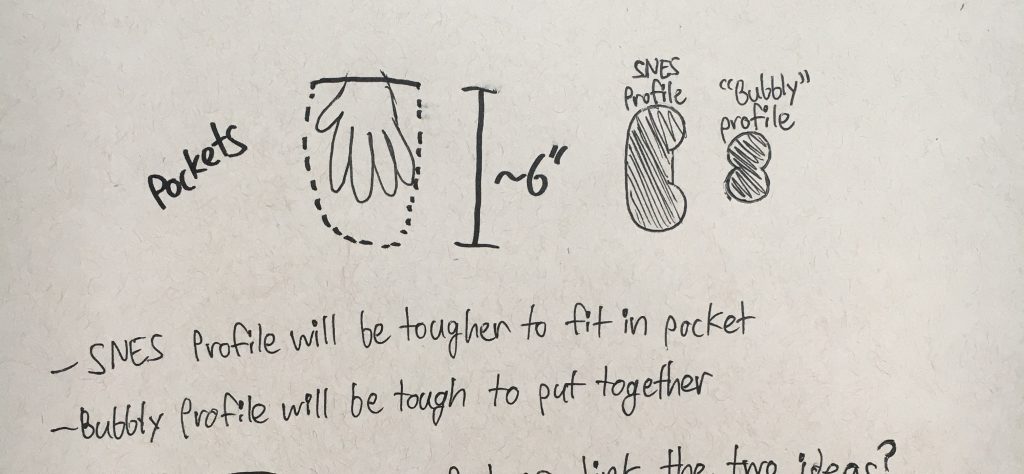
Some of the original sketches that detailed some of the form issues I would have to solve.
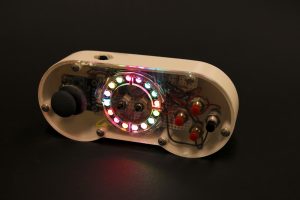
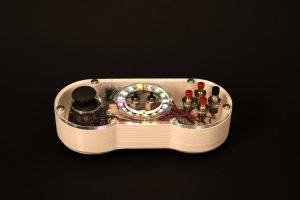
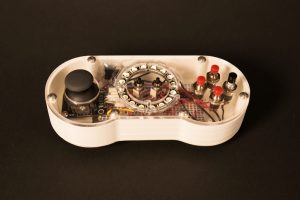
Designing this project was mostly a pain because of how many electronics had to be fit into such a small space. I consistently had to change the dimensions of the SPES to fit in new components like a power switch or an LED ring.
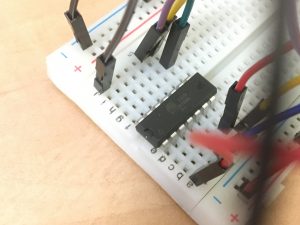
This is the ATTiny84A, a microcontroller small enough to control the SPES!
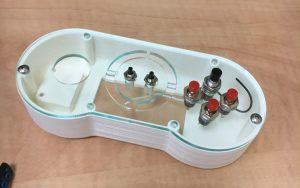
The original print of the SPES case. It is very small, and I had to make a hole in the back for a set of batteries.
The project was very difficult to power effectively since I was using a NeoPixel LED Ring, which uses a lot of current. My solution was to simply push the electronics as close to the front of the SPES as possible, and sneak two AA batteries in behind them.
In terms of software, I did not experience any real challenges except implementing an event-loop system to make the SPES able to change modes very quickly and reliably, as well as flash its LED’s consistently while switching game modes.

An extremely short video of the first time the event loop for flashing the LED ring worked!
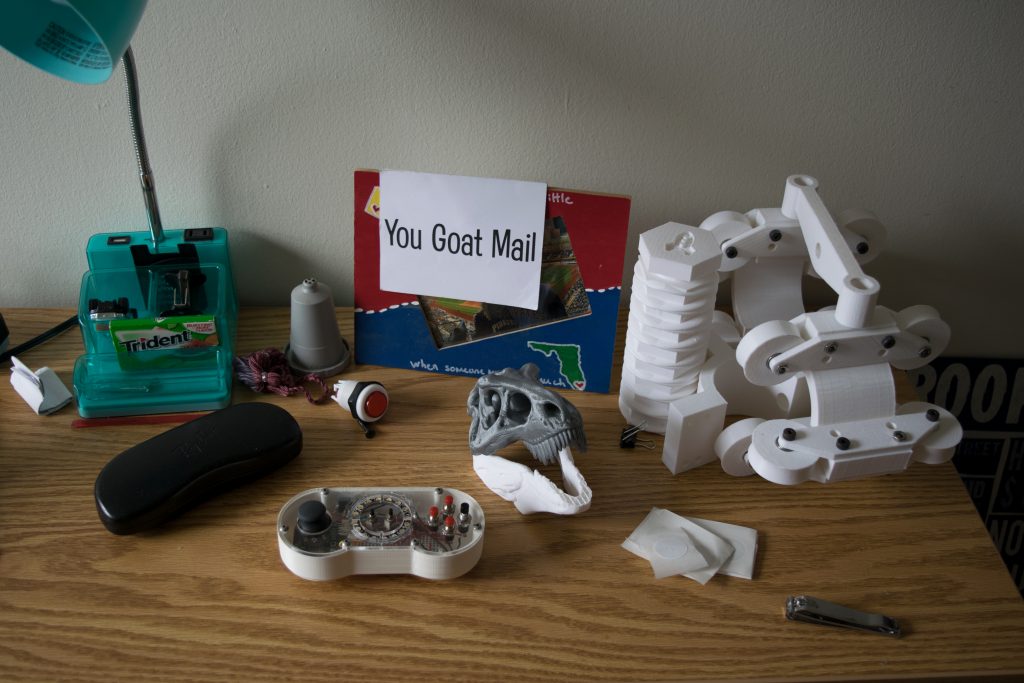
The SPES in its normal place on my desk. It fits in quite well amongst the other pieces.
Discussion:
Some feedback from my classmates included:
“Some light sequences seem a bit jarring.”
I agree with this feedback, in regards to other users. However, I do not find them jarring personally, and this is a very personalized device. If I were to market this kind of product to others, I would certainly dim down any extreme color shifts and perhaps make a more cohesive user interface.
“…it would be cool to have labels.”
I also agree with this. The original plan was to have colorful buttons with letters on them, much like a Super Nintendo console controller, but acquiring the buttons would have been expensive relative to the rest of the project. I could have 3D-printed them, but their quality may have been questionable.
Overall, I am very happy with how this project turned out. It was hard work to manufacture the case for my electronics, but it looks as polished as I would have liked. The software works as was intended, but my color-blending “game” is very hard since my concept of color comes from pigmented colors like paint and colored pencils, not mixing light together. This is somewhat annoying, but helps my mind stay occupied when I am not trying to focus on something else.
I certainly did not enjoy spending all night building that case, so I learned to always start (no matter what other progress I have made) building the container earlier. I am very sensitive to the amount of sleep I get, and the day after finishing the case was absolutely terrible. The case was 3D-printed, but I ran out of material and had to remake it, which taught me to always have material handy.
The project certainly sparked a fun train of thought while I was implementing the color-blending mode. My original idea was to somehow make a different, more “traditional” game out the LED ring, but I changed it relatively late in the process. I got the idea from a game on my iPhone called Blendoku, and simply implemented its logic in a simpler format.
I would like to rebuild the SPES with a prettier body (e.g. not white) and I would like to solder the electronics absolutely perfectly so that I do have to worry about breaking hard-to-detect connections.
Schematic:
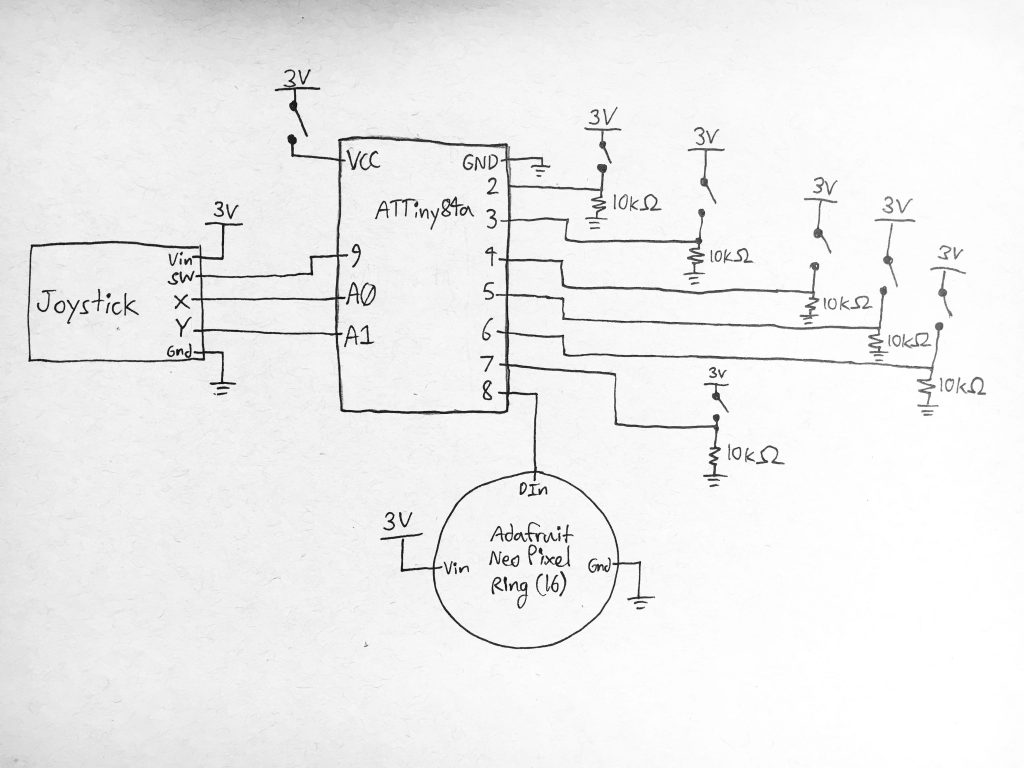
This schematic has many pushbuttons with pull-down resistors.
Code:
/*=============================================================
 * SUPER PULANDO ENTERTAINMENT SYSTEM (SPES)
 *
 * By: Rolando Garcia III
 *
 * This code controls the SPES, a small handheld fidget device
 * inspired by a Super Nintendo Entertainment System controller.
 *
 * There are two "game" modes:
 *
 * • Fun with LED's - Just play around with mixing colors
 *                    and making a light move around!
 *
 * • Blendoku - You are given two colors and you must mix them properly to
 *              win!
 =============================================================*/

/*=============================================================
 * PIN MAPPING:
 *
 * • A button - 2
 * • B button - 3
 * • X button - 4
 * • Y button - 5
 * • Select button - 6
 * • Start button - 7
 * • NeoPixel Ring - 8
 * • Joystick switch - 9
 * • Joystick X - A0
 * • Joystick Y - A1
 *
 =============================================================*/

#include <Adafruit_NeoPixel.h>
#define APIN 2
#define BPIN 3
#define XPIN 4
#define YPIN 5
#define SELECT 6
#define START 7
#define LEDS 8
#define STICKSW 9 //MUST BE PULLED UP TO WORK PROPERLY
#define STICKX A0
#define STICKY A1


//Flashing event loop variables
uint32_t lastTimeLightsOn;
uint32_t lastTimeLightsOff;
const int flashInterval = 250; //How long to flash on or off

/*=============================================================
 * INPUTS:
 * • Joystick
 * • Joystick switch
 * • Start Button
 * • Select Button
 * • A
 * • B
 * • X
 * • Y
  =============================================================*/
//Struct to hold a button and its properties, including debouncing properties
struct button {

  int pin; //Pin mapping of button
  int lastState; //Previous state of button
  int buttonState; //Current state of button
  unsigned long lastBounceTime; //Last bounce time of button

};

//Initialize buttons
struct button A = { APIN, LOW, LOW, millis() };
struct button B = { BPIN, LOW, LOW, millis() };
struct button X = { XPIN, LOW, LOW, millis() };
struct button Y = { YPIN, LOW, LOW, millis() };
struct button Select = { SELECT, LOW, LOW, millis() };
struct button Start = { START, LOW, LOW, millis() };
struct button StickSwitch = { STICKSW, HIGH, HIGH, millis() };

//Button debounce function
int debounce(struct button *b) {

  //Get the current reading
  int buttonReading = digitalRead(b->pin);
  bool result = HIGH;

  //If the buttonState has changed
  if (buttonReading != b->lastState) {
    //Reset the bounce timer
    b->lastBounceTime = millis();
  }

  //If enough time has passed, check if the state is the same
  if ( (millis() - (b->lastBounceTime)) > 10 ) {

    if (buttonReading != b->buttonState) {

      b->buttonState = buttonReading;


      // only toggle the LED if the new button state is HIGH
      if (b->buttonState == LOW) {
        result = !result;
      }
    }

  }

  b->lastState = buttonReading;

  return result;

}

//=============================================================
//OUTPUT: NeoPixel Ring (16 LEDs)
//=============================================================
//Initialize the ring
Adafruit_NeoPixel ring = Adafruit_NeoPixel(16, LEDS, NEO_RGBW + NEO_KHZ800);

//Function to clear the lights of all their color
void clearLights(){

  //Loop through all the pixels and set their RGBW values to all 0's
  for(int i = 0; i < 16; i++){
    ring.setPixelColor(i, 0, 0, 0, 0);
  }
  //Then show them so that the change is reflected
  ring.show();

}

/*=============================================================
 * GAME MODES:
 *  true = Fun with LEDs
 *  false = Blendoku
  =============================================================*/
//Game state variables
bool gameMode = true;
bool lastMode = false;

//Hue changing variables
int color = 0; //Color being changed
int red = 1; //Value of red
int green = 1; //Value of green
int blue = 1; //Value of blue
const int change = 10; //Amount of change in color during increases or decreases

//Increase the saturation of a certain color with no rollover
void increaseColor() {
  //Determine which color is being changed
  //and ensure that it is not already maxed out
  if(color == 0 && red+change <= 255){
    red += change;
  } else if(color == 1 && green+change <= 255) {
    green += change;
  } else if(color == 2 && blue+change <= 255) {
    blue += change;
  }
}

//Decrease the saturation of a certain color with no rollover
void decreaseColor() {
  //Determine which color is being changed
  //and ensure that it is not already minimized
  if(color == 0 && red-change >= 0){
    red -= change;
  } else if(color == 1 && green-change >= 0) {
    green -= change;
  } else if(color == 2 && blue-change >= 0) {
    blue -= change;
  }
}

//Function to randomize a passed-in hue
void randomizeColors(int *redVal, int *greenVal, int *blueVal){

  *redVal = random(0,255);
  *greenVal = random(0,255);
  *blueVal = random(0,255);

}

//Resets all user's hue variables
void resetColors(){
  red = 0;
  green = 0;
  blue = 0;
}

//Flash the center lights to alert the user of the game mode
void flashLights(bool currentMode) {

  //For the funwithLEDs mode, simply flash white lights
  if (currentMode == true) {

    if(millis() - lastTimeLightsOff >= flashInterval){
      clearLights();
      lastTimeLightsOff = millis();
    }

    if(millis() - lastTimeLightsOn >= flashInterval*2){
      for (int j = 0; j < 16; j++) {

        ring.setPixelColor(j, 0, 0, 0, 255);

      }
      ring.show();
      lastTimeLightsOn = millis();
    }

  } else { //For the blendoku mode, flash colorful lights

    if(millis() - lastTimeLightsOff >= flashInterval){
      clearLights();
      lastTimeLightsOff = millis();
    }

    if(millis() - lastTimeLightsOn >= flashInterval*2){
      //For the blendoku game mode, flash colorful lights
      for (int j = 0; j < 16; j++) {

        ring.setPixelColor(j, random(0,255), random(0,255), random(0,255), 0);

      }
      ring.show();
      lastTimeLightsOn = millis();
    }

  }

}

//=============================================================
//VARIABLES/FUNCTIONS FOR BLENDOKU MODE
//=============================================================
//Random Color 1
int red1;
int green1;
int blue1;
//Random Color 2;
int red2;
int green2;
int blue2;

//New blendoku game flag variable
bool newBlendoku = true;

//Randomizes the colors that the person has to blend
void pick2RandomColors() {

  //Use the randomizeColors() function to do the work for you
  randomizeColors(&red1, &green1, &blue1);
  randomizeColors(&red2, &green2, &blue2);

}

//Shows player the two colors of the game
void showPlayerProblem(){

  //Flash the first color
  for (int i = 0; i < 16; i++) {

    ring.setPixelColor(i, green1, red1, blue1, 0);

  }
  ring.show();
  delay(500);

  clearLights();
  delay(500);

  //Flash the second color
  for (int i = 0; i < 16; i++) {

    ring.setPixelColor(i, green2, red2, blue2, 0);

  }
  ring.show();
  delay(500);

  clearLights();
  delay(500);

}

//Function to show player's current color combination
void showPlayerColors() {

  for (int i = 0; i < 16; i++) {

    ring.setPixelColor(i, green, red, blue, 0);

  }
  ring.show();

}

//Checks the user's solution
bool checkBlendoku(){

  //Set the threshold for verifying two colors
  const int threshold = 200;

  //Determine the solution
  int solveRed = min(red2,red1) + (int)(abs(red1-red2)/2);
  int solveGreen = min(green2,green1) + (int)(abs(green1-green2)/2);
  int solveBlue = min(blue2,blue1) + (int)(abs(blue1-blue2)/2);

  //If the RGB value is between those of the random colors, they solved it
  if( (sq(red-solveRed) + sq(green-solveGreen) + sq(blue-solveBlue)) <= sq(threshold) ) {
    return true;
  }

  return false;

}

//Flash a green circle when a player solves a blendoku
void success(){

  for(int j = 0; j < 2; j++){
    for (int i = 0; i < 16; i++) {

      ring.setPixelColor(i, 255, 0, 0, 0);

    }
    ring.show();
    delay(500);

    clearLights();
    delay(500);
  }

}

//Flash a red circle for a failure
void failure(){

  for(int j = 0; j < 2; j++){
    for (int i = 0; i < 16; i++) {

      ring.setPixelColor(i, 0, 255, 0, 0);

    }
    ring.show();
    delay(500);

    clearLights();
    delay(500);
  }

}

//Game mode where the player must blend two colors
void blendoku() {

  //If a new game is initiated, pick two new colors and show them
  if(newBlendoku || debounce(&Start) == LOW){
    clearLights();
    pick2RandomColors();
    resetColors();
    showPlayerProblem();
    newBlendoku = false;
  }

  //Allow the user to recheck the colors they were given
  //by moving the stick up or down
  if(analogRead(STICKY) >= 900 || analogRead(STICKY) <= 100){
    showPlayerProblem();
  }

  //Allow the user to switch the hue they are changing
  if(debounce(&StickSwitch) == LOW){
    color += 1;
    color %= 3;
  }

  if(debounce(&X) == LOW){
    increaseColor();
  }

  if(debounce(&B) == LOW){
    decreaseColor();
  }

  //Also allow them to reset their color selections and start over
  if(debounce(&Y) == LOW){
    resetColors();
  }

  showPlayerColors();

  //If the user confirms their solution, check it and start a new game
  if(debounce(&A) == LOW){

    if(checkBlendoku() == true){
      success();
    } else {
      failure();
    }
    newBlendoku = true;

  }


}

//VARIABLES/FUNCTIONS FOR FUNWITHLEDS MODE

//Index of the light that is currently on
int lightOn = 0;

//Function to determine light index from joystick position
float lightIndexFromJoystick(int stickX, int stickY){

  //Arctangent magics!
  float angle = atan2(stickY, stickX);
  int lightIndex = 15 - round((angle/1.57)*15);

  return lightIndex;
}

//Fun mode where the user can simply play with colors on the wheel
void funWithLEDs() {

  clearLights();
  int stickX = analogRead(STICKX);
  int stickY = analogRead(STICKY);

  //Find how far the joystick is from its center
  int xDist = stickX - 512;
  int yDist = stickY - 512;

  double distance = sqrt( (float)xDist*xDist + (float)yDist*yDist );

  //Only change the light that is on if the analog stick is fully pushed
  if(distance > 100){
    ring.setPixelColor(lightOn, 0, 0, 0, 0);
    lightOn = lightIndexFromJoystick( stickX, stickY );
  }

  //Allow the user to switch the hue they are changing
  if(debounce(&A) == LOW){
    color += 1;
    color %= 3;
  }

  if(debounce(&X) == LOW){
    increaseColor();
  }

  if(debounce(&B) == LOW){
    decreaseColor();
  }

  //Also allow them to reset their color selections and start over
  if(debounce(&Y) == LOW){
    randomizeColors(&red, &green, &blue);
  }

  if(debounce(&Start) == LOW){
    resetColors();
  }

  ring.setPixelColor(lightOn, green, red, blue, 0);
  ring.show();

}

//Switches game modes when the Select button is pressed
void switchGameMode() {
  //Switch the game mode
  gameMode = !gameMode;

  //Reinitialize blendoku
  if(gameMode == false){
    newBlendoku = true;
  }

  //Blank out the lights and reset the timers
  resetColors();
  lastTimeLightsOff = millis();
  lastTimeLightsOn = millis() + flashInterval;
  delay(10);
}

void setup() {
  // put your setup code here, to run once:
  pinMode(APIN, INPUT);
  pinMode(BPIN, INPUT);
  pinMode(XPIN, INPUT);
  pinMode(YPIN, INPUT);
  pinMode(STICKX, INPUT);
  pinMode(STICKY, INPUT);
  pinMode(STICKSW, INPUT_PULLUP); //Remember to pull up for reliable reading

  ring.setBrightness(30); //Lower the default brightness so as not to
  ring.begin(); //Initialize the LED ring
  ring.show();

  lastTimeLightsOff = millis();
  lastTimeLightsOn = millis() + flashInterval;
}

void loop() {

  //Check the select button
  if (debounce(&Select) == LOW) {
    lastMode = gameMode;
    switchGameMode();
  }

  //If the person has not confirmed the game mode, flash the lights at them
  if(lastMode != gameMode && debounce(&Start) == HIGH ){
    resetColors();
    flashLights(gameMode);
    return;
  } else {
    //Otherwise continue into the gameMode
    lastMode = gameMode;
  }

  //Determine the correct game mode and play it
  if (gameMode == true) {

    funWithLEDs();

  } else {

    blendoku();

  }
}
Leave a Reply
You must be logged in to post a comment.