For this project, we worked in teams of three to design a device that would be useful for a person living with a disability. Each team worked alongside a client from Community Living and Support Services (CLASS) to create something what would be relevant and useful in their lives. Our client was Jeff Owens, an individual with a mobile disability. Through the course of this project we would conduct an interview with Jeff and incorporate his feedback into the final product. To read more about our interview with Jeff, click here.
What We Built
Our end product for Jeff was a device that he could strap onto the bottom of his wheelchair using Velcro strips. This device would help ensure that he would not back up into/onto the objects behind him. Jeff gets in the range of an object behind him the device would beep until he is a reasonable distance away from the object. In additional, the device includes lights that would flash on and off at the same time. Jeff has total control of this device, he has the ability to turn off the device entirely or just the beeping. Similarly, Jeff can adjust the range in which the device starts beeping at.
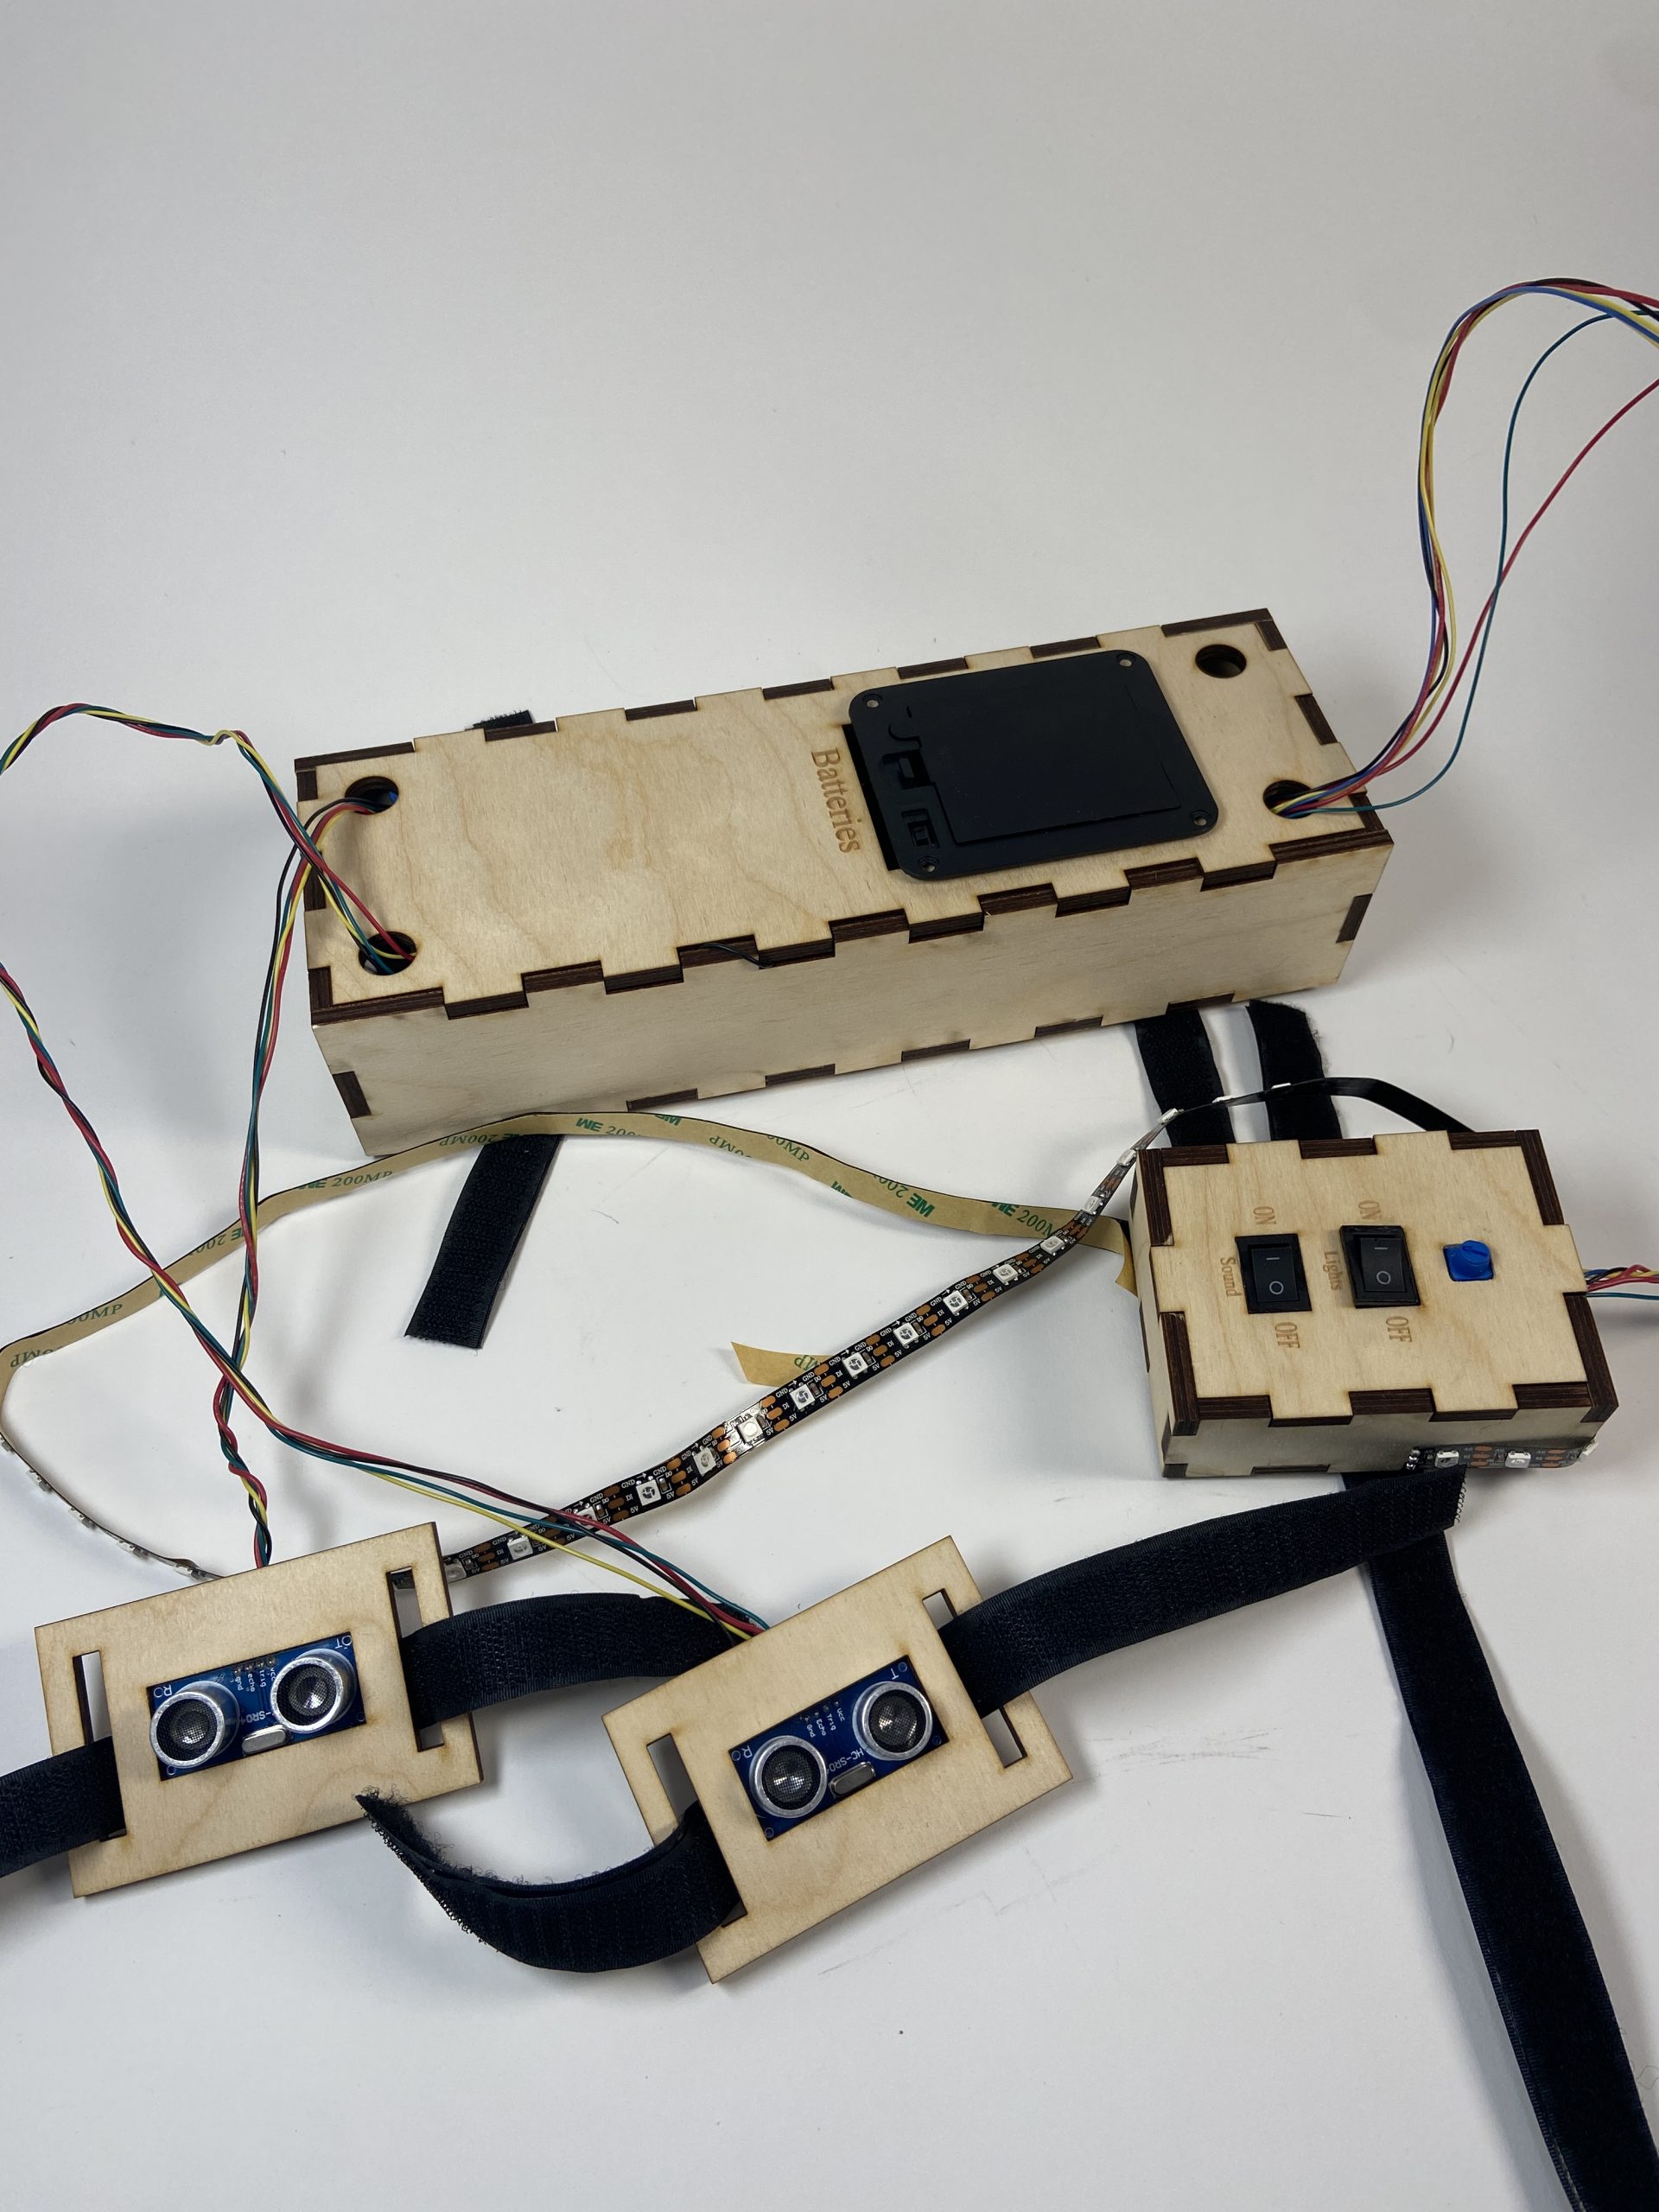
This is the main photo of the device with all its parts. All the velcro is unstrapped in this photo and there is a loose LED strip in the middle that is connected to the control panel.
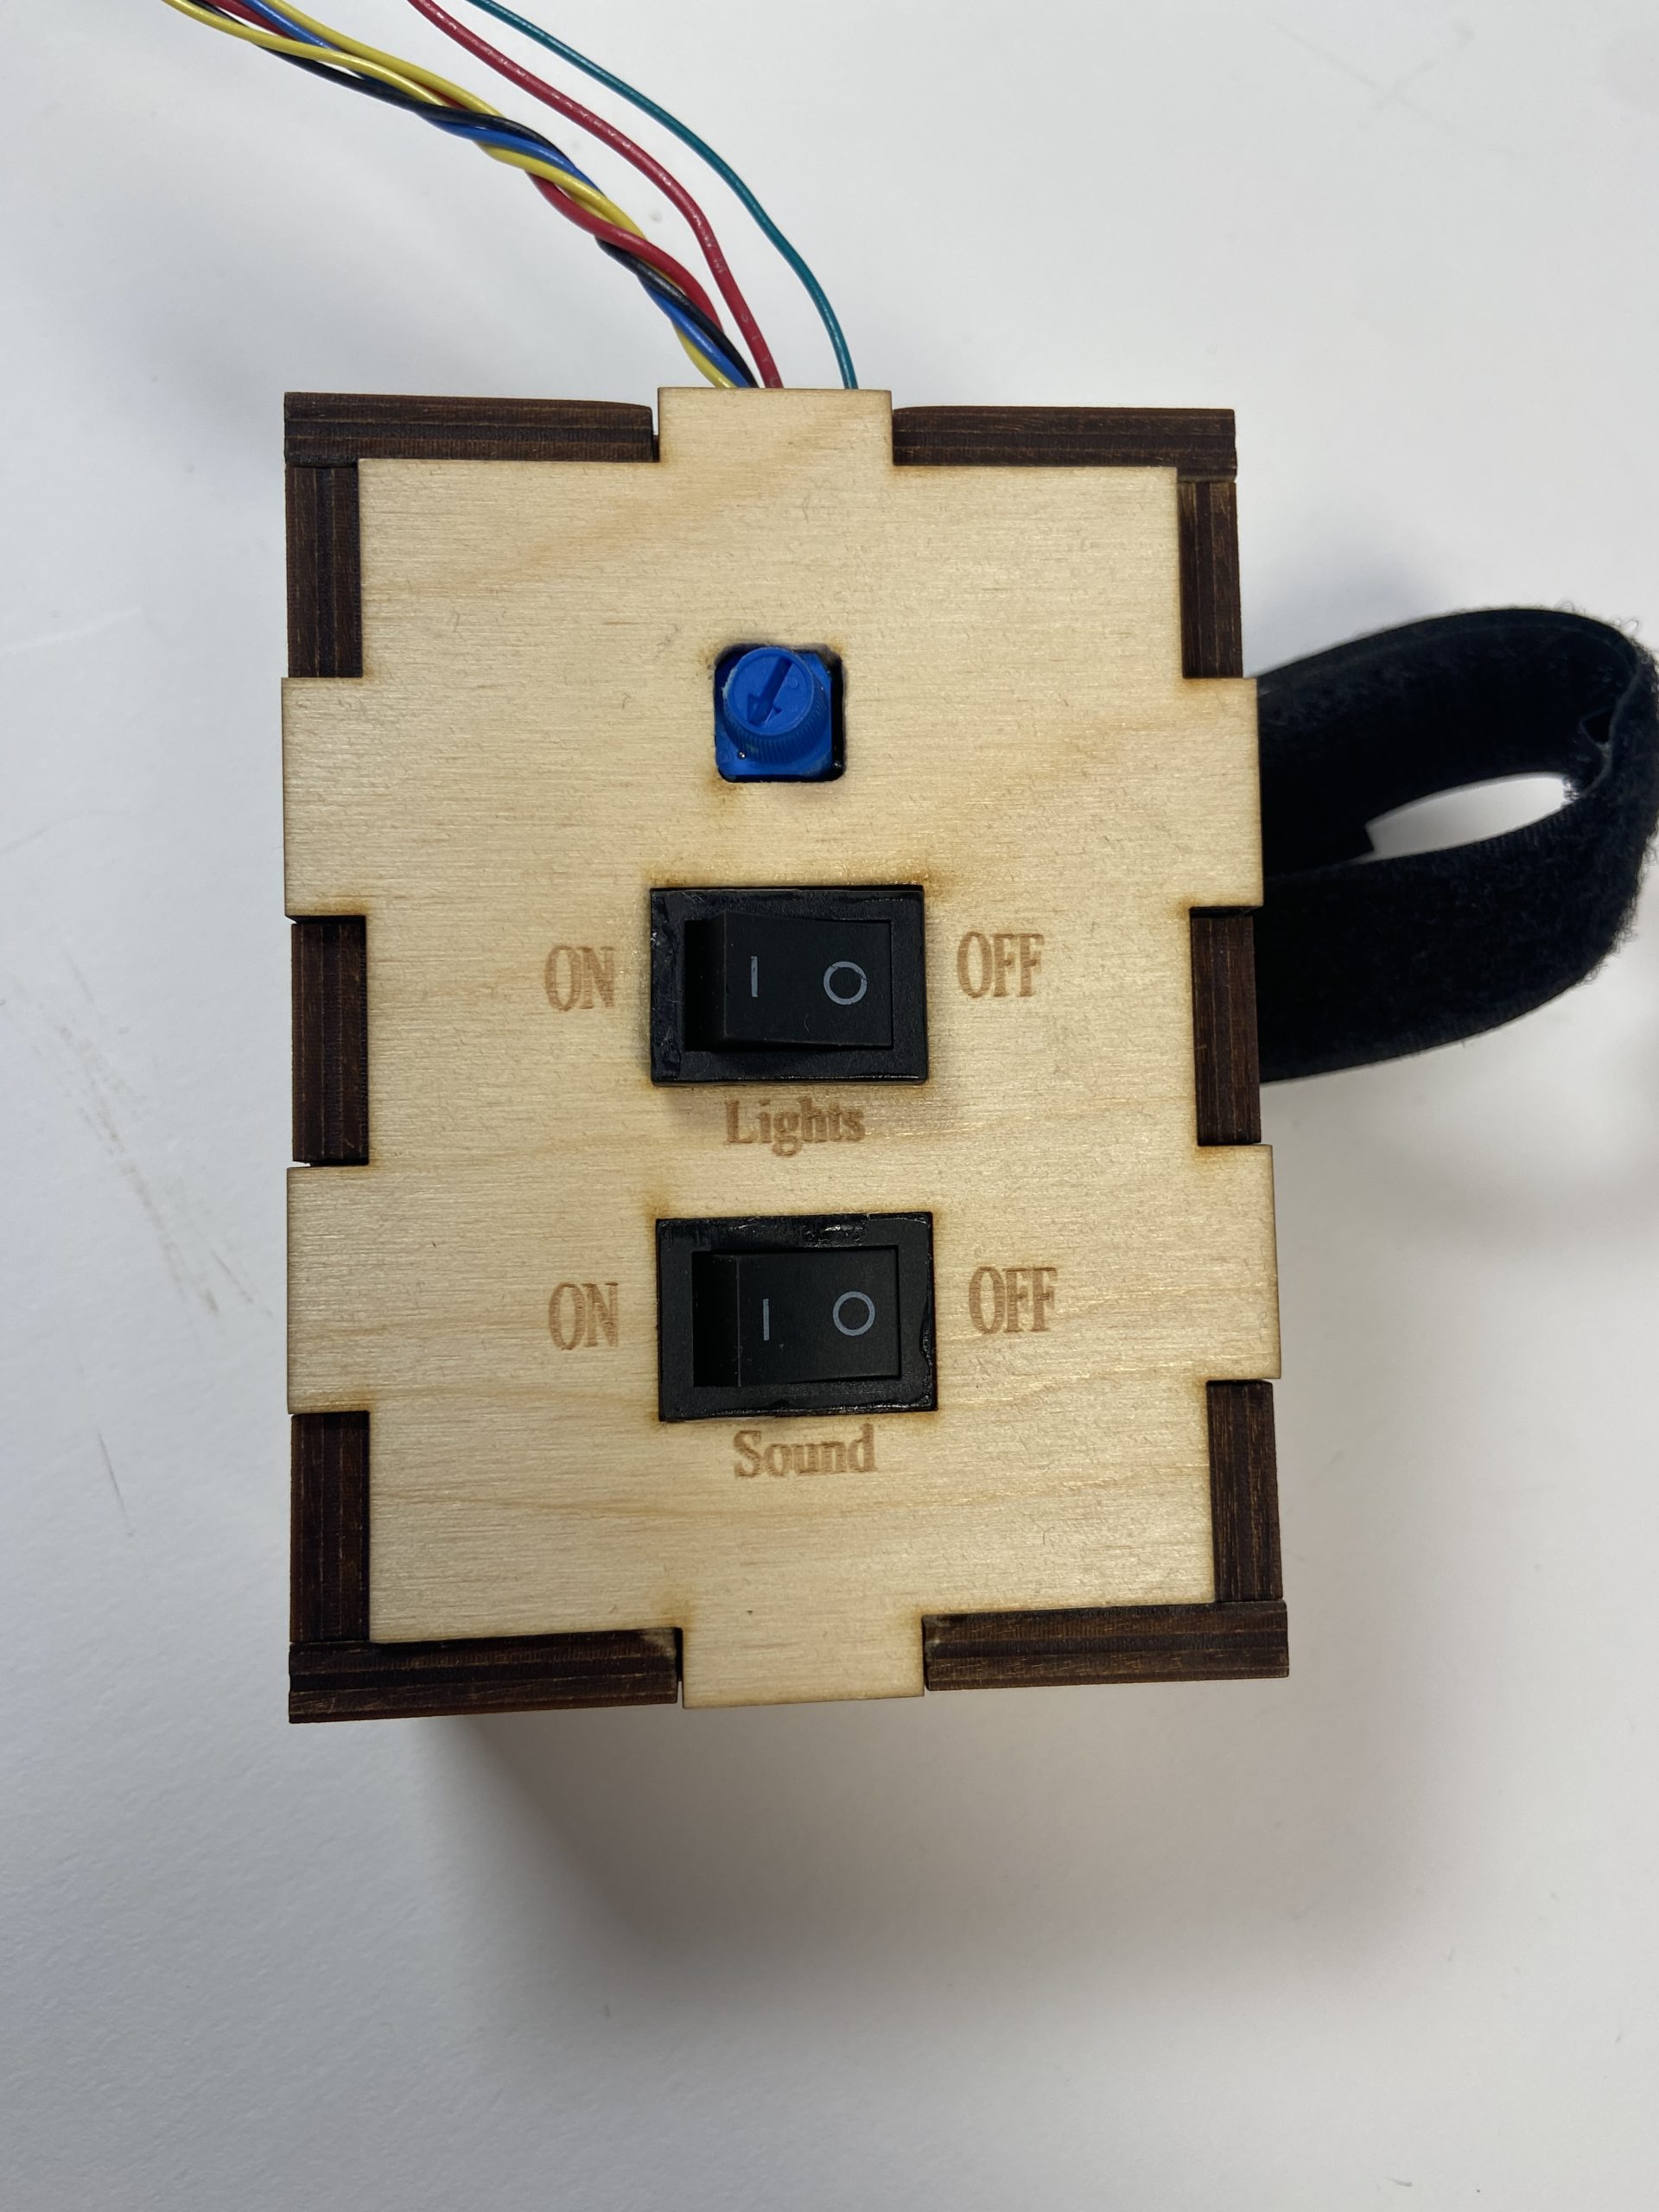
This is the control panel close up. It contains a switch that turns off sound (it has sound labeled underneath), and it has a switch that turns off lights and sound (has lights labeled underneath). The switches are like this because we wanted Jeff to have the ability to stop lights and sounds up at the control panel where he can reach. The blue knob is a potentiometer for adjusting the distance the sensor scans for.
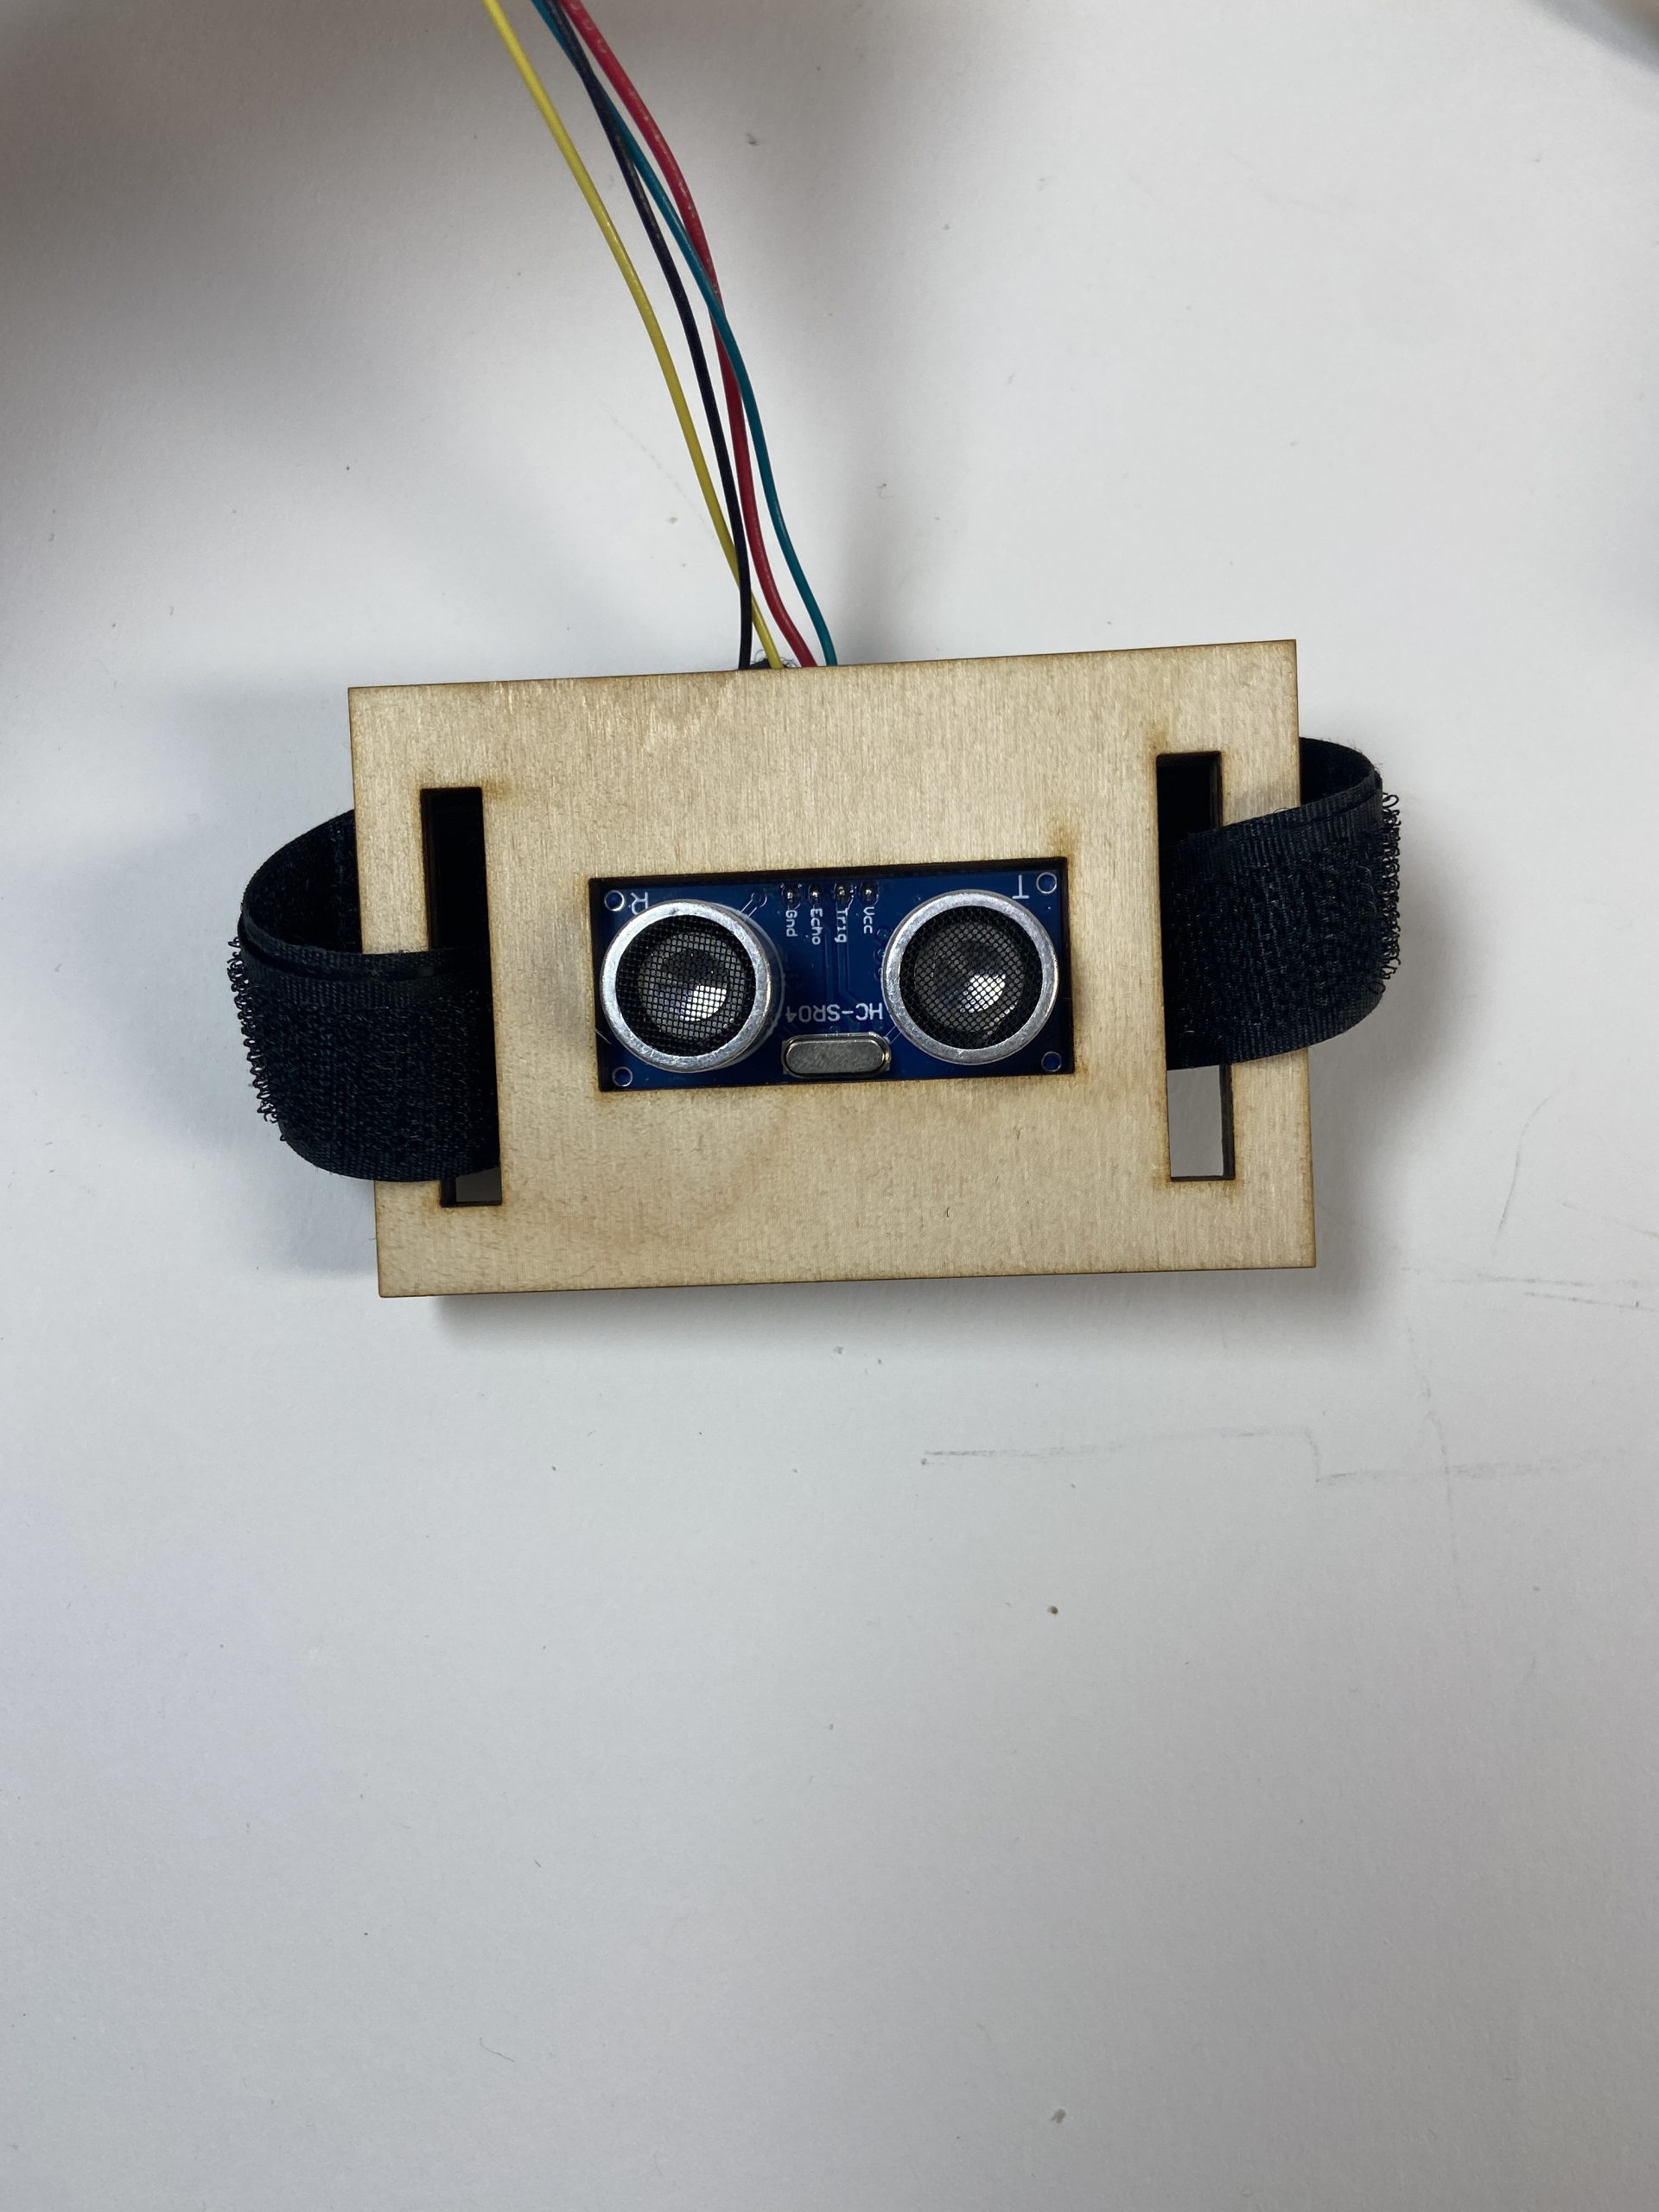
This is one of our ultra sonic sensors that is suppose to be strapped to the behind lower part of wheelchair with its one other counterpart. As you can see, you mount this by strapping the velcro tightly around the wheelchair rods.
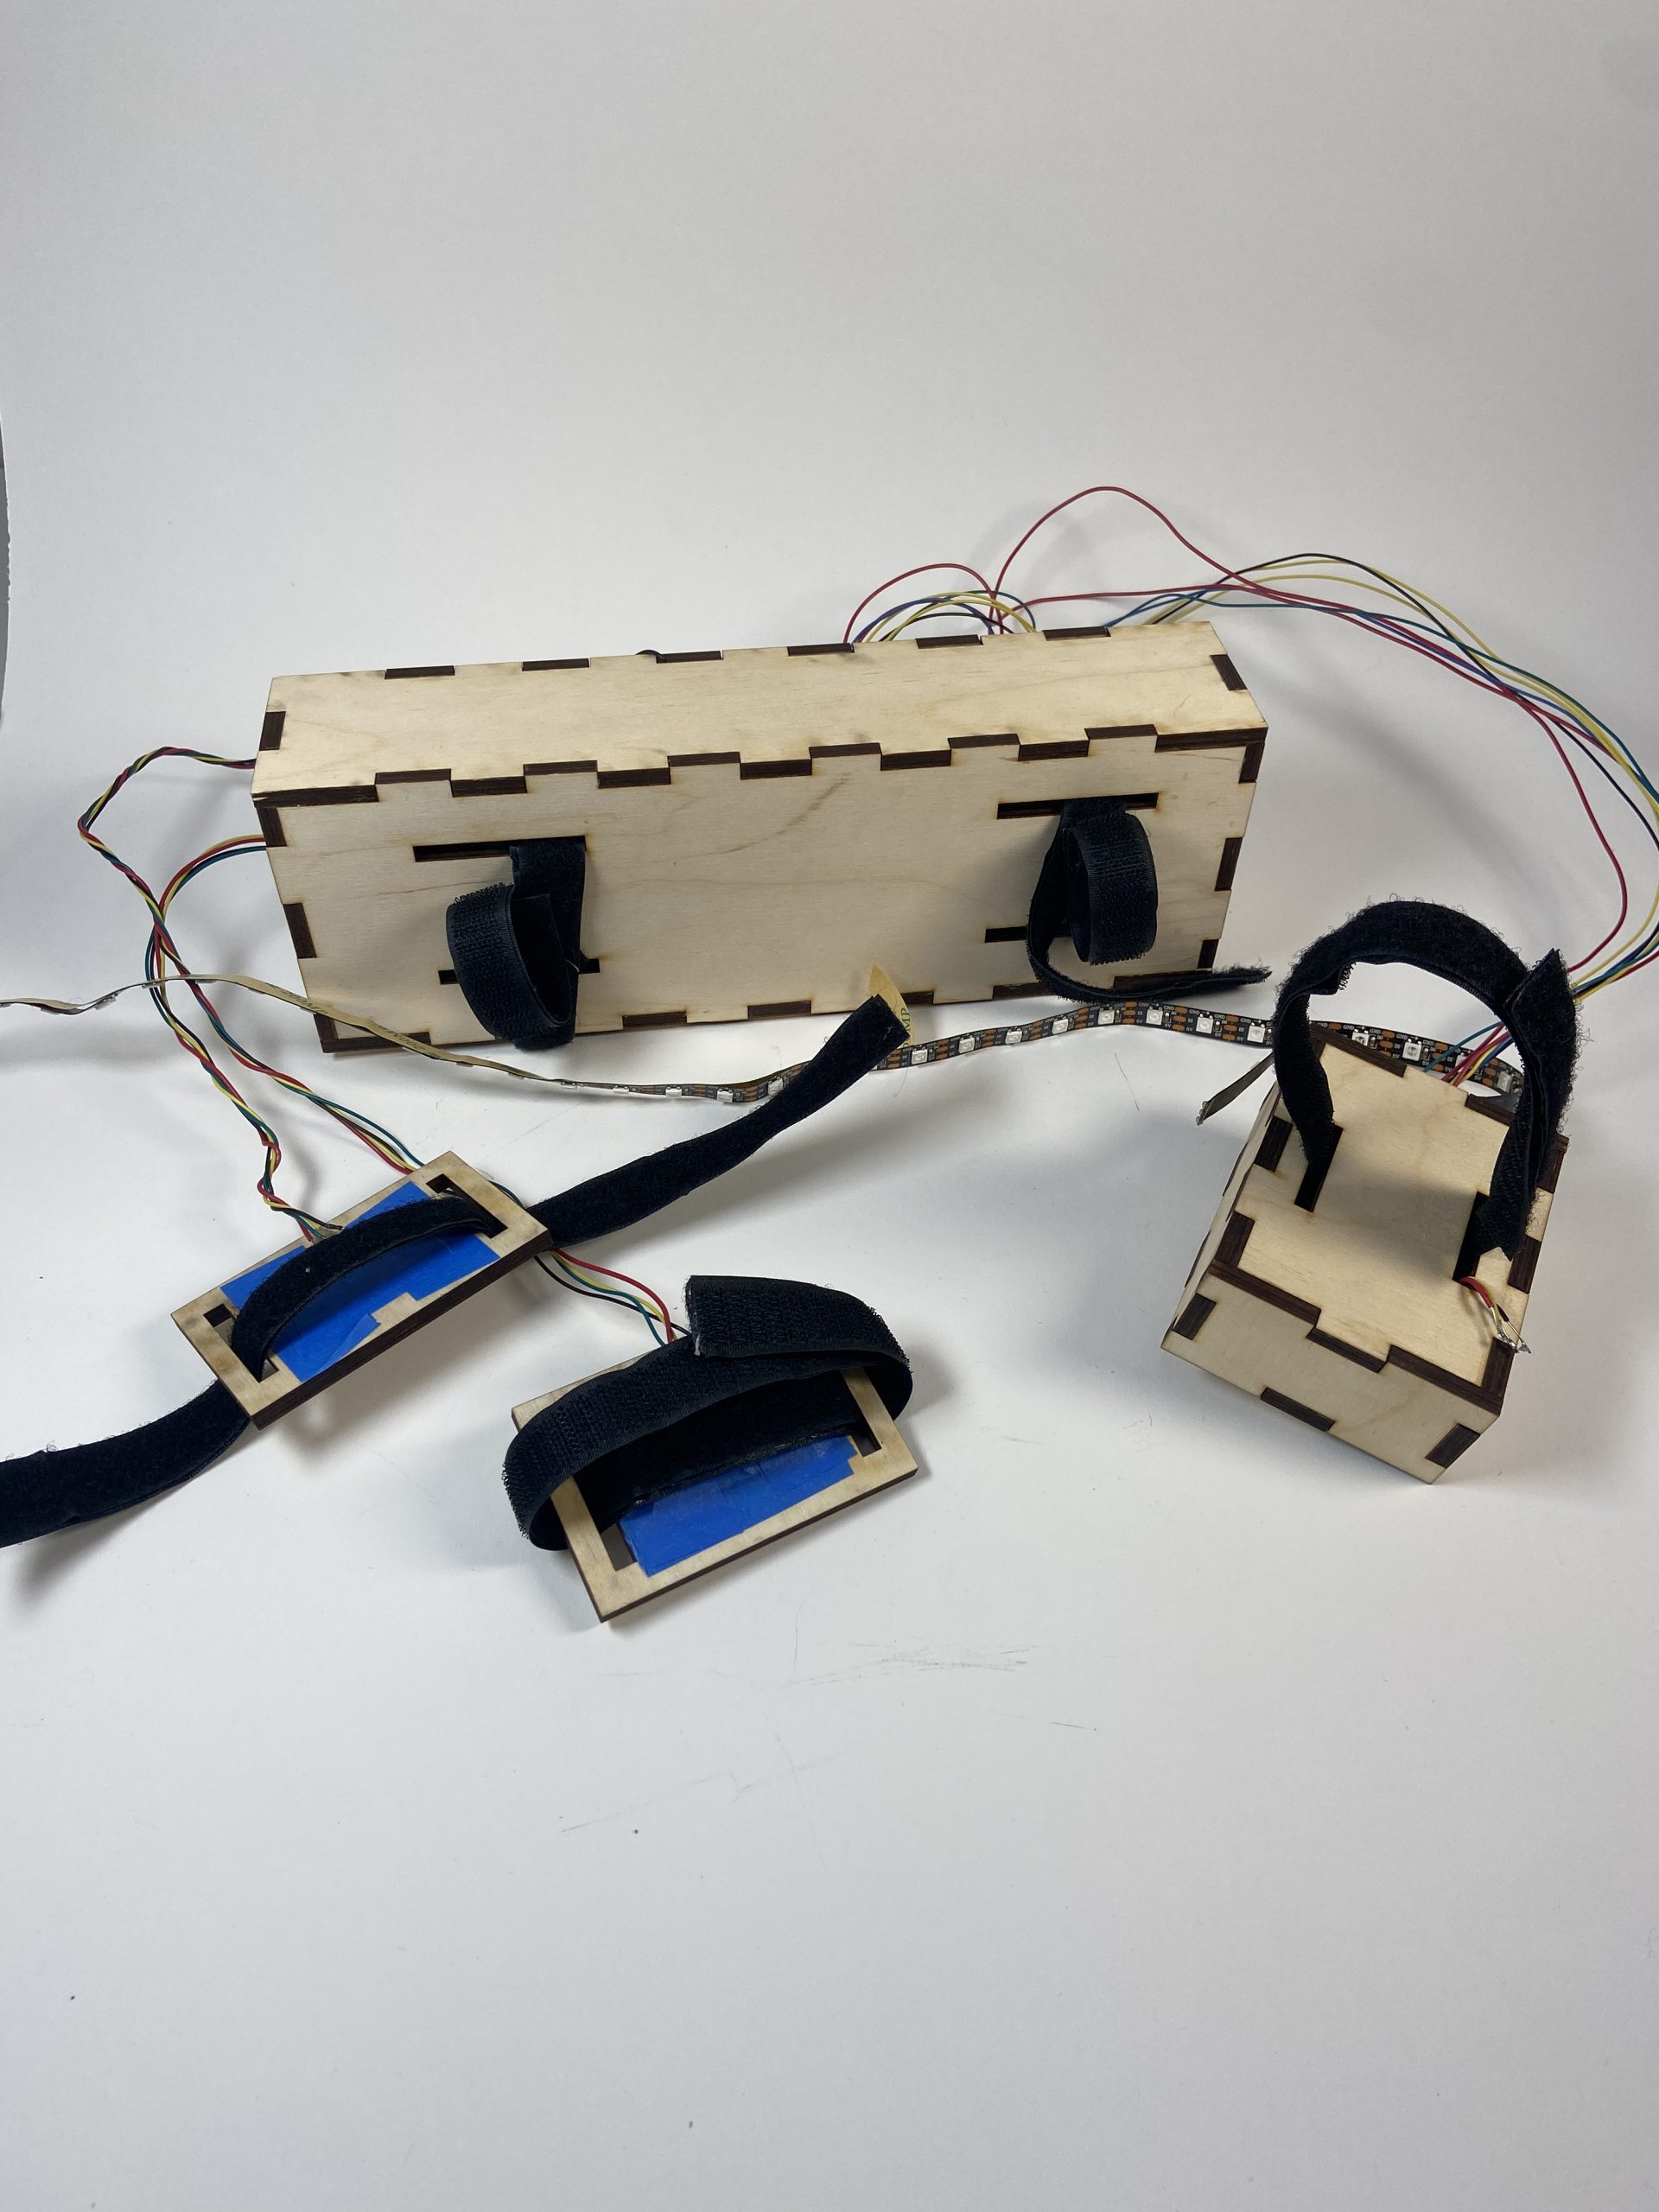
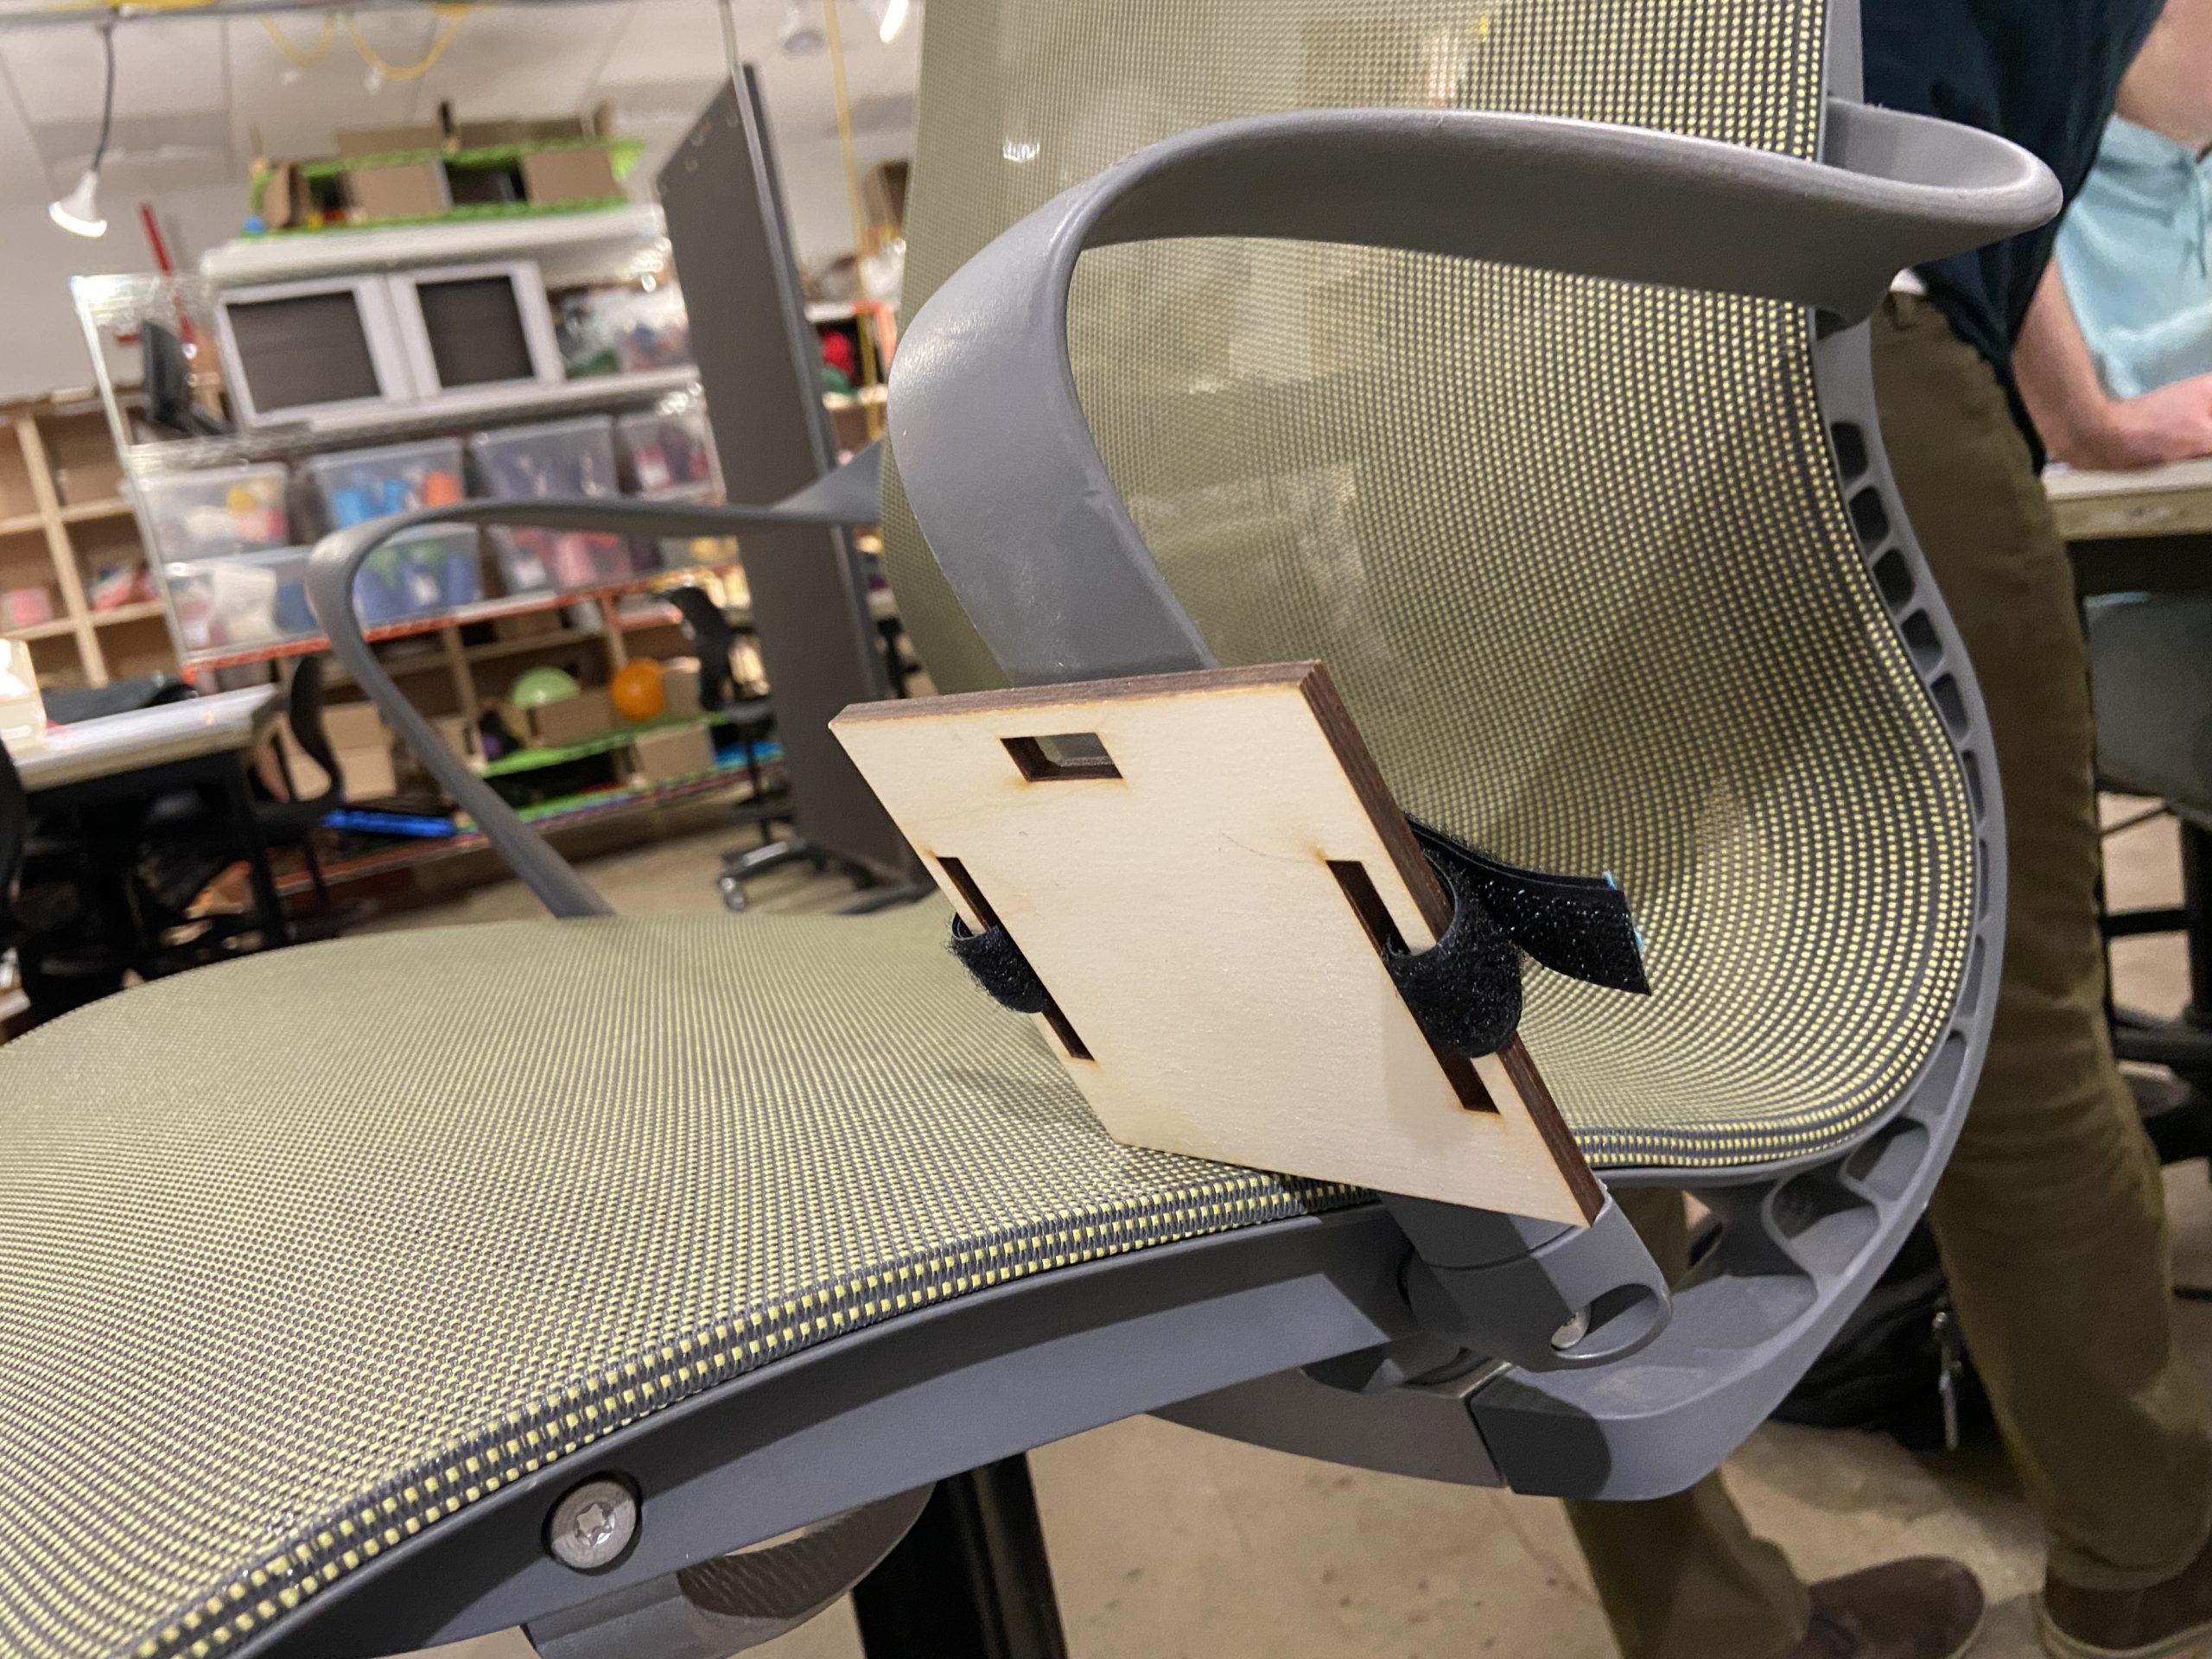
This is a picture showing what the back of everything looks like, and it’s suppose to show you how you would strap the velcro if it was on the wheelchair.

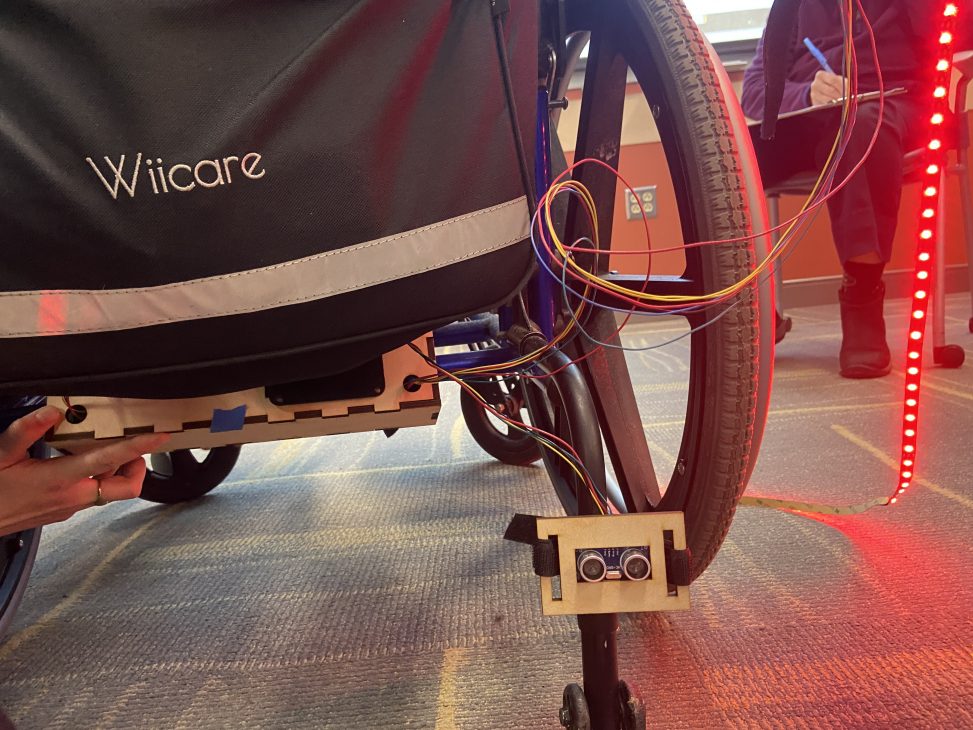
This is the device on Jeff’s wheelchair at the critique. We didn’t get much time with it but we found it mostly worked except for attaching the underneath box with the Arduino. We must have incorrectly measured on prototype day because the velcro straps were not quite long enough. Otherwise it was kinda successful!
Narrative Sketch
After recording another album review for this YouTube, Jeff decides to take a quick nap in his wheelchair. Unknowingly to Jeff at the same time as he begins to drift away his two-year old nephew decided to take out all his toys and begin to play with them all around Jeff. Very quickly Jeff’s nephew gets bored of playing inside and decides to go outside, leaving all his toys still on the ground around Jeff.
After Jeff wakes up from his nap, he realizes that he is surrounded by all his nephew’s toys. Jeff turns on the back-up alarm. Jeff waits and does not hear a beep. He now knows that there is a safe path behind him that he can take to get out of the living room. Jeff has saved himself from getting hurt from accidentally tipping over and has saved himself from hurting his nephew’s feelings by accidentally breaking one of this toys.
How We Got Here
Prototype
The prototype we created was designed to answer the question: How can we help Jeff move safely from Point A to Point B?
Our prototype was more on the simpler side as we wanted to gauge Jeff’s opinion on our approach. The prototype took the shape of a rectangular cardboard box with optical proximity sensors poking out of the frontside. In addition, we mocked up a control panel on paper for Jeff to take a look at. When we showed our prototype, we focused a lot of explaining how device would interact upon certain actions.
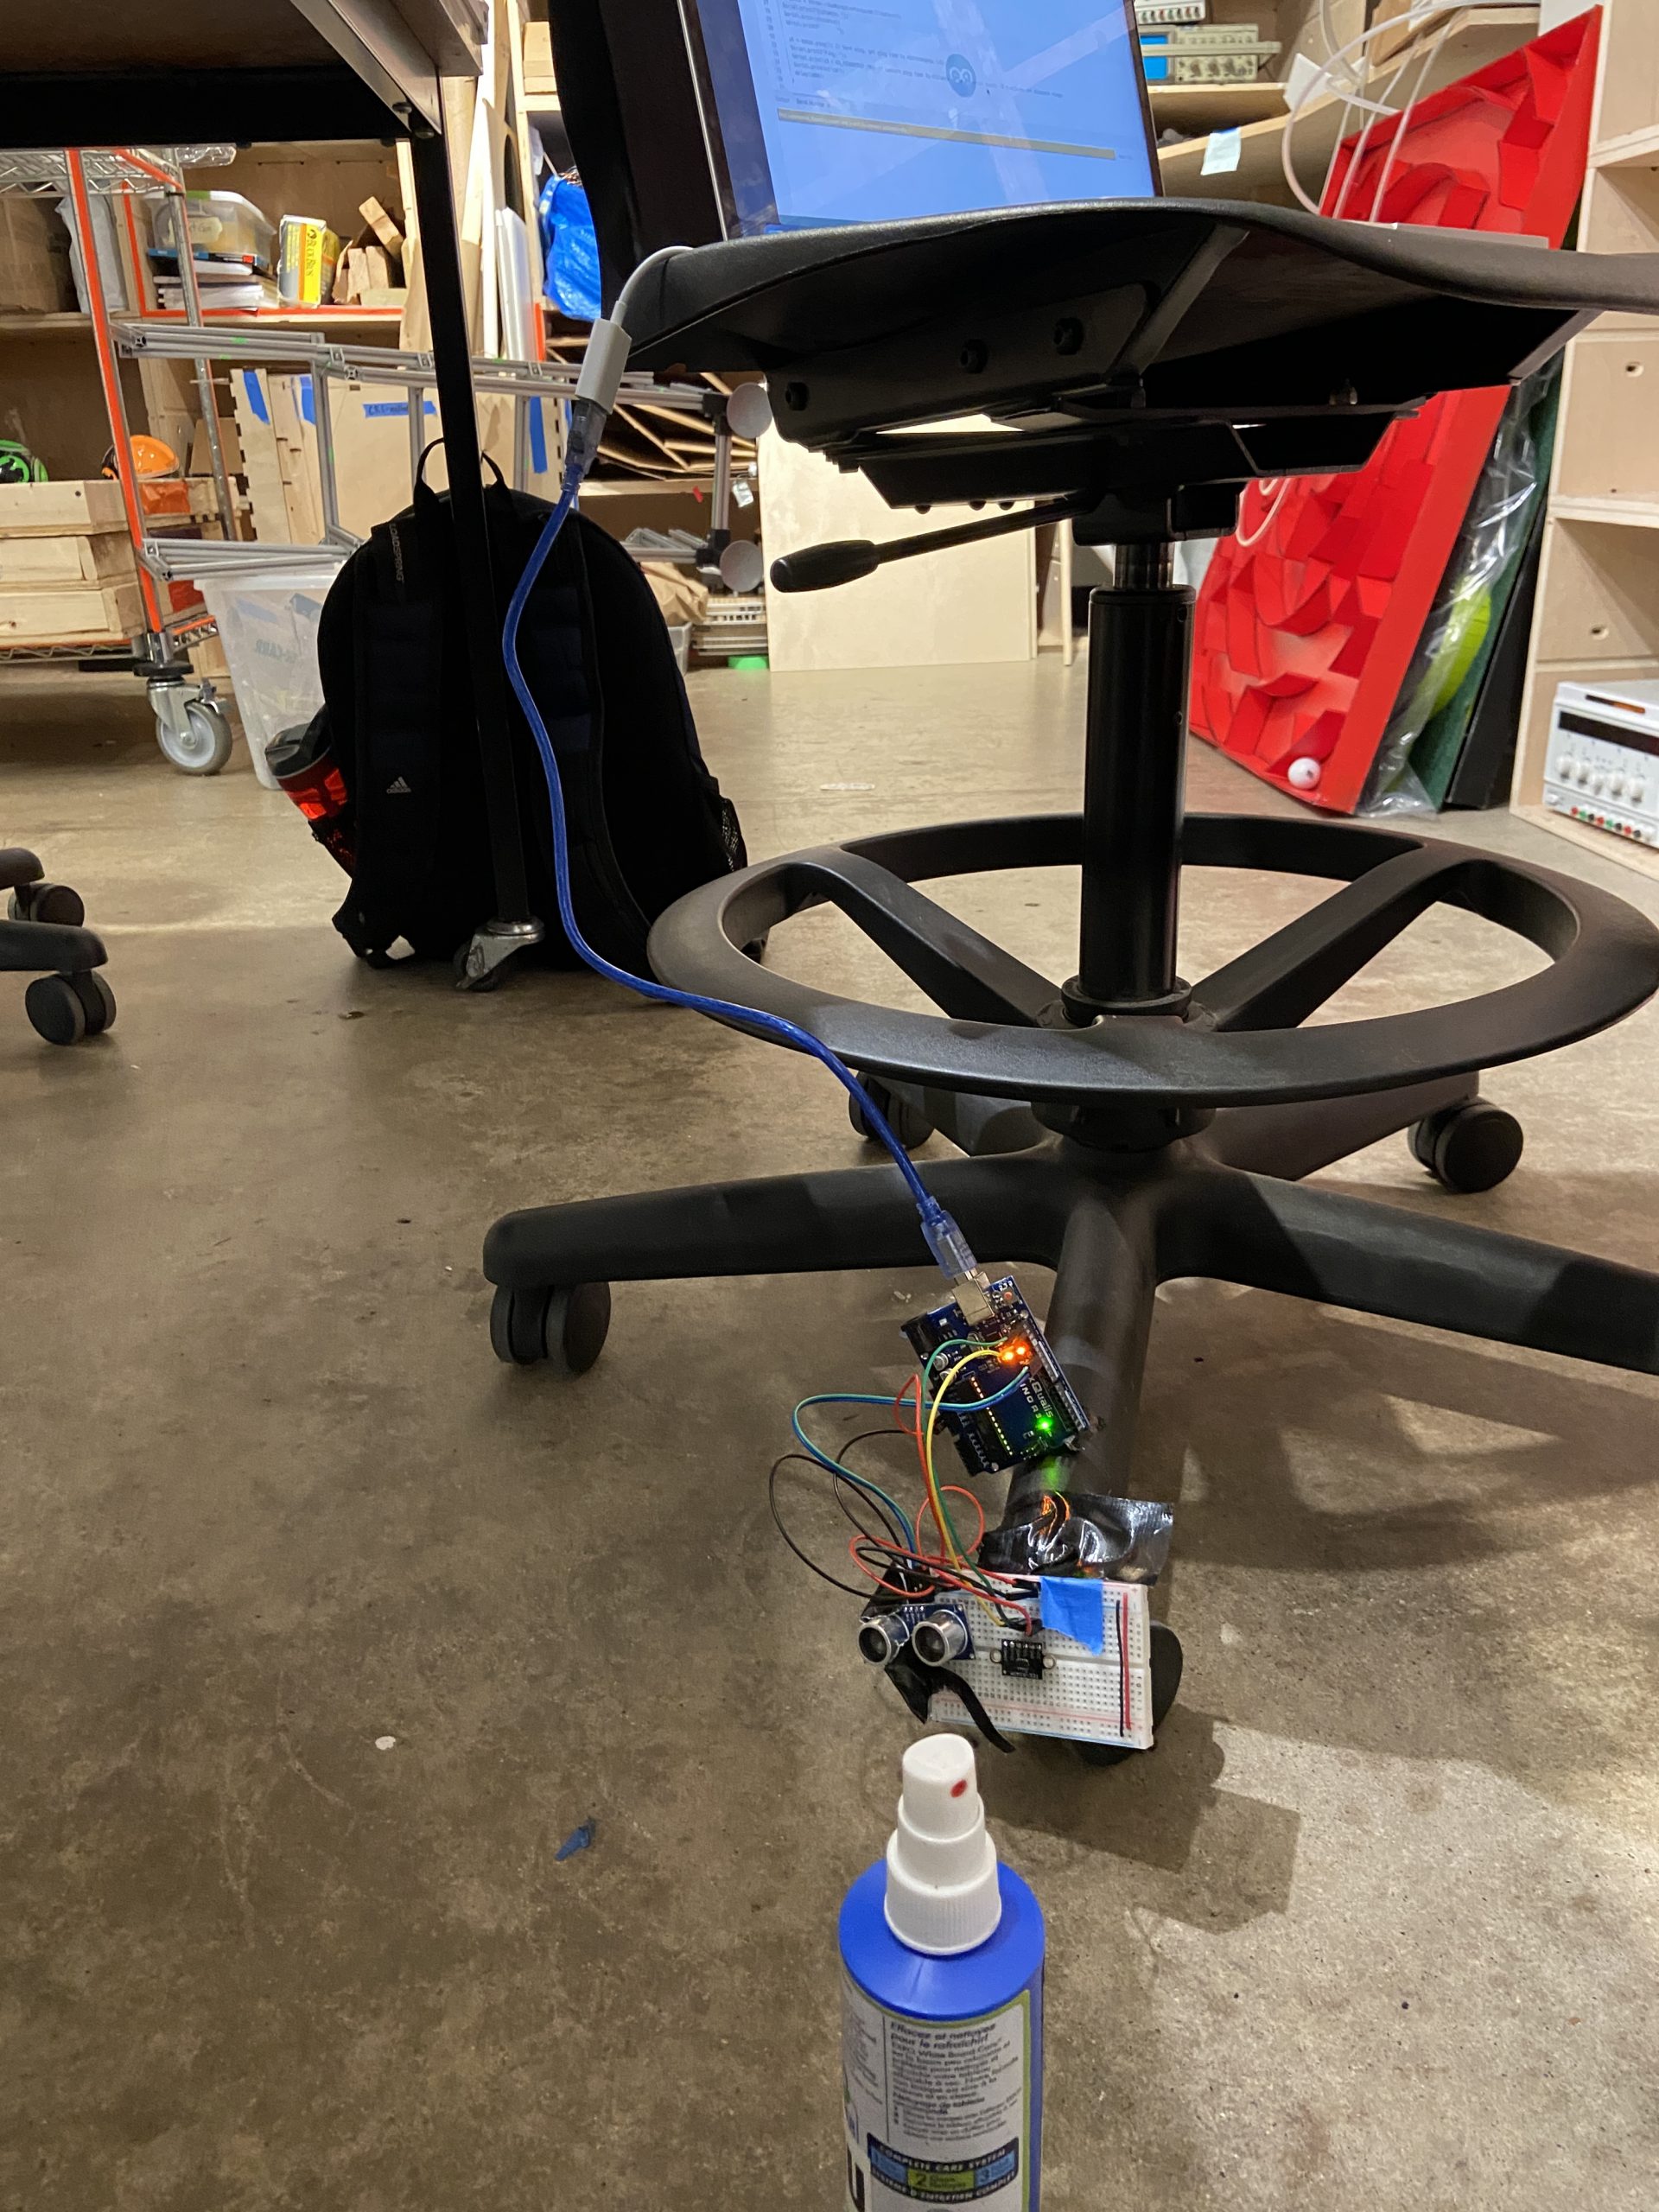
This is us testing which sensors to use for our project. We ended up going with the ultrasonic sensor because it had a larger range it detected which would help minimize problems later we suspected. We brought this set up to the prototype critique but the design and wizard of oz prototypes ended up helping us communicate better with Jeff.
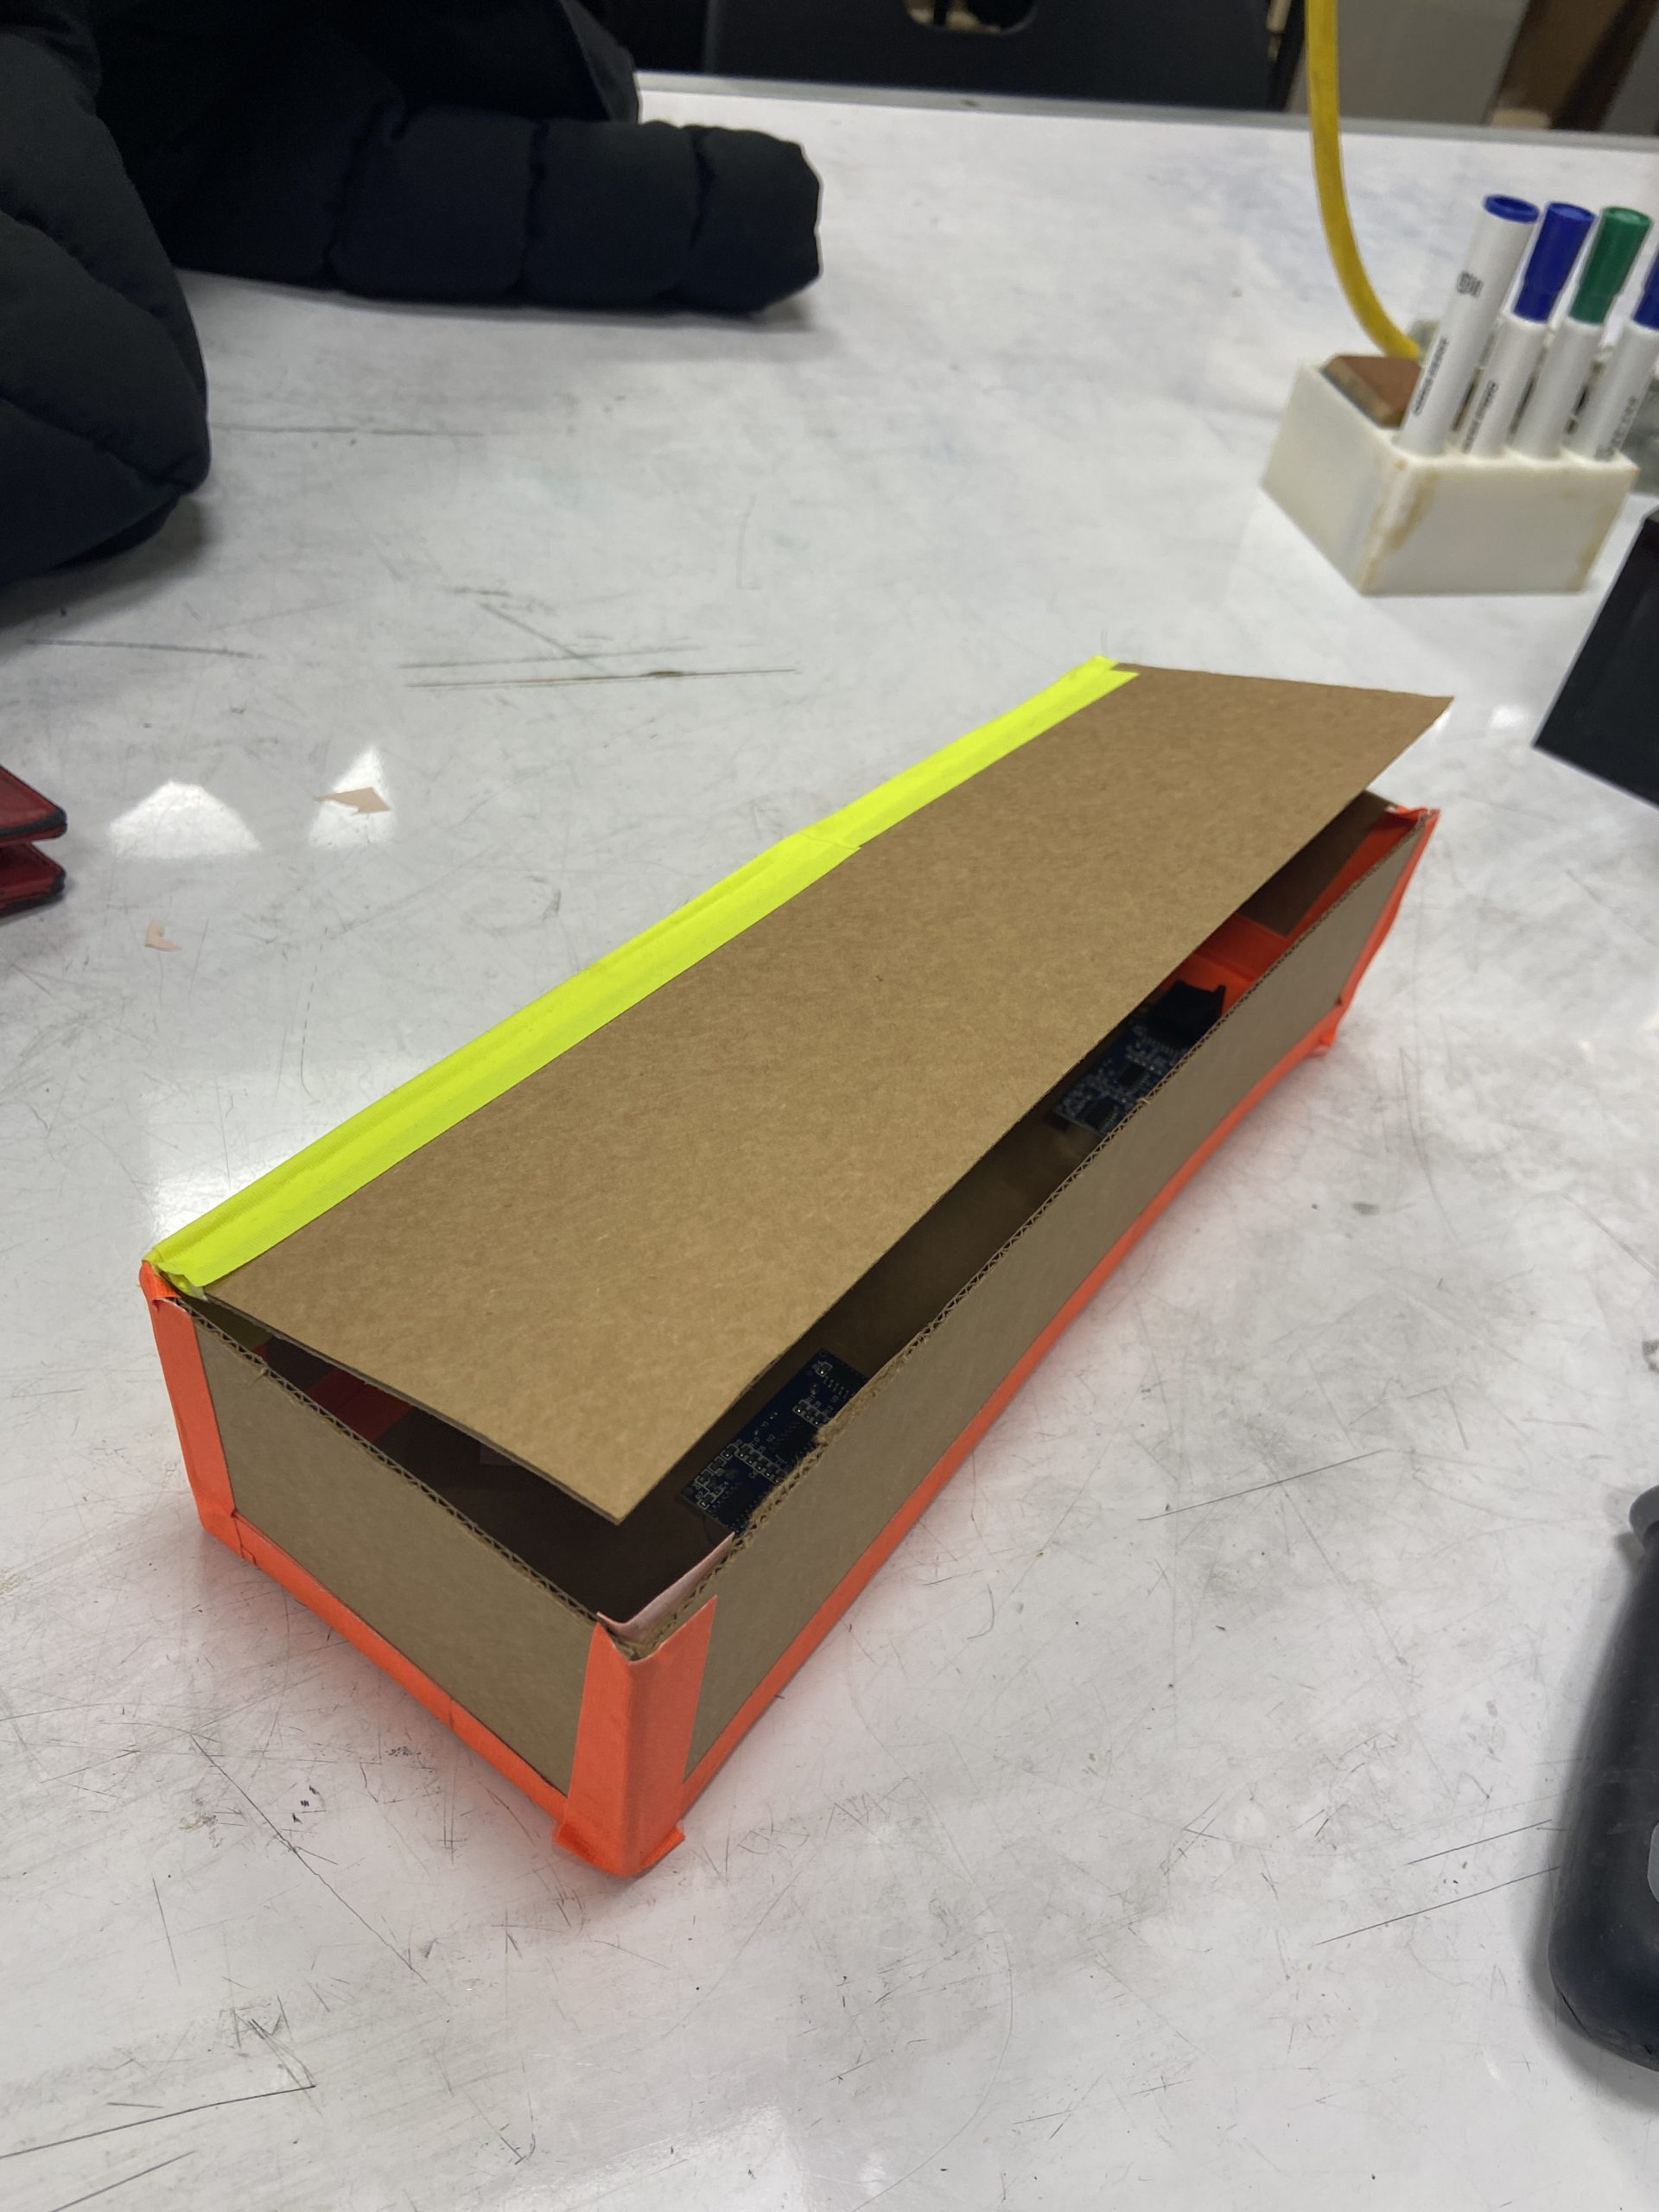
This was the underneath box prototype, we talked about how the sensors may end up on the side of this box and be put on the lower half of the wheelchair, however, after looking at Jeff’s wheelchair we decided this wasn’t going to happen.
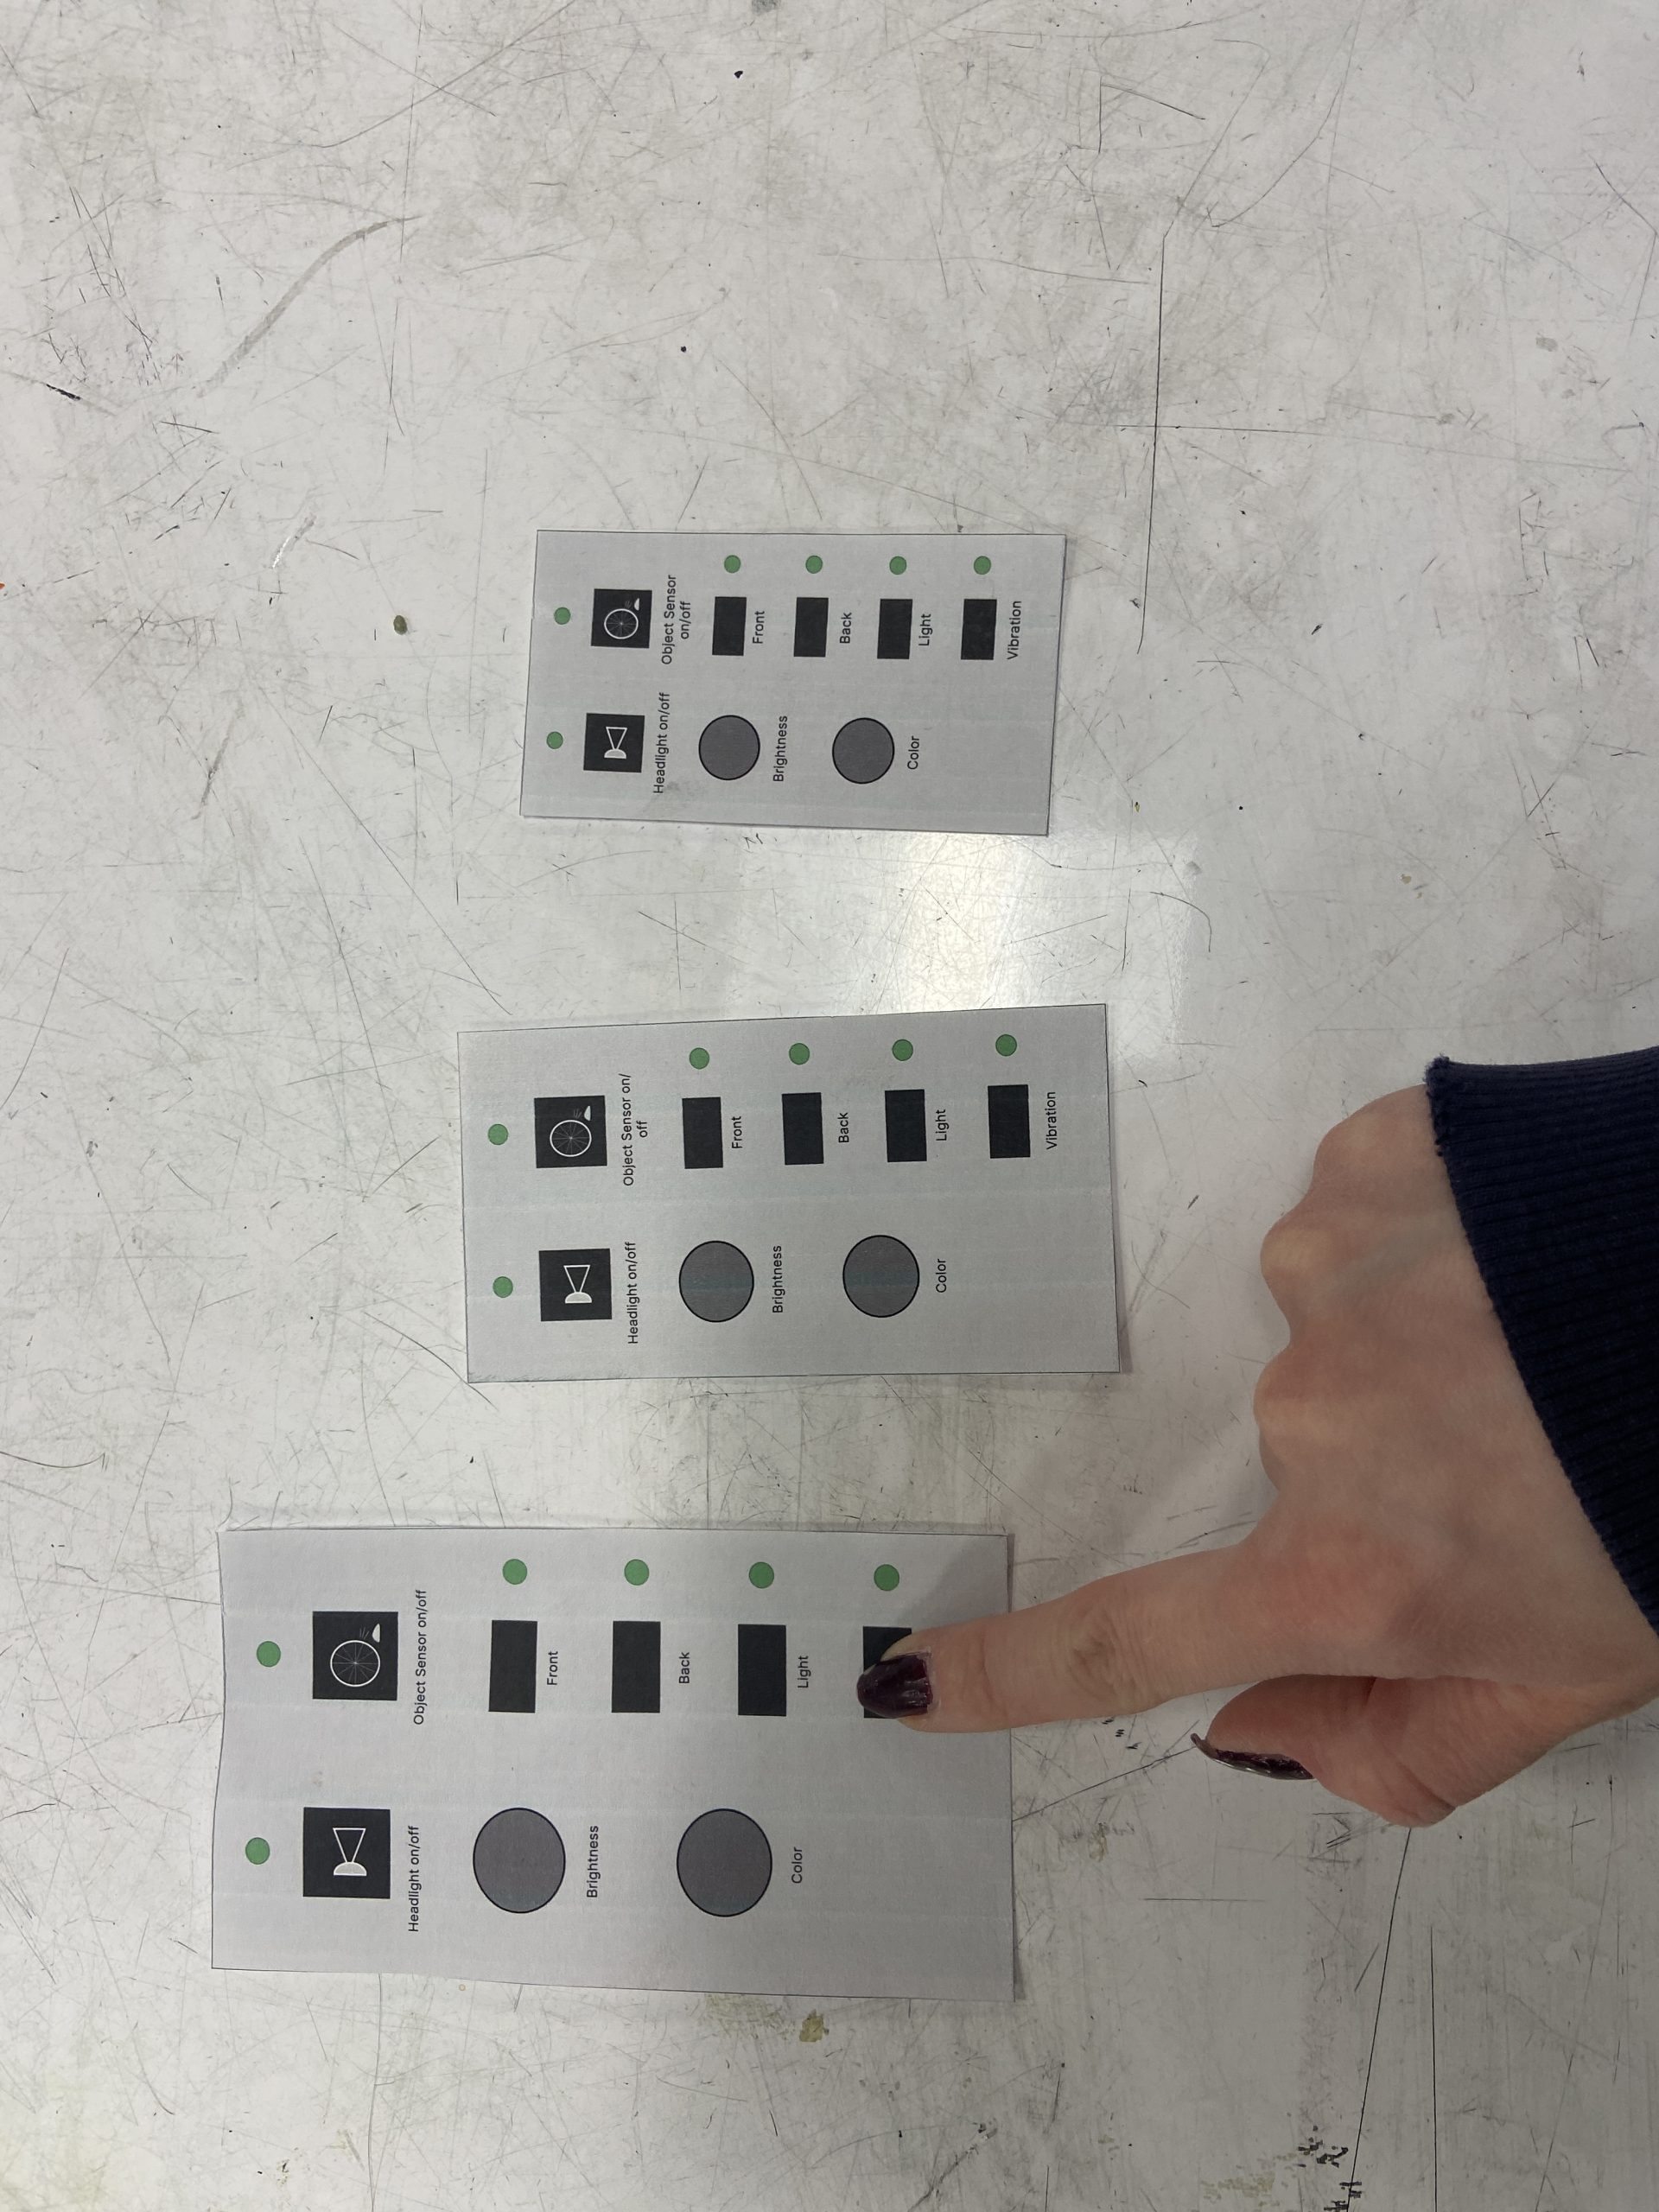
This is the paper control panel mockups. We had Jeff put his finger on the imaginary buttons to see what was big enough. We also held it next to his arm rest and asked which size was most legible. We found the biggest one was the only viable option after these two tests.
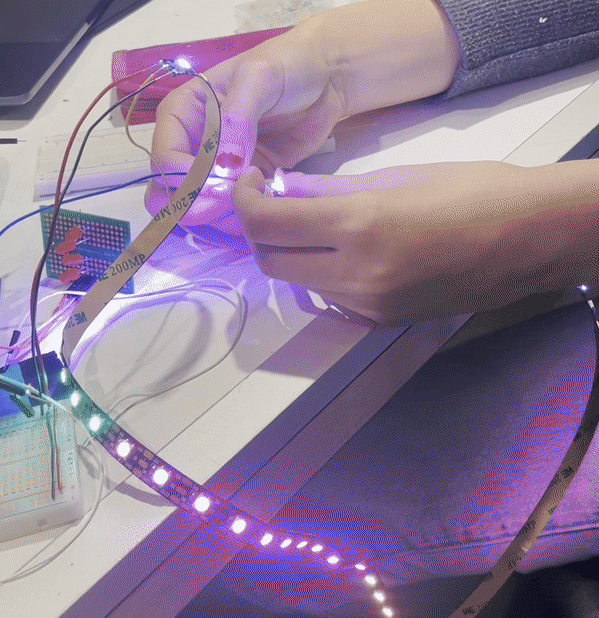
Wizard of Ozzing of the LED Strip
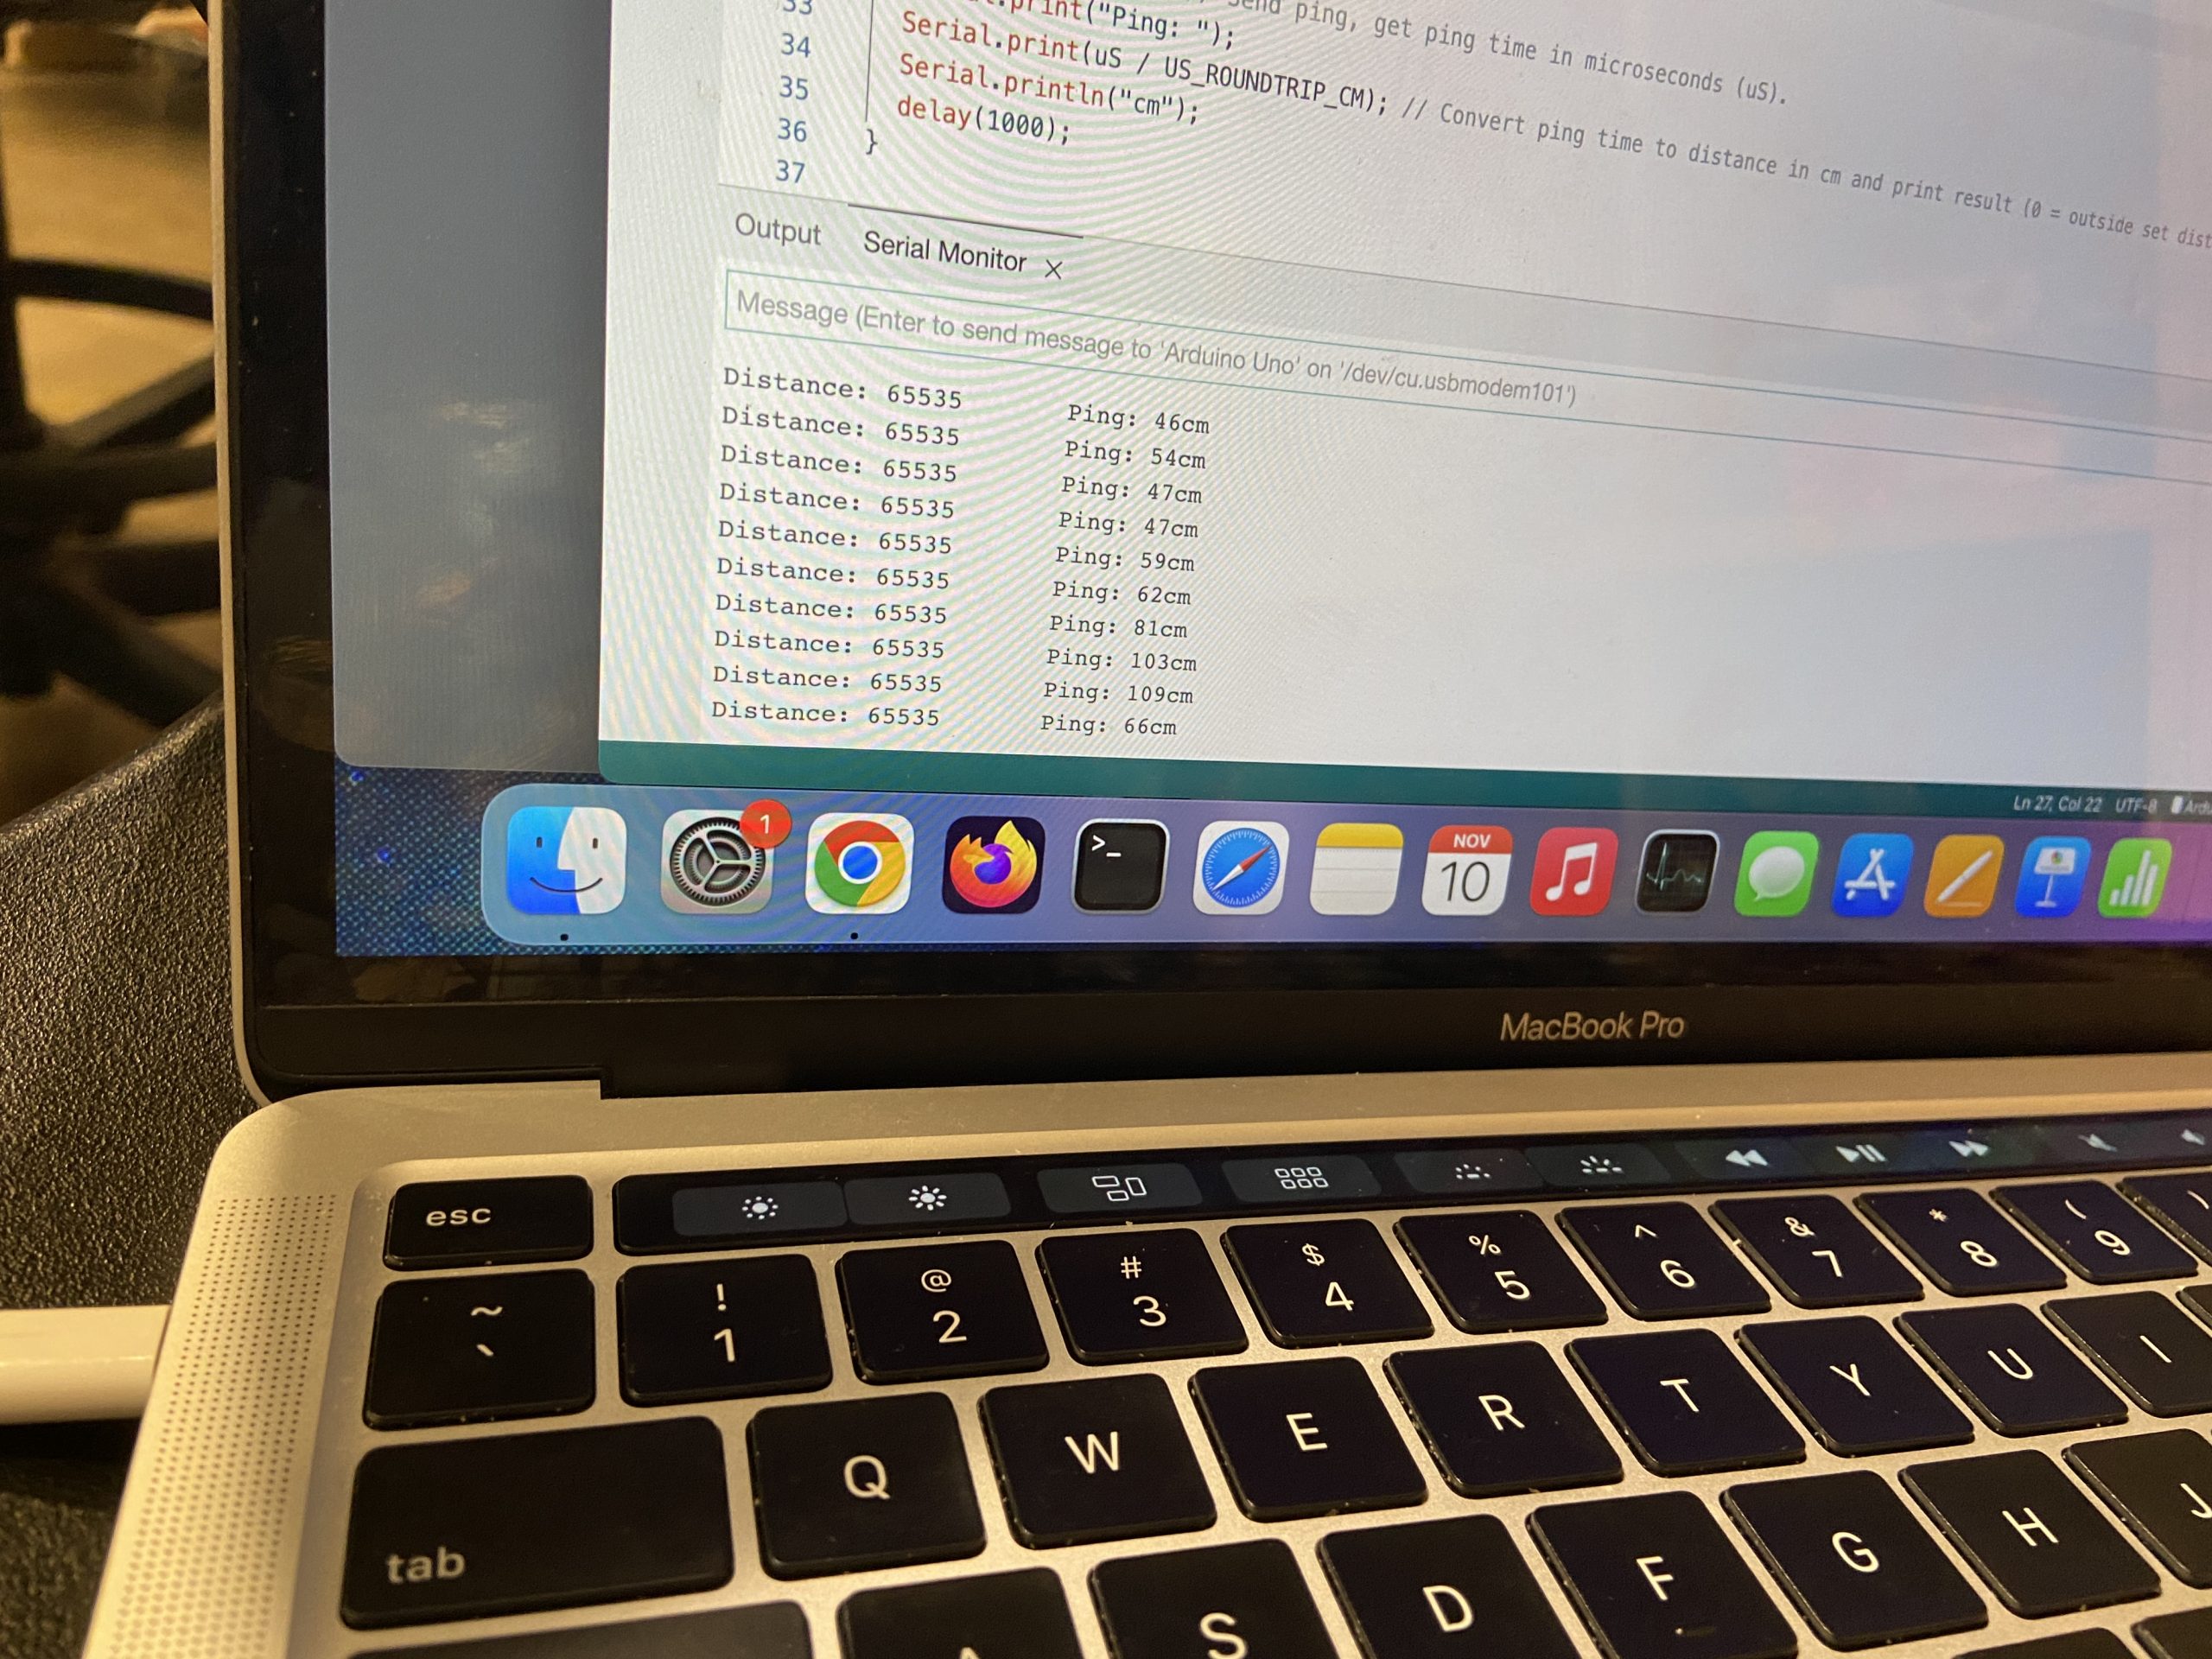
This is what the serial monitor looked like when we were testing the distance sensors before the prototype session.
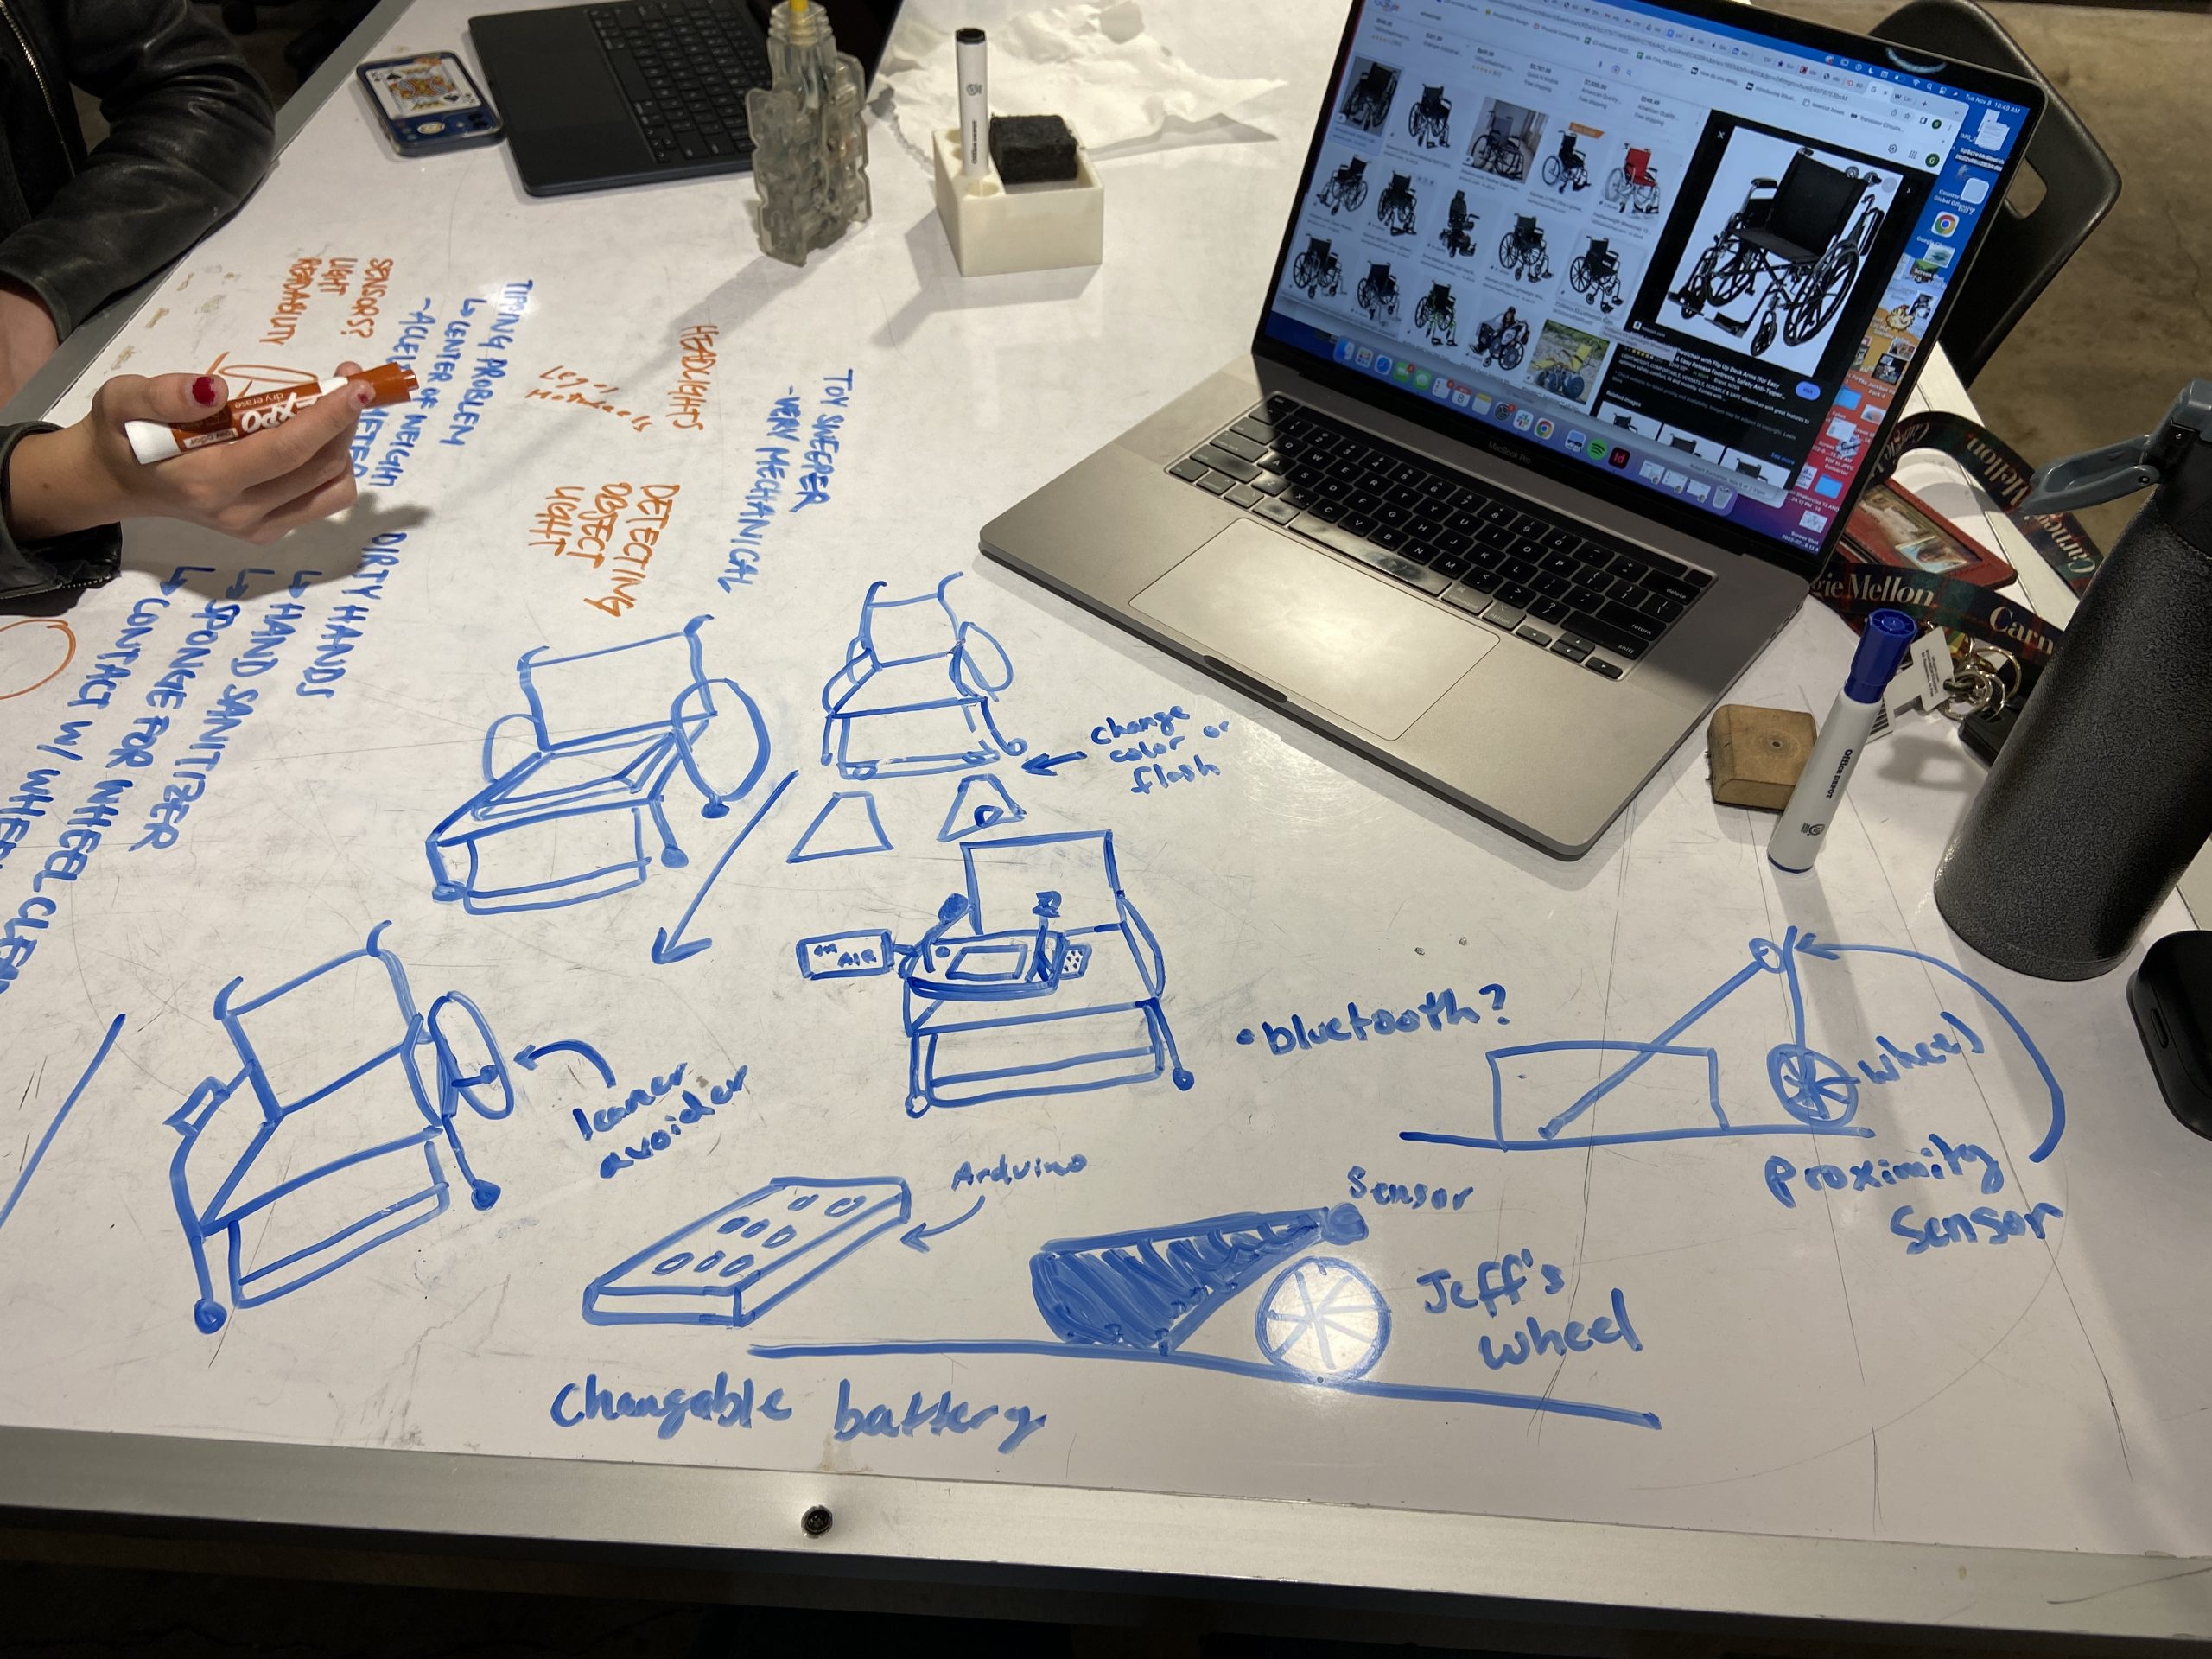
Here you can see us ideating after Jeff’s interview, trying to get an idea for the prototype critique. We struggled with this because we found Jeff didn’t have any complaints about his daily life. So we tried fleshing out/expanding all three of our ideas and talked to Zach about it. We ended up telling Jeff the problem space we picked but let him decided if he liked this route or not.
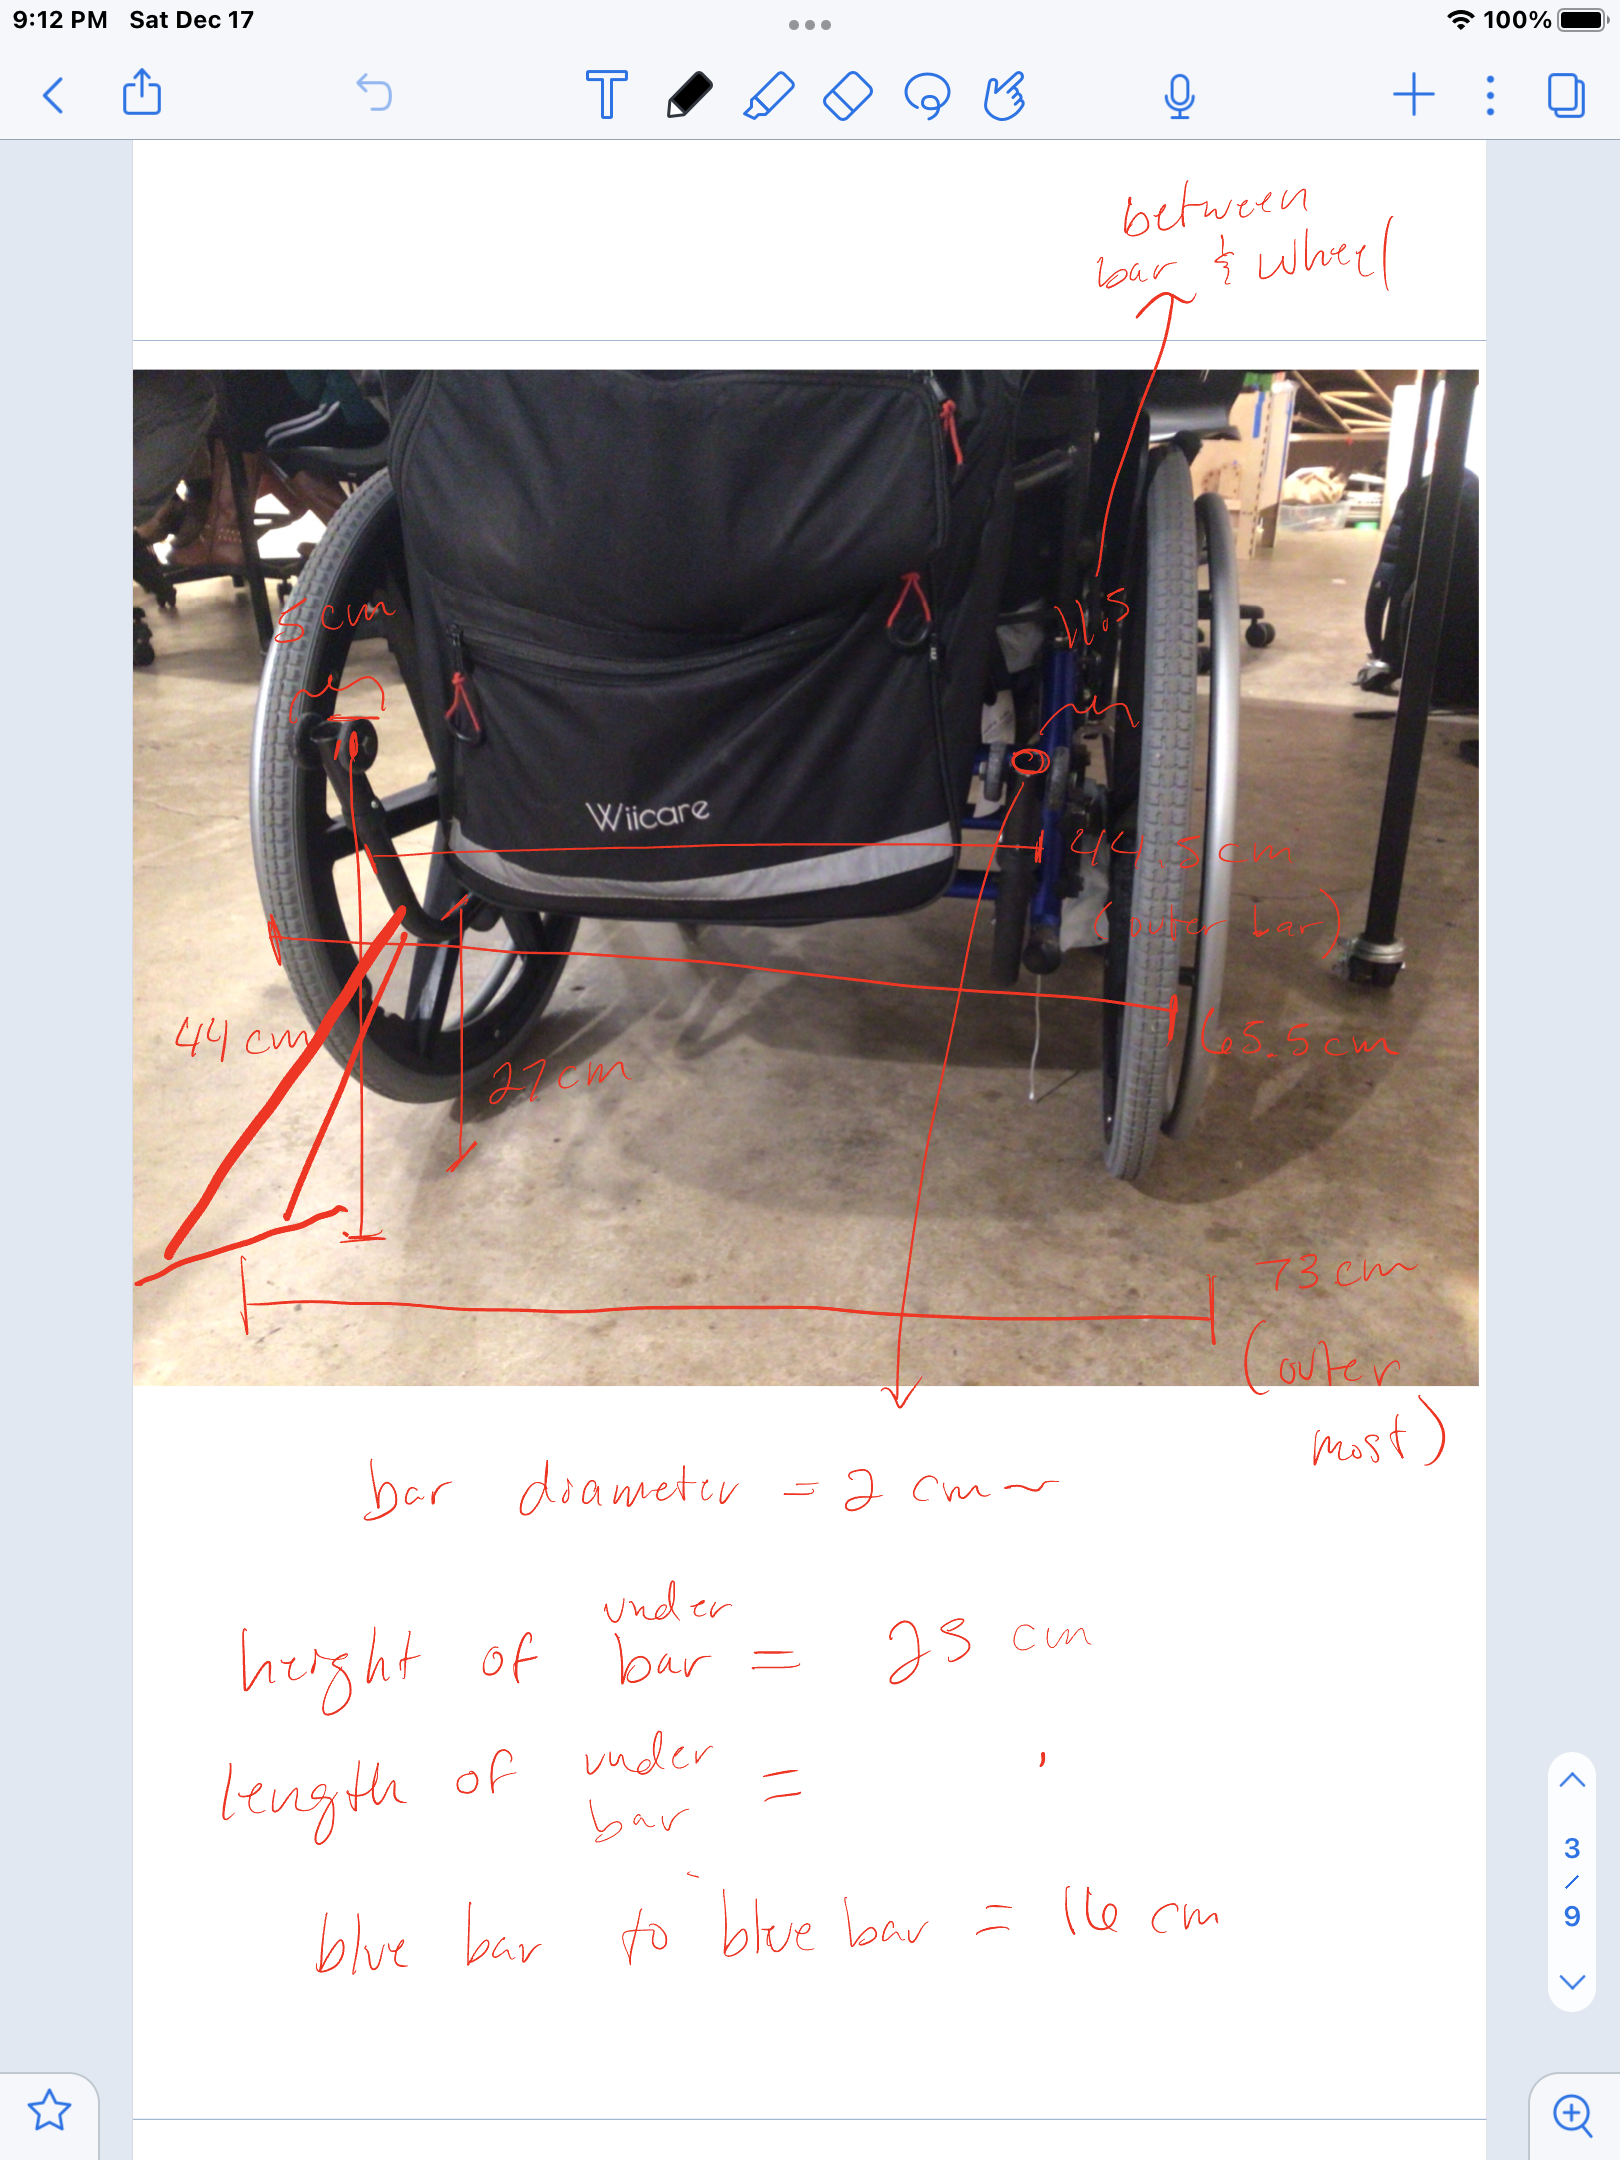
The main helpful info we got from the prototype session other than a solid direction for our project was a lot of measurements. This is the main page of notes that documented our measurements through a picture and writing. We ended up referencing this image a lot in the process.
In our mind, our device would mount underneath Jeff’s wheelchair and help detect objects in front of him. From the Prototype Critique, we gained valuable feedback that helped patch up holes from our initial interview with Jeff. Moreover, the Prototype Critique redefined the purpose of our device. Instead of detecting objects in front of Jeff, that he can already see, we learned that it was much more helpful if the device could detect objects behind Jeff as he backs up. This led us to separate the optical proximity sensor from being embedded within the device. We decided to move these sensors to these two metal rods already pointing from the back of Jeff’s wheelchair because these rods were already at an angle.
At the end of the Prototype Critique, we decided to acknowledge and include all the feedback we received from Jeff and the other CLASS clients. As people who do not have much experience with wheelchairs, we believed it was in the best interest to consider all the information we were given as our client knows himself the best. Furthermore, we are making this device for Jeff, hence his opinion would help us finalize our ideas for the final iteration. The main problem we encountered while prototyping was we found that getting the distance sensor accurate was pretty difficult because of angle and the sensor moving around, thus explaining why we wizard of oz the prototype instead.
Process
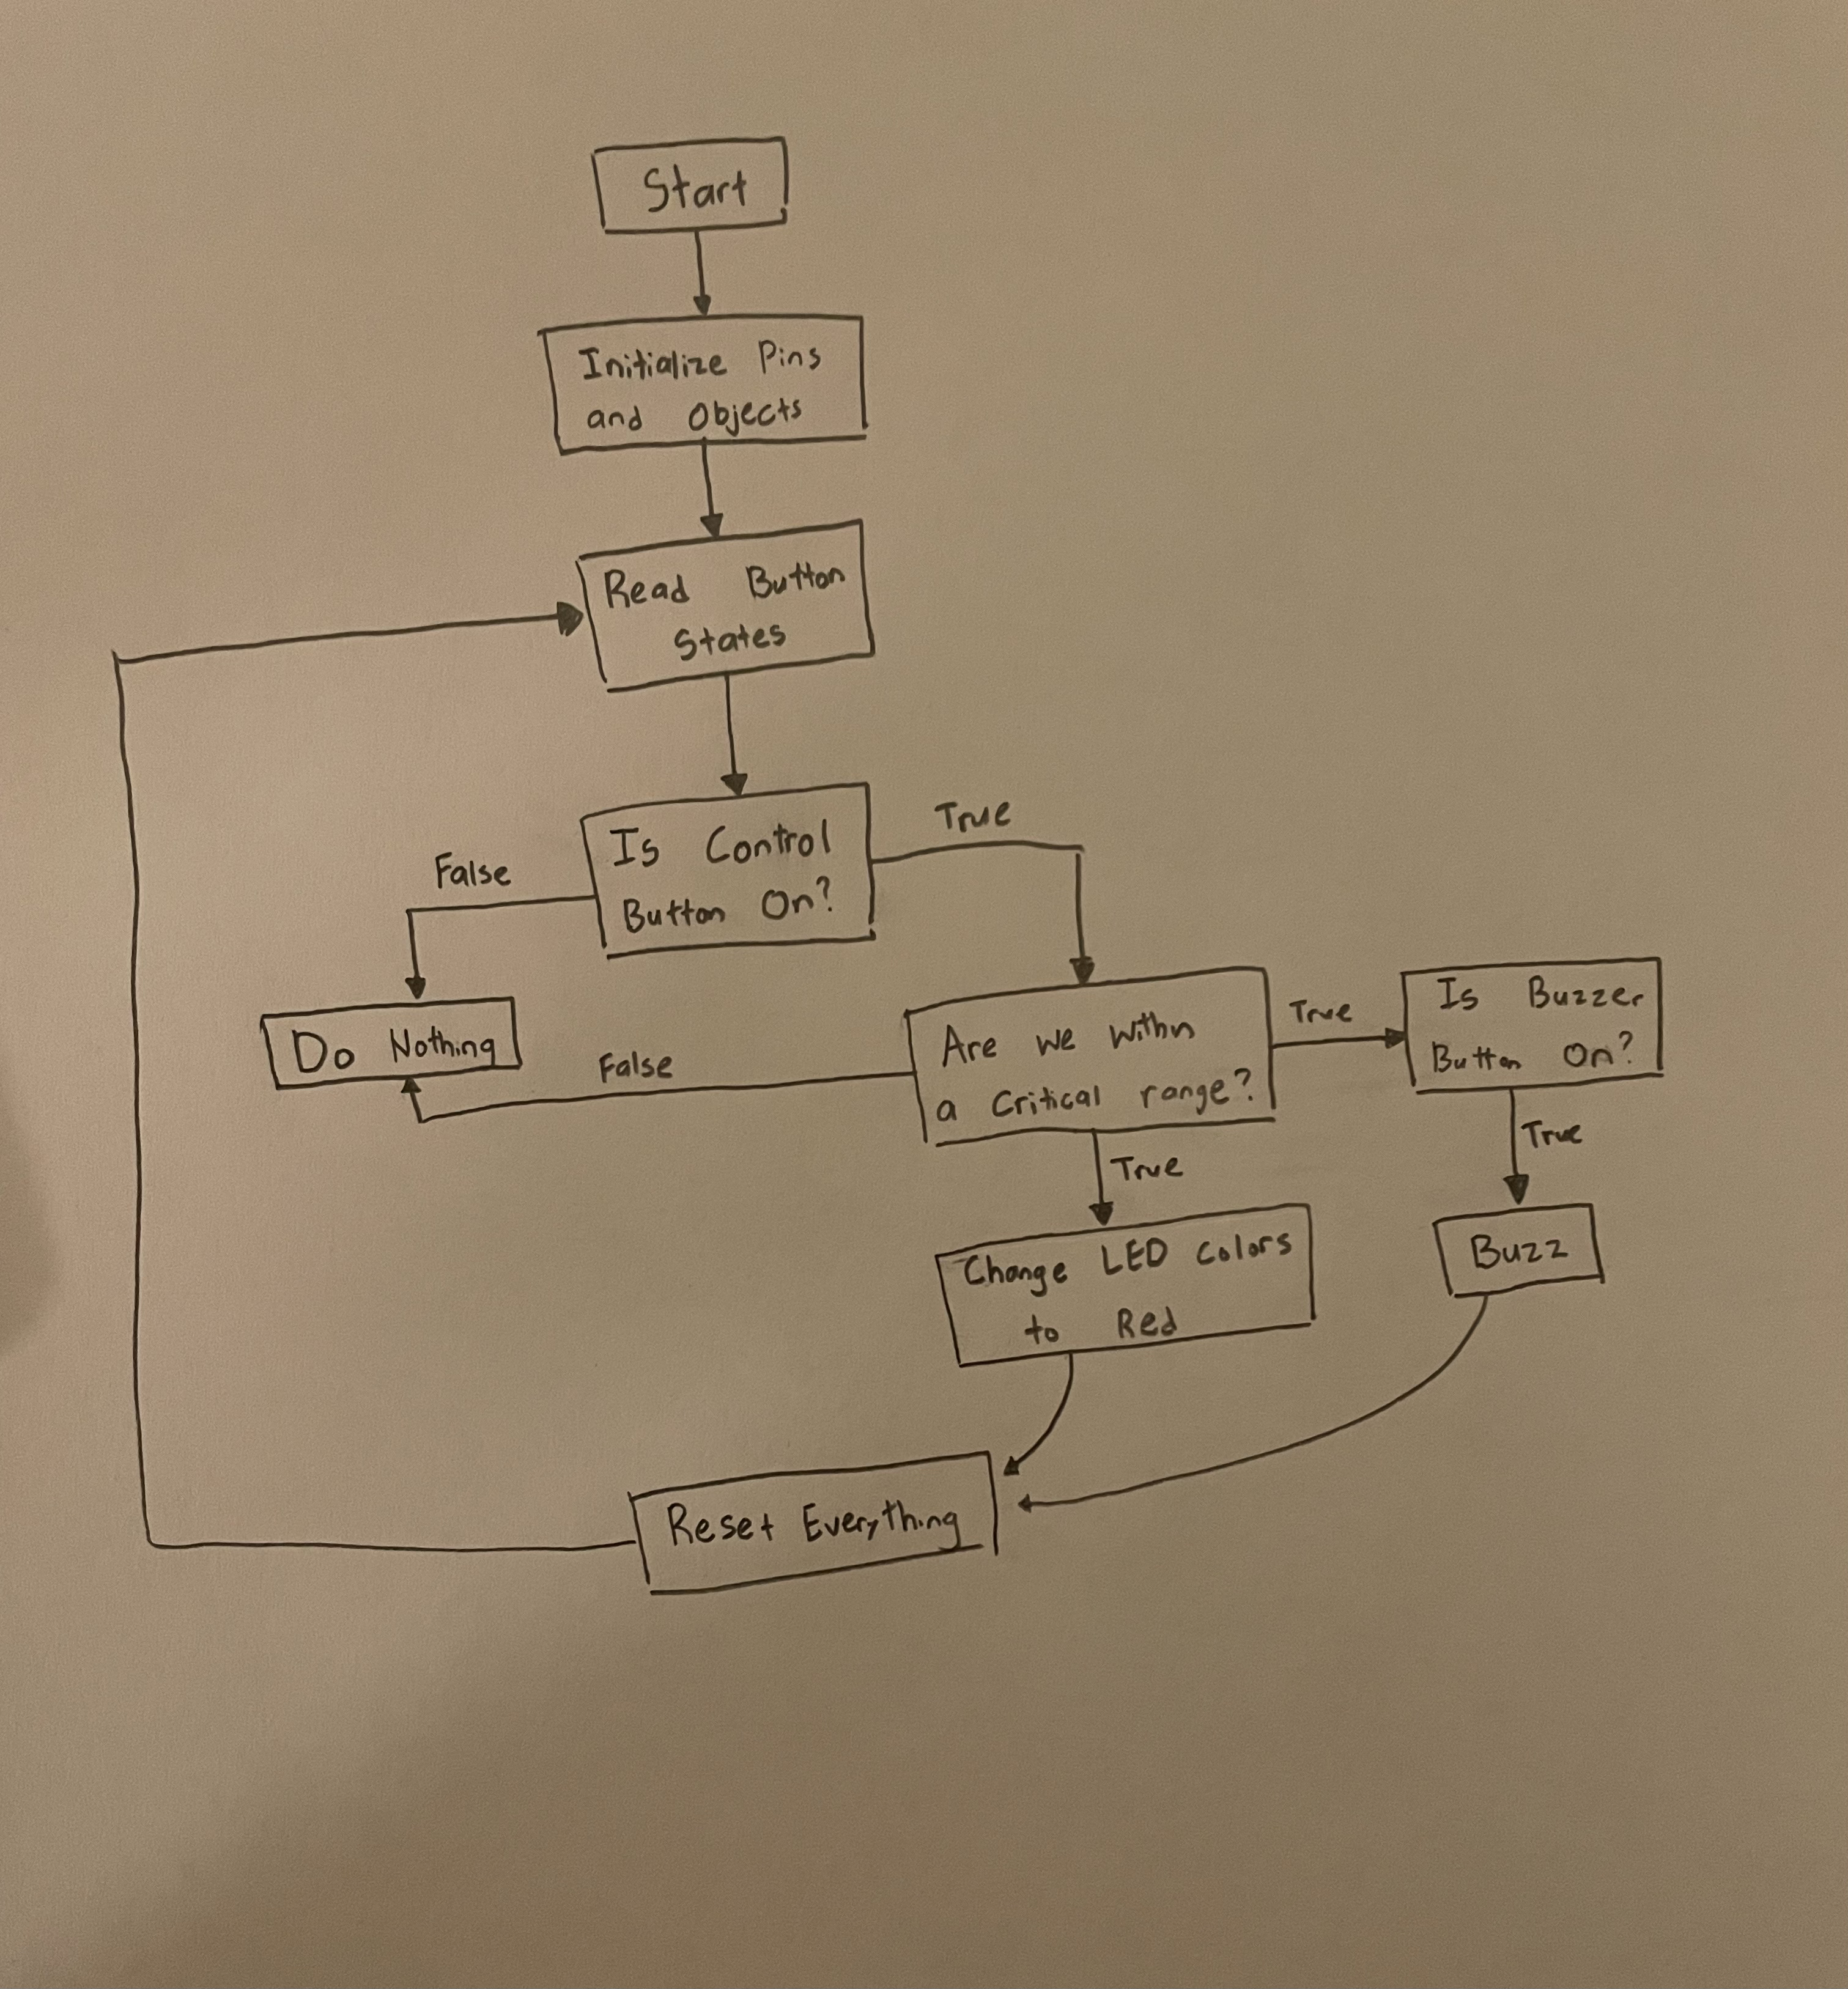
This is the original code flow chart. This was used to help organize the code initially and figure out how we wanted the information to flow through the device.
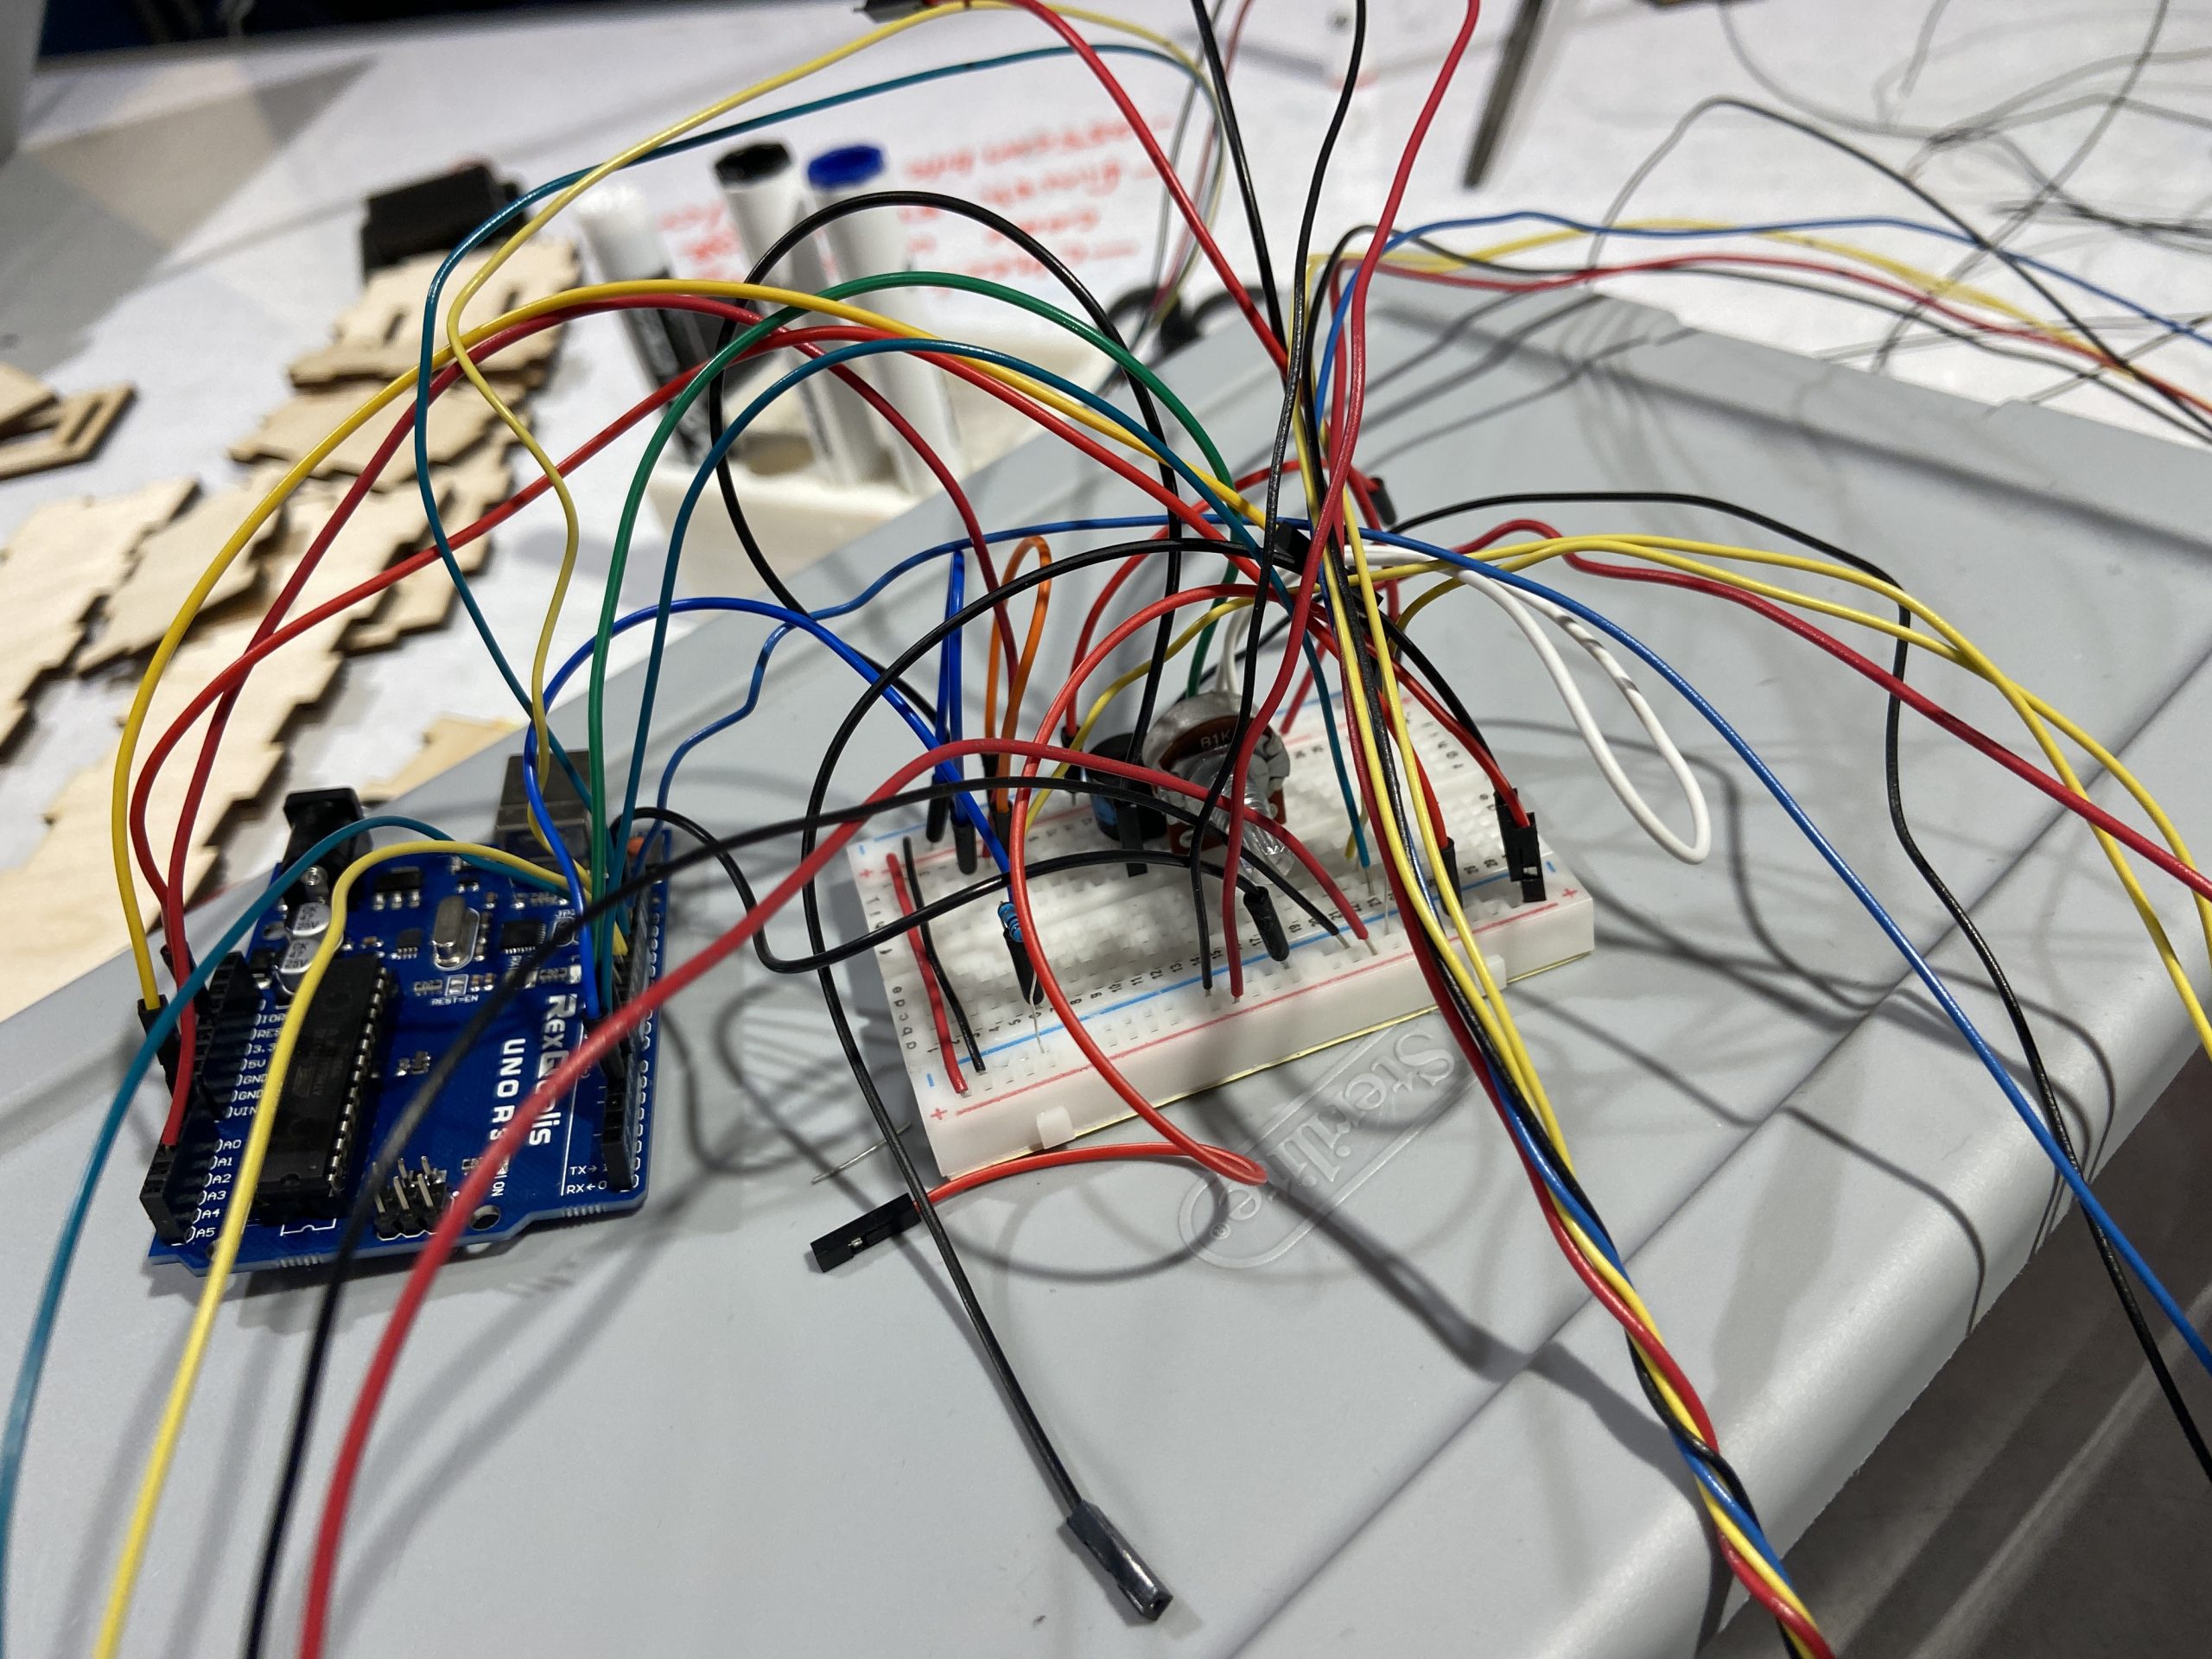
This was all our wiring before soldering. This was definitely a lot to tackle and difficult to read when initially soldering.
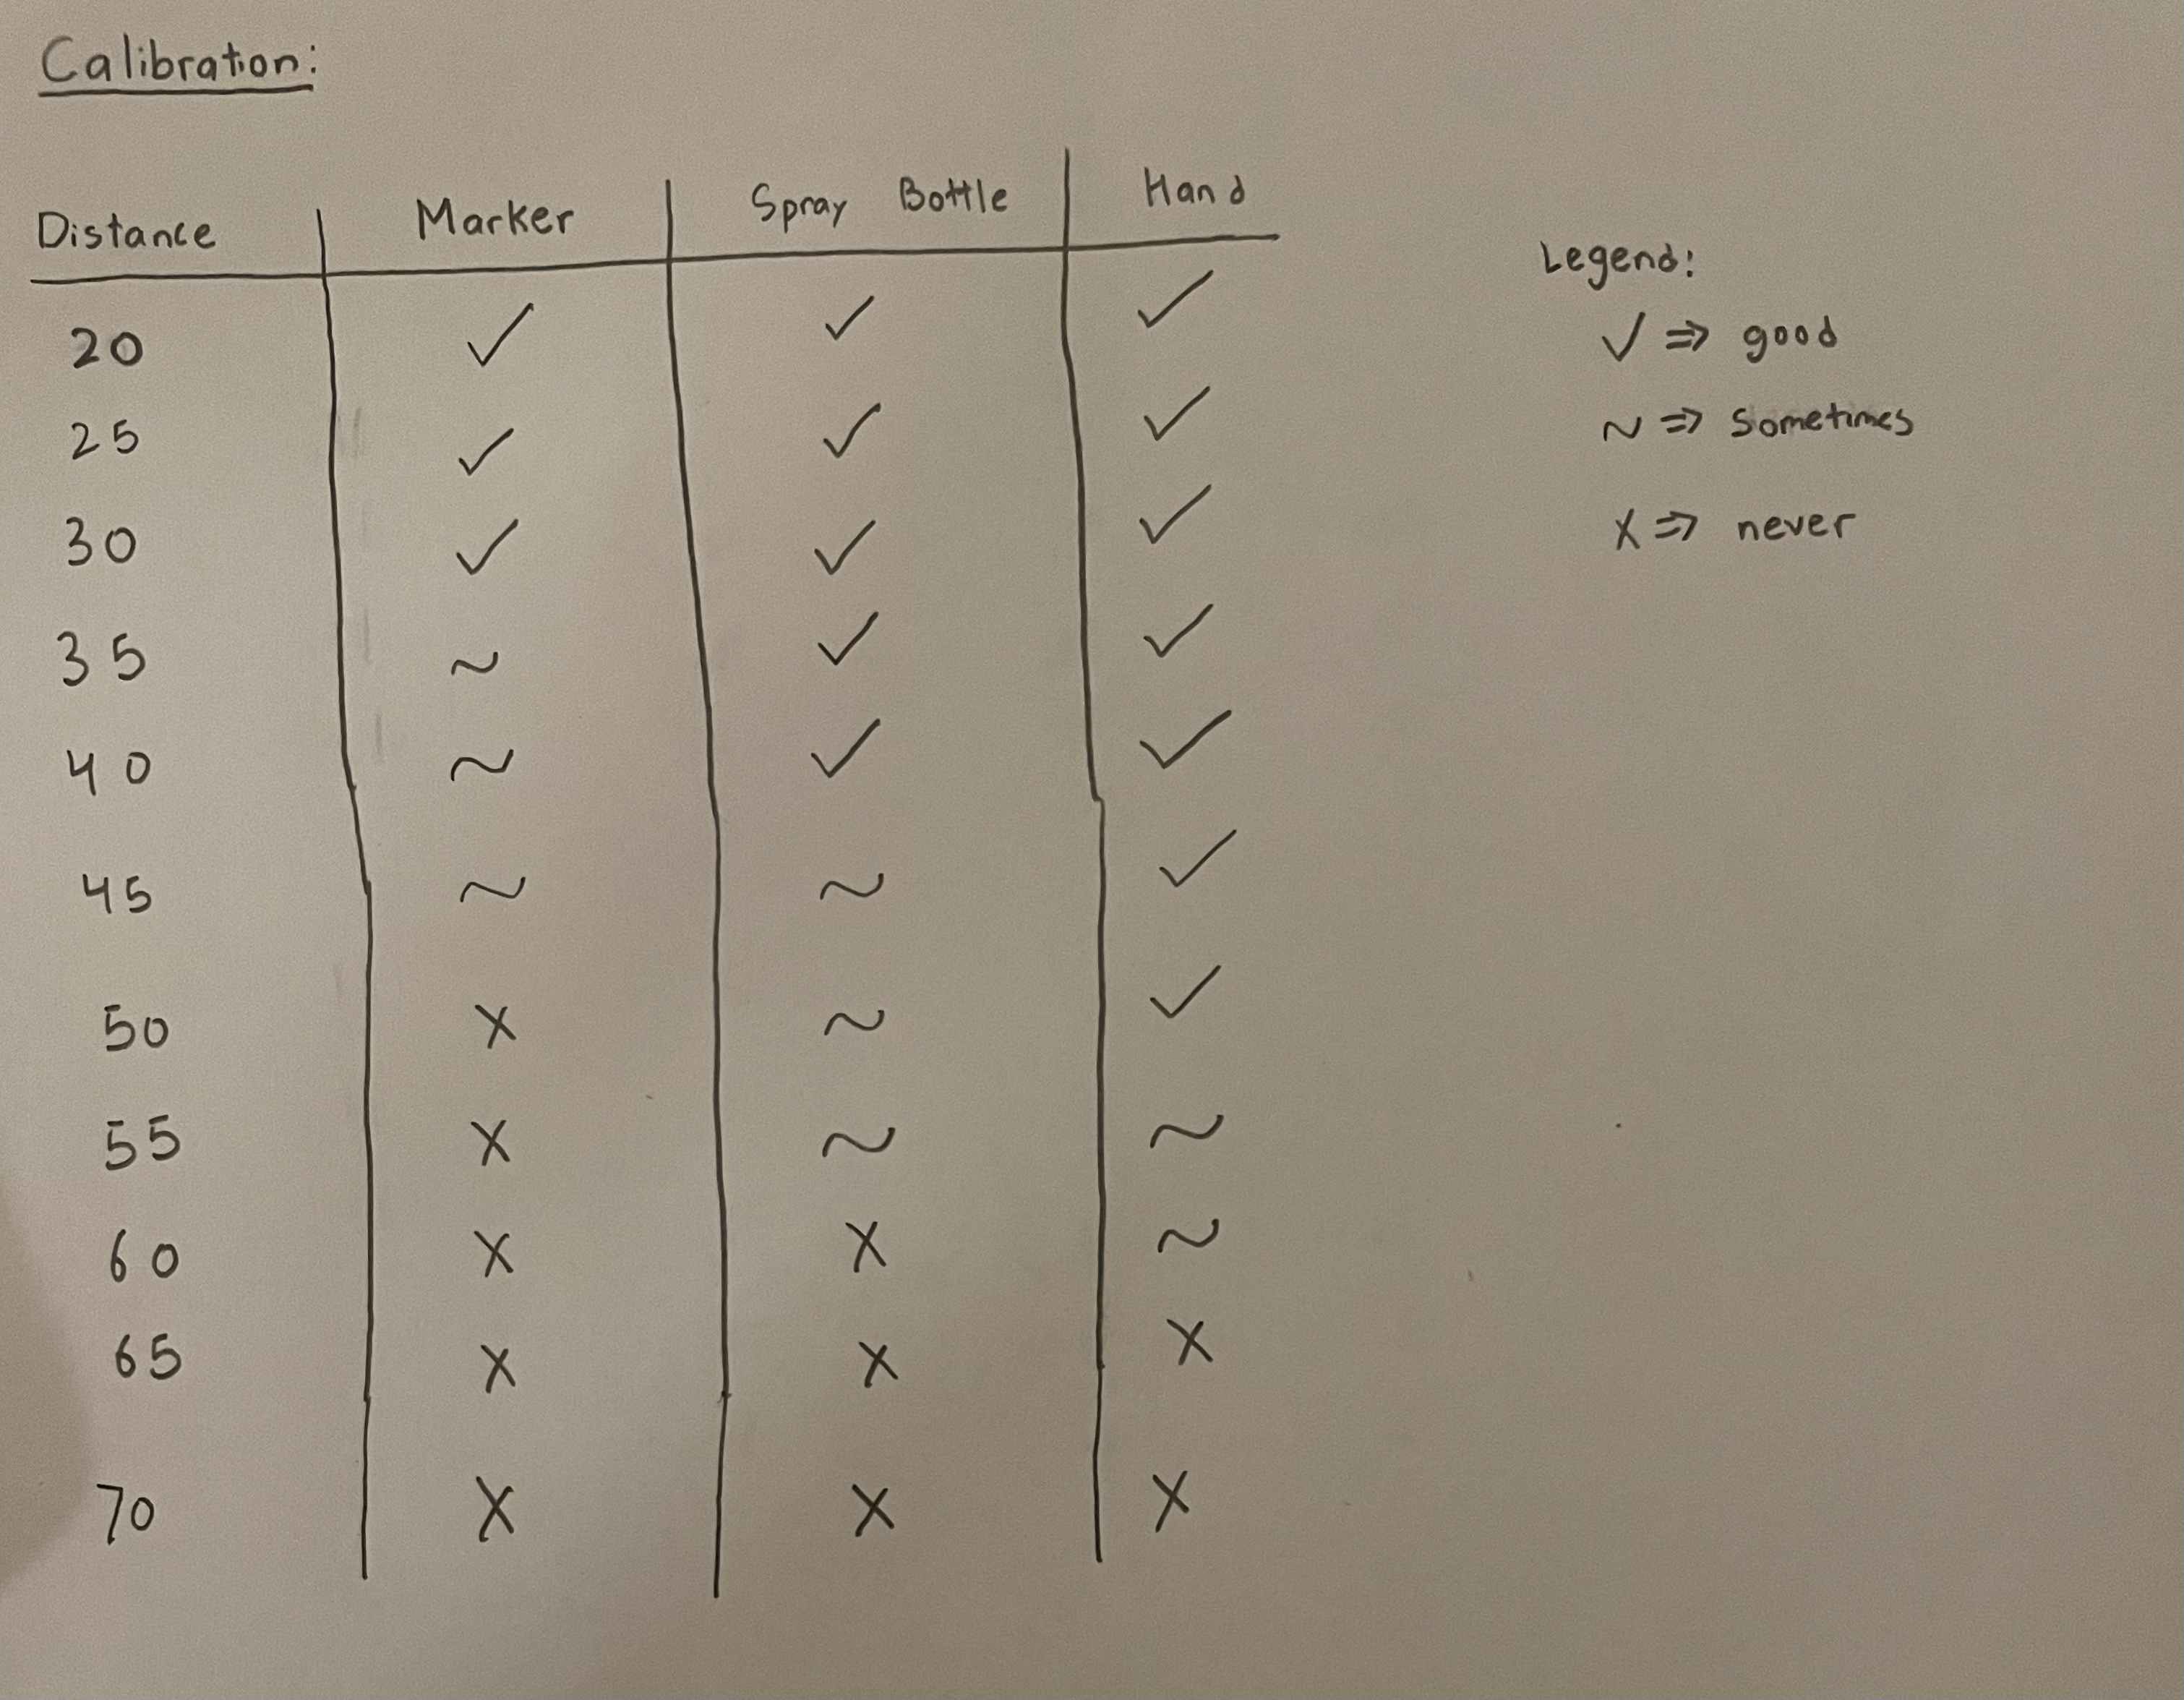
Results from calibration. This is what we documented when testing the potentiometer. We needed to figure out the highest the calibration should go.
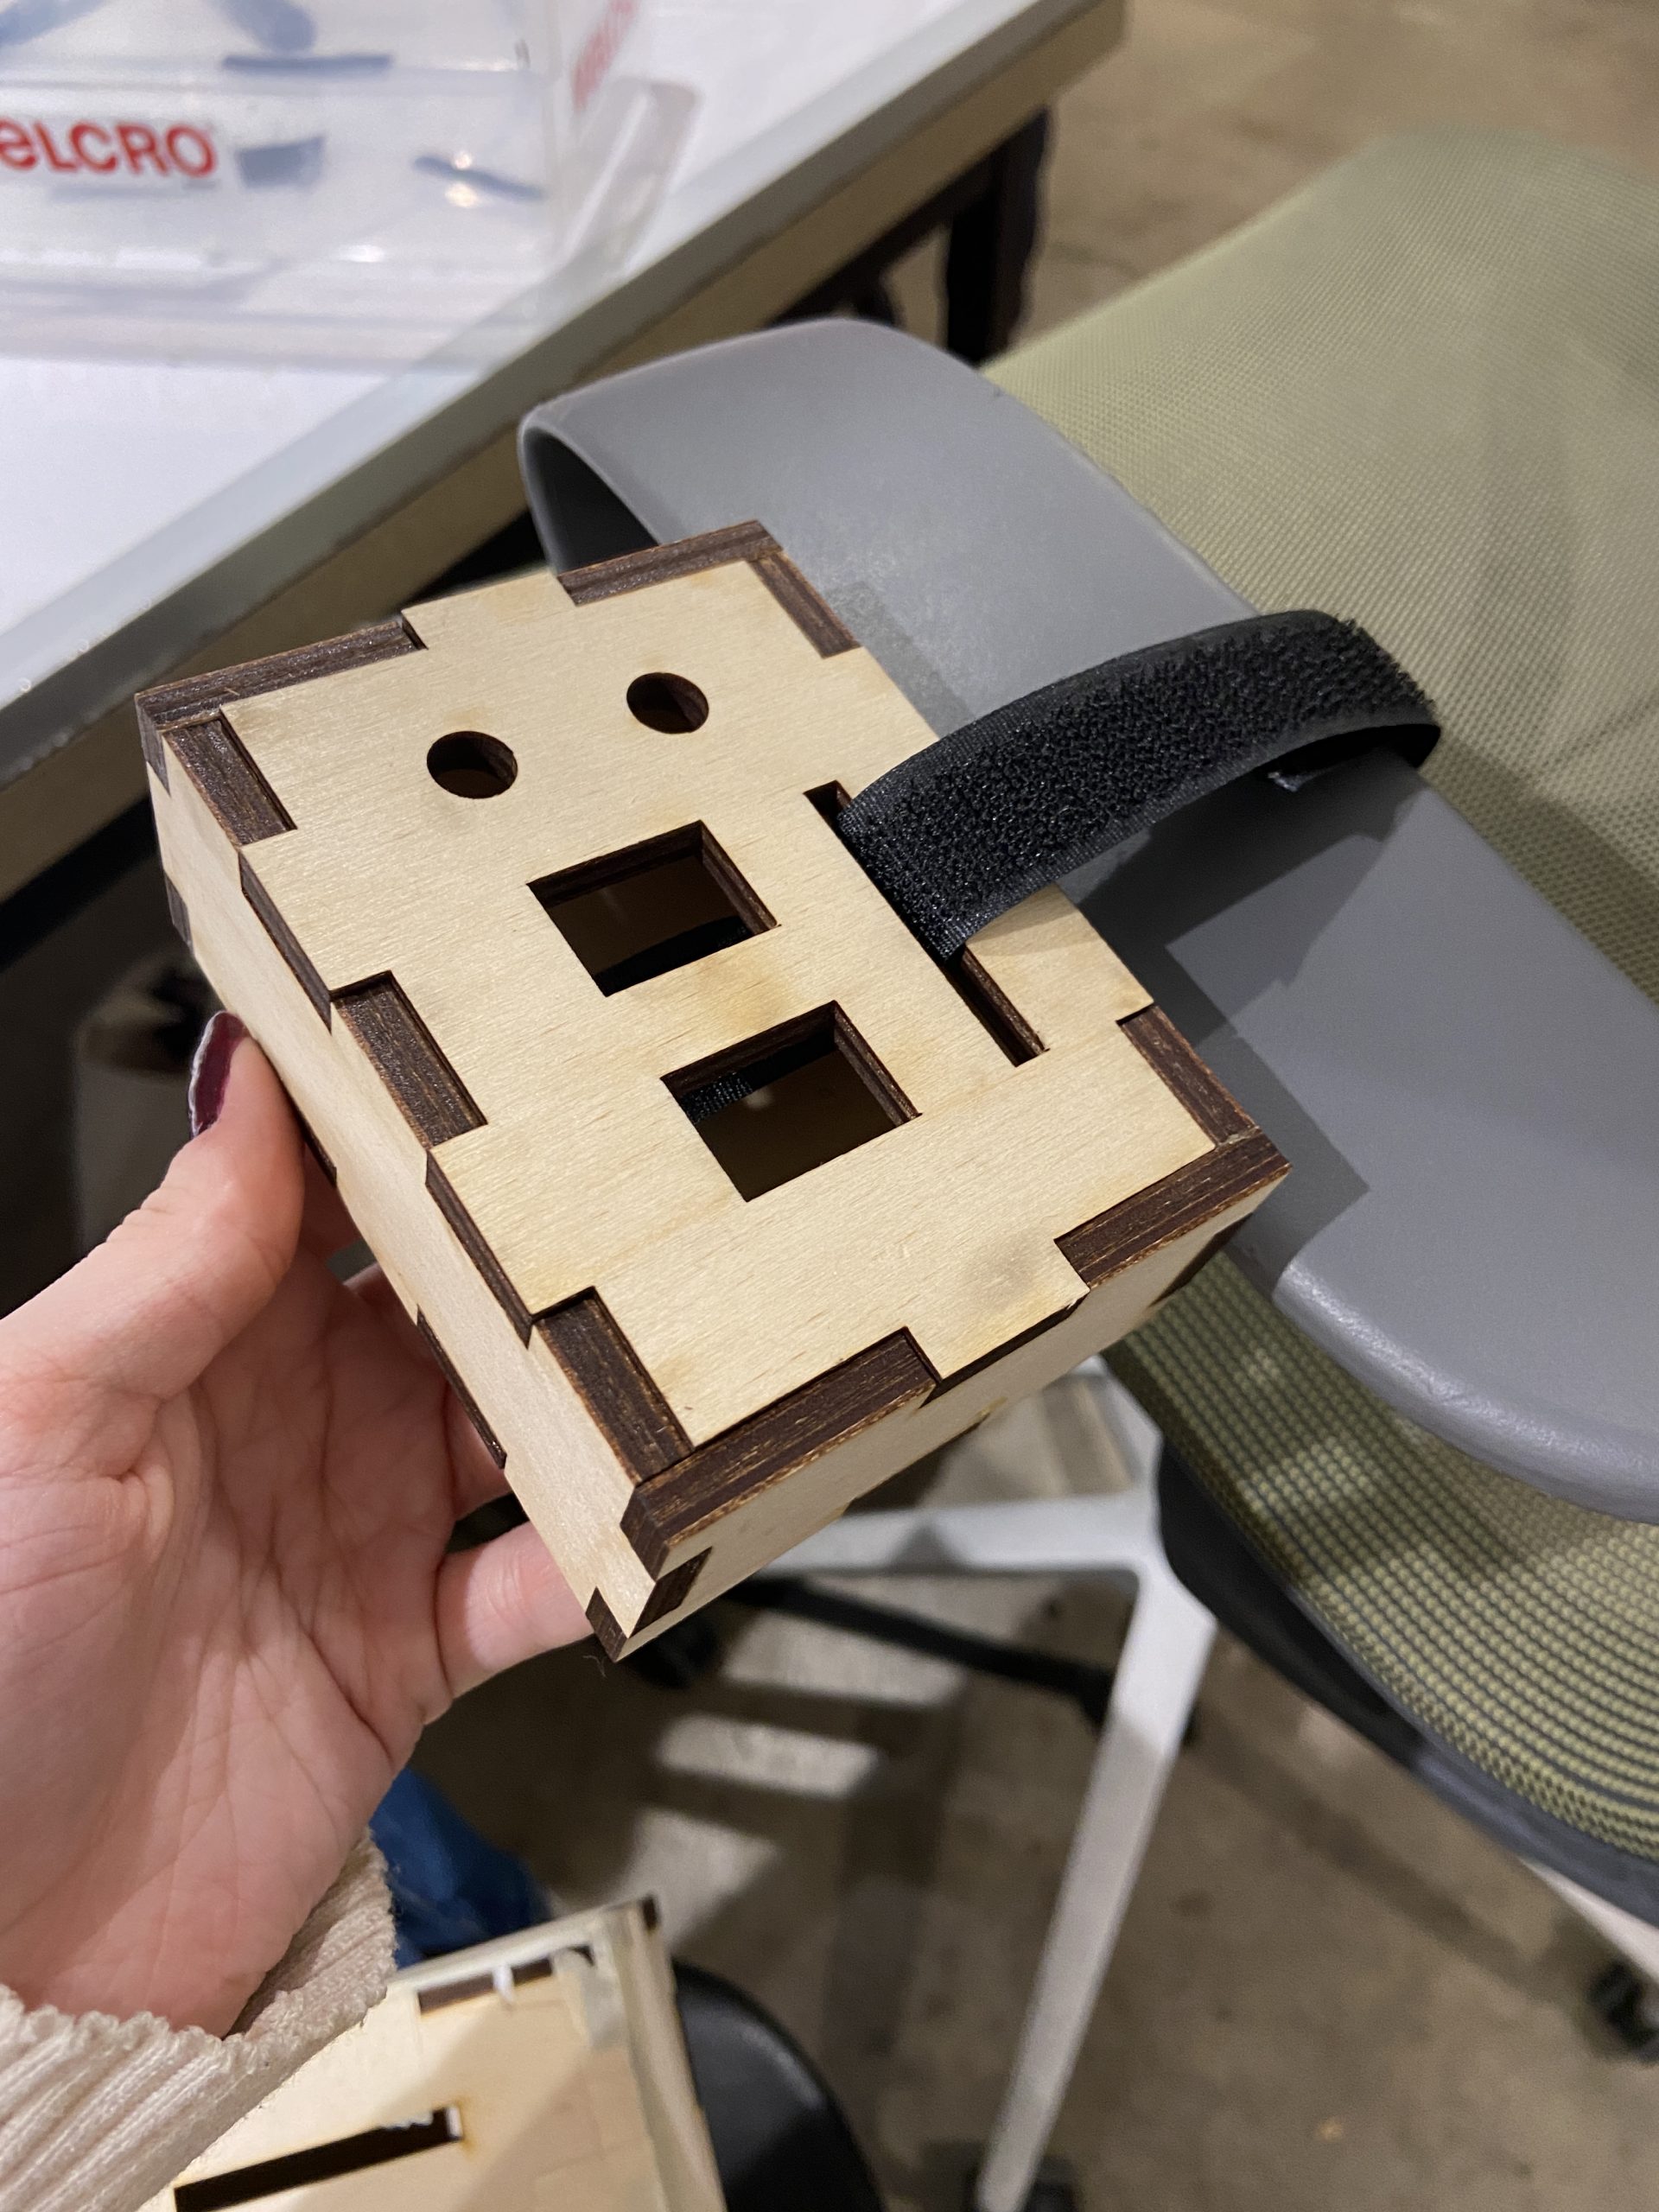
This was the first prototype of the control panel. We ended up deciding the velcro should only strap underneath, because this was extremely unstable and wouldn’t really stay up. We also decided not to do a second potentiometer, and decided to enlarge the hole to a square so the potentiometer was easier to pinch.
This was us testing the ultrasonic sensor holder. We found it to be a little wide and we decided we want a hole to embed the sensor instead of have it sit on top or the wood.
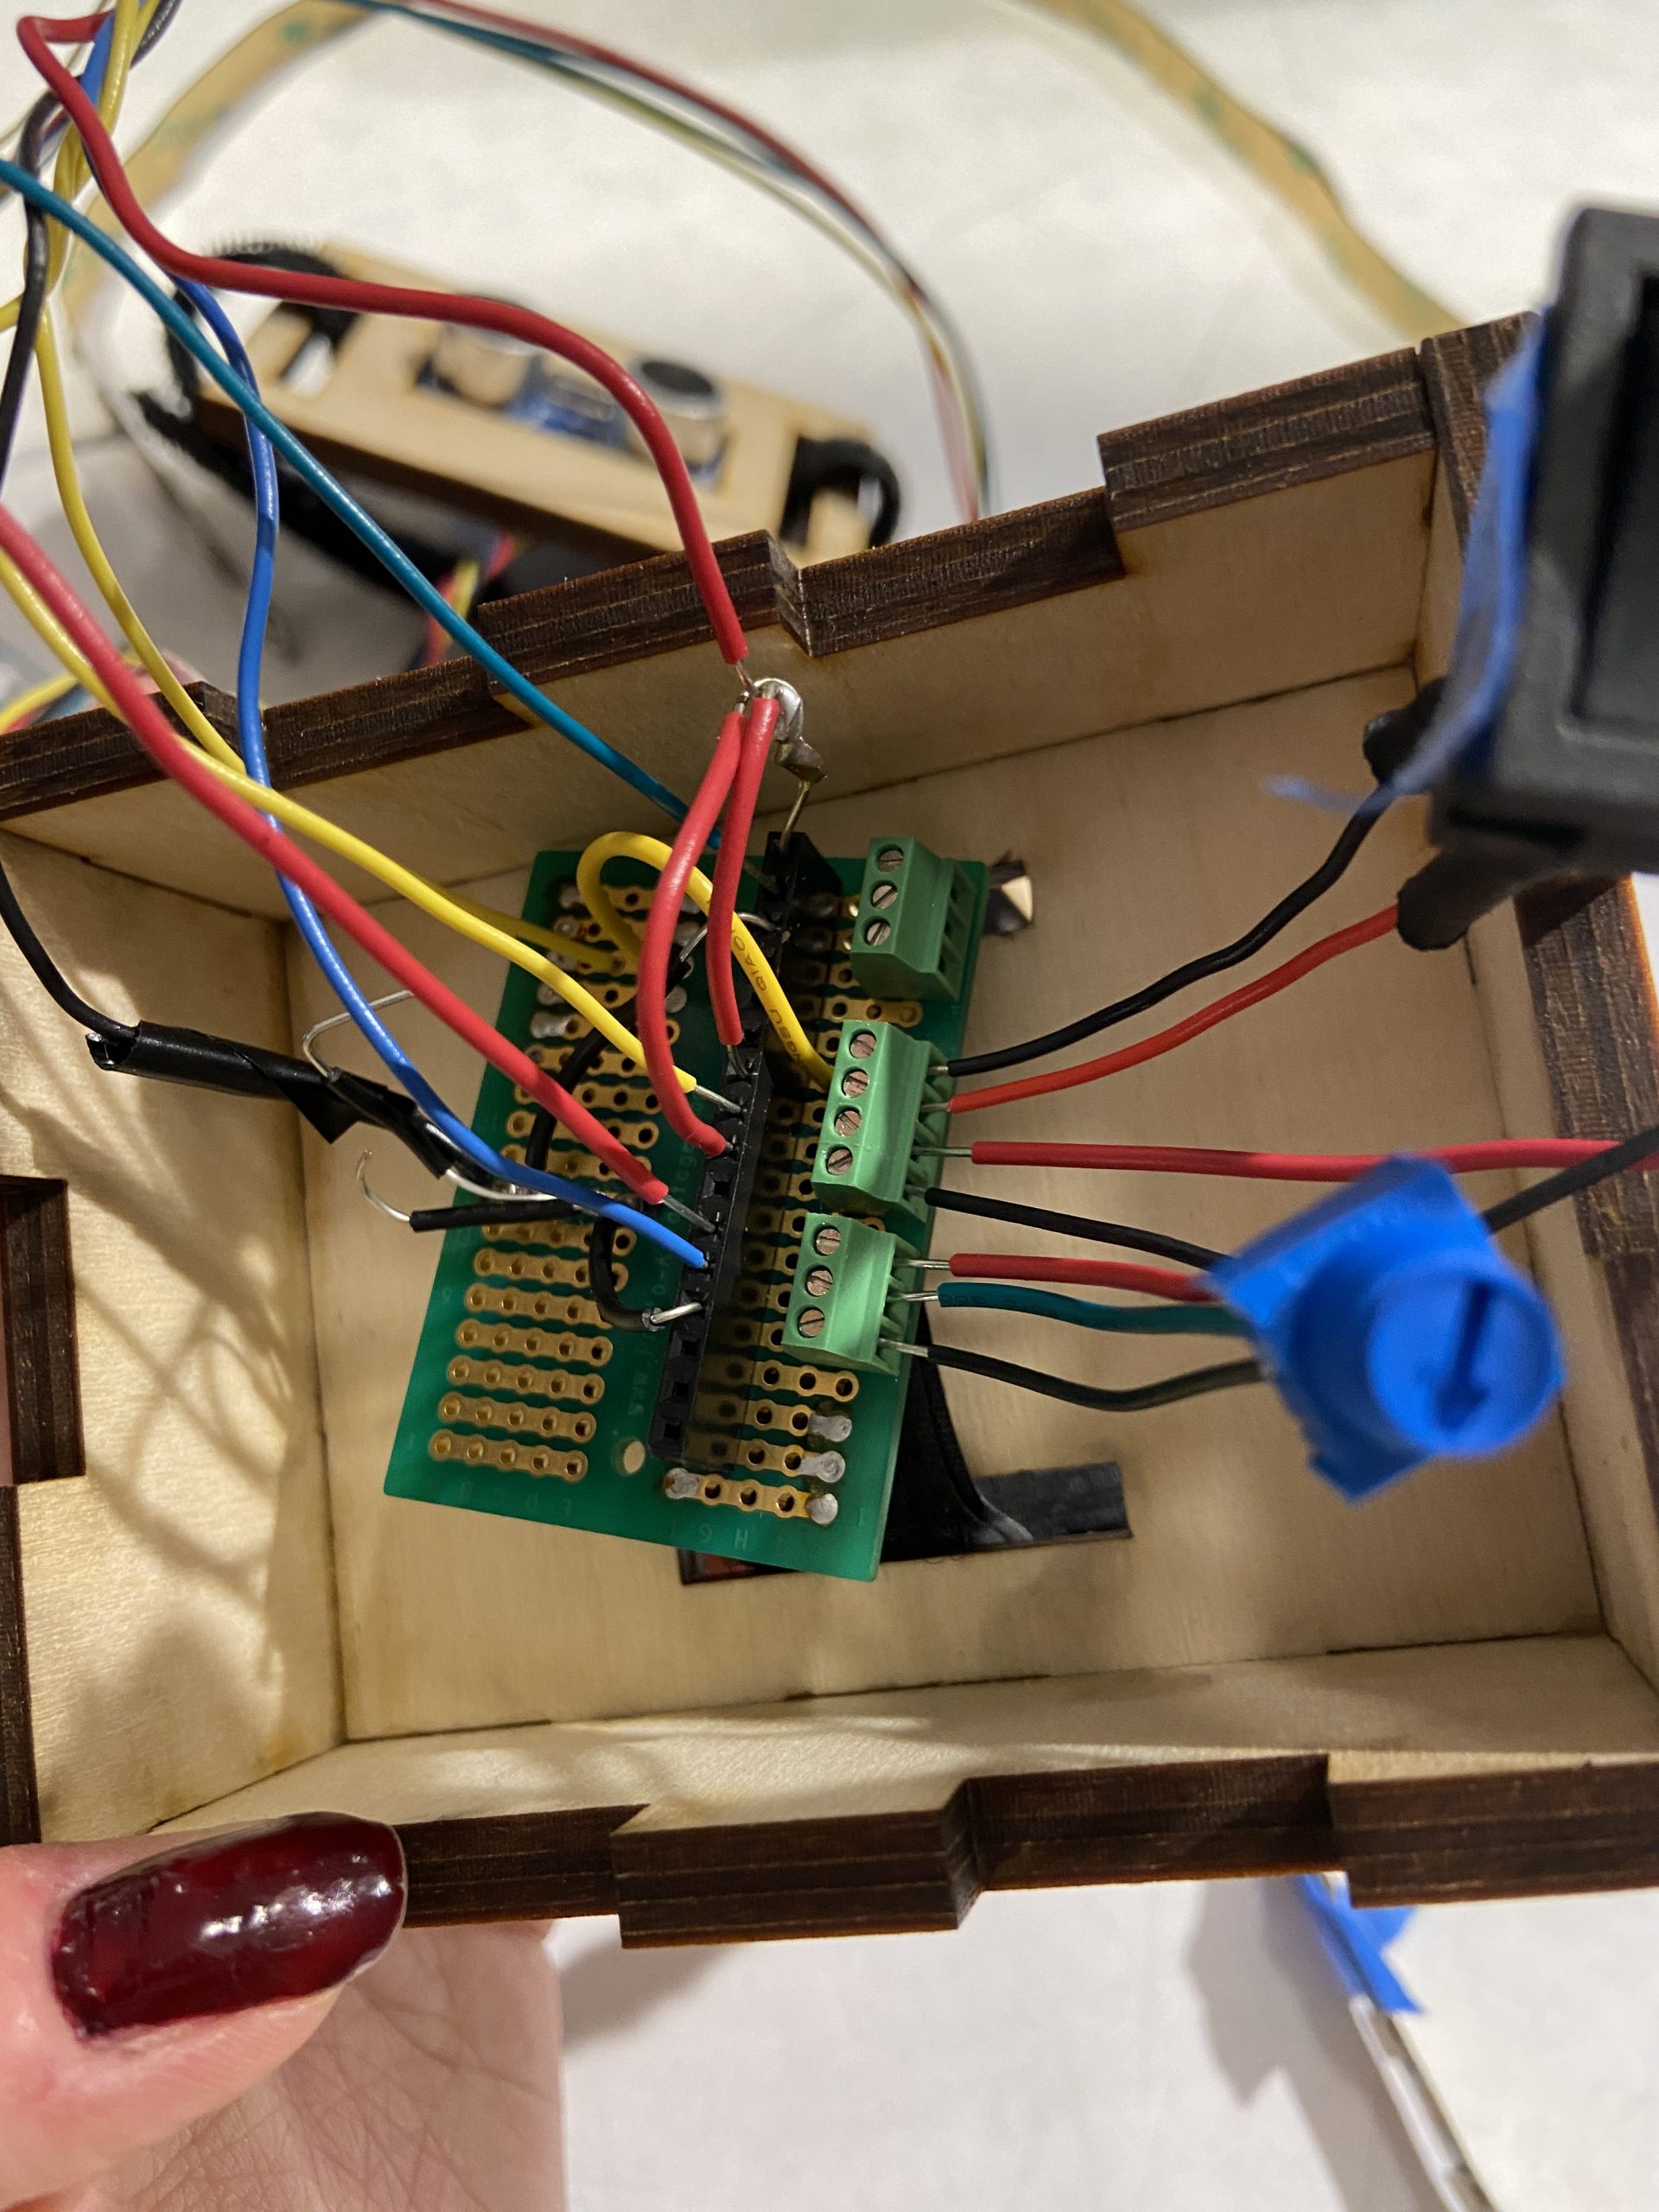
This was us realizing two things. We made a mistake wiring the switches, and the bread board was not fitting in the control panel neatly. This lead us to a lot of re-soldering.
Through this project, we ran into several roadblocks. Firstly, after we had decided on the project, we struggled with deciding exactly how we wanted to go about the user feedback. We had to make some executive decisions on using lights and a buzzer and forgoing vibration. We then had some issues getting our buttons wired, but we then figured out how to get them to work because we found that we accidentally wired the incorrect holes in the soldering board. Afterwards, we then ran into some issues with exactly how we were going to mount the ultrasonic distance sensors on the wheelchair. We realized that the sensors could have easily been bumped, throwing off the distances. We then had to add a potentiometer, though we already had a working setup and working code. After, we ran into several issues with soldering, with the solder on the LEDs easily falling off. This caused several issues, but at the end of the day, we ended up with a working product.
A lot of the issues we ran into were found the night before. This was because we diverged a bit with our projected Gantt chart. We spent the class period before the project’s due date still working, since we had no sense of urgency, and put in little time outside of class. Instead of soldering and assembling the product, which is where we ran into the majority of our problems, we continued trying to refine our code and hardware. If we had dedicated that class period to assembling, we would have had more time to debug, and more time to dedicate to details.
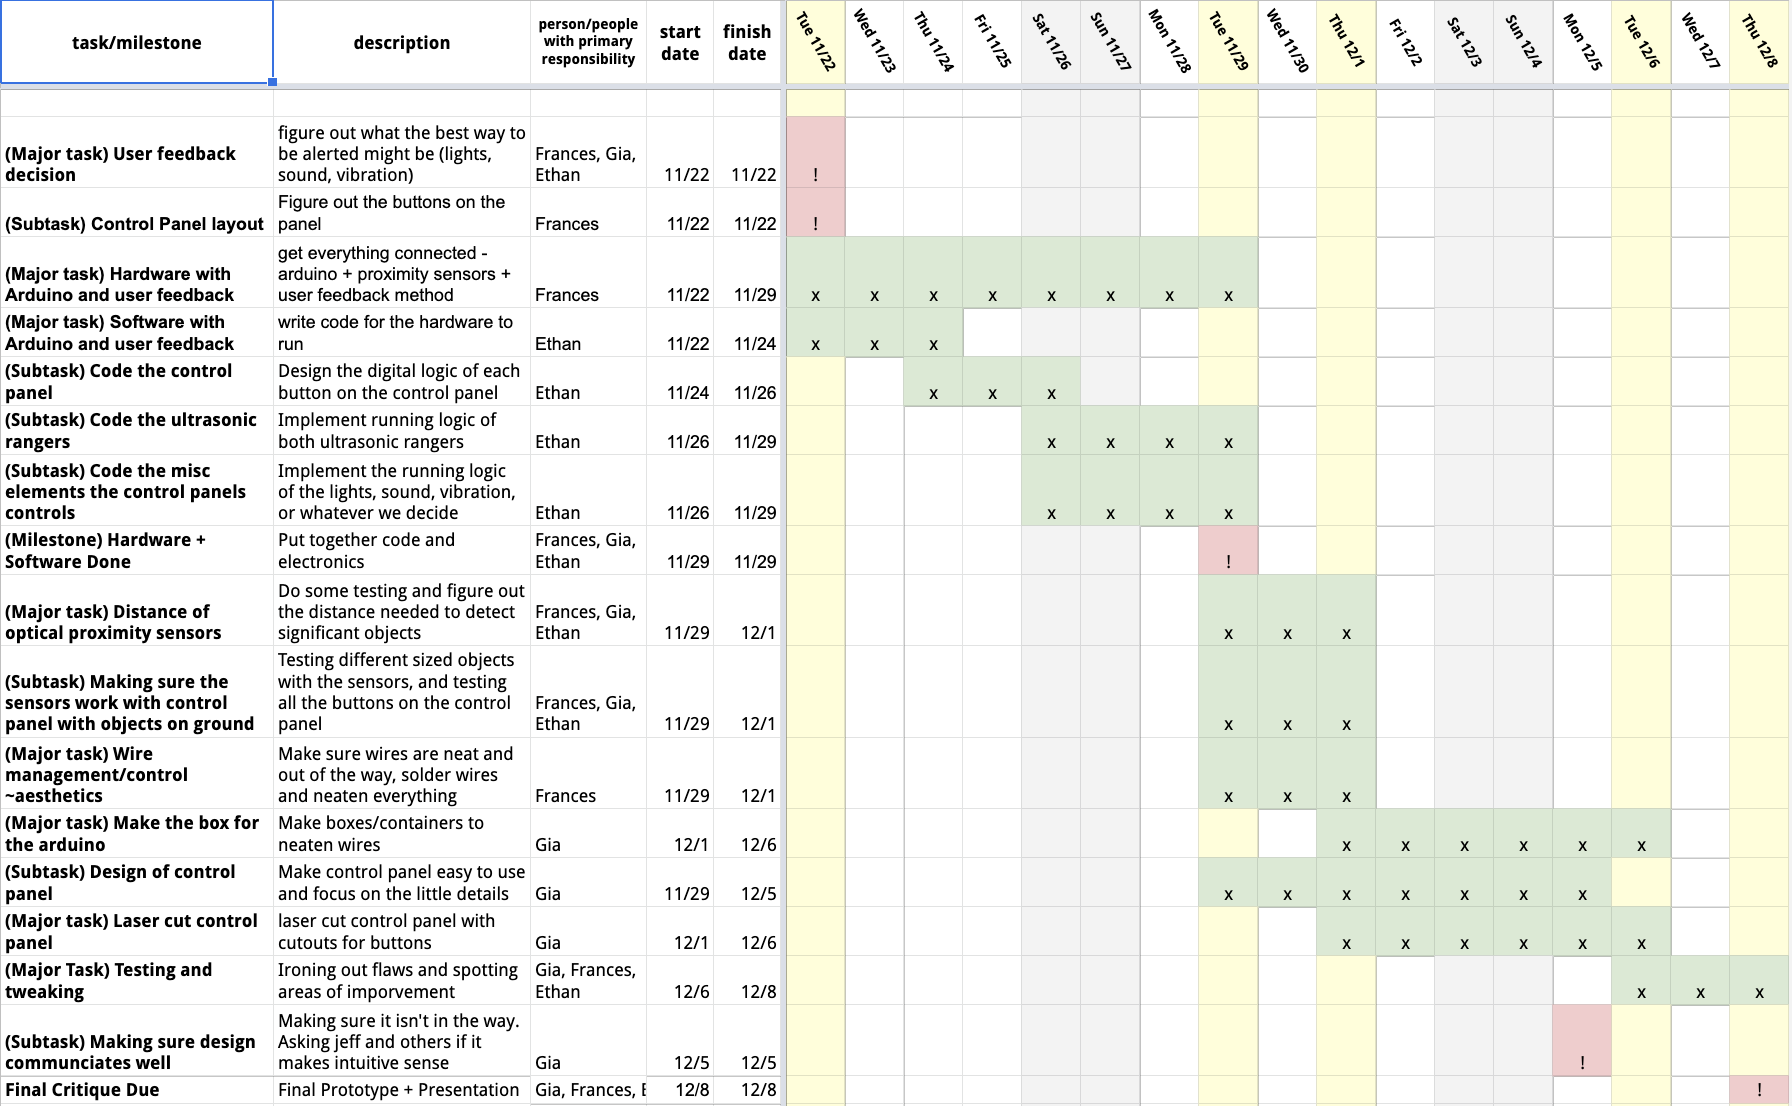
Planned Gantt Chart
Conclusions and Lessons Learned
Our group had a great time with this project and we were happy with the product we produced during the final critique day. That being said, there is always room for improvement, and we received a lot of helpful feedback that we could have implemented, feedback that could have improved our project.
For example, we received multiple critiques on our non-shrink-wrapped wires, such as “exposed wiring needs shrink wrap,” and “The wires […] would benefit from more protective covering as well”. We thought this was a good critique, as it was one way that our project could have been elevated to the next level. During the final build stage, we were considering adding the shrink wrap to our project, but we ultimately ran out of time. Another critique was that a stable mounting system would have helped a lot with our project, and I am very inclined to agree. The problem that we encountered was that we didn’t have access to Jeff’s wheelchair, and a more complicated mounting system would have taken up a lot of time, and been very difficult to create in the scope of our class. We ended up using velcro for mounting, since it was the simplest option, but I do agree that with a more stable mounting system we would have been able to make the product a lot more effective.
There was also feedback that complimented our use of the wheelchair, and considering the situation that Jeff himself was in. “[T]he group did a nice job figuring out how to make the device fit on his chair best”. The idea of personalization vs. generalization was a critique that was discussed a lot in person as well. We tried to make it very clear that the goal of this project was not to make a manufacturable product, but to make a project for Jeff himself. That being said, I think some of our guests were excited about the possibility that our product had if we were able to generalize it a bit. I think they appreciated how many people our product might have been able to help, which is a critique that is easy to accept. Another positive critique that we received was that the user feedback options that we had were good choices. We got multiple compliments on the visibility and clarity of the lights, but then one guest commented that for the visually impaired, the idea of the buzzer for sound feedback was also a good option. We appreciated this critique because it took us a while to decide what might be the most effective method of user feedback.
Working with a client with a disability was a good experience for us. We had to be careful about how we worded interview questions, and it was a bit hard to communicate with Jeff, but we managed to find aspects of his life that we could improve and build our project on. In order to do that, we had to dive fairly deeply into what a day in his life looked like. I don’t think there was anything we would have done differently. We tried to be as open as we could when it came to communication with our client, and I think we did a fairly good job, even though our client was not as responsive as we might have hoped.
I think all of our group members had a good time with this project. The diversity of backgrounds and skills that we brought into this project helped it run smoothly. We learned how to make things, not just for ourselves or for this class, but for other people. Something that really stuck with me was the impact that our work had on so many people. There were multiple clients talking about how important and life-changing the work we were doing was. Though we’ve only been through one semester of this class, we were able to see the applications of our knowledge in a way that was very fulfilling and meaningful.
Technical Details
Electronic Schematic and Block Diagram

Electronic Schematic

Block Diagram
Code
/**
 * @title Back-up Alarm
 * @brief A useful device designed for Jeff
 *
 * 60-223: Introduction to Physical Computing
 *
 * The following code initializes two optical proximity that serve
 * as eyes of the back of Jeff's wheelchair. If Jeff backs within
 * a certain distance of object, the led strip will light up and
 * the buzzer will buzz. The code also gives Jeff the freedom to
 * adjust the upperbound distance using a potentiometer.
 *
 * @authors Ethan Lu <ethanl2@andrew.cmu.edu>
 *          Frances Adiwijaya <fda@andrew.cmu.edu>
 *          Gia Marino <gnmarino@andrew.cmu.edu>
 *
 * @mapping
 *  Arduino Pin |   Role   |   Description
 *  ------------|----------|-----------------
 *      A0         INPUT    Potentiometer
 *      3          INPUT    Buzzer Control Button
 *      4          INPUT    Device Control Button
 *      5          OUTPUT   Buzzer
 *      9          INPUT    ECHO Pin for Right Sensor
 *      10         INPUT    TRIGGER Pin for Right Sensor
 *      11         INPUT    ECHO Pin for Left Sensor
 *      12         INPUT    TRIGGER Pin for Left Sensor
 *      13         OUTPUT   LED Strip
 */

/** @brief Import libraries */
#include <NewPing.h>
#include <PololuLedStrip.h>
#include <assert.h>

/** @brief Declare constants */
#define POTENTIOMETER_PIN         A0

#define BUZZER_CONTROL_PIN        3
#define CONTROL_BUTTON_PIN        4
#define BUZZER_PIN                5
#define RIGHT_ECHO_PIN            9
#define RIGHT_TRIGGER_PIN         10
#define LEFT_ECHO_PIN             11
#define LEFT_TRIGGER_PIN          12

#define LED_COUNT     60
#define MAX_DISTANCE 200
#define MAX_BUZZ       8

/** @brief Debugging macros */
#define requires(expr) assert(expr)
#define ensures(expr)  assert(expr)

PololuLedStrip<13> led_strip;
NewPing sonar_left(LEFT_TRIGGER_PIN, LEFT_ECHO_PIN, MAX_DISTANCE);
NewPing sonar_right(RIGHT_TRIGGER_PIN, RIGHT_ECHO_PIN, MAX_DISTANCE);
rgb_color colors[LED_COUNT];

unsigned lowerbound = 10;
unsigned upperbound =  0;

void fill(uint8_t r, uint8_t g, uint8_t b);

/**
 * @brief Declare pin modes
 */
void setup() {
  pinMode(RIGHT_ECHO_PIN, INPUT);
  pinMode(RIGHT_TRIGGER_PIN, INPUT);
  pinMode(LEFT_ECHO_PIN, INPUT);
  pinMode(LEFT_TRIGGER_PIN, INPUT);

  pinMode(CONTROL_BUTTON_PIN, INPUT);
  pinMode(BUZZER_CONTROL_PIN, INPUT);
  pinMode(POTENTIOMETER_PIN, INPUT);

  pinMode(BUZZER_PIN, OUTPUT);
}

/**
 * @brief Main routine
 */
void loop() {
  delay(100);
  upperbound = map(analogRead(POTENTIOMETER_PIN), 0, 1023, 60, 150);

  cleanup();
  if (digitalRead(CONTROL_BUTTON_PIN) == HIGH) {
    unsigned int left_distance = (sonar_left.ping() / US_ROUNDTRIP_CM);
    unsigned int right_distance = (sonar_right.ping() / US_ROUNDTRIP_CM);

    /** Too close to an object */
    while ((lowerbound < left_distance && left_distance < upperbound) || (lowerbound < right_distance && right_distance < upperbound)) {
      fill(255, 0, 0);
      if (digitalRead(BUZZER_CONTROL_PIN) == HIGH) {
        buzz(min(left_distance, right_distance));
      }
      left_distance  = (sonar_left.ping() / US_ROUNDTRIP_CM);
      right_distance = (sonar_right.ping() / US_ROUNDTRIP_CM);
    }
  }
}

/**
 * @brief     Assigns a new rgb value to every element in the color array
 * @param[in] r Amount of red
 * @param[in] g Amount of green
 * @param[in] b Amount of blue
 */
void fill(uint8_t r, uint8_t g, uint8_t b) {
  for (uint16_t i = 0; i < LED_COUNT; i++) {
     colors[i] = rgb_color(r, g, b);
  }
  led_strip.write(colors, LED_COUNT);
}

/**
 * @brief     Activate the buzzer
 * @param[in] distance
 * @pre       `distance` is non-negative
 * @pre       `distance` is less than `MAX_DISTANCE`
 */
void buzz(unsigned long distance) {
  requires(distance < MAX_DISTANCE);
  int x = MAX_BUZZ - int_log2(distance);

  warn(x);
}

/**
 * @brief     Calculate log2 of an integer
 * @param[in] x
 * @return    log2(`x`)
 * @pre       `x` is non-negative
 */
int int_log2(int x) {
  requires(-1 < x);

  int c = 0;
  if (x == 0) return 1;
  while ((x >>= 1)) { c++; }
  return c;
}

/**
 * @brief     Run the buzzer a number of times
 * @param[in] x The number of times
 * @pre       `x` is non-negative
 * @pre       `x` is less than or equal to 7
 */
void warn(int x) {
  requires(-1 < x);

  for (int i = 0; i < x; i++) {
    digitalWrite(BUZZER_PIN, HIGH);
    delay(50);
    digitalWrite(BUZZER_PIN, LOW);
    delay(50);
  }
  delay(500);
}

/**
 * @brief Turns the buzzer and led strip off
 */
void cleanup() {
  digitalWrite(BUZZER_PIN, LOW);
  fill(0, 0, 0);
}
Design File
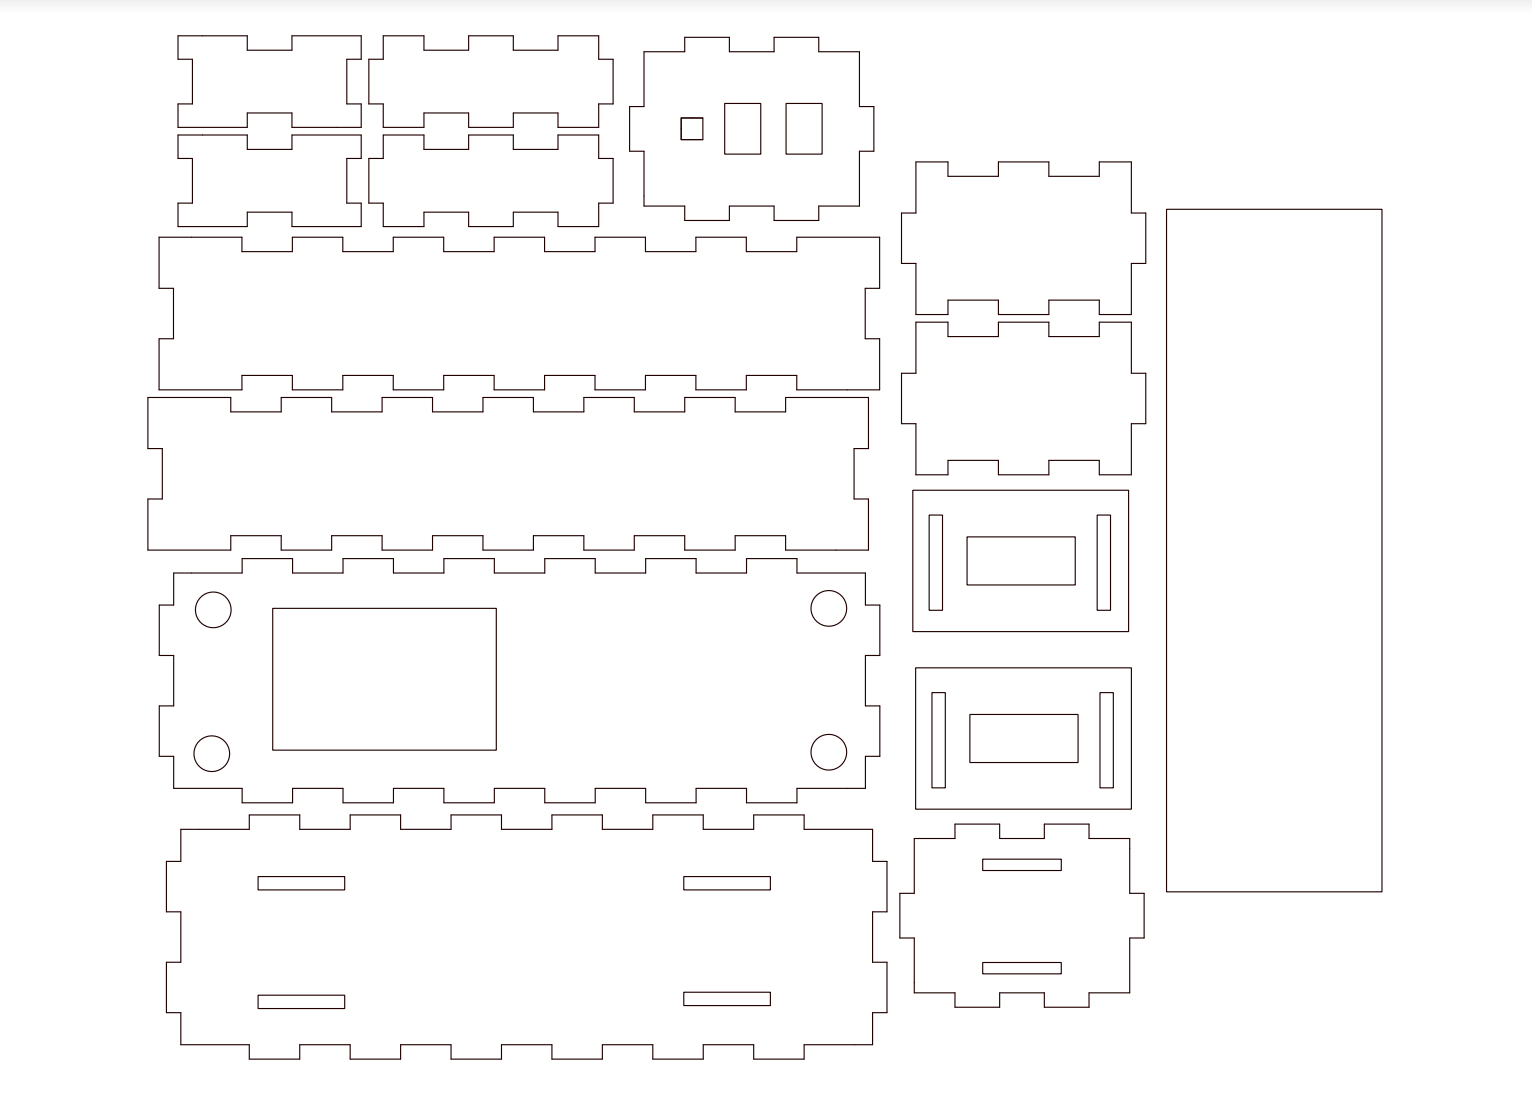
Rhino file that was used to laser cut all the pieces of this device.