The goal of our final project was to integrate our electrical, mechanical, and design skills we have been learning throughout the semester in order to create an assistive device for an older person. This assistive device was intended to address any problem in our older friend, Elinor’s, life. After meeting Elinor and having conversations with her, we realised that she enjoyed a really active, fast-paced lifestyle and was not encountering any specific problems. Based on our talks, we were inspired by her crazy packed schedule and the lack of time that she takes just for herself to relax, even if just for a minute. We decided to create a device that will help Elinor to take breaks during her busy schedule and take a minute to breathe even when she’s on-the-go. Our device uses a heart rate sensor and an LED ring to visualise Elinor’s heart rate through a pulsing light, which guides her through a series of deep breaths for a minute. We also created a home dock/charging port for her portable device that will recharge it, and also contain more breathing exercises on an LCD display. Continue reading this post to learn more about our device, and our entire process of how we got here!
Read more about earlier stages in our project:
First meeting/ideation: https://courses.ideate.cmu.edu/60-223/s2019/work/interview-with-elinor/
First prototype: https://courses.ideate.cmu.edu/60-223/s2019/work/team-elinor-prototype-documentation/
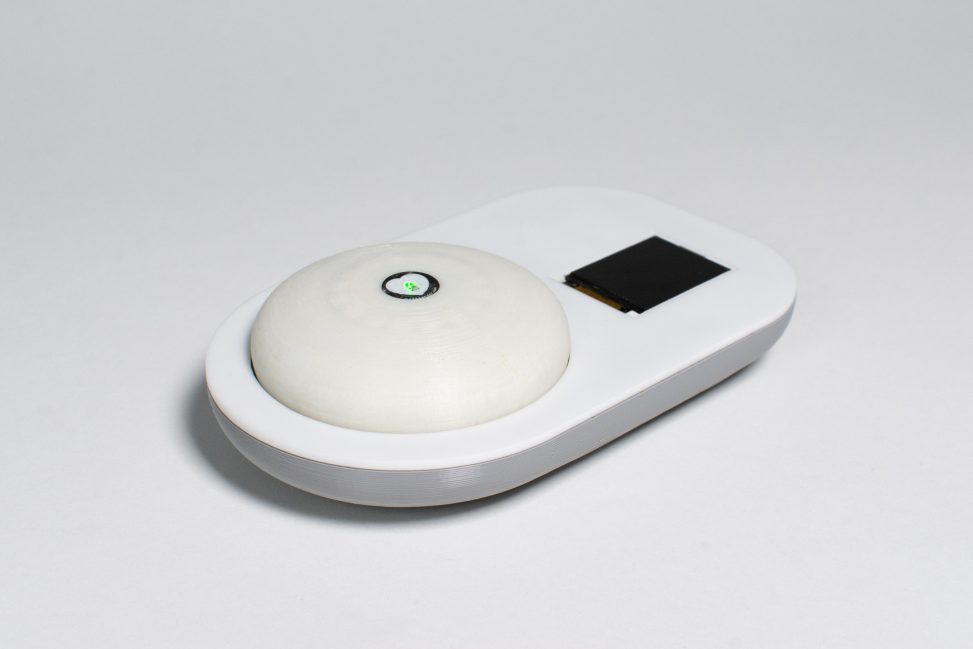
What We Built
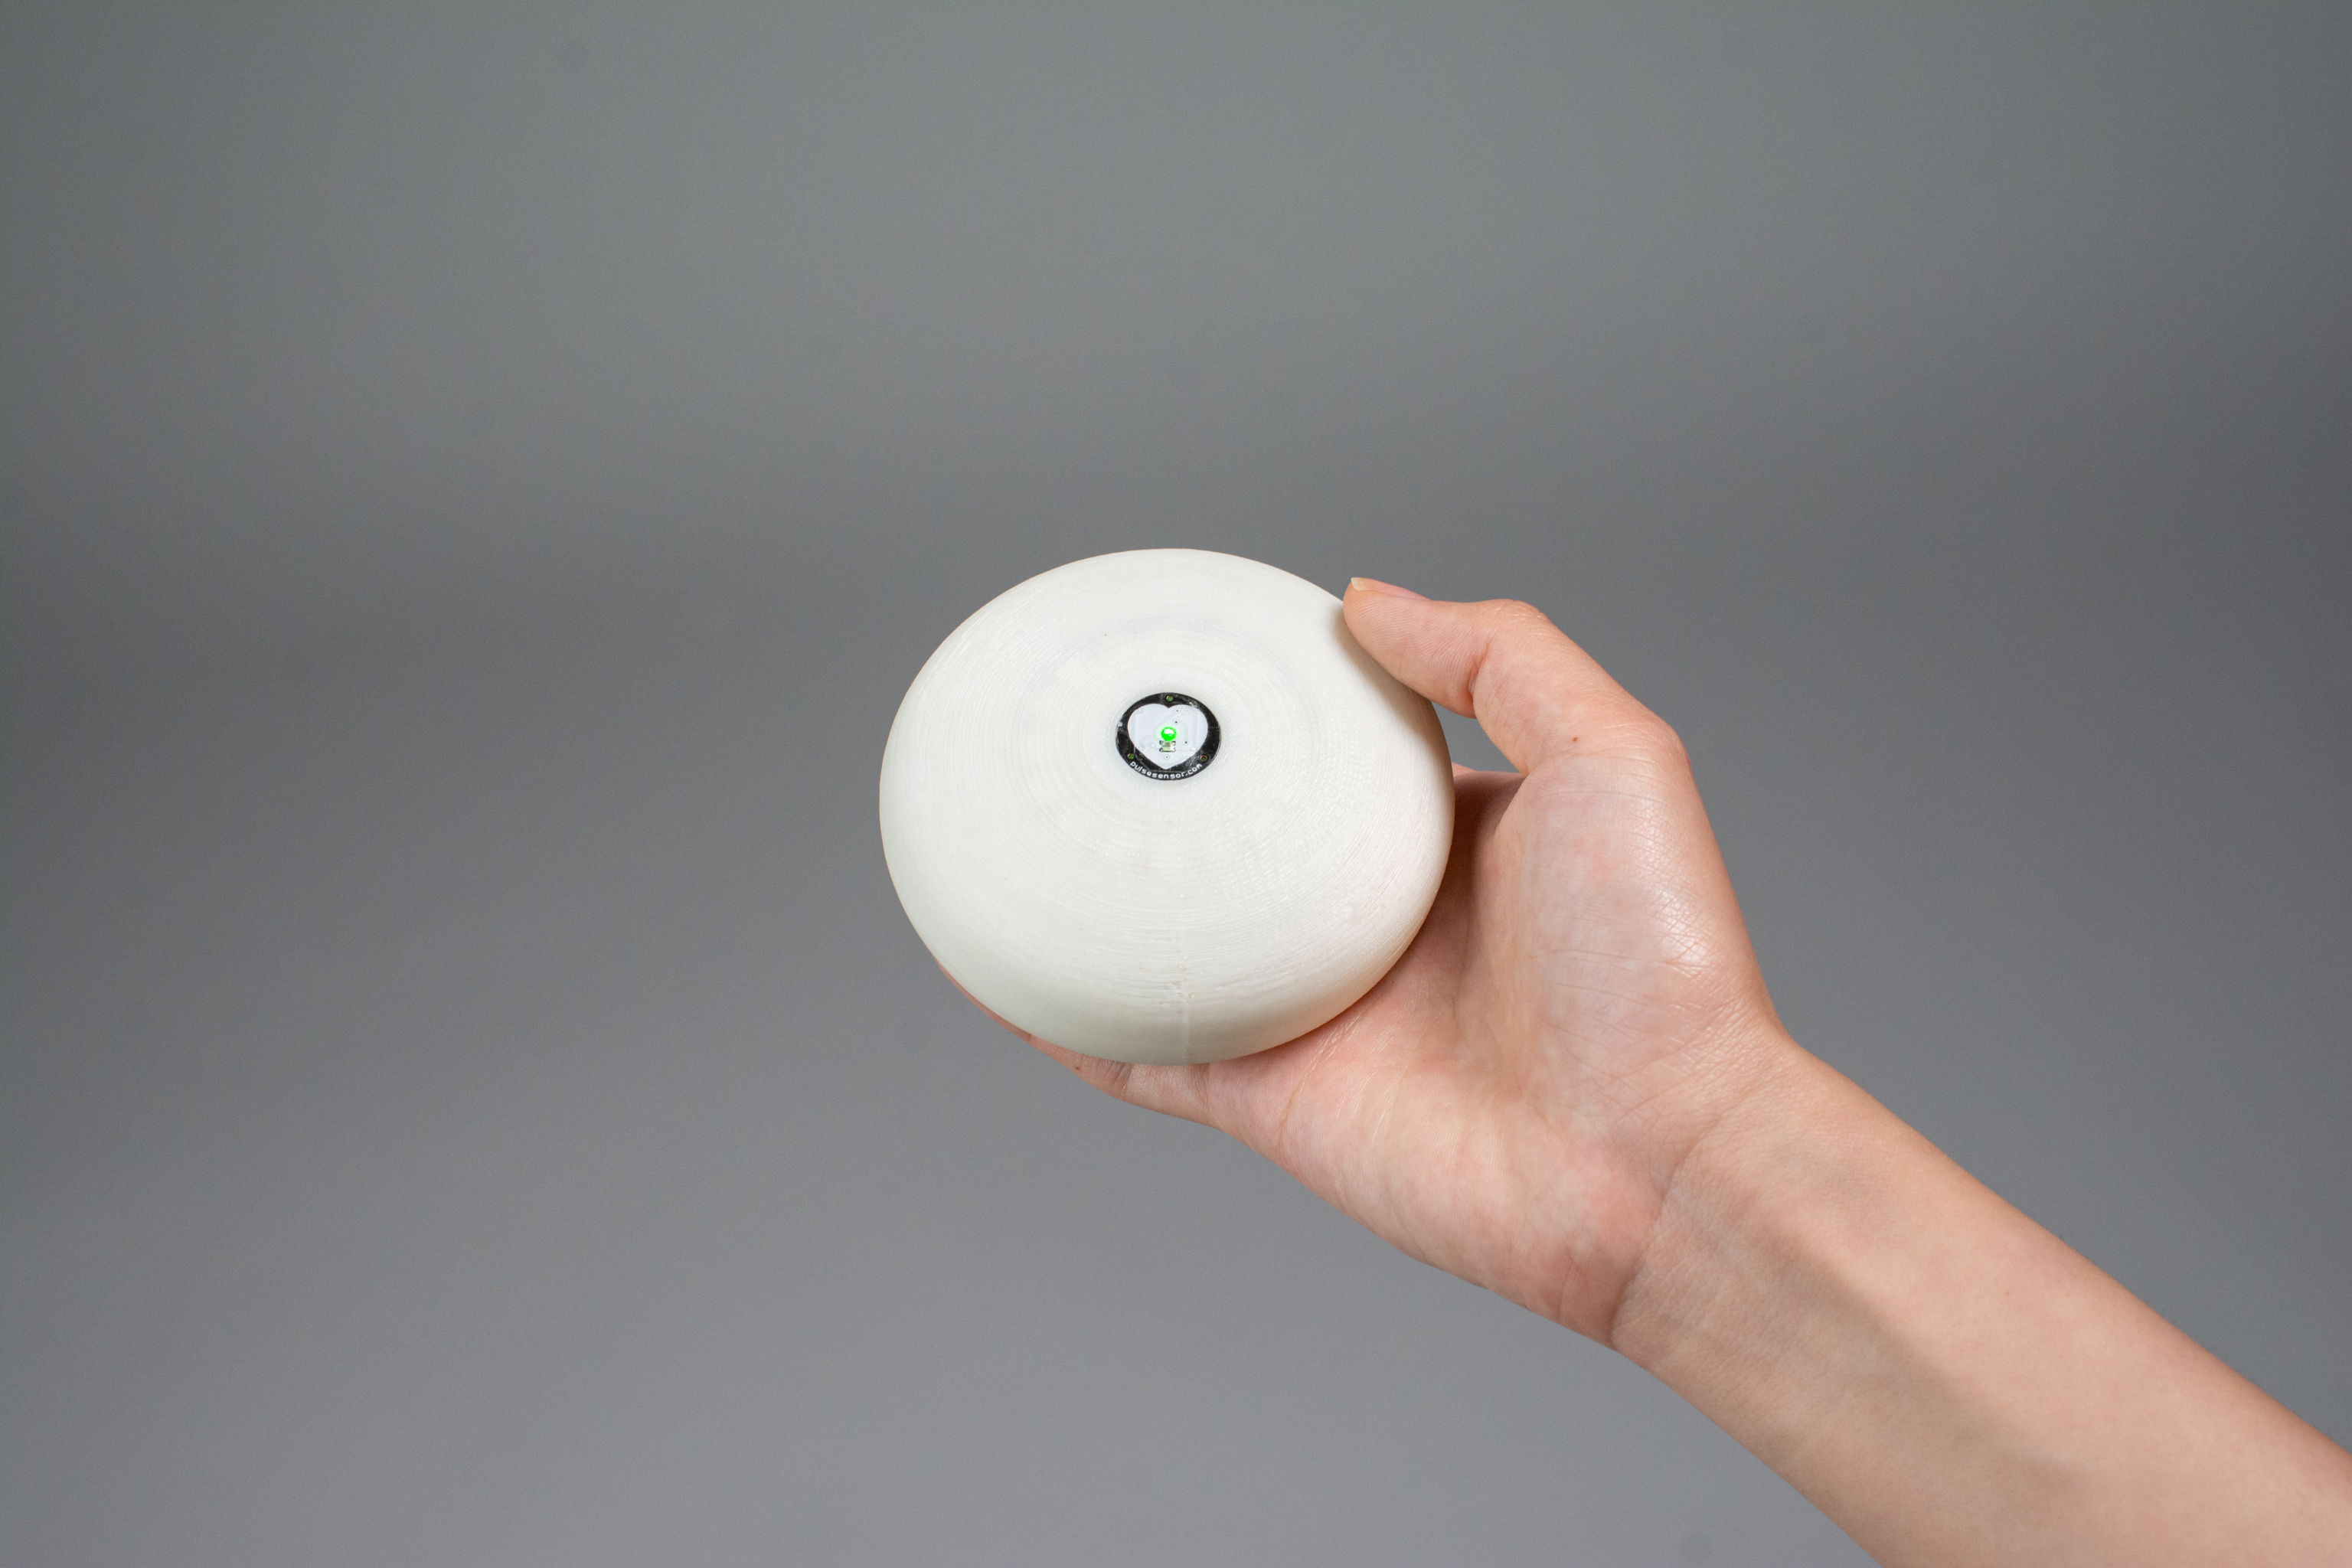
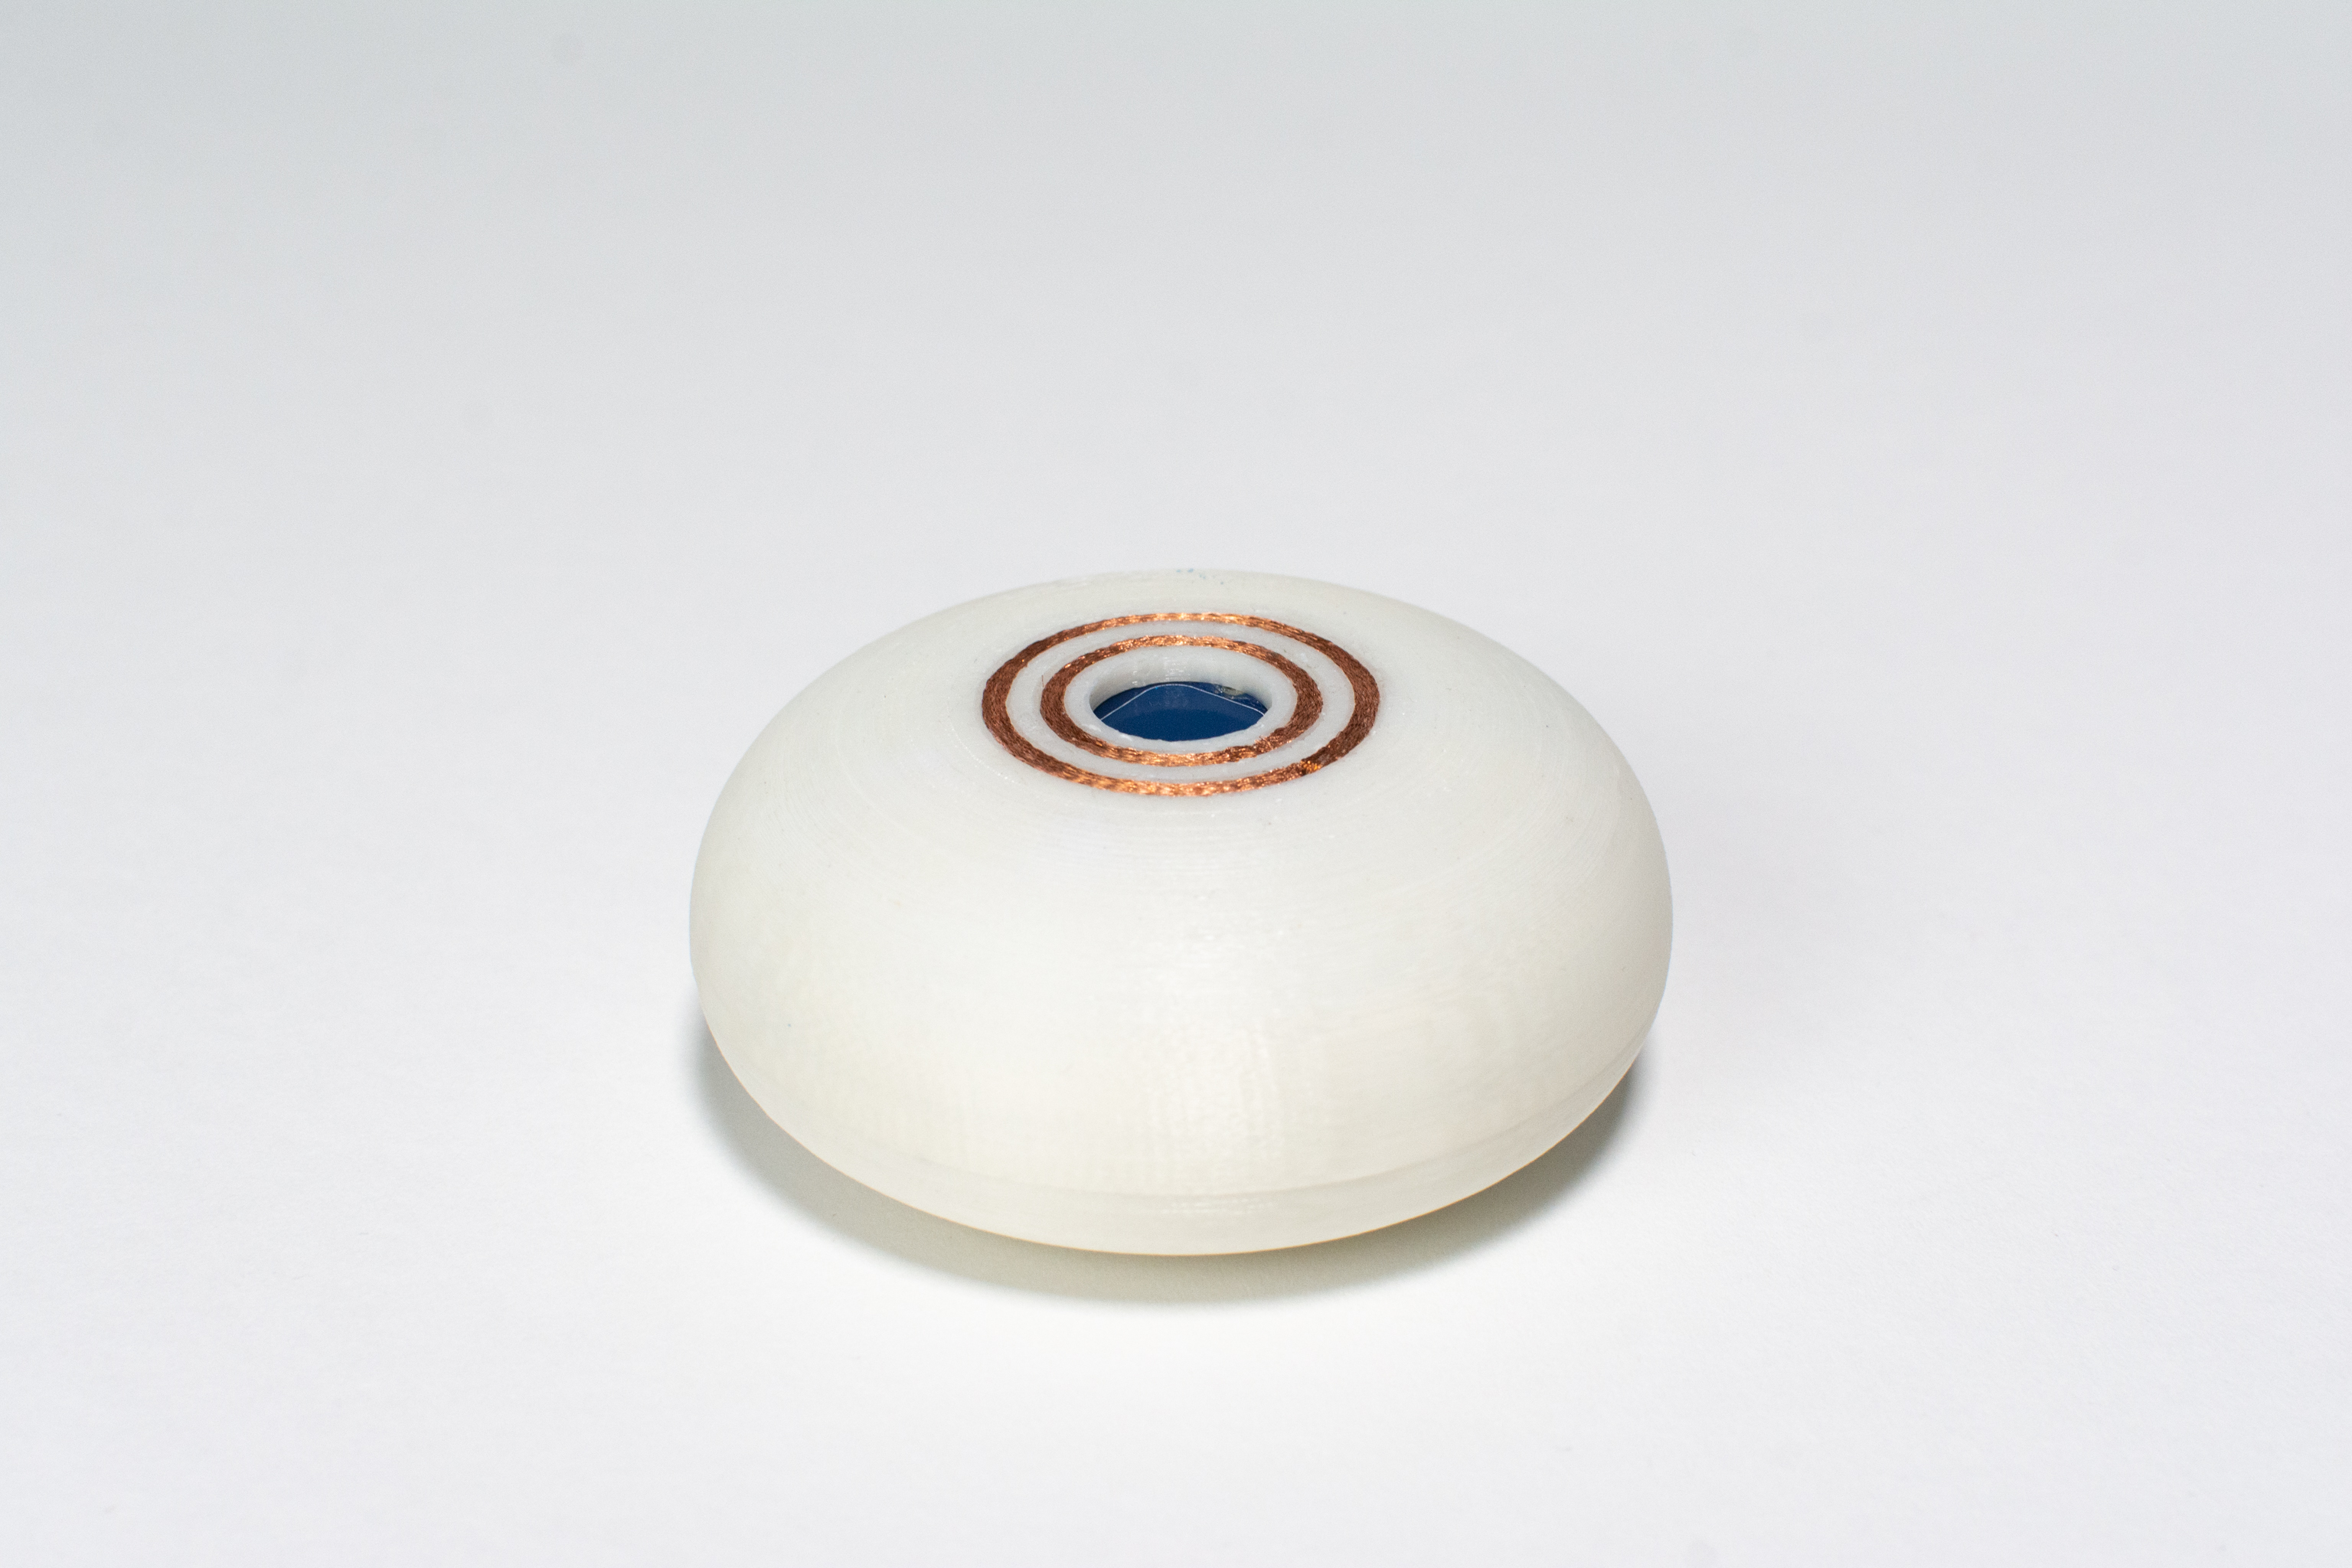
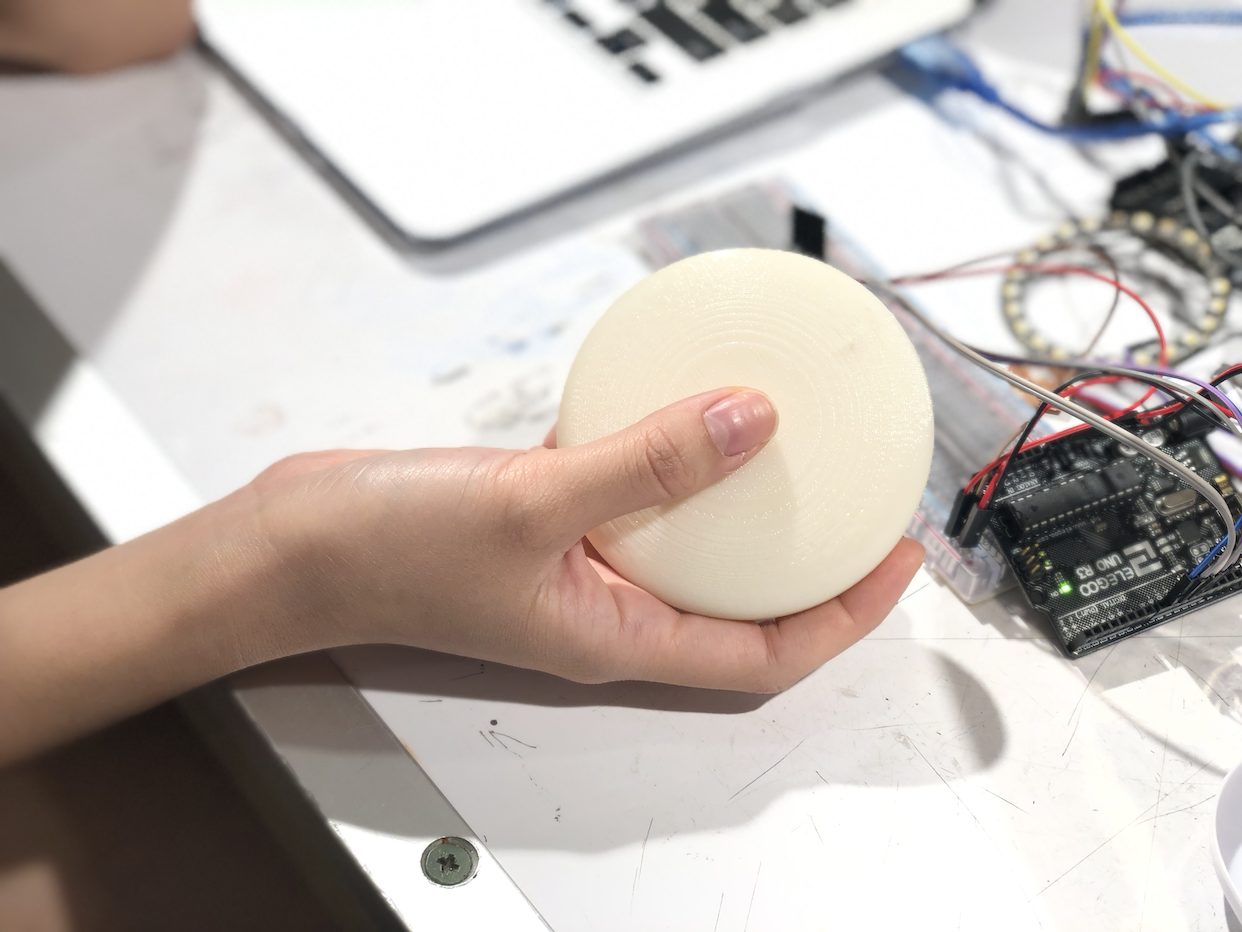
The “puck” is compact enough to be carried wherever Elinor goes and was designed with her hand size in mind.
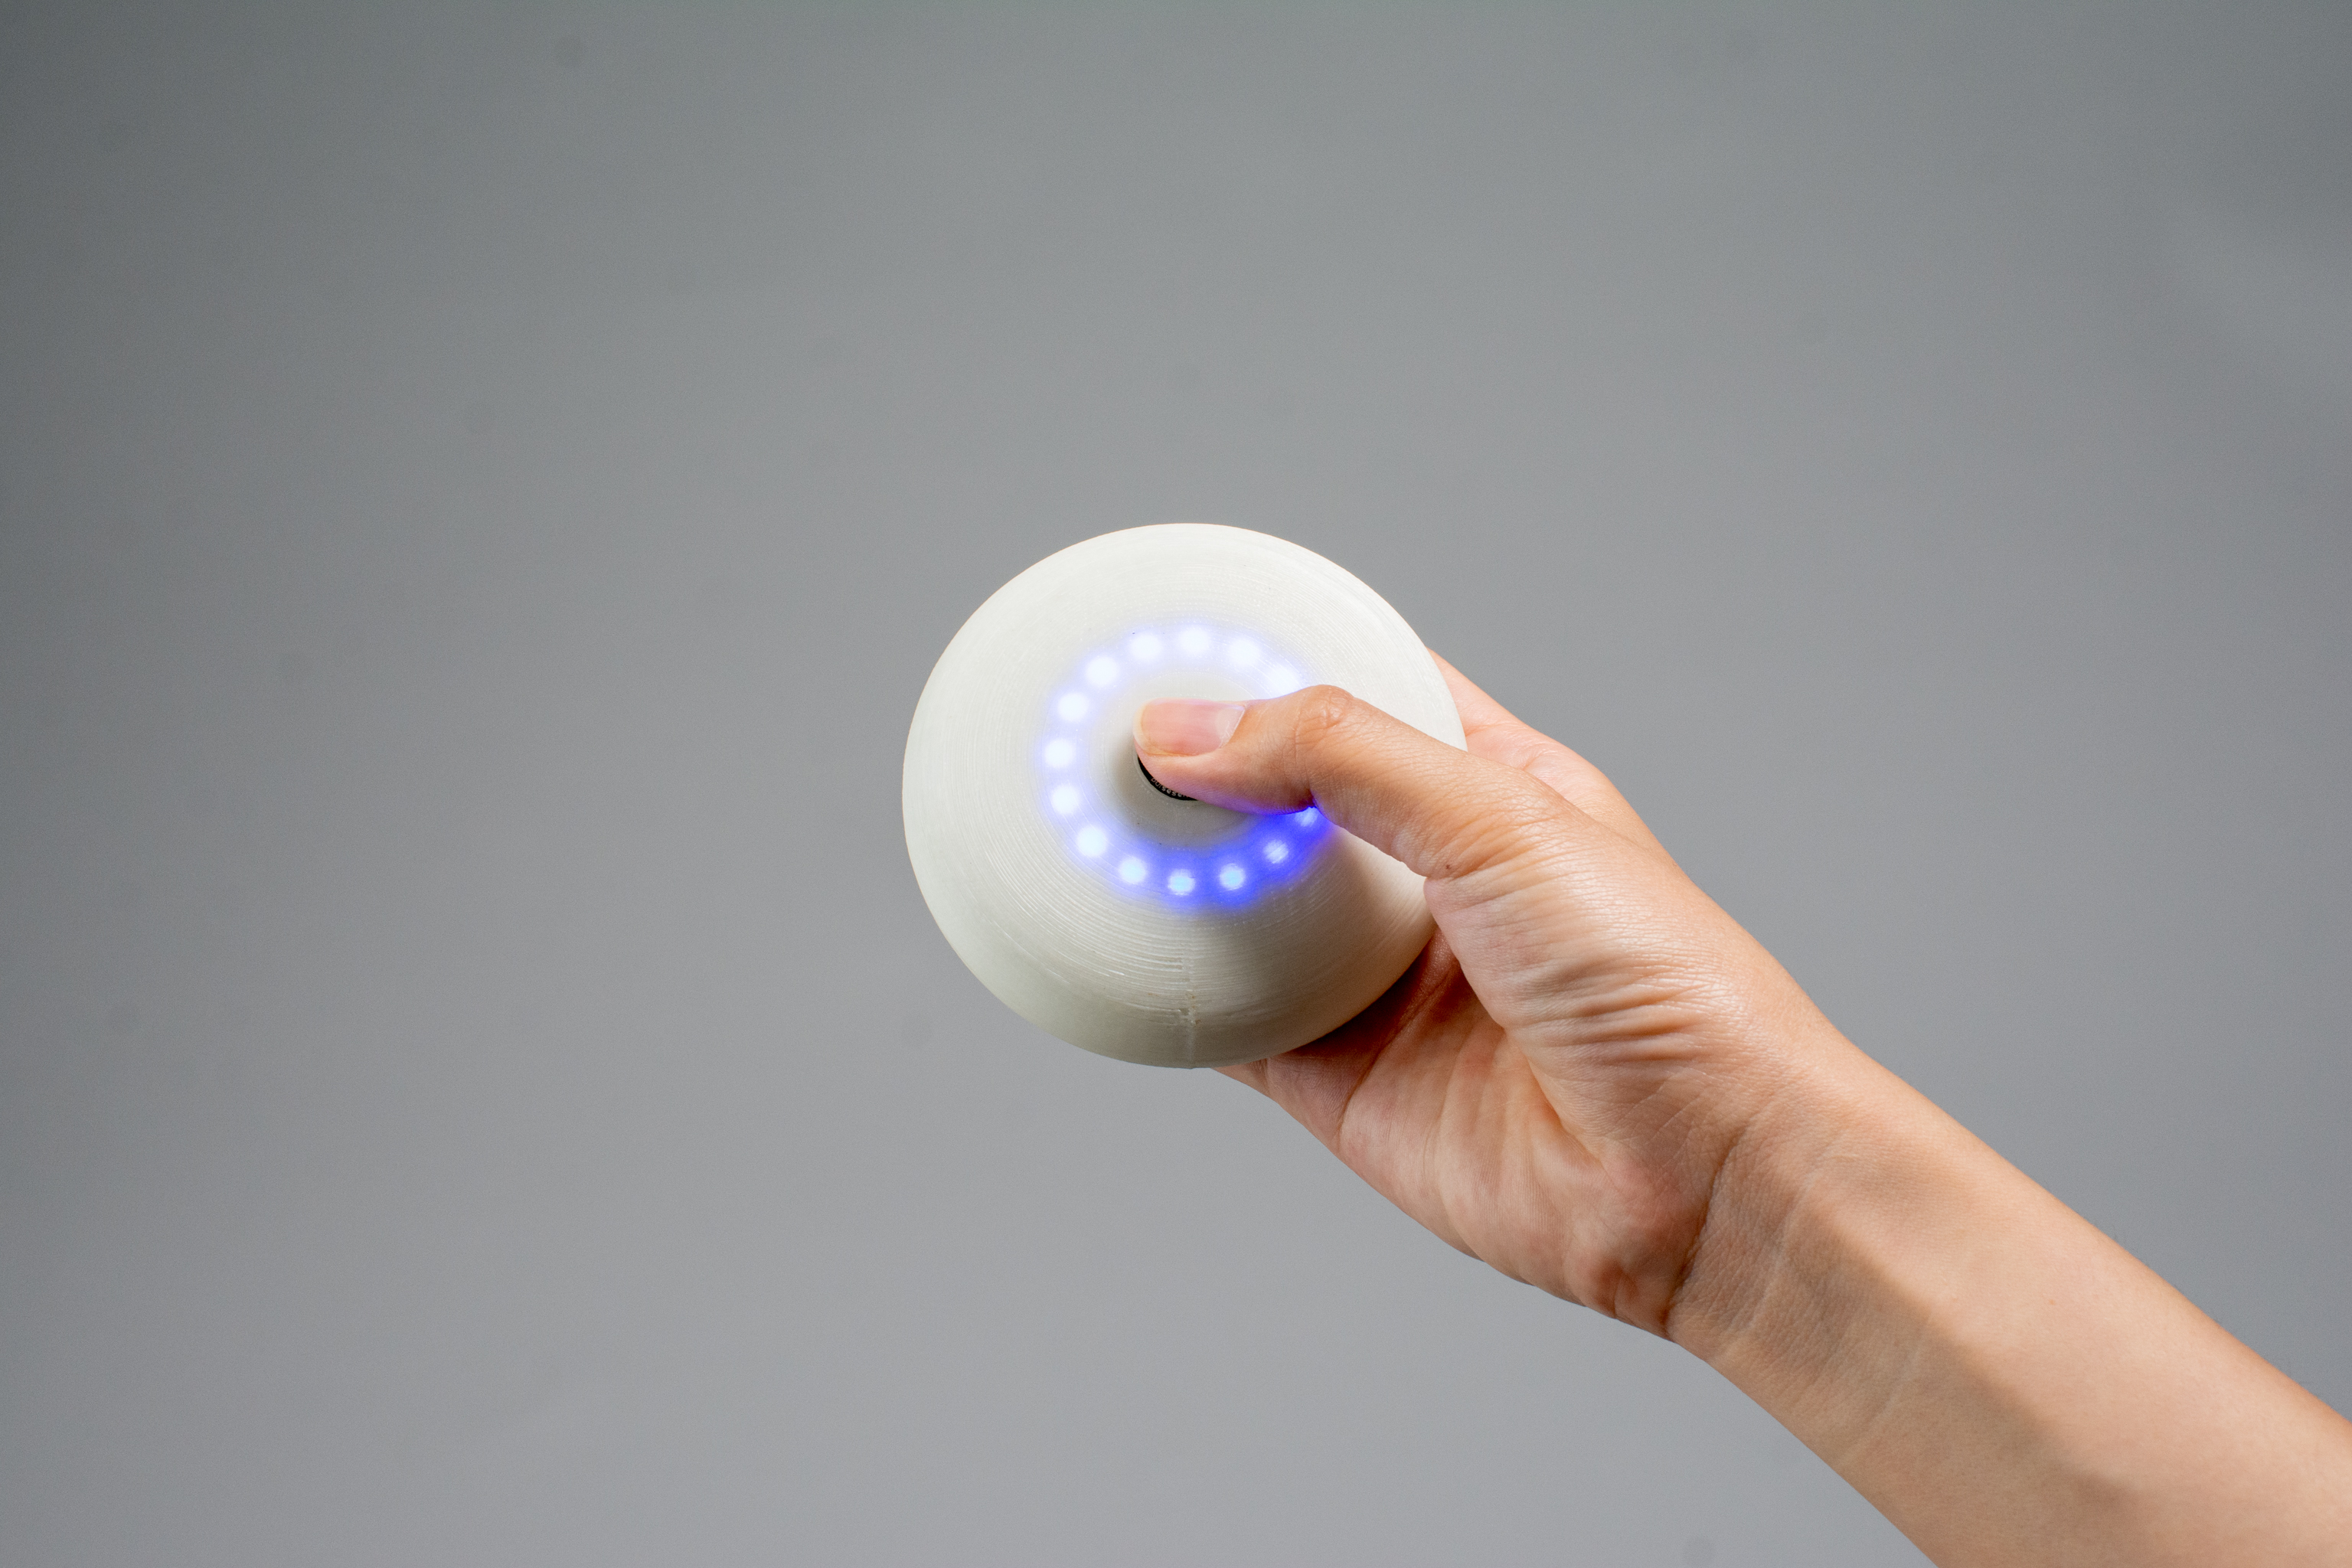
A sequence of blue pulses guides the rate of deep breathing.
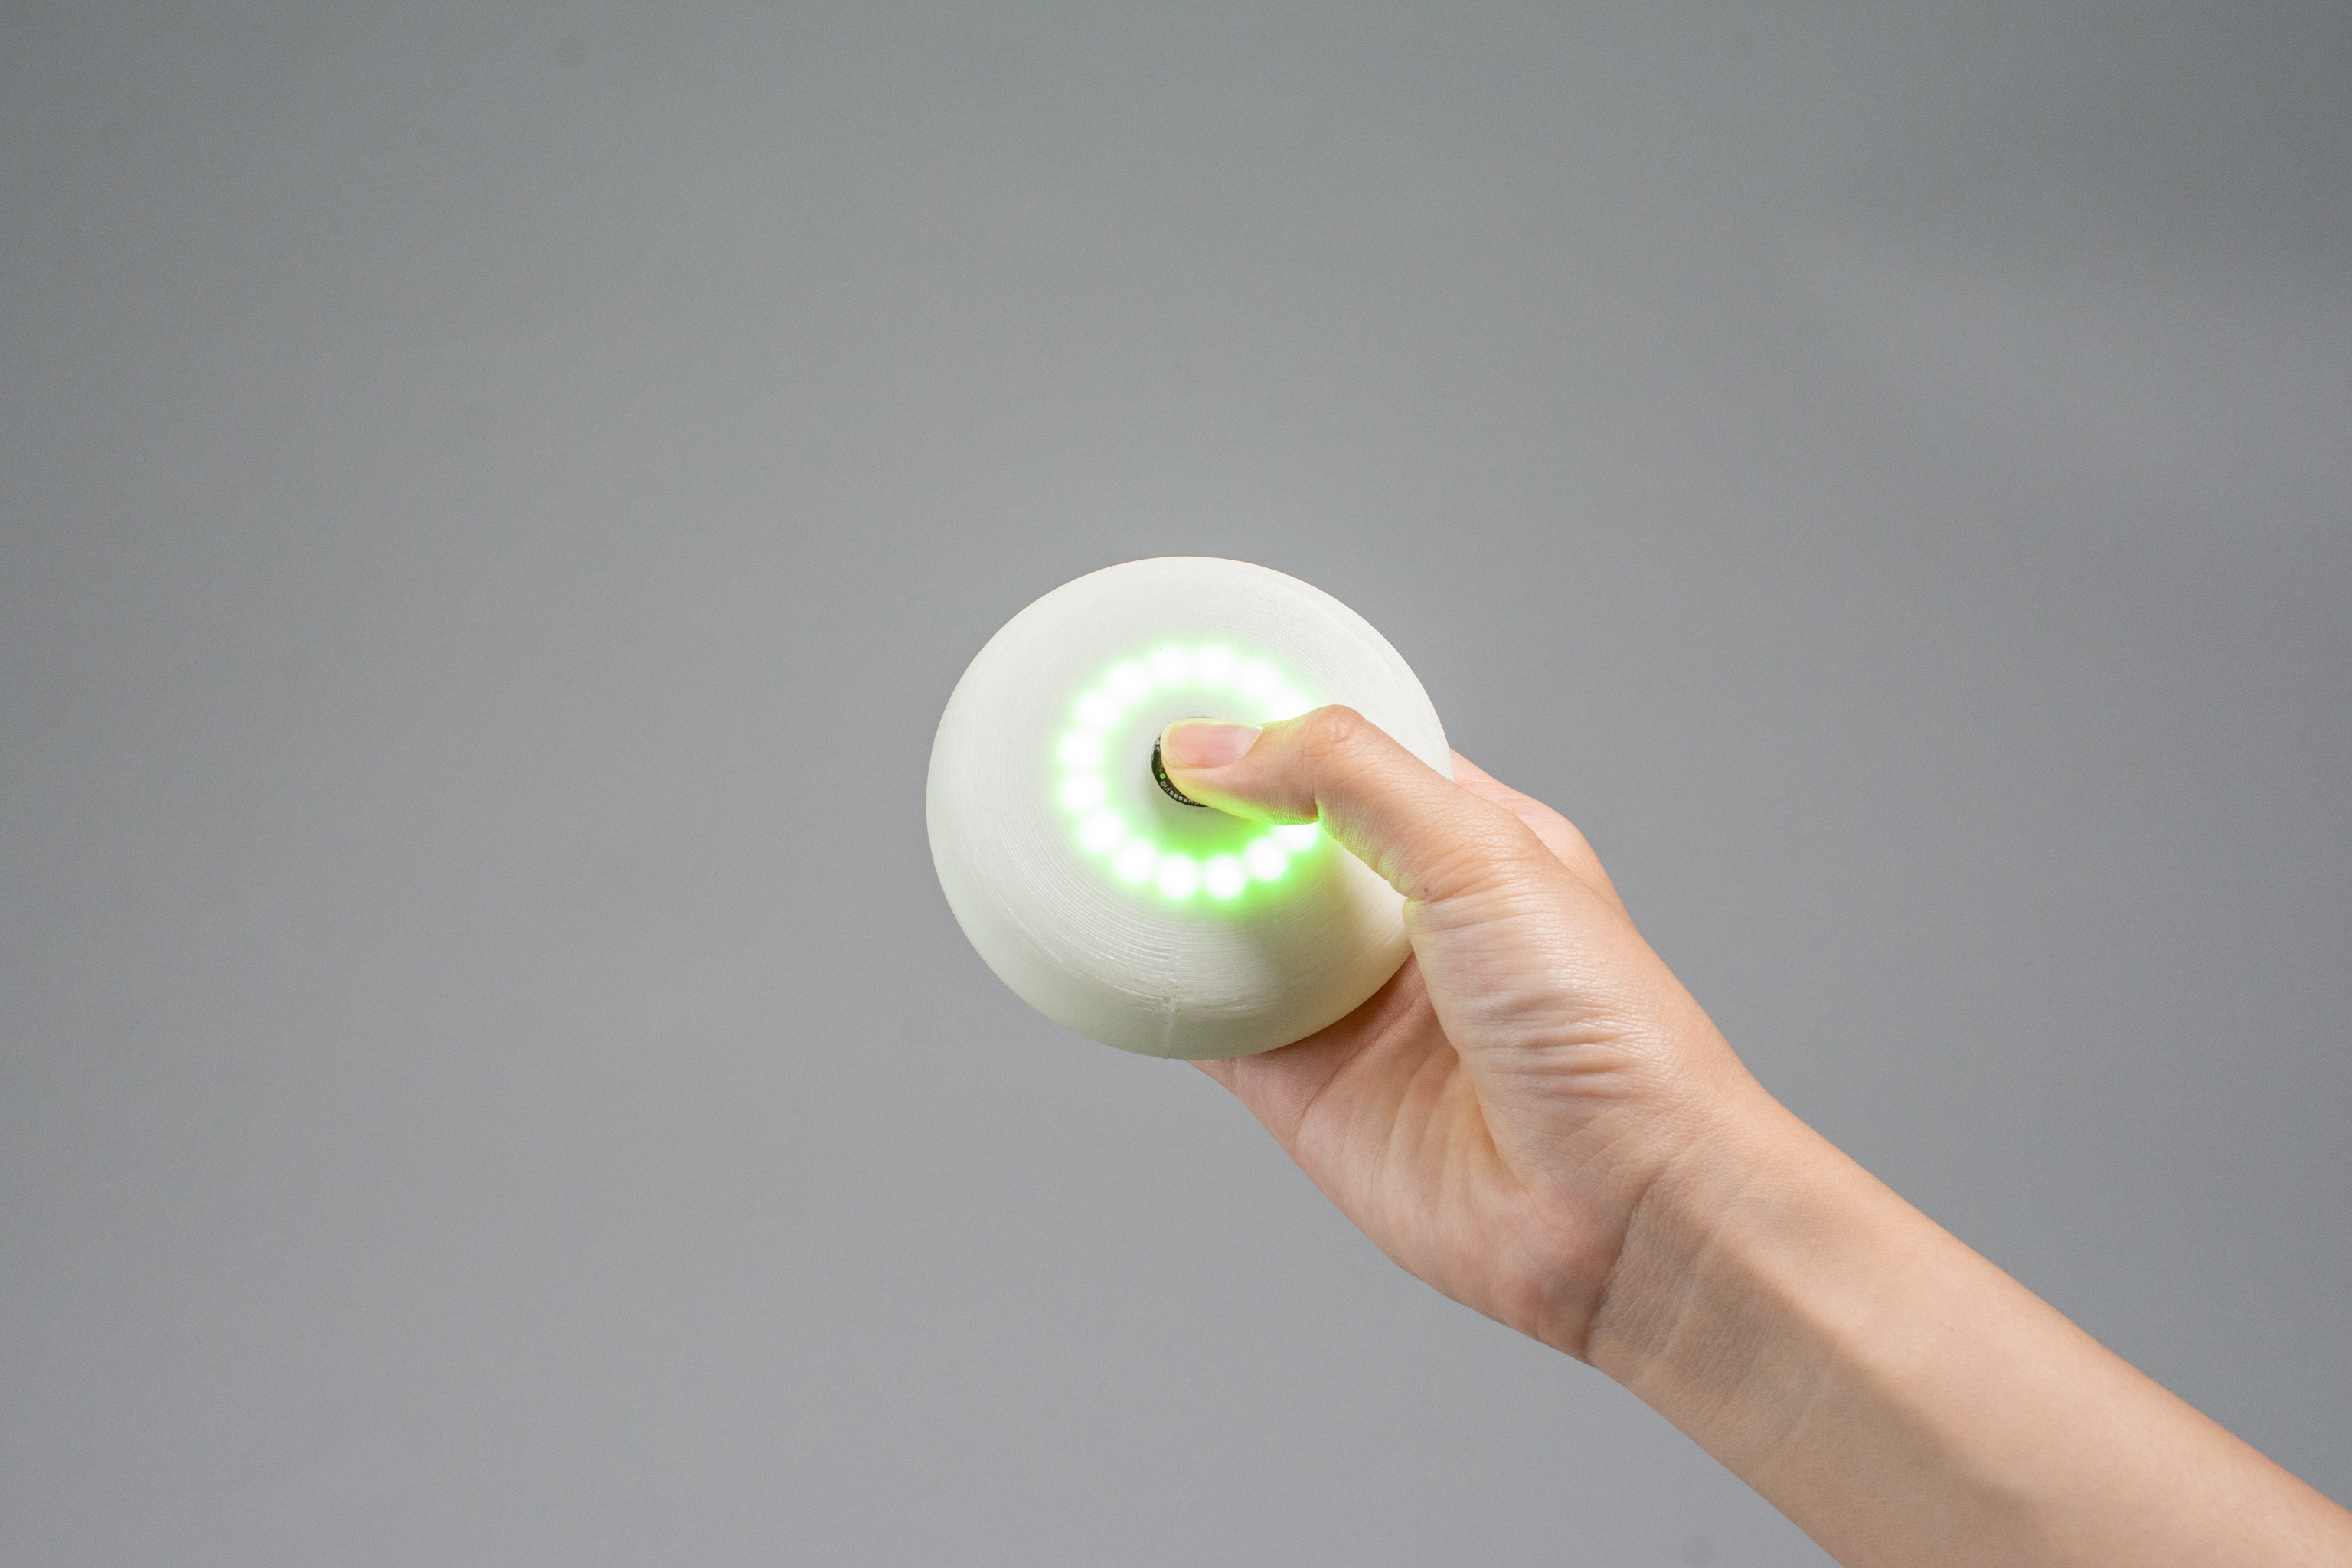
The ring of lights turns green to signal the end of a minute of deep breathing.
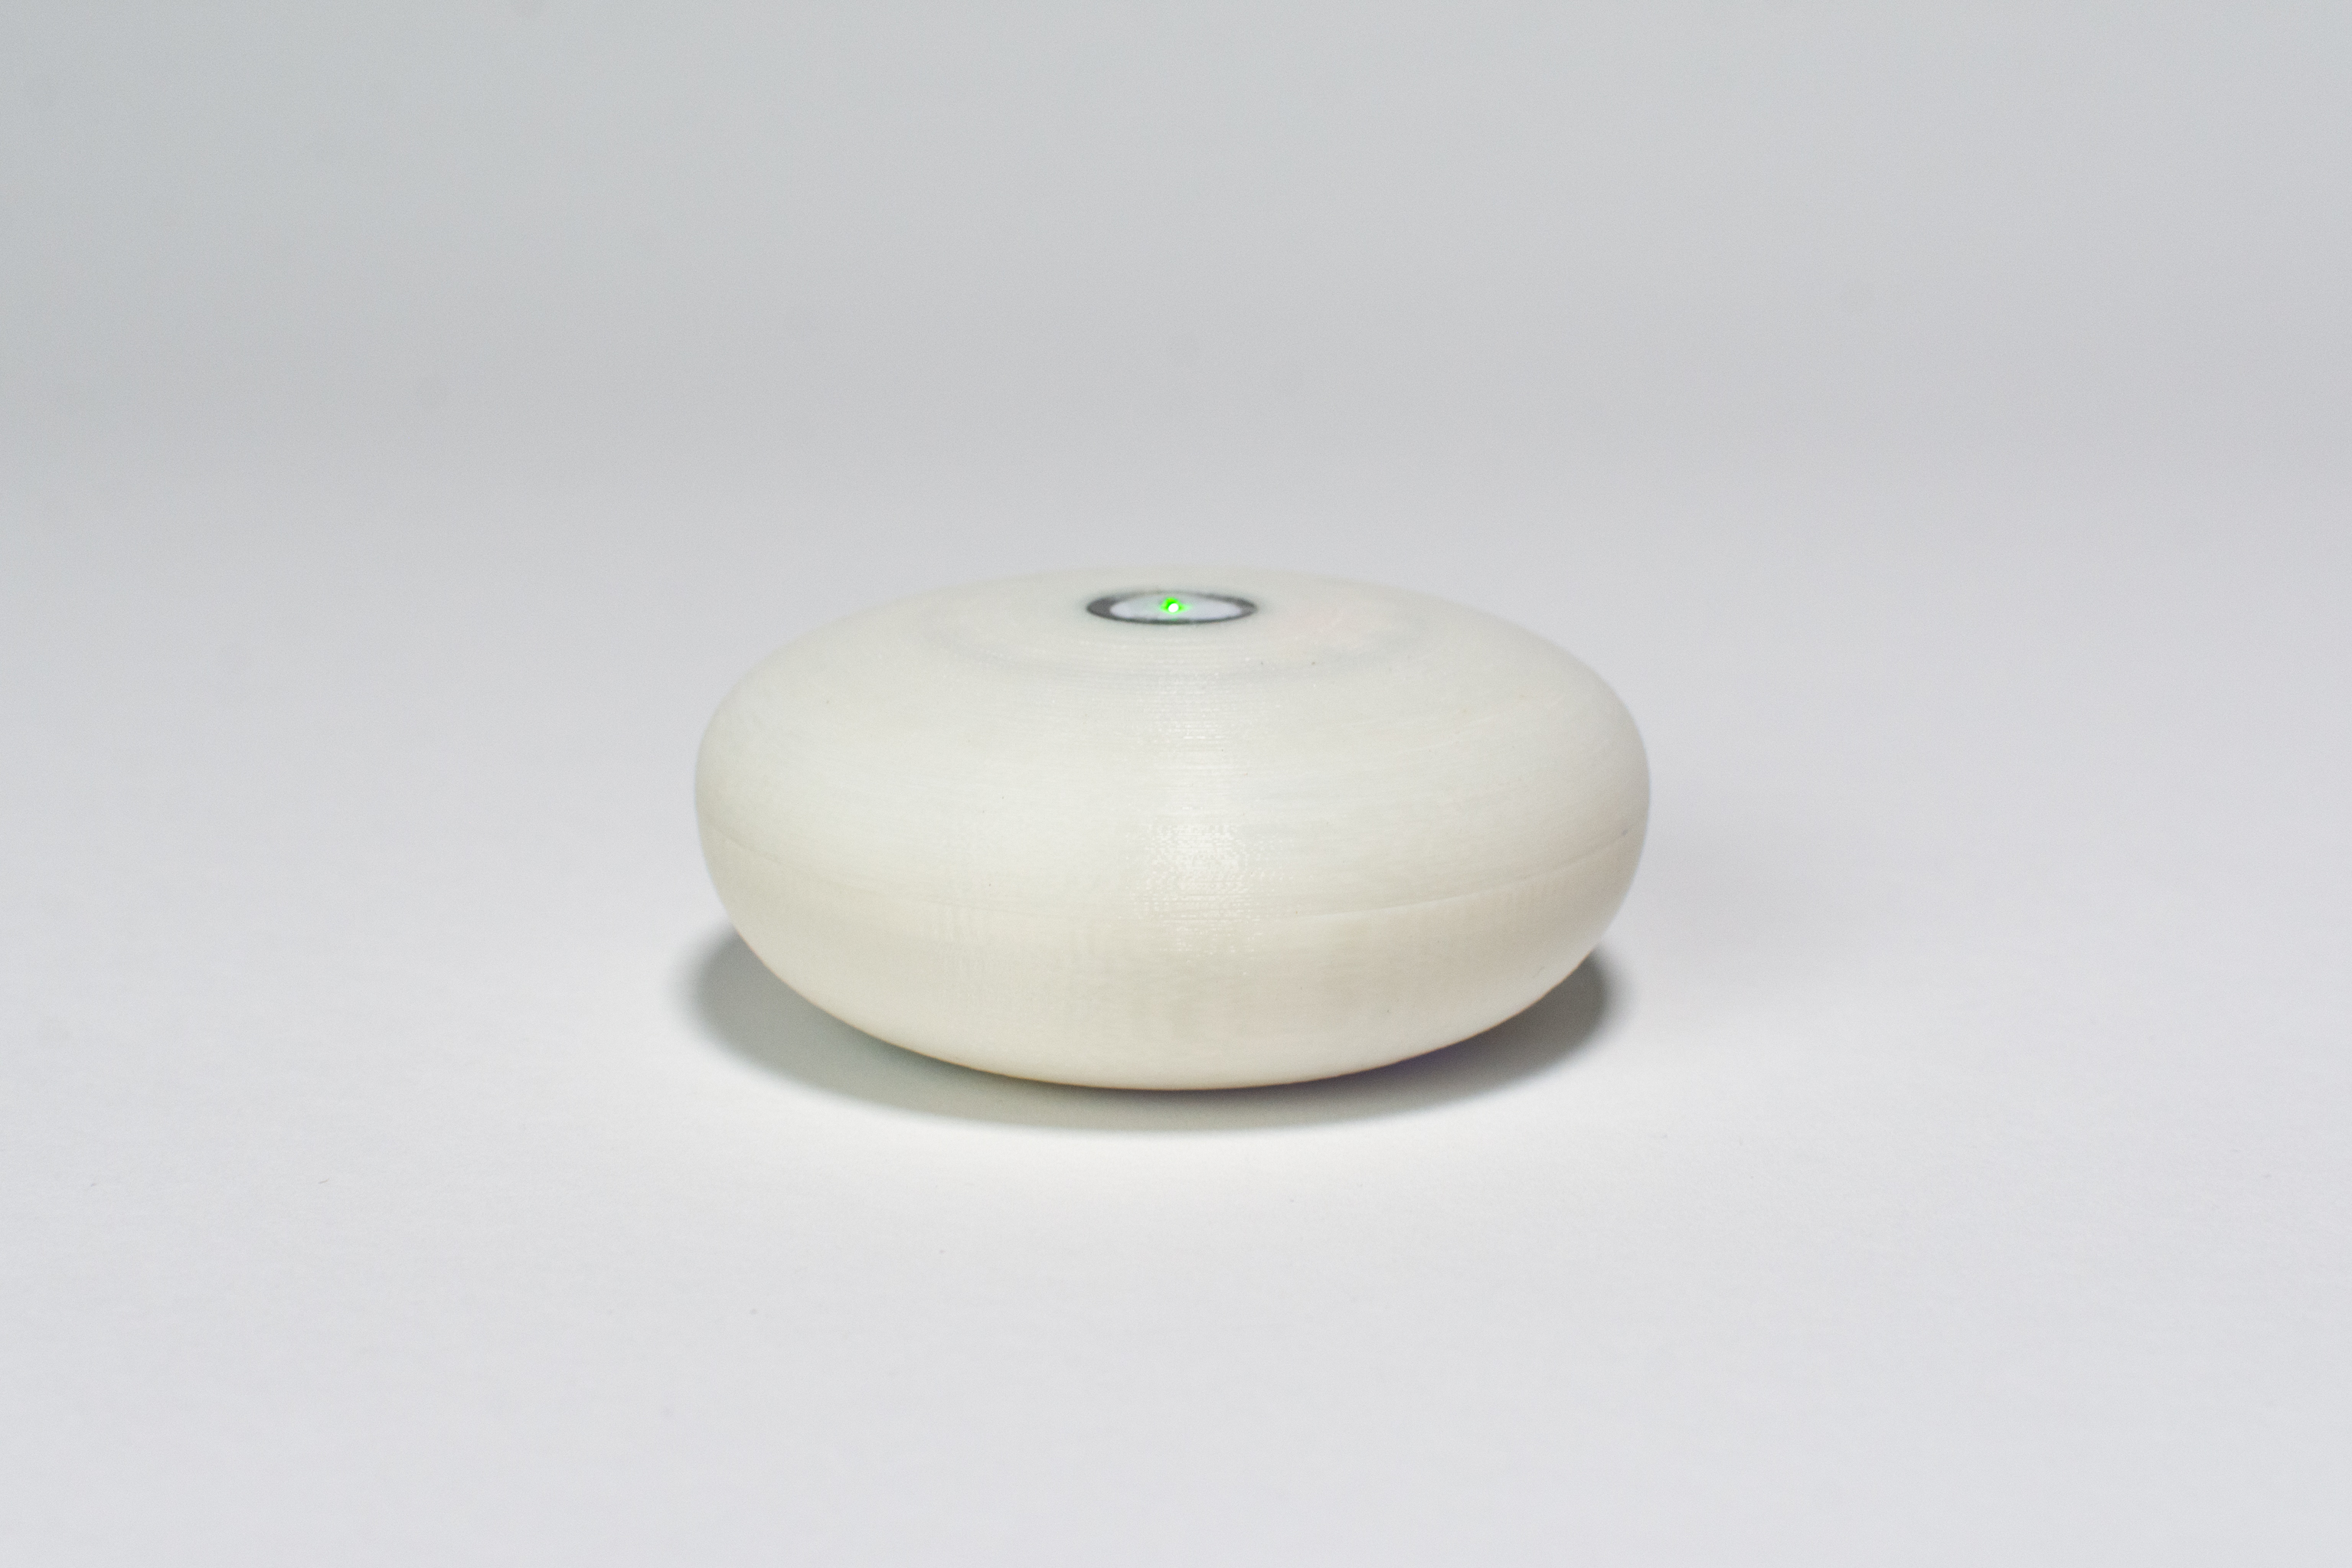
Inspired by smooth river stones, the puck was designed to be smooth and rounded for great ergonomics.

As the portable puck charges in the cable, a display guides Elinor through more mindfulness exercises.
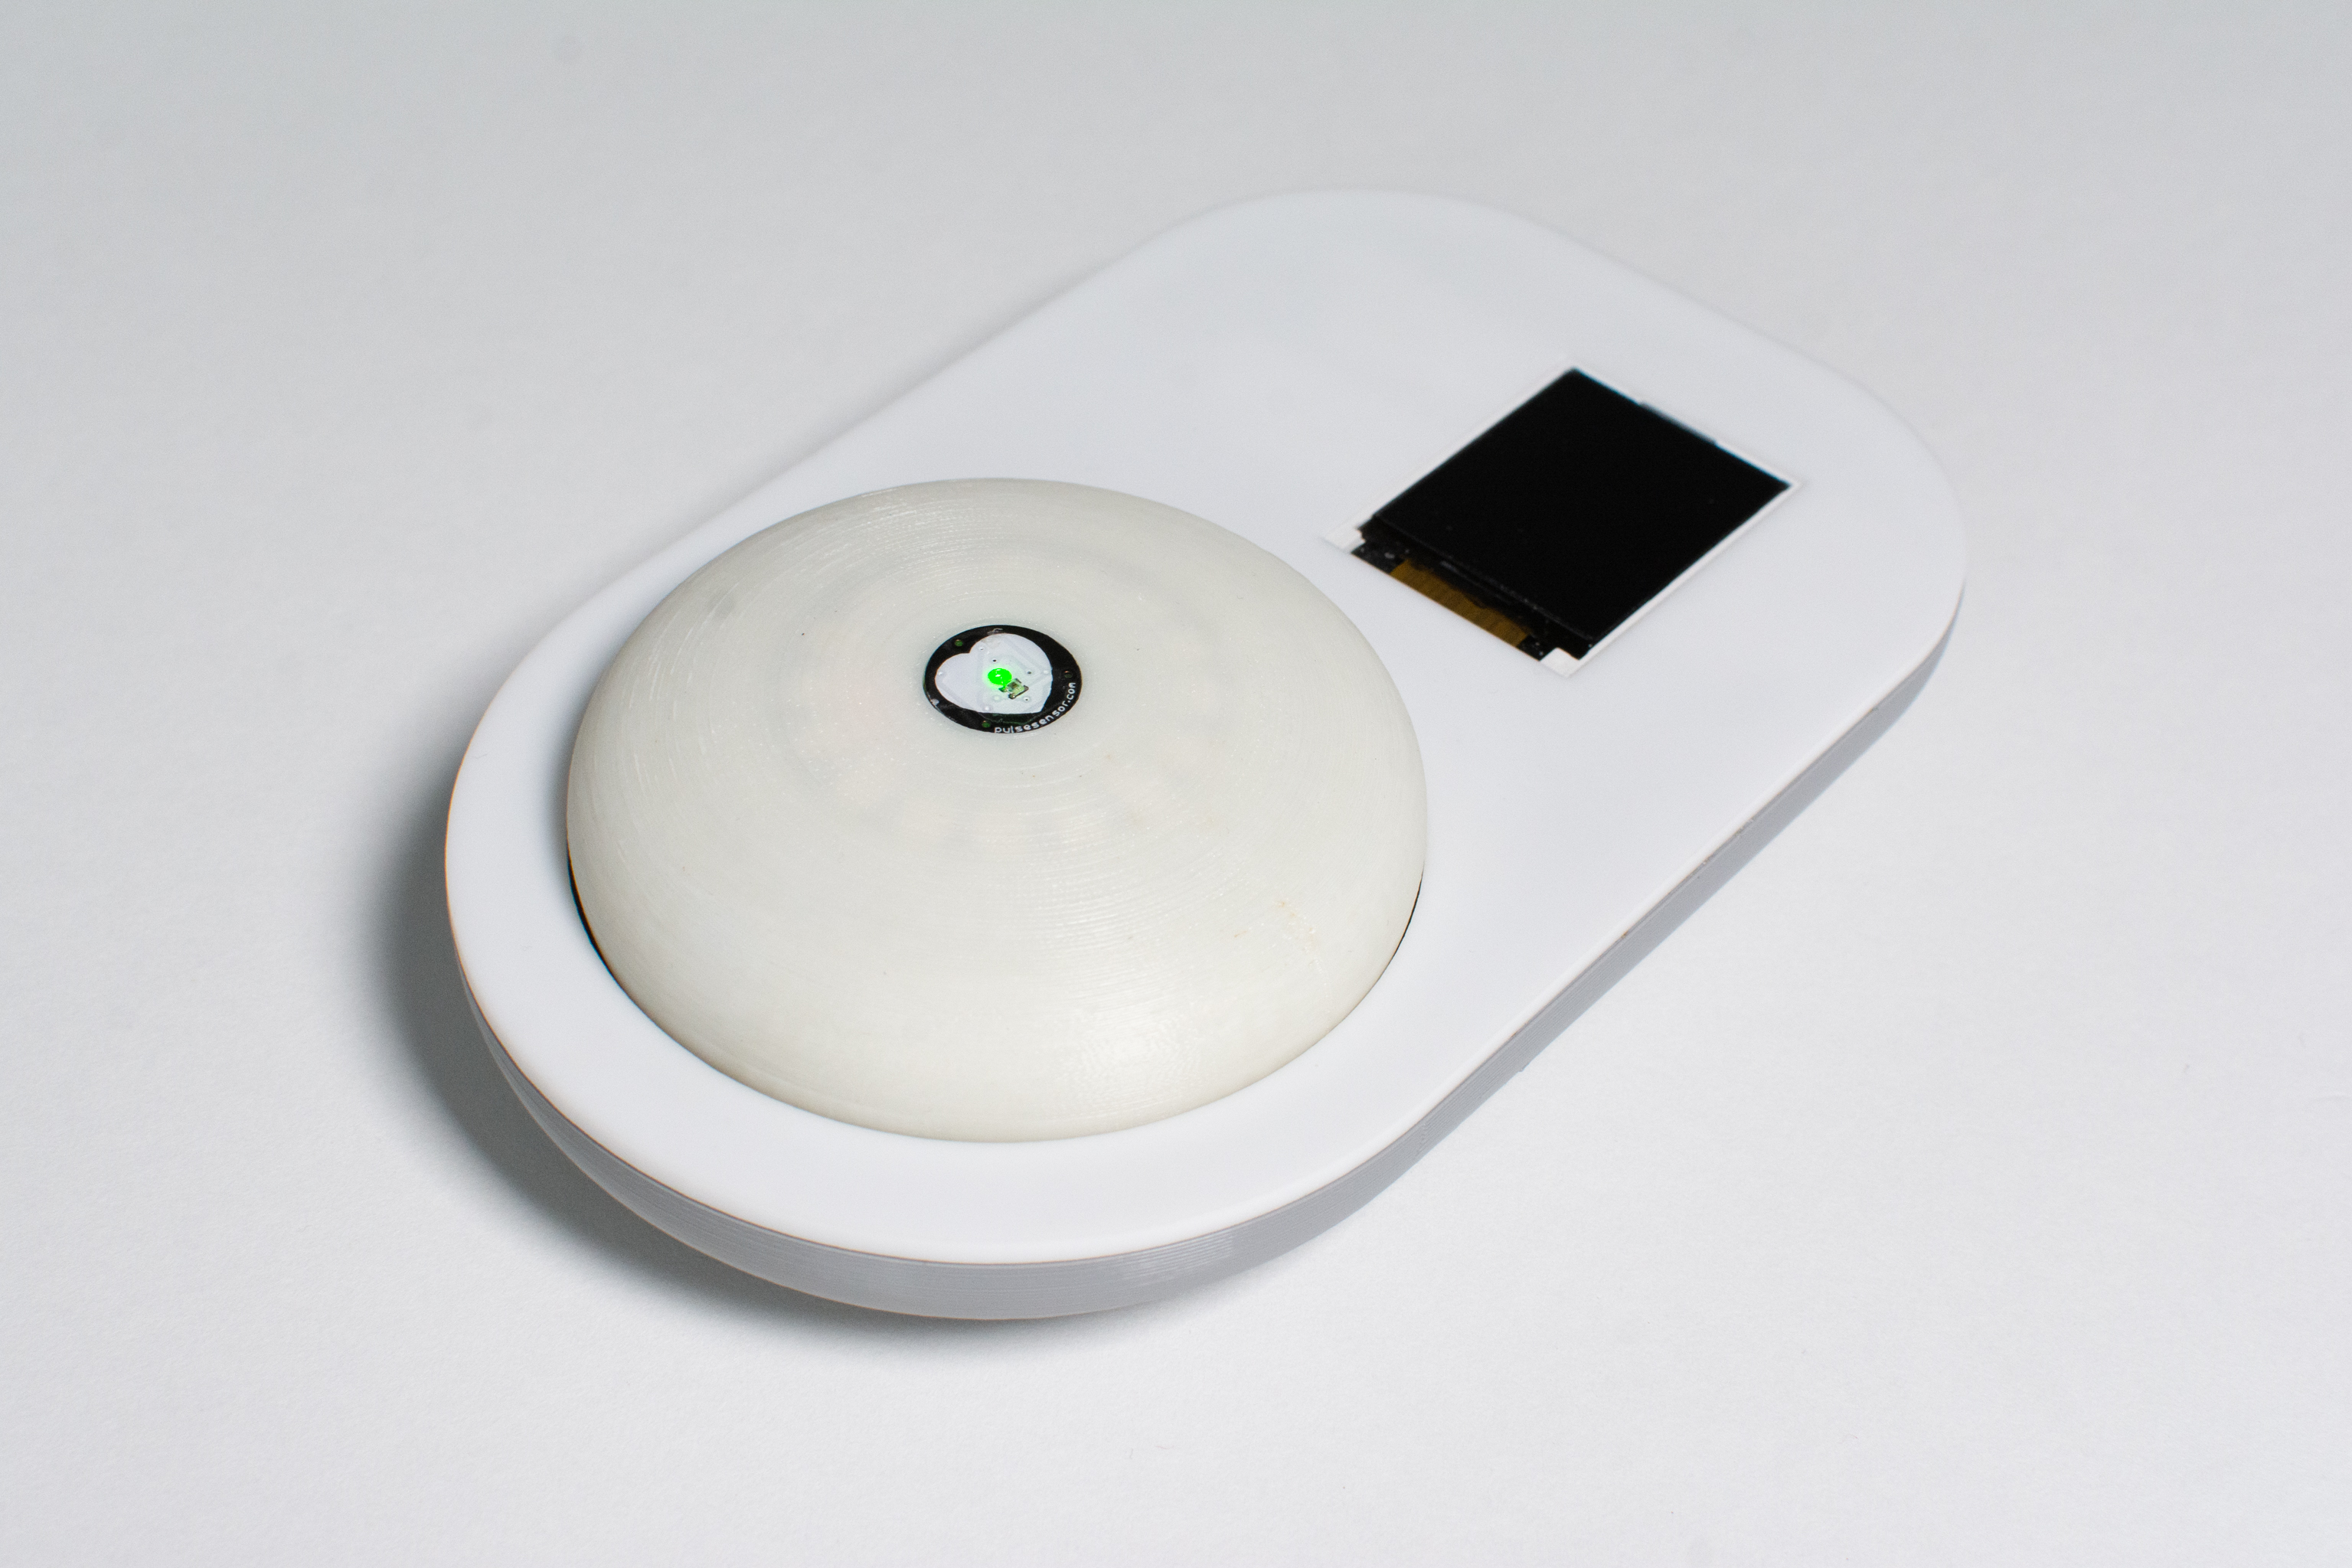
The puck and dock were designed together to be approachable and small enough to be placed on a nightstand or desk.
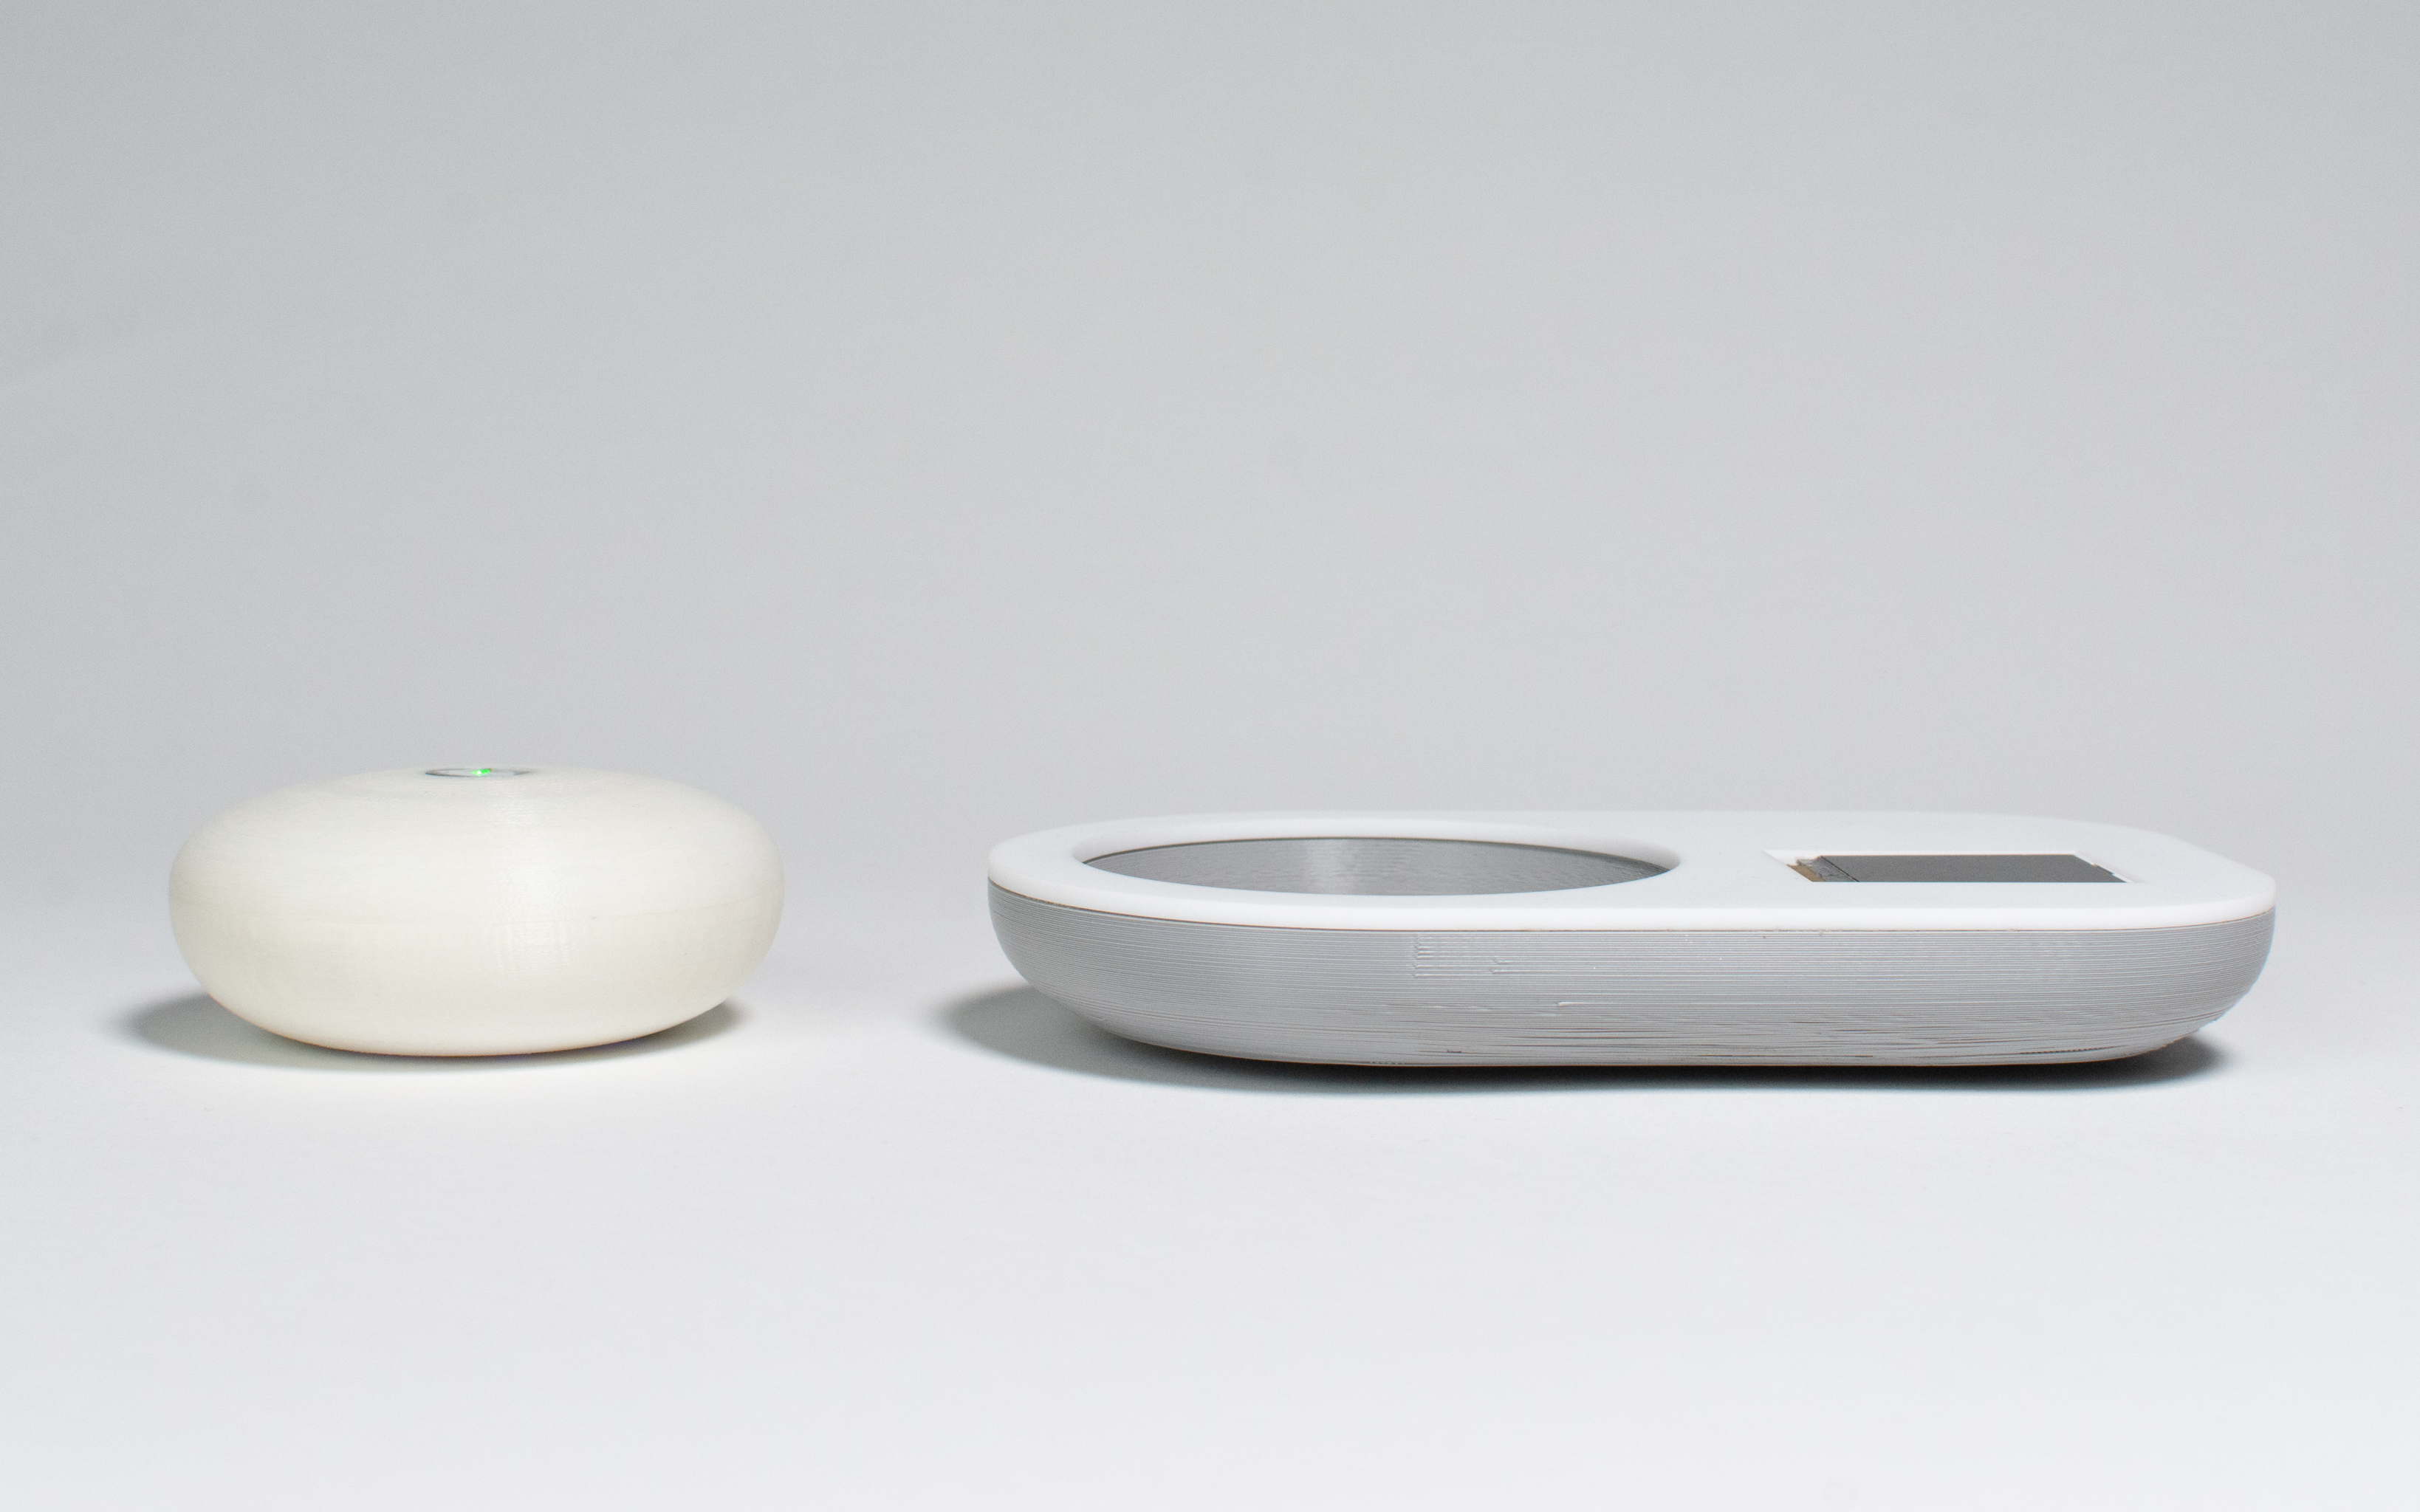
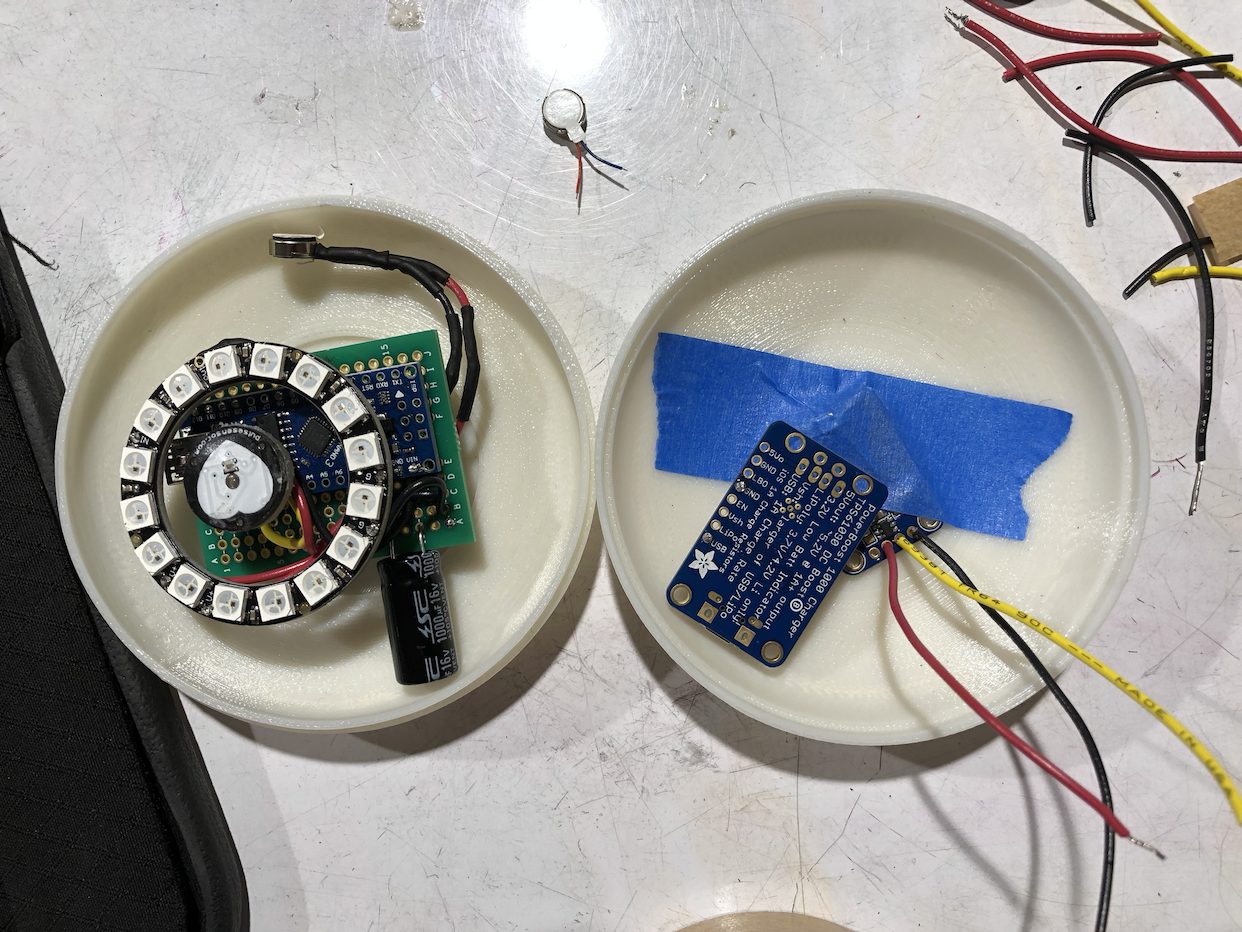
Fitting all the necessary components inside both enclosures proved a challenge, but was possible through careful modeling and prototyping.
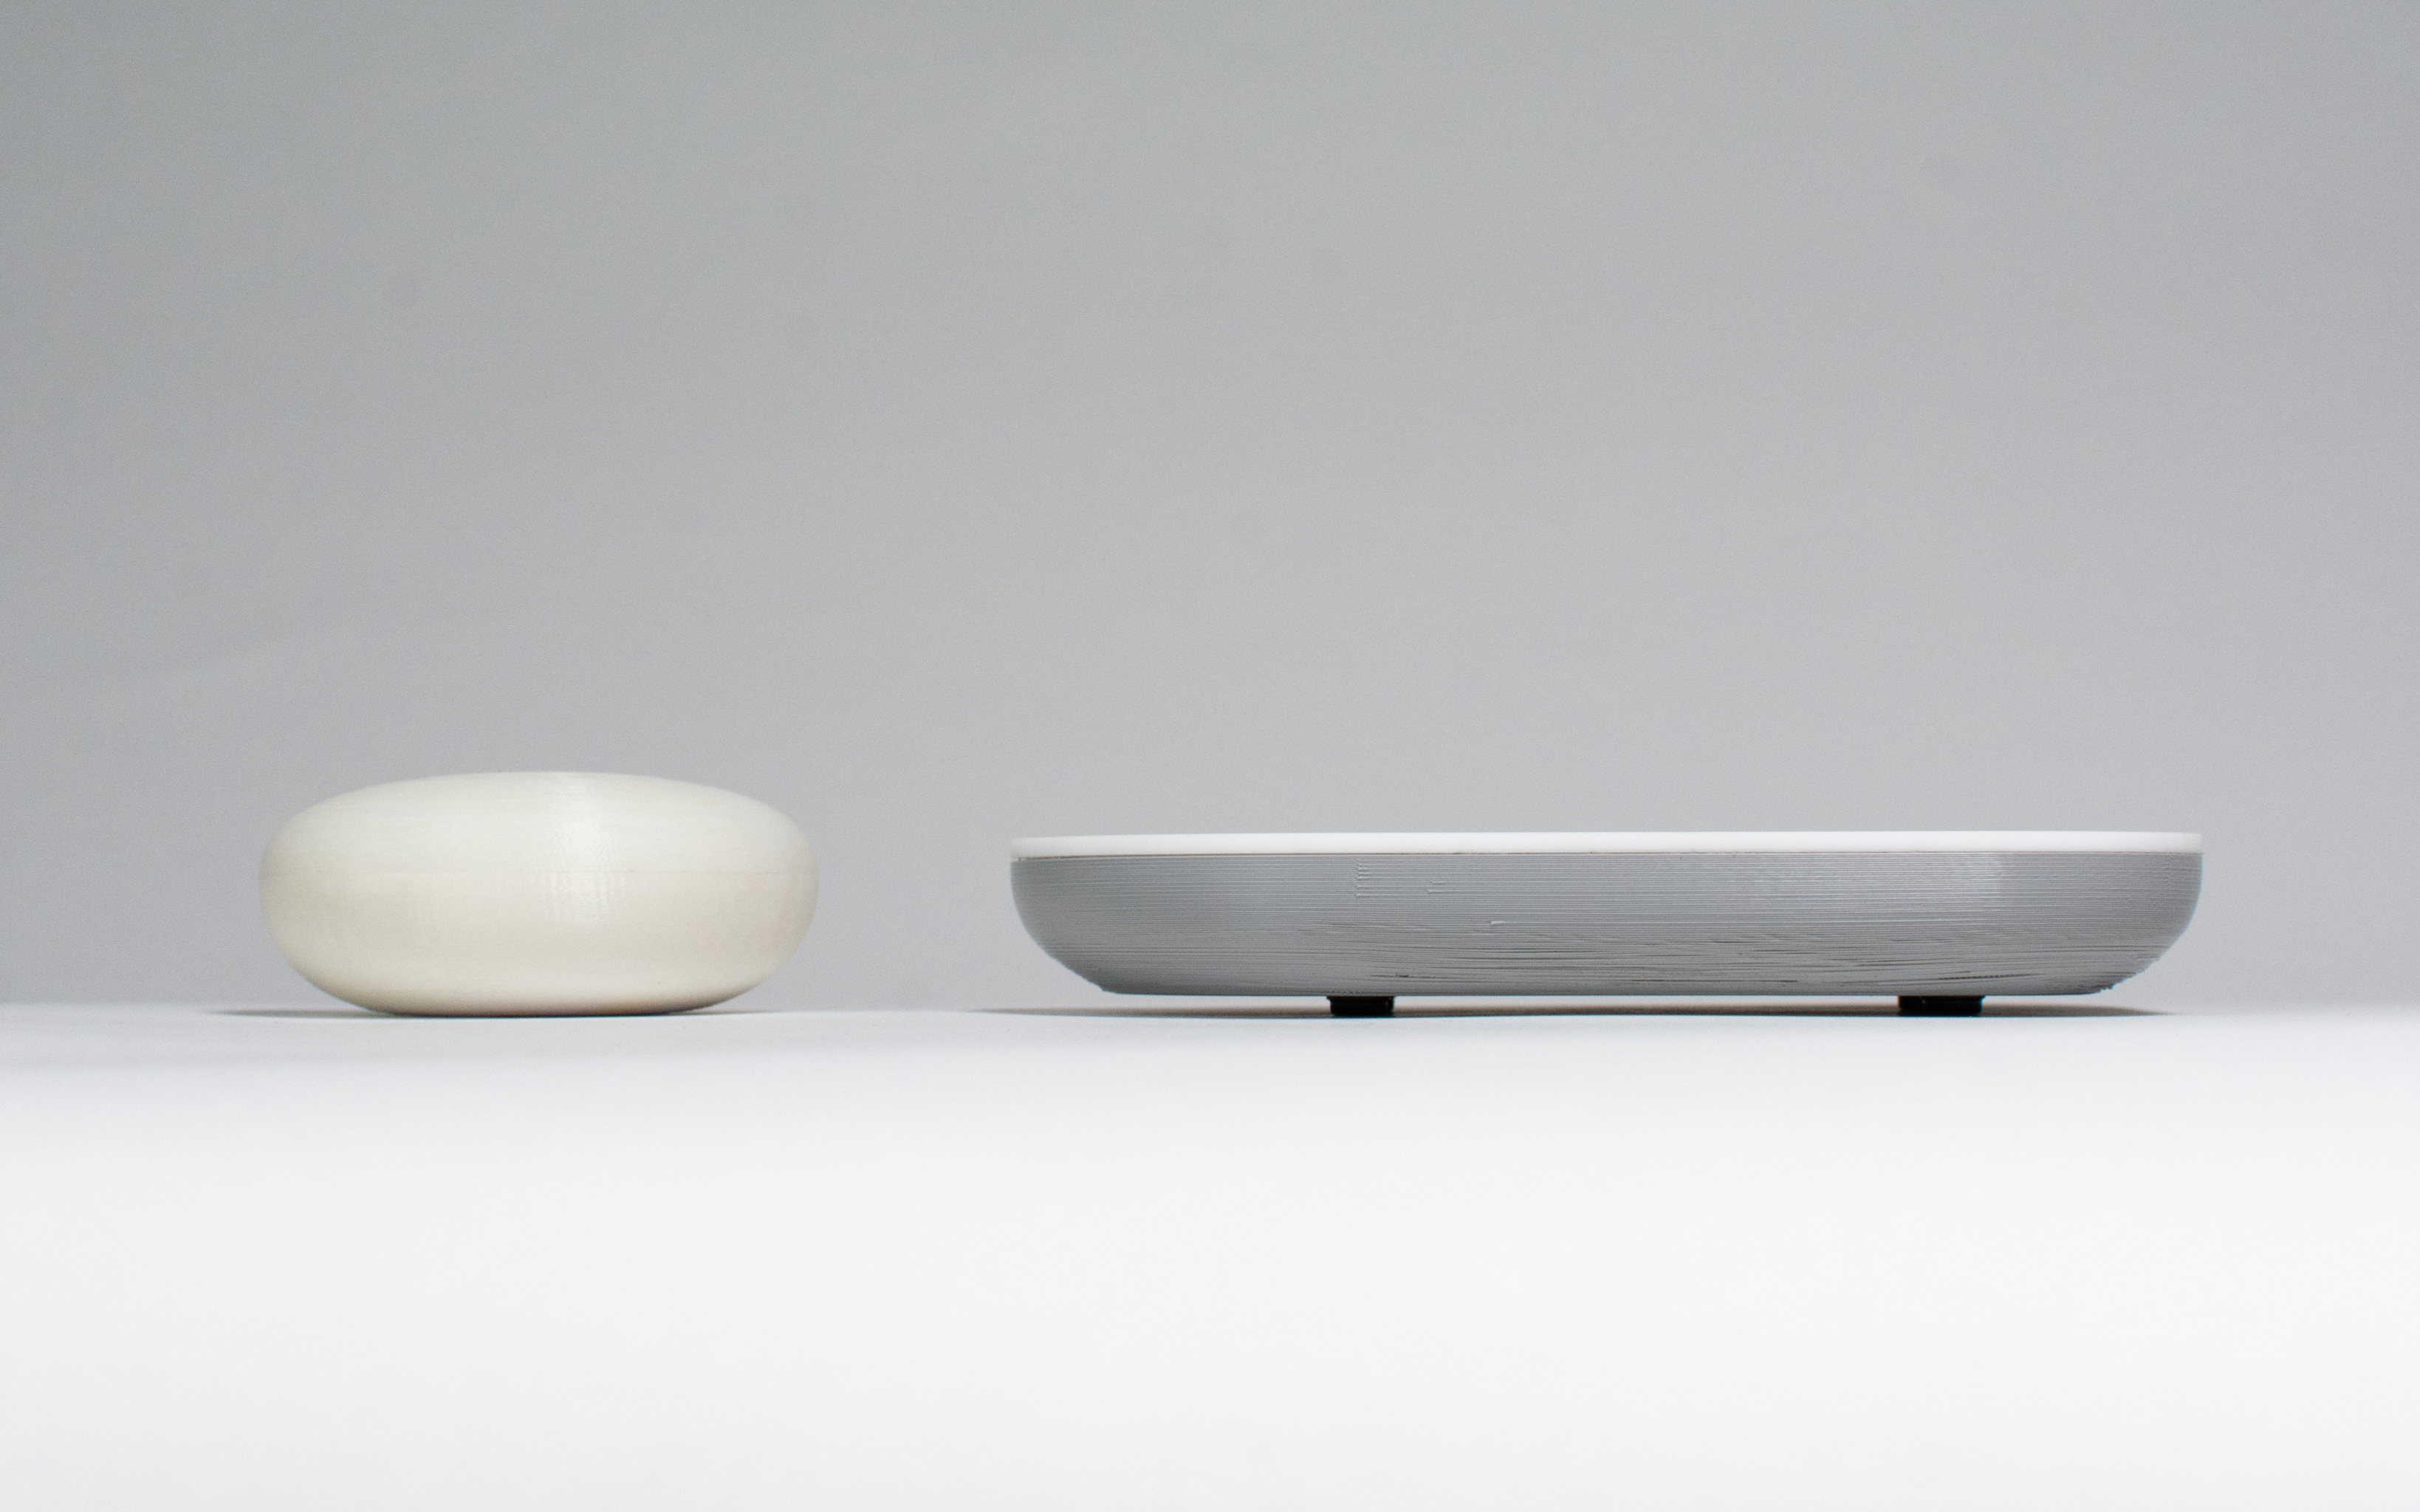
The puck measures about an inch and a half in height, meaning that the many parts inside had to be stacked and arranged carefully.
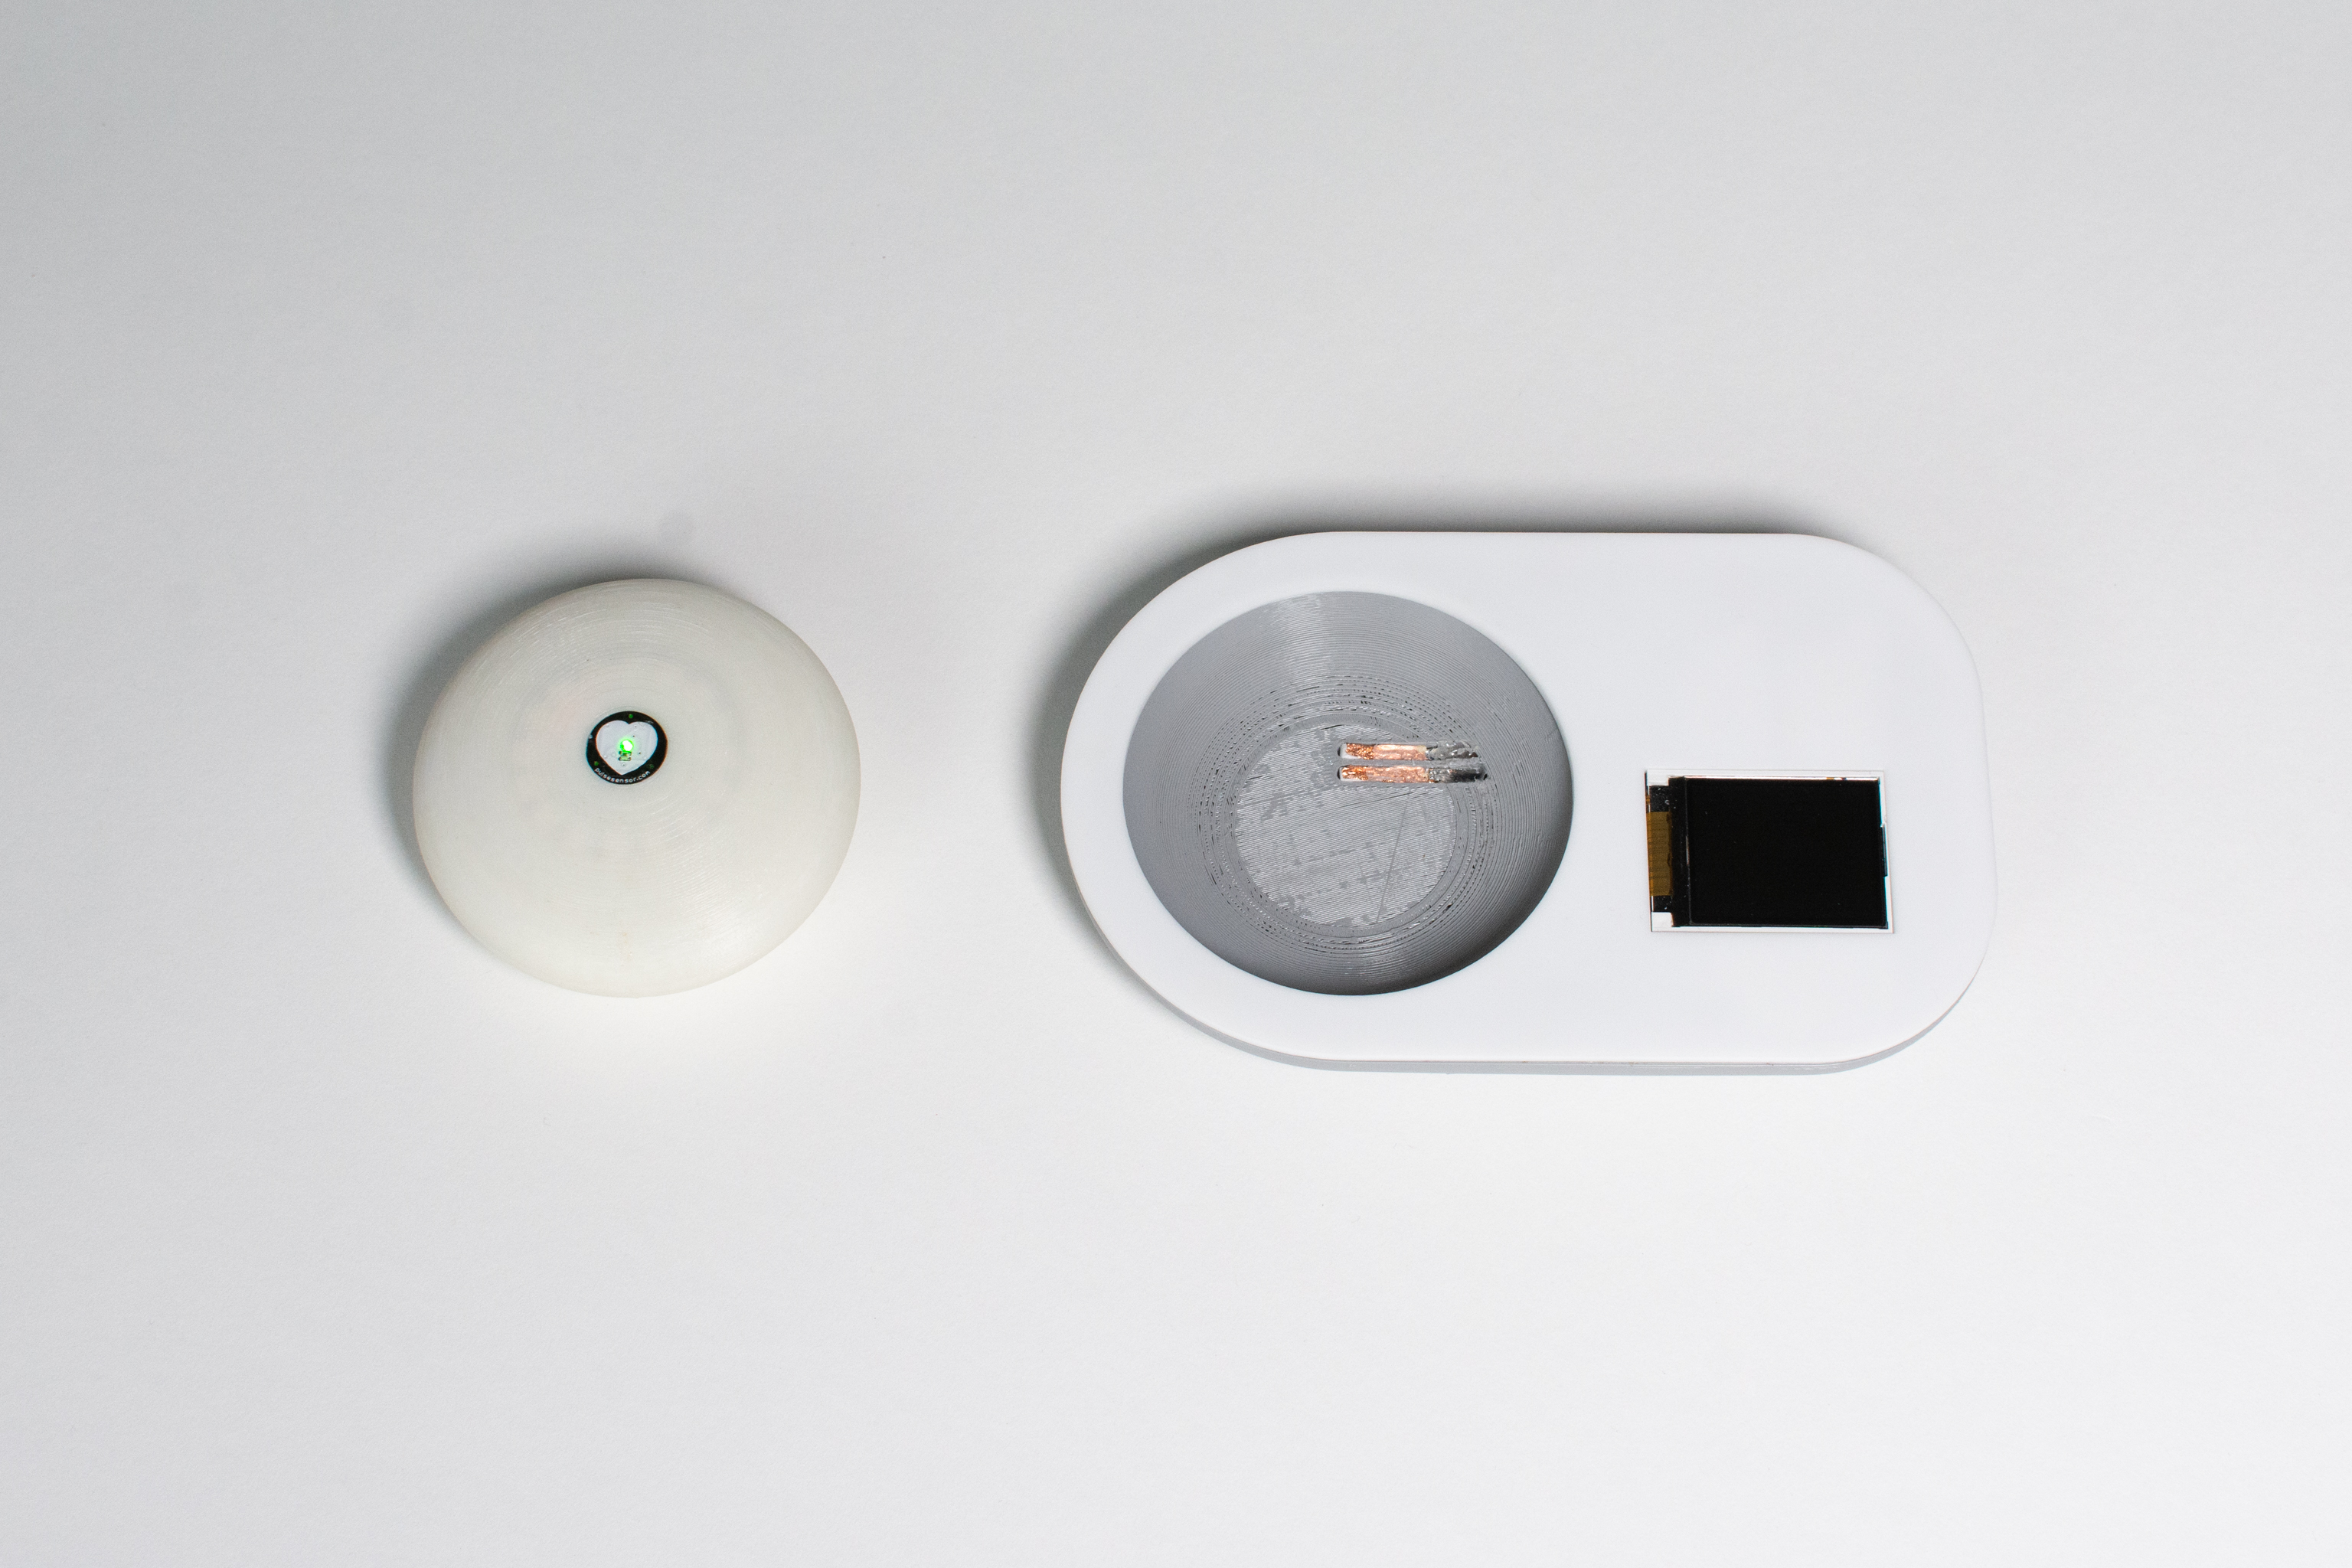
A pair of copper contacts on the dock provide omnidirectional charging to the battery inside the puck.
Two concentric rings surround the capacitive touch sensor. When Elinor returns home, she can simply drop the puck on the dock to start charging – no need to align contacts or plug in a cable.
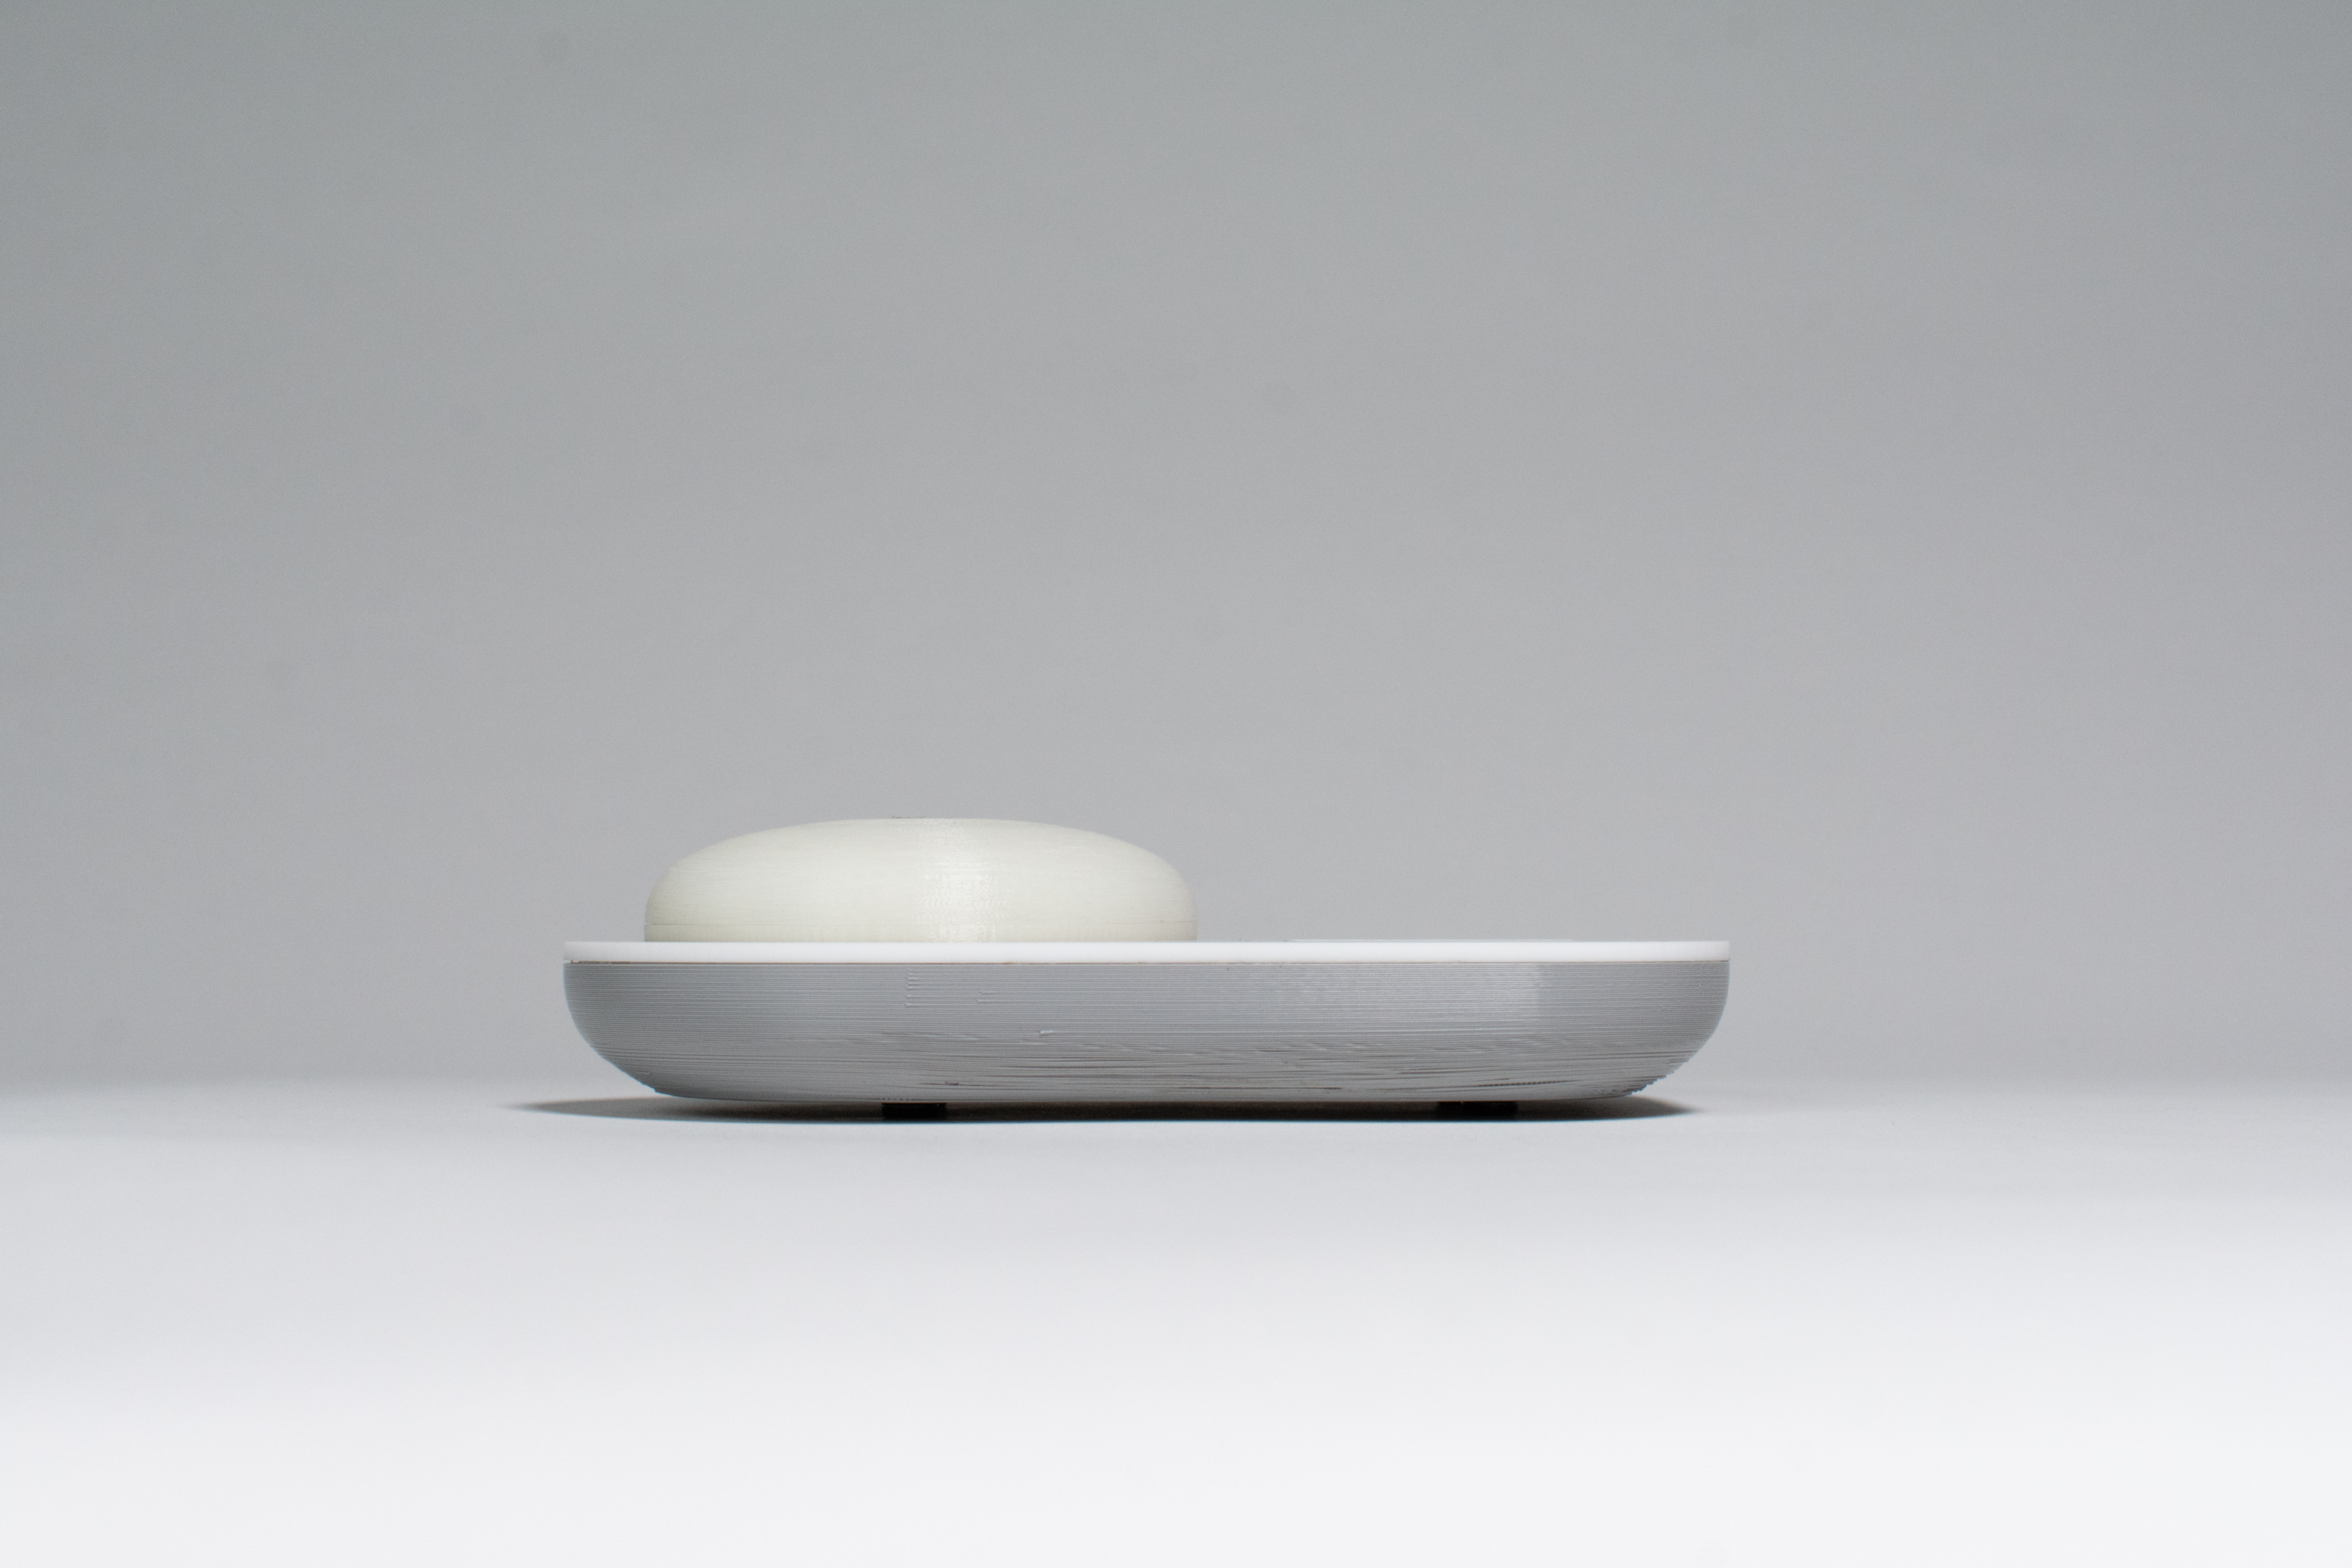
The puck charging on the dock.
Here’s how we imagine Elinor using our device:
Elinor wakes up in the morning and opens her calendar app on her phone to familiarise herself with the agenda for the day. The first thing she needs to do is drop her daughter off at school. Before leaving, she takes her mindfulness device with her and drops it in her bag.
After dropping her daughter off, she goes straight to a meeting and then to the grocery store. By the time she finishes grocery shopping, Elinor is feeling exhausted and has 5 minutes to spare before she needs to go back home. She takes out her mindfulness device and completes some deep breathing for 2 minutes while playing calming music on her meditative playlist, and feels so much more relaxed than she did before. She’s ready to go back home and tackle the rest of her day!
When she gets home, she decides she wants to do a few more breathing exercises. She sits at her desk where the dock for her mindfulness device is, and reads the instructions on the screen for 5 more minutes. Before going to sleep, she drops her mindfulness device in the dock that stays on her desk and it starts charging so it’s ready for her to use tomorrow.
When Elinor drops the puck onto the dock to charge, the display welcome her home and guides her through an optional meditation exercise.
How We Got Here
On the day of our final presentation and critique, we were really proud of how everything came together into a working device. Our last prototype is miles away from how our first prototype looked, and incorporated feedback from Elinor regarding features she wanted to see in our device as well as how she wanted it to look and feel.
Starting to work on what our device would look like
The first 3D print of a solid puck shape. We tested out the size of this one before moving on
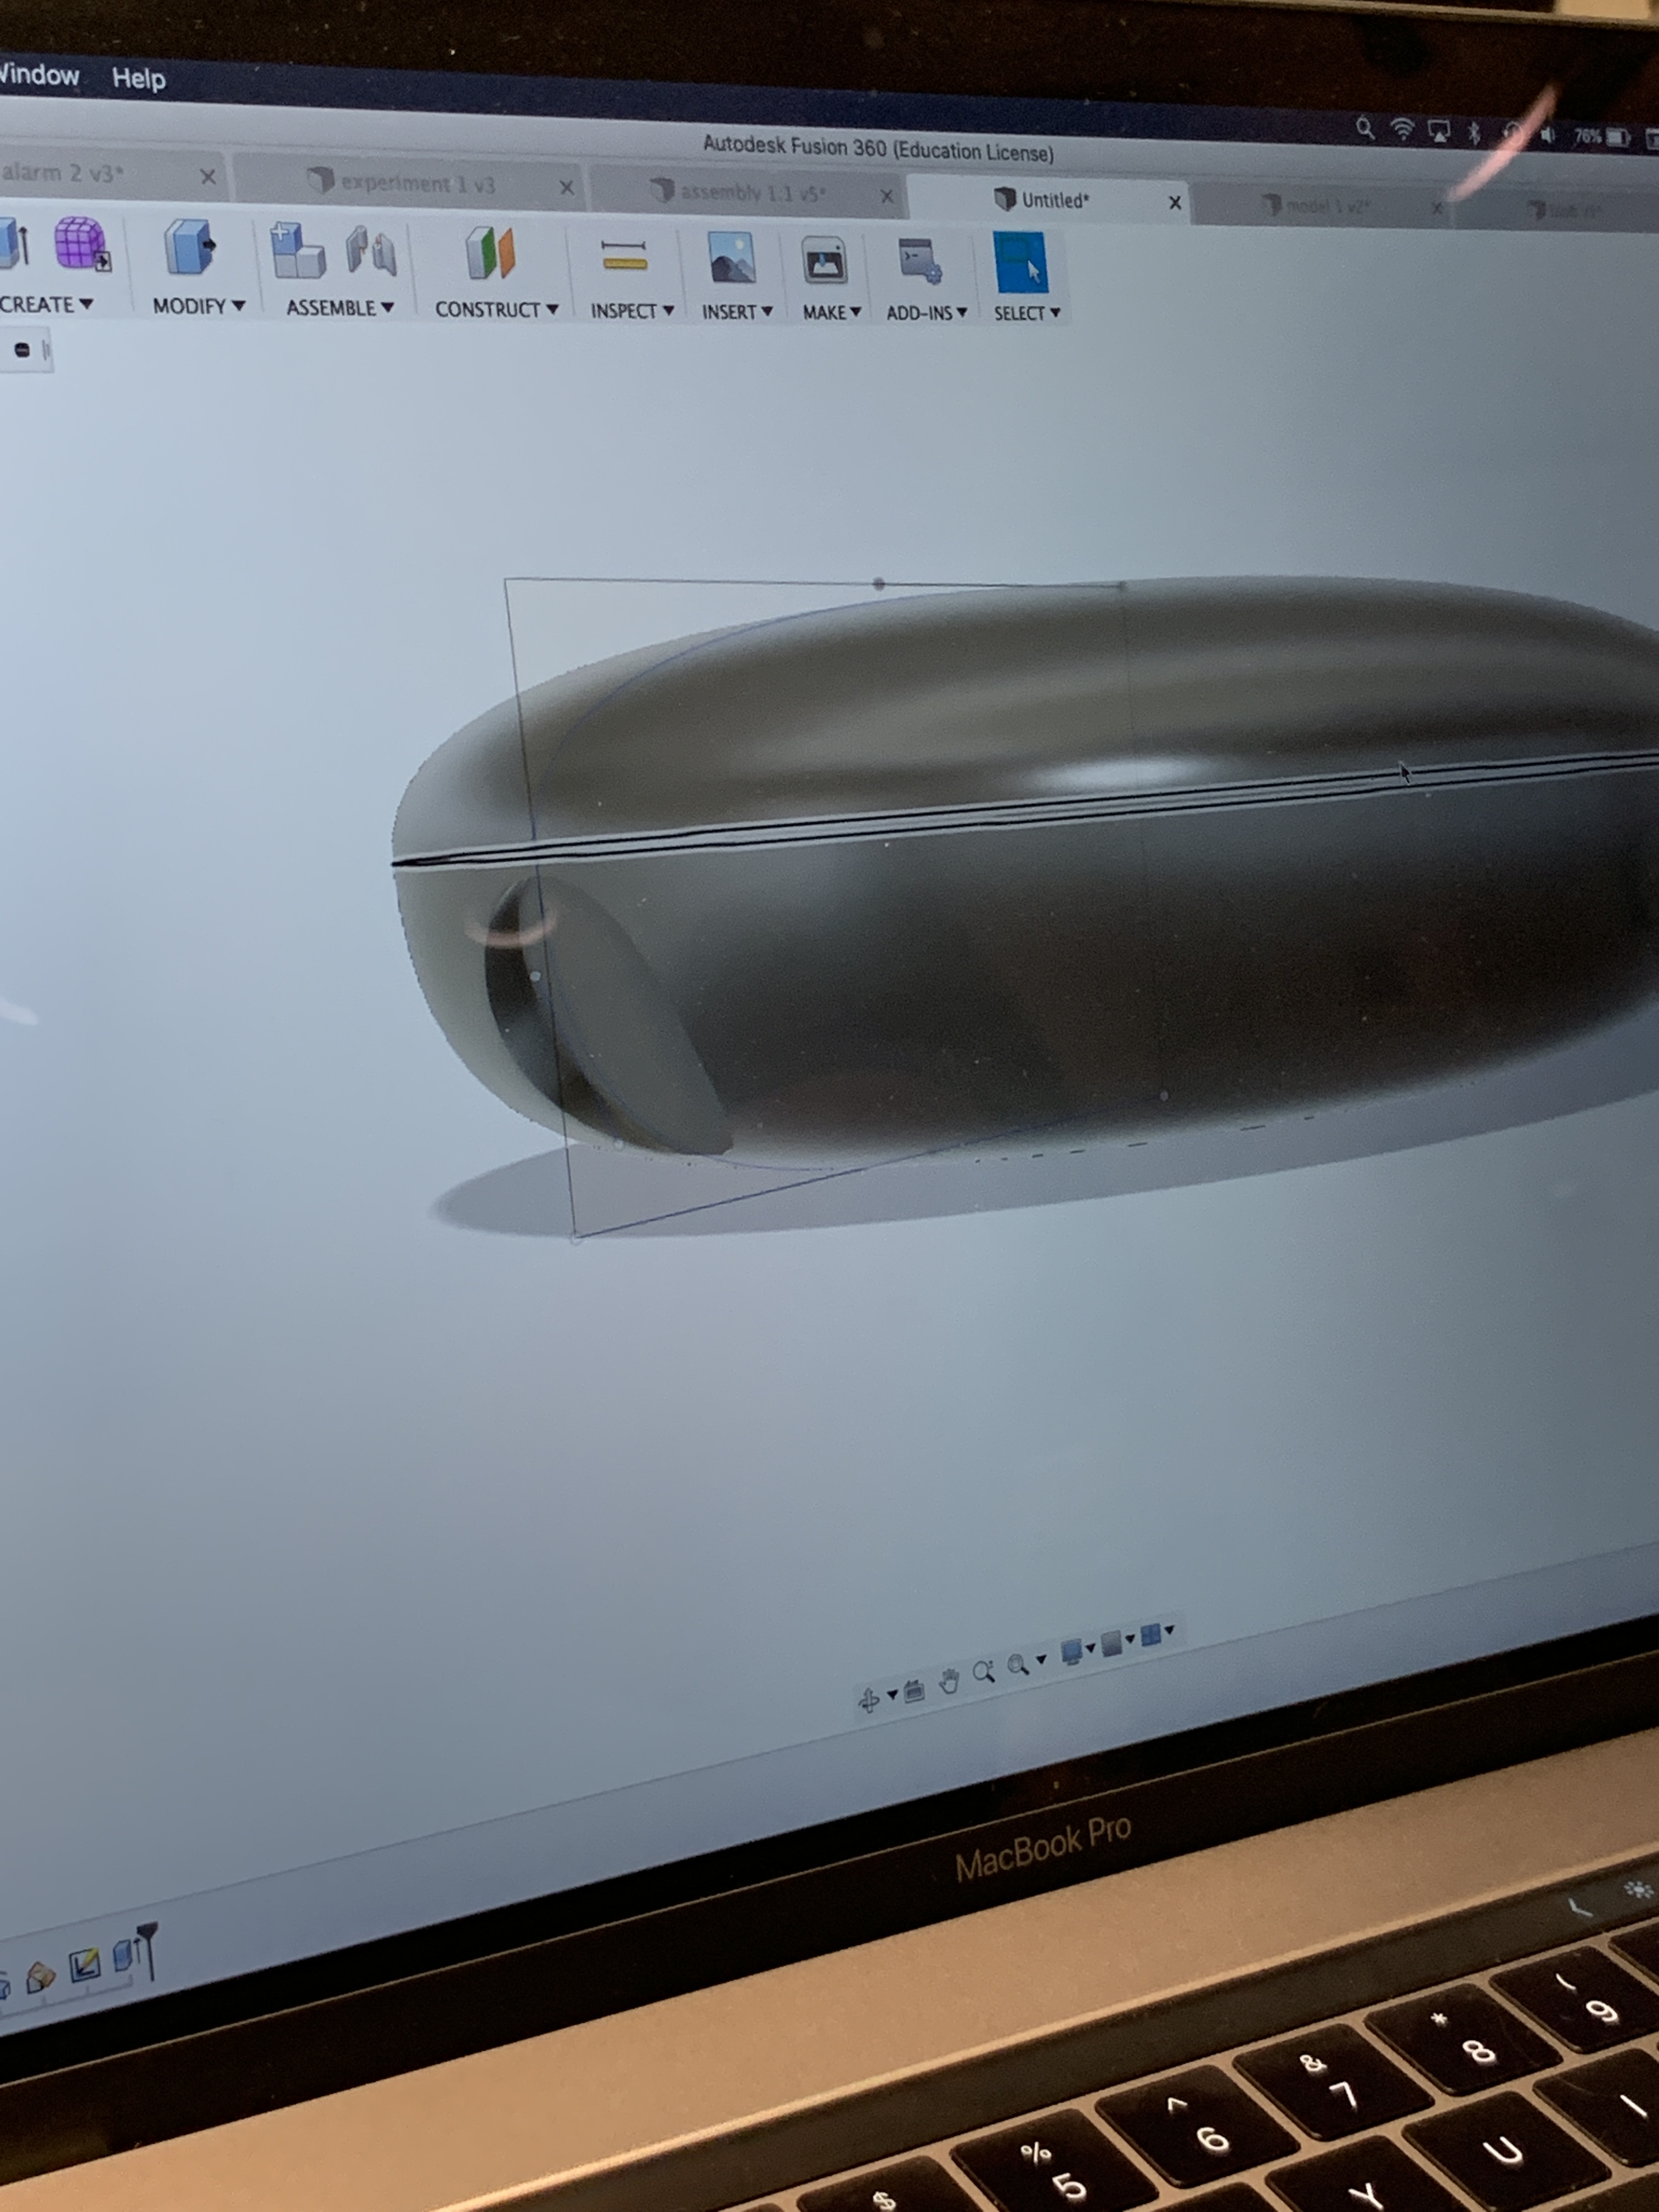
One of our first considerations was the form factor of our portable device. Since Elinor will be using this device to help her through meditative exercises and to relax, it was important that the device itself evoked a sense of calmness. We were inspired by shapes like worry stones and organic forms such as a Google home that Elinor could easily hold in one hand while she uses it. We went through several different iterations of the form, starting with a compact puck looking shape and tested out the shape and size with Elinor before landing on the final form.
After testing with elinor’s hand, we landed on a size and also measured out our components to make sure everything fit inside
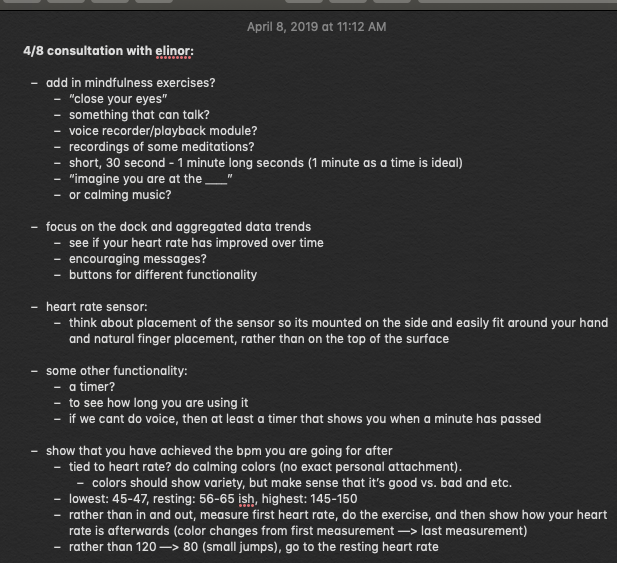
Notes from our consultation with Elinor after our first prototype
Elinor also provided a lot of inspiration for what types of features she wanted to see in our device. In the beginning, we intended on having an LED ring to visualise her heart rate through pulsing as well as a vibrating motor to provide haptic feedback. After meetings however, we learned that Elinor was less interested in features such as haptic feedback and was more interested in actually learning breathing/meditation exercises, so we created a playlist with calming sounds and guided breathing exercises as a companion and also added in an LCD screen in the dock that would teach her exercises and worked on building the most functionality in regard to the LED ring– such as changing colors. The pulsing started out with only basic white LEDs that corresponded with her heart rate. Elinor told us that she would love to see a variety of colors and that she would prefer colors other than white, so we used a light purple color for the first 5 seconds of usage while a baseline rate is being set, blue during the actual minute of deep breathing, and green to indicate when a minute has passed and the heart rate sensor turns off. We considered what types of colors would be most calming– we started out having red as the indication that a minute has passed, but decided it was too harsh and changed to red.
The idea for a one-minute timer also came from Elinor, who did not previously meditate or complete any type of breathing exercises during her lifestyle. She also did not want 5 or 10 minute long cycles because those are harder to fit into her schedule. As we hope our device can act as a sort of gateway into bringing more relaxation into her life, each breathing cycle is set at one minute at a time so that it’s something quick that can be done even while she is in her car.
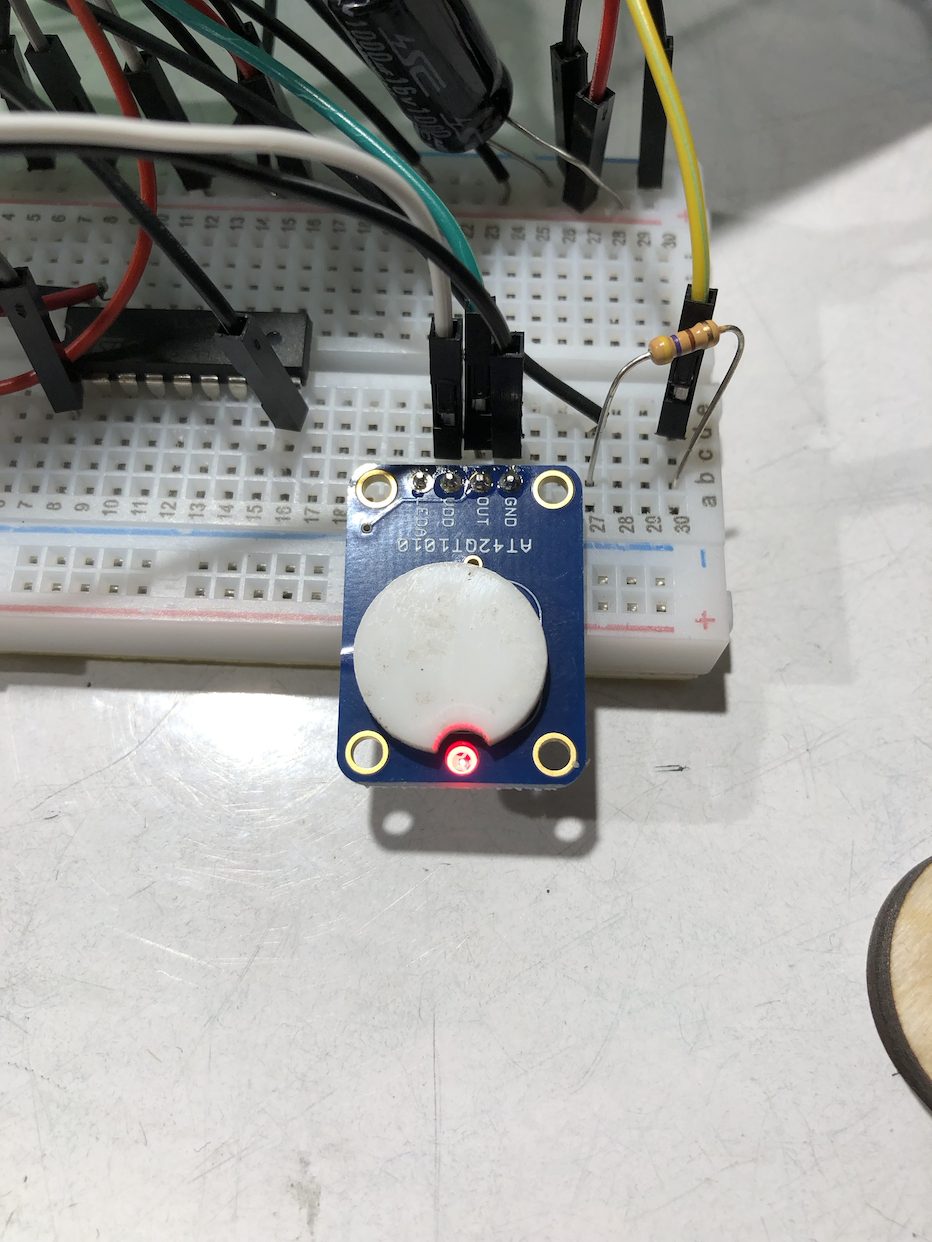
We ran into many challenges along the way in regards to the electronic component of building our device. The heart rate sensor that was available to check out in our lab was a really finicky part and often displayed strange (too high or too low) heart rate readings when we used it (more details about the problems we ran into can be read here). We thought about going a different route and pivoting to use a different part or tackle the issue of mindfulness in a different way but ultimately decided to stick with it and order a new heart rate sensor that would hopefully work better. Fortunately, the new part that we ordered behaved much more normally and although far from medical grade, displayed normal and pretty accurate heart rate readings when compared with an apple watch.
Another issue we ran into was with the wireless data transmission. Initially, one of the features that we wanted to have was wireless data transmission from Elinor’s portable device to the dock that stayed at home to display average BPM and average usage amounts over the course of a day and over the course of a week. We worked really hard on implementing this feature and was able to make it work in the beginning stages, but when we went to put all of the parts together, we discovered that both devices needed to use the same specialised pin (the SPI pin) on the Arduino. We attempted to find workaround solutions and followed tutorials that had the same problem but ultimately was not able to fix the issue and decided to devote the rest of our time to making all of the other components of our final product work properly and look great.
We added in a capacitative sensor that will turn on and off the device so that the heart rate sensor is not constantly measuring
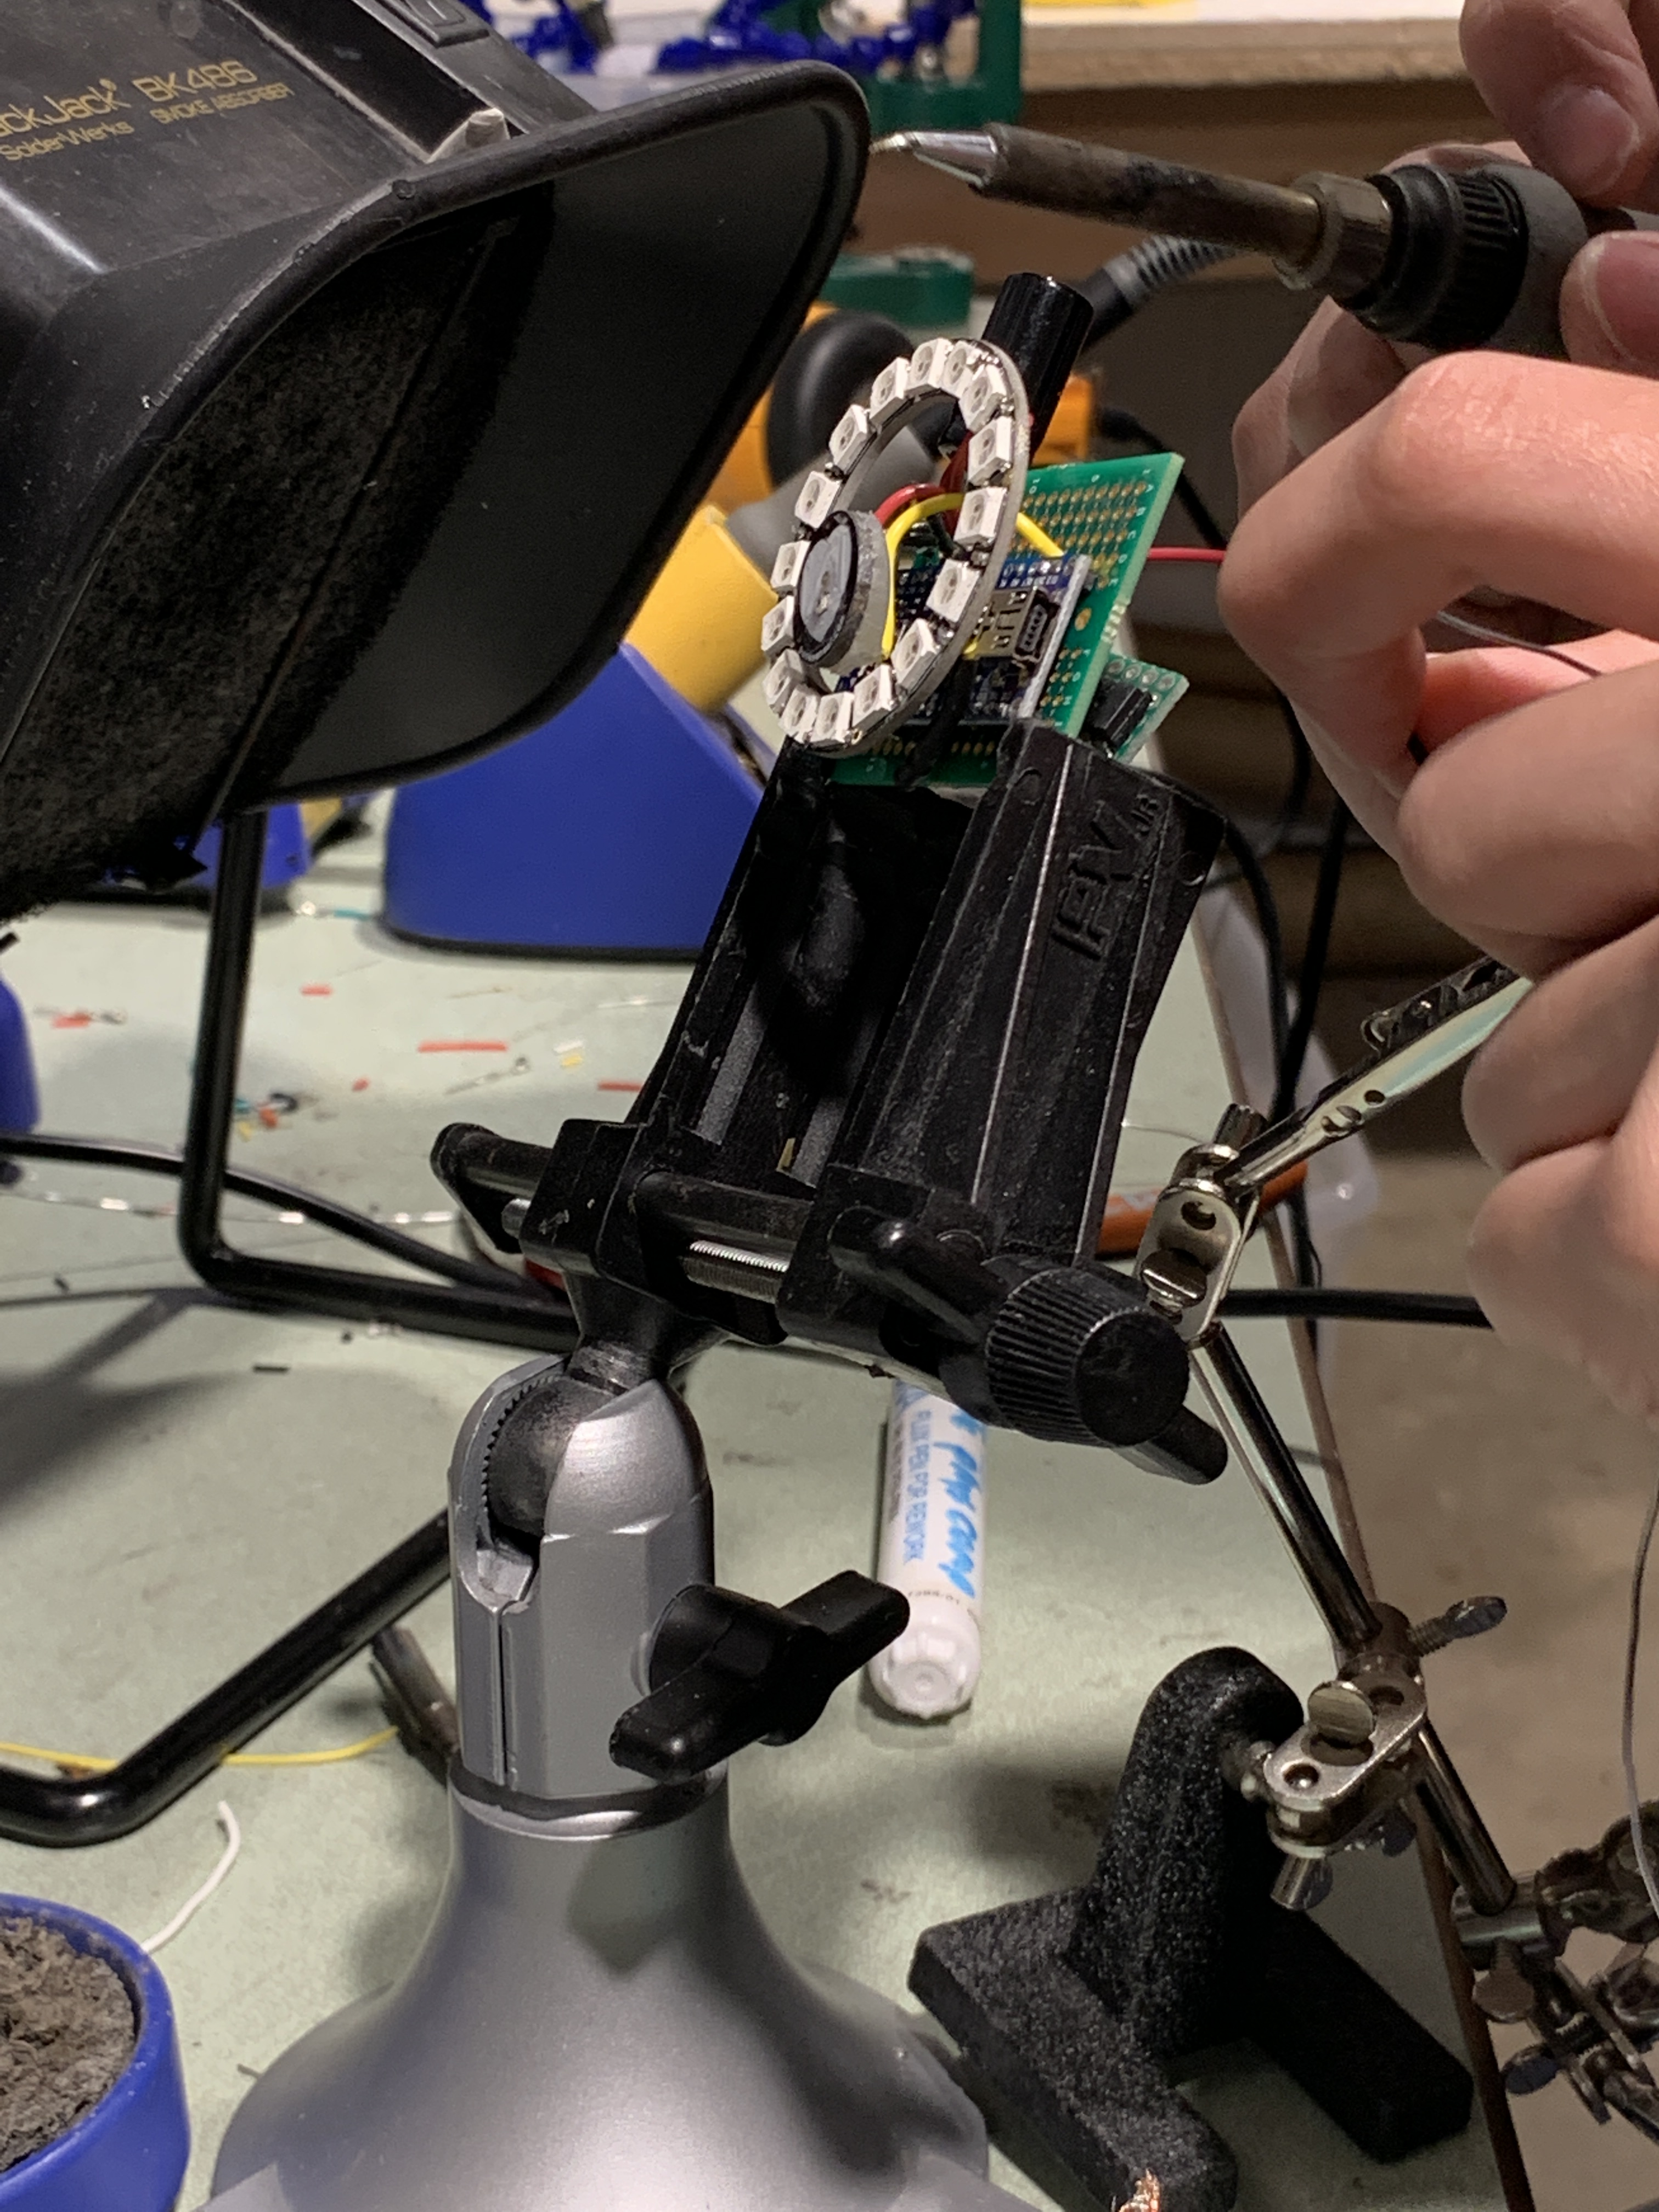
Soldering all of our components together to make them fit into our shell
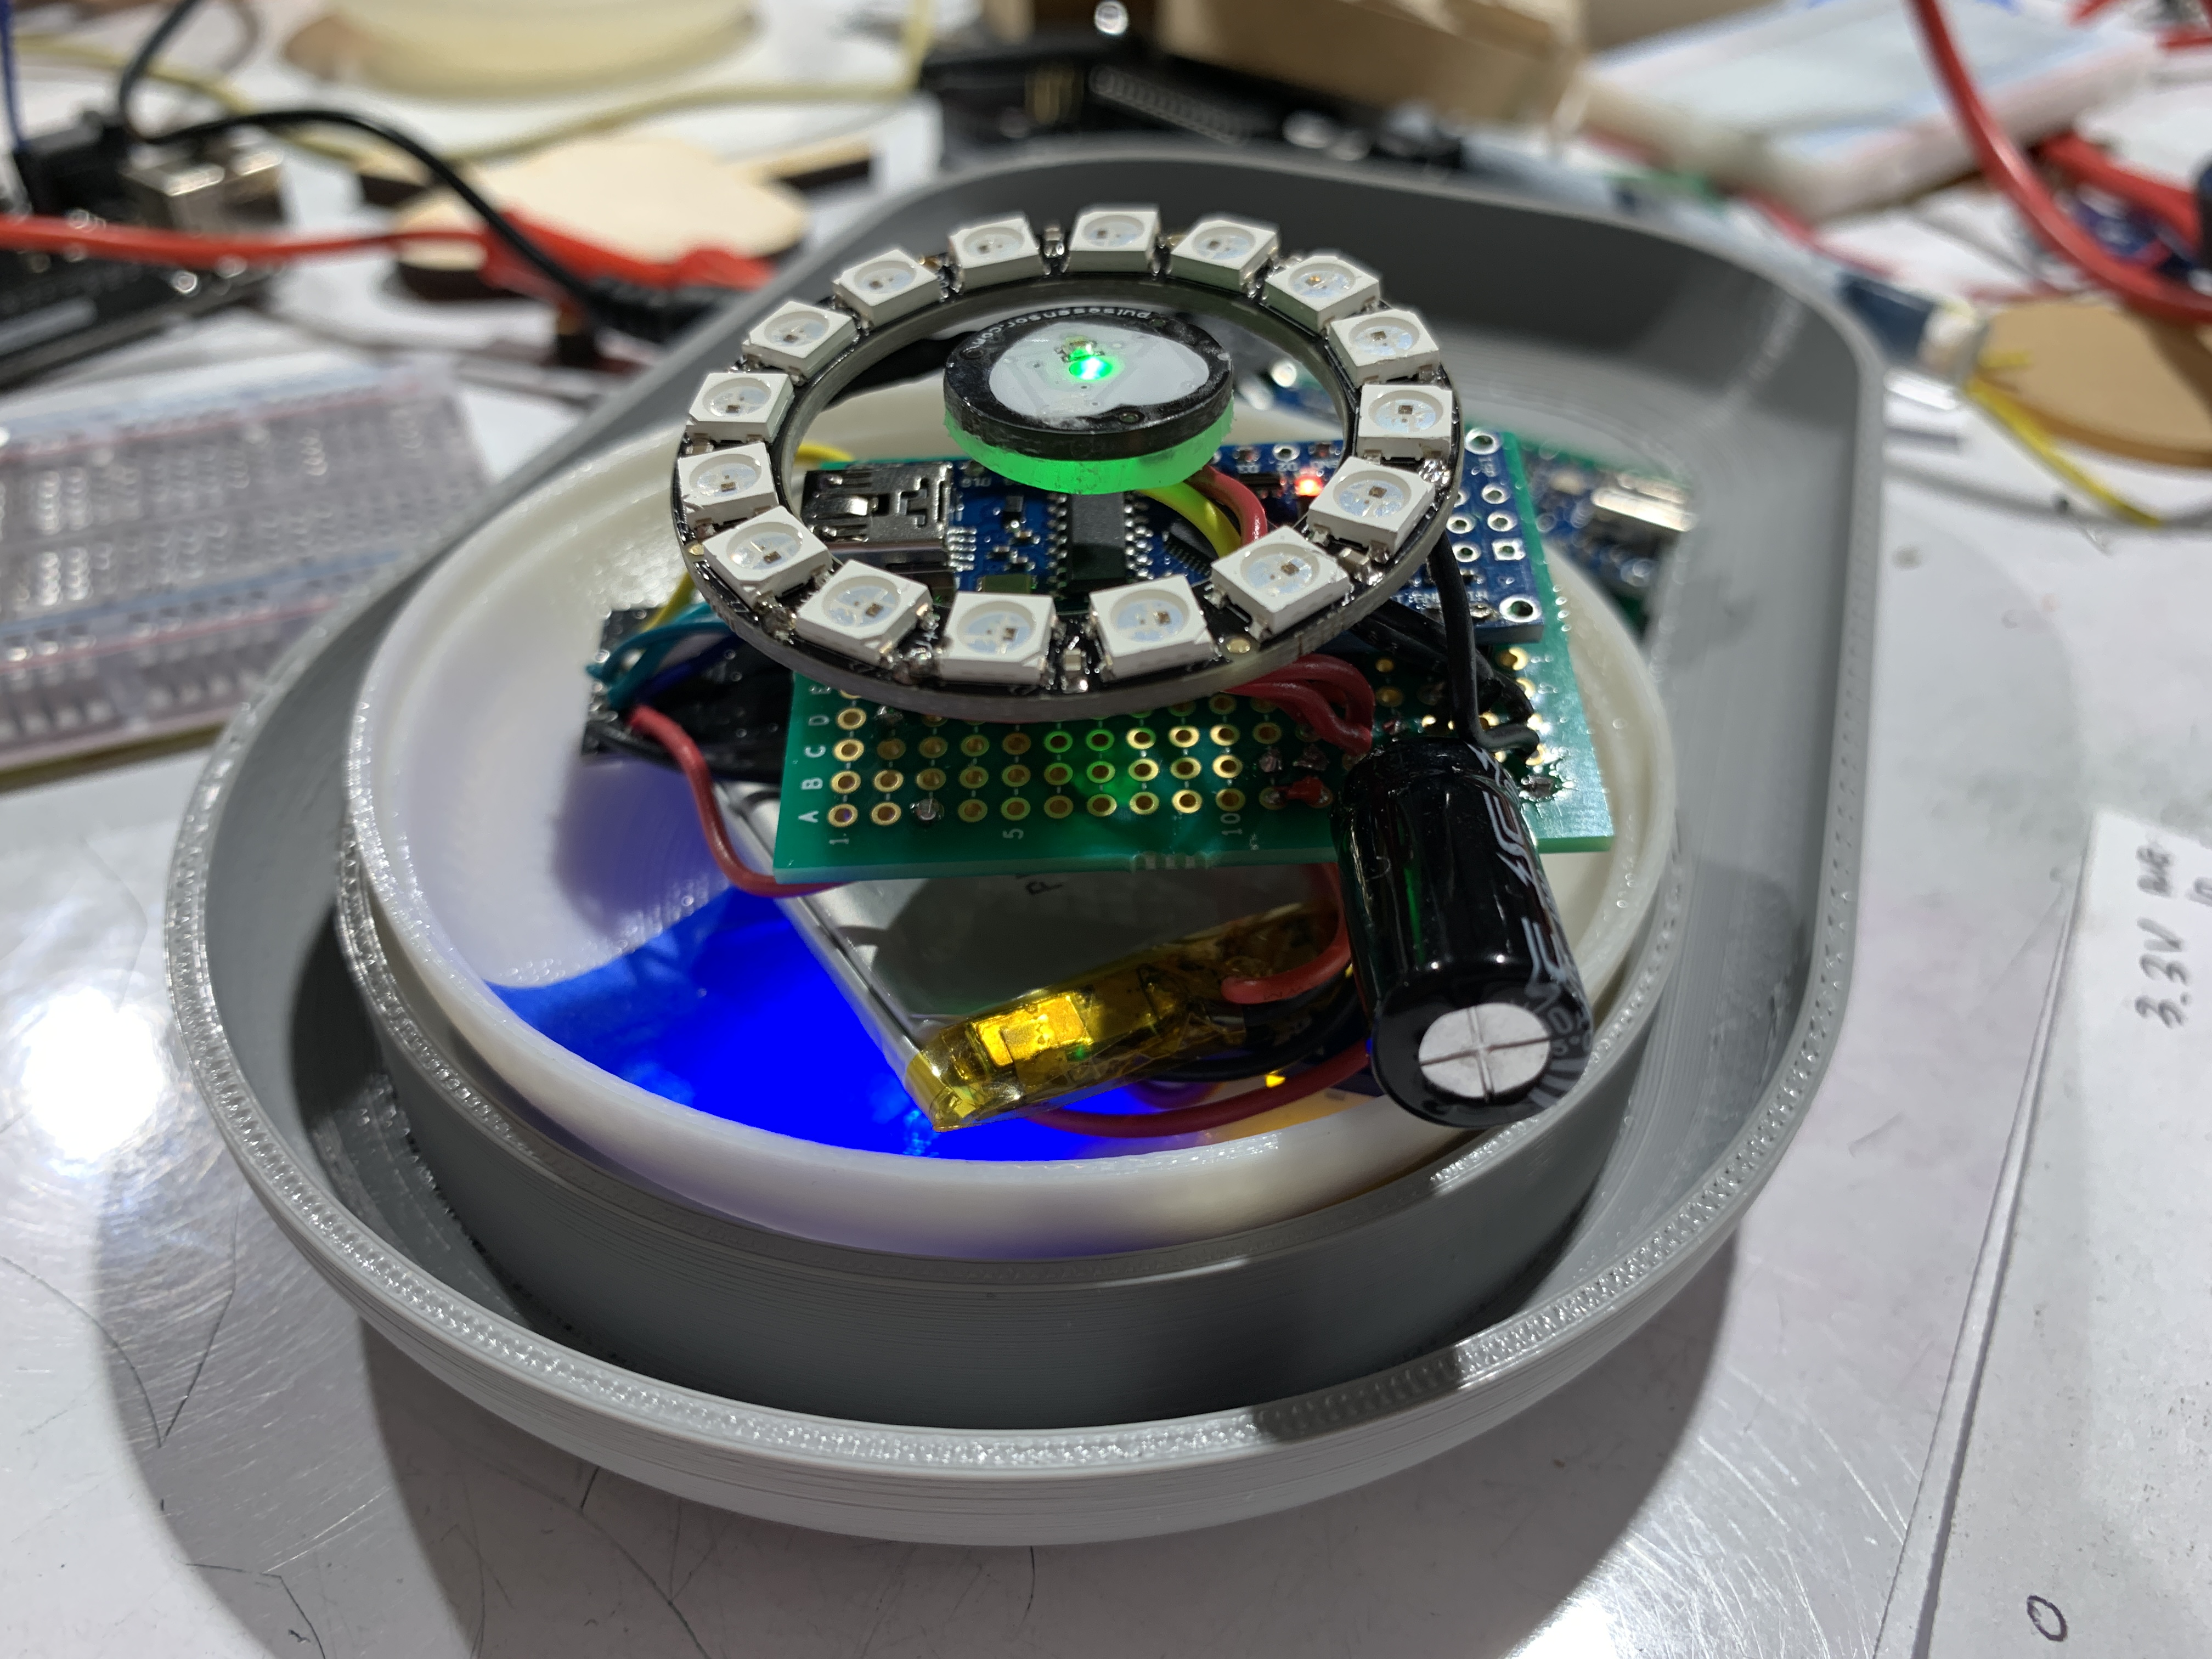
Making sure everything fits inside!
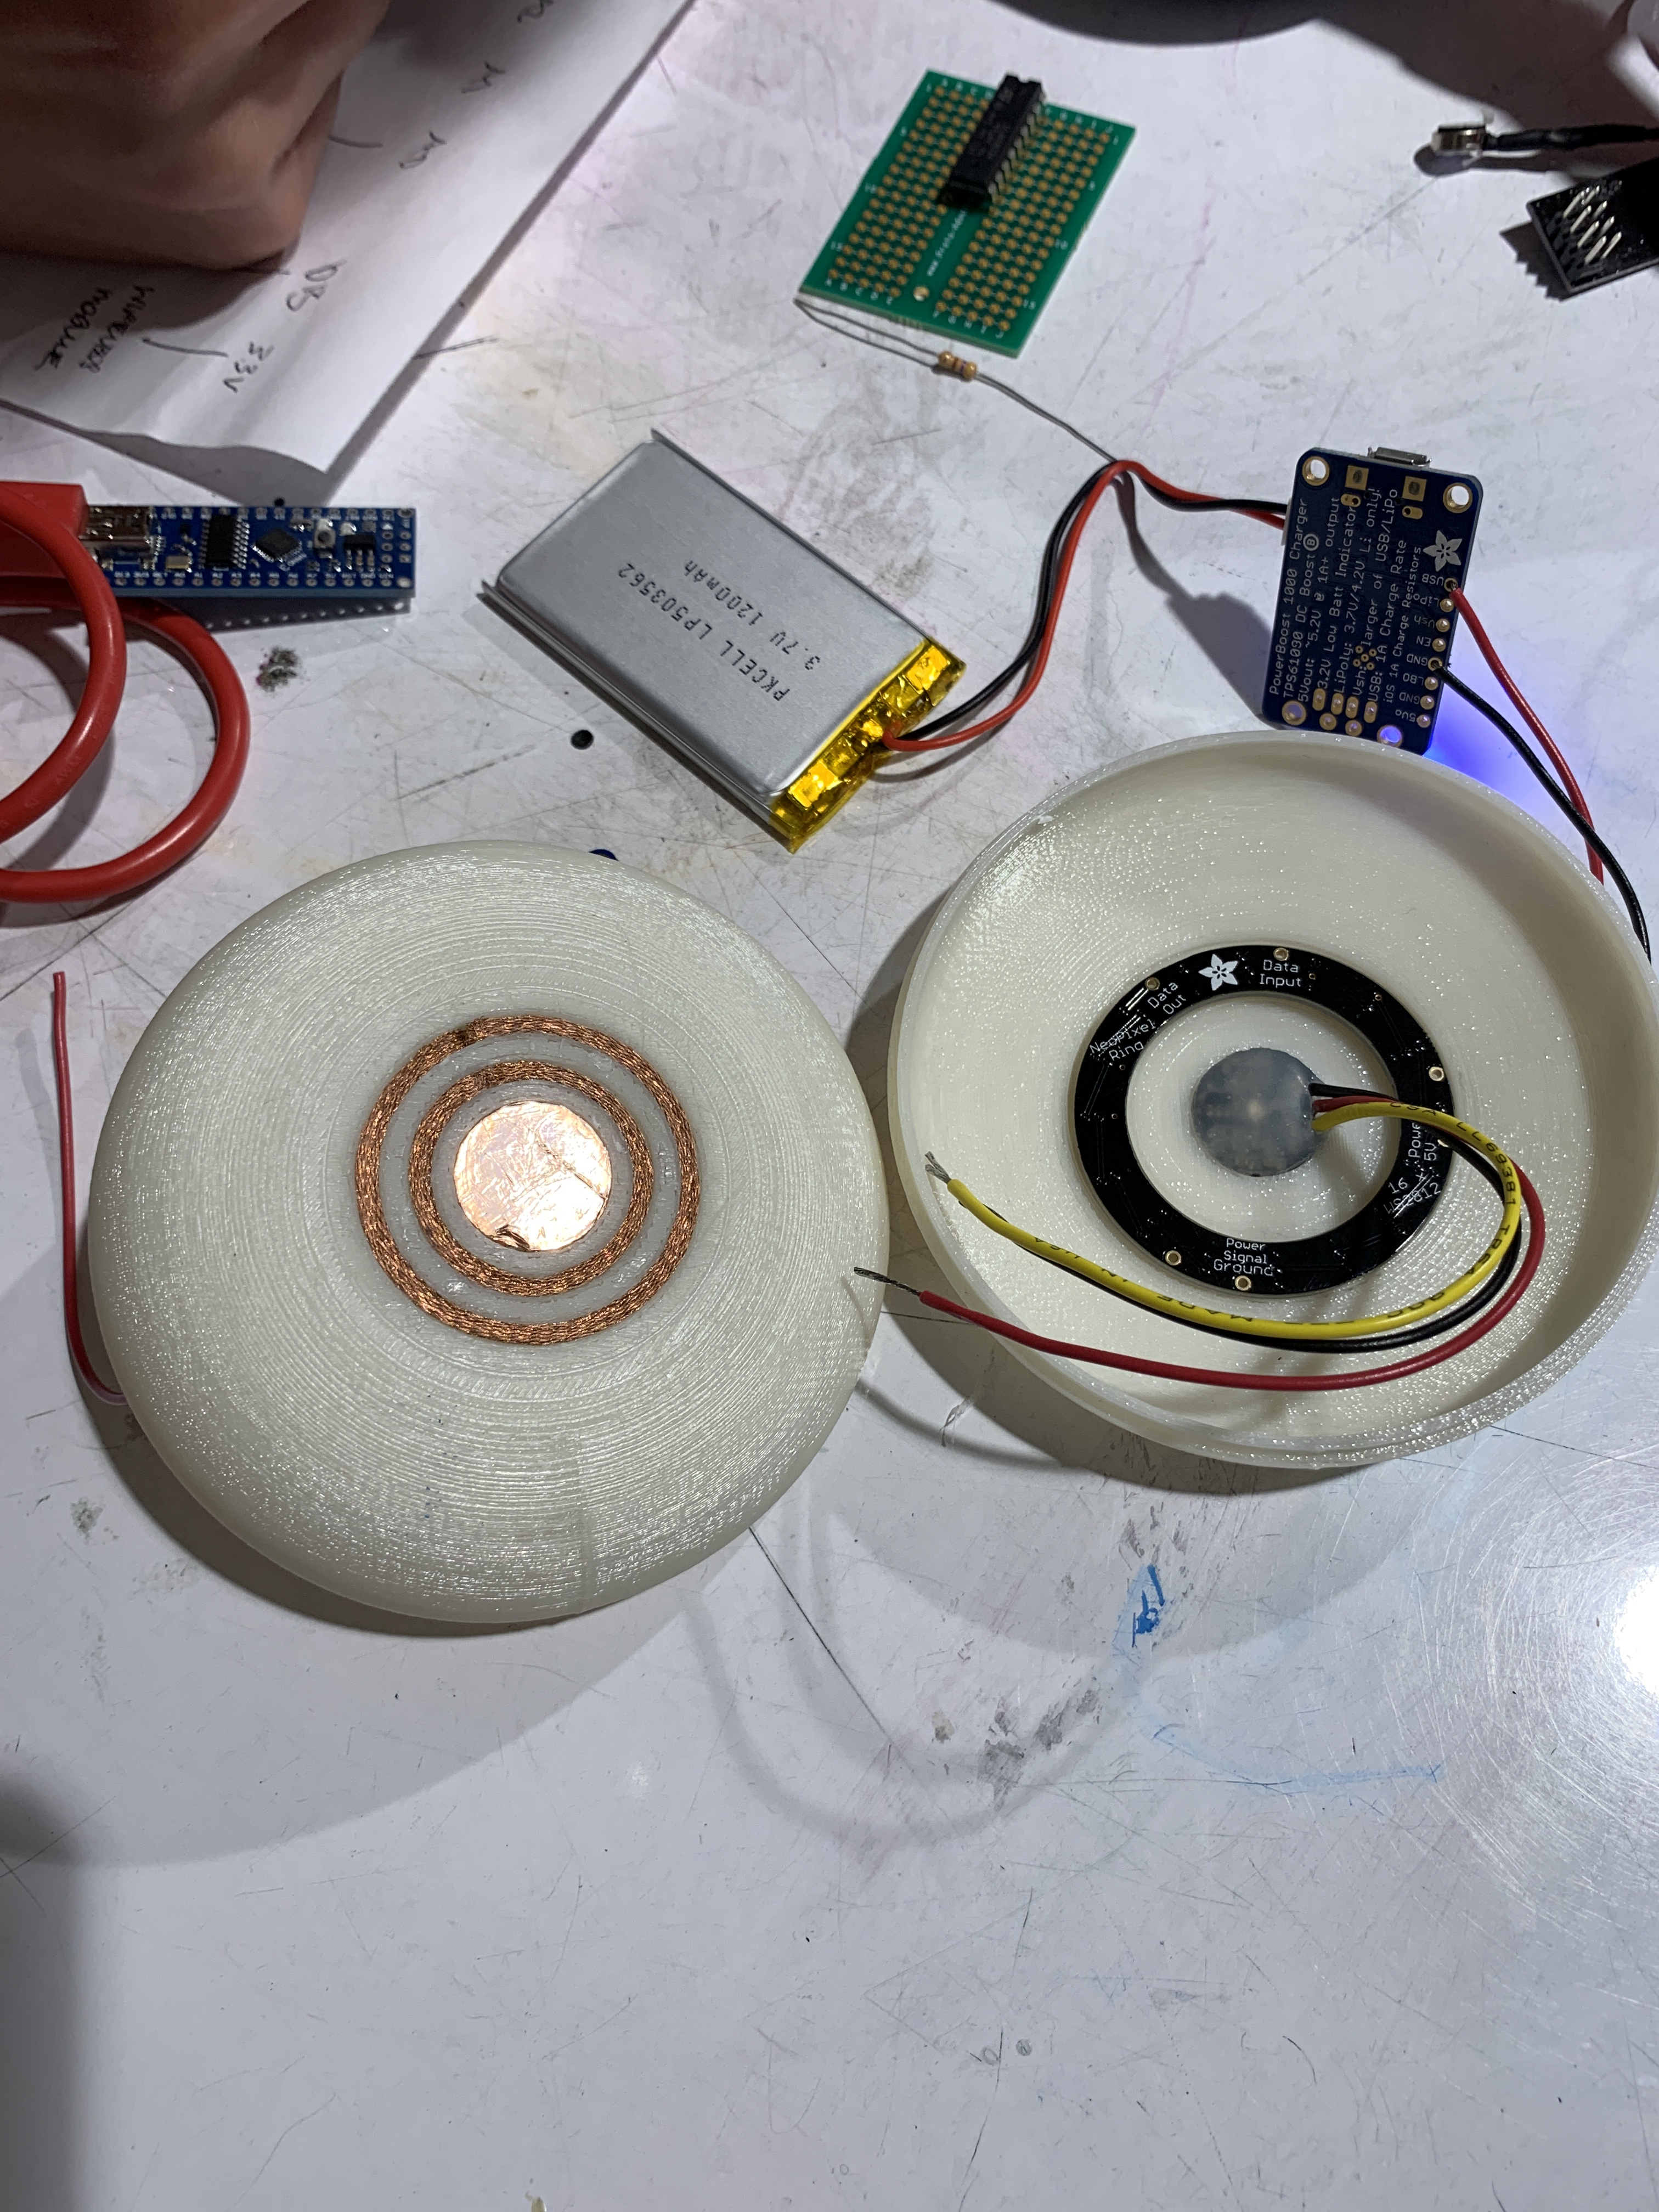
Working on the contacts to make sure the rechargeable battery works

Working hard to debug and work with the mess of components on the 11th hour!
As most long-term projects go, we were initially able to stick to our schedule and plan as we worked individually on software and hardware. However, as we got closer to final critique day, we realised that fabrication and assembly of our products took much, much longer than we expected. The night before the critique we worked tirelessly to debug, solder, and assemble everything into a functioning beautiful device! The issues that we mentioned were by far our biggest problems but we wanted to make sure to deliver Elinor something that she would really appreciate.
Conclusions and Lessons Learned
At the critique, the positive feedback was largely directed at the form factor of the device and how polished it looked– “The design of the device is lovely. It looks very touchable and smooth.” “Nice design and good calming indicator.” We were really happy that visitors who came by and interacted with our device seemed to feel a sense of calmness from the device itself, which is what we had really hoped and intended for.
Recurring feedback that we received mostly revolved around if Elinor would actually use our device, and the necessity of it– “It depends on the user to create a habit.” “Doesn’t seem to solve a large problem.” Some future features we would want to add to address this sort of feedback would be to focus on data feedback between the portable device and the dock so that Elinor can take a look back at how many times she has used the device, and if her resting heart beat or average BPM has improved over the course of her usage. This would definitely be implemented in a second iteration of our project.
We also considered this “can’t she just use her phone?” factor throughout our design process, and made a conscious decision to keep our device as analog as possible. Elinor uses her digital phone, tablet, and watch very often and we wanted to create something more tactile and interactive that she can integrate into her daily life without feeling a huge sense of foreignness. The functionality exists on other devices, but the way that the features are presented is one of the most important parts.
In a future iteration, we would also definitely add more features for the portable component such as a different time length setting for the device so that Elinor can have 1, 3, 5, 10 minute settings. Some other, more physical features we would focus on if we had more time would be to refabricate the dock using a more sturdy print to make sure that it will stay on her desk without any issues or breakage.
Working with Elinor was a really unique experience that we had not been able to experience through a class or through any other project. At school we are constantly surrounded by like-minded people who often have similar life experiences. We had a great time visiting Elinor’s house and learning about the different perspectives that she has on life. This project also allowed for us to stretch our minds in terms of designing for her, since the prompt was really open-ended and let us work with an abstract problem like mindfulness.
We did feel a bit of a disadvantage as a two-person team, since one of us almost solely focused on software and the other on hardware. If we had one more person, we feel that we would have been able to add more functionality than we were able to, or spend even more time honing in on the form factor. Despite this, we are really proud of what we were able to create and learned a lot not just about electronics, but about working with people who are different from us! Watching Elinor use our device on final critique day was definitely the highlight of the project.
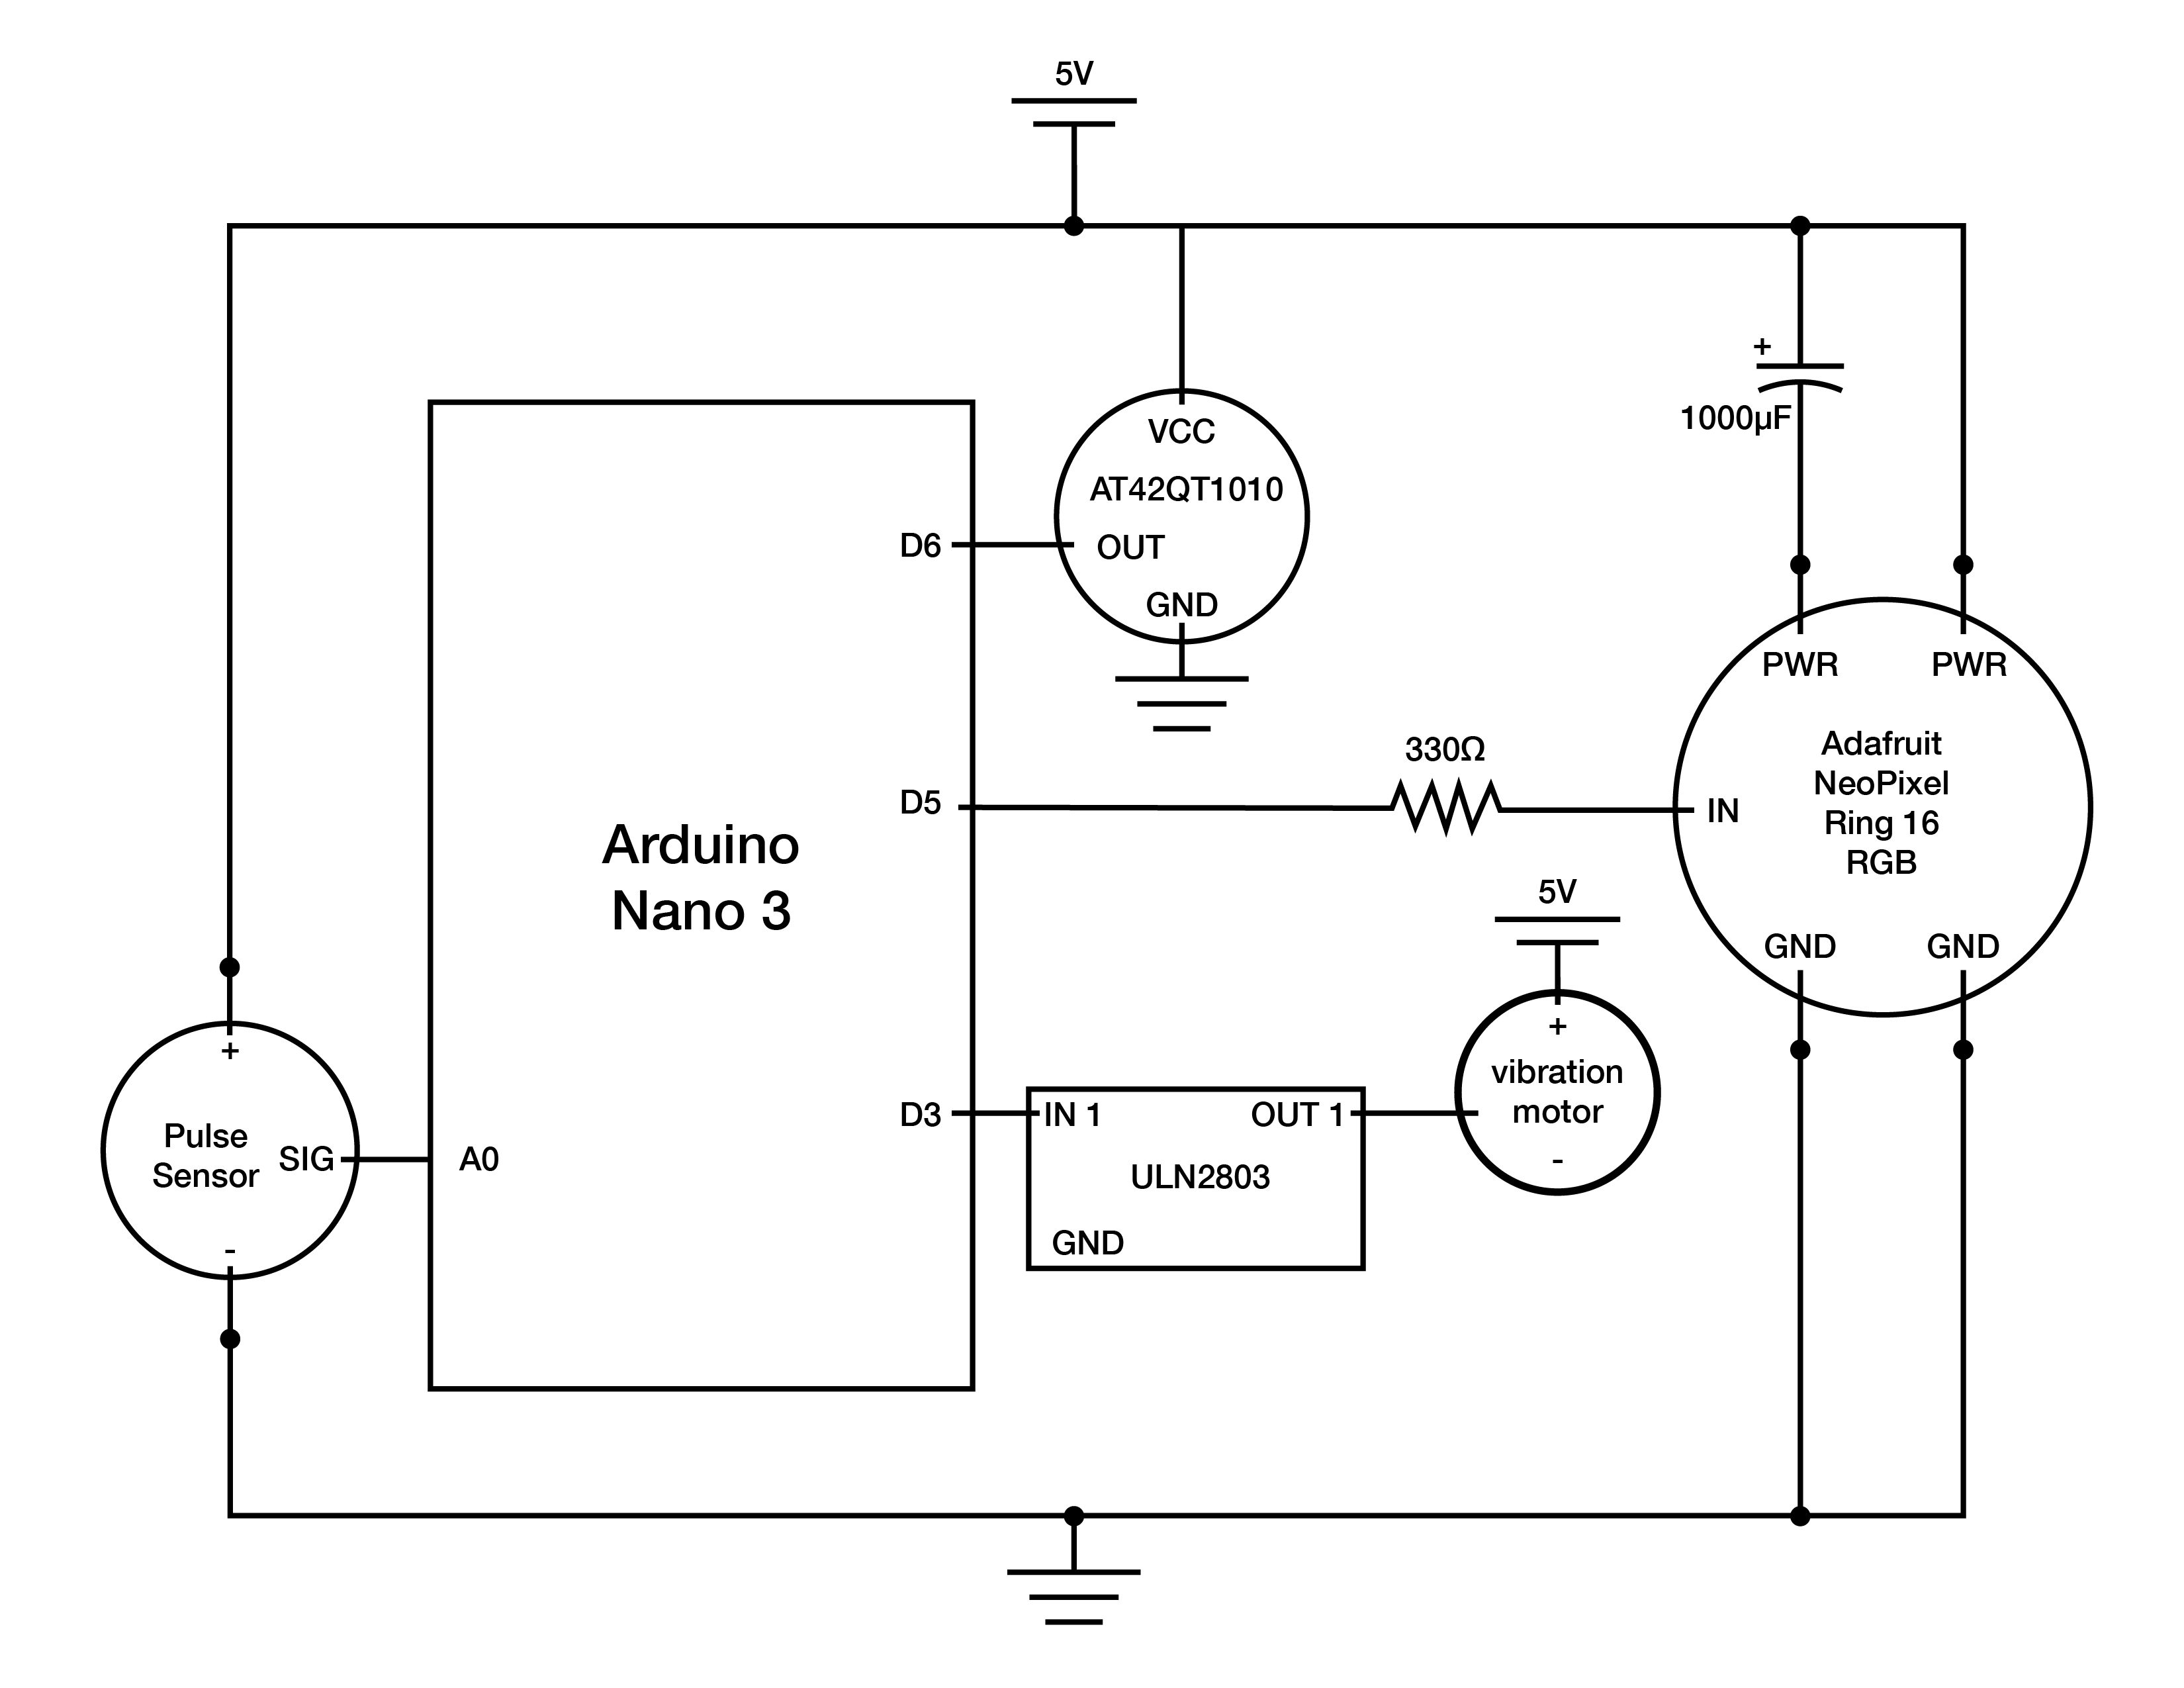
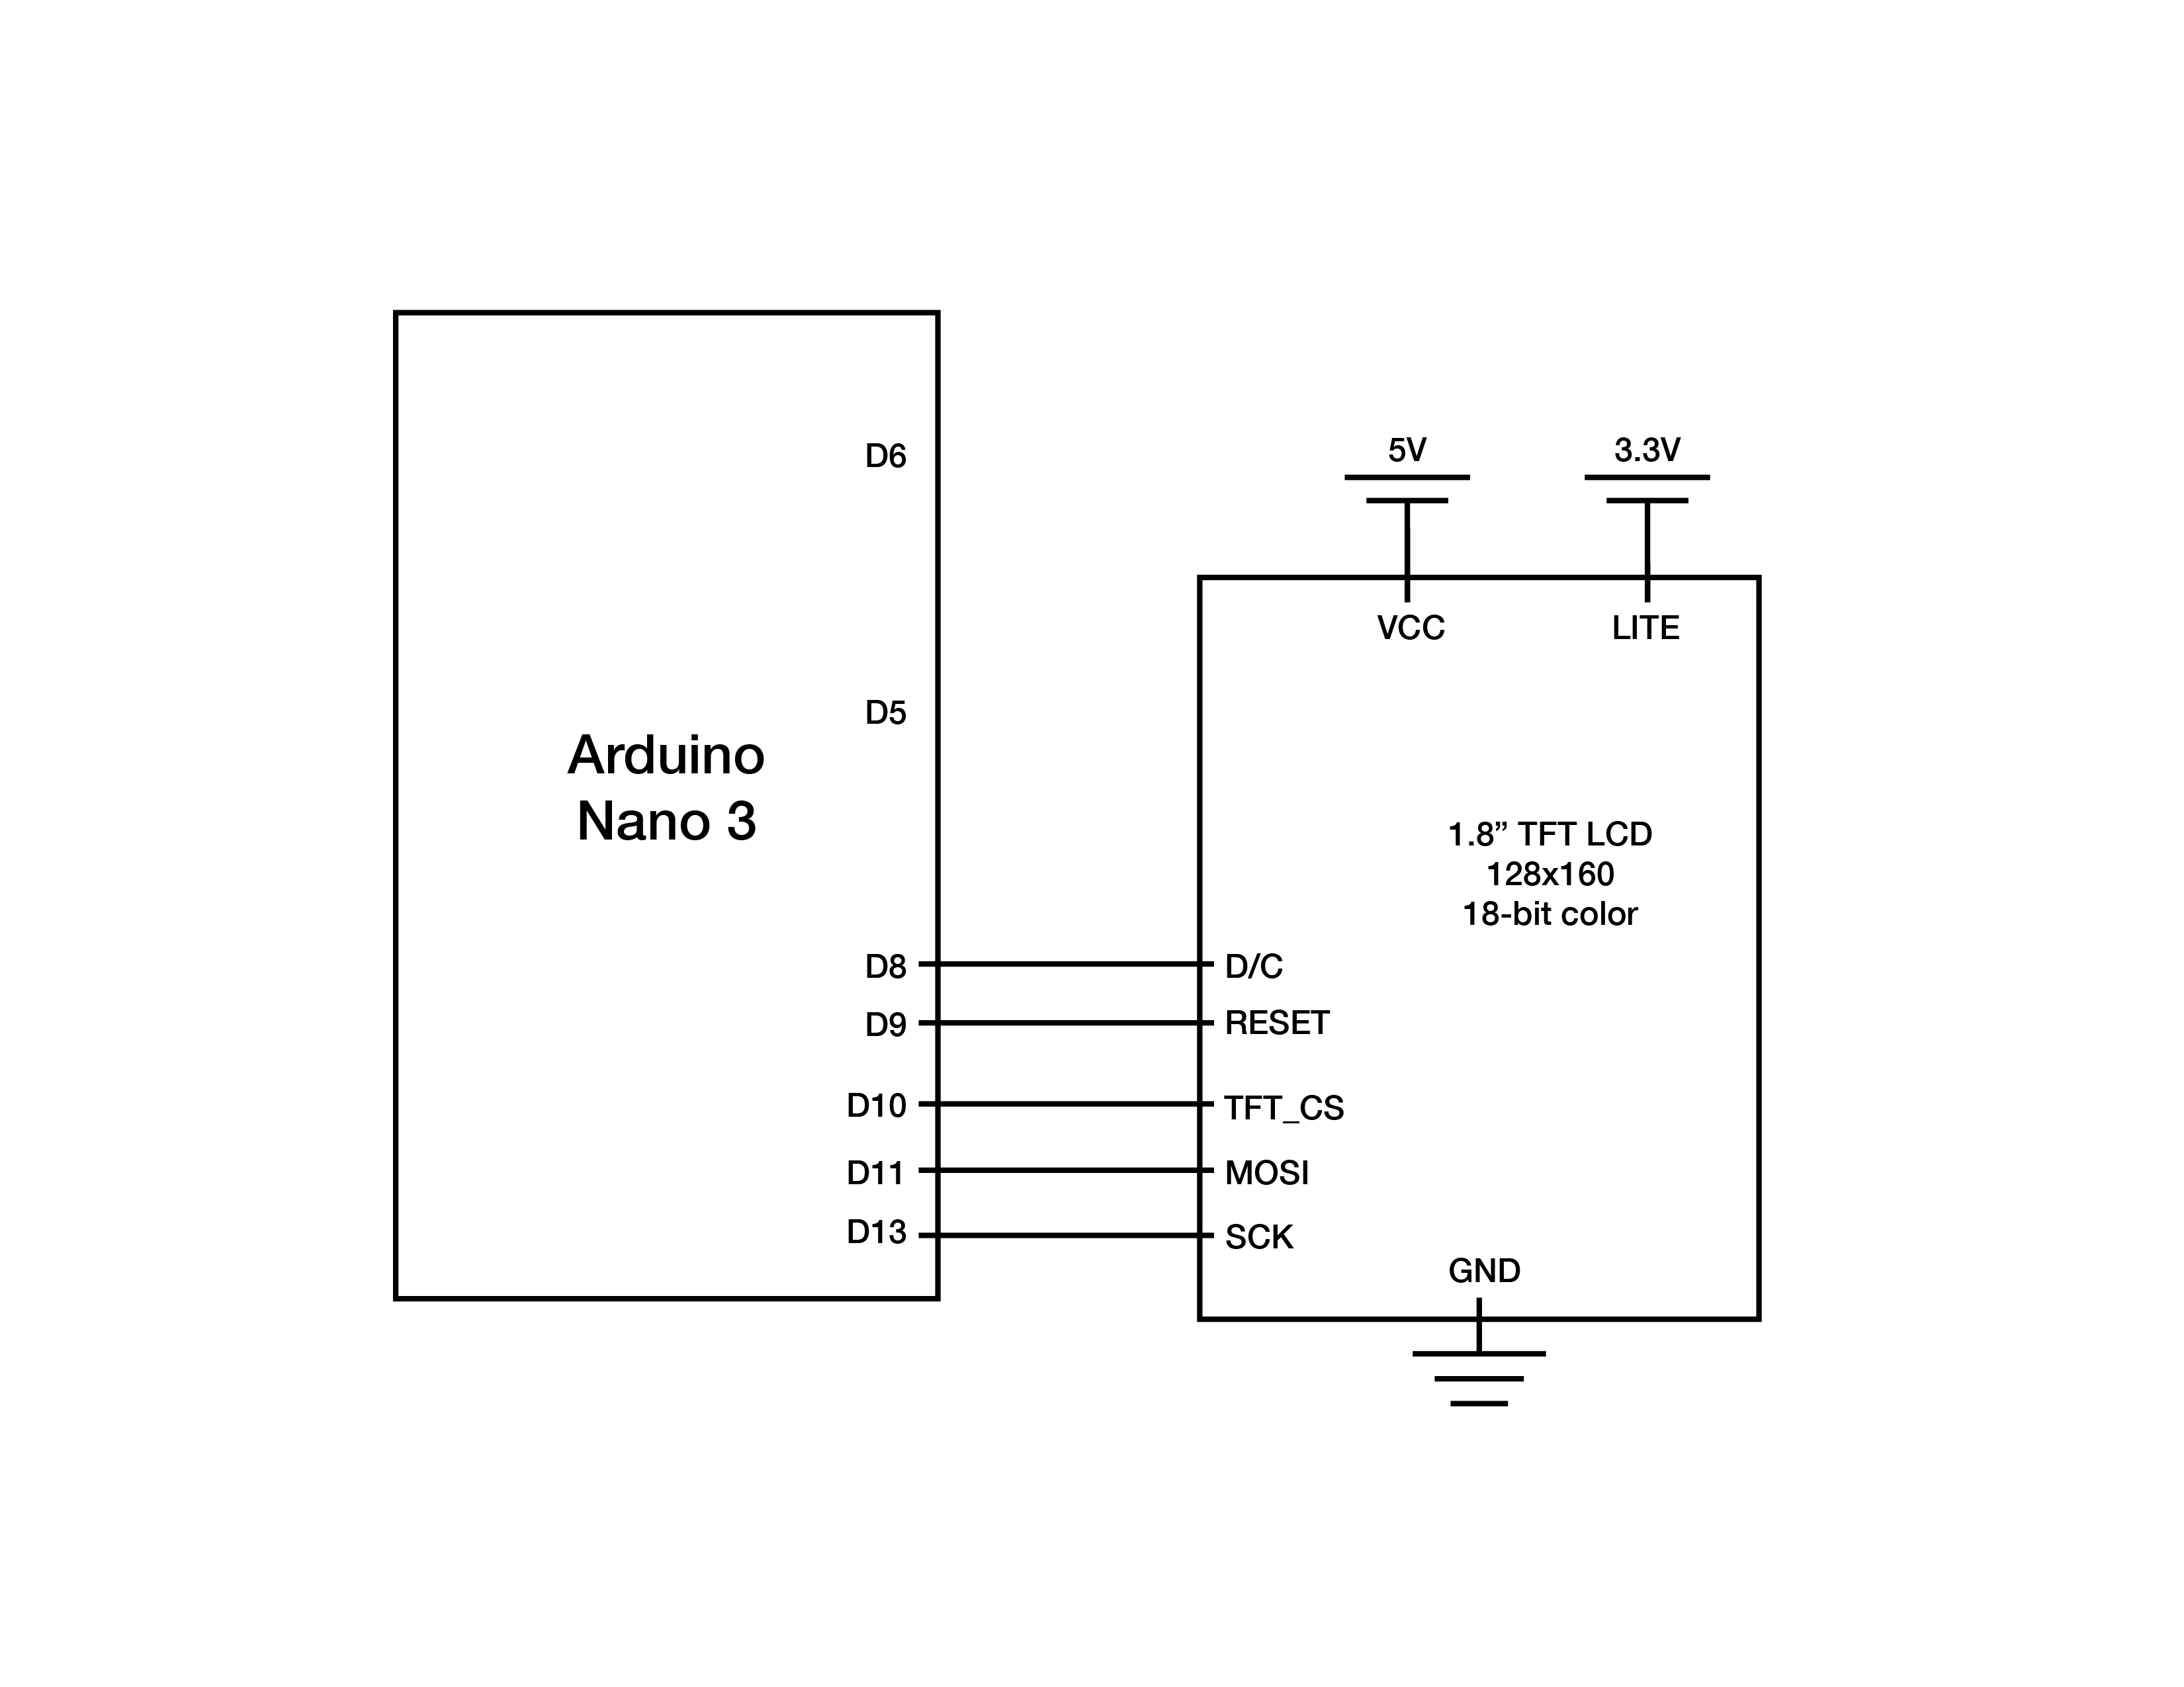
Schematic:
Code for the portable device:
/*
 *  Mindfulness Device
 *
 *  Karen Kim + Ian Shei
 *
 *  This code uses a pulse sensor to measure heart rate
 *  and display it through an LED ring. There are
 *  different thresholds that determine the speed
 *  of the pulsing of the LED ring.
 *
 *  Input: heart rate sensor (A0), capacitative sensor (Pin 6)
 *  Output: LED ring (Pin 5)
 *
 *  Example code used from:
   http://pulsesensor.com/pages/pulse-sensor-amped-arduino-v1dot1
   Version 1.0 by Mike Barela for Adafruit Industries, Fall 2015
*/

#include <Adafruit_NeoPixel.h>    // Library containing
#include <SPI.h>
#include <nRF24L01.h>
#include <RF24.h>

#define CE_PIN   9
#define CSN_PIN 10

// Behavior setting variables
int pulsePin = A0;                 // Pulse Sensor purple wire connected to analog pin 0
int blinkPin = 13;                // Digital pin to blink led at each beat
int ringPin  = 5;                 // pin to do fancy neopixel effects at each beat
int fadeRate = 0;                 // used to fade LED on with PWM on ringPin
int sensorPin = 6;
const int motorPin = 3;

// array for LED brightness pulsing values
int brightnessVal [201] = {0, 0, 0, 1, 1, 2, 2, 3, 4, 5, 6, 8, 9, 10, 12, 14, 16, 18, 20, 22, 24, 27, 29, 32, 35, 37, 40, 43, 46, 49, 53, 56, 59, 63, 66, 70, 73, 77, 81, 84, 88, 92, 96, 100, 104, 108, 112, 116, 119, 123, 128, 132, 136, 139, 143, 147, 151, 155, 159, 163, 167, 171, 174, 178, 182, 185, 189, 192, 196, 199, 202, 206, 209, 212, 215, 218, 220, 223, 226, 228, 231, 233, 235, 237, 239, 241, 243, 245, 246, 247, 249, 250, 251, 252, 253, 253, 254, 254, 255, 255, 255, 255, 255, 254, 254, 253, 253, 252, 251, 250, 249, 247, 246, 245, 243, 241, 239, 237, 235, 233, 231, 228, 226, 223, 220, 218, 215, 212, 209, 206, 202, 199, 196, 192, 189, 185, 182, 178, 174, 171, 167, 163, 159, 155, 151, 147, 143, 139, 136, 132, 128, 123, 119, 116, 112, 108, 104, 100, 96, 92, 88, 84, 81, 77, 73, 70, 66, 63, 59, 56, 53, 49, 46, 43, 40, 37, 35, 32, 29, 27, 24, 22, 20, 18, 16, 14, 12, 10, 9, 8, 6, 5, 4, 3, 2, 2, 1, 1, 0, 0, 0};

const byte slaveAddress[5] = {'R','x','A','A','A'}; // for radio
RF24 radio(CE_PIN, CSN_PIN); // Create a Radio

char message[10]; // array length for radio message
char txNum = '0';

unsigned long currentMillis;
unsigned long prevMillis;
unsigned long txIntervalMillis = 1000; // send once per second


// these variables are volatile because they are used during the interrupt service routine
volatile int BPM;                   // used to hold the pulse rate
volatile int Signal;                // holds the incoming raw data
volatile int IBI = 600;             // holds the time between beats, the Inter-Beat Interval
volatile boolean Pulse = false;     // true when pulse wave is high, false when it's low
volatile boolean QS = false;        // becomes true when Arduoino finds a beat.

// Set up use of NeoPixels
const int NUMPIXELS = 24;           // Put the number of NeoPixels you are using here
const int BRIGHTNESS = 60;          // Set brightness of NeoPixels here
Adafruit_NeoPixel strip = Adafruit_NeoPixel(24, ringPin, NEO_GRBW + NEO_KHZ800);

unsigned long startMillis;
bool inTrial = false;
bool inWait = false;
bool turnOn = false;

int bpmCount = 0;
int bpmAvg = 0;
int totalBPM = 0;
int dailyBPM[10] = {-1,-1,-1,-1,-1,-1,-1,-1,-1,-1};

void setup(){
  pinMode(blinkPin,OUTPUT);         // pin that will blink to your heartbeat!
  pinMode(motorPin, OUTPUT);
  pinMode(sensorPin, INPUT);
  Serial.begin(9600);           // Serial output data for debugging or external use
  strip.begin();
  strip.setBrightness(BRIGHTNESS);
  for (int x=0; x < NUMPIXELS; x++) {  // Initialize all pixels to 'off'
     strip.setPixelColor(x, strip.Color(0, 0, 0));
  }
  strip.show();                     // Ensure the pixels are off
  delay(1000);                      // Wait a second
  interruptSetup();                 // sets up to read Pulse Sensor signal every 2mS

   radio.begin();
   radio.setDataRate( RF24_250KBPS );
   radio.setRetries(3,5); // delay, count
   radio.openWritingPipe(slaveAddress);
}

void loop(){
  int sensorRead = digitalRead(sensorPin);
  // Serial.println(sensorRead);

  if (sensorRead == HIGH){ // use capaacitative sensor to turn on device
    turnOn = true;
  }

  if (turnOn == true){
  if (inWait == false and inTrial == false and QS == true){  // Quantified Self flag is true when arduino finds a heartbeat
//    analogWrite(motorPin, 100);
     Serial.println("START WAIT"); // setting 5 second baseline for heartrate
     inWait = true;
//     inTrial = true;
     startMillis = millis();
//     fadeRate = 255;                  // Set 'fadeRate' Variable to 255 to fade LED with pulse
     Serial.println(BPM);
//     sendDataSerial('B',BPM);       // send heart rate with a 'B' prefix
//     sendDataSerial('Q',IBI);       // send time between beats with a 'Q' prefix
     QS = false;                      // reset the Quantified Self flag for next time
  }

  else if (inWait == true and millis() - startMillis >= 5000){
      Serial.println("END WAIT");

      inTrial = true;
      inWait = false;
      startMillis = millis();
    }

  else if (inTrial == true and QS == true){
    bpmAvg = totalBPM/bpmCount;
//    Serial.println(bpmAvg);
    Serial.println("IN TRIAL");
//    Serial.println(millis() - startMillis);

    if (millis() - startMillis >= 5000){
      Serial.println("END OF TRIAL");
      inTrial = false;
      for (int x=0; x < NUMPIXELS; x++) {  // Initialize all pixels to 'off'
        strip.setPixelColor(x, strip.Color(255, 0, 0)); // blue light for during 1 minute cycle
      }
      strip.show();
      send(bpmAvg);
      totalBPM=0;
      bpmCount=0;
      delay(1000);
      turnOn = false;
    }
 //   fadeRate = 400;
    QS = false;
  }

  if (inTrial == true){
    Serial.print("BPM=");
    Serial.println(BPM);
    totalBPM+=BPM;
    bpmCount+=1;
    ledFadeToBeat(BPM);                    // Routine that fades color intensity to the beat
  }

  else if (inWait == true) {
    for (int x=0; x < NUMPIXELS; x++) {  // Initialize all pixels to 'off'
      strip.setPixelColor(x, strip.Color(0, 255, 0)); // turns off after 1 minute
      }
      strip.show();
  }

  else {
    setStrip(255,0,0,BPM);
    delay(3000);
  }
  delay(100);                          //  take a break
}
}

void ledFadeToBeat(int BPM) {
  static int i = 100;
           // Set LED fade value
  if (BPM < 50){
    i+=1;
      if (i >= 201) {
        i = 0;
    }
    fadeRate = brightnessVal[i];
    fadeRate = constrain(fadeRate,0,255);   // Keep LED fade value from going into negative numbers
    setStrip(0,0,fadeRate, BPM);
  }
  else if (BPM >= 50 and BPM < 80){ // setting BPM thresholds to set pulsing speed
    i+=2;
    if (i >= 201) {
       i = 0;
    }
    fadeRate = brightnessVal[i];
    fadeRate = constrain(fadeRate,0,255);   // Keep LED fade value from going into negative numbers
    setStrip(0,0,fadeRate, BPM);
  }
  else if (BPM >= 80 and BPM < 100){
    i+=3;
    if (i >= 201) {
       i = 0;
    }
    fadeRate = brightnessVal[i];
    fadeRate = constrain(fadeRate,0,255);   // Keep LED fade value from going into negative numbers
    setStrip(0,0,fadeRate, BPM);
  }
  else if (BPM >= 100 and BPM < 120){
    i+=4;
    if (i >= 201) {
       i = 0;
    }
    fadeRate = brightnessVal[i];
    fadeRate = constrain(fadeRate,0,255);   // Keep LED fade value from going into negative numbers
    setStrip(0,0,fadeRate, BPM);
  }
  else if (BPM >= 120 and BPM < 150){
    i+=5;
    if (i >= 201) {
       i = 0;
    }
    fadeRate = brightnessVal[i];
    fadeRate = constrain(fadeRate,0,255);   // Keep LED fade value from going into negative numbers
    setStrip(0,0,fadeRate, BPM);
  }
  else{
    for (int x=0; x < NUMPIXELS; x++) {  // Initialize all pixels to 'off'
       strip.setPixelColor(x, strip.Color(0, 0, 0));
    }
    strip.show();
    i=0;
  }
//  Serial.print("i=");
//  Serial.println(i);
//    sendDataSerial('R',fadeRate);
}

void sendDataSerial(char symbol, int data ) {
//    Serial.print(symbol);                // symbol prefix tells Processing what type of data is coming
//    Serial.println(data);                // the data to send culminating in a carriage return
}

void setStrip(int r, int g, int b, int BPM) {     // Set the strip to one color intensity (blue)
  for (int x=0; x < NUMPIXELS; x++) {
    strip.setPixelColor(x, strip.Color(0, 0, b));
  }
   strip.show();
}

/*
  sending the 10 most recent bpm values to receiver

*/
void send(int bpmAvg) { // function for radio

  // shift every BPM value to the right for the new bpmAvg
  for (int i=0; i<9; i++){
    dailyBPM[i+1] = dailyBPM[i];
  }
  dailyBPM[0] = bpmAvg; //putting newest bpmAvg value at the front of array

  bool rslt = radio.write( &dailyBPM, sizeof(dailyBPM) );
        // Always use sizeof() as it gives the size as the number of bytes.
        // For example if dataToSend was an int sizeof() would correctly return 2

    Serial.print("Data Sent ");
    for (int x = 0; x < (sizeof(dailyBPM) / sizeof(dailyBPM[0])); x++) {
      Serial.println(dailyBPM[x]);
    }
    if (rslt) {
        Serial.println("  Acknowledge received");
        memset(dailyBPM, -1, sizeof(dailyBPM));

        // for (int x = 0; x < sizeof(dailyBPM) / sizeof(dailyBPM[0]); x++)
        // updateMessage();
    }

    else {
        Serial.println("  Tx failed");
    }
}
Code for the dock:
#include <Adafruit_GFX.h>    // Core graphics library
#include <Adafruit_ST7735.h> // Hardware-specific library for ST7735
#include <Adafruit_ST7789.h> // Hardware-specific library for ST7789
#include <SPI.h>


#ifdef ADAFRUIT_HALLOWING
  #define TFT_CS        39 // Hallowing display control pins: chip select
  #define TFT_RST       37 // Display reset
  #define TFT_DC        38 // Display data/command select
  #define TFT_BACKLIGHT  7 // Display backlight pin
#else

  #define TFT_CS        10
  #define TFT_RST        9 // Or set to -1 and connect to Arduino RESET pin
  #define TFT_DC         8
#endif

Adafruit_ST7735 tft = Adafruit_ST7735(TFT_CS, TFT_DC, TFT_RST);

const int CHARGE_PIN1 = A1; // display turns on when contact is made from the device to the dock
const int CHARGE_PIN2 = A2;
const int CHARGE_TOLERANCE = 20;


void setup(void) {
#ifdef ADAFRUIT_HALLOWING
  tft.initR(INITR_HALLOWING);        // Initialize HalloWing-oriented screen
  pinMode(TFT_BACKLIGHT, OUTPUT);
  digitalWrite(TFT_BACKLIGHT, HIGH); // Backlight on
#else
  // Use this initializer if using a 1.8" TFT screen:
  tft.initR(INITR_BLACKTAB);      // Init ST7735S chip, black tab
#endif

  tft.setRotation(1); // rotate the screen to horizontal
  pinMode(CHARGE_PIN1, INPUT);
  pinMode(CHARGE_PIN2, INPUT);
  Serial.begin(9600);

  testfillcircles(10, ST77XX_BLUE);
  testdrawcircles(10, ST77XX_WHITE);
}

void loop() {
  static bool plugged = false;
  int chargeRead1 = analogRead(CHARGE_PIN1); // reading if contact has been made
  int chargeRead2 = analogRead(CHARGE_PIN2);
//  Serial.println(chargeRead1);
//  Serial.println(chargeRead2);

  if ((chargeRead1 - CHARGE_TOLERANCE <= chargeRead2) and  // portable device not plugged in
    (chargeRead2 <= chargeRead1 + CHARGE_TOLERANCE)) {
      plugged = false;
      tft.fillScreen(ST77XX_BLACK);
     }

  else if (plugged == false) { // this condition fires once we plug in
    tftPrintTest();
    plugged = true; // portable device marked as "plugged in" now
}

  delay(500);
}


void tftPrintTest() { // the content of the screens
  tft.fillScreen(ST77XX_MAGENTA);
  tft.setTextColor(ST77XX_WHITE);
  tft.setCursor(0, 30);
  tft.setTextSize(3);
  tft.println("WELCOME");
  tft.setCursor(0, 60);
  tft.println("HOME");
  tft.setCursor(0, 90);
  tft.println("ELINOR!");
  delay(3000);
  tft.setTextSize(1);
  tft.setCursor(0, 20);
  tft.fillScreen(ST77XX_BLACK);
  tft.setTextColor(ST77XX_WHITE);
  tft.println("Hello Elinor!");
  tft.setCursor(0, 40);
  tft.println("Hope you are having");
  tft.setCursor(0, 60);
  tft.println("a great day.");
  delay(5000);
  tft.fillScreen(ST77XX_BLUE);
  tft.setTextColor(ST77XX_WHITE);
  tft.setCursor(0, 10);
  tft.setTextSize(2);
  tft.println("Here are some");
  tft.setCursor(0, 30);
  tft.println("breathing");
  tft.setCursor(0, 50);
  tft.println("tips for you!");
  delay(3000);
  tft.fillScreen(ST77XX_BLUE);
  tft.setTextColor(ST77XX_WHITE);
  tft.setCursor(0, 10);
  tft.setTextSize(2);
  tft.println("First, take a");
  tft.setCursor(0, 30);
  tft.println("long, slow");
  tft.setCursor(0, 55);
  tft.println("INHALE.");
  delay(3000);
  tft.fillScreen(ST77XX_BLUE);
  tft.setTextColor(ST77XX_WHITE);
  tft.setCursor(0, 10);
  tft.setTextSize(2);
  tft.println("Next, a quick");
  tft.setCursor(0, 30);
  tft.println("and powerful");
  tft.setCursor(0, 55);
  tft.println("EXHALE.");
  delay(3000);
  tft.fillScreen(ST77XX_BLUE);
  tft.setTextColor(ST77XX_WHITE);
  tft.setCursor(0, 10);
  tft.println("Take a total");
  tft.setCursor(0, 30);
  tft.println("of 10 breaths");
  delay(3000);
  tft.fillScreen(ST77XX_WHITE);
  testfillcircles(10, ST77XX_BLUE);
  testdrawcircles(10, ST77XX_WHITE);
  delay(4000);
  testlines(ST77XX_YELLOW);
  delay(2000);
  testfastlines(ST77XX_RED, ST77XX_BLUE);
  delay(2000);
  tft.fillScreen(ST77XX_GREEN);
  tft.setTextColor(ST77XX_WHITE);
  tft.setCursor(0, 10);
  tft.setTextSize(2);
  tft.println("Here's a");
  tft.setCursor(0, 30);
  tft.println("tip for you!");
  delay(3000);
  tft.fillScreen(ST77XX_GREEN);
  tft.setTextColor(ST77XX_WHITE);
  tft.setCursor(0, 10);
  tft.setTextSize(2);
  tft.println("Deep breaths");
  tft.setCursor(0, 30);
  tft.println("increase your");
  tft.setCursor(0, 50);
  tft.println("oxygen flow.");
  delay(2000);
  tft.fillScreen(ST77XX_GREEN);
  tft.setTextColor(ST77XX_WHITE);
  tft.setCursor(0, 10);
  tft.setTextSize(2);
  tft.println("Also, it");
  tft.setCursor(0, 30);
  tft.println("promotes a");
  tft.setCursor(0, 50);
  tft.println("state of");
  tft.setCursor(0, 70);
  tft.println("CALMNESS.");
  delay(5000);
  tft.fillScreen(ST77XX_WHITE);
  testfillcircles(10, ST77XX_BLUE);
  testdrawcircles(10, ST77XX_WHITE);
}

void testfillcircles(uint8_t radius, uint16_t color) { //graphics for elinor to view while breathing
  for (int16_t x=radius; x < tft.width(); x+=radius*2) {
    for (int16_t y=radius; y < tft.height(); y+=radius*2) {
      tft.fillCircle(x, y, radius, color);
    }
  }
}

void testdrawcircles(uint8_t radius, uint16_t color) {
  for (int16_t x=0; x < tft.width()+radius; x+=radius*2) {
    for (int16_t y=0; y < tft.height()+radius; y+=radius*2) {
      tft.drawCircle(x, y, radius, color);
    }
  }
}

void testlines(uint16_t color) {
  tft.fillScreen(ST77XX_BLACK);
  for (int16_t x=0; x < tft.width(); x+=6) {
    tft.drawLine(0, 0, x, tft.height()-1, color);
    delay(0);
  }
  for (int16_t y=0; y < tft.height(); y+=6) {
    tft.drawLine(0, 0, tft.width()-1, y, color);
    delay(0);
  }

  tft.fillScreen(ST77XX_BLACK);
  for (int16_t x=0; x < tft.width(); x+=6) {
    tft.drawLine(tft.width()-1, 0, x, tft.height()-1, color);
    delay(0);
  }
  for (int16_t y=0; y < tft.height(); y+=6) {
    tft.drawLine(tft.width()-1, 0, 0, y, color);
    delay(0);
  }

  tft.fillScreen(ST77XX_BLACK);
  for (int16_t x=0; x < tft.width(); x+=6) {
    tft.drawLine(0, tft.height()-1, x, 0, color);
    delay(0);
  }
  for (int16_t y=0; y < tft.height(); y+=6) {
    tft.drawLine(0, tft.height()-1, tft.width()-1, y, color);
    delay(0);
  }

  tft.fillScreen(ST77XX_BLACK);
  for (int16_t x=0; x < tft.width(); x+=6) {
    tft.drawLine(tft.width()-1, tft.height()-1, x, 0, color);
    delay(0);
  }
  for (int16_t y=0; y < tft.height(); y+=6) {
    tft.drawLine(tft.width()-1, tft.height()-1, 0, y, color);
    delay(0);
  }
}

void testfastlines(uint16_t color1, uint16_t color2) {
  tft.fillScreen(ST77XX_BLACK);
    for (int16_t y=0; y < tft.height(); y+=5) {
      tft.drawFastHLine(0, y, tft.width(), color1);
      }
    for (int16_t x=0; x < tft.width(); x+=5) {
      tft.drawFastVLine(x, 0, tft.height(), color2);
      }
}
3D fabrication files:
Comments are closed.