
This is a set of sensors to notify the IDeATe Tech Advisors when an Ultimaker 3 printer is low on one or both of its filaments.
Ultimately, it will reside in the 3D printing room in the back of Hunt A5.
Process
The first point at which I had to make a major decision was in figuring out whether or not I would incorporate sensors for both filaments. For context, the Ultimaker 3 can use 2 filaments when printing. The first is often the build material, which is typically either:
- PLA–PolyLactic Acid, which is basically corn or sugar plastic and is biodegradable.
- ABS–Acrylonitrile Butadiene Styrene, which is commonly used in manufacturing.
The second is often a support material, which is typically either:
- PVA–PolyVinyl Alcohol, which is water soluble plastic.
- Breakaway, which is a plastic meant to be easily removed from the finished part.
Ideally, I would want to include sensors with both, but it turns out that PVA is transparent to infrared. Since the break-beam sensors I planned to use operated with infrared LEDs, they would work fine with the build materials, but not with PVA. They wouldn’t see the strand of PVA. At this point, I either would have needed to make a custom sensor that uses a regular LED and a photoresistor, or order a break-beam sensor that uses visible light. When I am able to return to this project, chances are high that I will just order some sensors that use visible light.
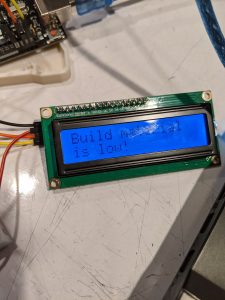
When the build material is low (not triggering the break-beam sensor), the screen will same something like this.
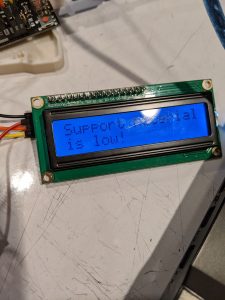
The same goes for the support material.
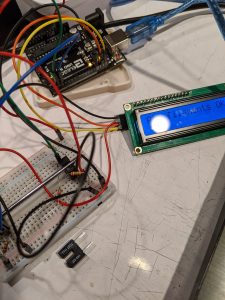
Here’s what is displayed when all filaments are OK. At this point, I was triggering the sensors with a screwdriver.
Another decision I had to make came as the deadline for the critique was fast approaching. I could either wire up one set of sensors and hopefully have that fully functioning, or try to wire all 4 sets up. This was ultimately my downfall. I never truly made a decision one way or the other, so the result was a severely underdeveloped device that barely worked. The 1 sensor that was wired up didn’t work at the time of critique due to faulty soldering on my part. Then again, this is what happens when you rush.
Discussion
I was relieved that those critiquing my underdeveloped device at least gave me constructive feedback and pointed out the good things about the project. Quite obviously, however, it was a far cry from faultless. Given the state the device was in, I can see why one critic said this:
“Would it have been easier and prone to less error if you made 4 seperate detectors? Then if something goes wrong, you would only need to fix 1 of the printers instead of putting all four sensors off-line.”
While I do agree that it would likely be easier to have 4 separate detectors for the sake of serviceability, it is a little bit wasteful when all 4 detectors could be driven off of 1 Arduino Uno R3 (or a Photon, more on that later).
Another critic said this:
“The project sounds very sophisticated and pretty useful for your job. However, how can you make it be more straightforward for the next users to use that have your job? Make it easier to understand?”
I think the reason it is so difficult to understand is because of how unfinished it is. Once the device is actually finished (hopefully this will be shortly after the COVID-19 pandemic dies down), it should make a lot more sense.
With all of that said, I am quite unhappy with how the project turned out. However, the issues that it has almost entirely trace back to me. In particular, my indecision was my biggest problem, and it led me to waste a lot of time. I think it goes without saying that I did not satisfy my goals for the project.
One truly bone-headed decision I made was using individual wires for each of the pins, rather than being smart and following RZach’s suggestion of using multi-core wire. It would have been the same level of difficulty in terms of soldering, but the external wiring would have been much cleaner. With that in mind, when I am finally able to resume work on this device, the sensors will all use multi-core wire where applicable. Everything will also be wired into a protoboard, rather than a breadboard, so as to make the device more permanent.
One final thing to note when continuing this project is that it will likely be ported to work with a Particle Photon (suggested by Cody Soska and RZach). This will enable me to use IFTTT (if-this-then-that) more easily so that I can have the device send a Slack message to IDeATe staff (Tech Advisors in particular) saying which printer is low on filament and which filament it’s low on. It’s possible to do this with an Arduino, but much easier with a Photon.
Technical Information
code
NOTE: The code you are about to see is very unfinished. That said, it does compile, and it properly reads the sensors (when they’re wired correctly). Once I am able to wire the device up correctly, I will update this post with revised code, both for the final Arduino version, as well as the Photon version. Regardless, here’s the code as it was during critique:
/*
   Project 2
   Seth Geiser (sgeiser)

   Collaboration: None

   Challenge: The biggest challenge was getting the sensor wired up
   correctly. I did cook one. :/

   Next time: I don't know... keep going?

   Description: The purpose is to create a set of sensors that can
   detect when a 3D printer is running out of filament. Two break-
   beam sensors are used for this purpose -- one for the primary
   (build) material and another for the secondary (support)
   material. When material is blocking the sensor, the sensor will
   read false, meaning that it is not yet critically low. When
   material is no longer blocking the sensor, the sensor will read
   true, meaning that the material is critically low and should be
   replaced with a new reel. At the very least, the device will
   sound an alarm (not implemented) and display which printer is
   low on filament and which filament it is low on (on the I2C
   LCD). The final version will do this and send a Slack message
   using IFTTT to IDeATe Tech Advisors.

   Pin mapping:

   pin  | mode  | description
   -----|-------|------------
   2      input   break-beam sensor 1 (build material)
   3      input   break-beam sensor 2 (support material)
   SDA/SCL        display

*/

#include <Wire.h>
#include <LiquidCrystal_I2C.h>

/*
   Create an LCD display object called "screen" with I2C address 0x27
   which is 20 columns wide and 4 rows tall.
*/

LiquidCrystal_I2C screen(0x27, 20, 4);

const int BUILDSENSOR = 2;
const int SUPPORTSENSOR = 3;

unsigned long timer = 0; // variable for timing
const int INTERVAL = 1000; // milliseconds between updates


void setup() {
  pinMode(BUILDSENSOR, INPUT);
  pinMode(SUPPORTSENSOR, INPUT);

  screen.init();
  screen.backlight();
  screen.home();
  Serial.begin(9600);
}

void loop() {
  bool buildCritical = digitalRead(2);
  bool supportCritical = false;
  /*
     would be digitalRead(3), but sensor was not wired up in time for
     critique, so I left it at false to eliminate any chances of an
     ambiguous reading.
  */
  // updating the LCD output
  if (millis() >= timer) {
    if (!buildCritical) {
      screen.setCursor(0, 0);
      screen.print((String) "All filaments OK.");
      screen.setCursor(0, 1);
      screen.print((String) "Support sensor");
      screen.setCursor(0, 2);
      screen.print((String) "is missing!");
    }
    else if (buildCritical) {
      screen.setCursor(0, 0);
      screen.print((String) "Build material  ");
      screen.setCursor(0, 1);
      screen.print((String) "is low!");
    }
    else if (supportCritical) {
      screen.setCursor(0, 0);
      screen.print((String) "Support material");
      screen.setCursor(0, 1);
      screen.print((String) "is low!");
    }
    timer = millis() + INTERVAL; // and update timer
  }

}
schematic
Unlike the code, the schematic for this device shouldn’t change too much, even when transitioning from an Arduino Uno R3 to a Particle Photon — some pin numbers may change, but that’s about it. This was made using Fritzing.
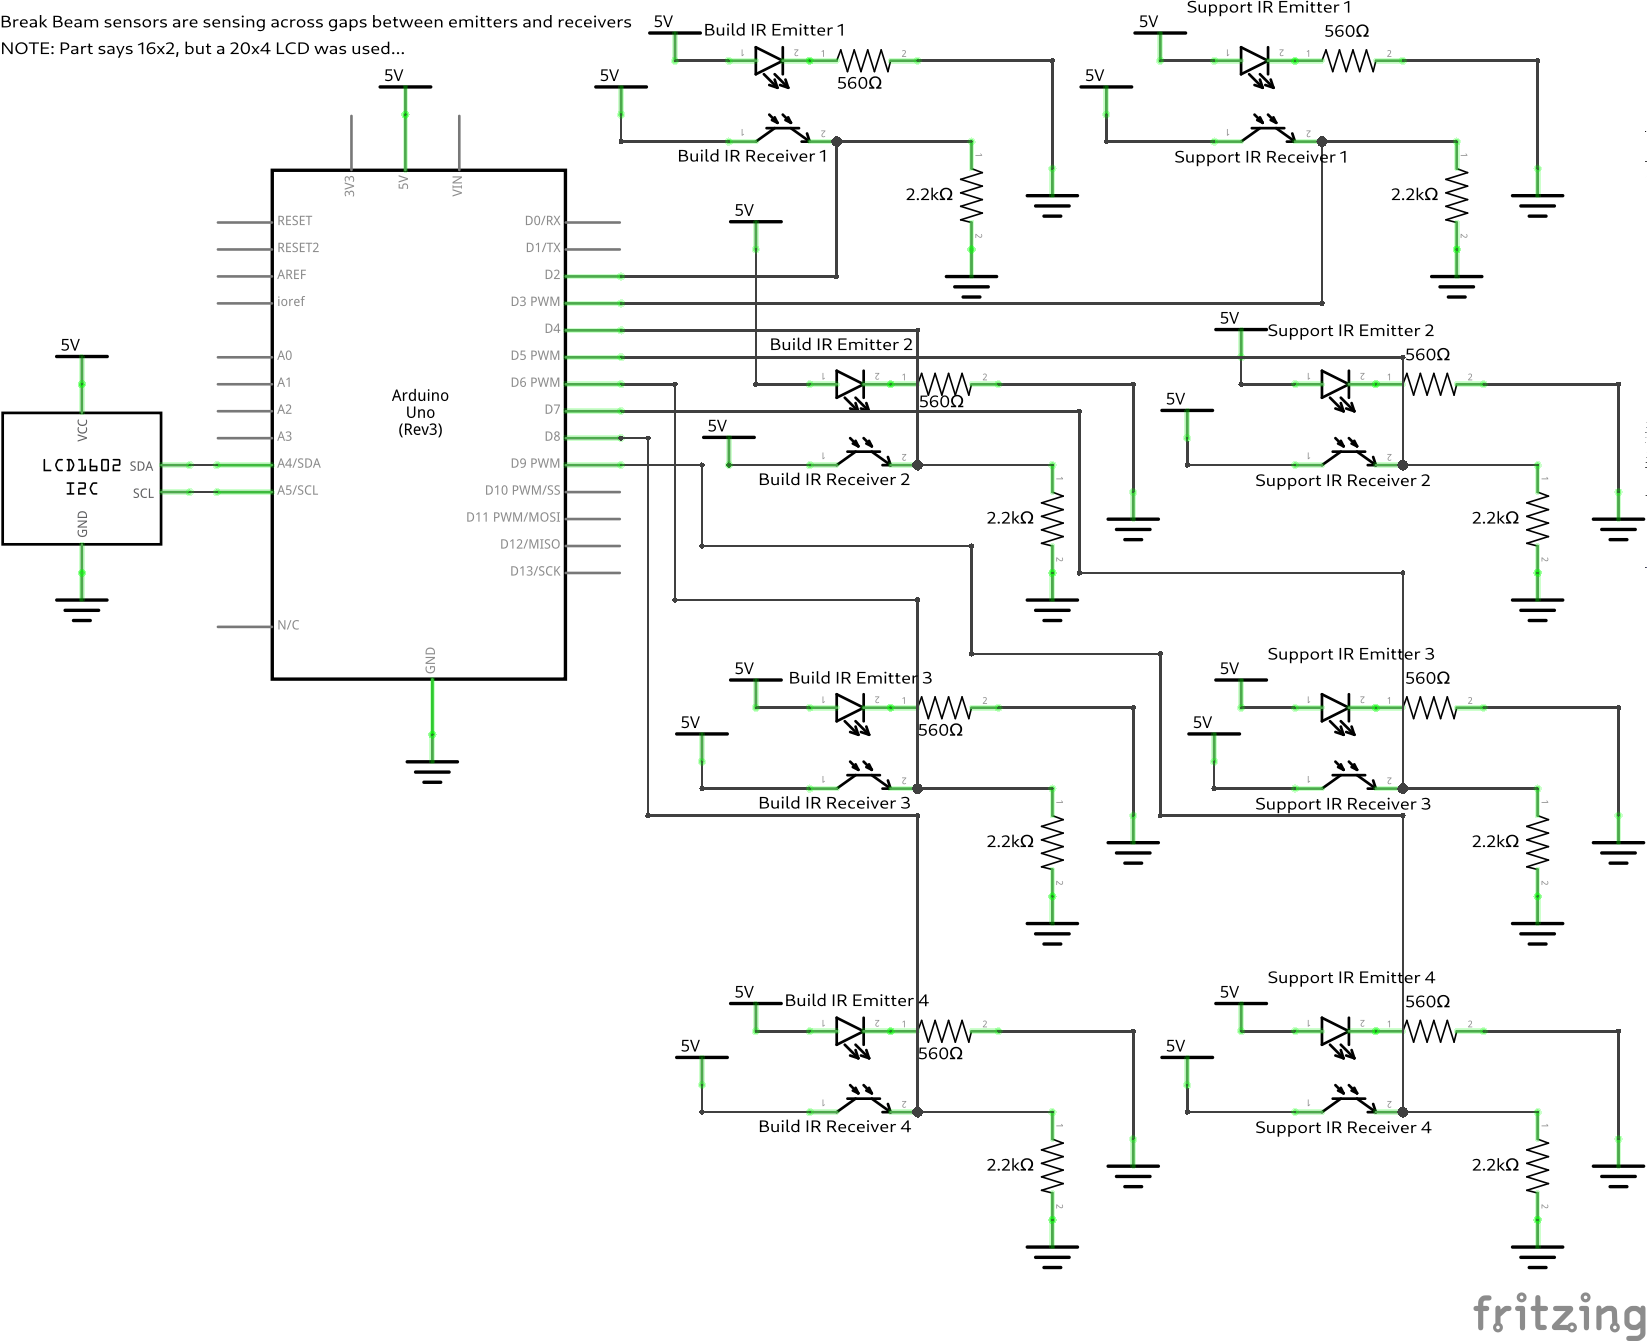
All four sets of sensors are wired up identically.
Comments are closed.