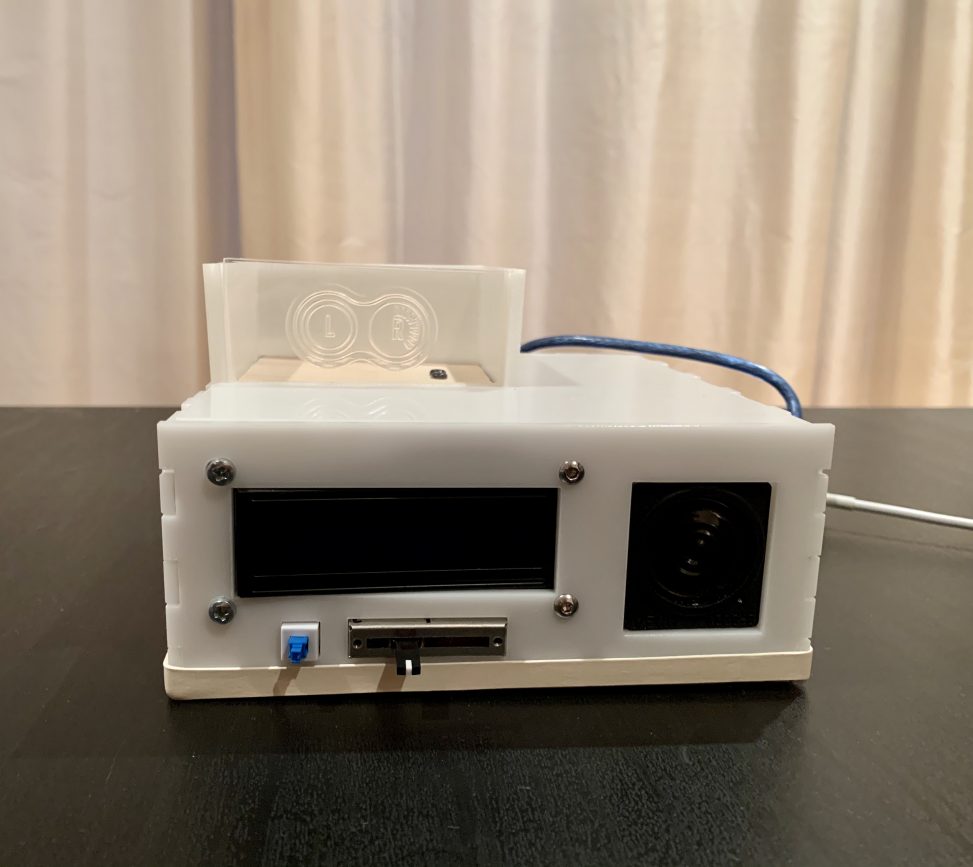
Overview
This alarm box utilizes a scale to detect the presence/absence of a contact lens case and sends out different reminders and alarms to promote a more routine and healthy habit of contact lens usage.
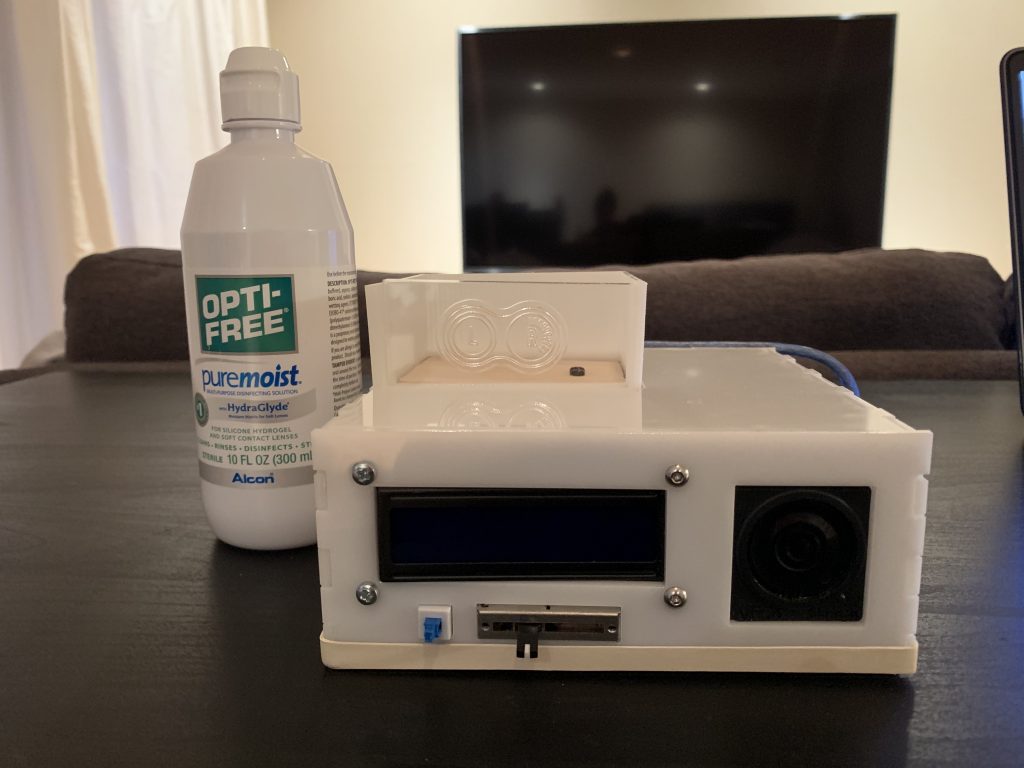
A side by side comparison of the box next to a common contact solution bottle.
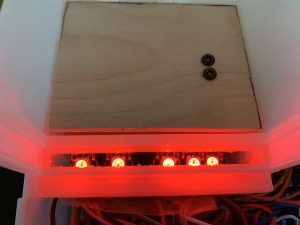
The LED’s will light up when the contact case is not in the designated box, assuming that the contact lens are currently being used or not properly stored. LEDs are green when the “usage time” or amount of time the case is not in the box is within the appropriate limit.
LEDs turn red when the contact case has been out of the box for too long or greater than the set appropriate amount of time (3 minutes for the purpose of this demonstration).
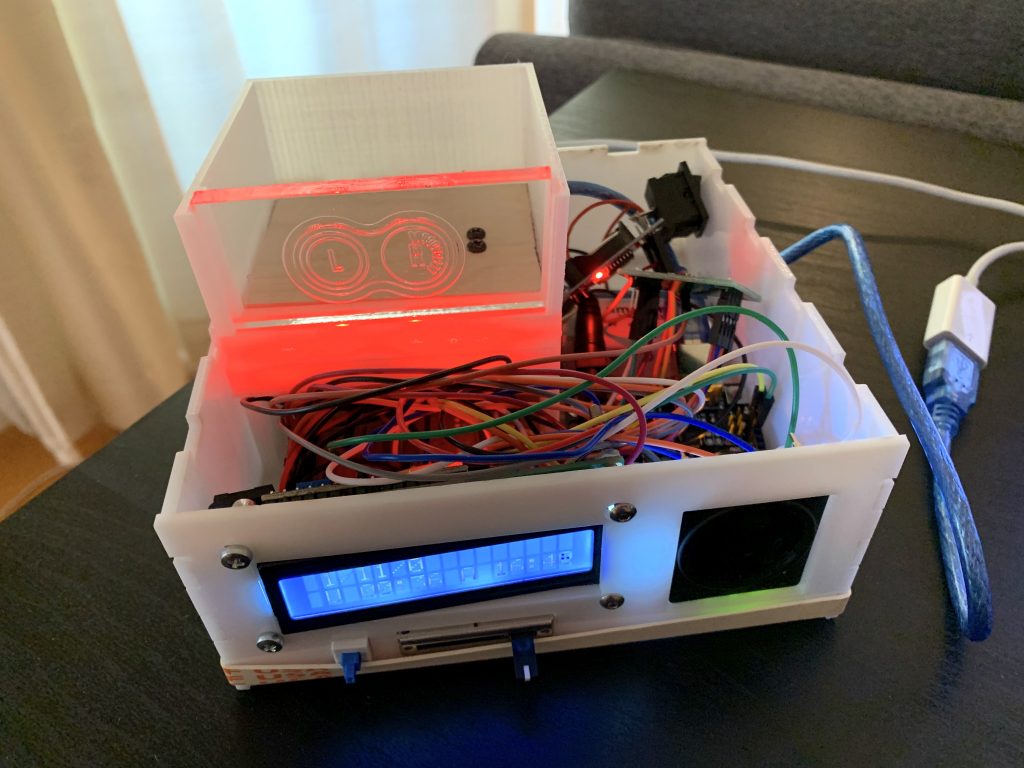
The box will trigger an alarm when the contacts case is not in the box and the current time is equal to the set “alarm time” or “A” as controlled by the slider. It will continue to make sounds and flash its LEDs for two hours or until the contact case is back in the box.
Only a small item that is around the weight range of a contact case can be used to stop the alarm. If the object is lighter or heavier than a typical contact case, the alarm will remain activated.
BONUS: The blue button converts the device into a fun night light when pressed.
Process Images & Review
One of the big changes made early in the process was to use a load cell that measures weight to detect the presence/absence of a contact lens case in the device. Originally, the plan was to use an IR Sensor to detect if the case is placed on the device or not. However, I wanted to try something new and I was able to find a small load cell that can measure small weight changes. This type of load cell is a strain gauge, which is set up in a Z formation and measures force from the deformation of the aluminum bar.
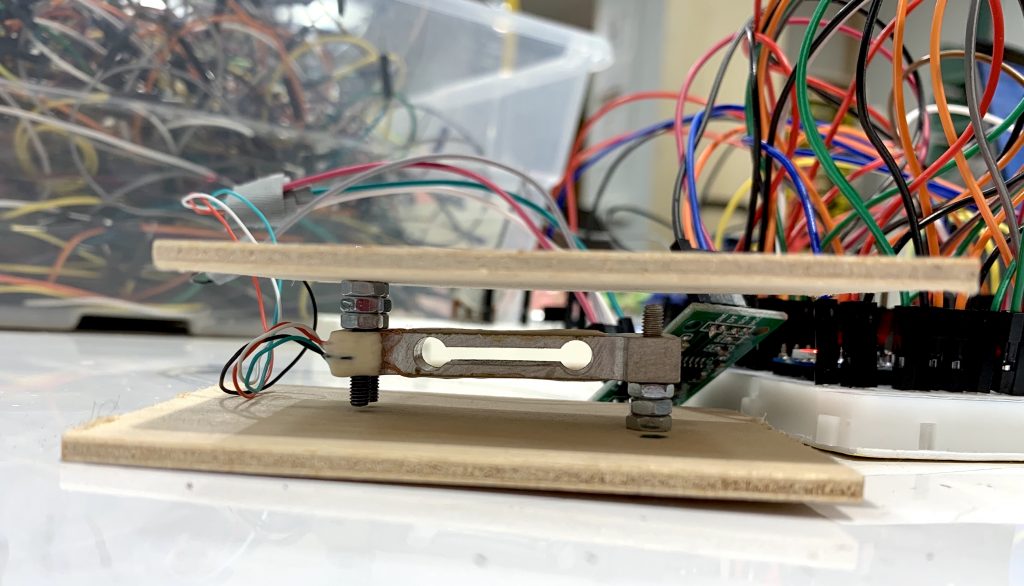
Straight bar 100g load cell to detect weight changes
After wiring up all of the essential components to make the device, I realized it was a lot of components and that I would need to optimize the wiring/position of the different parts to make a compact device that can fit in a small box.
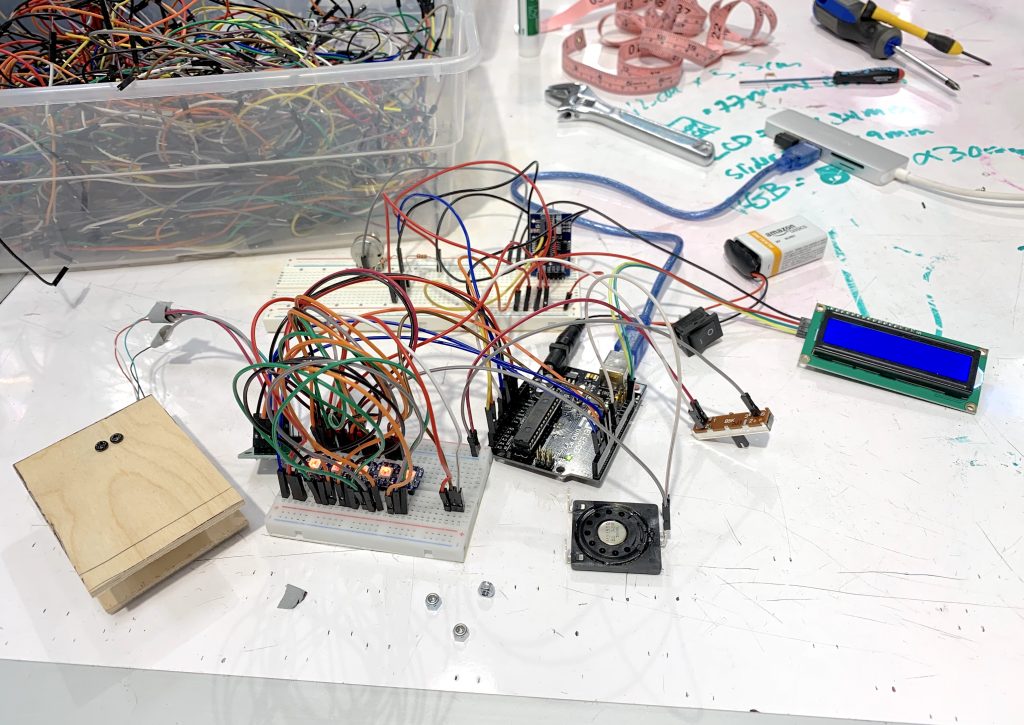
Initial wiring
First, I consolidated all of the wires onto one medium-sized breadboard. Then, I 3D-printed an enclosure which would house the load cell apparatus. I left empty space below the scale so that the breadboard can rest underneath. This stacking helped reduce the overall area of the final box and thus amount of acrylic material used.
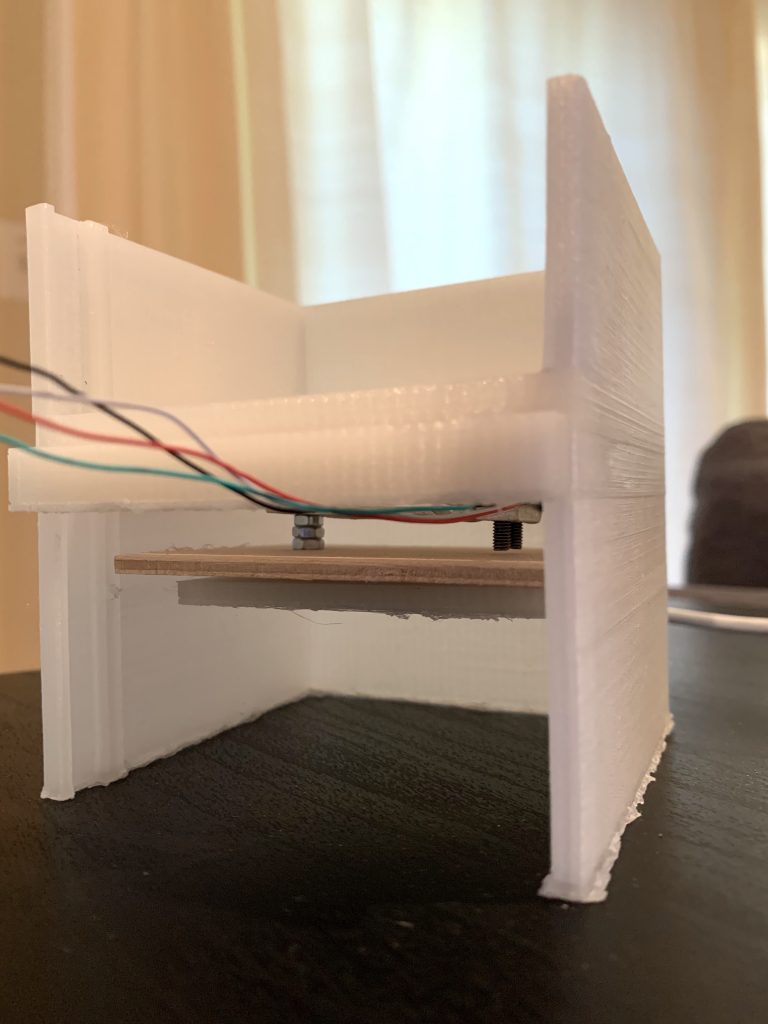
3D-printed enclosure houses the load cell and breadboard to optimize space.
The five breadboard-friendly RGB Neopixels did not all fit onto the medium-sized breadboard. I used a lot female-female wires to connect the 5 pixels together and a few male-female wires to connect the first pixel to the breadboard. This introduced more degrees of freedom to how the 5 LED’s could be positioned. When designing the 3D-printed enclosure, I made a small rectangular hole that can hold the 5 Neopixels in place so that it looks like an LED strip. I could have also used actual LED strips, but strips available had too much space in between each LED light.
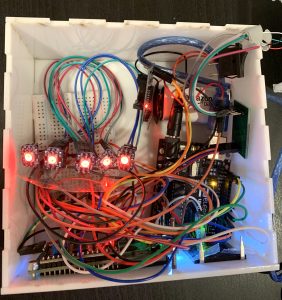
Electronic placement inside the box.
RGB breadboard-friendly Neopixels are taken out of the breadboard and wedged into a tight-fit space to reduce breadboard space usage.
Final layout
Discussion
I am overall satisfied with how my project turned out. I was able to incorporate new electrical components and learn how to use them throughout the process. In the end, I was able to save space, carry out all of the different functions I wanted out of the device, and package them in a compact and usable box. Below are some of the responses I received from my peers:
“I liked how it looked, very clean and the lights under the glass container looked very cool. I also liked the thought that way put into it, like how you can’t cheat it. Maybe some labels could help other operate it as well, but overall a great project.“
“Other than the band holding it together, the Contact Lens Reminder looked very appealing. The light up display was beautiful. I liked how it could sense whether or not the contact lens case was in there or another item. Other than the scale not working properly all the time, the project was well done.“
Some of the positive responses that I received was that it looked clean and aesthetic. However, I do agree that this could have been improved. The LCD cutout was slightly too small and the square for the 3D enclosure was too constrained. I did not leave too much buffer on the side, which caused the acrylic to crack. Additionally, I did not leave myself enough time to glue the acrylic pieces together and have the adhesion cure. I do agree that the rubber band is a huge red flag.
I was able to learn new technical skills including working with a load cell and a real time clock. It was definitely hard to get the right second onto the clock, especially since I don’t know how long for sure it takes the computer to load the code to the Arduino. Additionally, I learned that the load cell super variable if you do not set it up right. During my initial testings, I did not screw the wood boards onto the load cell all the way and I only used one point of attachment instead of two. This introduced rotation and caused the load cell to have different read-outs for different positions. I also learned how to use a new Fusion360. It was easy to use to make laser print files for the large box but it was slow to use when I was designing the 3D-printed enclosure. Thus, I switched to Solidworks to do this part, which I was more comfortable with.
I do not expect to build another iteration of this project since it serves the main function I wanted it to. Some of the more crucial improvements also required access to a laser printer, which I would no longer have. However, if I were to do it again, I would carry out the steps earlier and give myself more time to prototype the physical final product. A lot of my difficulties involve not having the right measurements or constraints for the mechanical parts I laser cutted and 3D printed. Although it is easy to figure out which dimensions need to be changed and fixed, I need to further plan out to get more materials and use the machines in the Ideate/TechSpark space. Thus, it is important to build these things early so that I can have enough time to iterate and have better results.
Technical Information
Schematic
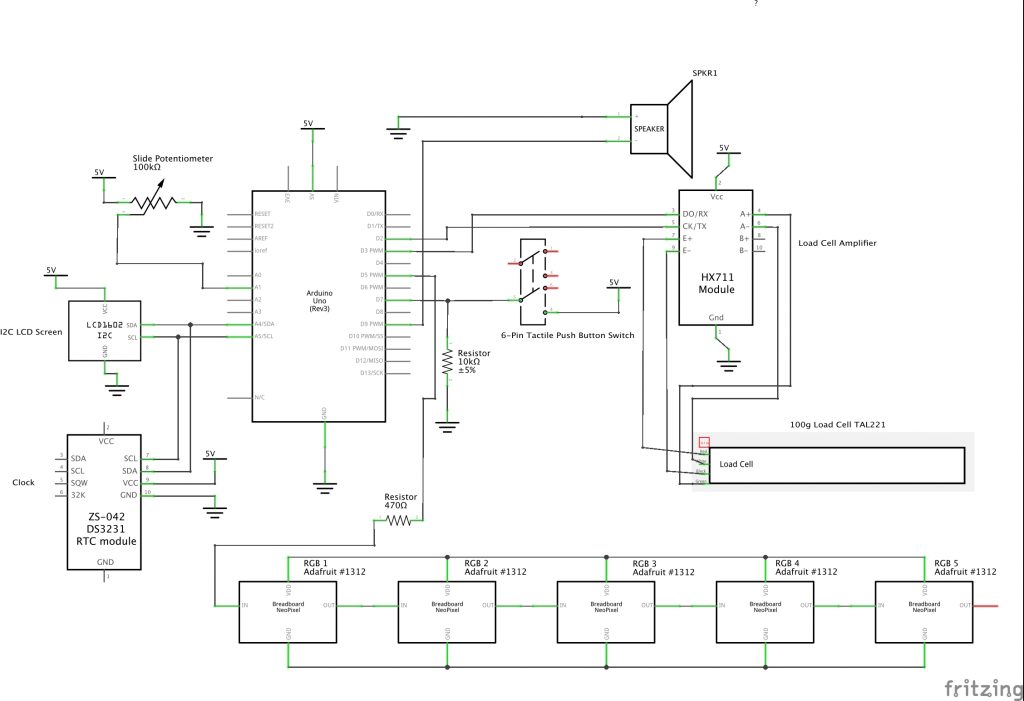
Schematic for the alarm box.
Code
/**
   Title: Alarm Box for Contact Lens Users
   Author: Gracia Genero
   Description: This code is used to keep track of time and how long my eye contacts have been used.
   It determines contact lens usage by the amount of time the contact case is not in the box, assuming that
   I will always take the contact case out of the scale when I am using my contacts and place the case back on
   scale when I have taken off the contact lens and stored it in the case. The way it works is as follows:


   1. LED lights will remain inactived as long as the case is in the box/on the scale. It determines this by
   measuring the weight of the object placed directly on the load cell.
   2. When the contact case is removed, the LED light will turn green. This indicates that it is withing the
   appropriate usage time. For a typical contacts lens, it is not recommended to use for more than 8 hours a day.
   3. The device continues to keep track of how long the contact case have been out of the box.
   4. When the usage time is above the recommended time, the LED light will turn red.
   5. The slider sets the alarm time of when the box should send out an alarm if no contact case is detected.
   Ideally, this should be set at your bed time so that the alarm box can remind you to take it off before you go to sleep.
   When the real time is between the set alarm time plus 2 hours, the speaker and flashing red LEDs will be triggered.
   6. When the alarm is going off, it can be deactivated with the placement of the contact case back onto the scale.
   If the object placed onto the scale is too light or too heavy compared to a typical contact case, it will not deactivate.
   7. The switch turn the device into a fun night light. When pressed, the LED's will flash rainbow colors.

  _____________________________________________________
   Pin mapping:

   pin   | mode   | description
  -------|--------|------------------------------------
   A1    | input  | slider potentiometer
   2     | input  | load cell SCK pin
   3     | output | load cell DT pin
   5     | output | Neopixel RGB Breadboard LEDs
   7     | input  | 6-pin Tactile Push-button switch
   9     | output | speaker

  _____________________________________________________
  Credits:
  The following functions were obtained or a modified version of
  prewritten functions from the sample codes of libraries <Adafruit_NeoPixel.h>,
  <DS3231.h>, and  <Volume3.h> :
  R2D2()
  whiteOverRainbow()
  displayTime()

 **/

const int SLIDER_PIN = A1;
const int SPEAKER_PIN = 9;
const int LOADCELL_DOUT_PIN = 3;
const int LOADCELL_SCK_PIN = 2;
const int SWITCH_PIN = 7;
const int LED_PIN = 5;
const int LED_COUNT = 5; // number of Neopixels in series
const int CONTACT_LOW = 20; // weight range of accepted values for when contact case is in the case
const int CONTACT_HIGH = 200;
const float  CONTACT_LIMIT = 0.05; // maximum limit of contact usage in hours

int contactLimitCalc = CONTACT_LIMIT * 3600; // convert above time to sec
float calibration_factor = 730;


// Timer variables
const int SECONDWAIT = 1000;
unsigned long secondTimer = 0;
unsigned long absentTime = 0;
unsigned long alarmTime = 0;
int absentHour = 0; // will be calculated from absentTime
int absentMin = 0; // will be calculated from absentTime
int absentS = 0;


// Toggle states
bool LCDState = HIGH;
bool LEDState = HIGH;
bool alarmState = LOW; // is the alarm activated?
bool ContactState = LOW; // is the contact case in the box?


// Variables to store sensor values
float weightVal; // load cell returns float numbers
int alarm = 120 ; // what minute of the day should the alarm go off
int alarm_stop = 360; // when alarm should stop
int color; // color of LED lights
int interval;
int currentMinOfDay;
int currentHour;
int currentMin;


// Libraries used
#include <Volume3.h>
#include <Wire.h>
#include <DS3231.h>
#include <Adafruit_NeoPixel.h>
#include <LiquidCrystal_I2C.h>
#include <HX711.h>

// Objects
DS3231 Clock;
Adafruit_NeoPixel rgb(LED_COUNT, LED_PIN, NEO_RGB + NEO_KHZ800);
LiquidCrystal_I2C screen(0x27, 16, 2);
HX711 scale;

// Clock variables
byte Year = 20;
byte Month = 03;
byte Date = 17;
byte Day = 03;
byte Hour = 18;
byte Minute = 18;
byte Second = 35;
bool Century=false;
bool h12;
bool PM;
byte ADay, AHour, AMinute, ASecond, ABits;
bool ADy, A12h, Apm;


void setup() {
  Serial.begin(9600);
  Wire.begin();

  // Potentiometer slider setup
  pinMode(SLIDER_PIN, INPUT);


  // Load cell setup
  scale.begin(LOADCELL_DOUT_PIN, LOADCELL_SCK_PIN);
  scale.set_scale(calibration_factor); //This value is obtained by using the SparkFun_HX711_Calibration sketch
  scale.tare(); //Assuming there is no weight on the scale at start up, reset the scale to 0

  // RGB Neopixels set up
  pinMode(LED_PIN, OUTPUT);
  rgb.begin();
  rgb.show();
  rgb.setPixelColor(0, 0, 150, 200); // first pixel lights up purple (for validation purposes)
  rgb.show();
  rgb.setBrightness(50); // Set brightness to about 1/5 (max = 255)


  // set initial time of clock here

 /*
  Clock.setClockMode(false);  // set to 24h

  // Clock.setClockMode(true); // set to 12h
  Clock.setYear(Year);
  Clock.setMonth(Month);
  Clock.setDate(Date);
  Clock.setDoW(Day);
  Clock.setHour(Hour);
  Clock.setMinute(Minute);
  Clock.setSecond(Second);
  */

  // get current clock time
  currentHour = Clock.getHour(h12, PM);
  currentMin = Clock.getMinute();
  currentMinOfDay = (currentHour * 60) + currentMin;

  // setup LCD screen
  screen.init();
  screen.backlight(); // turn on the backlight to start
  LCDtoggle();
  delay(2000); // do nothing for 2 seconds

  // tactile switch setup
  pinMode(SWITCH_PIN, INPUT);


}


void loop() {

  // UPDATE VALUES

  displayWeight(); //

  // SLIDER
  alarm = map(analogRead(SLIDER_PIN), 0, 1023, 0, 143) * 10;
  alarm_stop = alarm + 120; // alarm is activated for 2 hours unless deactivated through other means

  // TIMING
  // if it has at least 1 second since the secondTimer variable last changed:
  if ( (millis() - secondTimer) >= SECONDWAIT ) {
    if (alarmState) {LCDState = !LCDState;}

    // Update and calculate usage time
    // continue counting the number of seconds since the last time the contacts are in the box.
    // If the contacts are out of the box, stop counting
    if (!ContactState) { absentTime++; }
    else { absentTime = 0; }

    // Converts usage time (time contacts case is out of the box) to hours, minutes, seconds
    int absentCalcH = absentTime/3600;
    int absentCalcM = (absentTime % 3600) / 60;
    int absentCalcS = (absentTime % 3600) % 60;
    absentHour = abs(absentCalcH);
    absentMin = abs(absentCalcM);
    absentS = abs(absentCalcS);

    // reset the timer before exiting the function.
    secondTimer = millis();


  // Print data
  displayTime(); // get and display Time
  Serial.print("Weight: ");
  Serial.print(weightVal, 1);
  Serial.print(" g");
  Serial.println();
  Serial.print("Contact State = " + String(ContactState));
  Serial.println();
  Serial.print("Usage Time:" + String(absentHour) + ":" + String(absentMin) + ":" + String(absentS));
  Serial.println();
  Serial.print("alarm = " + String(alarm) + "  alarm_stop = " + String (alarm_stop) + " CurrentMin = " + String(currentMinOfDay));
  Serial.println();
  Serial.print("switch = " + String(digitalRead(SWITCH_PIN)));
  Serial.println();
  Serial.println();
  }


  // ACTION
  LCDtoggle(); // toggles the LCD on and off

  if (digitalRead(SWITCH_PIN)) {
    whiteOverRainbow(75, 5);
  }
  else {
  // Turn on LED if contacts are not in the box
  if (ContactState) {
    LEDState = LOW;
    alarmState = LOW;
    LCDState = HIGH;
    int interval = 0;
    setRGBcolor(color, interval);
    }
  else {
    LEDState = HIGH;

    // set off alarm if time is at set alarm time --> no natter what, at time X contacts should be in the box
    if ((currentMinOfDay >= alarm) and (currentMinOfDay <= alarm_stop)) {
      alarmState = HIGH;
      R2D2(); // turn on alarm sound
      color = 0;
      interval = 250;

    }
    else {
      alarmState = LOW;
      LCDState = HIGH;
      // change LED color based on usage time
      if (absentTime >= contactLimitCalc) { color = 0; }
      else { color = 1; }
      interval = 0;

    }
    setRGBcolor(color, interval);
    }
  }

}

/* Below are supporting functions */

void LCDtoggle() {
  int absMin1 = absentMin % 10;
  int absMin10 = absentMin / 10;
  int absHour1 = absentHour % 10;
  int absHour10 = absentHour / 10;

  int alaHour1 = (alarm / 60) % 10;
  int alaHour10 = (alarm / 60) / 10;
  int alaMin1 = (alarm % 60) % 10;
  int alaMin10 = (alarm % 60) /10;


  if (LCDState) {
    screen.display();
    screen.setCursor(1,0); // set cursor to home position
    screen.print(String(Clock.getMonth(Century)) + "/" + String(Clock.getDate()) + "/" + String(Clock.getYear()));
    screen.setCursor(1, 1);
    screen.print("U " + String(absHour10) + String(absHour1) + ":" + String(absMin10) + String(absMin1) +  // Time of usage
                 " A " + String(alaHour10) + String(alaHour1) + ":" + String(alaMin10) + String(alaMin1)); // Time that alarm will go off
    }
  else {screen.noDisplay();}
}


void setRGBcolor(int color, int interval) {
  if (LEDState) {
    switch (color) {
      case 0: // red
        lightUpAll(0, 150, 0, interval); // PIXEL #, GREEN, RED, BLUE
        break;
      case 1: // green
        lightUpAll(150, 0, 0, interval);
        break;
      case 2: // blue
        lightUpAll(0, 0, 150, interval);
        break;
      case 3: // purple
        lightUpAll(0, 150, 200, interval);
        break;
      case 4: // yellow
        lightUpAll(150, 0, 150, interval);
        break;
    }
  }
  else {
    rgb.clear(); // turn off all LEDs
    rgb.show();
  }
}

void lightUpAll(int G,int R,int B, int interval) {
  for(int i=0; i<rgb.numPixels(); i++) {
  rgb.setPixelColor(i, G, R, B);    // sets the RGB values for pixel number i
  rgb.show();
  delay(interval);
  }
  if (interval > 0) {
  rgb.clear();
  rgb.show();
  }

  }

void displayWeight() {
  weightVal = scale.get_units(); // returns a float
  if ((weightVal >= CONTACT_LOW) and (weightVal <= CONTACT_HIGH)) { ContactState = HIGH; }
  else { ContactState = LOW; }

}

// Modified from library <DS3231.h>
void displayTime() {
  currentHour = Clock.getHour(h12, PM);
  currentMin = Clock.getMinute();
  currentMinOfDay = (currentHour * 60) + currentMin;


  Serial.print("2");
  if (Century) {
    Serial.print("1");
  } else {
    Serial.print("0");
  }
  Serial.print(Clock.getYear(), DEC);
  Serial.print(' ');
  // then the month
  Serial.print(Clock.getMonth(Century), DEC);
  Serial.print(' ');
  // then the date
  Serial.print(Clock.getDate(), DEC);
  Serial.print(' ');
  // and the day of the week
  Serial.print(Clock.getDoW(), DEC);
  Serial.print(' ');
  // Finally the hour, minute, and second
  Serial.print(Clock.getHour(h12, PM), DEC);
  Serial.print(' ');
  Serial.print(Clock.getMinute(), DEC);
  Serial.print(' ');
  Serial.print(Clock.getSecond(), DEC);
  // Add AM/PM indicator
  if (h12) {
    if (PM) {
      Serial.print(" PM ");
    } else {
      Serial.print(" AM ");
    }
  } else {
    Serial.print(" 24h ");
  }
  // Display the temperature
  Serial.print("T = ");
  Serial.print(Clock.getTemperature(), 2);
  // Tell whether the time is (likely to be) valid
  if (Clock.oscillatorCheck()) {
    Serial.print(" O + ");
  } else {
    Serial.print(" O - ");
  }
  // New line on display
  Serial.print('\n');

  int dayOfWeek  = Clock.getDoW();
  switch(dayOfWeek){
    case 1:
      Serial.println("Sunday");
      break;
    case 2:
      Serial.println("Monday");
      break;
    case 3:
      Serial.println("Tuesday");
      break;
    case 4:
      Serial.println("Wednesday");
      break;
    case 5:
      Serial.println("Thursday");
      break;
    case 6:
      Serial.println("Friday");
      break;
    case 7:
      Serial.println("Saturday");
      break;
  }

}

// Obtained from library <Volume3.h>
void R2D2() {
  int beeps[] = {1933, 2156, 1863, 1505, 1816, 1933, 1729, 2291};
  int buzzVols[] = {144, 180, 216, 252, 252, 252, 252, 216, 180, 144};

  int i = 9;
  while (i >= 0) {
    vol.tone(SPEAKER_PIN, 1050, buzzVols[i]*4);
    delayMicroseconds(20*64);
    vol.tone(SPEAKER_PIN, 1050, buzzVols[i] / 8*4);
    delayMicroseconds(40*64);
    i--;
  }

  delay(35);

  i = 0;
  while (i < 8) {
    int v = 0;
    while (v < 250) { // 12.5 mS fade up time
      vol.tone(SPEAKER_PIN, beeps[i], v*4);
      v += 10;
      delayMicroseconds(2*64);
    }
    delay(20);
    v = 250;
    while (v > 0) { // 12.5 mS fade down time
      vol.tone(SPEAKER_PIN, beeps[i], v*4);
      v -= 10;
      delayMicroseconds(5*64);
    }
    vol.noTone();
    delay(25);
    i++;
  }

  int f = 2466;
  while (f < 2825) {
    vol.tone(SPEAKER_PIN, f, 1023);
    f += 3;
    delay(1);
  }
  f = 2825;
  int v = 255;
  while (f > 2000) {
    vol.tone(SPEAKER_PIN, f, v*4);
    f -= 6;
    v -= 1;
    delay(1);
  }
  vol.noTone();
  delay(35);

  i = 10;
  while (i > 0) {
    vol.tone(SPEAKER_PIN, 1050, buzzVols[i]*4);
    delayMicroseconds(20*64);
    vol.tone(SPEAKER_PIN, 1050, buzzVols[i] / 8*4);
    delayMicroseconds(40*64);
    i--;
  }
  vol.noTone();
}

// Obtaied from library <Adafruit_NeoPixel.h>
void whiteOverRainbow(int whiteSpeed, int whiteLength) {

  if(whiteLength >= rgb.numPixels()) whiteLength = rgb.numPixels() - 1;

  int      head          = whiteLength - 1;
  int      tail          = 0;
  int      loops         = 3;
  int      loopNum       = 0;
  uint32_t lastTime      = millis();
  uint32_t firstPixelHue = 0;

  for(;;) { // Repeat forever (or until a 'break' or 'return')
    for(int i=0; i<rgb.numPixels(); i++) {  // For each pixel in strip...
      if(((i >= tail) && (i <= head)) ||      //  If between head & tail...
         ((tail > head) && ((i >= tail) || (i <= head)))) {
        rgb.setPixelColor(i, rgb.Color(0, 0, 0, 255)); // Set white
      } else {                                             // else set rainbow
        int pixelHue = firstPixelHue + (i * 65536L / rgb.numPixels());
        rgb.setPixelColor(i, rgb.gamma32(rgb.ColorHSV(pixelHue)));
      }
    }

    rgb.show(); // Update strip with new contents
    // There's no delay here, it just runs full-tilt until the timer and
    // counter combination below runs out.

    firstPixelHue += 40; // Advance just a little along the color wheel
    if((millis() - lastTime) > whiteSpeed) { // Time to update head/tail?
      if(++head >= rgb.numPixels()) {      // Advance head, wrap around
        head = 0;
        if(++loopNum >= loops) return;
      }
      if(++tail >= rgb.numPixels()) {      // Advance tail, wrap around
        tail = 0;
      }
      lastTime = millis();                   // Save time of last movement
    }
  }
}
Comments are closed.