[Final Images and Video Not Available – the device is currently in Pittsburgh and I am not available to take a proper image of the final product.]
Overview
This project is an alarm clock that will drive around your room and flicker your lights until you wake up and stop it.
Process images and review
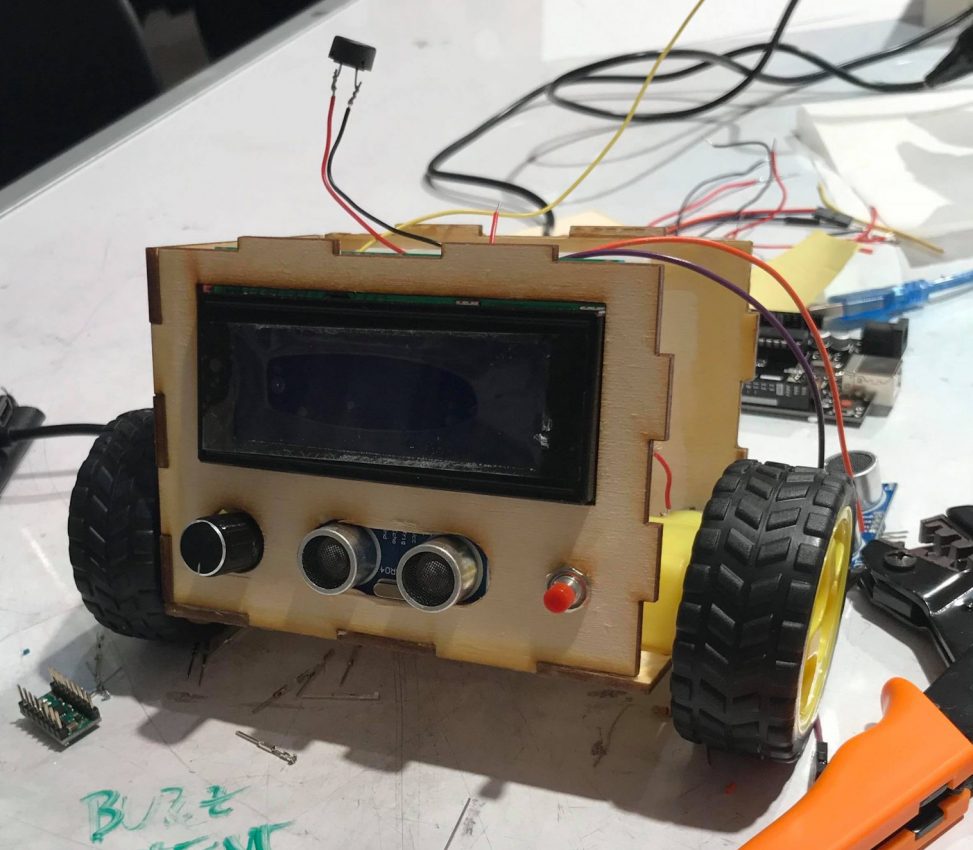
I used a smaller screen than I had wanted. Essentially, I didn’t want a very big boxy alarm clock, since I thought it would look a little ugly aesthetically speaking. This decision was a factor in the next decision I will talk about.
Making the smaller screen functional
I made the UI simpler than I wanted it to be. At first, I wanted the screen to have options for how quick the robot would run around, how quick the lights would flicker, how easy it would be for the robot to dodge obstacles, and then all the setting for time, date, alarm etc. I also originally wanted it to show the seconds. But due to difficulty and space, I decided to go for a much simpler UI. Which looks like the following.
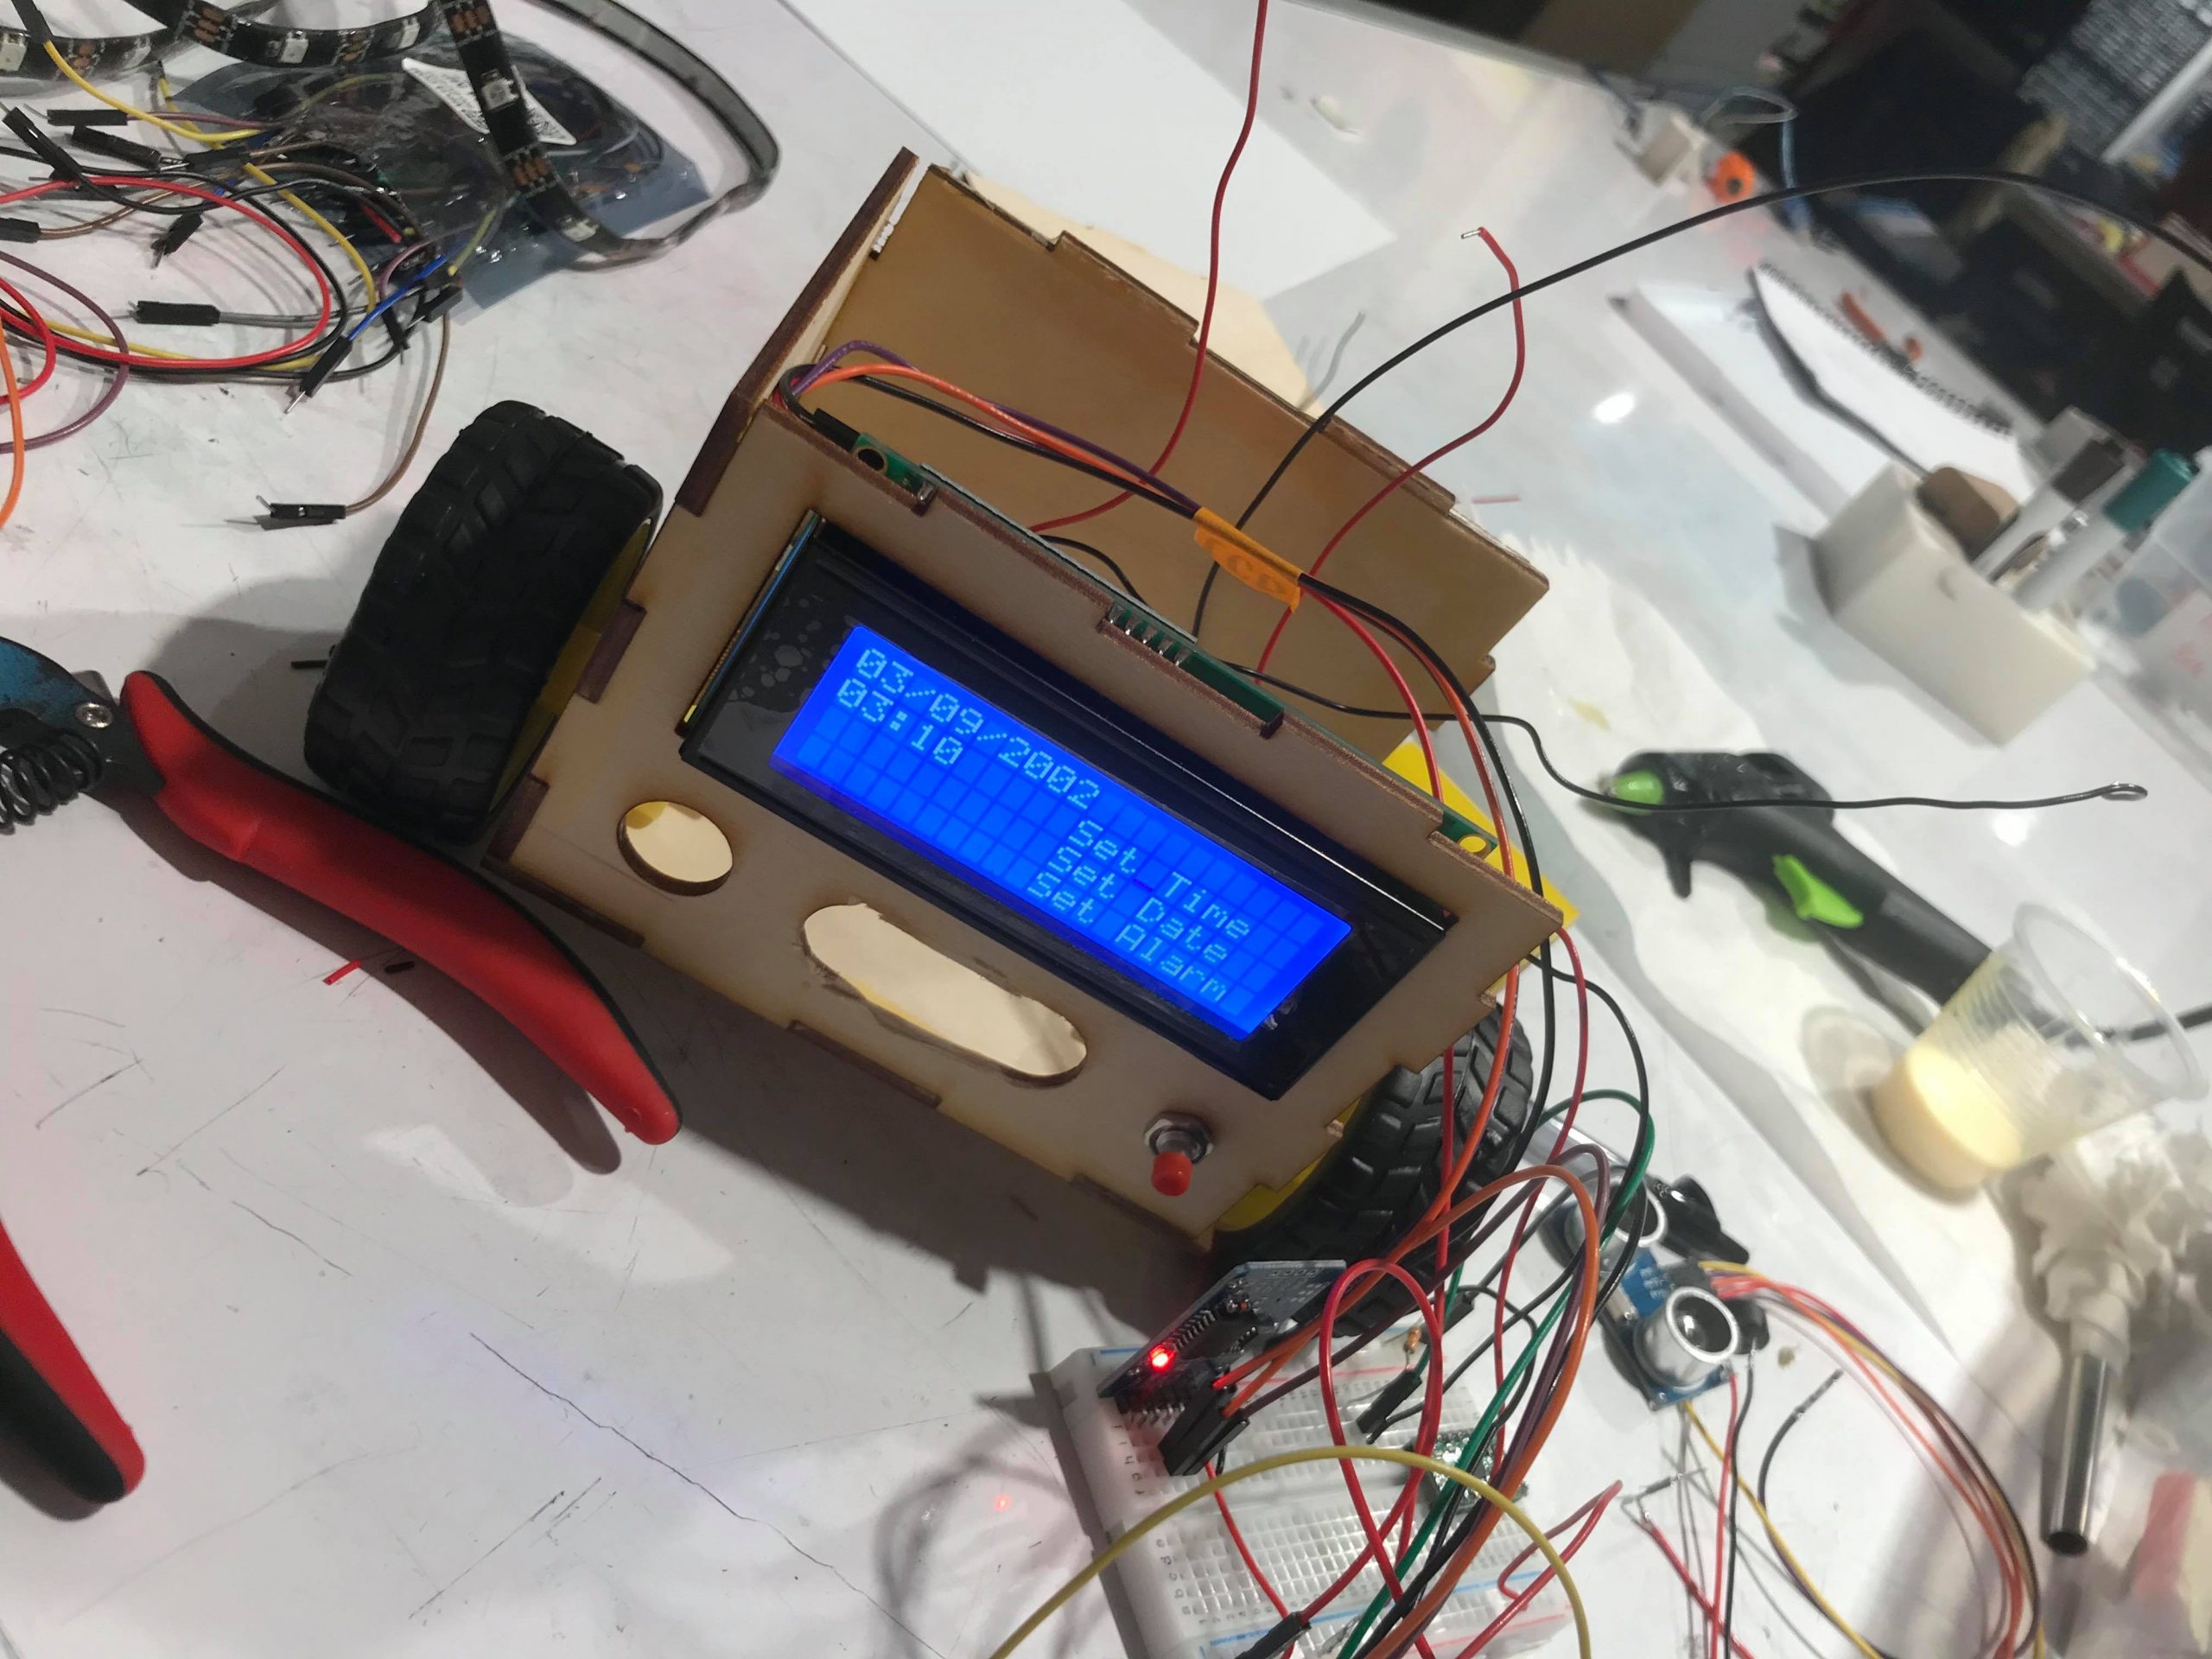
Simpler UI
Another decision I had to make early on was how many wheels I wanted and how big. Considering that I had some easy pre-geared wheels I kind of wanted to integrate those into the design to make my life easier. This also meant I had to build around the size of the wheels. Most alarm clocks aren’t that big, which mean’t if I was using those wheels, things were going to have to be squished into to the smallest space possible. I ended up just using two of those pre-geared wheels and adding a small point turn bearing later to conserve space for electronics.
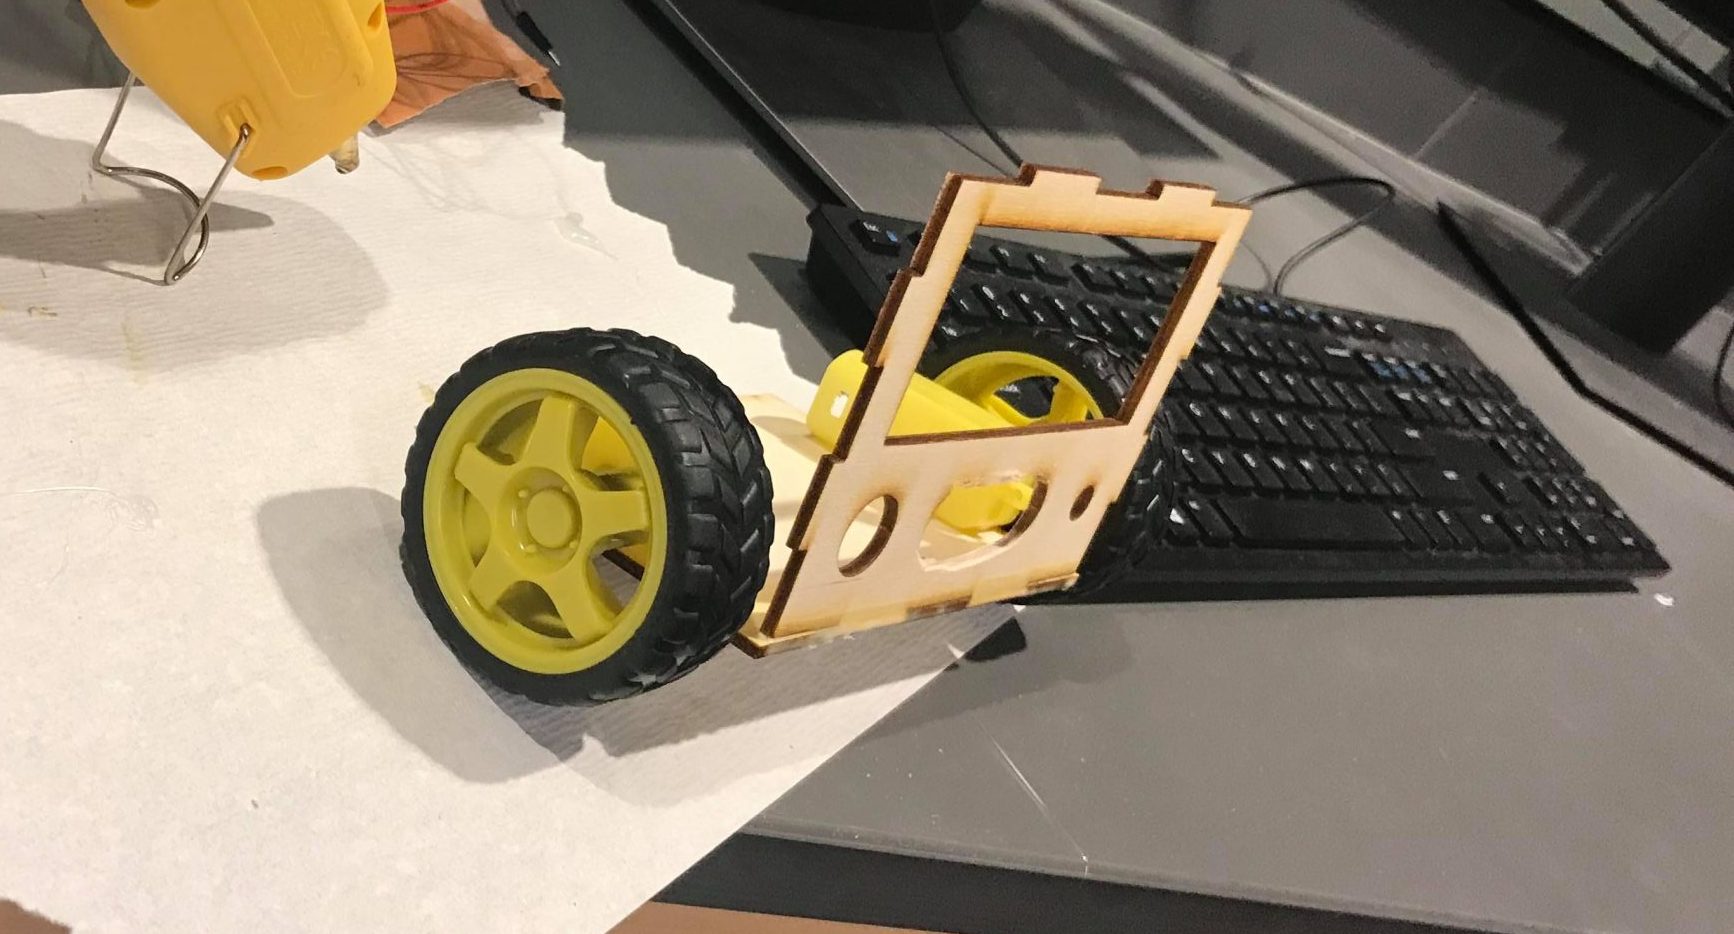
Two wheel with small point turn bearing decision
Here is an image of my initial idea for this project and how I wanted it to turn out.

Original brainstorming
Discussion
Response
“Where would be the light be located? Also will other lights be hinder the photoresistor? The user interface is easy, with easy buttons and options to choose from, the ultrasonic sensor works great to avoid bumping into other stuff. I would like to see how big the range the movement is. In the demo it stayed pretty much in the same area, I would like to see it run around like in bigger area, so it would make you get up more. “
The light would be located anywhere in your room. The idea was that you would be able to purchase a bigger set of NeoPixel lights and hang them anywhere around your room. Something I could work on is making a better system to trigger the lights. As of now, with no adjustable threshold, the lights would not go off in a very dark room. I would really like to add a magnetic trigger so that this would work in a lot more environments than the current system does. The device currently has an infinite range, it only looked like it stayed in the same area because I forced it into a circle with my foot.
“I think the entire idea is really cool and i really appreciate the attention to details that you have p especially in terms of the user interface! I think the entire project is really crazy and I am super happy that you were able to get a lot of your features done!“
Thank you so much! It took a lot of time to get some of these features to work, especially the UI. I do think I could have paid more attention to detail if I had paced myself a little better considering our time constraint.
Self critique
I am satisfied with how it came out, but not entirely happy with it. My project basically does what I wanted it to do, but the end game of my process was very rushed. (my fault though) If I had paced myself and spent more time I think I could have solved some issues with some better solutions than the ones I currently have. I also think I could have made it look a lot more aesthetically pleasing if I had given myself more time. In conclusion, I did meet my goals, but not my own expectations.
What you learned
What would you do differently next time?
I would have allotted more time to this project. Most of the project was done in under 10 hours on the day before it was due. This gave me very little time to come up with elegant solutions to problems I had. It also gave me little time to manufacture and work on aesthetics.
Did you get hung up at a particular point in progress, or fail to see an easy workaround to a problem?
I think the main issue here is that I thought I had solved the hardest issue of the project and then left rest of the project to a way later date. When that date came, a lot of unexpected issues came up and I only had a couple of hours to fix them. This also led to me to “tunnelvision” and put my brain in a box. I only realized some better solutions after the due date.
What you learned about your own abilities and/or limitations
Given the amount of time I used to produce a working product I think I did a very good job. On the flip side, I am my own limiter. I can only imagine what I would’ve produced if I had used the time I had more wisely.
Next steps
Do you expect to build another iteration of this project?
If Zach would give us extra credit to do so, I would not be apposed to building another iteration. Well, if I were to build another iteration, I would implement a magnetic trigger for the lights in the room. This would allow me to create a “home” for the alarm clock as it waits until the next alarm date. I would create an easy way to turn it off/on and a way to charge it in its “home”. I would also try to add a sound to it while the alarm goes off. It currently doesn’t have a sound due to some internal libraries colliding, but I would find a workaround to this. Lastly, I would make it more aesthetically pleasing.
Technical information
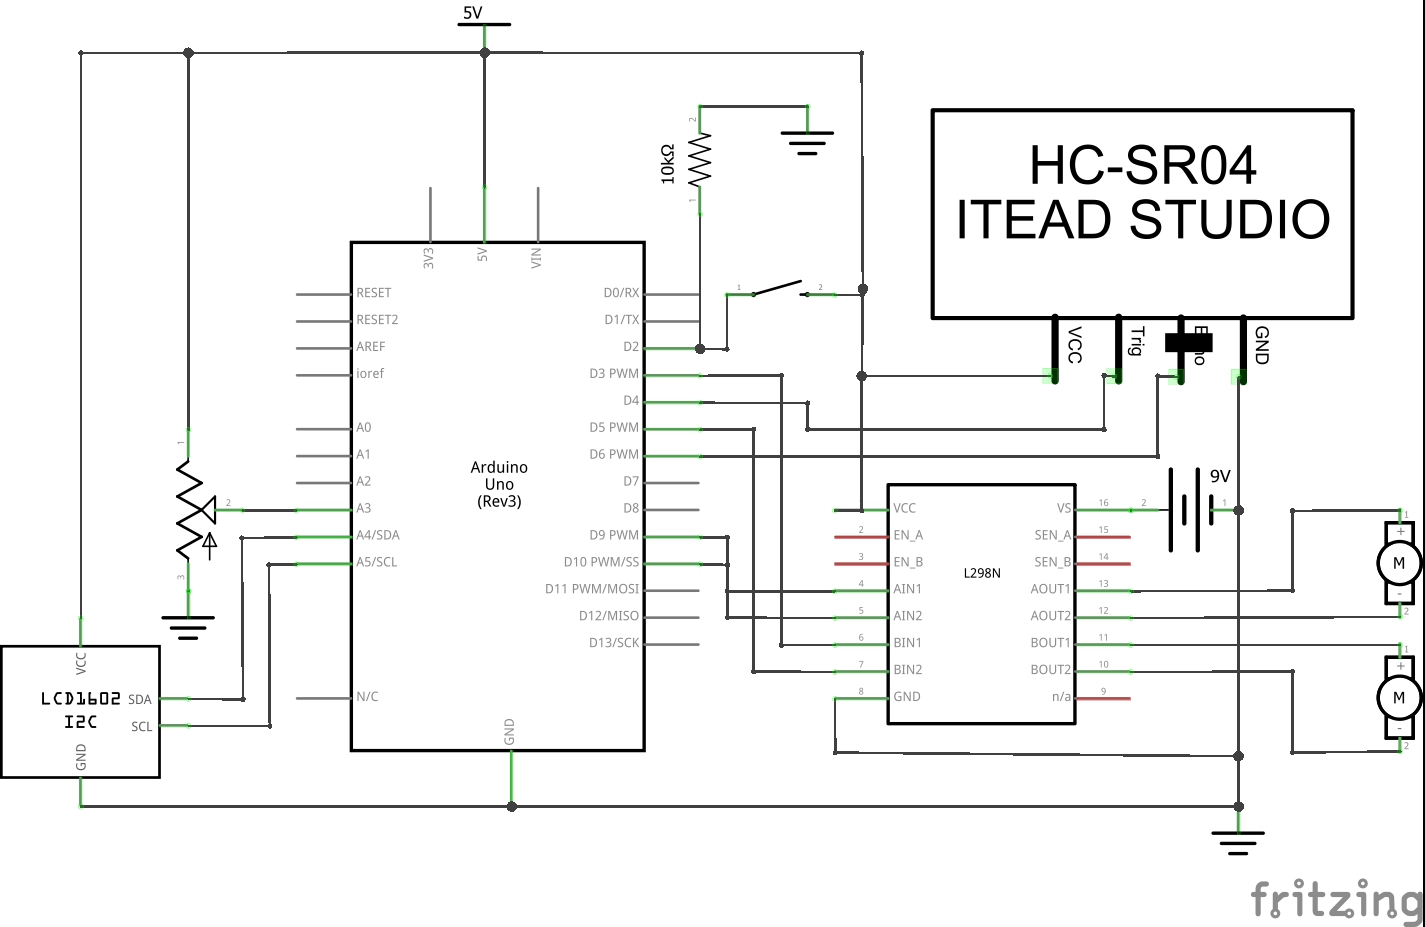
Alarm Clock Schematic
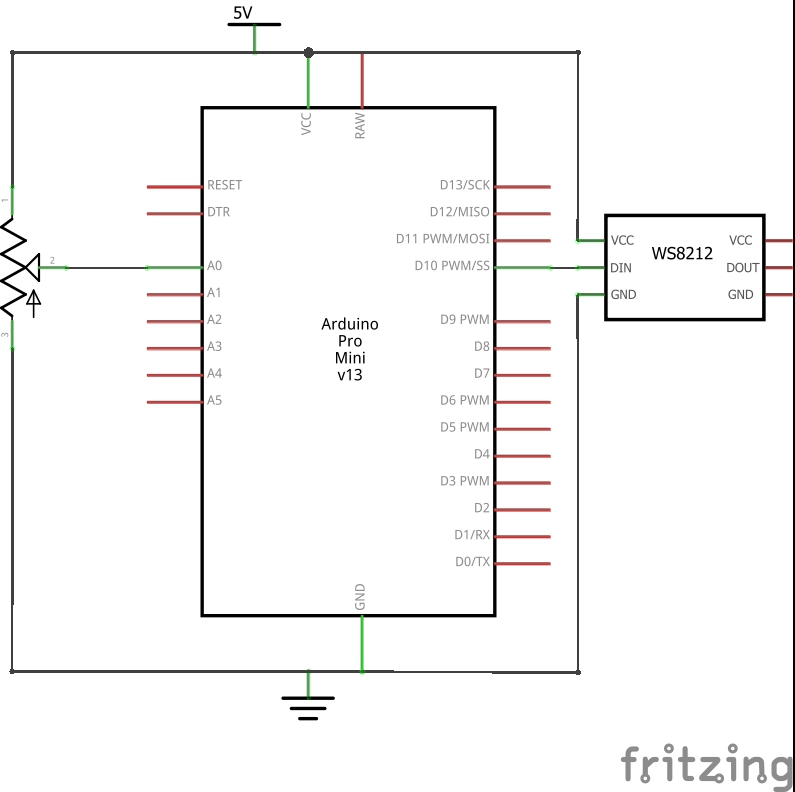
Lights Schematic
Alarm Clock Code
/* Catch the Clock (alarm clock code)
 * Estevan Chairez
 *
 * Description: This code runs all the logic for the alarm clock.
 * It will set up the menu screen and let the user select options,
 * trigger the motors to autonomously navigate its surrounding area
 * if the clock reaches the set alarm time and turn off to stop the alarm.
 * The potentiometer will act as a scroll-knob, the pushbutton as
 * a button to select options and numbers.
 *
 * Pin mapping:
 *
 * pin   | mode   | description
 * ------|--------|------------
 * A3     input     potentiometer
 * 2      input     momentary pushbutton
 * 4      input     TRIG pin for ultrasonic sensor
 * 6      input     ECHO pin for ultrasonic sensor
 * 3      output    B1IN for motor 1
 * 5      output    B2IN for motor 1
 * 9      output    A2IN for motor 2
 * 10     output    A1IN for motor 2
 *
 */
#include <DS1307RTC.h>
#include <Wire.h>
#include <LiquidCrystal_I2C.h>
#include <NewPing.h>

#define POTENT A3
#define BUTTON 2
#define TRIG 4
#define ECHO 6
#define MAX_DISTANCE 200
#define THRESHOLD 40
#define AIN_1 10
#define AIN_2 9
#define BIN_1 3
#define BIN_2 5

///////////////////////////////////
// global variables and objects
///////////////////////////////////

tmElements_t tm;
int alarmTime[2];
int knobPos;
int velocity = 70;
unsigned long minInPico = 60000;

bool clockState = true;
bool dateState = false;
bool timeState = false;
bool alarmState = false;
bool alarmOn = false;
bool hasAlarm = false;
bool reStart = true;

NewPing sonar(TRIG, ECHO, MAX_DISTANCE);
LiquidCrystal_I2C lcd(0x27, 20, 4);


////////////////////////////////////
// clock functions
////////////////////////////////////
void displayDate(int character, int line, tmElements_t tm)
{
  lcd.setCursor(character, line);
  if (tm.Month < 10) lcd.print("0");
  lcd.print(tm.Month);
  lcd.print("/");
  if (tm.Day < 10) lcd.print("0");
  lcd.print(tm.Day);
  lcd.print("/");
  lcd.print((String)(1952 + tm.Year));
}

void displayTime(int character, int line, tmElements_t tm)
{
  String minutes, hours;
  lcd.setCursor(character, line);
  if (tm.Hour < 10) lcd.print("0");
  lcd.print(tm.Hour); lcd.print(":");
  if (tm.Minute < 10) lcd.print("0");
  lcd.print(tm.Minute);
}

// displays the main clock idle screen, which has the
// options to set time, date and alarm
void displayClock()
{
  if (RTC.read(tm)) {
    Serial.println(tm.Hour);
    Serial.println(tm.Minute);
    lcd.noCursor();
    displayDate(0, 0, tm);
    displayTime(0, 1, tm);
  }
  lcd.setCursor(10, 1);
  lcd.print("Set Time");
  lcd.setCursor(10, 2);
  lcd.print("Set Date");
  lcd.setCursor(10, 3);
  lcd.print("Set Alarm");
  lcd.cursor();
}

/////////////////////////////////////
// other functions
/////////////////////////////////////

// gives the right range when trying to set days, minutes, hours etc.
int configureNumber(int type)
{
  int num;
  lcd.noCursor();
  while (true)
  {
    lcd.clear();
    lcd.setCursor(4, 1);
    if (type == 1) {
      num = map(analogRead(POTENT), 0, 1023, 0, 24);
      lcd.print("Set Hour: ");
    }
    else if (type == 2) {
      num = map(analogRead(POTENT), 0, 1023, 0, 60);
      lcd.print("Set Minute: ");
    }
    else if (type == 3) {
      num = map(analogRead(POTENT), 0, 1023, 0, 12);
      lcd.print("Set Month: ");
    }
    else if (type == 4) {
      num = map(analogRead(POTENT), 0, 1023, 0, 31);
      lcd.print("Set Day: ");
    }
    else {
      num = map(analogRead(POTENT), 0, 1023, 1980, 2050);
      lcd.print("Set Year: ");
    }
    lcd.print(num);
    delay(200);
    if (digitalRead(BUTTON) == HIGH) break;
  }
  return num;
}

// autonomous control of robot traveling around area once
// alarm is set off
void alarmProtocol()
{
  lcd.noCursor();
  lcd.clear();
  while (true)
  {
    // turn in place
    if (sonar.ping_cm() < THRESHOLD)
    {
      analogWrite(AIN_1, 0);
      analogWrite(AIN_2, velocity);
      analogWrite(BIN_1, velocity);
      analogWrite(BIN_2, 0);
      delay(100);
    }
    // go straight
    else
    {
      analogWrite(AIN_1, 0);
      analogWrite(AIN_2, velocity);
      analogWrite(BIN_1, 0);
      analogWrite(BIN_2, velocity);
      delay(100);
    }
    // turn motors off
    if (digitalRead(BUTTON) == HIGH)
    {
      analogWrite(AIN_1, 0);
      analogWrite(AIN_2, 0);
      analogWrite(BIN_1, 0);
      analogWrite(BIN_2, 0);
      delay(1000);
      break;
    }
  }
  hasAlarm = false;
  clockState = true;
  reStart = true;
}

void setup()
{
  pinMode(POTENT, INPUT);
  pinMode(BUTTON, INPUT);
  pinMode(AIN_1, OUTPUT);
  pinMode(AIN_2, OUTPUT);
  pinMode(BIN_1, OUTPUT);
  pinMode(BIN_2, OUTPUT);
  // set motors off
  analogWrite(AIN_1, 0);
  analogWrite(AIN_2, 0);
  analogWrite(BIN_1, 0);
  analogWrite(BIN_2, 0);

  // default clock in lcd
  lcd.begin(20, 4);
  lcd.backlight();
  displayClock();
  lcd.cursor();
}


void loop()
{
  // default state to go into other menus
  if (clockState)
  {
    // brings you back to default menu
    if (reStart) {
      lcd.clear();
      displayClock();
      reStart = false;
    }
    unsigned long currentMillis = millis();
    if (currentMillis > minInPico) {
      displayClock();
      currentMillis = 0;
    }

    // logic for set time, date, alarm settings
    knobPos = map(analogRead(POTENT), 0, 1023, 1, 4);
    if (knobPos != 4) lcd.setCursor(13, knobPos);
    if (hasAlarm && tm.Hour == alarmTime[0] && tm.Minute == alarmTime[1]) {
      clockState = false;
      alarmOn = true;
    }
    if (knobPos == 1 && digitalRead(BUTTON) == HIGH) {
      lcd.clear();
      clockState = false;
      timeState = true;
    } else if (knobPos == 2 && digitalRead(BUTTON) == HIGH) {
      lcd.clear();
      clockState = false;
      dateState = true;
    } else if (knobPos == 3 && digitalRead(BUTTON) == HIGH) {
      lcd.clear();
      clockState = false;
      alarmState = true;
    }
    delay(200);
  }
  // to set time
  else if (timeState)
  {
    delay(100);
    tm.Hour = configureNumber(1);
    delay(100);
    tm.Minute = configureNumber(2);
    timeState = false;
    clockState = true;
    reStart = true;
    RTC.write(tm);
    delay(100);
  }
  // to set date
  else if (dateState)
  {
    delay(100);
    tm.Month = configureNumber(3);
    delay(100);
    tm.Day = configureNumber(4);
    delay(100);
    tm.Year = configureNumber(5);
    dateState = false;
    clockState = true;
    reStart = true;
    RTC.write(tm);
    delay(100);
  }
  // to set alarm
  else if (alarmState)
  {
    delay(100);
    alarmTime[0] = configureNumber(1);
    delay(100);
    alarmTime[1] = configureNumber(2);
    delay(100);
    alarmState = false;
    clockState = true;
    reStart = true;
    hasAlarm = true;
    RTC.write(tm);
    delay(100);
  }
  // sets robot to run around area
  else if (alarmOn) alarmProtocol();
}
Lights Code
/* Catch the Clock (lights code)
 * Estevan Chairez
 *
 * Description: This code runs the logic for the flickering
 * lights portion of the project. If the potentiometer reads
 * a value under a certain threshold, it will flicker the lights
 * and if not, the lights stay off.
 *
 * Pin mapping:
 *
 * pin   | mode   | description
 * ------|--------|------------
 * A0     input     potentiometer
 * 10     output    neopixel strip
 */
#include <Adafruit_NeoPixel.h>

#define LED 10
#define LED_COUNT 42
#define PHOTO A0
#define THRESH 600

Adafruit_NeoPixel strip = Adafruit_NeoPixel(LED_COUNT, LED, NEO_GRB + NEO_KHZ800);
uint32_t white = strip.Color(255, 255, 255);

void setup() {
  pinMode(PHOTO, INPUT);

  strip.begin();
  strip.show();
}

void loop(){
  int photoVal =analogRead(PHOTO);

  // flash lights
  if (photoVal < THRESH){
    strip.fill(white);
    strip.show();
    delay(500);
    strip.clear();
    strip.show();
    delay(500);
  }
  // lights off
  else {
    strip.clear();
    strip.show();
  }
}
Comments are closed.