Overview
Description
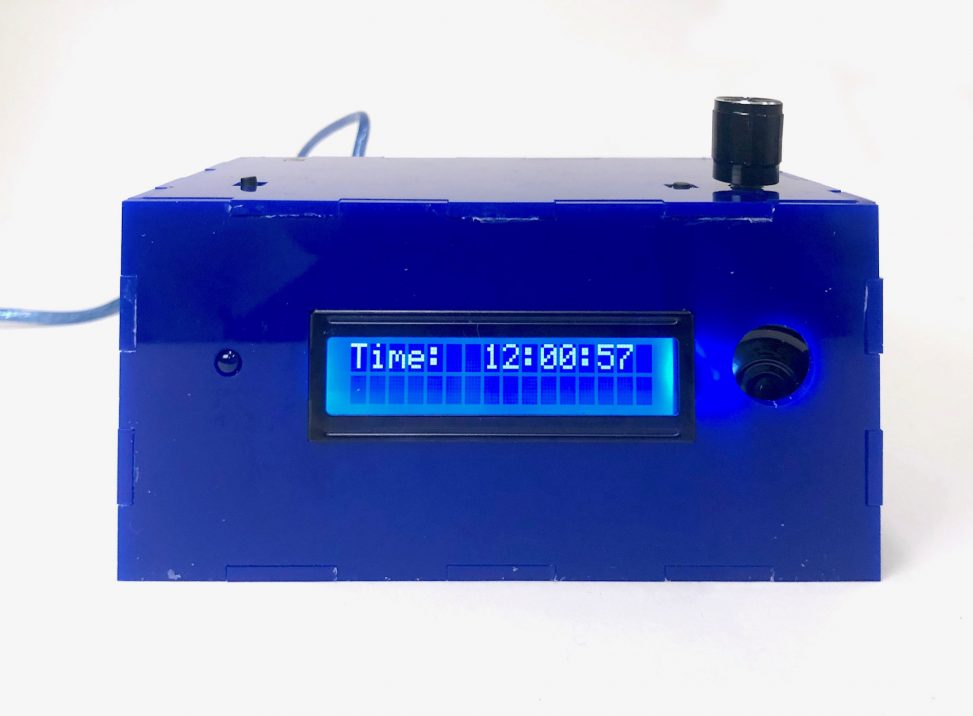
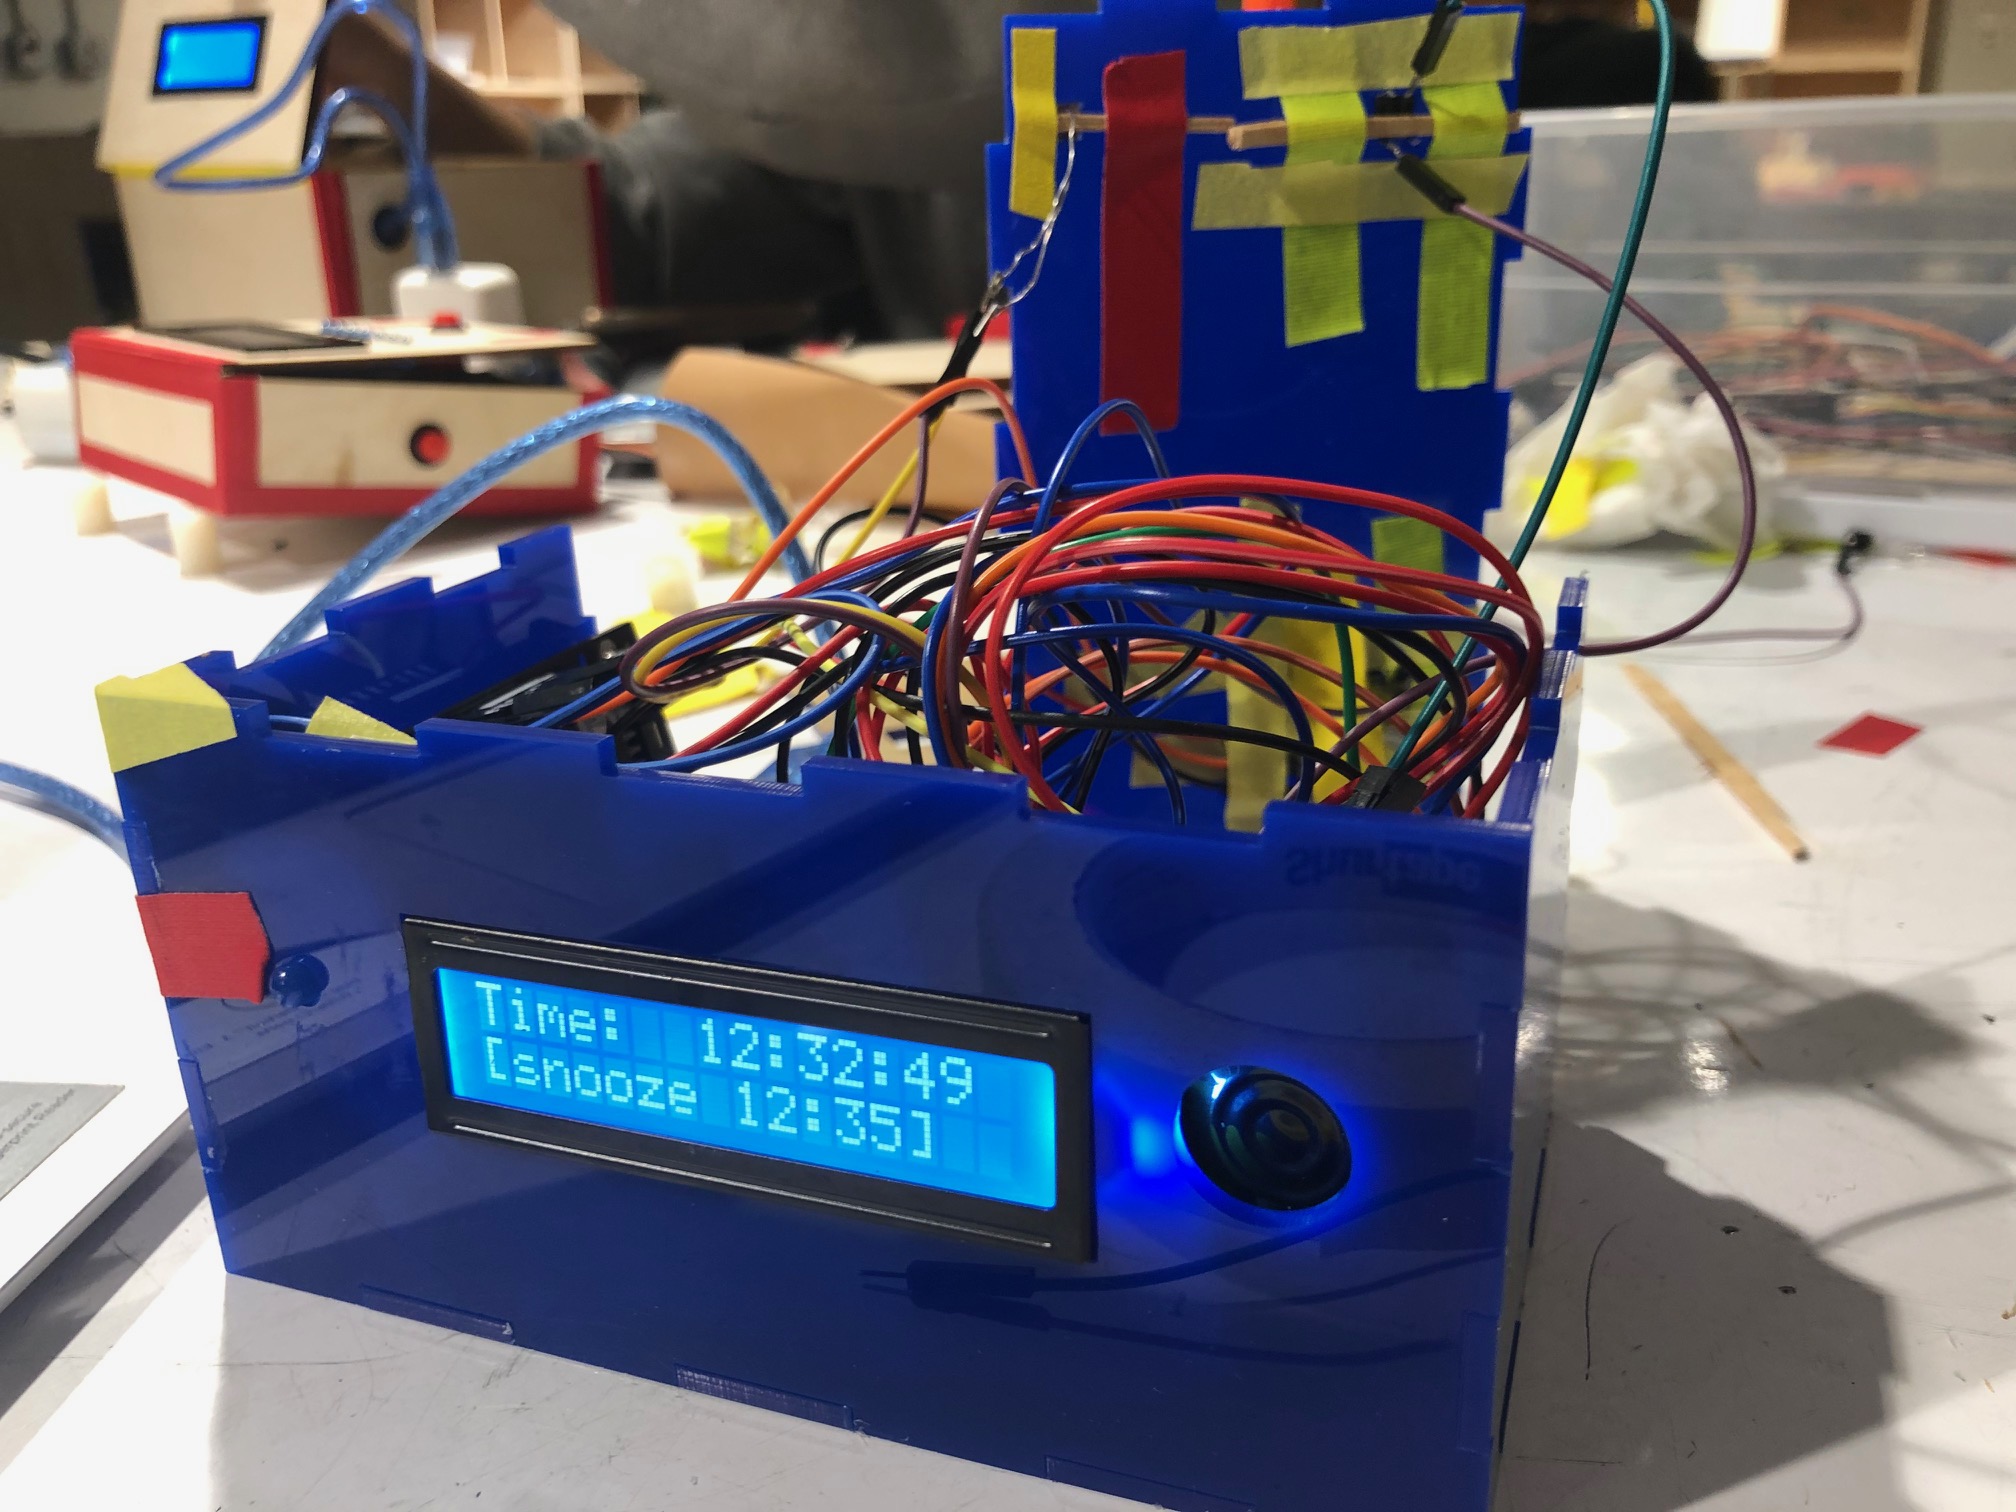
An interactive alarm clock that reminds you to go to sleep if you are still awake past a certain bedtime by detecting light levels in the room.
A photoresistor senses light levels in the room.
There is a menu system to view alarm settings.
You can edit the alarm as well as the time.
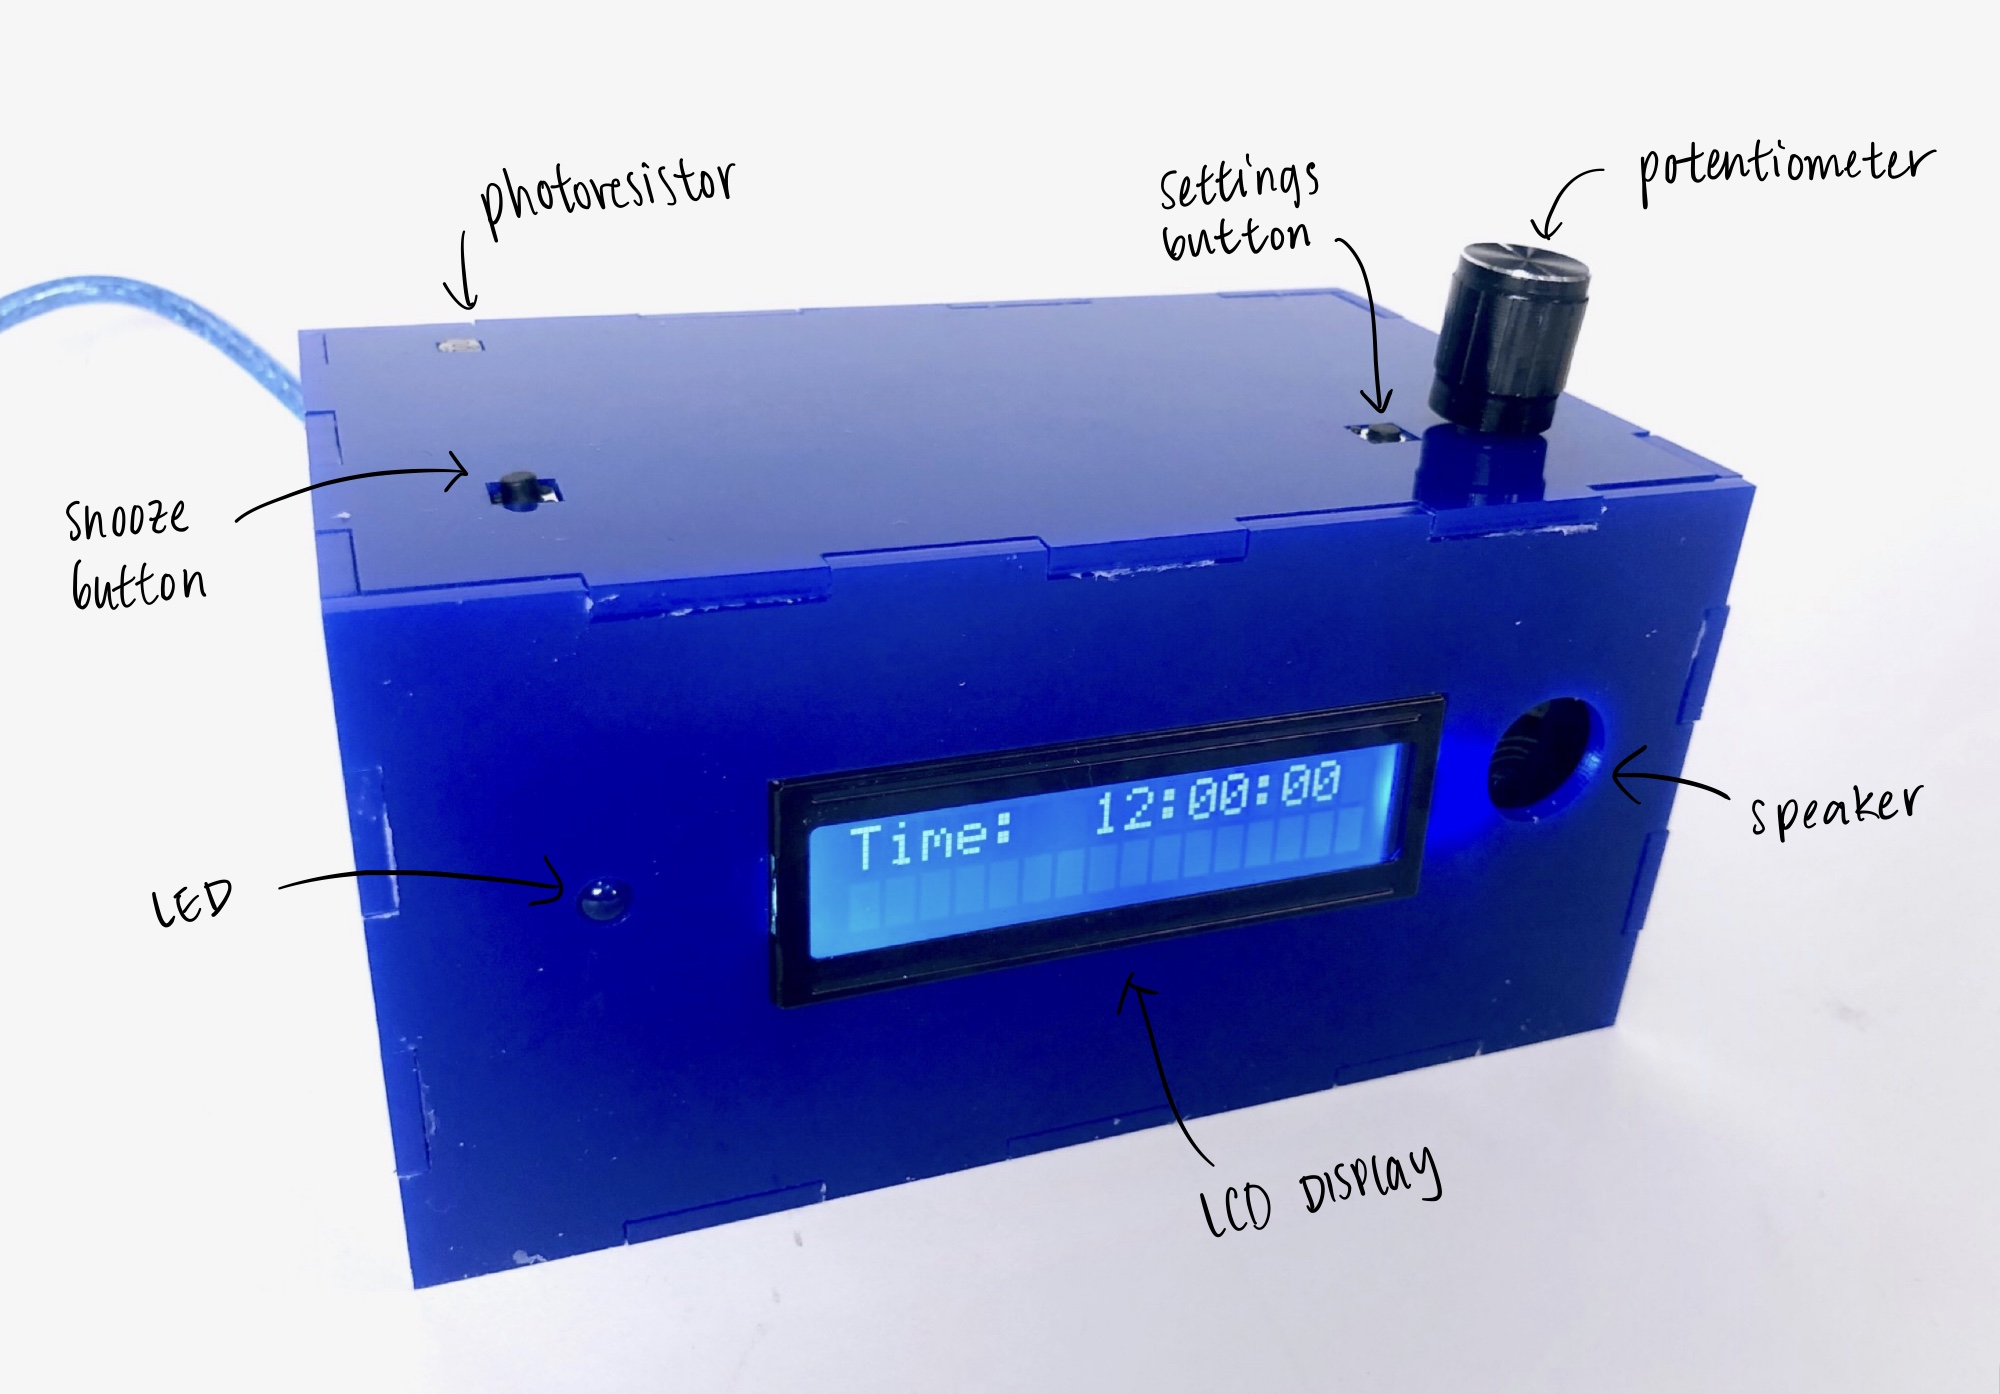
Labeled physical components of the alarm clock.
[Note: detailed photos of the device could not be provided]
Process Images and Review
Planning
I started with brainstorming ideas and sketching how I wanted the alarm clock to function and look like. I envisioned the device to resemble a regular alarm clock in form, but I also wanted to integrate the added functionality of light detection. It was definitely helpful to begin with a solid concept in mind for what I was building.
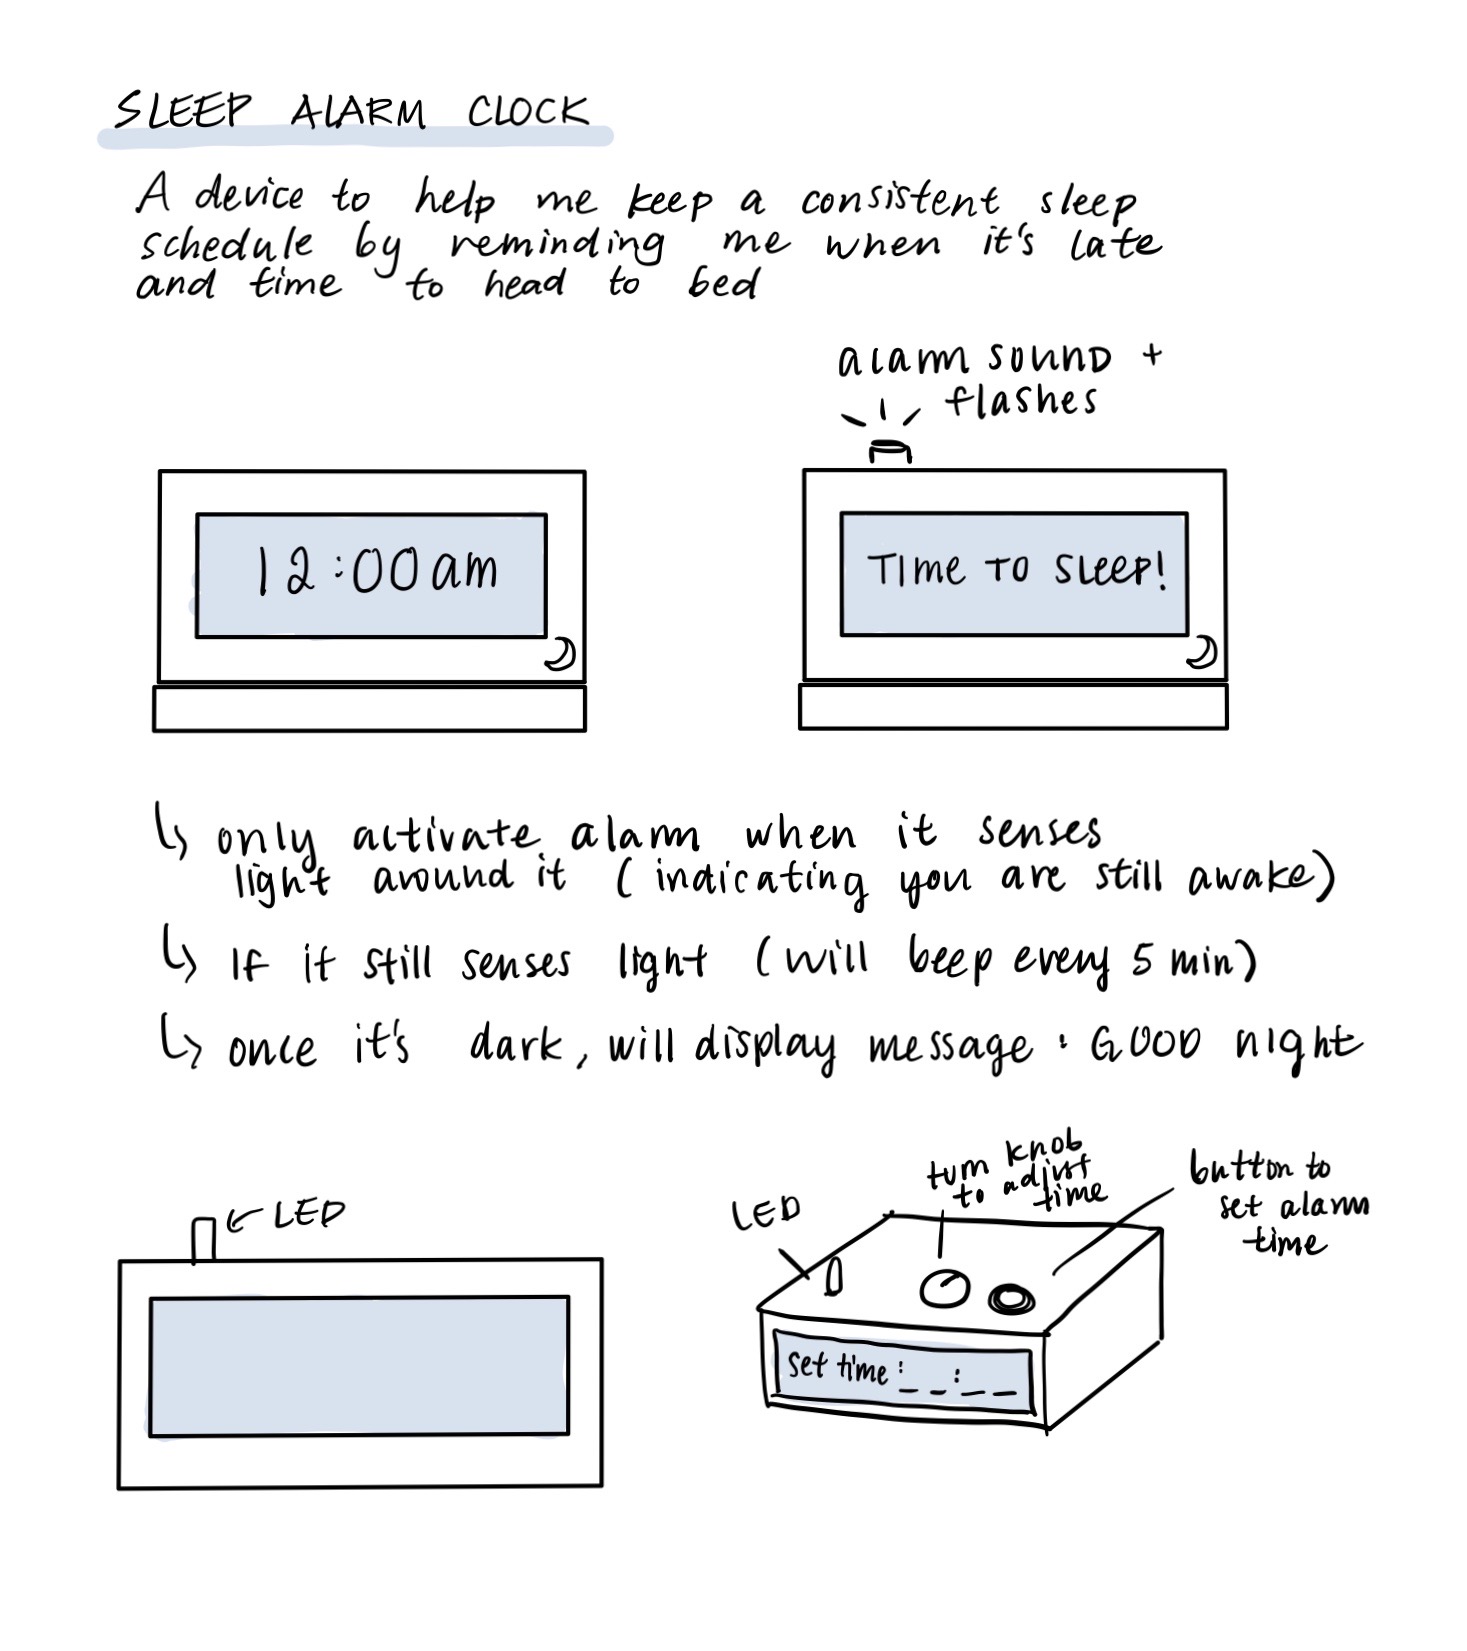
Initial concept sketches and notes.
Prototyping
The first two pieces I focused on were the LCD Display and the real time clock as these were the two fundamental components to a basic working clock. I was able to get the LCD to display the time data, although the time had to be hard coded in.
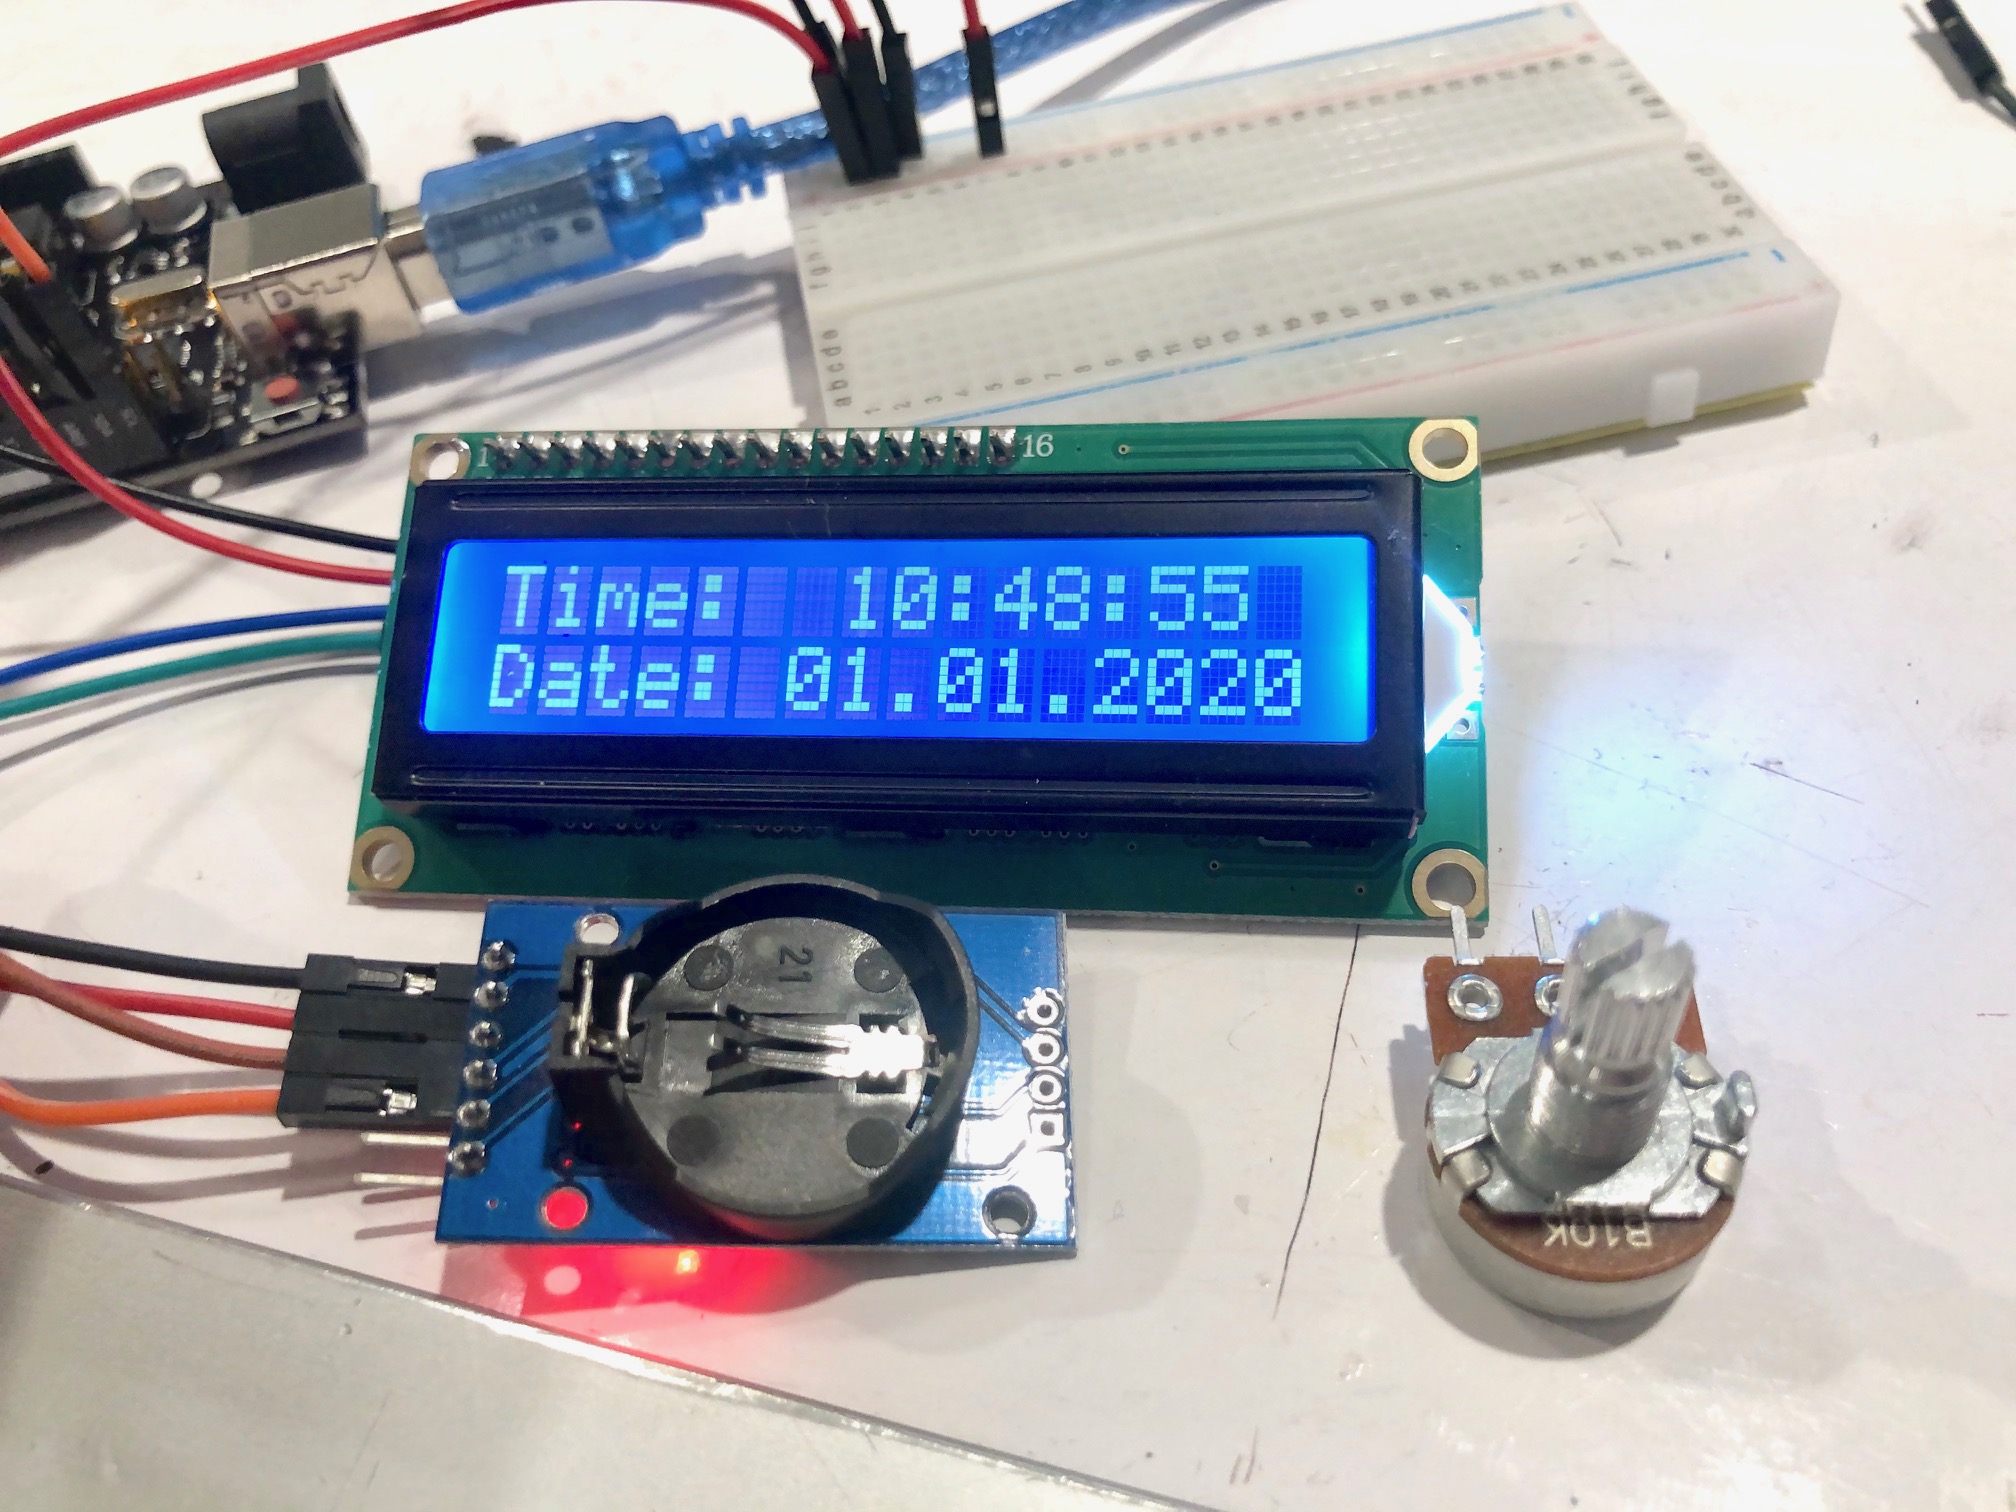
Building a basic functional clock.
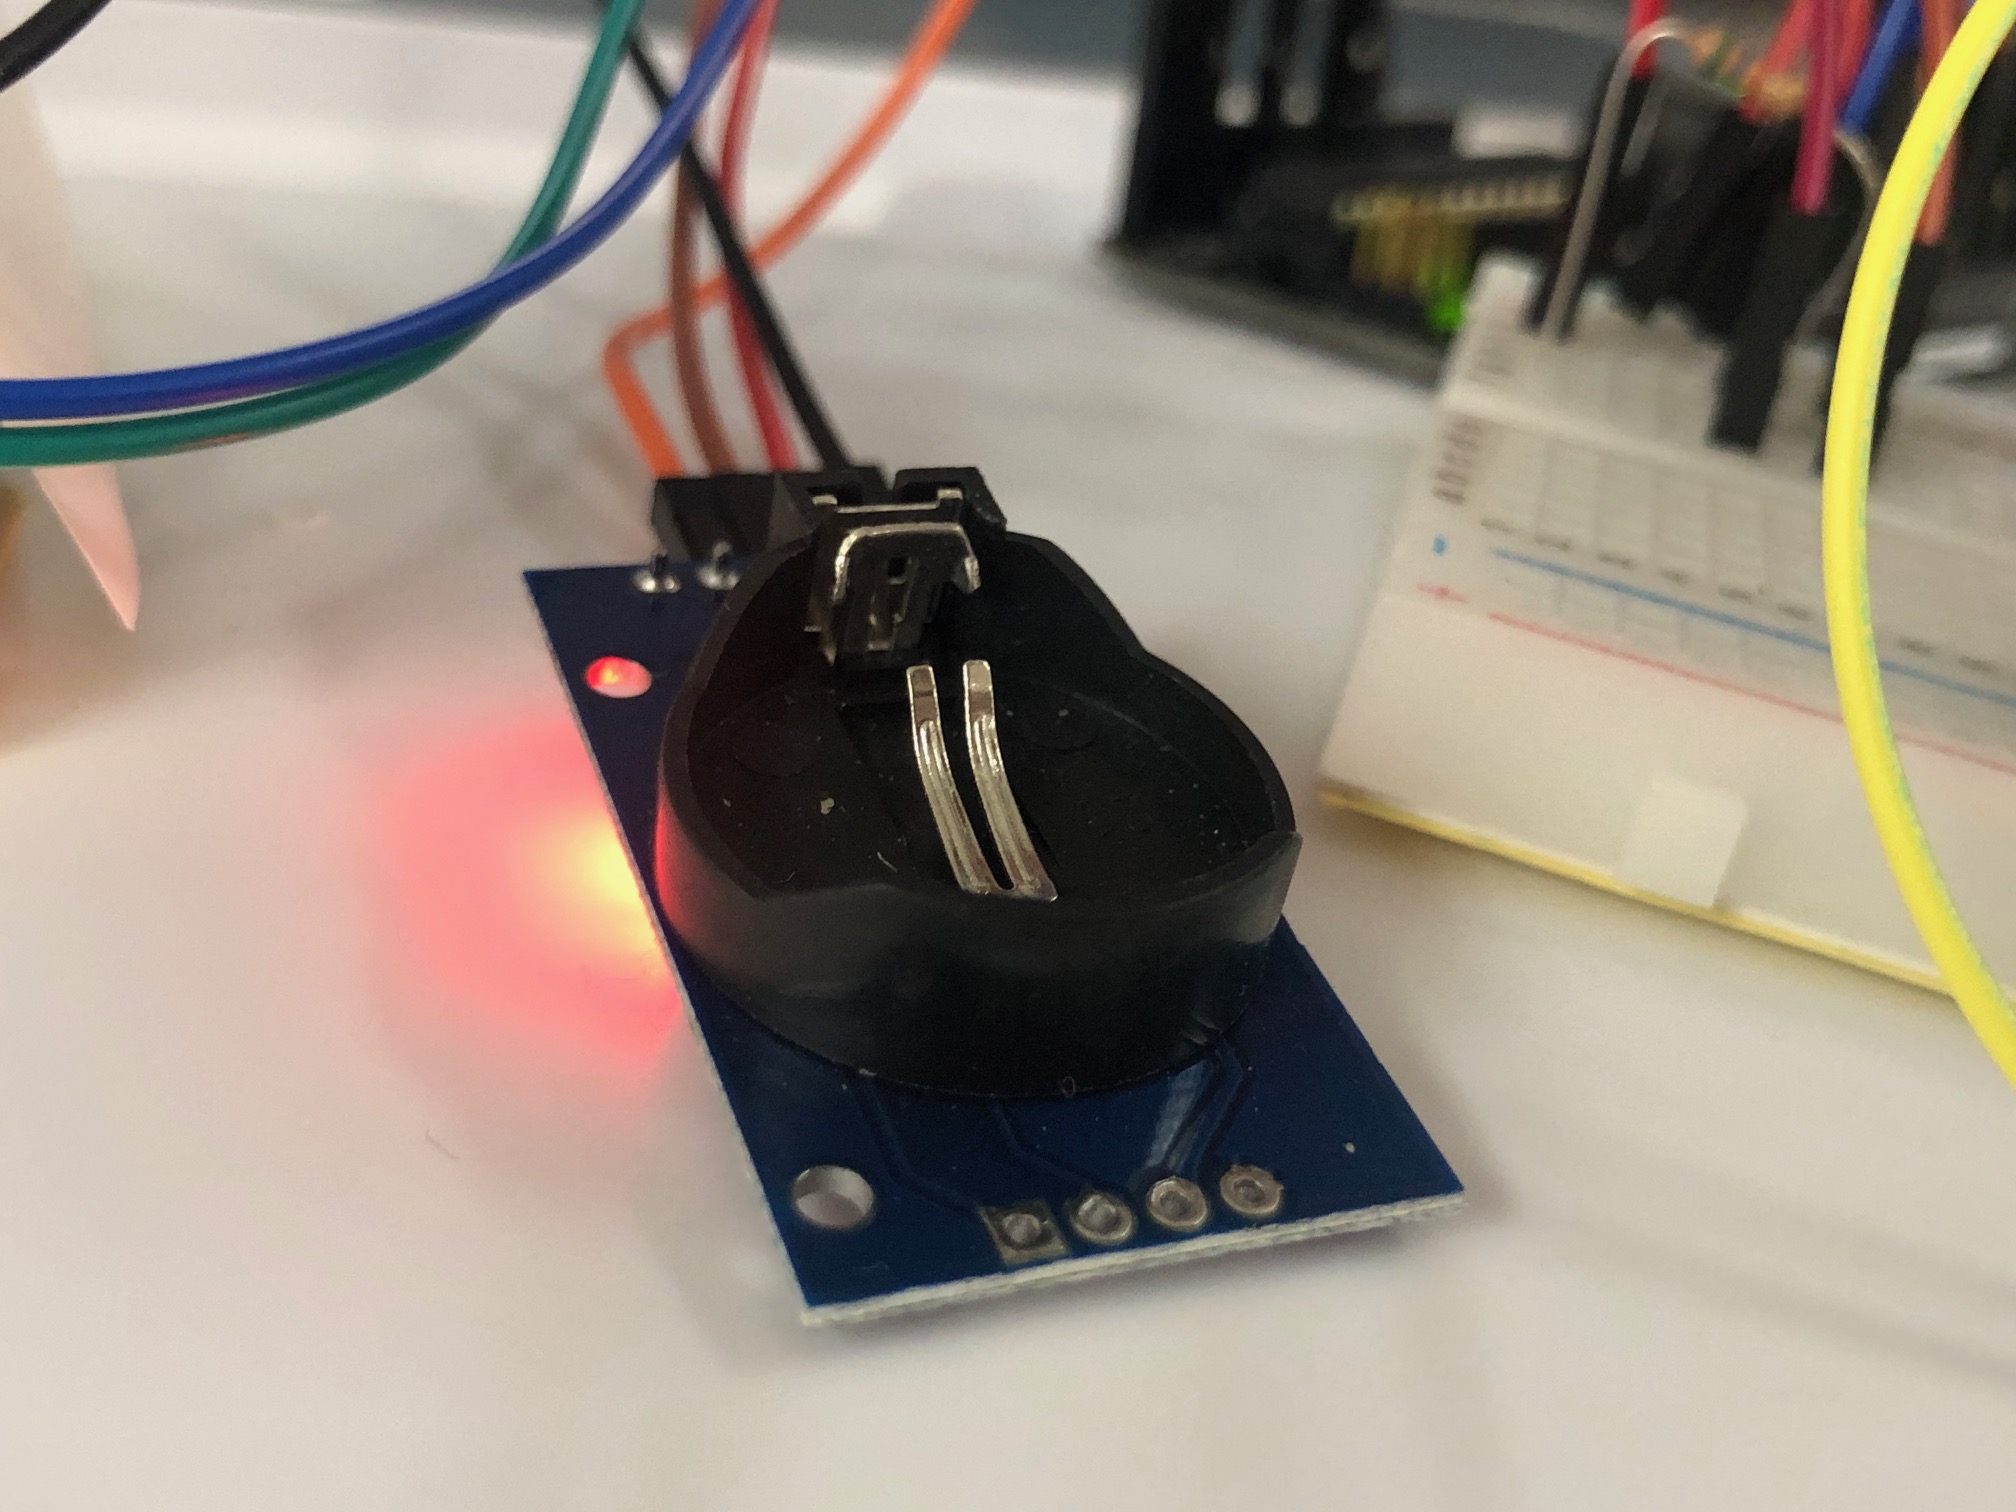
Real time clock used to measure time data.
I started early on the menu system to eliminate the hard coding issue and to help make alarm/general software testing easier. For user input, I used a potentiometer for entering values along a range and a push button to select options. The code for the menu system ended being one of most complex aspects of this project due to all the different settings with various inputs and screen displays.
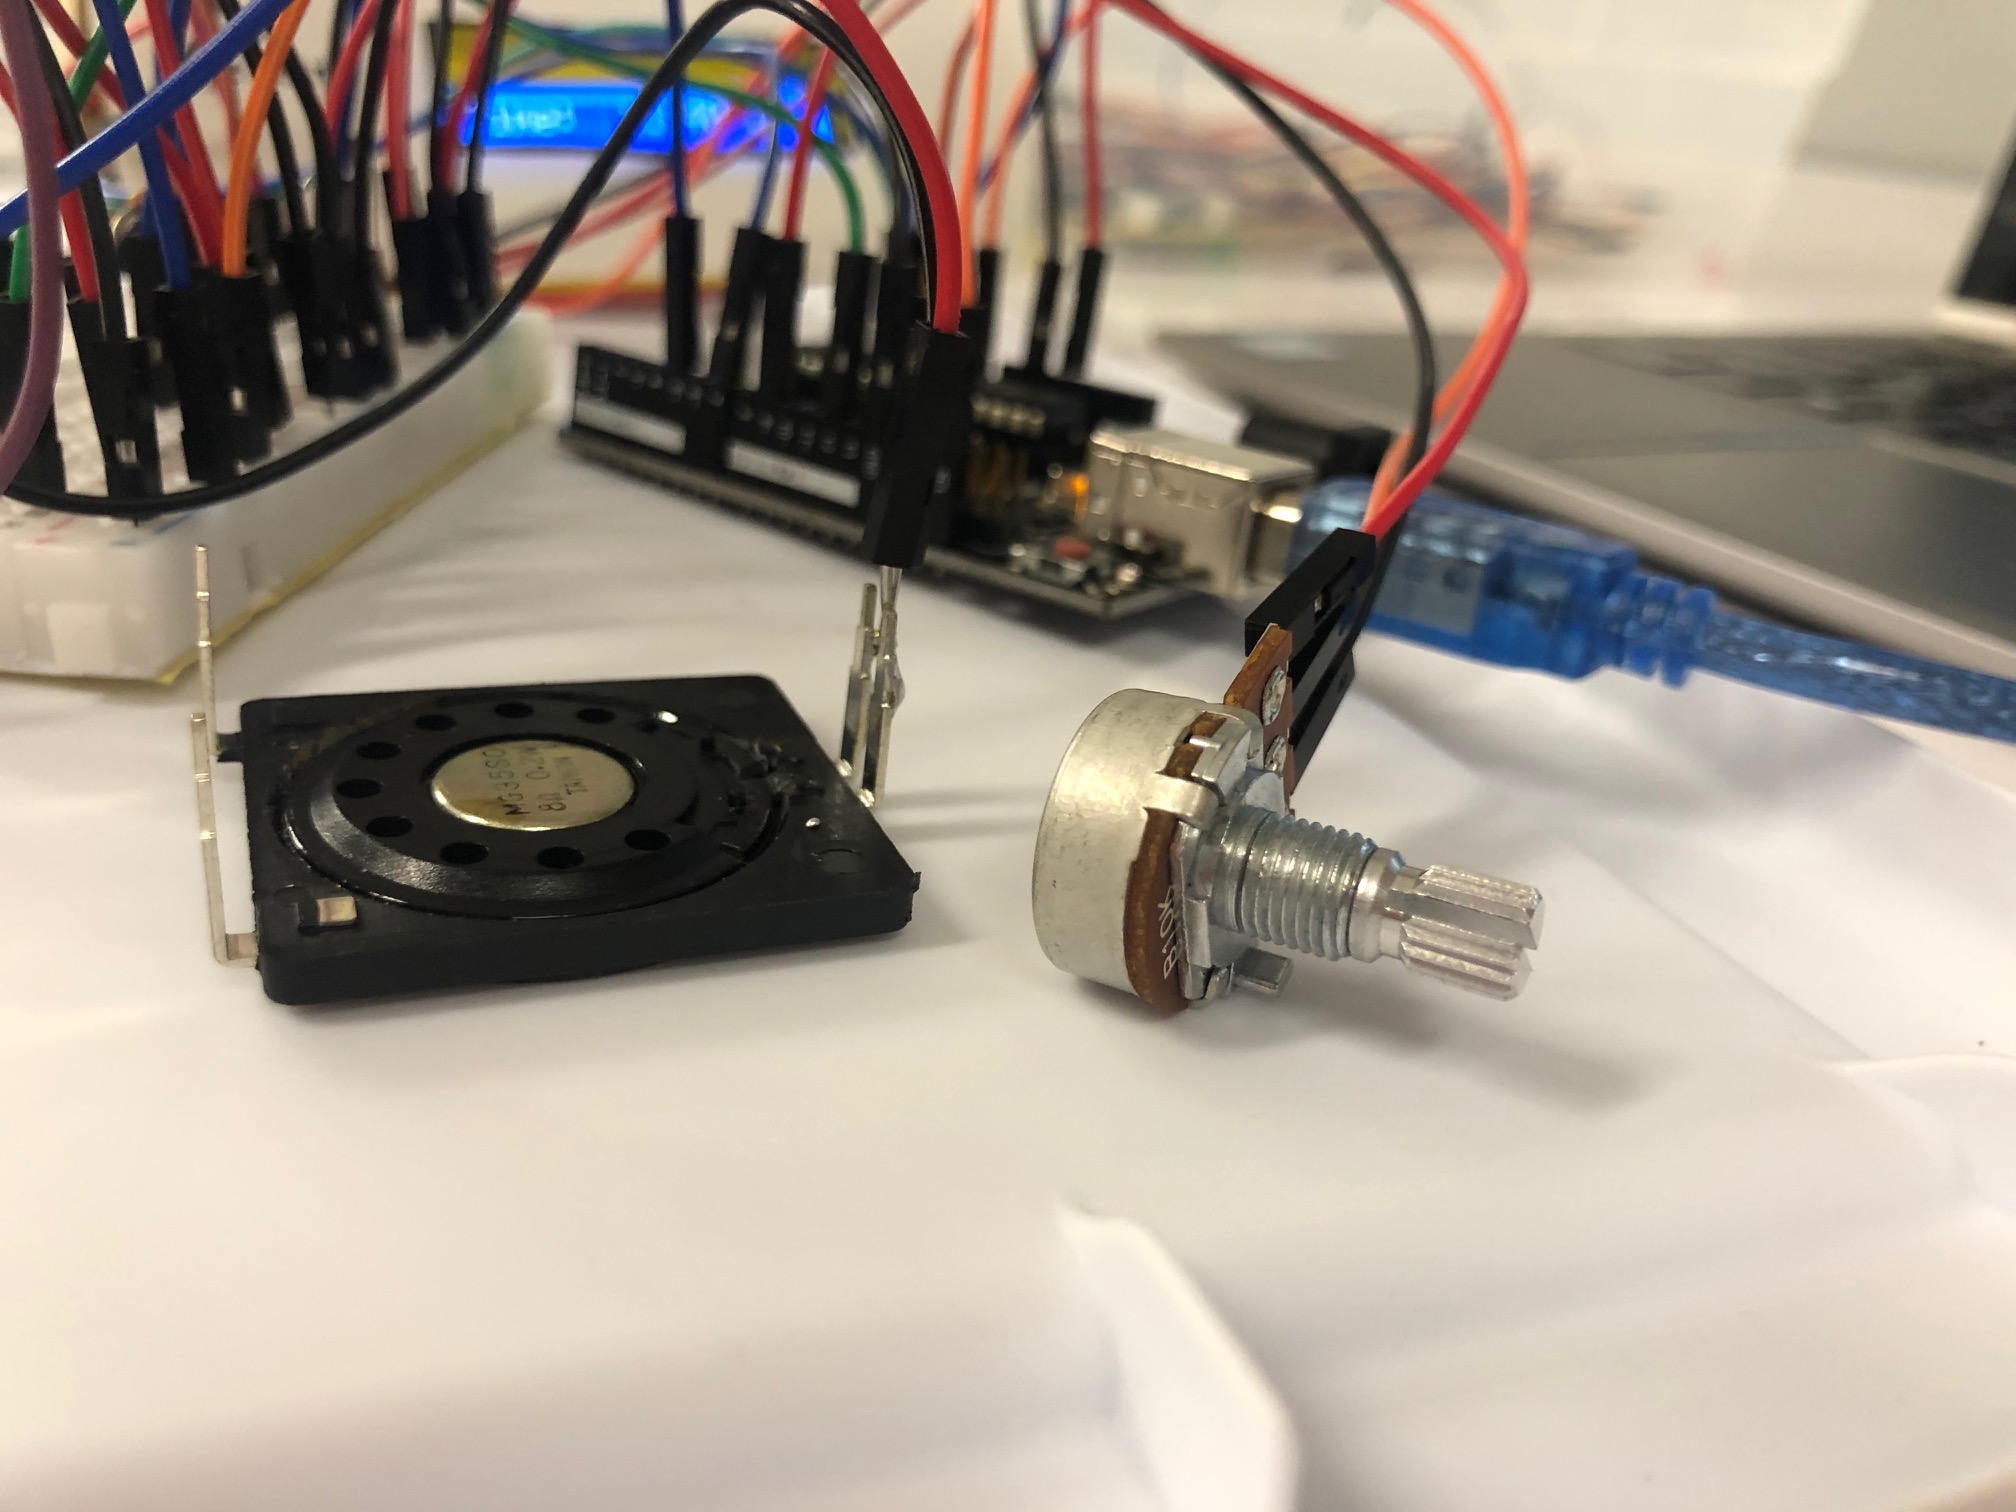
Speaker (left) and Potentiometer (right).
In place of the potentiometer and push button, I attempted to use a rotary encoder to make user input easier with continuous rotation and added button functionality. However, I spent way too much time trying to figure out the wiring and code to read inputs from the rotary encoder without much progress. I eventually switched back to my original choice of a separate potentiometer and push button since they were more familiar to me and already integrated into the menu code.
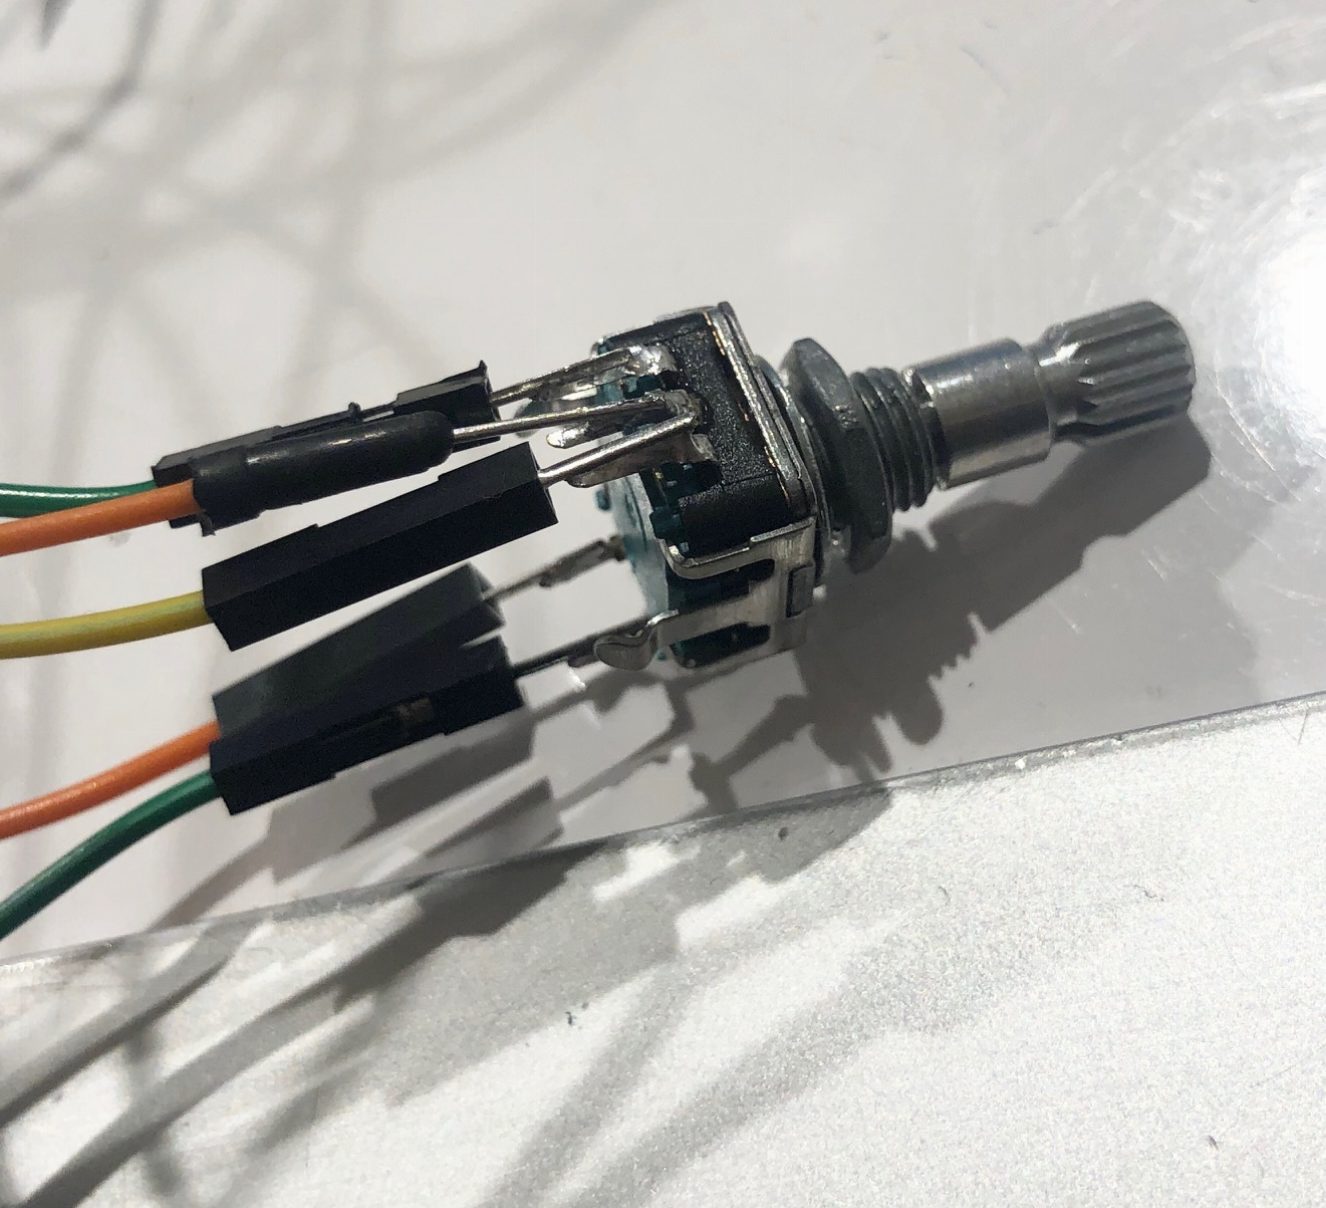
Rotary encoder component.
For the physical prototype, I just made a simple white box to hold the screen and drawn-on components.

Prototype built from cardboard and paper.
Final Development
I measured each of the components to ensure that they would fit appropriately. I sketched the location of each part and how large I wanted the physical box to be, keeping in mind that it had to hold both the Arduino and the breadboard.
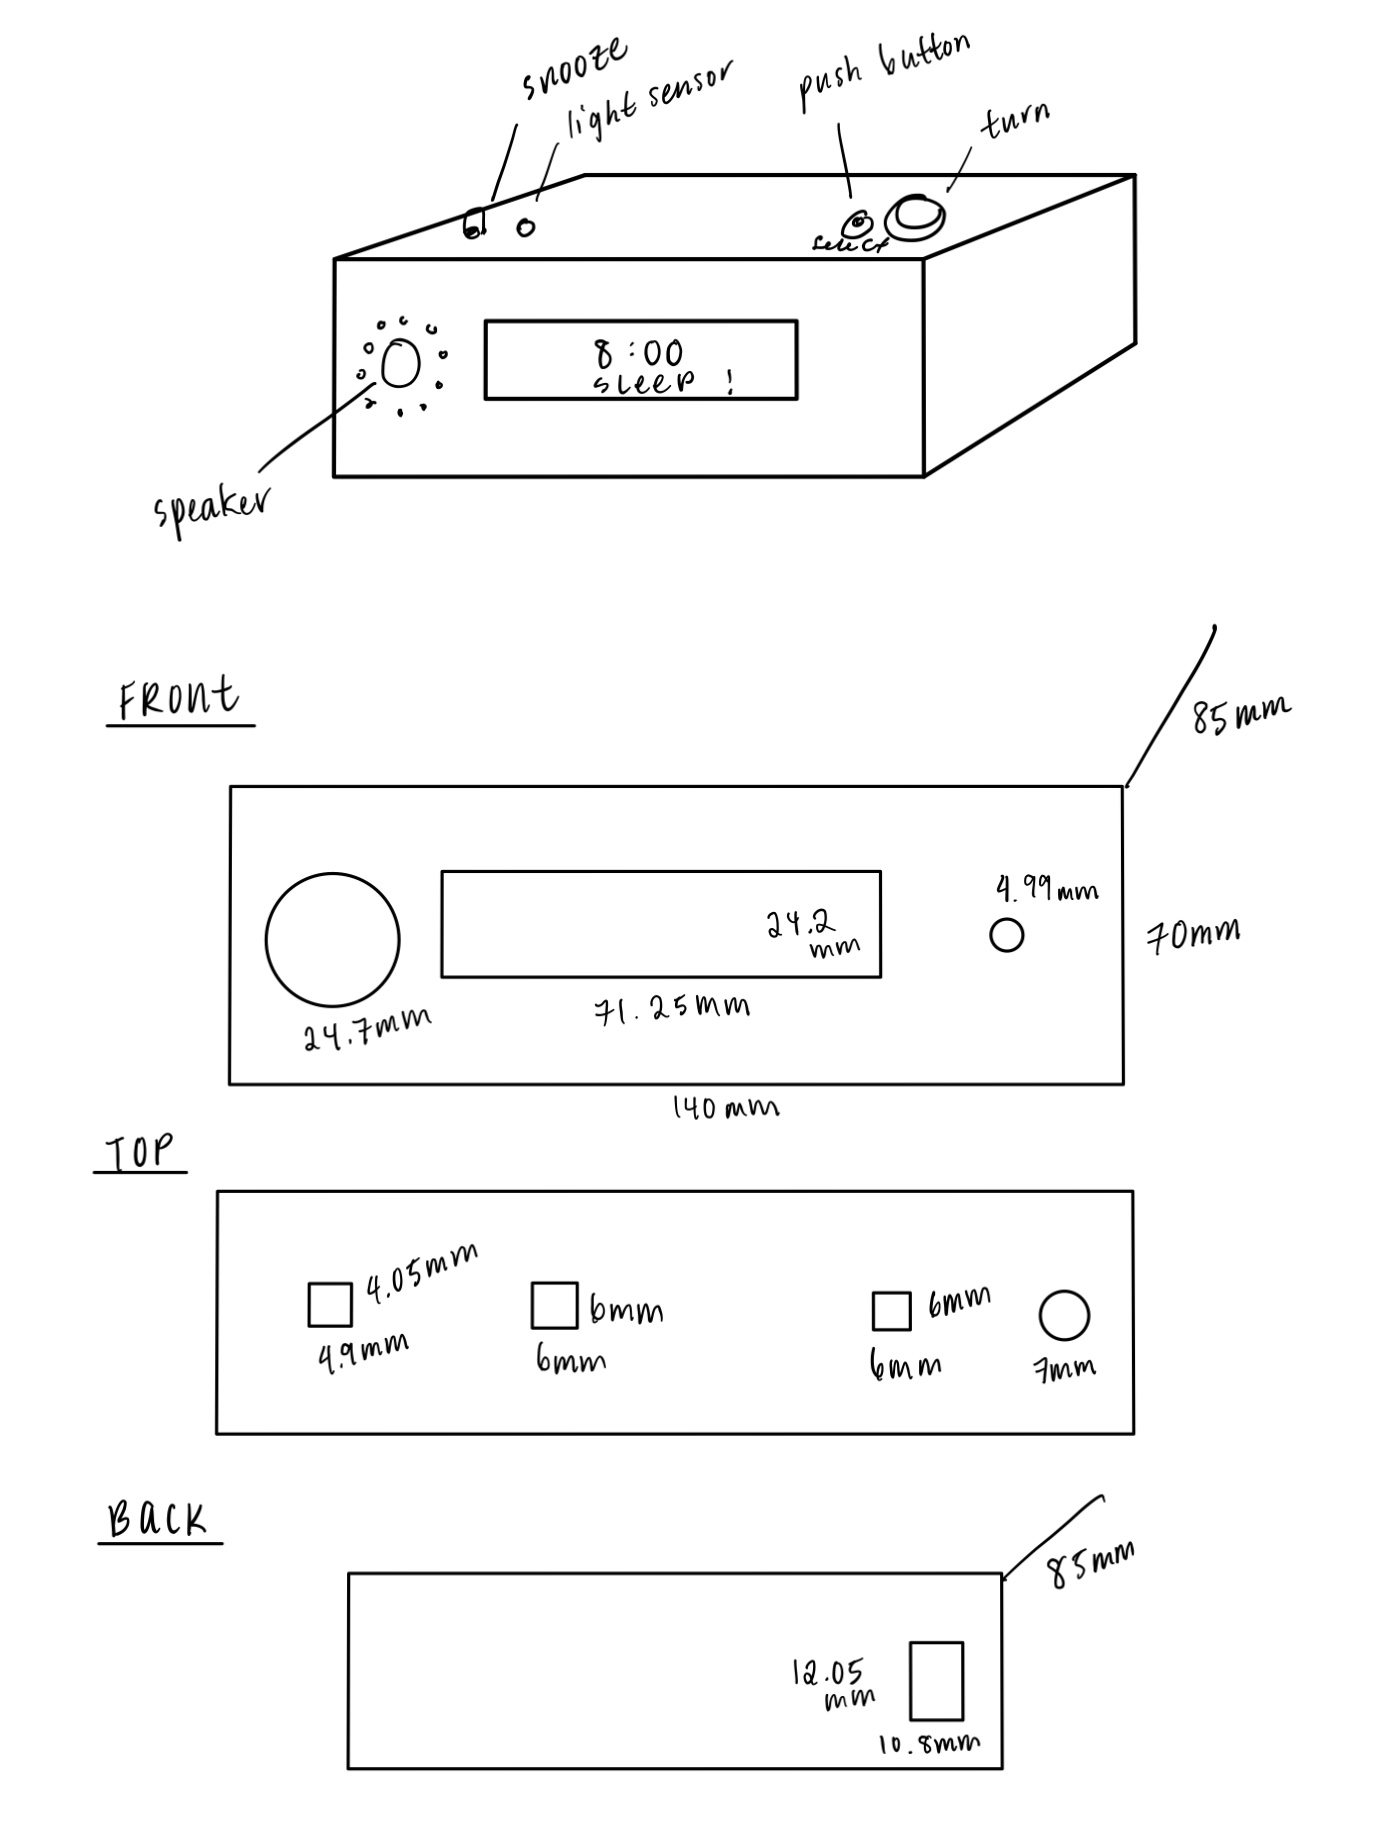
Box sketches and measurements.
The clock was modeled in Fusion 360 before being laser cut. This step was also very time consuming especially since I had little experience working with Fusion. I wanted to add finger joints to each side to make the box more structurally sound, but the process of making rectangular cuts on each edge proved to be pretty tedious.
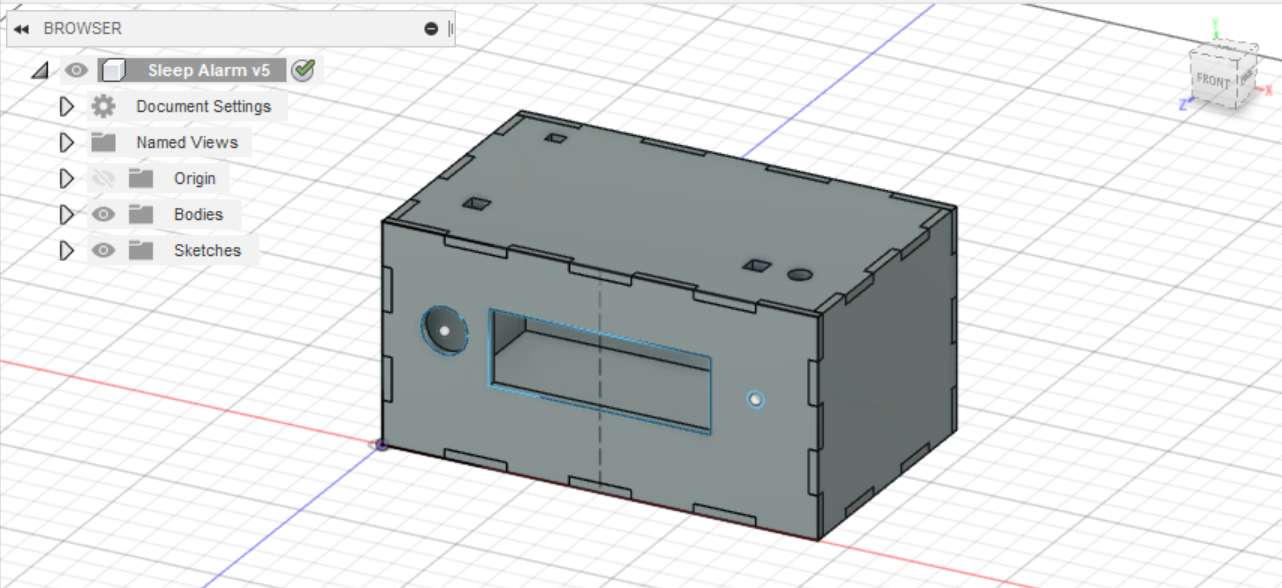
3D box model in Fusion 360
I decided to go with acrylic as my material of choice because I wanted the clock to have a clean, sleek appearance. I chose blue acrylic because since this was a sleep device, I felt that blue was a calming color and also associated with night time. Once the pieces were cut, I realized the box might actually be too small to fit everything inside. It turned out to be a tight fit, so I had to strategically position and cram together all the internal components. In then end, I was able to successfully fit everything inside.
Realizing this is a lot of stuff to fit inside a tiny box.
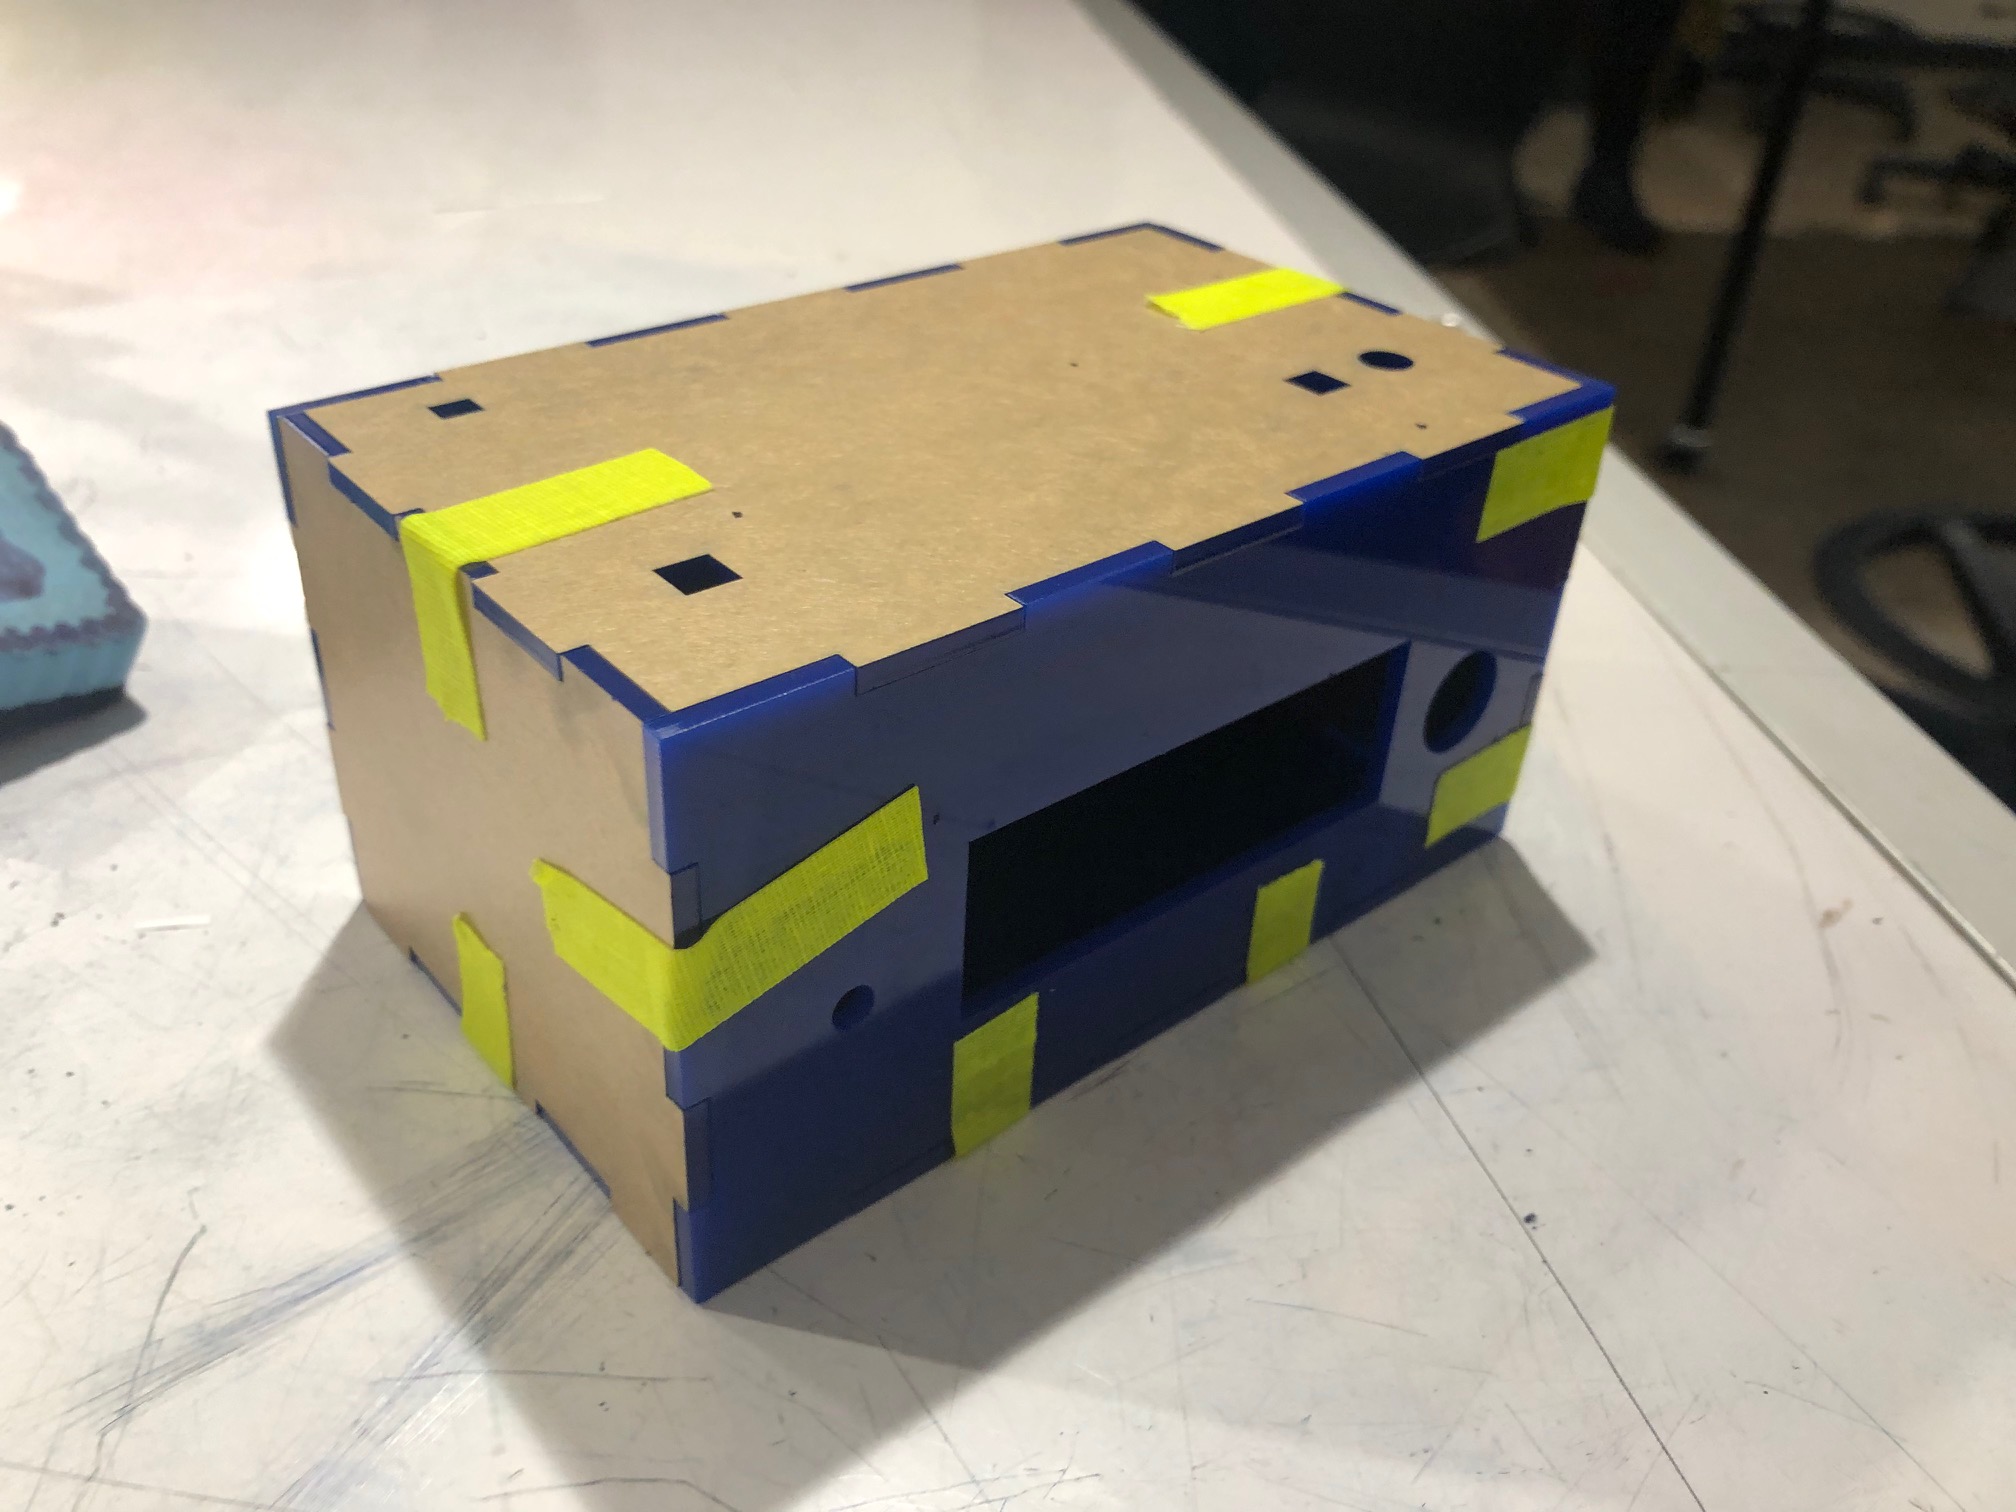
Tape helped hold together loose pieces, especially while waiting for glue to dry.
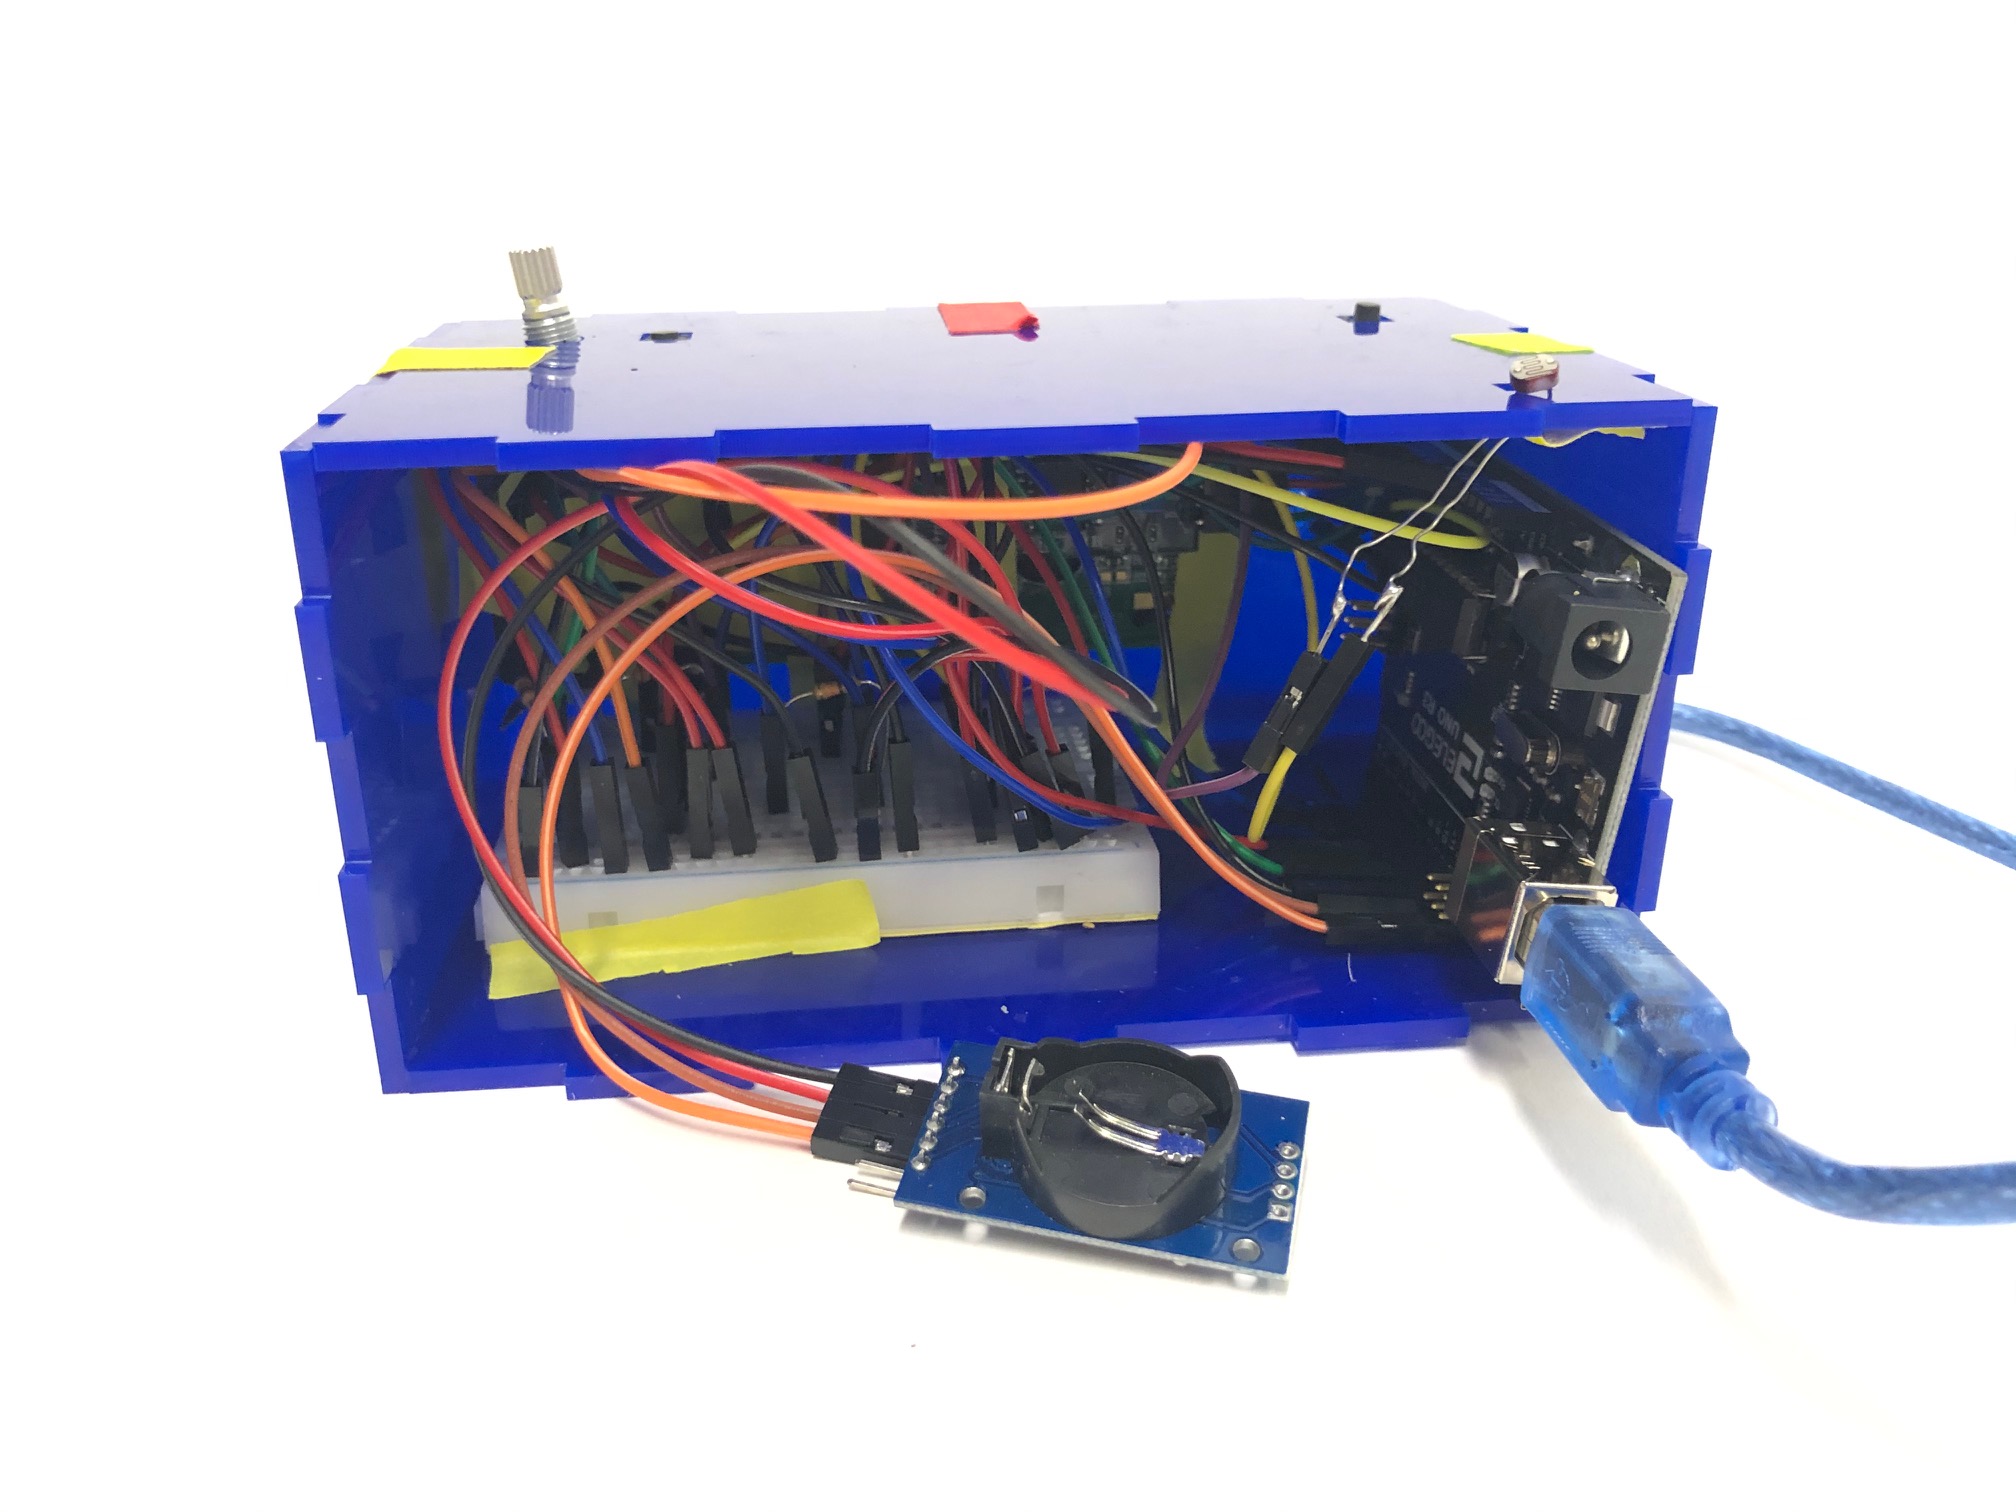
Fitting all the internal components inside.
Discussion
Overall, I am pretty happy with how my project turned out. It functions as intended, and the design is similar to how I envisioned, although there is definitely still room for improvement. Reflecting on the challenges I faced, I’m glad I pushed myself to work with new components and software. It was certainly frustrating at times, but these setbacks proved to be good learning opportunities.
While trying to figure out the rotary encoder, I kept getting stuck on the complicated technical aspects. It would have been difficult to integrate since the menu system code was already written in terms of the potentiometer and button inputs. I wish I could have realized sooner it would have been better to stick with my original components given the time constraints I had.
Moving forward, I know to more carefully consider which components I will need and to not make major changes prior to writing a lot of code. The menu code itself was more complicated than anticipated, and it would have been helpful to organize and plan out my code on a conceptual level before writing it out. I realized sometimes it’s okay to quit while you’re ahead. The menu system was already working, so I could have saved a lot of time had I just moved onto the next feature instead of focusing on perfecting this one small detail. For future projects, I’ll keep in mind the importance of prioritizing the big picture rather than getting stuck on one small aspect.
Working with Fusion 360 was another step which challenged me because I did not have much experience with using the software. I did not think I would be able to get the model to look the way I wanted it to, but it actually turned out okay. Making the finger joints was challenging, but it was worth the extra effort to learn how to use Fusion as it’s a useful skill for later projects as well.
In retrospect, I realized the importance of planning ahead, especially when it came to piecing together the final box. A lot of last minute problems arose which I definitely did not anticipate, for instance the internal pieces being too tightly fitted inside. If I had measured more thoughtfully ahead of time, I might have made the box bigger. In addition, the buttons at the top did not have ample support below. I applied some creative problem solving and taped wood pieces below them for base support. Next time, I know to work on my project earlier to give myself ample time to make these mistakes, or better yet, have time to plan ahead and anticipate these problems before they arise in the first place.
During the class crit, some of the feedback I received included:
Interesting idea, and I think it’s quite practical where it could force you to sleep. One thing you could consider is how could you make this more accessible for other people to use? How will people decipher what controls to use?
This is a good point because I left the buttons unlabeled, so it might be confusing for users what the buttons are supposed to do. To make the user interaction more clear, I would probably add labels/symbols or some clear indicator next to the buttons to convey their function.
A choice for sound could be helpful, as I know people who need white noise sensors or soothing sounds to go to sleep.
I agree that having a variety of alarm sounds would improve the clock’s customization. Given more time, I would add a selection of sounds for the user to choose. However for now, I chose a somewhat annoyingly high pitched tone alarm with the intention of both alerting and punishing the user for staying up past their set sleep time.
For future iterations, I would also try to add a distance sensor near the photoresistor to prevent cheating the system by draping something over the clock to make it dark. This added feature would ensure light levels are representative of the surrounding area.
In the end, I think I did satisfy a lot of my own goals in terms of learning to work with Fusion 360 and getting to build a finished, working alarm clock. I’m pretty satisfied with the appearance, and while it was challenging to work with a smaller box to hold everything, it also allowed for a more compact and sleek outer appearance. I’m also glad I made detailed sketches for my vision of the design prior to building it because it helped to give me a strong visual design to work towards.
Technical Information
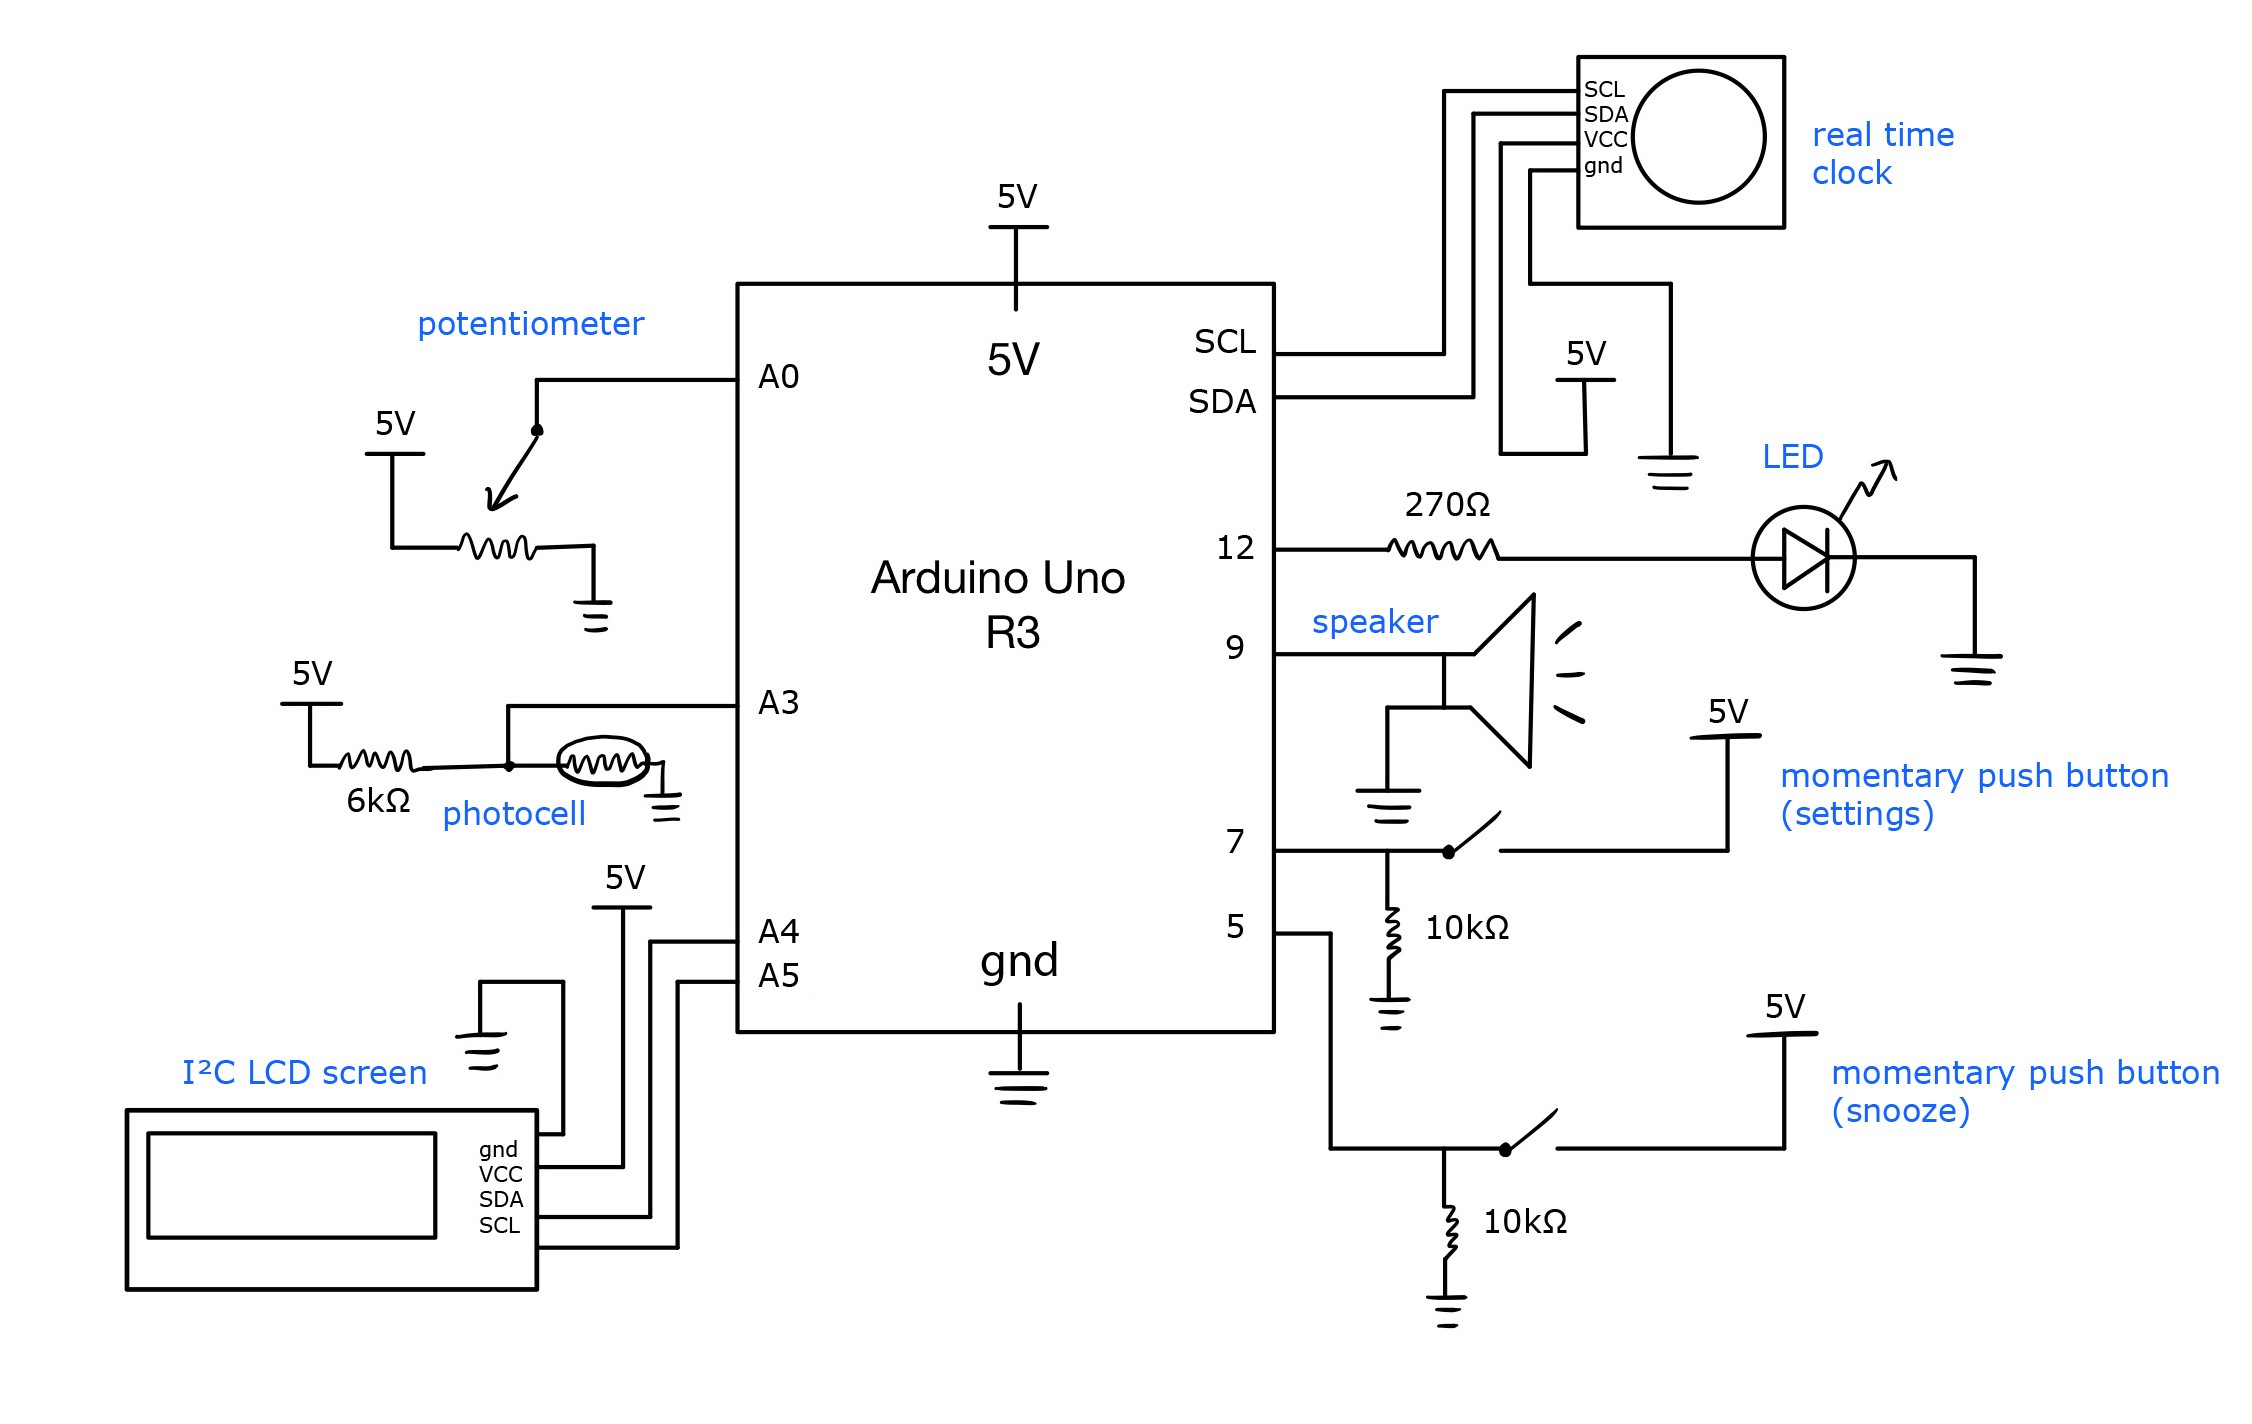
Schematic
Code SUbmission
/*
   Project Title: Snooze Alarm

   Description: This code sets off a sound alarm to remind the user the
   user to go to sleep if they are awake past their set bed time.
   A photoresistor reads in brightness levels of the room to
   detect whether the user is asleep or not. A potentiometer and
   momentary push button provide input to change the time displayed
   and alarm settings on an LCD screen. If the user is still not not
   in bed within 5 minutes of the alarm, a second snooze alarm
   will be set off. The first alarm can be stopped by pressing
   a snooze button but not the second snooze alarm.

   Pin mapping:

   pin   | mode   | description
   ------|--------|------------
   A0      input     potentiometer
   A3      input     photocell
    7      input     momentary push button (settings)
    5      input     momentary push button (snooze)
    9      output    sound speaker (alarm)
    12     output    LED (alarm)

*/

// include necessary libraries
#include <DS3231.h>
#include <LiquidCrystal_I2C.h>
#include "Volume3.h"

String state = "display time"; // clock menu state
int hours; // hours set for display or alarm time
int minutes; // minutes set for diplay or alarm time

int speakerVol; // volume of alarm
int maxVol = 800; // speaker max volume
int threshold = 930; // brightness threshold
bool soundAlarm = false; // play alarm sound

bool alarmOn = false;
bool alarmTime = false; // indicate setting alarm or display time
int alarmHr;
int alarmMin;

bool snooze = false; // whether user has pressed snooze button
int snoozeHr;
int snoozeMin;
int snoozeDelay = 5; // how many minutes to snooze
bool snoozeAlarm = false;

const int POTPIN = A0; // potentiometer
const int PHOTOPIN = A3; // photocell
const int PUSHPIN = 7; // momentary push button for settings
const int PUSHPIN2 = 5; // momentary push button for snooze
const int SPEAKERPIN = 9; // sound speaker
const int LEDPIN = 12; // LED

DS3231 rtc(SDA, SCL); // initialize real time clock
LiquidCrystal_I2C lcd(0x27, 16, 2); // initialize LCD display

// control alarm sound and light behavior
void callAlarm(int brightnessVal) {
  if (brightnessVal < threshold) {
    speakerVol = maxVol;
    digitalWrite(LEDPIN, HIGH);
  }
  else {
    speakerVol = 0;
    digitalWrite(LEDPIN, LOW);
  }
  vol.tone(SPEAKERPIN, 800, speakerVol);
}

void setup() {
  pinMode(POTPIN, INPUT); // potentiometer
  pinMode(PHOTOPIN, INPUT); // photoresistor
  pinMode(PUSHPIN, INPUT); // momentary push button
  pinMode(PUSHPIN2, INPUT); // snooze push button
  pinMode(LEDPIN, OUTPUT); // LED
  pinMode(SPEAKERPIN, OUTPUT); // sound speaker
  Serial.begin(115200);

  // set up LCD screen
  lcd.init();
  lcd.backlight();
  lcd.home();

  // set up real time clock
  rtc.begin();
  rtc.setTime(12, 0, 0); // Set time to 12:00:00 (24hr format)
}

void loop() {
  int potVal = analogRead(POTPIN); //(range 0-1023)
  int brightnessVal = analogRead(PHOTOPIN); //(range 800-1022)
  int pushVal = digitalRead(PUSHPIN); // settings button
  int pushVal2 = digitalRead(PUSHPIN2); // snooze button

  Serial.println(brightnessVal);

  // check whether alarm should be set off
  Time t = rtc.getTime();
  if (snoozeHr == t.hour and snoozeMin == t.min) {
    snoozeAlarm = true;
    snooze = false;
  }
  else if (not snooze and alarmOn and alarmHr == t.hour and alarmMin == t.min) {
    soundAlarm = true;
  }
  else {
    soundAlarm = false;
    snoozeAlarm = false;
    digitalWrite(LEDPIN, LOW);
    vol.tone(SPEAKERPIN, 800, 0);
  }

  // check if snooze button pressed
  if (pushVal2 == HIGH and not snooze and soundAlarm) {
    snooze = true;
  }

  // check if selection button pressed, update to next menu state
  if (pushVal == HIGH) {
    lcd.clear();
    if (state.equals("set minutes")) {
      // setting alarm
      if (alarmTime) {
        // set alarm time to selected hour and min
        alarmHr = hours;
        alarmMin = minutes;
        alarmTime = false;

        // set corresponding snooze time (5 min later)
        snoozeHr = alarmHr;
        snoozeMin = alarmMin + snoozeDelay;
        // manage minute overflow
        if (snoozeMin > 59) {
          if (snoozeHr + 1 == 24)
            snoozeHr = 0;
          else
            snoozeHr += 1;
          snoozeMin = snoozeMin - 60;
        }
      }
      // setting display time
      else
        rtc.setTime(hours, minutes, 50); // edit for testing
      // reset snooze settings
      snooze = false;
      state = "display time";
    }
    else if (state.equals("set hours")) {
      state = "set minutes";
    }
    else if (state.equals("display time"))
      state = "settings";
    else if (state.equals("settings")) {
      // check which option selected
      if (potVal < 511)
        state = "set hours";
      else
        state = "edit alarm";
    }
    else if (state.equals("edit alarm")) {
      if (potVal < 511)
        state = "display time";
      else
        state = "set alarm";
    }
    else if (state.equals("set alarm")) {
      if (potVal < 511) {
        alarmOn = true;
        alarmTime = true;
        state = "set hours";
      }
      else {
        alarmOn = false;
        // reset snooze settings
        snooze = false;
        state = "display time";
      }
    }
    // time gap for button unpress
    delay(500);
  }

  // update alarm screen display
  if (state.equals("display time")) {
    lcd.setCursor(0, 1);
    if (soundAlarm and not snooze) {
      // set off alarm
      lcd.print("Time to go sleep!");
      callAlarm(brightnessVal);
    }
    else if (snoozeAlarm) {
      // set off snooze alarm
      lcd.print("PLEASE GET SLEEP");
      callAlarm(brightnessVal);
    }
    else if (snooze) {
      // display time for next alarm
      lcd.print((String) "[snooze " + snoozeHr + ":" + snoozeMin + "]   ");
    }
    else {
      lcd.setCursor(0, 1);
      lcd.print("                 ");
    }
    // display current time
    lcd.setCursor(0, 0);
    lcd.print("Time:  ");
    lcd.print(rtc.getTimeStr());
  }
  else if (state.equals("settings")) {
    // display options and cursor
    lcd.setCursor(0, 0);
    lcd.print("Edit Time");
    lcd.setCursor(0, 1);
    lcd.print("Set Alarm");
    if (potVal < 511) {
      lcd.setCursor(15, 1);
      lcd.print(" ");
      lcd.setCursor(15, 0);
    } else {
      lcd.setCursor(15, 0);
      lcd.print(" ");
      lcd.setCursor(15, 1);
    }
    lcd.print("<");
  }
  else if (state.equals("edit alarm")) {
    // select whether to change or keep alarm time
    lcd.setCursor(0, 0);
    if (alarmOn)
      lcd.print((String)"Alarm: " + alarmHr + ":" + alarmMin);
    else
      lcd.print("Alarm: None");
    lcd.setCursor(0, 1);
    lcd.print("Edit");
    if (potVal < 511) {
      lcd.setCursor(15, 1);
      lcd.print(" ");
      lcd.setCursor(15, 0);
    } else {
      lcd.setCursor(15, 0);
      lcd.print(" ");
      lcd.setCursor(15, 1);
    }
    lcd.print("<");
  }
  else if (state.equals("set alarm")) {
    // select if alarm is turned on or off
    lcd.setCursor(0, 0);
    lcd.print("Alarm On");
    lcd.setCursor(0, 1);
    lcd.print("Alarm Off");
    if (potVal < 511) {
      lcd.setCursor(15, 1);
      lcd.print(" ");
      lcd.setCursor(15, 0);
    } else {
      lcd.setCursor(15, 0);
      lcd.print(" ");
      lcd.setCursor(15, 1);
    }
    lcd.print("<");
  }
  else if (state.equals("set hours")) {
    // update hour being entered
    lcd.setCursor(0, 0);

    // map potVal to be within 0-23 hr range
    hours = constrain(map(potVal, 0, 1023, 0, 30), 0, 23);

    // adjust spacing for 1 vs 2 digit display
    String space = " ";
    if (hours < 10) space = "  ";
    lcd.print((String)"Set Hour:" + space + hours);
  }
  else if (state.equals("set minutes")) {
    // update minutes being entered
    lcd.setCursor(0, 0);

    // map potVal to be within 0-59 min range
    minutes = constrain(map(potVal, 0, 1023, 0, 65), 0, 59);

    // adjust layout spacing for 1 vs 2 digit display
    String space = " ";
    if (minutes < 10) space = "  ";
    lcd.print((String)"Set Minutes:" + space + minutes);
  }
}
Comments are closed.