Introduction
After the team’s interview with Cynthia, we decided to build a device that would help train her dog who loves to chew sandals and other items like paper. In this documentation, we will go over the various forms of prototypes that were created to further develop the device.
The general idea of the device is to put an item, like Cynthia’s sandals, on a platform with PIR sensors that can detect wether or not the object has been moved. If the object is moved by Cynthia’s dog, the device will emit sounds at 25 kHz and LED lights will activate. The sound is meant to be at frequencies that only dogs can hear, but not humans, so as not to disturb Cynthia. There is an additional switch that Cynthia can turn on/off so that she may move/remove the object on the platform without the device going off. We hope that over time, Cynthia’s dog will learn what items he should not be touching and chewing on with the help of this device.
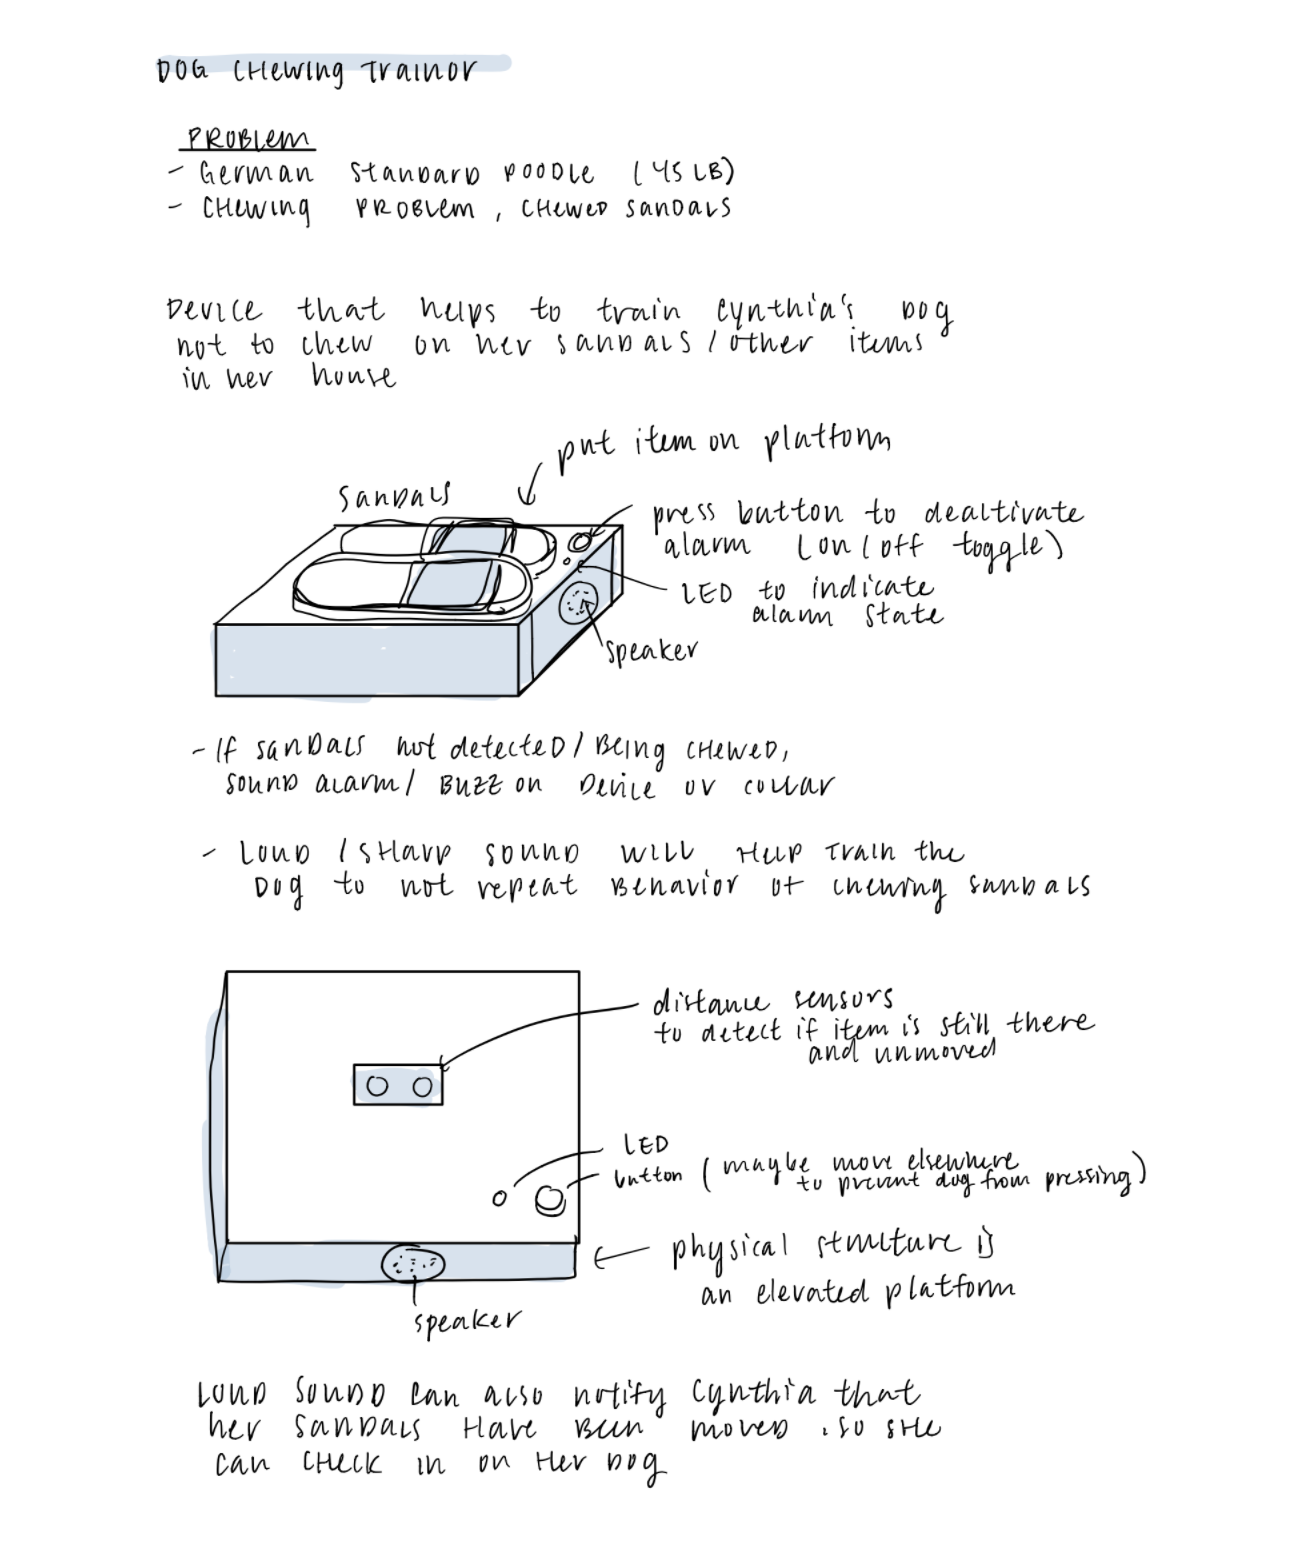
Ideation sketch
Prototypes
1. Works-like Prototype on TinkerCAD (Gracia)
This prototype was designed to help answer the question: what features are attainable to simulate and what are some limitations that we must keep in mind? The engineering prototype shown below was made on TinkerCAD and has four main components, a PIR Sensor, Neopixel Ring (LED), Piezo Buzzer, and a switch. When the device is on (controlled by the switch button) and the PIR Sensor detects movement, the Neopixel LEDs turn blue and the buzzer emits a sound. For simplicity, the alarm is deactivated when the detected movement has stopped. When the switch button is in its off position, no alarm will go off even if there’s movement detected by the PIR sensor. The color blue is a design decision based off color ranges that dogs are able to see and the sound frequency emitted is in the range detectable by dogs but not the human ear.

Final wiring of electrical components
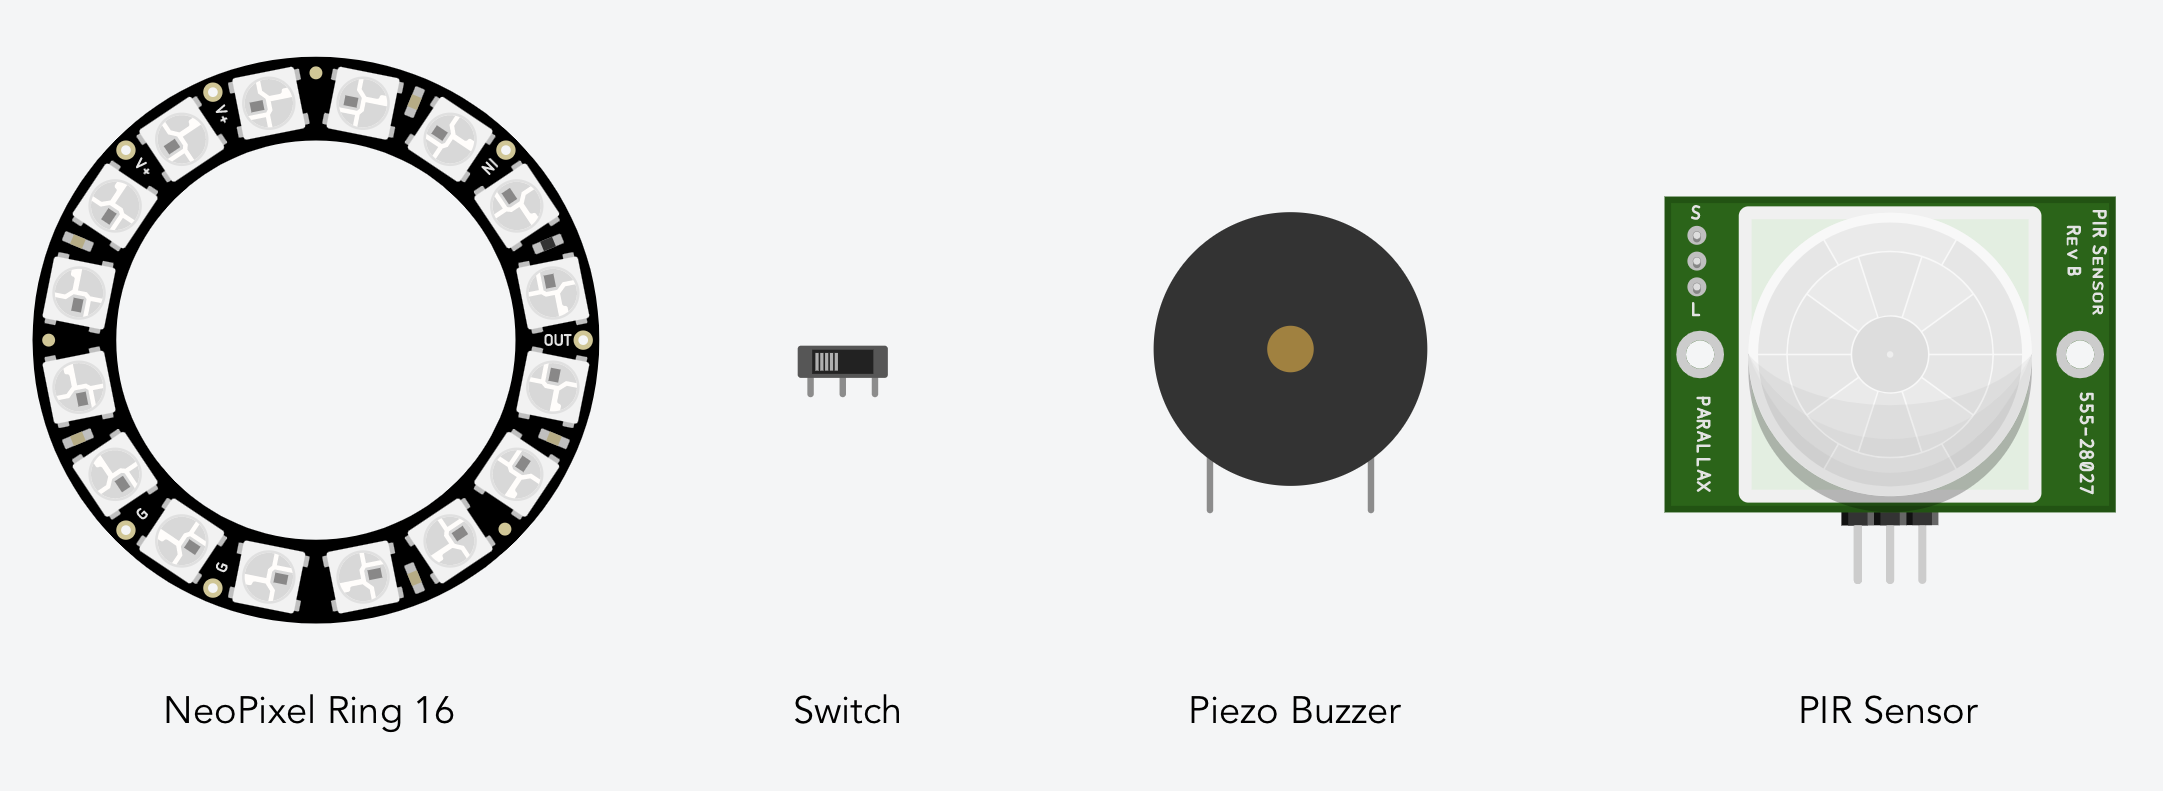
Four main input/output components of the prototype
The video above shows the interaction when movement is stimulated in front of the PIR sensor when the switch button is off vs on.
The biggest issue that I encountered during the prototyping process is reducing the lag time in the simulation. When I first wired and coded my prototype, it took a really long time for the simulation to register changes in movement/no movement detection from the PIR sensor. It took about 1 simulation second, which translates to around a whole minute in real time. Thus, I tried to improve my code so that the system runs as efficiently as possible, which helped move things faster and reduce lag time. For instance, I eliminated redundant actions. In order to turn on and specify each pixel in the NeoPixel ring, it must be done one-by-one for each pixel. The simulation ran really slow if the show function for the NeoPixel is within the loop that updates each pixel’s color. However, it ran much faster the show function only happened once after the loop finishes. Additionally, I got rid of external functions. Even though the commands are exactly the same, I found that the simulation ran faster if the main loop function didn’t have to call an external function.
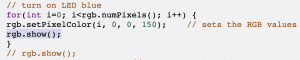
Update and show pixels individually
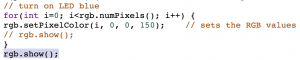
Show after all pixels are updated
Overall, I was able to get a general answer to my design question after going through the TinkerCAD library to see what components are available and implementing the basic function of the device. A lot of the feedback I was getting was also related to the slow response time in the TinkerCAD simulation. I will definitely be working further to take extra precautions when writing my code in the future so that the system can run as efficiently as possible. The slowness and non-instantaneous response was not surprising but it was surprising to find that eliminating functions helped reduce the lag time. This will ultimately make the code style unfriendly to outside readers, but I think it’s a tradeoff that is necessary for a better user experience.
Another feedback I received was that the device functionality itself was too simplistic. Going forward, I would like to add more functionalities to it without adversely affecting the simulation time. One idea I am going to work on implementing is to have a motor move the platform down and maybe have a mechanism that encloses the object when the alarm goes off. It’s another level of teaching the dog that he/she shouldn’t be touching the object. Even if the dog tries to get it, he/she wouldn’t be able to. I also plan to have “ON/OFF” labels on the switch since it’s not very intuitive.
2. Looks-like Prototype on Fusion360 (Amy)
This prototype was designed to help answer the design question: How might the physical appearance and form of the device be designed to look to achieve both functionality and clean aesthetics?
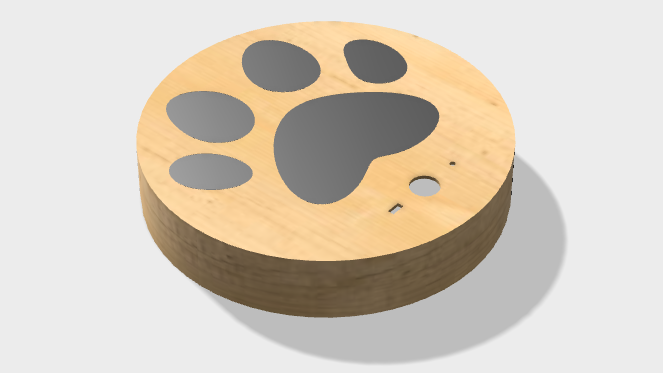
This prototype is a looks-like model of the dog-training device to help our team visualize what the final product will actually look like. Its form is an elevated platform designed to hold and detect Cynthia’s sandals via PIR sensors located beneath the glass paw print. Other components located at the bottom of the platform include a switch button, LED, and Piezo Buzzer. The model body is made with wood material and has a cylindrical form (80mm tall, 300mm wide).
IMAGES

Completed prototype rendering in Fusion 360
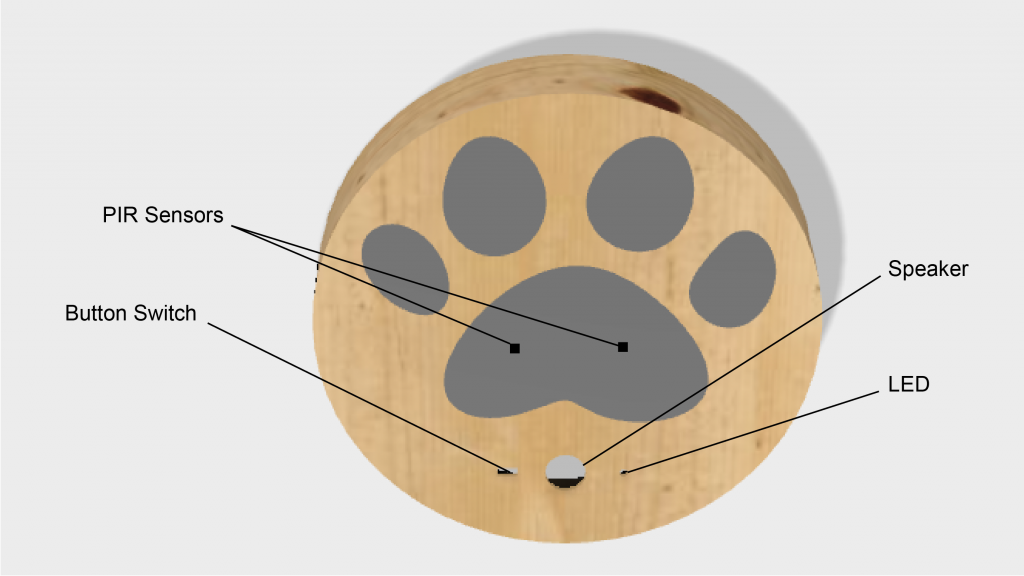
Aerial view of device and labelled components

Overall of device proportion and scale (mm)
PROCESS IMAGES
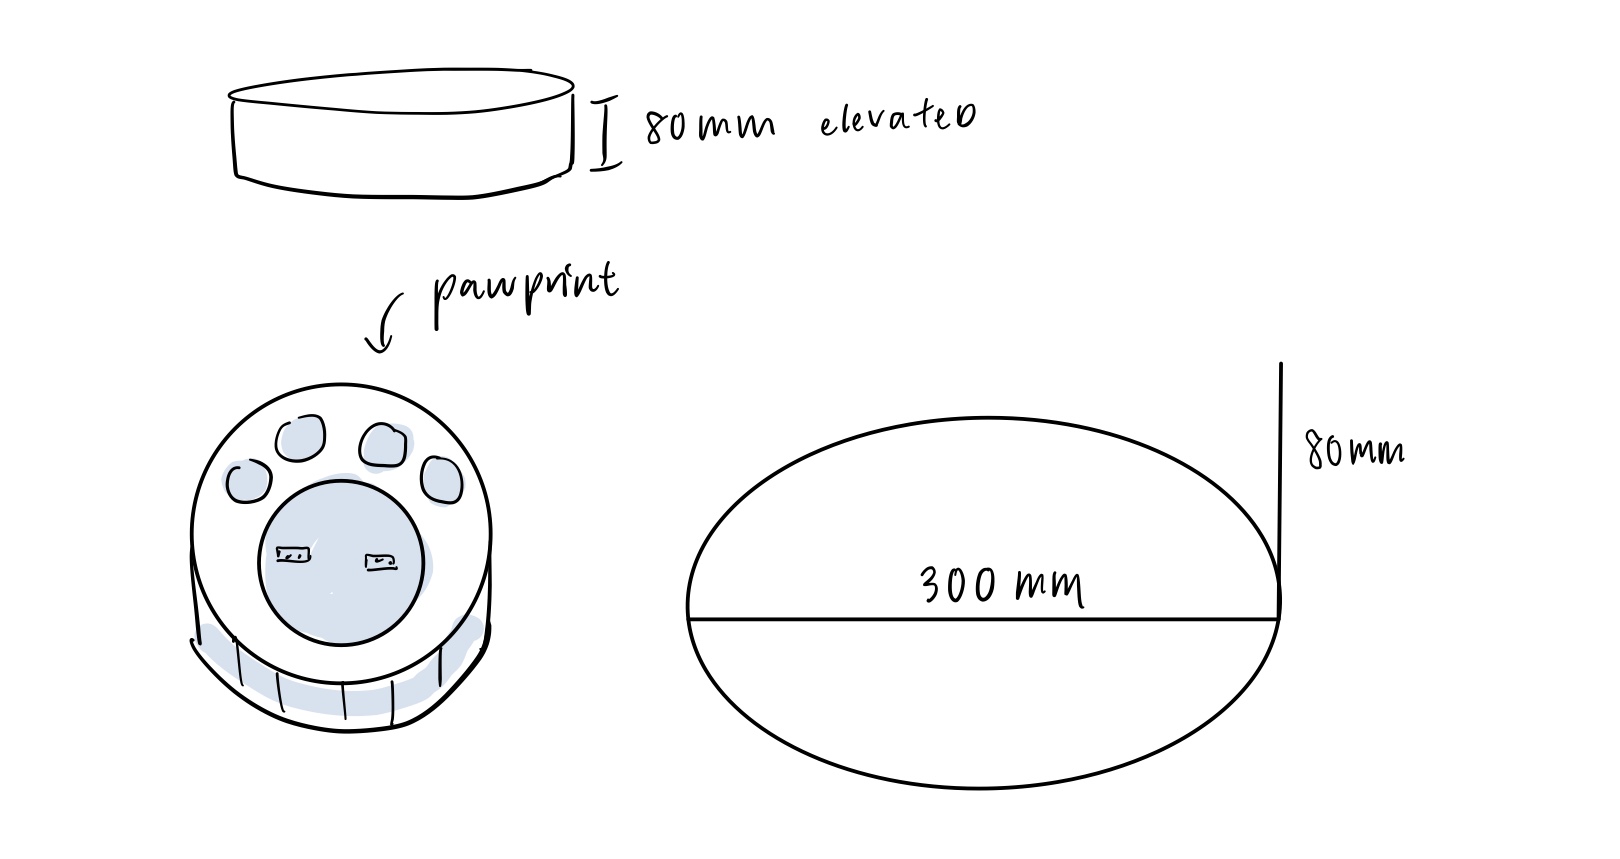
Planning sketches of the device appearance and dimensions before modeling

Creating different sketch layers for the model
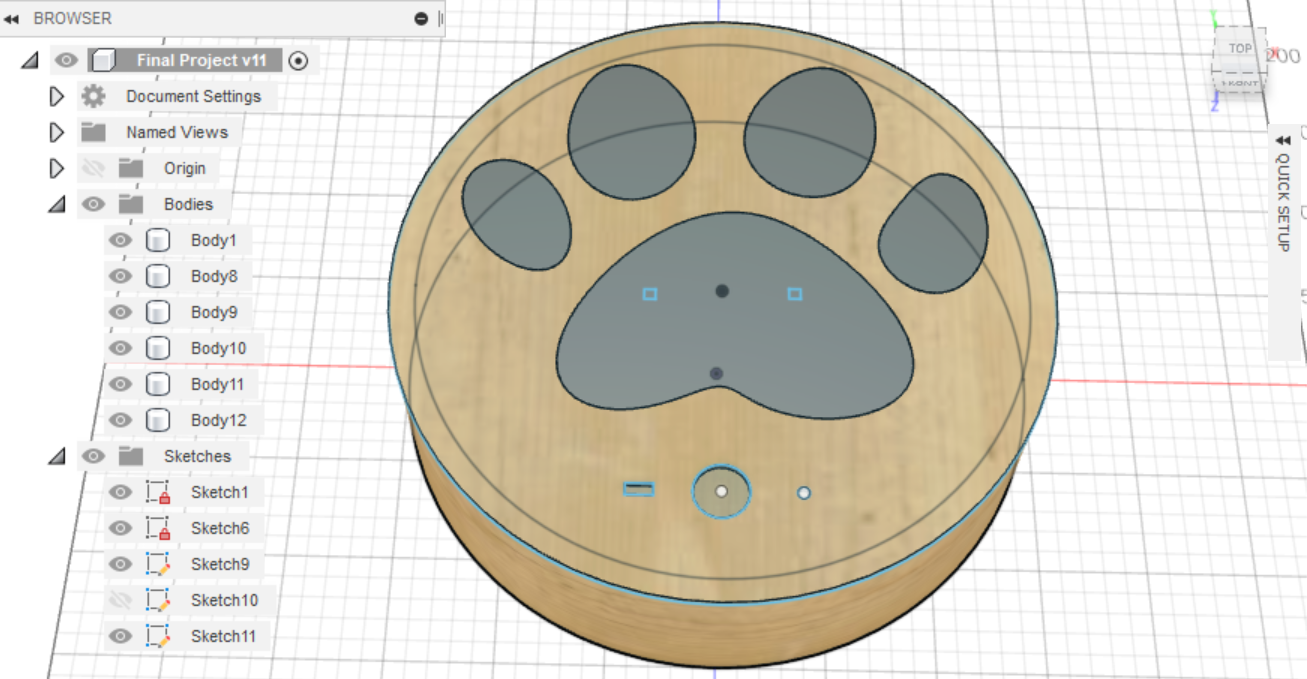
Putting the sketch bodies together and setting material (glass and wood)
During the prototyping process, I found that it was really helpful to first have the design of the device sketched out ahead of time so I had a clear idea of what I was trying to build. A challenge I had while trying to build this model was figuring out how to use a lot of the tools in Fusion 360, since I’m not that familiar with the software. I spent some time trying to figure out how to create rounded walls for the outer edge of the device. I eventually solved this by first extruding the circular face and then creating a smaller circular extrusion inside the larger one to hollow out the inside. Overall, there was definitely a learning curve, but with online resources and tutorials I was able to figure out most of what I needed to start designing the platform. Upon finishing the prototype, I think I was able to answer the initially proposed design question. The form satisfied what we needed in terms of both functionality and a clean, simple appearance, although there are definitely still improvements which can be made.
Some of the in-person feedback I received on my prototype included that the components seemed too small and difficult to notice, especially the LED and the button switch. Since the LED is supposed to light up as an indicator that the alarm is going off, it’s important that the light is noticeable. In addition, the shape of the device was called into question as the circular form didn’t seem very space efficient. For future changes, I plan to integrate the larger NeoPixel ring component into the device as a light indicator rather than a tiny LED light. For the circular form, I primarily chose it for aesthetic purposes because the round corners give it a smoother and more playful appearance. But I think I might also stick to it because since there’s no sharp corners, it will not pose as a safety hazard in case the user accidentally hits the edge of the device.
3. Behaves-like Prototype (seth)
This prototype was designed to answer the question of how the device might behave. It was made using only things available around the house–namely, a storage box and a playing card. The shoes sit on top of the box above the “sensors” and the indicator is lit up blue (blue playing card), meaning that the shoes are in place and not being chewed. When one or both shoes are removed, the indicator light turns red (red playing card) and the piezo begins emitting a dog whistle tone, indicating that shoes may be getting chewed. In the case of this prototype, my harsh screaming was substitute for a piezo.
There wasn’t much to creating this prototype due to the simplistic nature of it–see “it was made using only things available around the house.” However, it did successfully convey how the final device might actually behave once fully built and implemented.
IMAGES
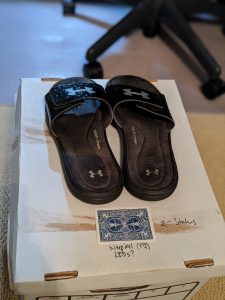
Light is blue when shoes are in place.
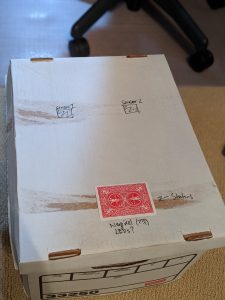
Light is red and piezo emits a dog whistle tone when one or more shoes is removed.
Despite the simplistic nature of this prototype, it received positive feedback. My screaming as substitute for the piezo received some laughter and confusion at first, but after explaining, it made sense to the users (my parents). While it was ultimately quite large, since I used a storage box, it still successfully got the point across.
Moving Forward
Reflecting on the prototyping process, our team found that we were able to create a more comprehensive exploration by each focusing on a different kind of prototype. There were definitely added challenges which came with working remotely. For instance, communication within our team and toward our client was limited. Working remotely makes it difficult for us to fully demonstrate our prototype to our client, especially when showing it on a software like Fusion360 or TinkerCAD. For both cases, it’s hard to show real time demonstration of our creation so we must create videos beforehand so that our client can watch it at an appropriate speed.
In addition, it’s more difficult to get a sense of a cohesive device due to the barrier of having three separate prototypes that can not be integrated together. Since each member was working on their own prototype, there were slight inconsistencies between each one such as different components or variations in form. However this was actually beneficial for us in terms of exploring different ways to achieve a result rather than being tied down by one method. In the future, we might try to develop a more solid idea of the details of our prototype before starting to work individually. Overall, the prototypes are still able to convey the vision for our device successfully.
After receiving feedback from Cynthia, our team decided to add a couple additional features to improve our device. We plan to include an additional reminder to walk her dog as well as an adjustable volume knob. We will be implementing a real time clock so that the device can keep track of time and notify Cynthia at 8AM that her dog should have already been walked. Also, we will use a potentiometer to control the volume of the alarm that is meant for Cynthia. With these added features, we are hoping our dog-trainer can be more customized and well-suited towards Cynthia’s needs.
Comments are closed.