Wearable Soundtrack
The Wearable Soundtrack is a wristband that uses a knob and speaker to play select songs as an “epic soundtrack” to the wearer’s life.
Process
One decision point in my process to change the device from an attachable sleeve to a wristband. This decision was made because it was more practical in terms of using the device and making the device with the amount of fabric I had. Another decision point in my process was to use a large 9V battery instead of the two coin cell batteries I originally planned on using. The coin cell batteries were inconsistent in their ability to power the device, and while the size of coin cell’s are preferable for the design of the device, I was forced to use a 9V battery.
Process Images
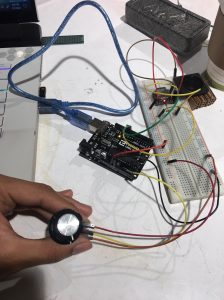
Testing out the electronic components of the device.
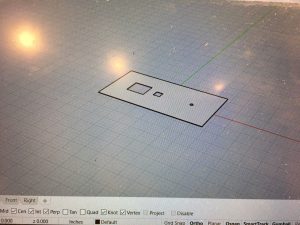
Creating the laser cut file for the fabric in Rhino 6
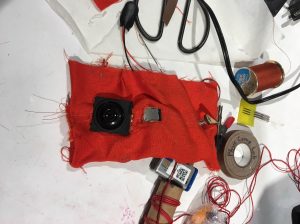
Placing components in fabric and sewing
Discussion
Making this Wearable Soundtrack was incredibly fun and rewarding for me because it allowed me to explore creating a whimsical device that reflected my love of music and its importance in my daily life. However, I was not as impressed with the result of my efforts. I received a lot of feedback about the aesthetics of the device. For example, one of my classmates noted that “[they] think it is a fun idea, but aesthetically it could look a lot better. Maybe like a watch?” I agree with this comment, the aesthetics on my device were not up to the standard that I am usually capable of because of rushing on my part to finish the device while balancing a heavy workload in my other classes. Also, there were some unforeseen complications with the power that forced me to use a larger battery than I accounted for, and in my attempts to accommodate this component, I created a messy looking device. However, some of the feedback from my classmates was not as relevant or helpful. One classmate asked me to consider “How could you make the lights that is glowing from your components more intentional? I thought you put LED lights in there, but it was just light from being turned on.” While I understand their comment, the component in question with the LED was essential to my design, and I could not replace it with a component without an LED; furthermore, I found the LED helpful as an indication whether or not the device was working after I added the fabric. I do not plan on building another iteration of this device; however, if I were to do so, I would use a synthetic fabric that would laser cut better, take more time sewing the device, creating mounts for each component, and buying a smaller battery with the appropriate voltage.
Technical Information
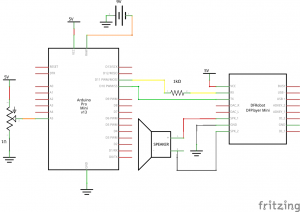
Schematic
Code
/*Wearable Soundtrack
  Anishwar Tirupathur

  Description:  This code sets up the DFPlayer Mini component and maps a potentiometer
  so that it can be used to select the songs the DFPlayer Mini plays.

  pin/  mode/ description
  -----------------------
  A5   INPUT  Potentiometer
  10   RX     DFPlayer Mini
  11   TX     DFPlayer Mini

  Collaboration:  I used code from the DFRobotDFPLayerMini Library, specifically the
  "FullFunction" and "GetStarted" libraries. In addition, I recieved help from Seth
  when using the IDeAte lasercutters.
*/
#include "Arduino.h"
#include "SoftwareSerial.h"
#include "DFRobotDFPlayerMini.h"


SoftwareSerial mySoftwareSerial(10, 11); // RX, TX
DFRobotDFPlayerMini myDFPlayer;
void printDetail(uint8_t type, int value);

const int POTENTPIN = A5;

int prevState;


void setup()
{

  pinMode(POTENTPIN, INPUT);


  mySoftwareSerial.begin(9600);
  Serial.begin(115200);

  Serial.println();
  Serial.println(F("DFRobot DFPlayer Mini Demo"));
  Serial.println(F("Initializing DFPlayer ... (May take 3~5 seconds)"));

  if (!myDFPlayer.begin(mySoftwareSerial)) {  //Use softwareSerial to communicate with mp3.
    Serial.println(F("Unable to begin:"));
    Serial.println(F("1.Please recheck the connection!"));
    Serial.println(F("2.Please insert the SD card!"));
    while (true) {
      delay(0); // Code to compatible with ESP8266 watch dog.
    }
  }
  Serial.println(F("DFPlayer Mini online."));

  myDFPlayer.volume(20);  //Set volume value. From 0 to 30

}

void loop() {
  // put your main code here, to run repeatedly:

  int potVal = map(analogRead(POTENTPIN), 0, 1023, 1, 35);
  //int buttonState = digitalRead(BUTTONPIN);

  prevState = potVal;
  if (prevState == potVal) {
    if (analogRead(POTENTPIN) % 36 == 0) {
      //do nothing
    } else {
      myDFPlayer.play(potVal);

      Serial.println((String)"Playing song # " + potVal);
      delay(250);
      while ((potVal - map(analogRead(POTENTPIN), 0, 1023, 1, 35)) == 0)
      {

        delay(1);
      }
    }
    prevState = potVal;
  }
}
Notes
– I could not include a gif/ video, featured image, or careful well-shot images of my device due to the complications of remote learning
Comments are closed.