
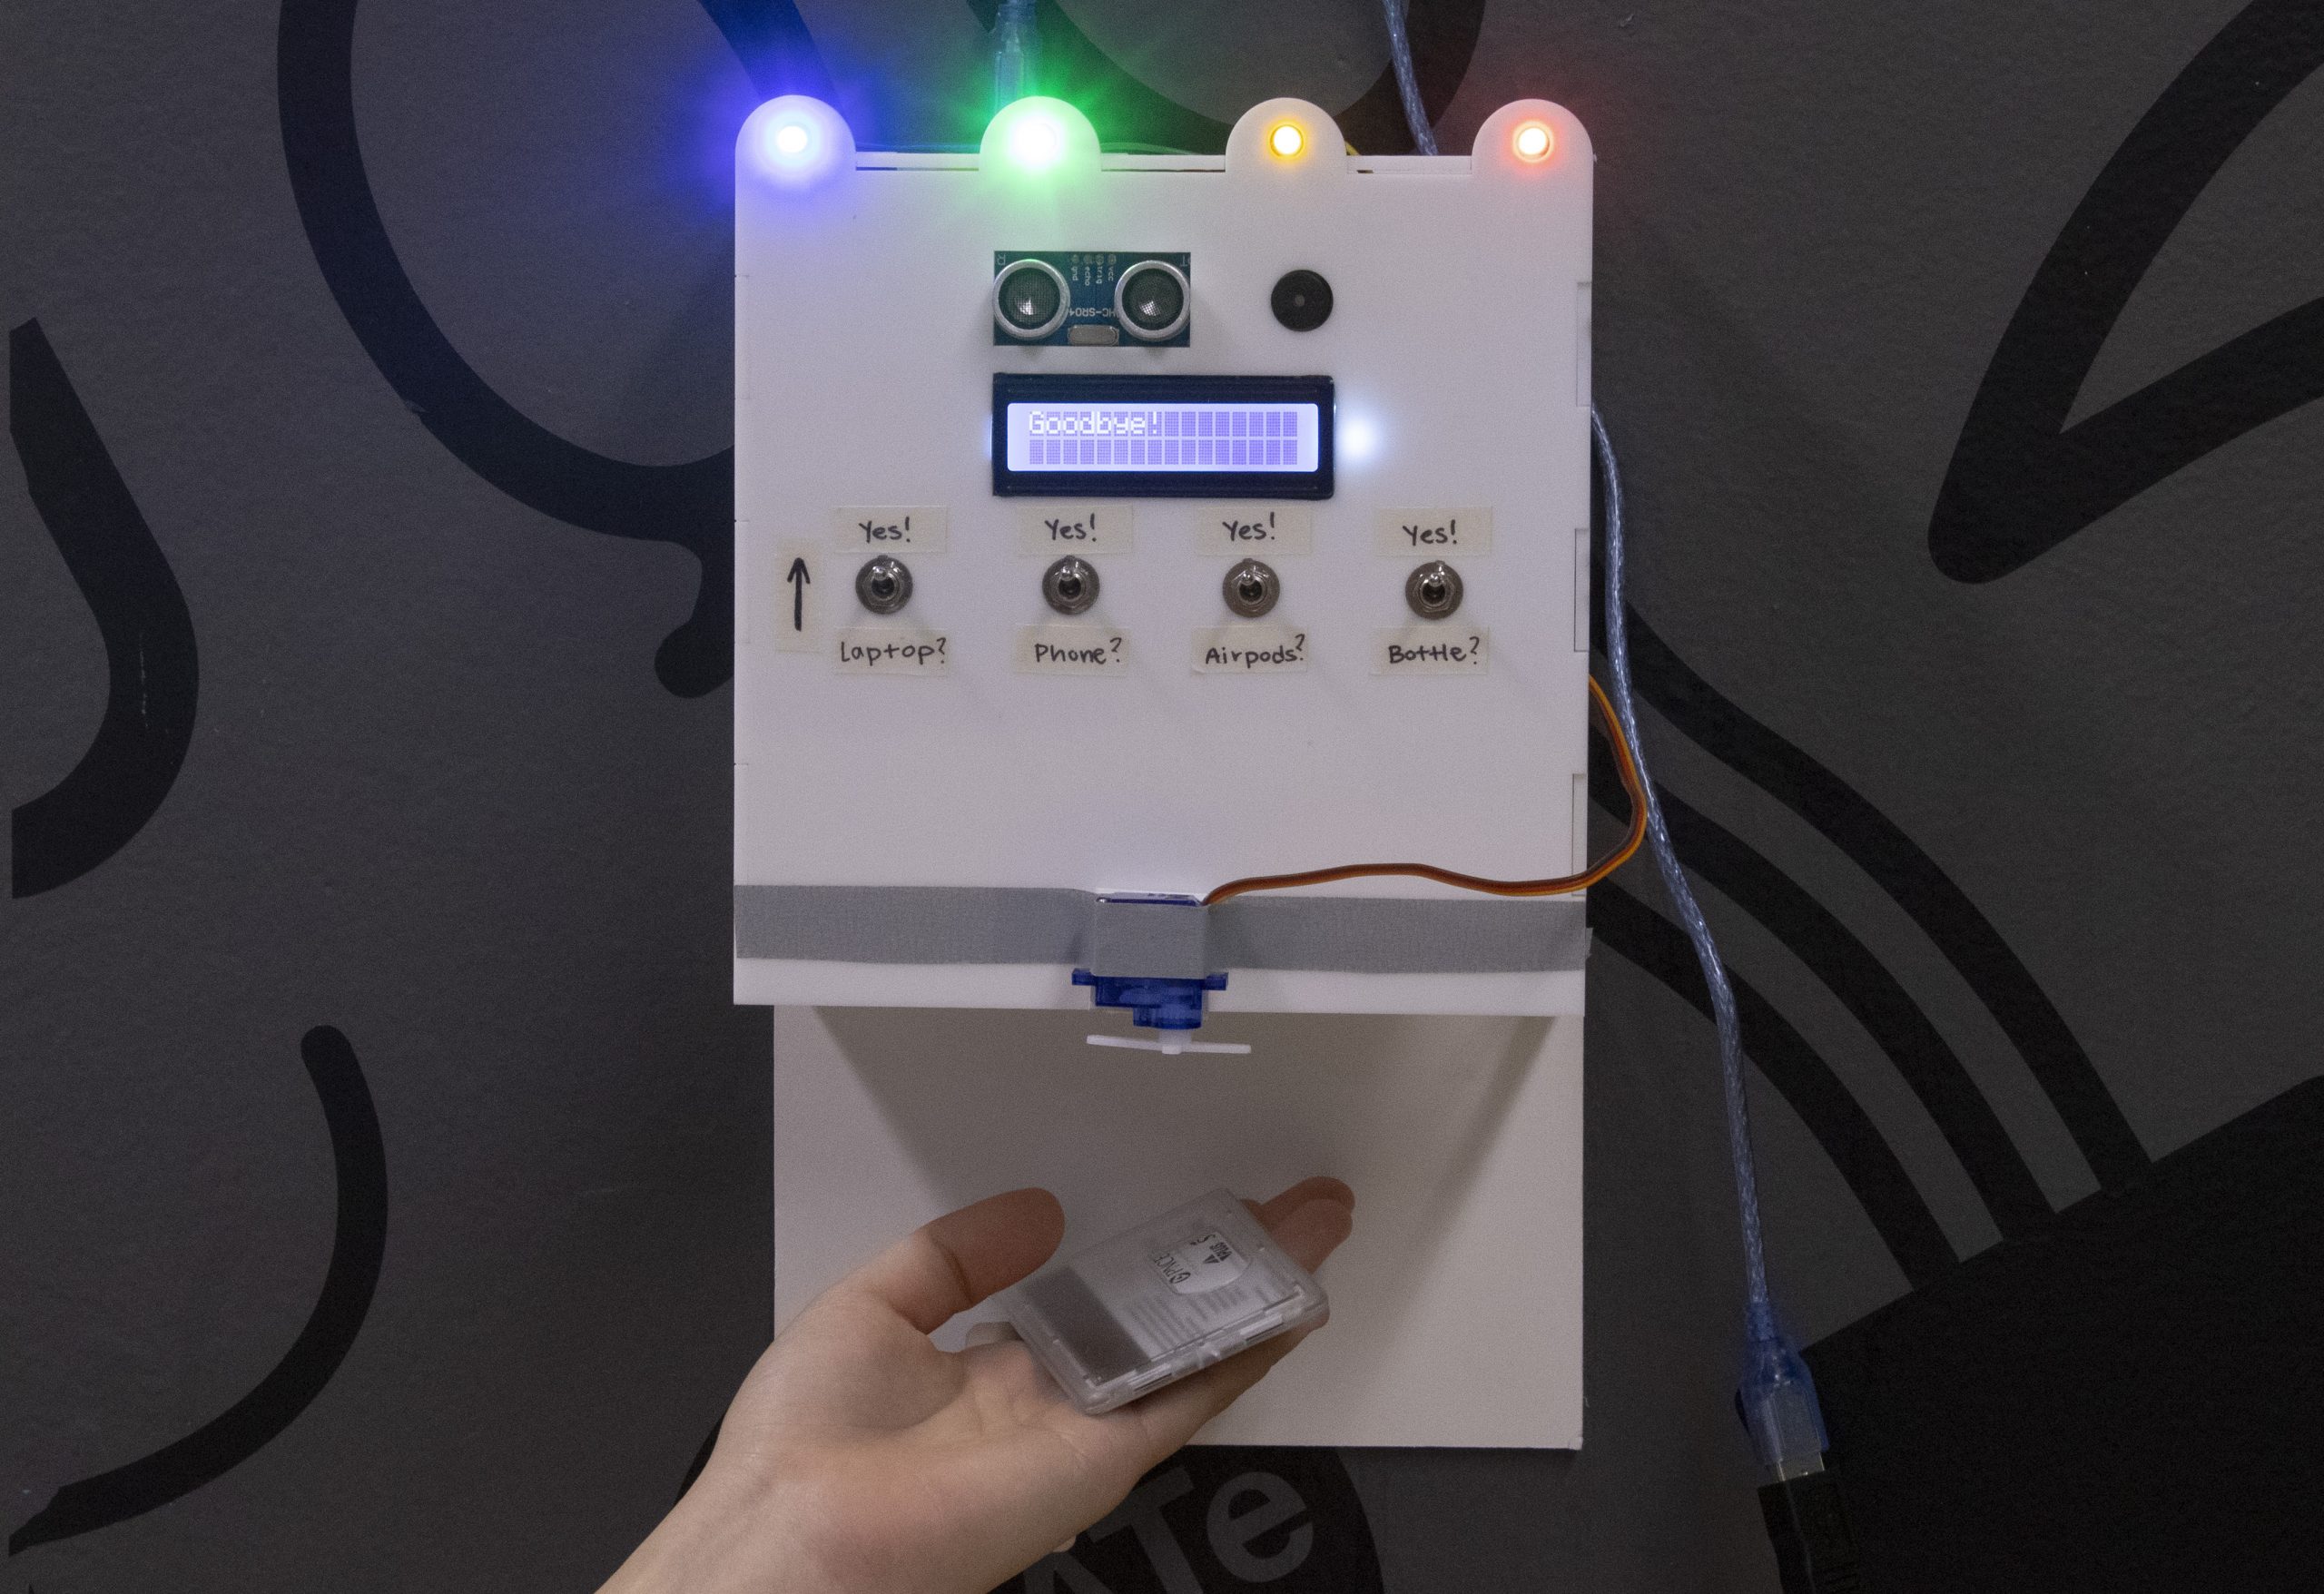
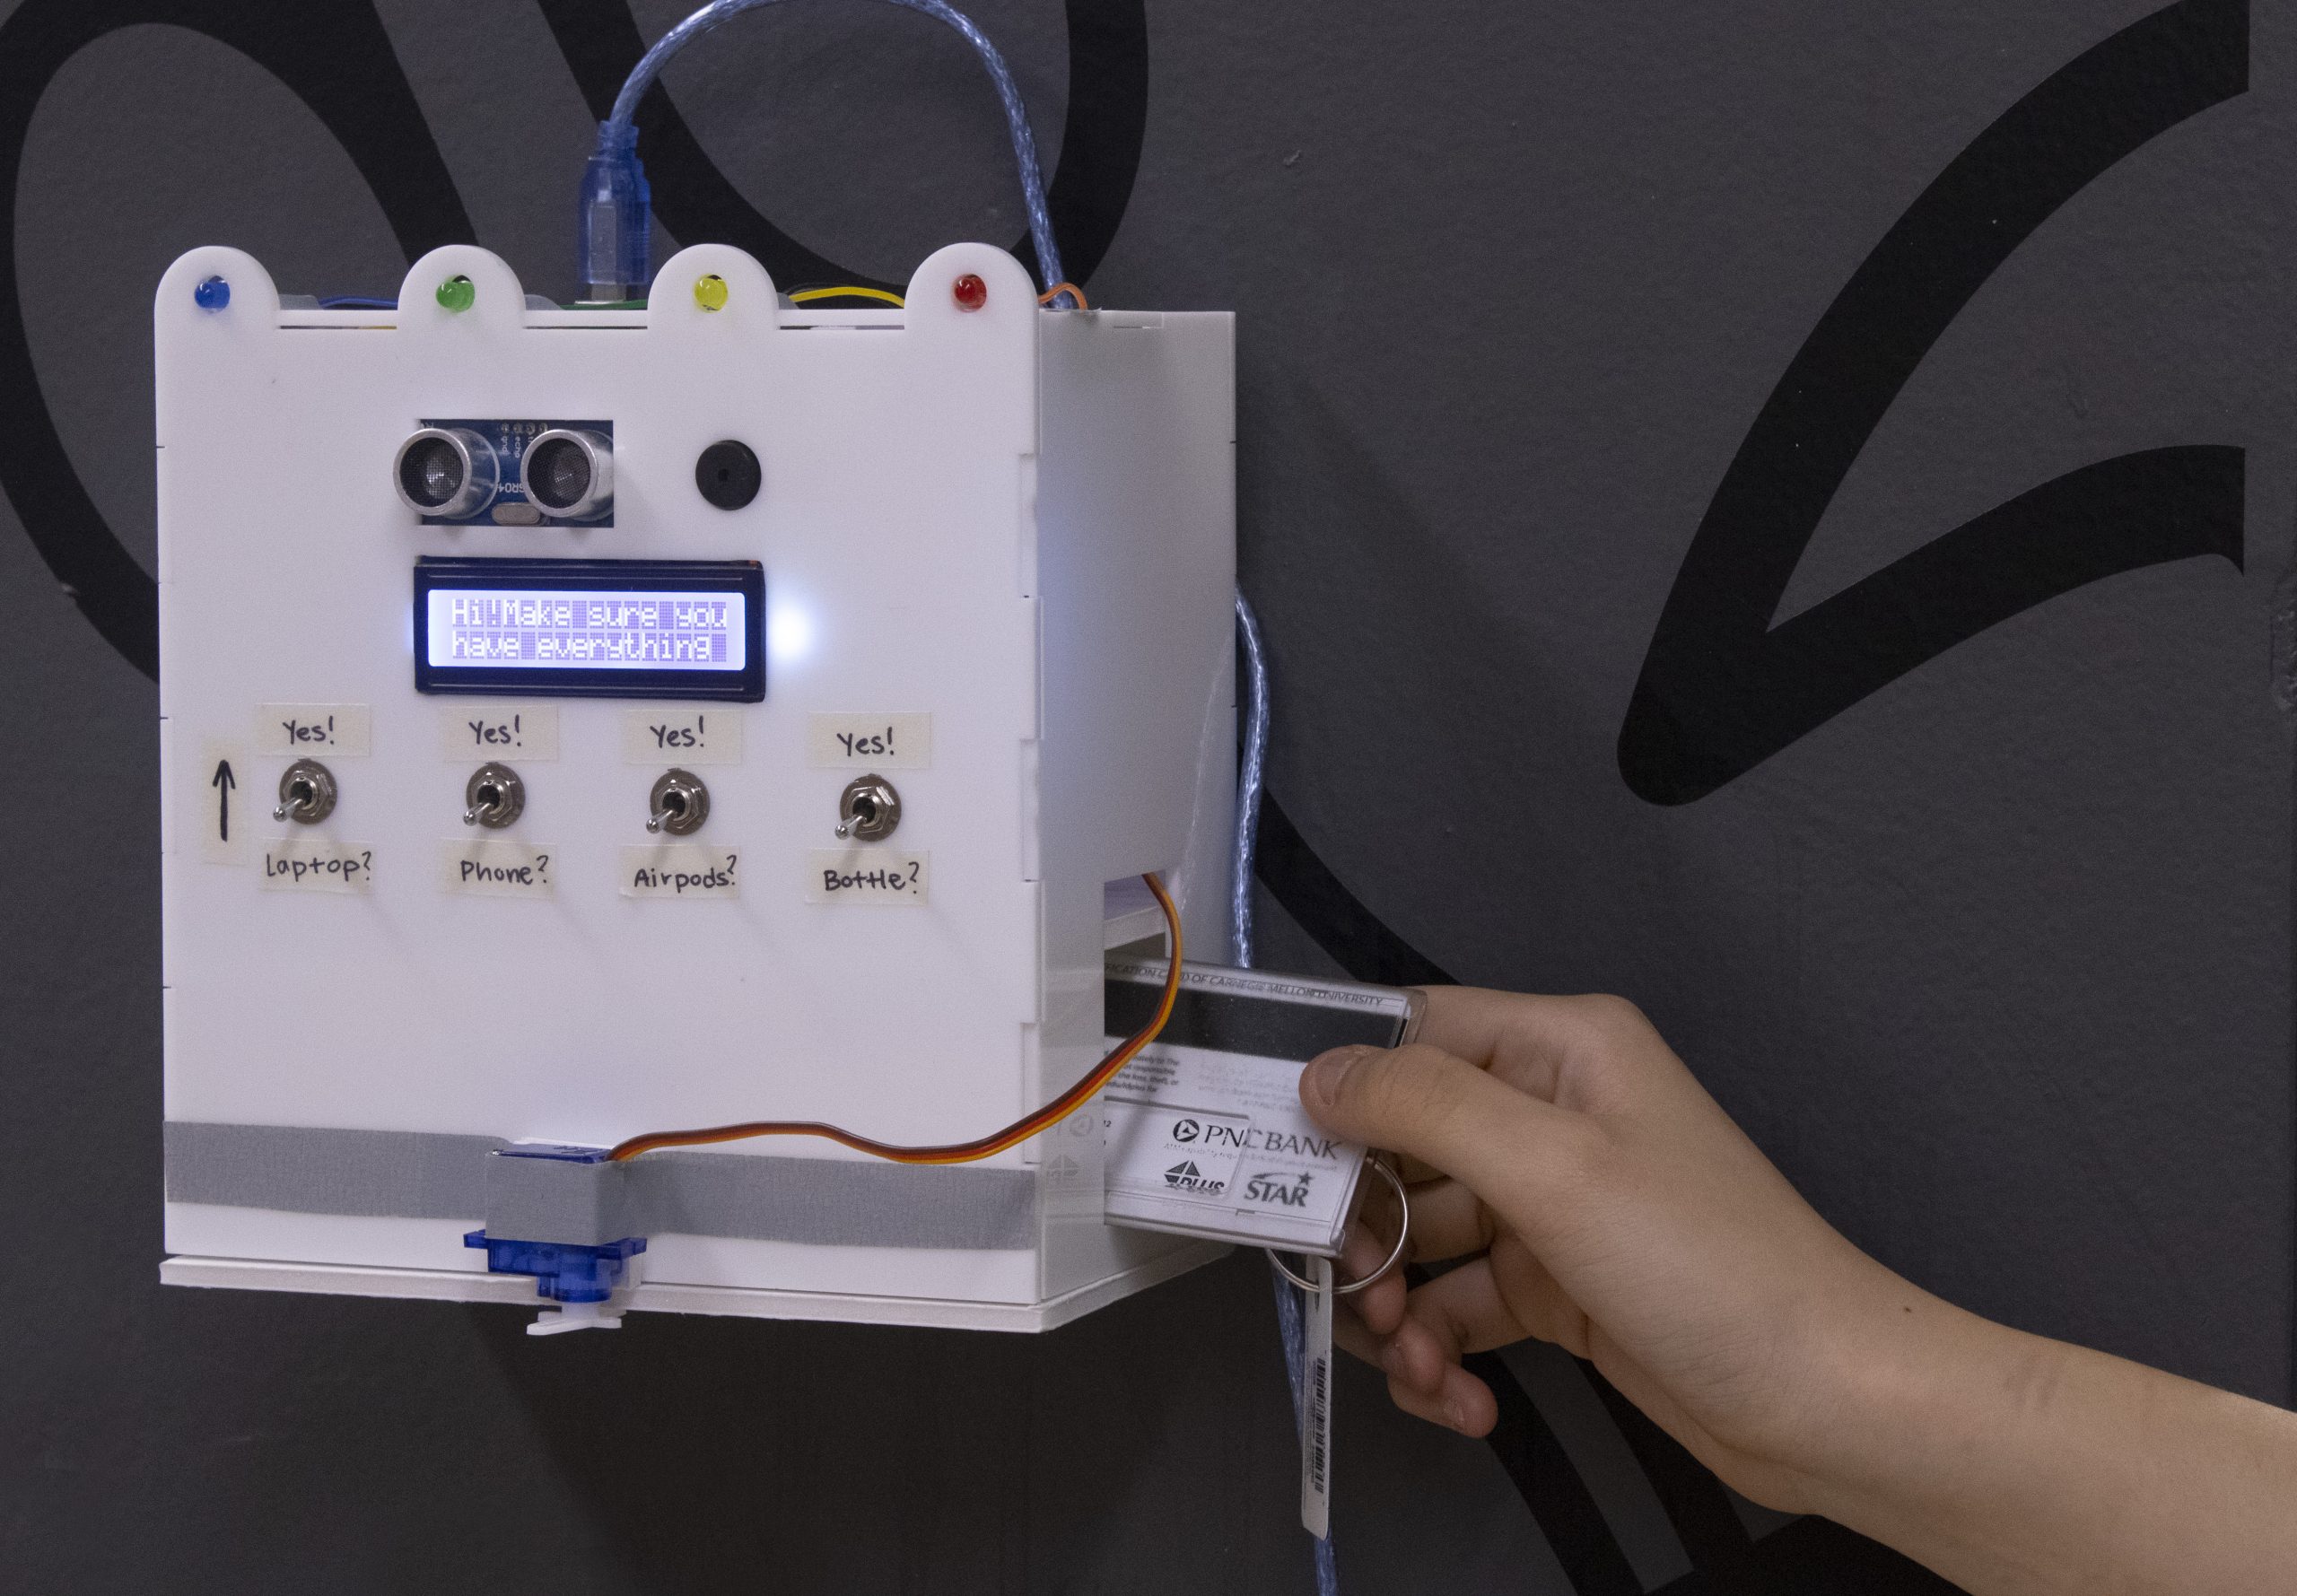
This device reminds me to bring my things with me in the morning. If I have everything listed with me, a latch opens and my ID falls out into a tray, allowing me to leave my house.
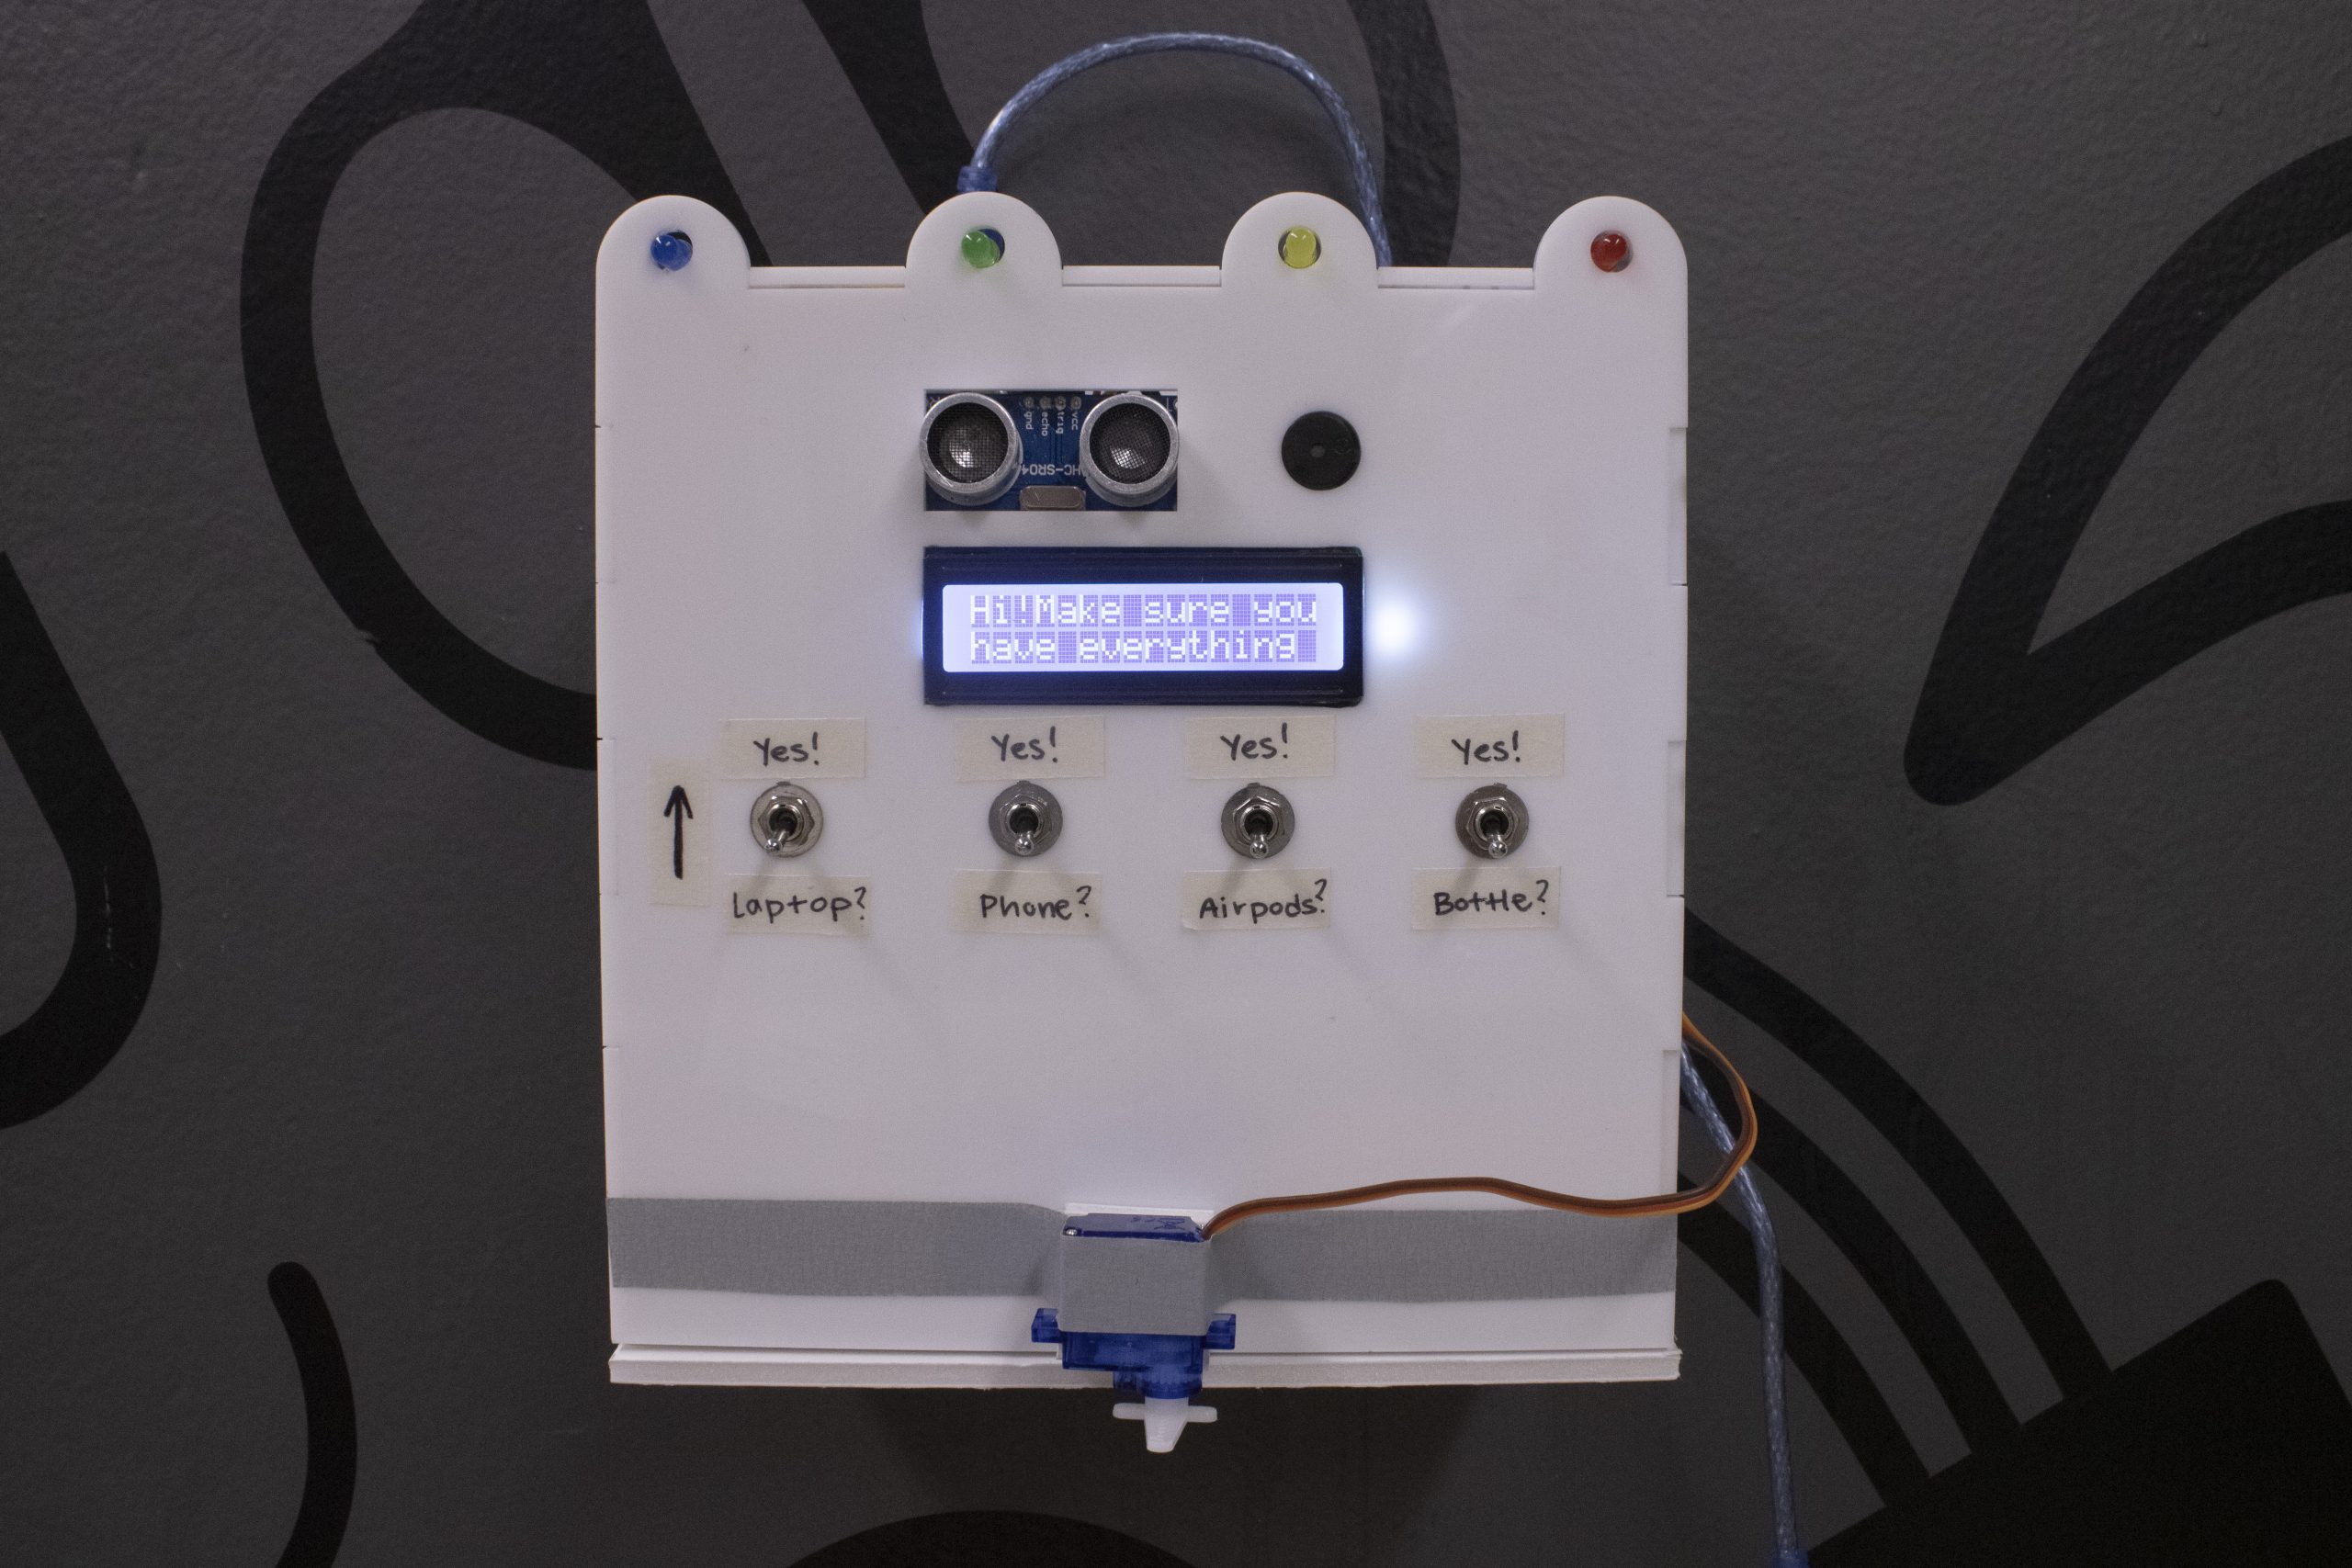
Overall image
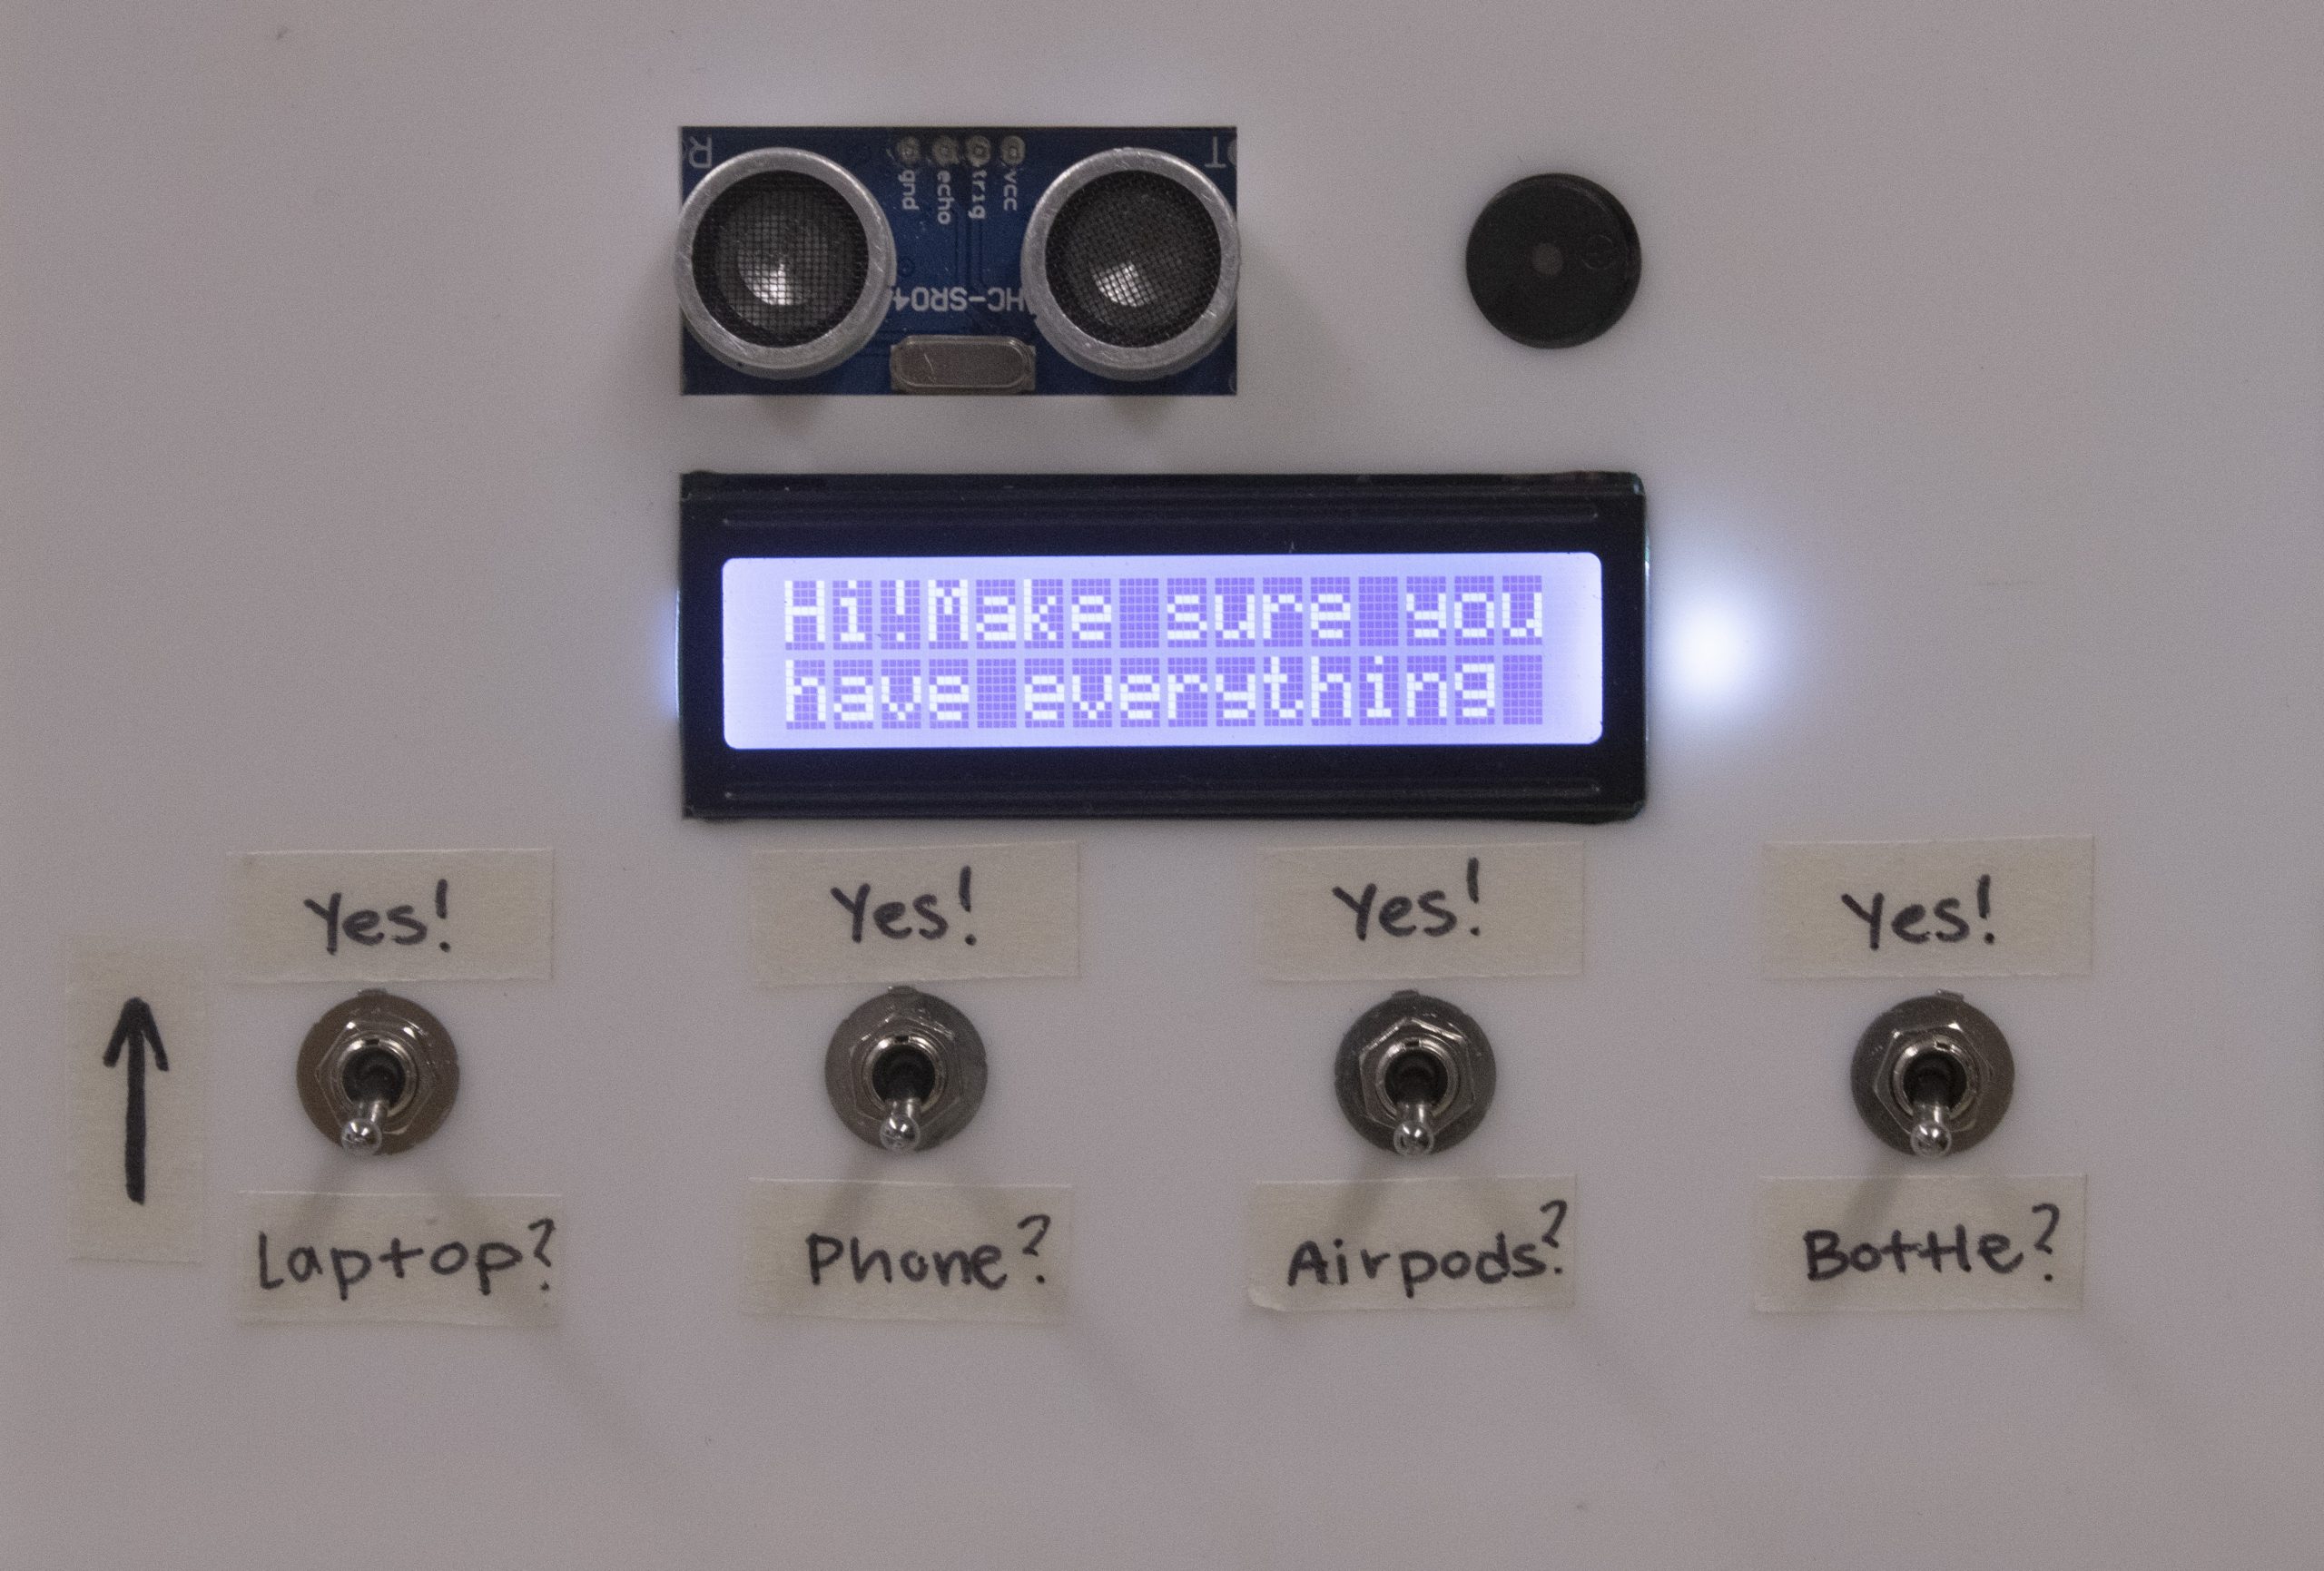
panel mount detail
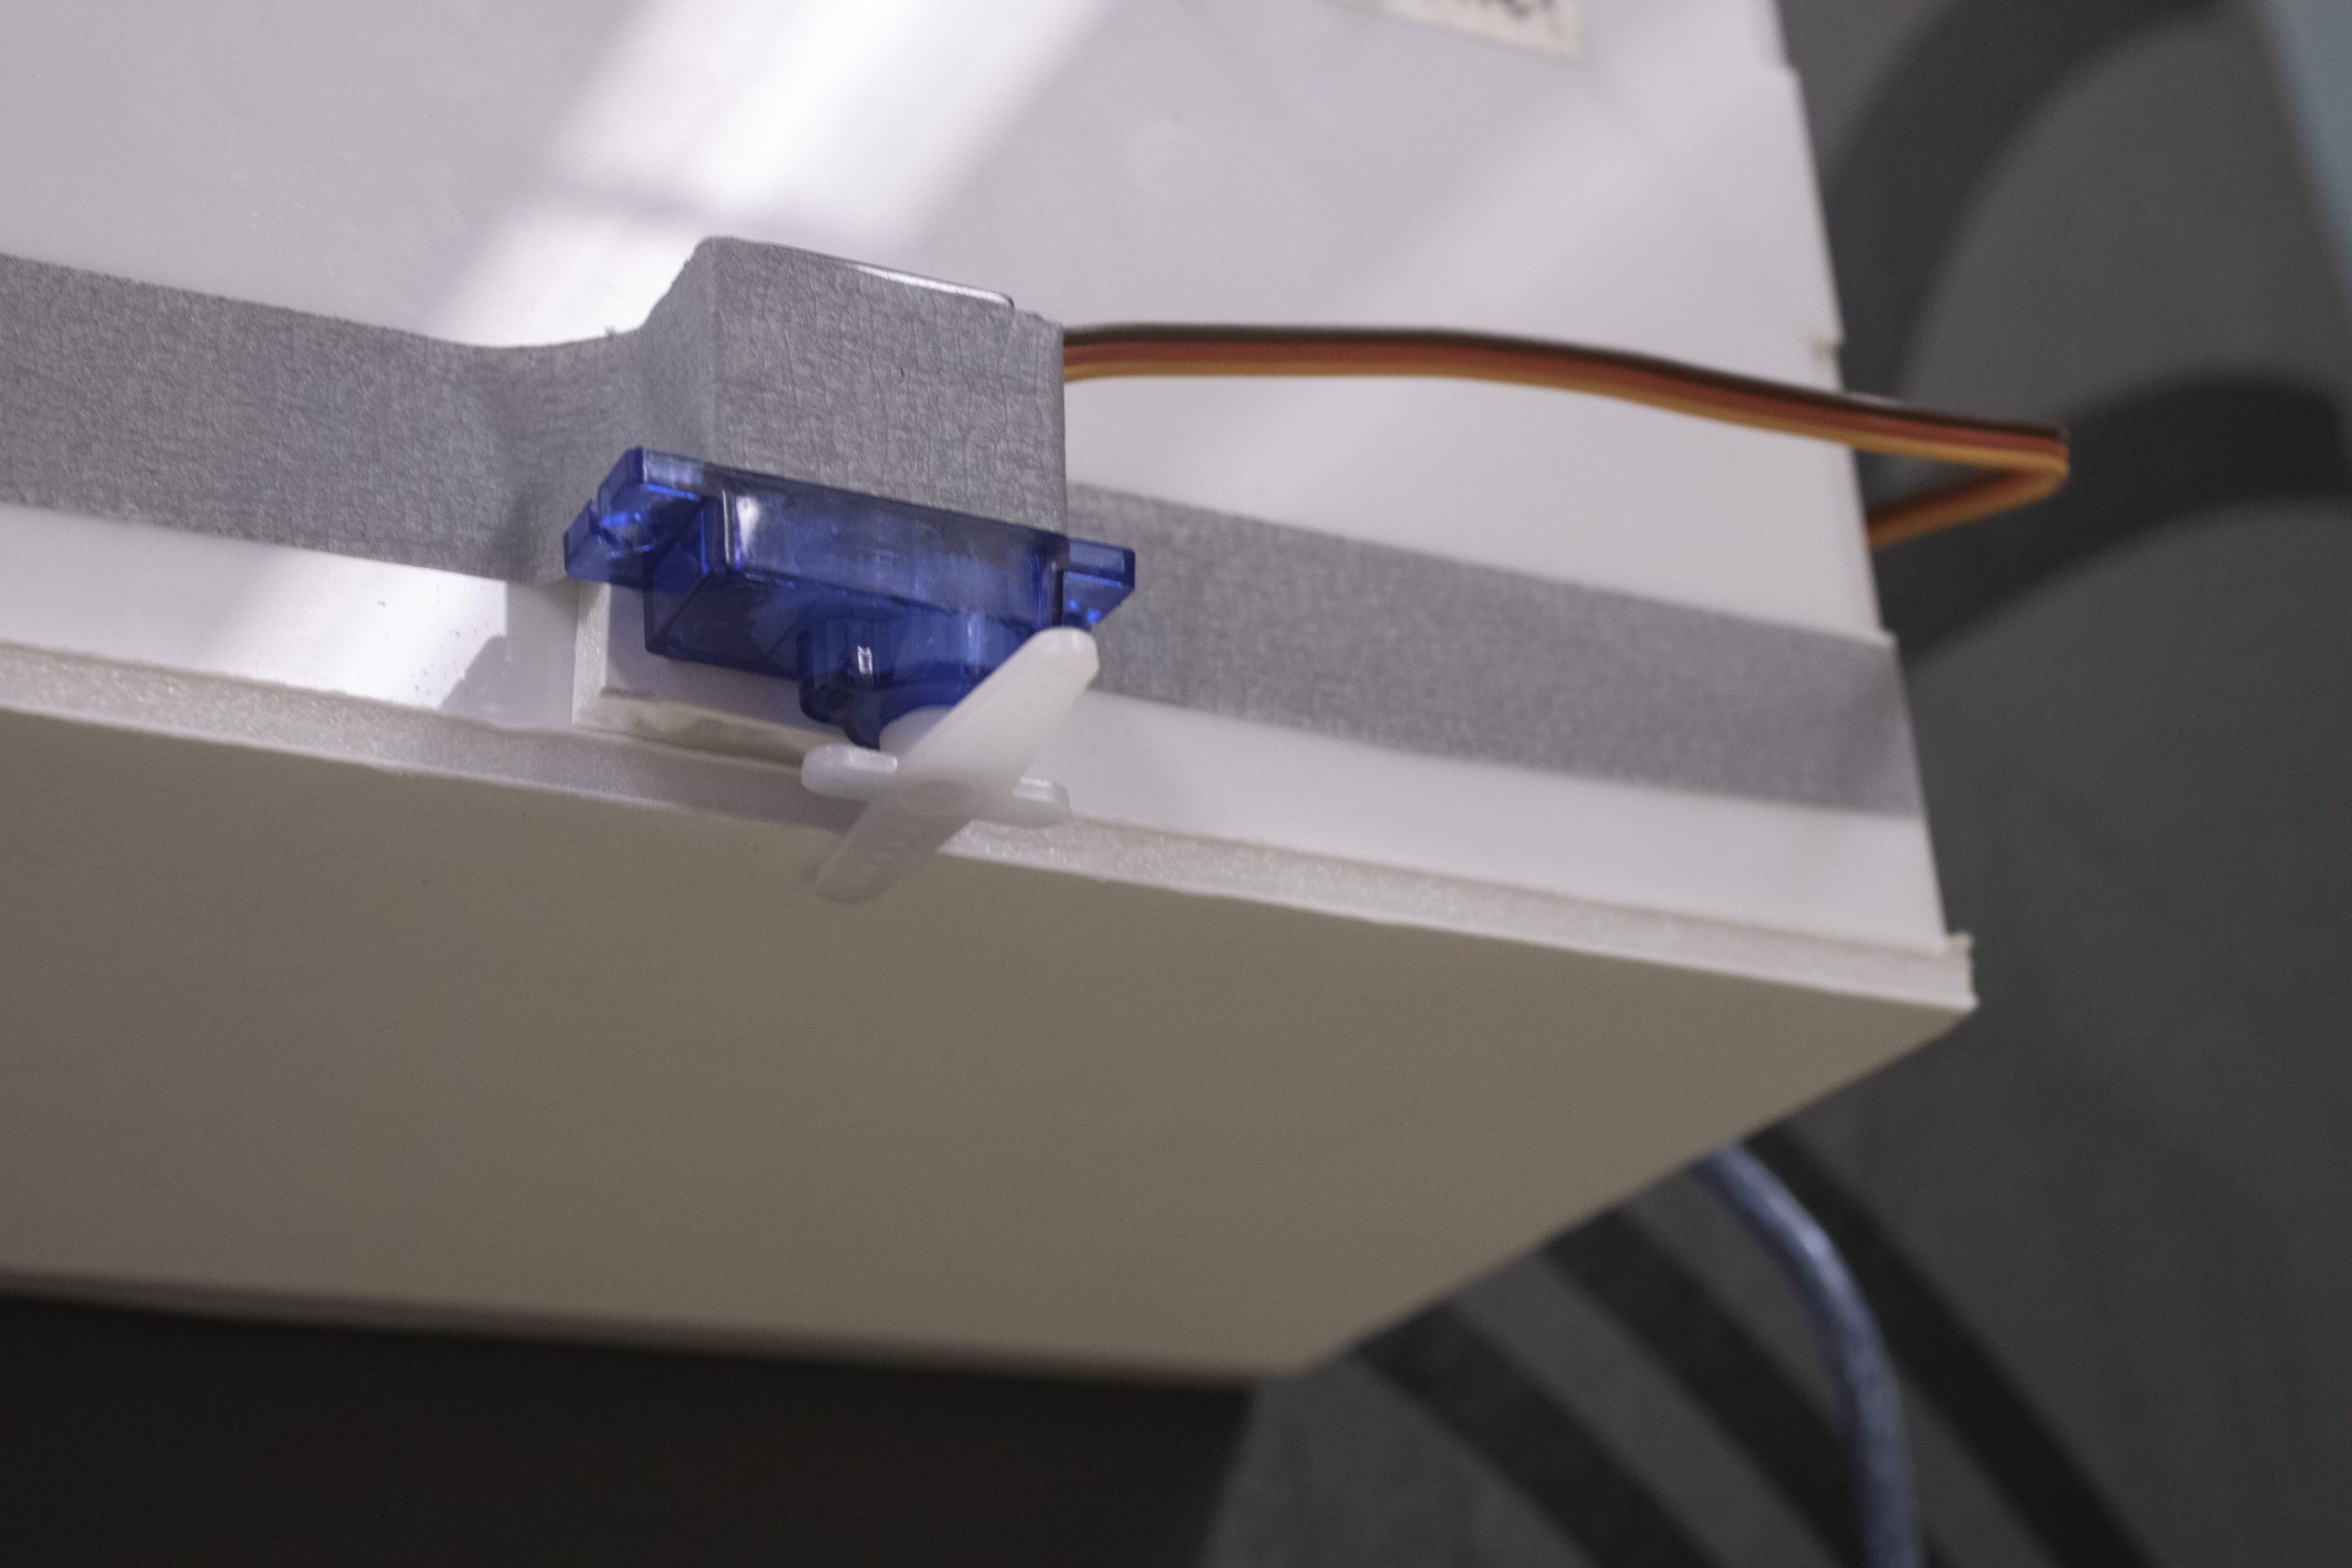
servo latch detail
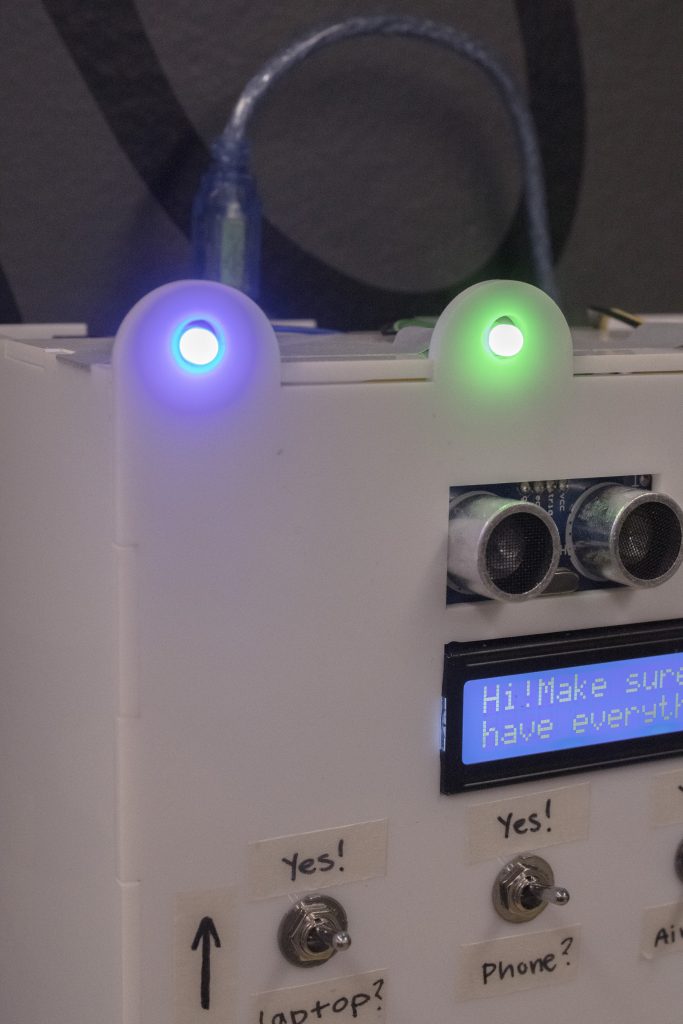
LED detail

Flipping the switches
Lid opens and you get your ID
Putting ID back into device and resetting it
I made some initial ideation sketches based on problems I had daily. (include sketches) I settled on creating a prize box for myself since I often found myself lacking the motivation to finish tasks, eat well, or exercise. I was also inspired by some projects from previous years where they used a combination of switches and LEDs to create tactile and visual interaction. The initial idea was to create a box-shaped device with switches and LEDs. Each switch represented something I had to do and as each switch gets flipped to signify completing a task, the corresponding LED will light up. Once all the switches are flipped, a servo motor would rotate to open a lid to reveal a prize I left for myself beforehand (so I’m rewarding myself).
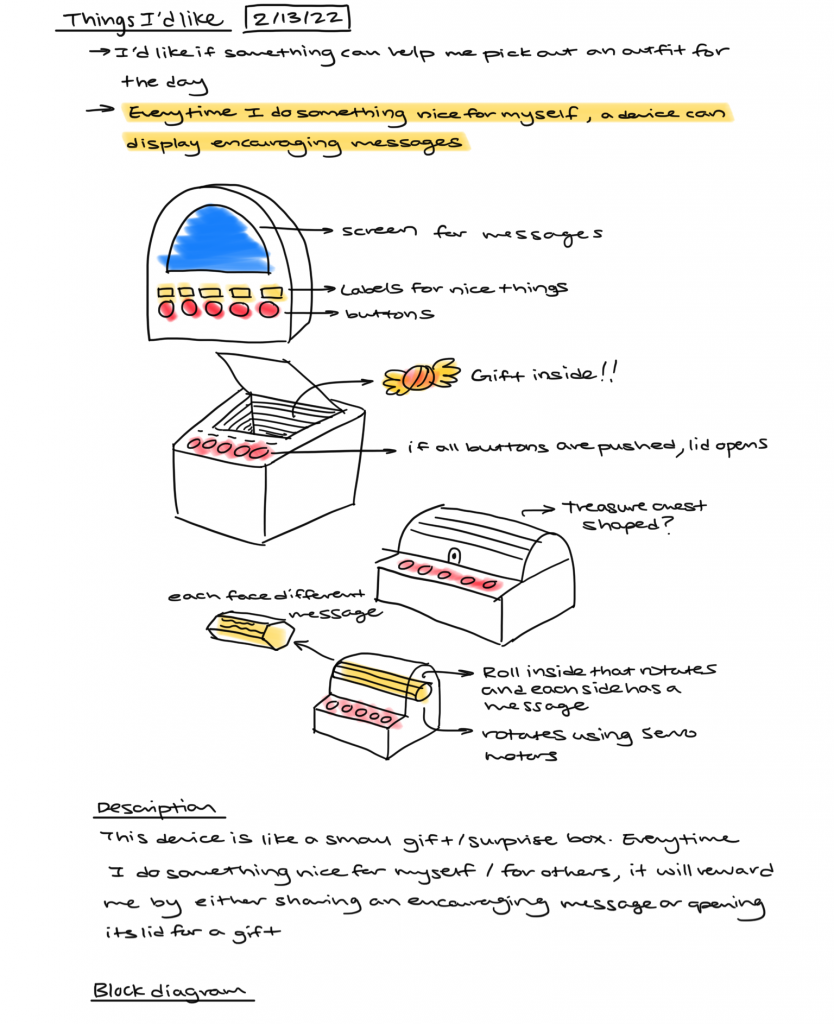
Initial idea sketches
Since I had quite a lot of individual components (5 switches, 5 LEDs, and a servo motor), I wanted to make sure there were enough plugs on my Arduino by first wiring everything in draw.io. I also had experience working with these components before so I was able to get the wiring and code done relatively quickly. However, I had significant difficulty with the physical fabrication of my device.
For my prototype, I used cardboard to make a box with the LEDs and switches in their own rows. But I was having trouble figuring out how to place the servo so that it could open the lid vertically. Instead, I could only position the motor to rotate the lid horizontally. So during the prototype crit, someone suggested: “I think that you can open it vertically by placing the servo motor parallel to the ground. It would be the servo rotate vertically”. I thought that was a good idea so I incorporated that into my design with the motor in the back of the box moving like a hinge to open the door
Since I had most of my wiring and code working by prototype crit, I wanted to challenge myself a little more. For the few days prior, I had been forgetting to bring things like my ID, AirPods, and water bottle with me in the morning. So I changed my concept to be a device that reminds me to check that I have all my things before I leave my house. Using the same base, I added 2 additional components: an ultrasonic ranger and buzzer. The device will therefore be mounted on my door so when I pass it in the morning it will beep and remind me to check it. Each switch corresponds to an item I need to bring, which I will flip if I have it in my bag. Instead of it being a prize, it will instead be my ID that will drop down. Once I have my ID, I can leave my house.
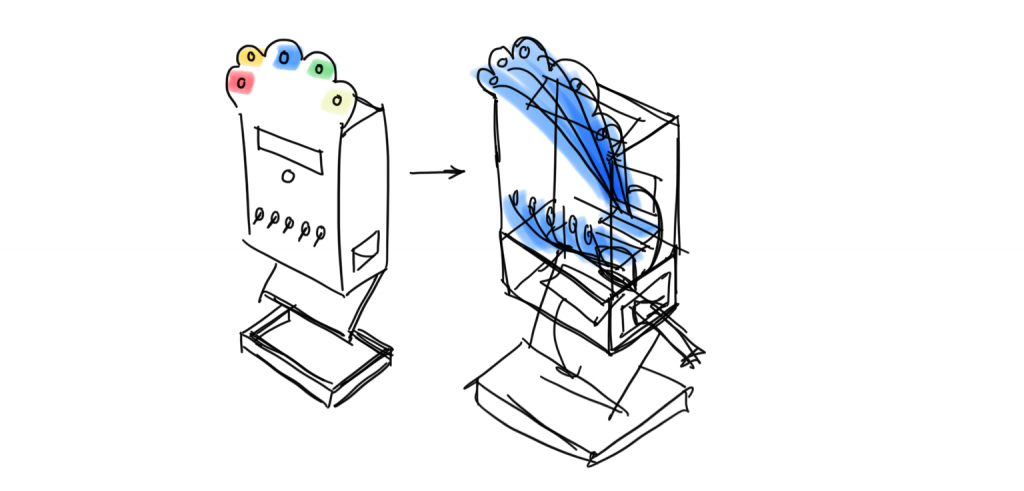
Updated idea sketch
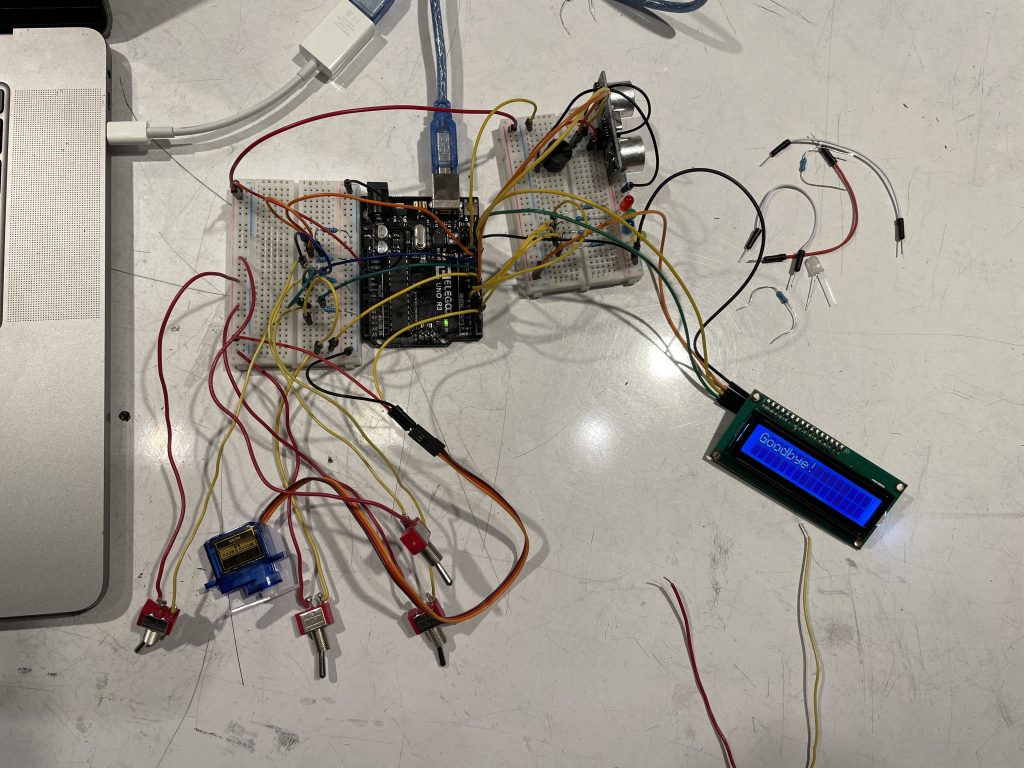
wiring of all the components
After adding the additional components, I started 3D modeling my device in Solidworks to 3D print, making sure to leave holes in some areas to panel-mount the different electronic components. But after talking to Zach, I realized 3D printing takes a long time and some holes on my box faces may ruin the dimensions needed to fit edges together and fit switches through. So I laser-cut pieces instead for a finger-joint box and welded them together.
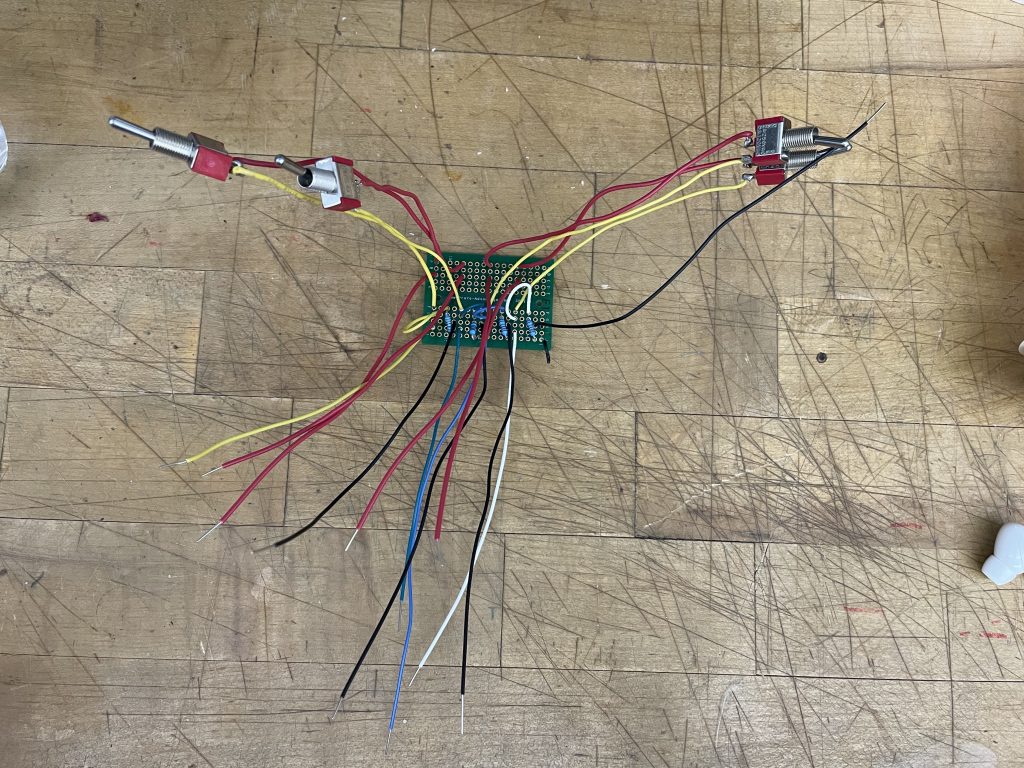
soldering switch wires

initial 3D model for 3D print
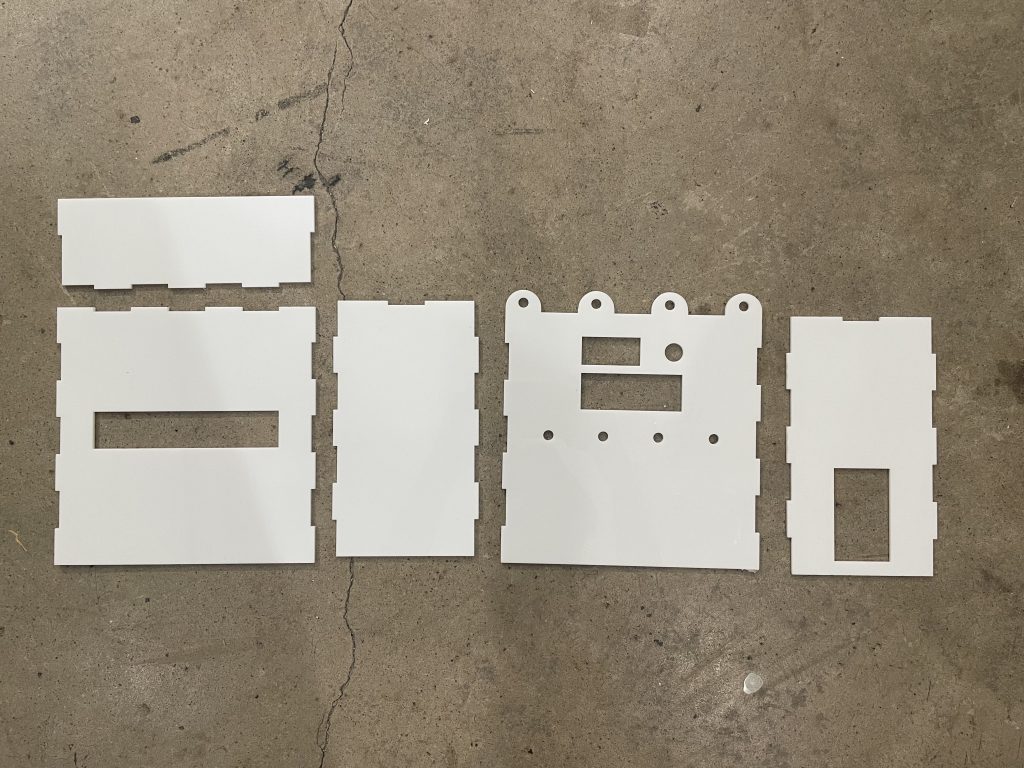
Lasercut pieces
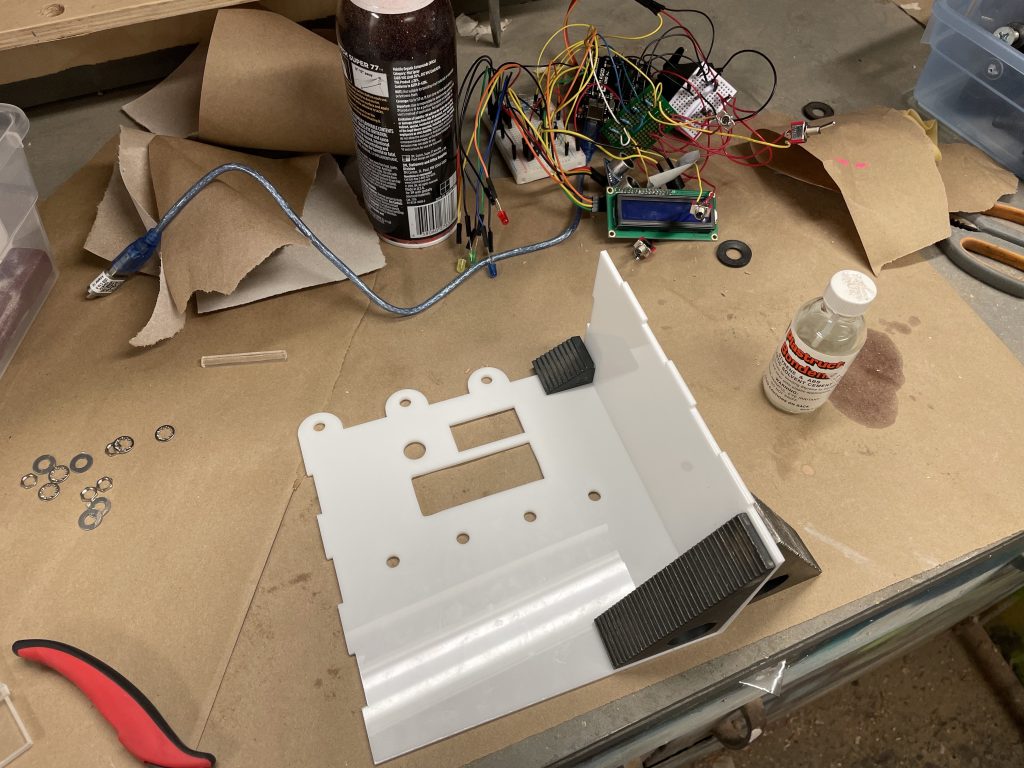
plastic welding pieces together
After I finished putting together the box, I had a problem with the servo again where the arm wasn’t long enough to fully support the lid and couldn’t hold it in place against gravity.
Instead of working against gravity, I thought to work with it and changed the servo position so instead of acting as a hinge to open the bottom door, it is more of a latch. When the arm rotates away, the lid naturally falls open so the ID can drop down.
During the final crit, I got a couple feedback points on how to improve my device. Someone said “If you wanted to go further, you could maybe add a motor to open/close the door, and not just rely on gravity” which was my original goal and is something I’d still like to achieve. I think I will need a more secure and longer arm to support the lid. The guest critiquer also said that the motor makes the device look slightly unfinished and suggested using magnets that work only when electricity is running through it to lock and unlock the lid. I also think this is a viable idea and probably something I would have tried too if I had more time. Someone else also pointed out “The gravity might lead the key to drop to the ground; is it possible to place a basket below the machine to avoid the key from going all the way down?” This is something I actually forgot to consider and I think is a great suggestion. I will probably make another tray to be mounted below the device that will catch the ID if it misses the user’s hand.
Overall, I’m quite happy with my project since it is pretty similar to my concept and it works well too. While I think the aesthetic design can be improved slightly, such as making it less box-shaped and making it smaller, I’m proud of what I was able to make with my minimal Arduino skills. It was also an exciting process since I’ve never designed and made something with electronics before even though it was something I’ve always wanted to try and incorporate into my work as a design student. Compared to the previous project where my partner and I struggled with coding the parts to make them work together, I was surprised that the wiring and coding were relatively straightforward for me and how well the components were working. I’d like to think it shows some improvement between the 2 projects and how I’ve learned from my mistakes before.
However, I was still slightly disappointed in the physical aspect of it since I had more details in mind but I couldn’t incorporate with the material and form. If I had more time, I would have probably prototyped more and experimented with different materials. I’d also try changing it from being too box-shaped and looking at possibilities for softer edges and possibly rounded designs. For that, I’d also try 3D printing my device to achieve those details. While not everything went according to plan, I think I responded well and was flexible with changing my idea as needed, and still made a project I can proudly present.
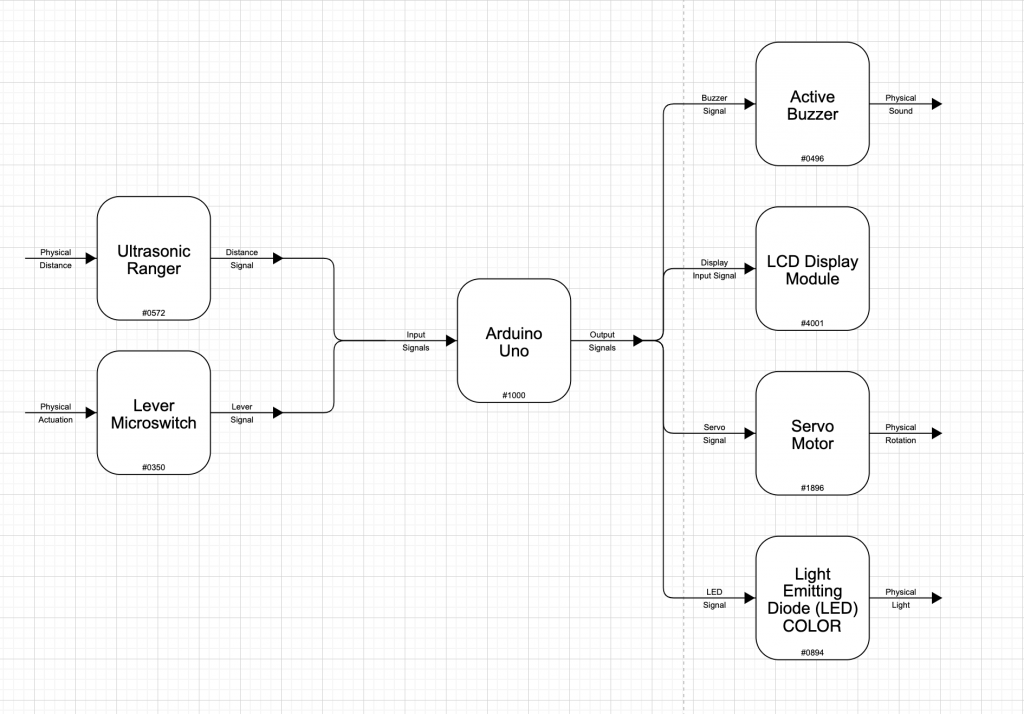
Block diagram
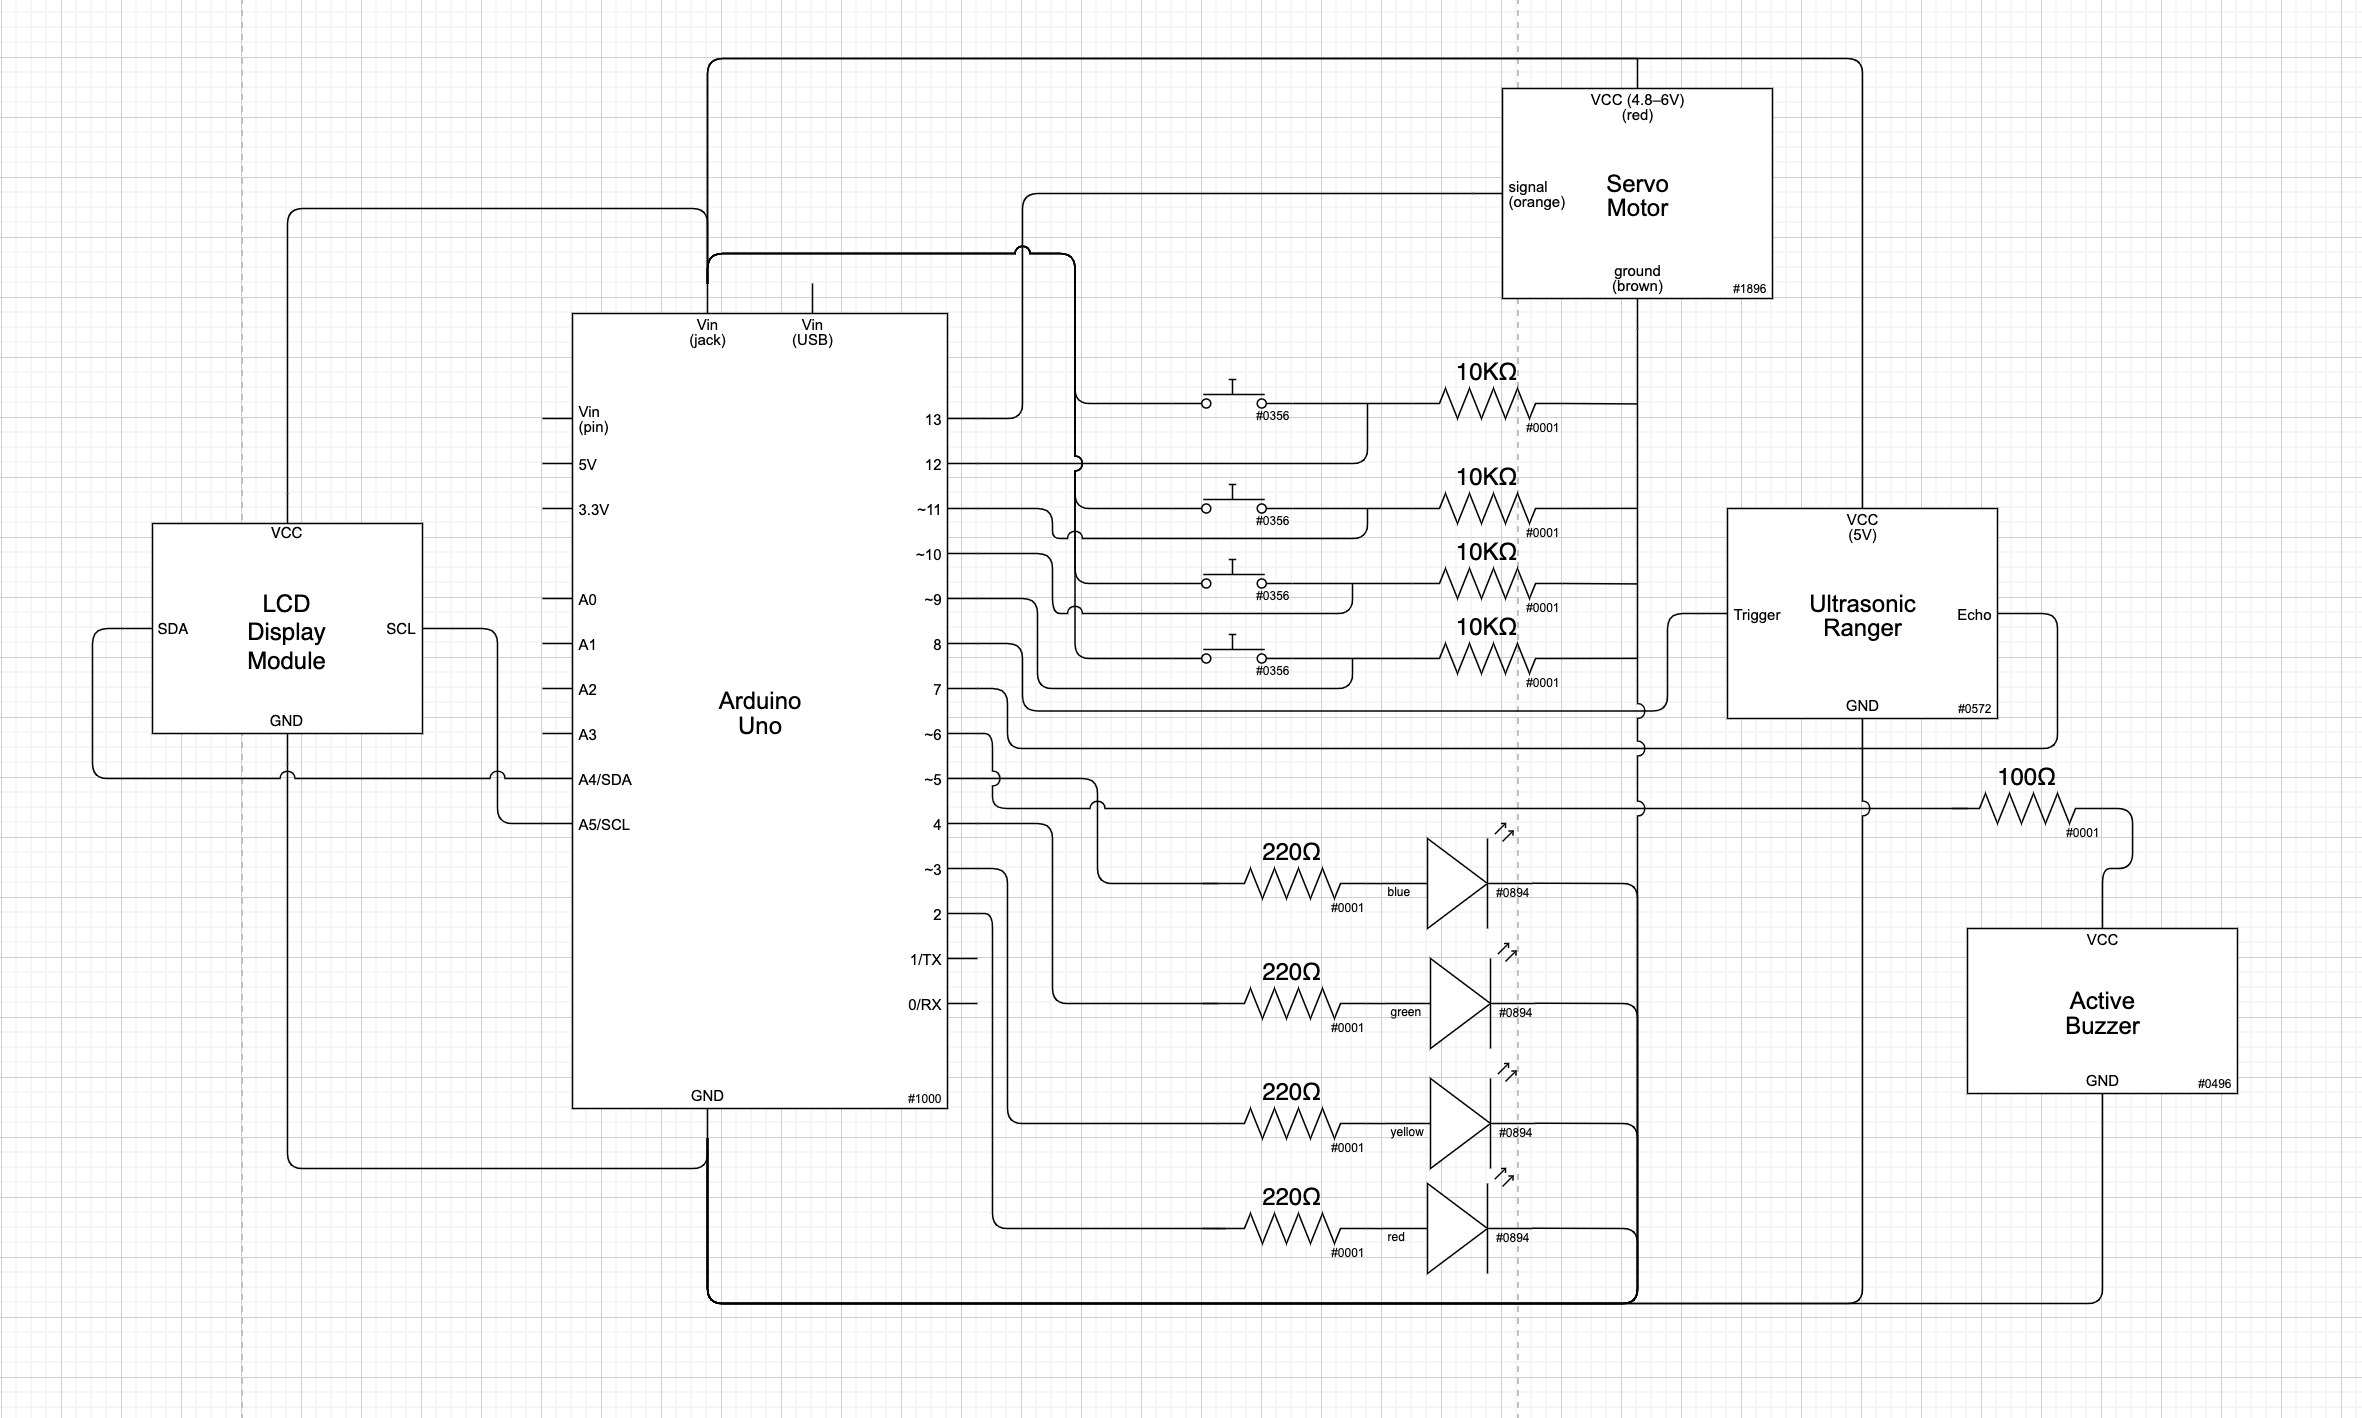
schematic diagram
/* "Don't Forget Your Things!"
 *
* Catherine Liu
*
* This code is for a device that reminds you to take your things with you in the morning. Each switch is
* wired to an LED and a servo motor rotates when all switches are flipped
*
* Pin Mapping:
* pin | mode   | description
* ----|--------|-------------
* 2  .  output .  servo motor
* 3  .  output .  LED 1
* 4  .  output .  LED 2
* 5  .  output .  LED 3
* 6  .  output .  LED 4
* 7  .  input  .  ultrasonic ranger trigger pin
* 8  .  input  .  switch 1
* 9  .  input  .  switch 2
* 10 .  input  .  switch 3
* 11 .  input  .  switch 4
* 12 .  input  .  ultrasonic ranger echo pin
* 13 .  output . buzzer
* re
* Code Used:
* Robert Zacharias: Displaying data on an I²C LCD screen (https://courses.ideate.cmu.edu/60-223/s2022/tutorials/I2C-lcd)
*/

#include <NewPing.h>
#include <Servo.h>
#include <LiquidCrystal_I2C.h> //LCD Display Module library
LiquidCrystal_I2C screen(0x27, 16, 2); //initiate screen


//LED pins
const int LEDPIN1 = 3;
const int LEDPIN2 = 4;
const int LEDPIN3 = 5;
const int LEDPIN4 = 6;

//switch pins
const int SWITCHPIN1 = 8;
const int SWITCHPIN2 = 9;
const int SWITCHPIN3 = 10;
const int SWITCHPIN4 = 11;
int switchCount = 0; //

//buzzer pin
const int BUZZERPIN = 13;
bool buzzerSound = false;
int buzzerCount = 0;

//servo pin
Servo lidMotor;
const int MOTORPIN = 2;

//distance sensor pin
#define TRIGGERPIN 7
#define ECHOPIN 12
#define MAXDISTANCE 200

NewPing sonar(TRIGGERPIN, ECHOPIN, MAXDISTANCE); // NewPing setup of pins and maximum distance.

//boolean for resetting the device
bool switchReset = false;

void setup() {
  Serial.begin(115200);

  pinMode(LEDPIN1, OUTPUT);
  pinMode(LEDPIN2, OUTPUT);
  pinMode(LEDPIN3, OUTPUT);
  pinMode(LEDPIN4, OUTPUT);

  pinMode(SWITCHPIN1, INPUT);
  pinMode(SWITCHPIN2, INPUT);
  pinMode(SWITCHPIN3, INPUT);
  pinMode(SWITCHPIN4, INPUT);

  pinMode(BUZZERPIN, OUTPUT);

  lidMotor.attach(MOTORPIN);
  lidMotor.write(5);

  screen.init();
  screen.backlight();
  screen.home();
  screen.print("Hi!Make sure you");
  screen.setCursor(0,1);
  screen.print("have everything");
}

void loop() {
  int buttonState1;
  int buttonState2;
  int buttonState3;
  int buttonState4;

  buttonState1 = digitalRead(SWITCHPIN1);
  buttonState2 = digitalRead(SWITCHPIN2);
  buttonState3 = digitalRead(SWITCHPIN3);
  buttonState4 = digitalRead(SWITCHPIN4);

  //checking distance
  delay(50);
  int distVal = sonar.ping_cm();
  Serial.println(distVal);

  //buzzer sounds 3 times max if object is detected
  if ((distVal < 30) && (buzzerSound == false)) {
    digitalWrite(BUZZERPIN, HIGH);
    delay(100);
    digitalWrite(BUZZERPIN, LOW);
    buzzerCount = buzzerCount + 1;
  }

  if (buzzerCount == 3) {
    buzzerSound = true;
  }

  //switch 1
  if (buttonState1 == LOW) {
    switchCount = switchCount + 1;
    digitalWrite(LEDPIN1, HIGH);
  }
  if (buttonState1 == HIGH) {
    digitalWrite(LEDPIN1, LOW);
  }

  //switch 2
  if (buttonState2 == LOW) {
    digitalWrite(LEDPIN2, HIGH);
  }
  if (buttonState2 == HIGH) {
    digitalWrite(LEDPIN2, LOW);
  }

  //switch 3
  if (buttonState3 == LOW) {
    digitalWrite(LEDPIN3, HIGH);
  }
  if (buttonState3 == HIGH) {
    digitalWrite(LEDPIN3, LOW);
  }

  //switch 4
  if (buttonState4 == LOW) {
    digitalWrite(LEDPIN4, HIGH);
  }
  if (buttonState4 == HIGH) {
    digitalWrite(LEDPIN4, LOW);
  }

  //rotate motor, and change LCD text after all switches are flipped
  if ((buttonState1 == LOW) && (buttonState2 == LOW) && (buttonState3 == LOW) && (buttonState4 == LOW)) {
    screen.clear();
    screen.home();
    screen.print("Goodbye!");
    lidMotor.write(170);
    switchReset = true;

  }

  //motor returns to relatch lid
  else {
    lidMotor.write(70);
  }

  //reset buzzer when switches are flipped back
  if ((buttonState1 == HIGH) && (buttonState2 == HIGH) && (buttonState3 == HIGH) && (buttonState4 == HIGH) && (switchReset == true)) {
    screen.home();
    screen.print("Hi!Make sure you");
    screen.setCursor(0,1);
    screen.print("have everything");
    buzzerSound = false;
    switchReset = false;
    buzzerCount = 0;
  }
}