
Math Buddy
Overview
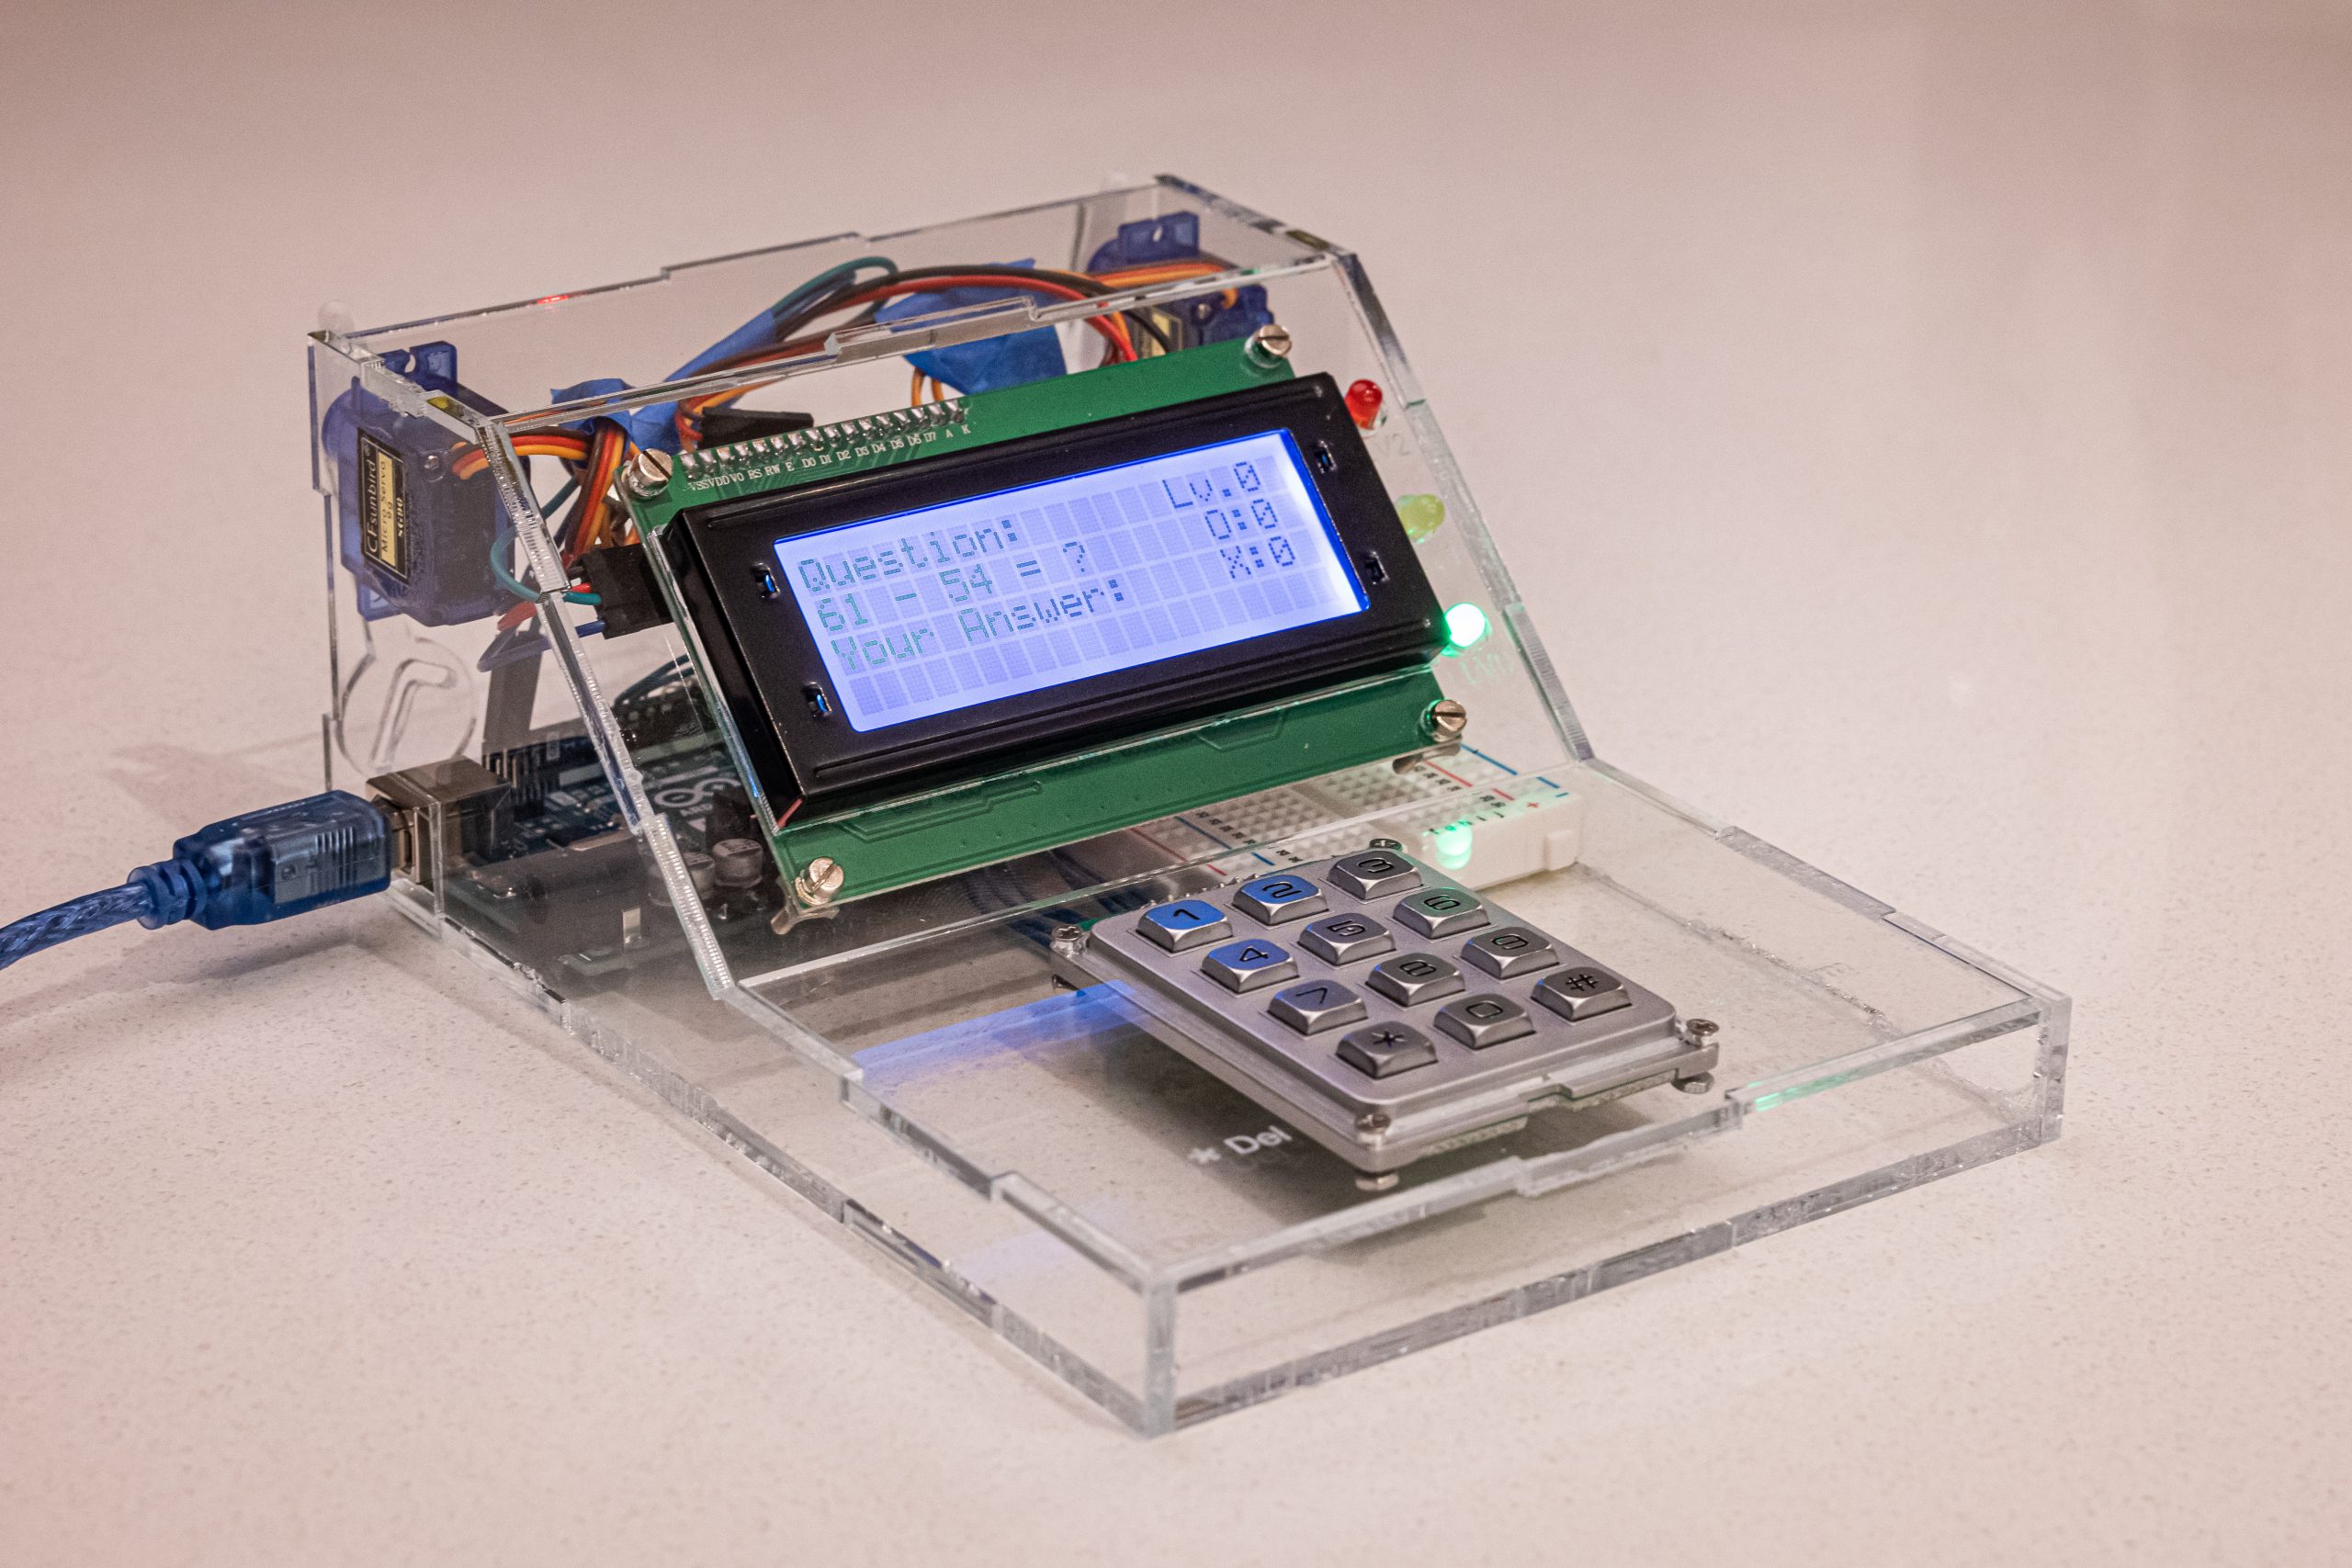
Math Buddy is my new electronic friend who always wants to improve my math by asking me mathematical questions and expecting my responses. If I answer correctly, it will be so happy, show me a smiling face and raise its “correct” hand; when I do it wrong, it’ll ask me to try again (and again) until I figure out a correct solution.
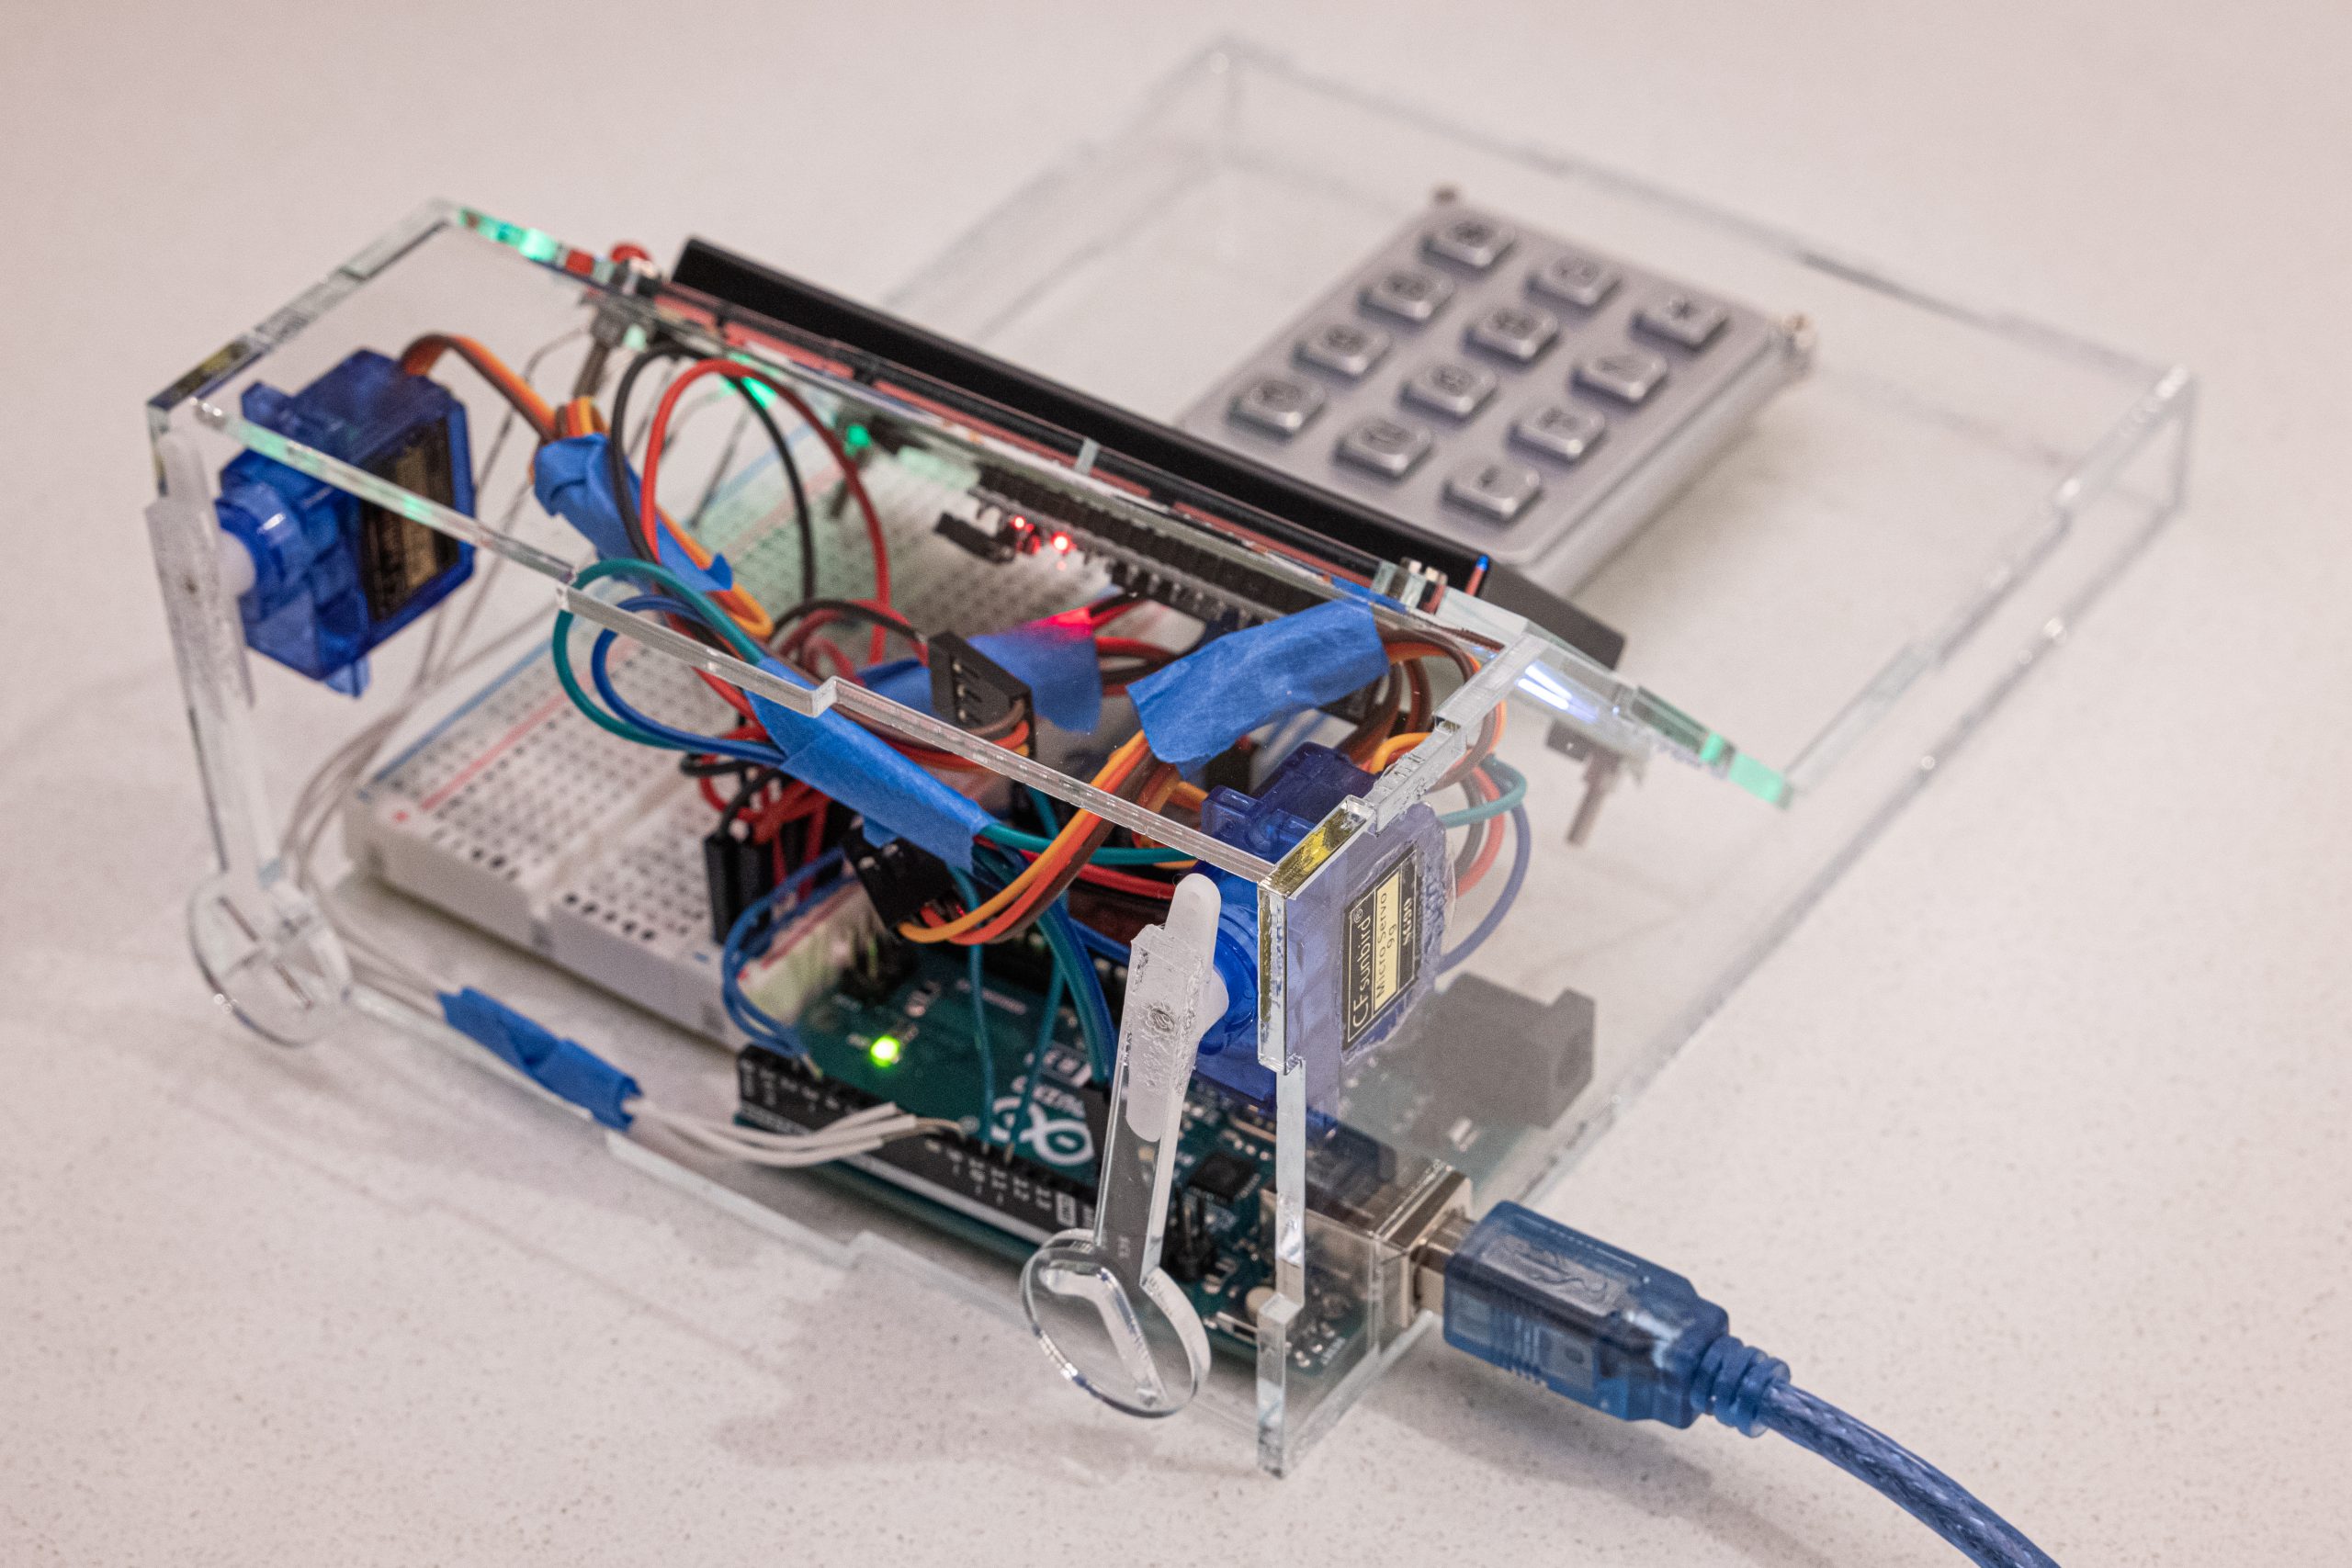
Math Buddy – Rear View

Smiling Face with “Correct” Hand
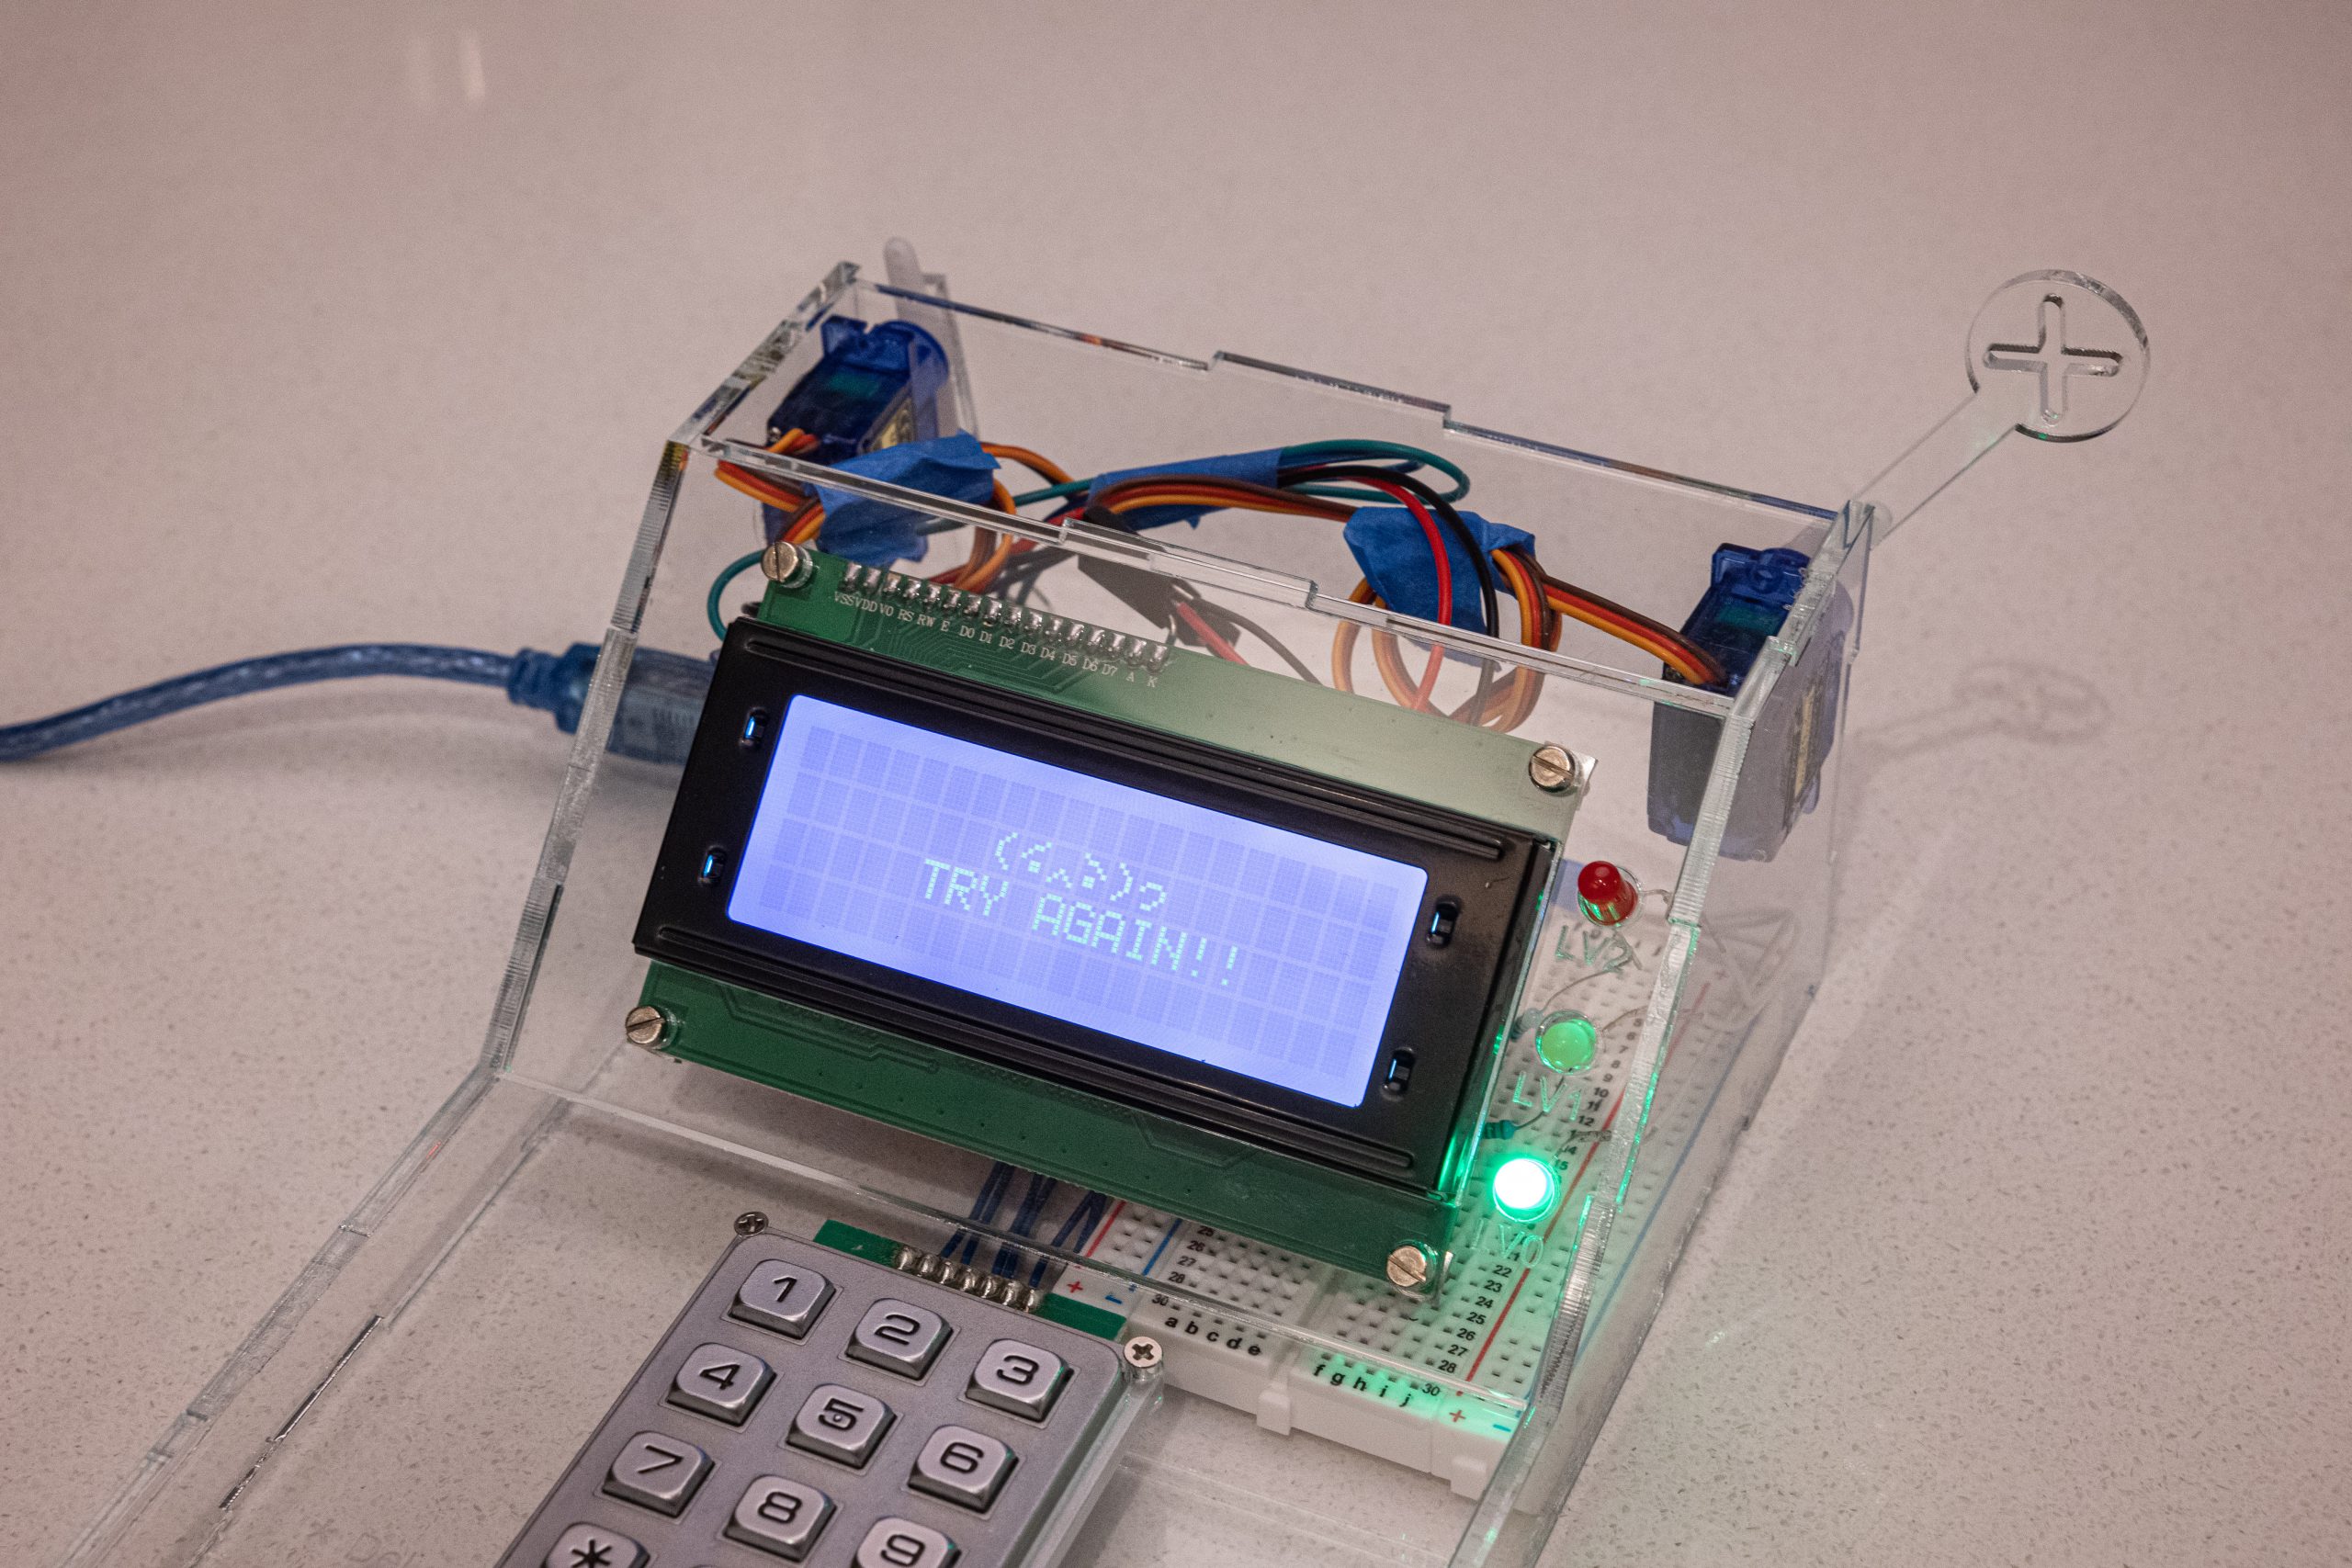
Sad Face with “Wrong” Hand
Process
At the initial stage of creating Math Buddy, I wanted to endow my little friend with some human-like interactive features but not simply ask questions and check my answers. There is a trade on between making things “lively” but keeping a simple (or clear) electronic logic and looking, so I chose to only integrate “facial expression” into the LCD screen and add “body language” which could be achieved by servo motors.
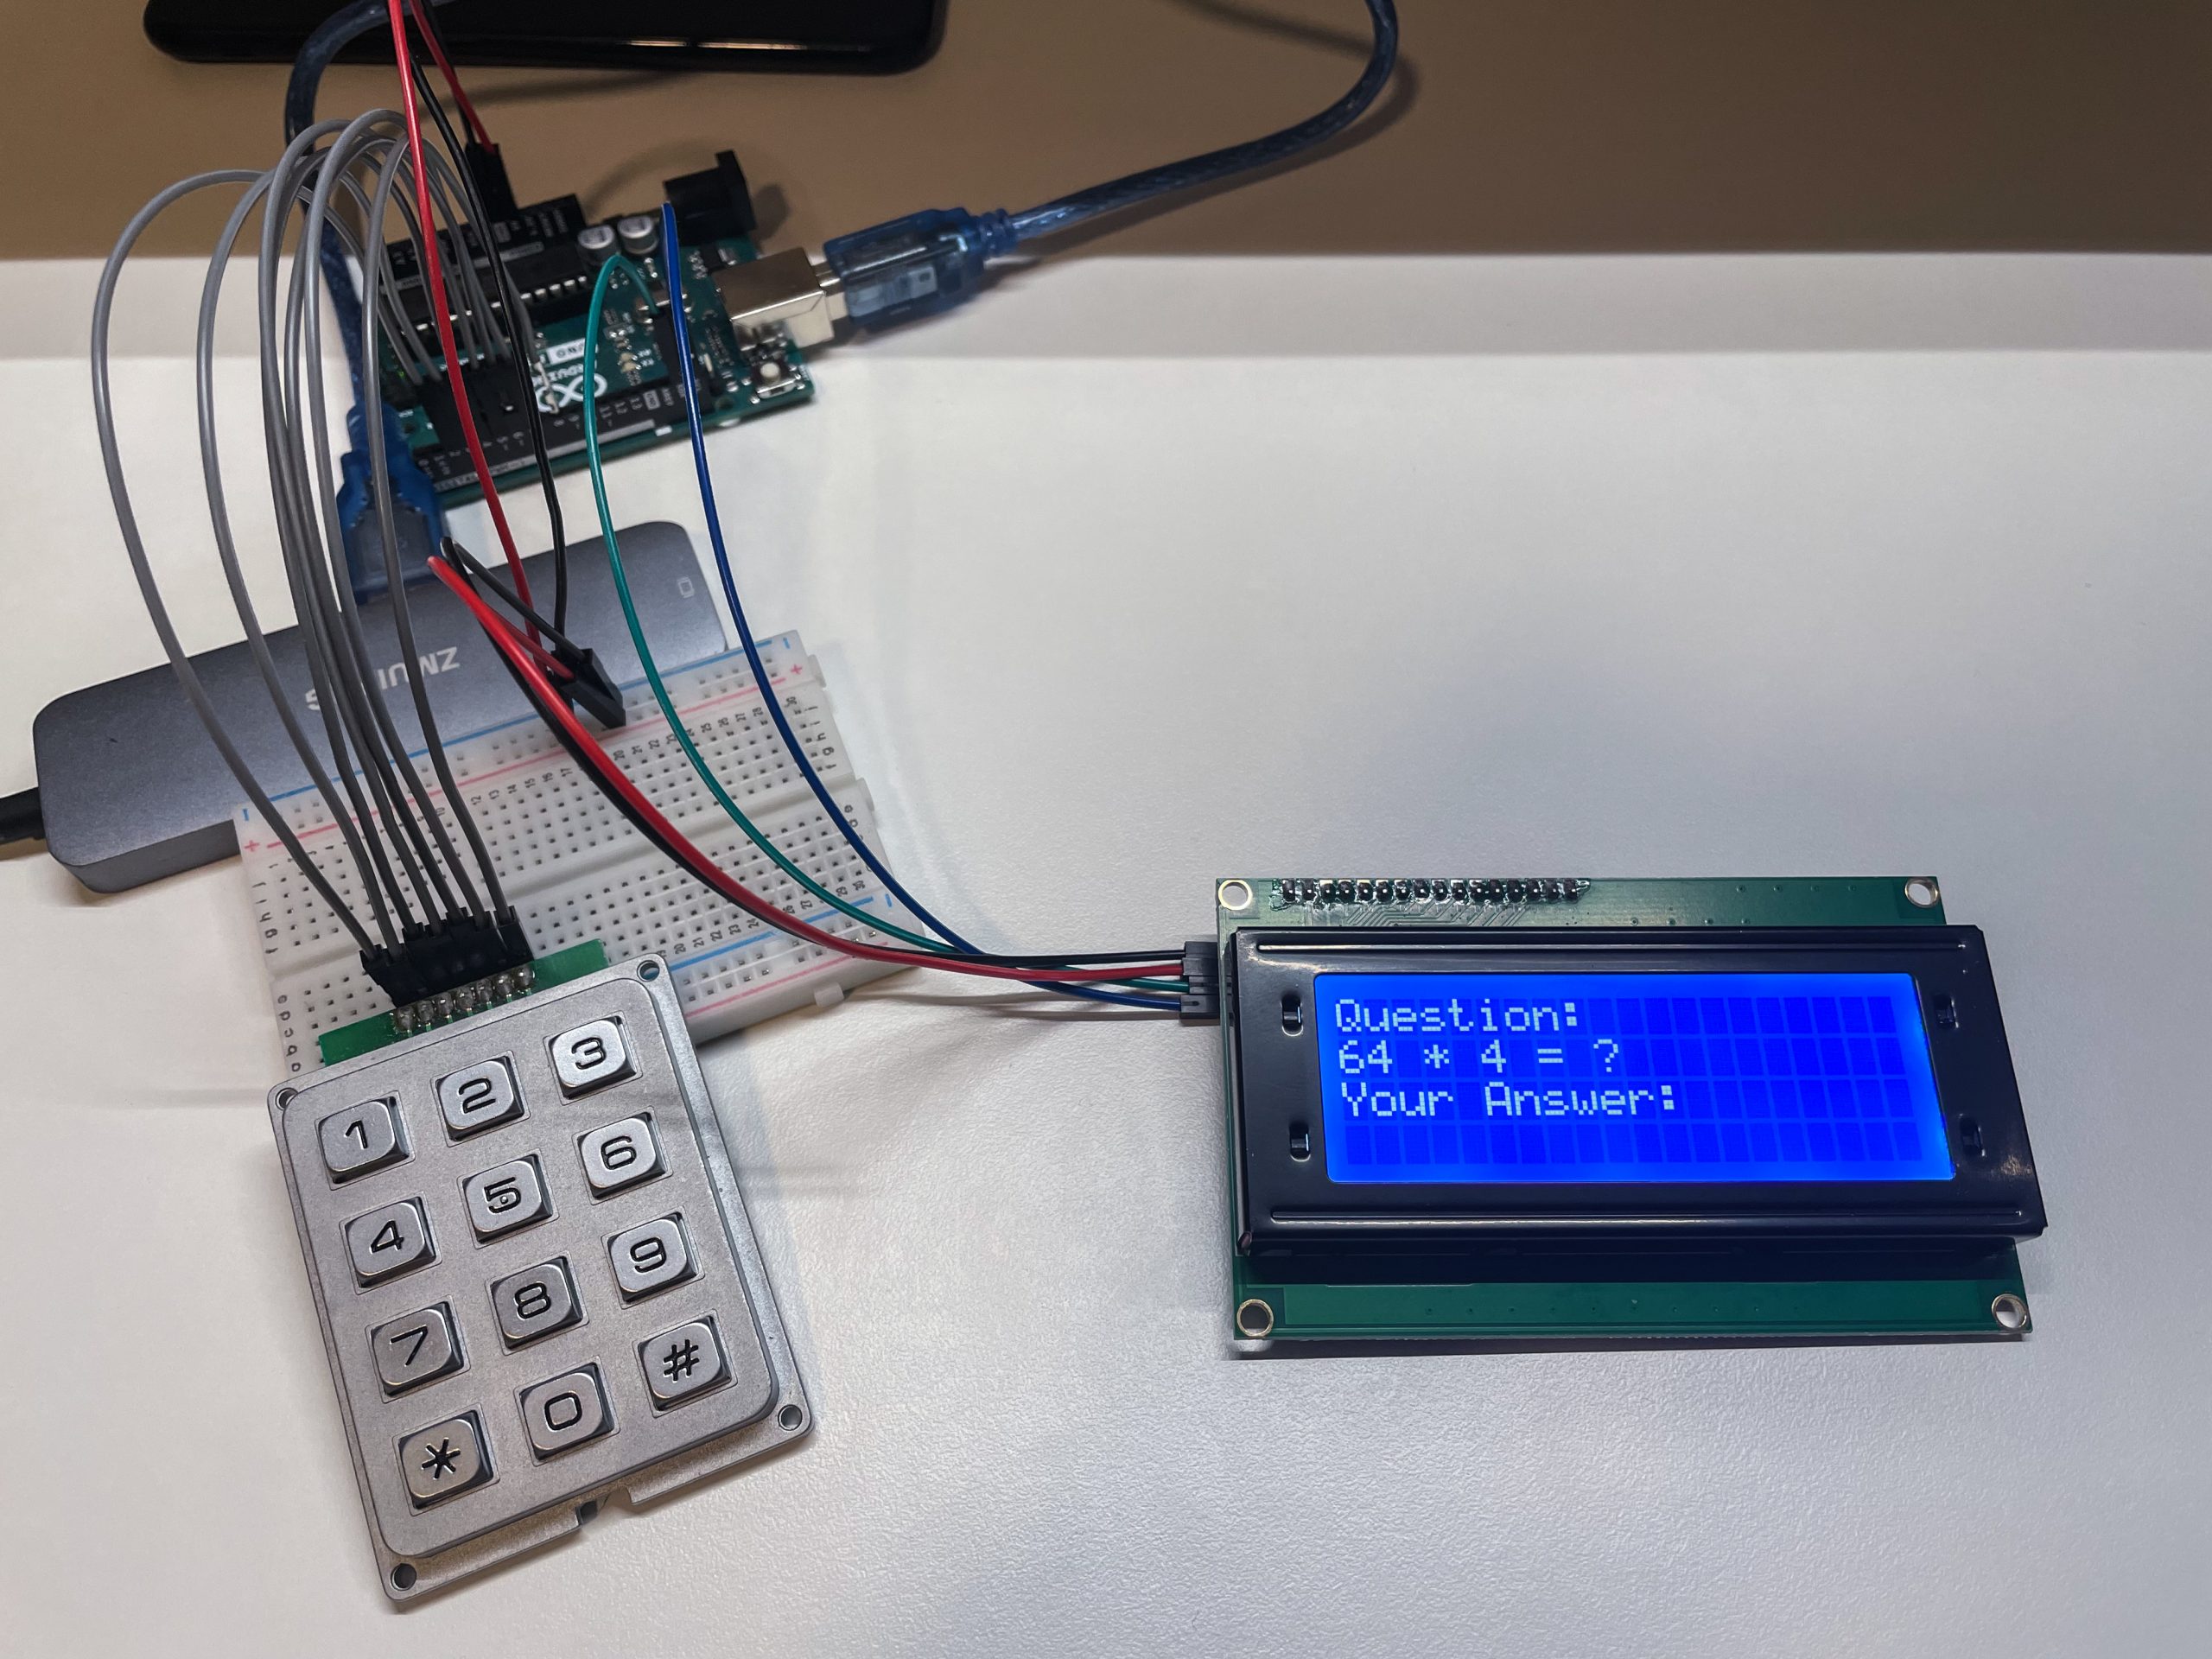
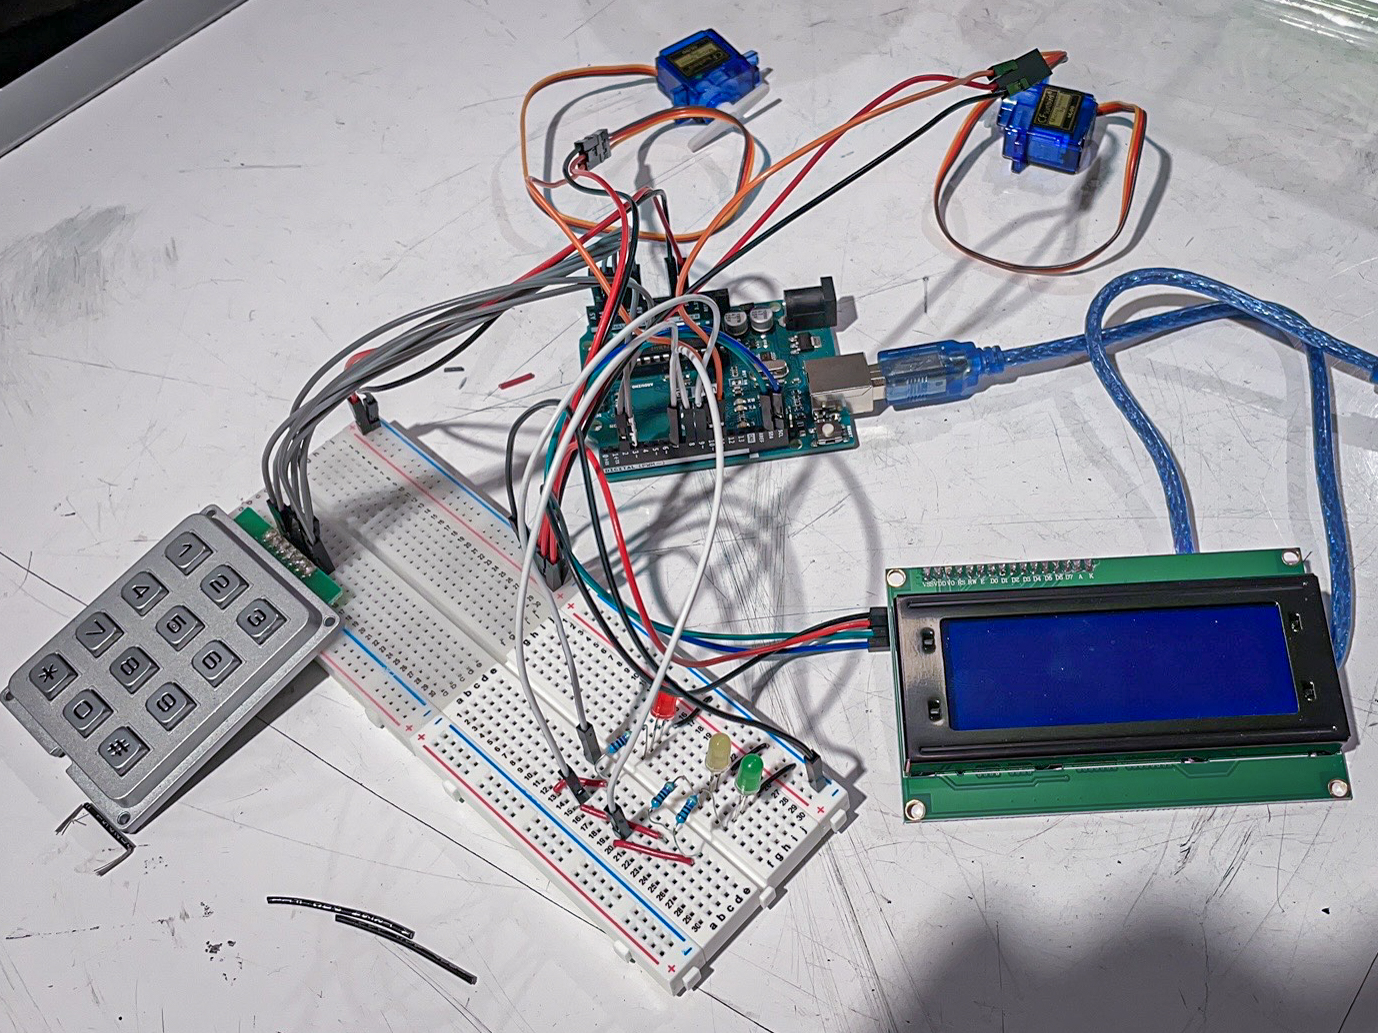
Testing Keypad input and LCD
Putting Electronics Together
After finishing all of the electronic and programming parts, I realized that my Math Buddy could be willing to have a fancy looking, which might make it more confident when it is standing in front of our classmates and its “Project 2” mates. At that moment, I recalled that when I was around 10, I had a Nintendo GameBoy Color with a purple-transparent case; I loved that machine not only because of the games but also I could always look at the tidy-designed electronic things inside. So I decided to make full use of my design knowledge to create a transparent case for my little buddy.
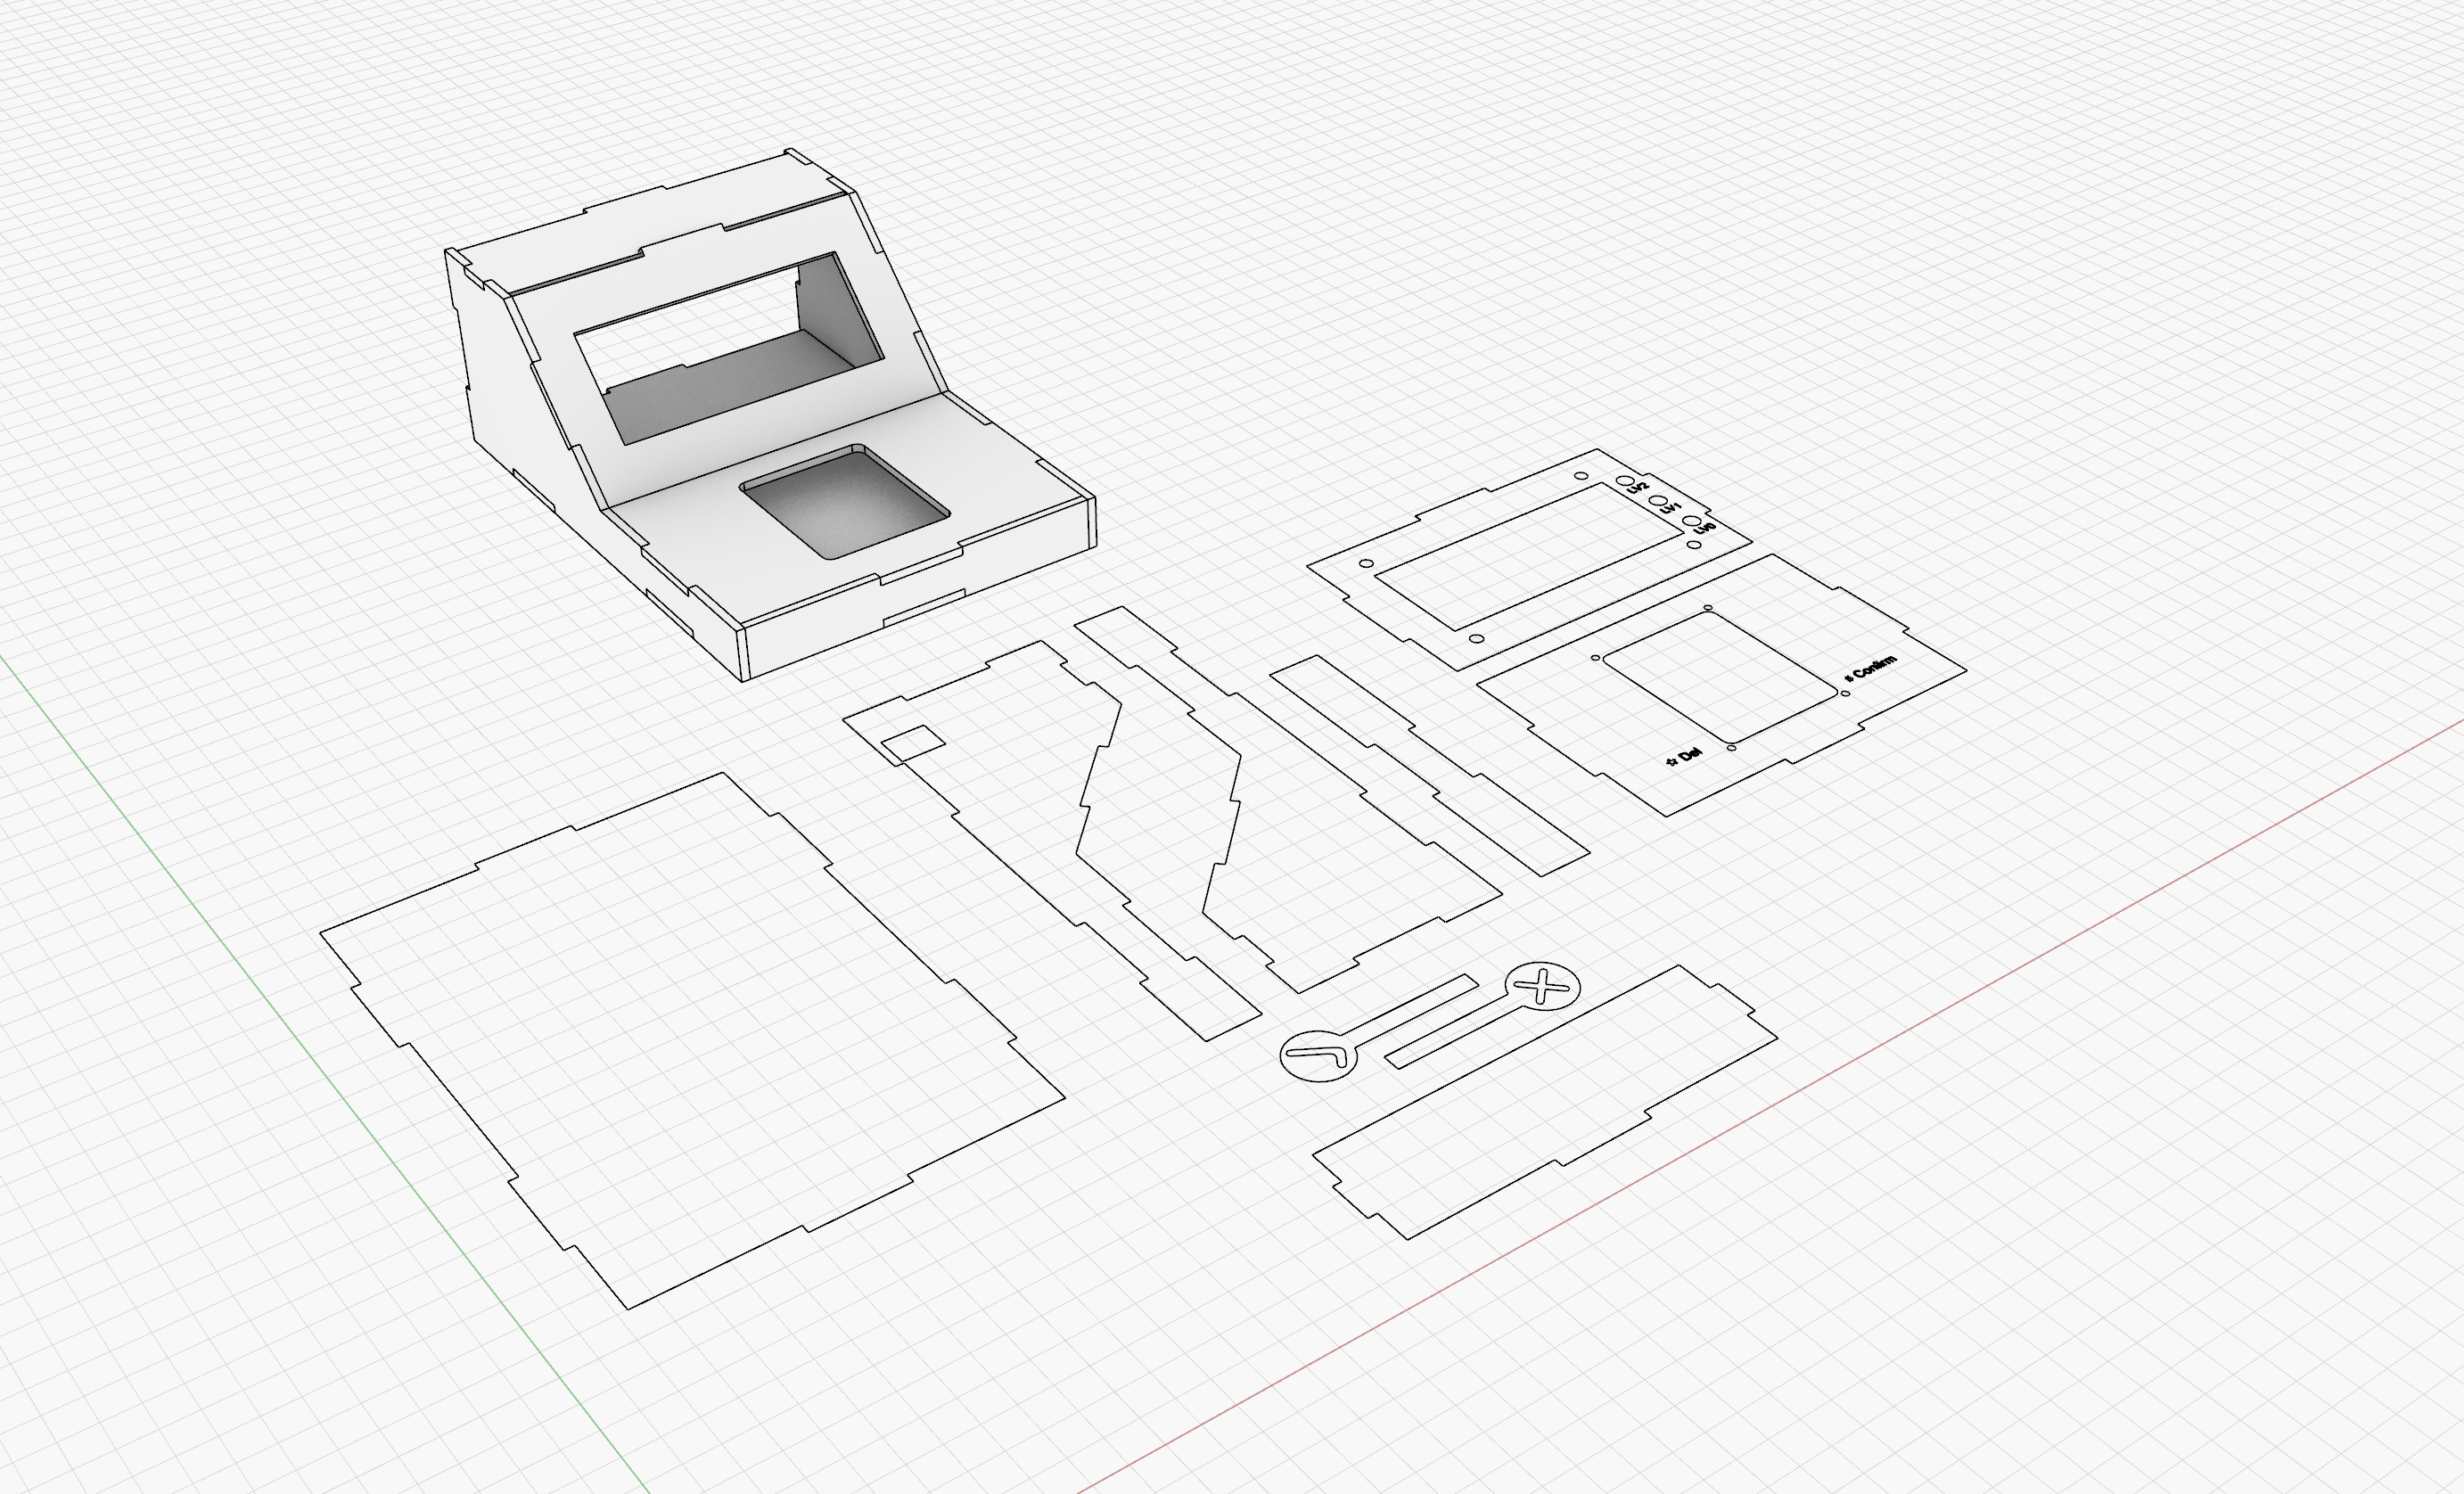
Container Design and Laser Cutting file Prep.
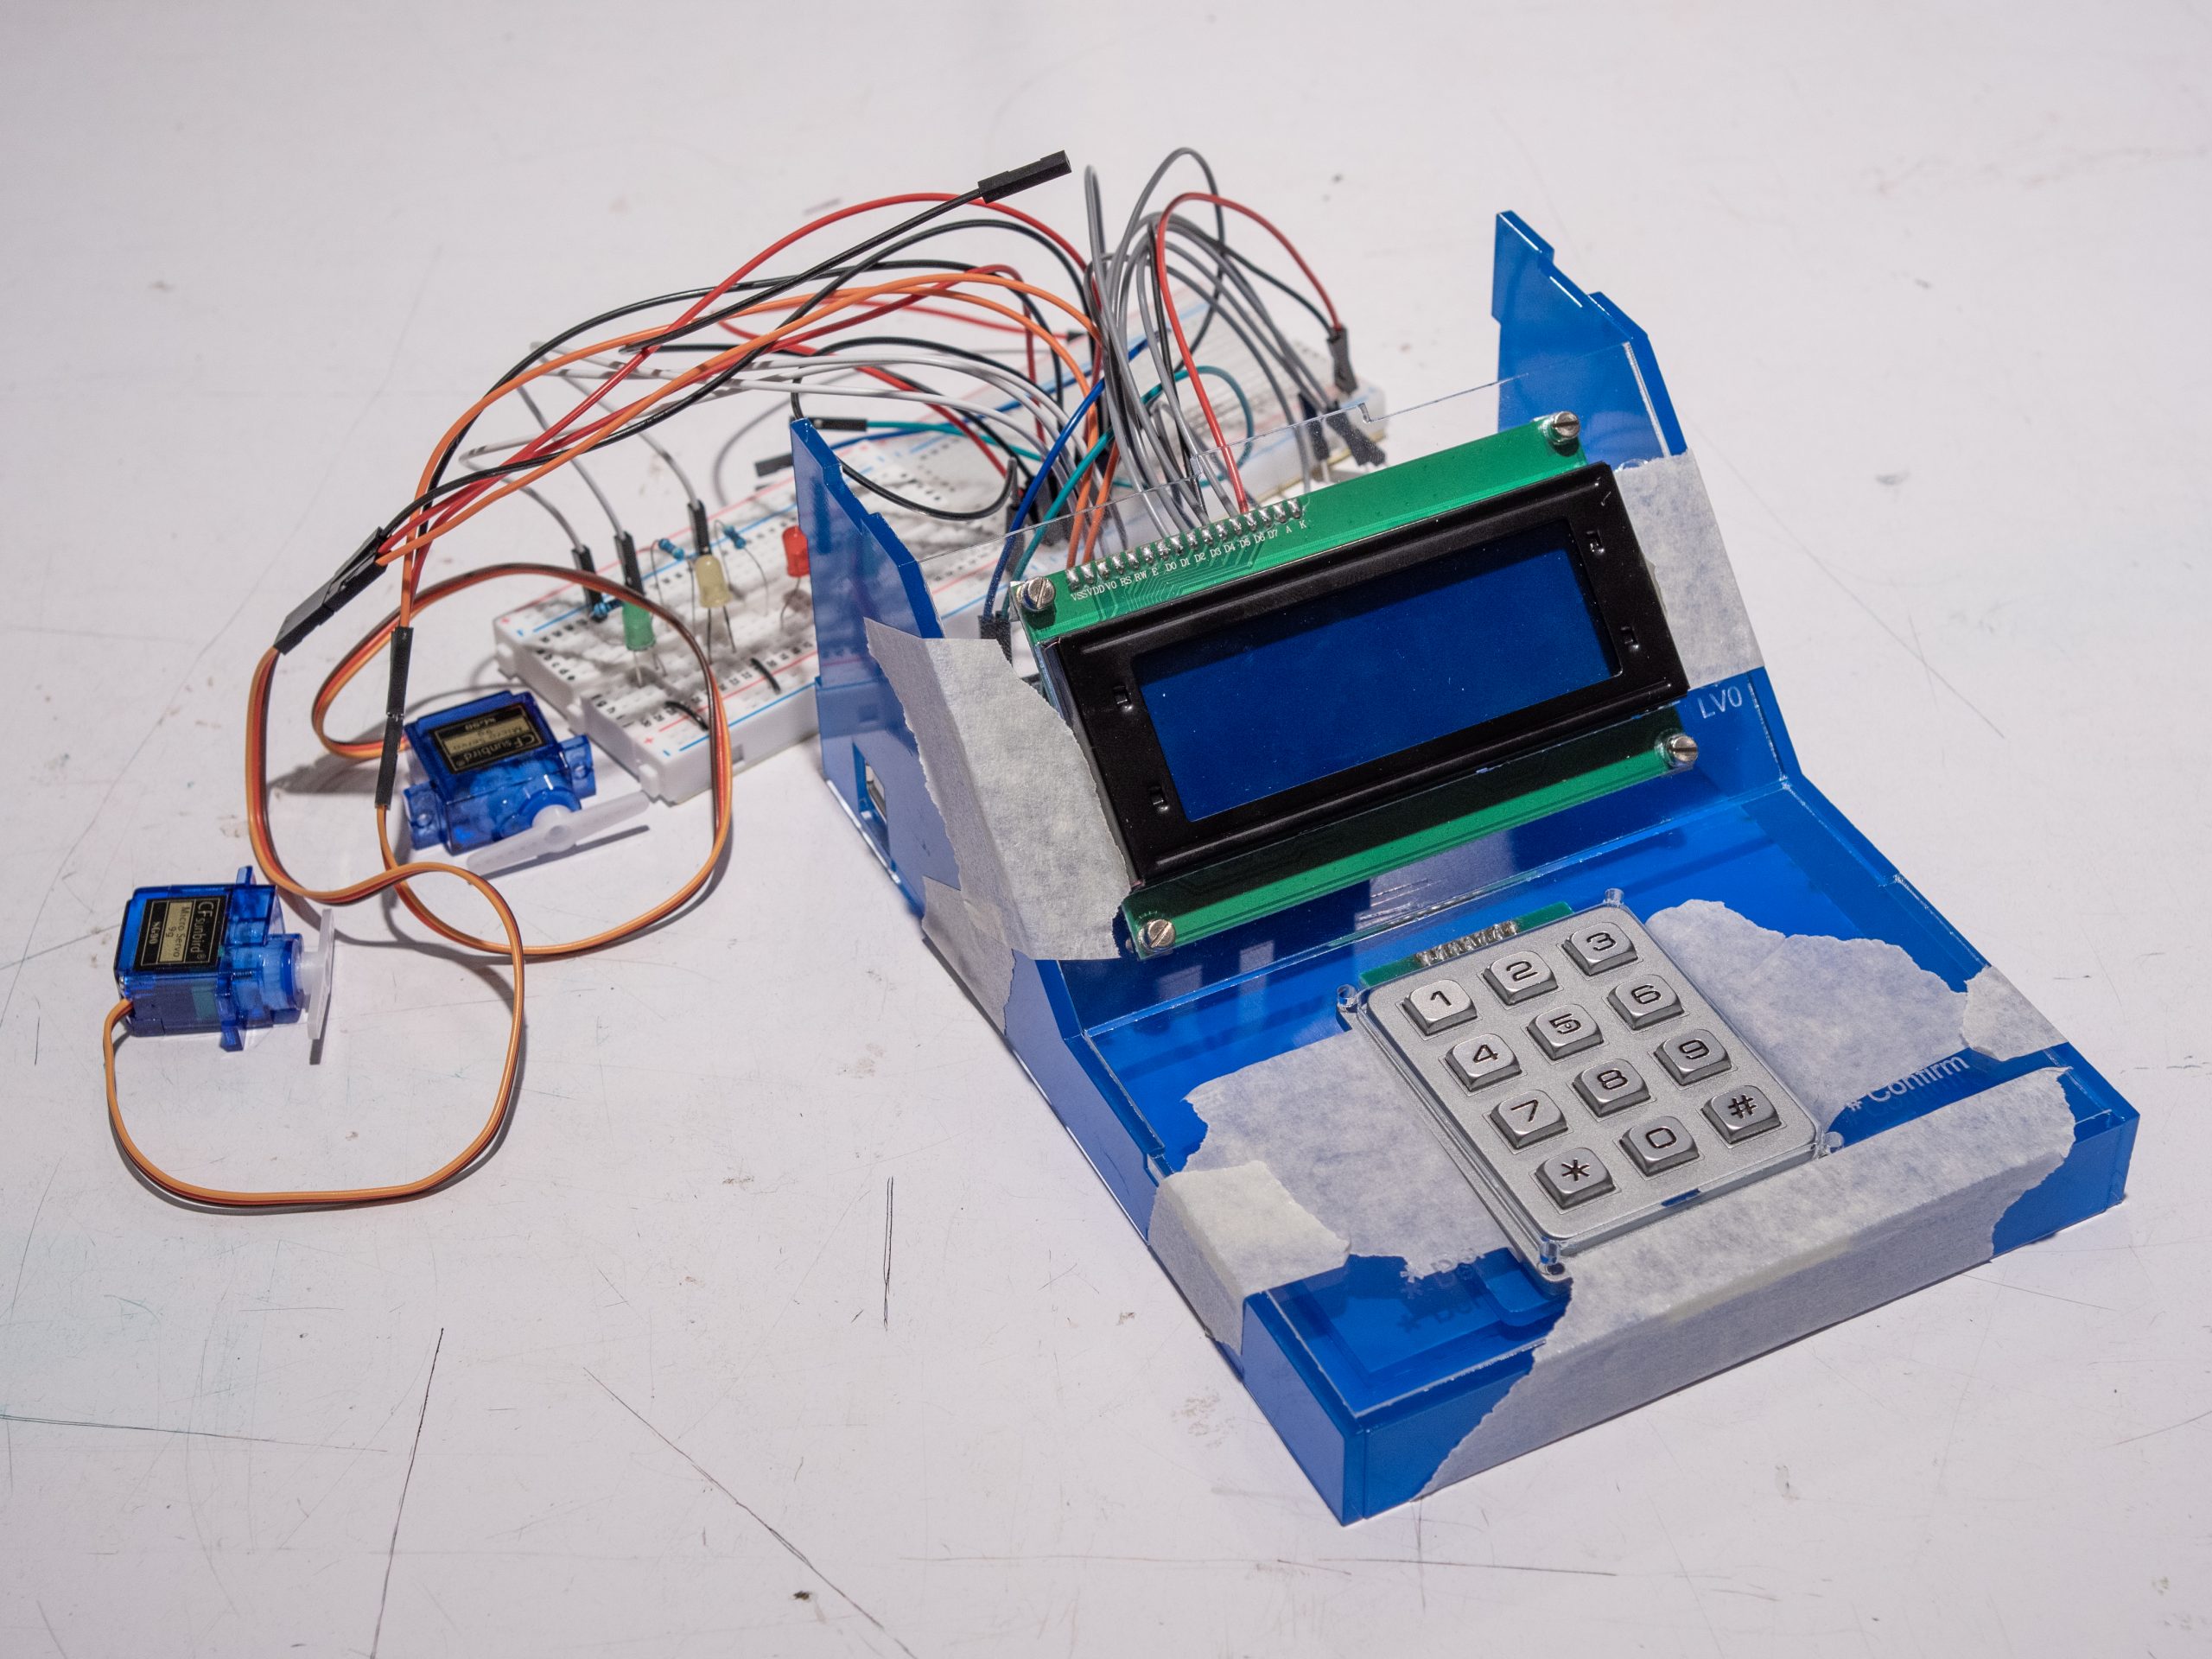
Assembling the Machine
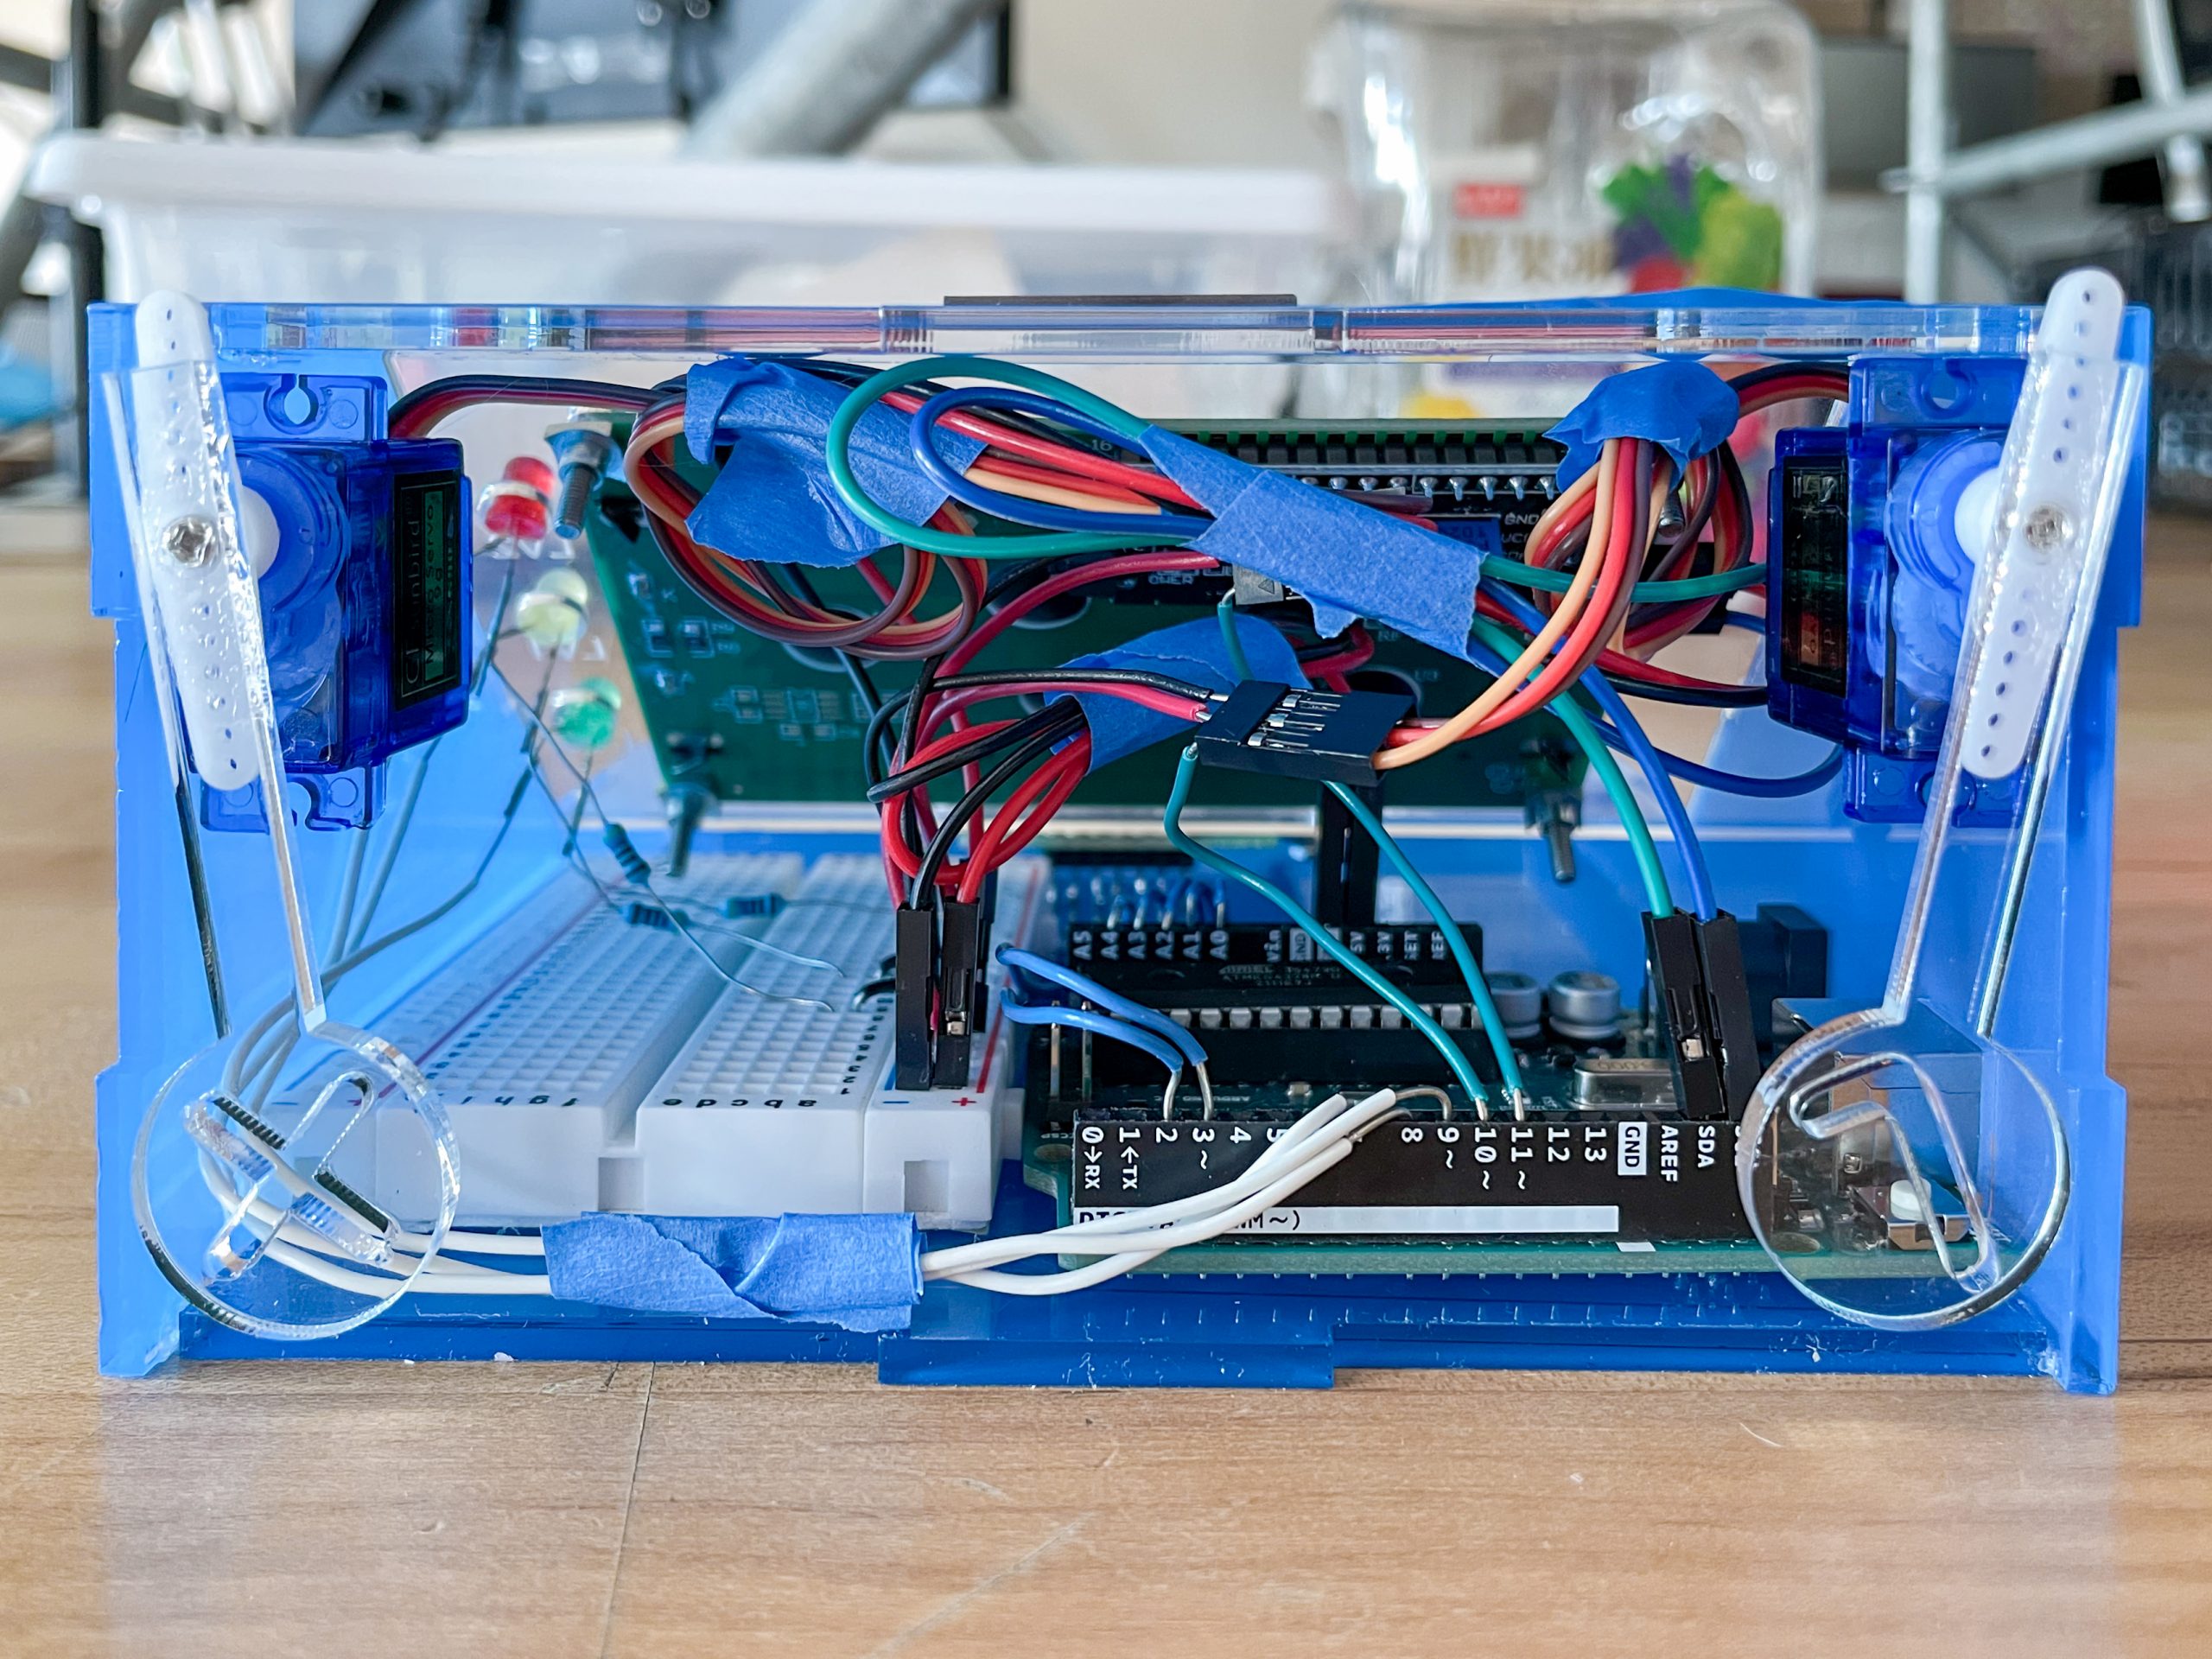
Organizing Wires
Discussions
One of the comment says “moving the hand with a checkmark to the right could be a better because of social customs. And also could paint the right one as green, the wrong one as red.” I think this is a great comment and I strongly agree with that because I didn’t really think about the user experience when designing the machine. “Binary coding the LEDs to make 8 levels” is such an interesting idea that I can have 8 levels with only 4 LEDs, as I was torn between doing more levels and reducing the number of LEDs (too many LEDs look messy).
From my side, I love my Math Buddy but I realize there are still some problems inside it. The case looks pretty good to me, but the input part is too large that wastes both space and material. There might be one solution that I could integrate a battery into those empty spaces to make my little machine self-powered. Reducing the size around the keypad might be another solution but that makes the machine look so wired; this is a view from the design aspect. I’m kind of not happy with the math question generation part of my code because I oversimplified the difficulty to “the number of digits”; I made a logic of more numbers in an equation means more difficult the question is. Another defect of the question part is that, there is a half chance I will get a “zero” result when generating subdivision questions; I might consider adding decimal features into the answer.
This project is a great chance for me to synthesize my design, programming, electronic knowledge together; I created a digital system with electronical and physical feedback. Also, I make full use of the pins on the Arduino Uno, so I might not have more pins to add more components if I keep using just one board. Overall, I’m very happy with the Math Buddy I made. It’s so much fun creating it and playing with it.
I actually planing to create another electronic buddy that can generate different types of questions rather than just math. With that buddy, the way I answer its question won’t be limited to typing the keypad, but also different types of sensors. But it is a general idea now; I haven’t gotten into detail about this proposal.
Block Diagram
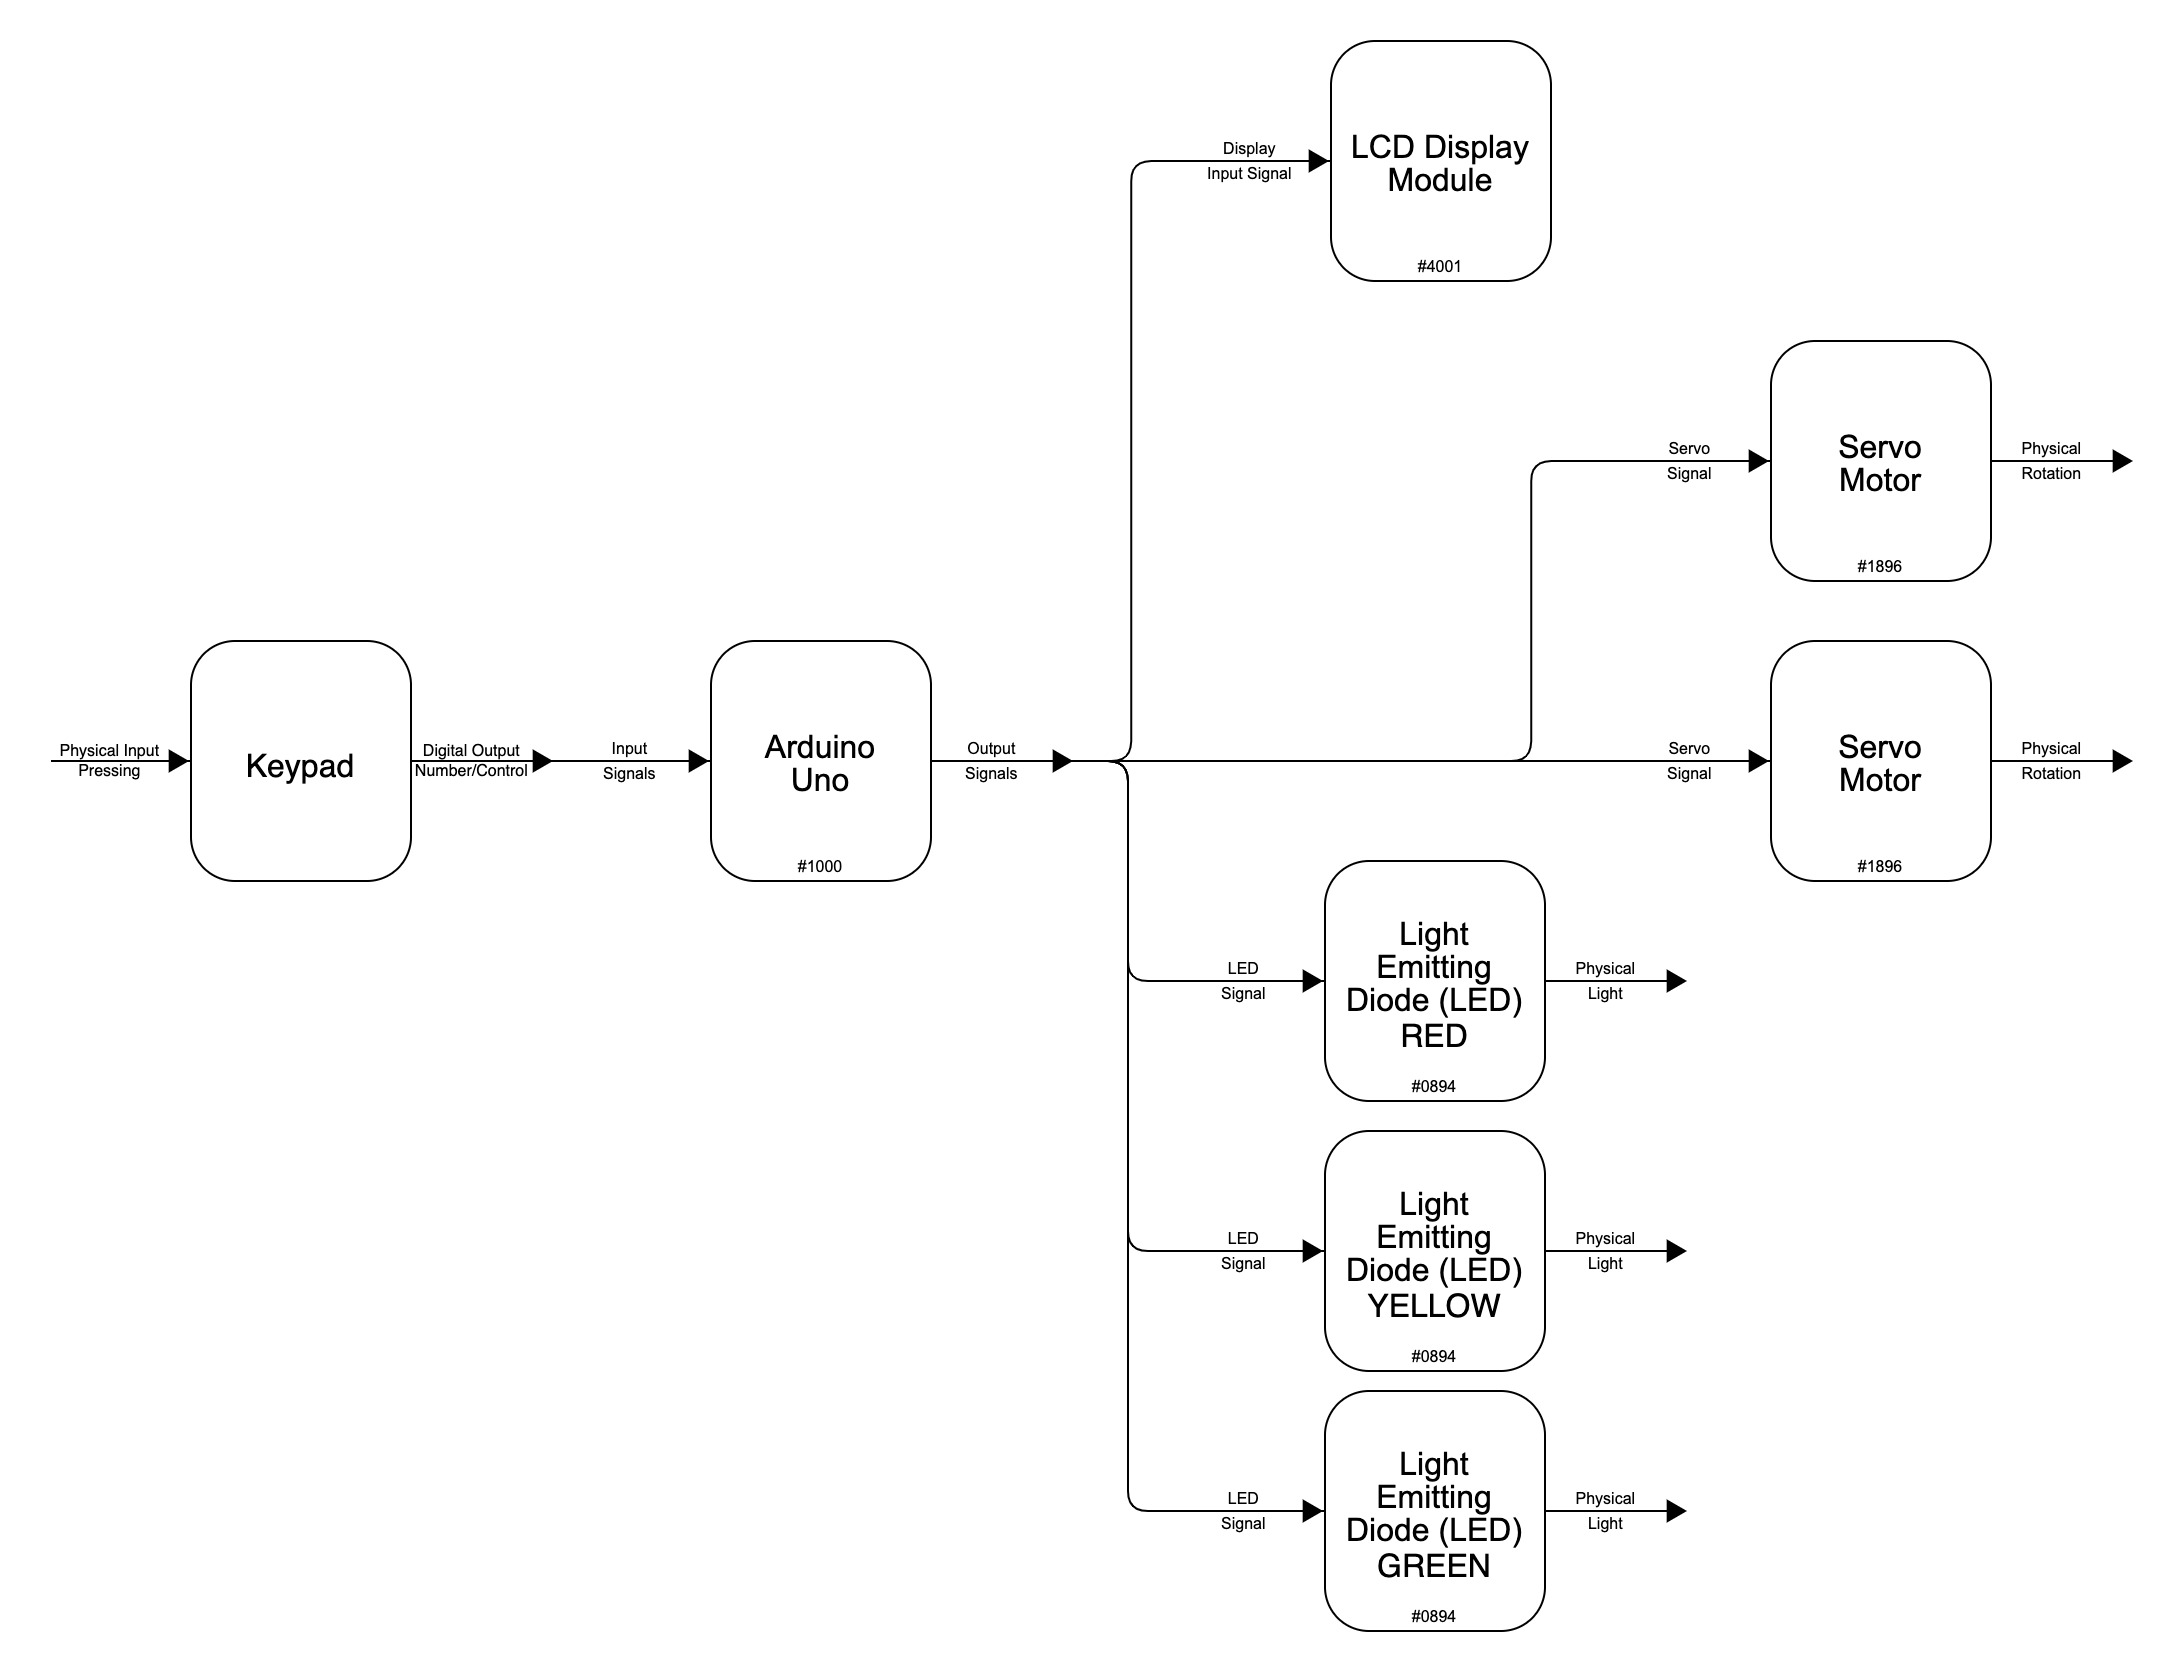
System Diagram
Electronic Schematic
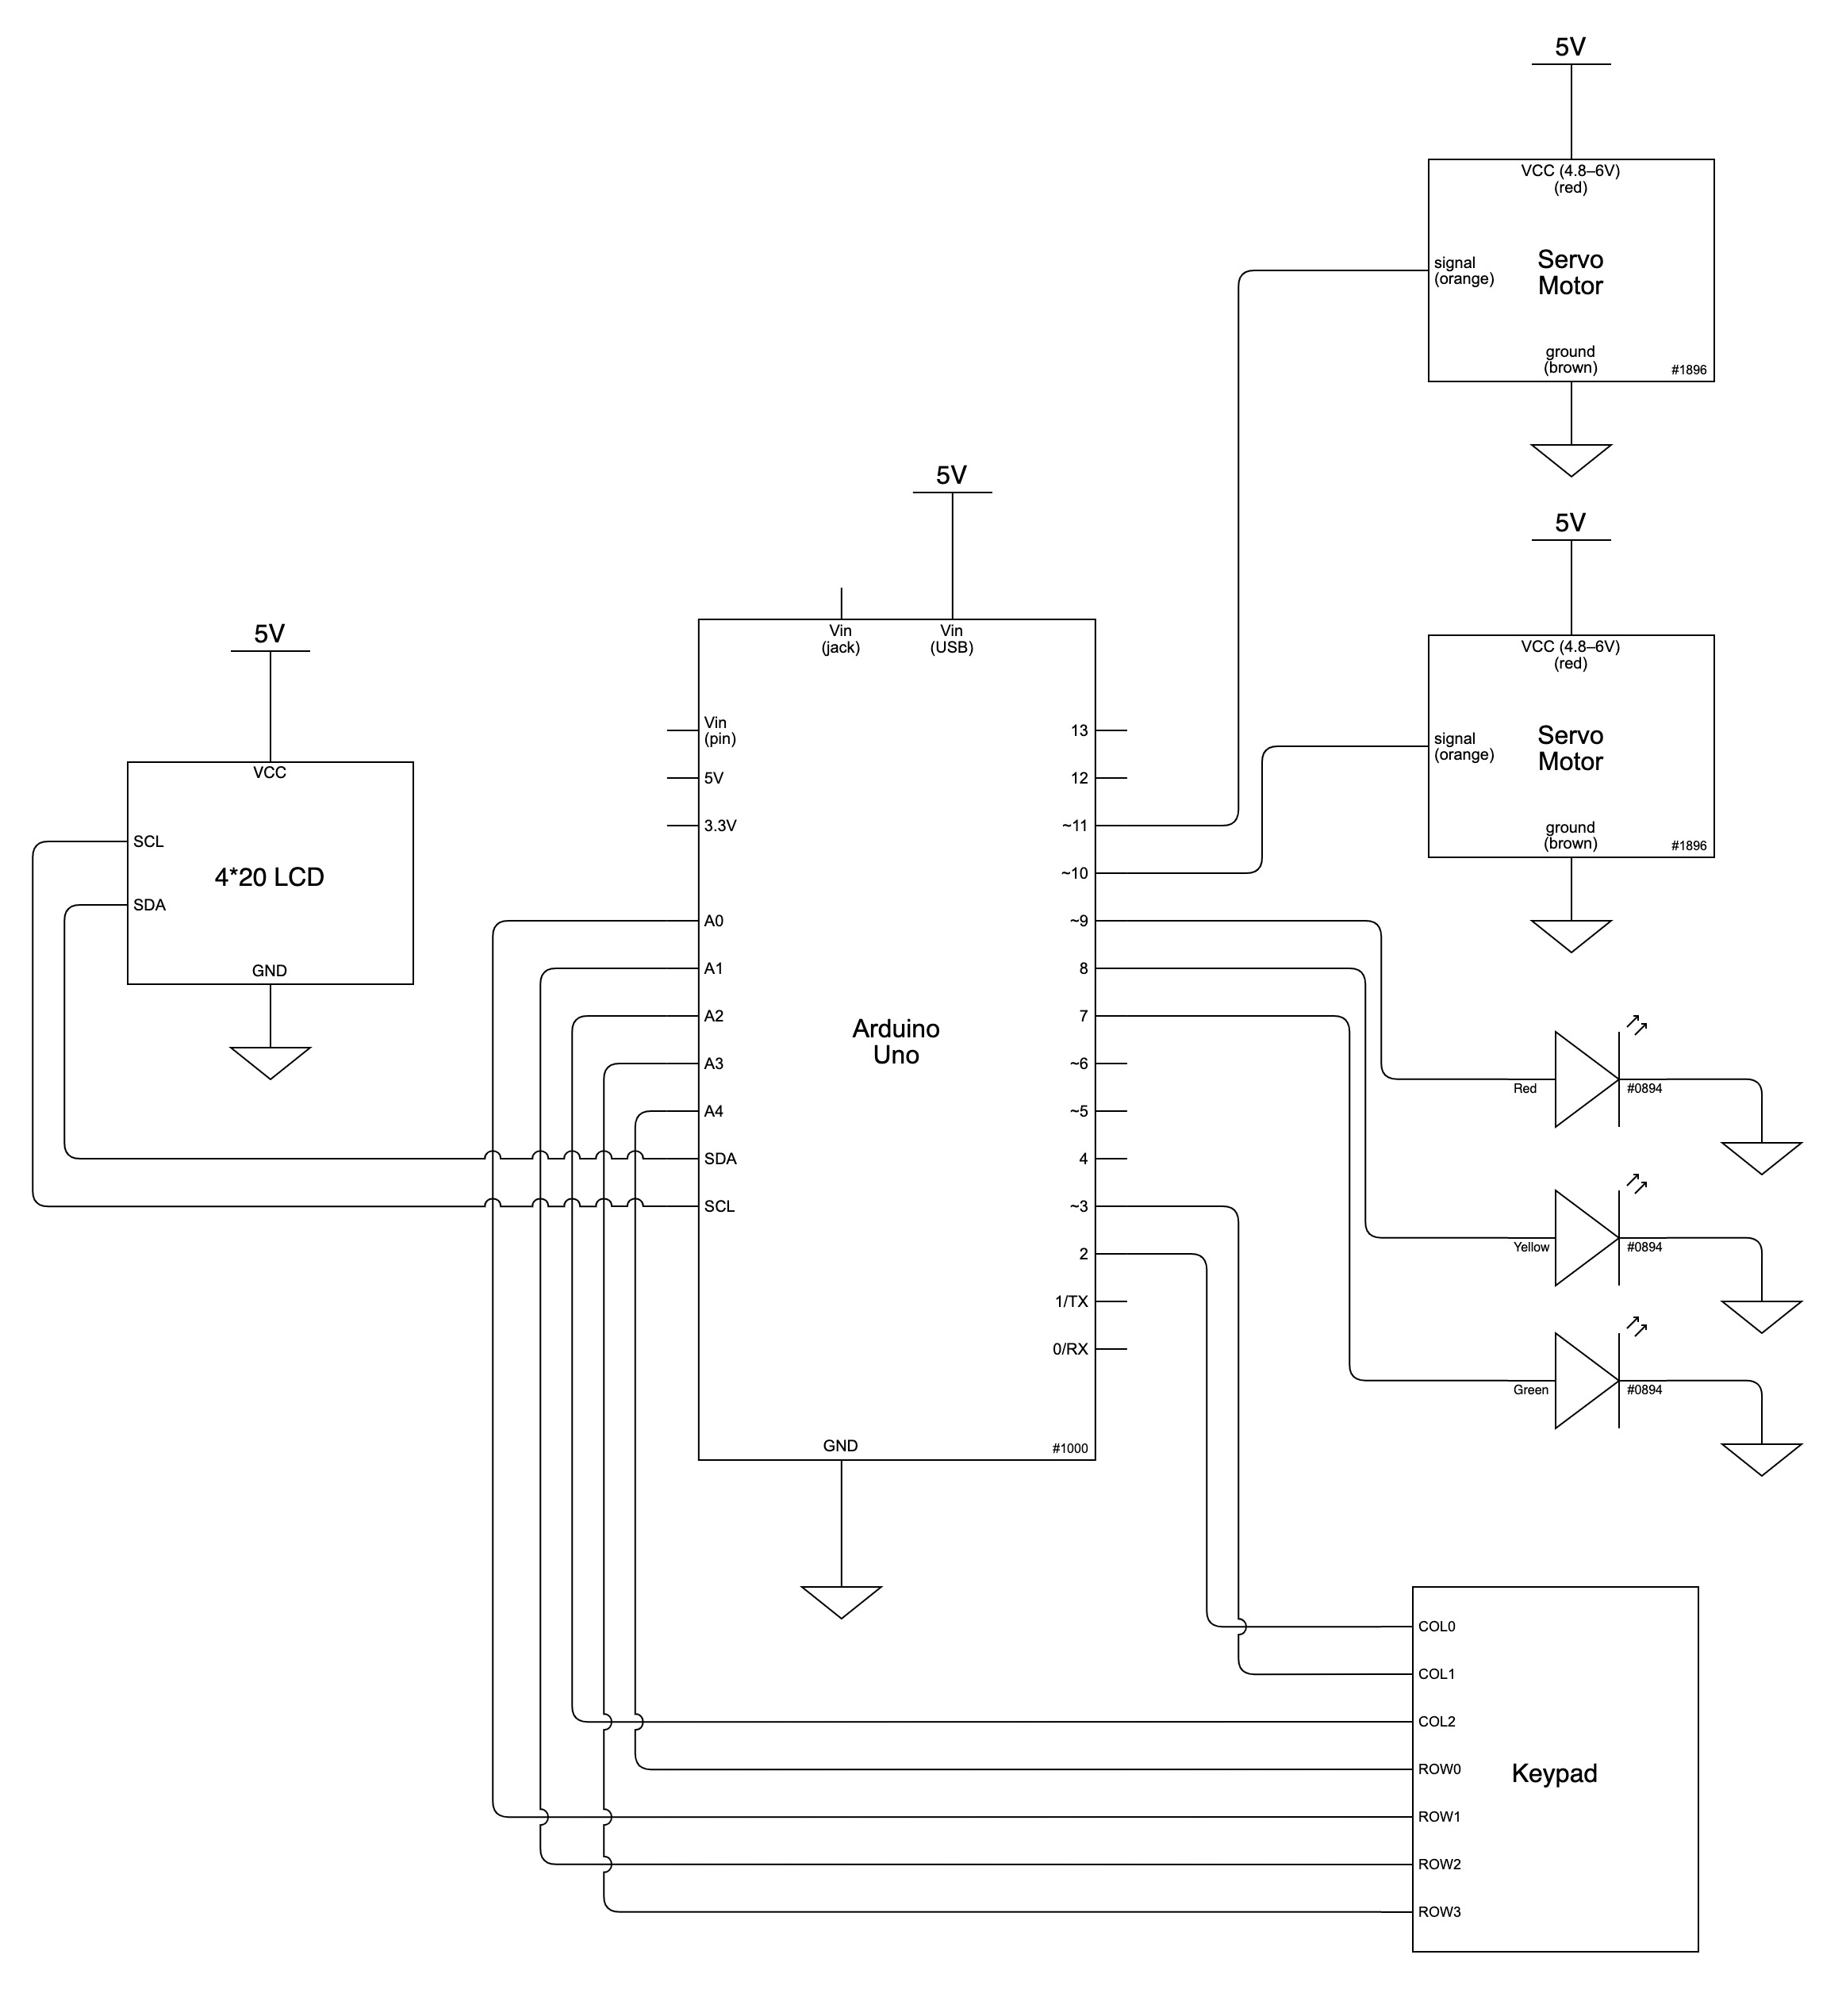
Electronic Schematic
Code
/*
  Math Buddy

  Tingsong (Terrence) Ou

  Project Description:
  My dear Math Buddy randomly generates a math question with types of plus, minus, multiplication, and division, for me to answer.
  I can input my answer with a number keypad on which number means number, star sign means backspace, and hashtag means confirm.
  If I provided a correct answer, a greeting screen shows up, and a hand with checkmark raises, and the next question shows on the screen;
  if I did it wrong, a sad screen and a hand with a cross mark would remind me to try again. I won't see a new question until I solve the current one.

  There is a rank system controlling the difficulty; The more correct answer I responded, the harder the next question gonna be.
  Three LEDs represent difficulty visually: green (Lv.0) is easy, yellow (Lv.1) indicates intermediate, while red (Lv.2) means hard.
  A simple/easy question looks like 26 + 73 = ?. An intermediate question looks like 792 - 432 = ?. A hard question looks like 57 * 23 = ?.
  In the subtraction function, I wrote a while loop to ensure the first number is always larger than the second one to avoid a negative result.

    Pin mapping:
    Arduino pin | role   |  description
    ------------|--------|----------------
    2             input     Keypad (COL0)
    3             input     Keypad (COL1)
    A2            input     Keypad (COL2)
    A4            input     Keypad (ROW0)
    A0            input     Keypad (ROW1)
    A1            input     Keypad (ROW2)
    A3            input     Keypad (ROW3)
    SDA           output    LCD SDA
    SCL           output    LCD SCL
    7             output    LED (Green)
    8             output    LED (Yellow)
    9             output    LED (Red)
    10            output    Servo
    11            output    Servo

  Reference:
  LCD screen control: https://courses.ideate.cmu.edu/60-223/s2022/tutorials/I2C-lcd
  Keypad: https://arduinogetstarted.com/tutorials/arduino-keypad
*/

#include <Keypad.h>
#include <LiquidCrystal_I2C.h>
#include <Wire.h>
#include <Servo.h>

//----------------------- Keypad Initializer --------------------

//Keypad setup; Because the keypad is "flipped" compare to the regular ones, I flipped the matrix vertically
const byte ROWS = 4;
const byte COLS = 3;
char keys[ROWS][COLS] = {
  {'E', '0', 'D'},
  {'9', '8', '7'},
  {'6', '5', '4'},
  {'3', '2', '1'}
};

byte rowPins[ROWS] = {A4, A0, A1, A3};
byte colPins[COLS] = {2, 3, A2};

//PIN A0, A1, A2, A3, 2, A4, 3 reserved for keypad; they're not in sequence but easier for me to organize physical connections
Keypad keypad = Keypad(makeKeymap(keys), rowPins, colPins, ROWS, COLS);


//----------------------- LCD, LED and Servo Initializer --------------------

//I'm using a 20 * 4 LCD in this project
LiquidCrystal_I2C screen(0x27, 20, 4);

Servo correctHand,
      wrongHand;

//PIN 10, 11 reserved for servos
int correctPin = 10, //For the hand with check mark
    wrongPin = 11,  //For the hand with cross mark
    greenLED = 7,
    yellowLED = 8,
    redLED = 9;


//----------------------- Math-related Parameters --------------------

String question = "";
String answer = "";
String correctAnswer = "";

int numA = 0,
    numB = 0,
    correctNum = 0,
    wrongNum = 0,
    level = 0,
    prevLevel = 0;


//----------------------- Main Program --------------------
void setup() {
  screen.init();
  screen.backlight();
  randomSeed(analogRead(0));

  //Initializing LEDs
  pinMode(greenLED, OUTPUT);
  pinMode(yellowLED, OUTPUT);
  pinMode(redLED, OUTPUT);

  //Initialize Question Screen
  generateQuestion();
  showQuestion(question, answer);

  //Initialize Servos
  correctHand.attach(correctPin);
  wrongHand.attach(wrongPin);
  correctHand.write(10);
  wrongHand.write(170);
}


void loop() {
  controlLight(); //Controling The LED light based on current level
  readKey();   // Read input from numpad
}


/*
  ####################### HELPER FUNCTIONS ######################
*/

//-----------------------LCD Control Stack---------------------

//Displaying the question and input answer on the LCD
void showQuestion(String question, String answer) {
  /*
    String question: a math question in the format of String
    String answer: the input answer in the format of String
  */
  //Print question and input answer
  screen.home();
  screen.setCursor(0, 0);
  screen.print("Question:");
  screen.setCursor(0, 1);
  screen.print(question);
  screen.setCursor(0, 2);
  screen.print("Your Answer:");
  screen.setCursor(0, 3);
  screen.print(answer);

  //Print lurrent level
  screen.setCursor(15, 0);
  screen.print("Lv." + String(level));

  //Print the number of correct and incorrect answers
  screen.setCursor(16, 1);
  screen.print("O:" + String(correctNum)); //Correct Answer
  screen.setCursor(16, 2);
  screen.print("X:" + String(wrongNum)); //Wrong Answer
}


//Removing last digit typed (backspace)
void clearLastInput() {
  int lastIdx = answer.length() - 1;
  screen.setCursor(lastIdx, 3);
  screen.print(" ");
}

//Removing the question from LCD
void clearQuestionLine() {
  for (int i = 0; i < 20; i++) {
    screen.setCursor(i, 1);
    screen.print(" ");
  }
}

//Removing the input answer from LCD
void clearAnswerLine() {
  for (int i = 0; i < 20; i++) {
    screen.setCursor(i, 3);
    screen.print(" ");
  }
}


//---------------------Math Question Stack------------------

//Generating math questions
void generateQuestion() {
  int mode = random(0, 4);//0-plus, 1-minus, 2-mult, 3-divid
  int pmBound = 100; //plus,minus bounds
  int mdBound = 10; //multiplication,division bounds
  if (level > 0) {
    pmBound = 1000;
  }
  if (level > 1) {
    mdBound = 100;
  }
  switch (mode) {
    case 0:
      numA = random(1, pmBound);
      numB = random(1, pmBound);
      correctAnswer = String(numA + numB);
      question = String(String(numA) + " + " + String(numB) + " = ?");
      break;
    case 1:
      numA = random(1, pmBound);
      numB = random(1, pmBound);
      while (numB > numA) {
        numA = random(1, pmBound);
        numB = random(1, pmBound);
      }
      correctAnswer = String(numA - numB);
      question = String(String(numA) + " - " + String(numB) + " = ?");
      break;
    case 2:
      numA = random(1, 100);
      numB = random(1, mdBound);
      correctAnswer = String(numA * numB);
      question = String(String(numA) + " * " + String(numB) + " = ?");
      break;
    case 3:
      numA = random(1, 100);
      numB = random(1, mdBound);
      correctAnswer = String(int(numA / numB));
      question = String(String(numA) + " / " + String(numB) + " = ?");
      break;
  }
}


//Checking current level
void checkLevel() {
  int diff = correctNum - wrongNum;
  if (diff >= 10) level = 2;
  else if (diff >= 5) level = 1;
  else level = 0;
  prevLevel = level;
}


//---------------------Input Control Stack------------------

//Read Key
void readKey() {
  char key = keypad.getKey();
  //If key pressed (not * or #) and the answer length is smaller than 20, add current input to the answer screen
  if (key != NO_KEY
      && key != 'D' && key != 'E'
      && answer.length() < 20) {
    answer += key;
    showQuestion(question, answer);
  }

  //D(*) Remove last input digit; E(#) Check answer
  if (key == 'D') {
    clearLastInput();
    answer.remove(answer.length() - 1); //The sequence of these two lines are very important
    showQuestion(question, answer);
  } else if (key == 'E') {
    if (answer == correctAnswer) {
      correctNum += 1;
      //If correct, show greeting screen and raise correct hand
      greetScreen();
      correctHand.write(170);
      delay(1500);
      correctHand.write(10);
      screen.clear();
      generateQuestion();
    } else {
      sadScreen();
      wrongNum += 1;
      wrongHand.write(10);
      delay(1500);
      wrongHand.write(170);
      screen.clear();
    }

    checkLevel();
    answer = ""; //Reset answer to empty string
    clearAnswerLine();
    showQuestion(question, answer);
  }
}


//---------------------Output Control Stack------------------

//Controlling the LED light accoring to current level
void controlLight() {
  digitalWrite(greenLED, LOW);
  digitalWrite(yellowLED, LOW);
  digitalWrite(redLED, LOW);
  if (level == 0) digitalWrite(greenLED, HIGH);
  if (level == 1) digitalWrite(yellowLED, HIGH);
  if (level == 2) digitalWrite(redLED, HIGH);
}


//Printing greeting screen when the result is correct
void greetScreen() {
  byte smileEye[] = {
    B00100,
    B01010,
    B10001,
    B00000,
    B00000,
    B00000,
    B00000,
    B00000
  };

  byte smileMouth[] = {
    B00000,
    B00000,
    B00000,
    B00000,
    B10001,
    B01110,
    B00000,
    B00000
  };
  byte hand[] = {
    B00000,
    B00000,
    B01110,
    B10001,
    B00001,
    B00010,
    B01100,
    B00000
  };

  screen.createChar(0, smileEye);
  screen.createChar(1, smileMouth);
  screen.createChar(2, hand);
  screen.clear();
  screen.setCursor(6, 1);
  screen.print("(");
  screen.setCursor(7, 1);
  screen.write(2);
  screen.setCursor(8, 1);
  screen.write(0);
  screen.setCursor(9, 1);
  screen.write(1);
  screen.setCursor(10, 1);
  screen.write(0);
  screen.setCursor(11, 1);
  screen.print(")");
  screen.setCursor(12, 1);
  screen.write(2);

  screen.setCursor(5, 2);
  screen.print("GOOD JOB!!");
}


//Printing "try again" screen
void sadScreen() {
  byte leftEye[] = {
    B00001,
    B00110,
    B01000,
    B10000,
    B00110,
    B00110,
    B00000,
    B00000
  };
  byte rightEye[] = {
    B10000,
    B01100,
    B00010,
    B00001,
    B01100,
    B01100,
    B00000,
    B00000
  };

  byte sadMouth[] = {
    B00000,
    B00000,
    B00000,
    B00000,
    B00100,
    B01010,
    B10001,
    B00000
  };

  screen.createChar(3, leftEye);
  screen.createChar(4, sadMouth);
  screen.createChar(5, rightEye);
  screen.clear();
  screen.setCursor(7, 1);
  screen.print("(");
  screen.setCursor(8, 1);
  screen.write(3);
  screen.setCursor(9, 1);
  screen.write(4);
  screen.setCursor(10, 1);
  screen.write(5);
  screen.setCursor(11, 1);
  screen.print(")");
  screen.setCursor(12, 1);
  screen.write(2);

  screen.setCursor(5, 2);
  screen.print("TRY AGAIN!!");
}