Gaming Keyboard and Mouse by Team Dione: Final Documentation
The goal of this project was to create a specialized keyboard and mouse for our design client, Kim, to make gaming on her computer more accessible. We first interviewed Kim to understand her daily routine and challenges. From there we ideated different assistive devices to address these daily problems. We had learned that Kim has a physical disability that limits the use of her right hand so she depends solely on her left hand when playing games on her laptop. Kim can grasp objects with her right hand but needs the assistance of her left hand to release her grip. We wanted to address this challenge by designing a keyboard catered to her left hand and a joystick that has a release mechanism for her right hand. Hence, we built this gaming device catered to her needs and preferences. More information about our interview with Kim can be found here: https://courses.ideate.cmu.edu/60-223/s2022/work/team-dione-interview-documentations/
Final Product
a. Description
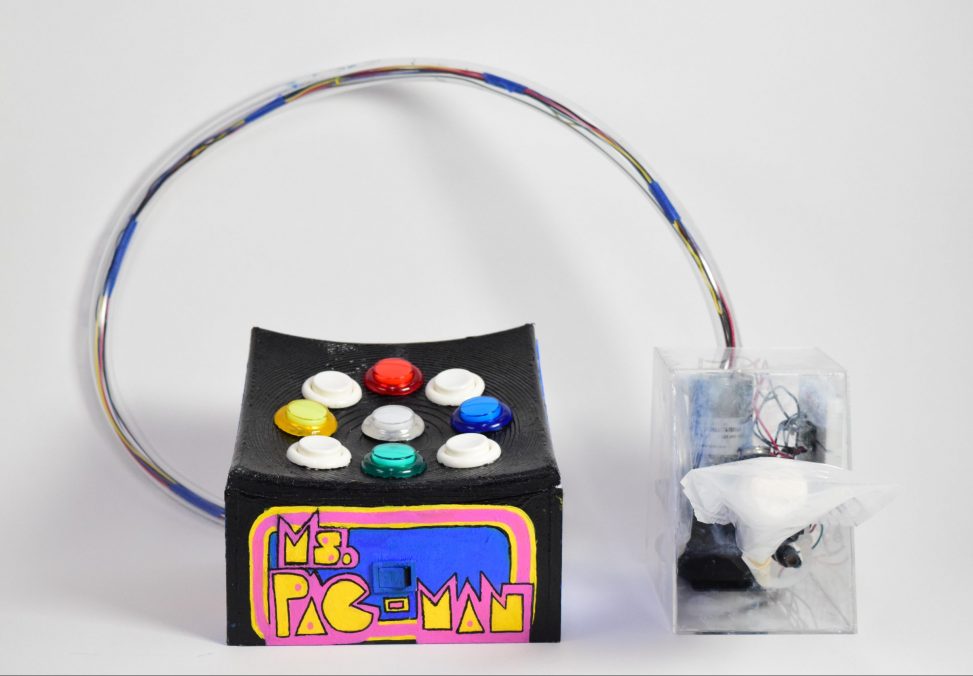
Our assistive Gaming Keyboard and Mouse device was designed to make gaming on the computer more accessible to our client Kim. The keyboard was created to Kim’s personal preferences and controls keys on the commonly used in gaming. Its interface inspired by classic arcade machines with the goal of making the gaming experience more enjoyable for Kim. We experimented with different layouts and shapes for the keyboard and finalized on a design that had optimal comfort and usability for Kim. The overall goal for this keyboard was to make the buttons used to play games more accessible for Kim’s left hand. In addition to the keyboard we also designed a mouse for Kim’s right hand. The mouse is a 3D printed joystick that controls the cursor and it has an inflatable plastic bag around it which helps our client release and firmly grasp the joystick.
b. Images

Front view of the device
start game by using joystick and playing snake game with keyboard
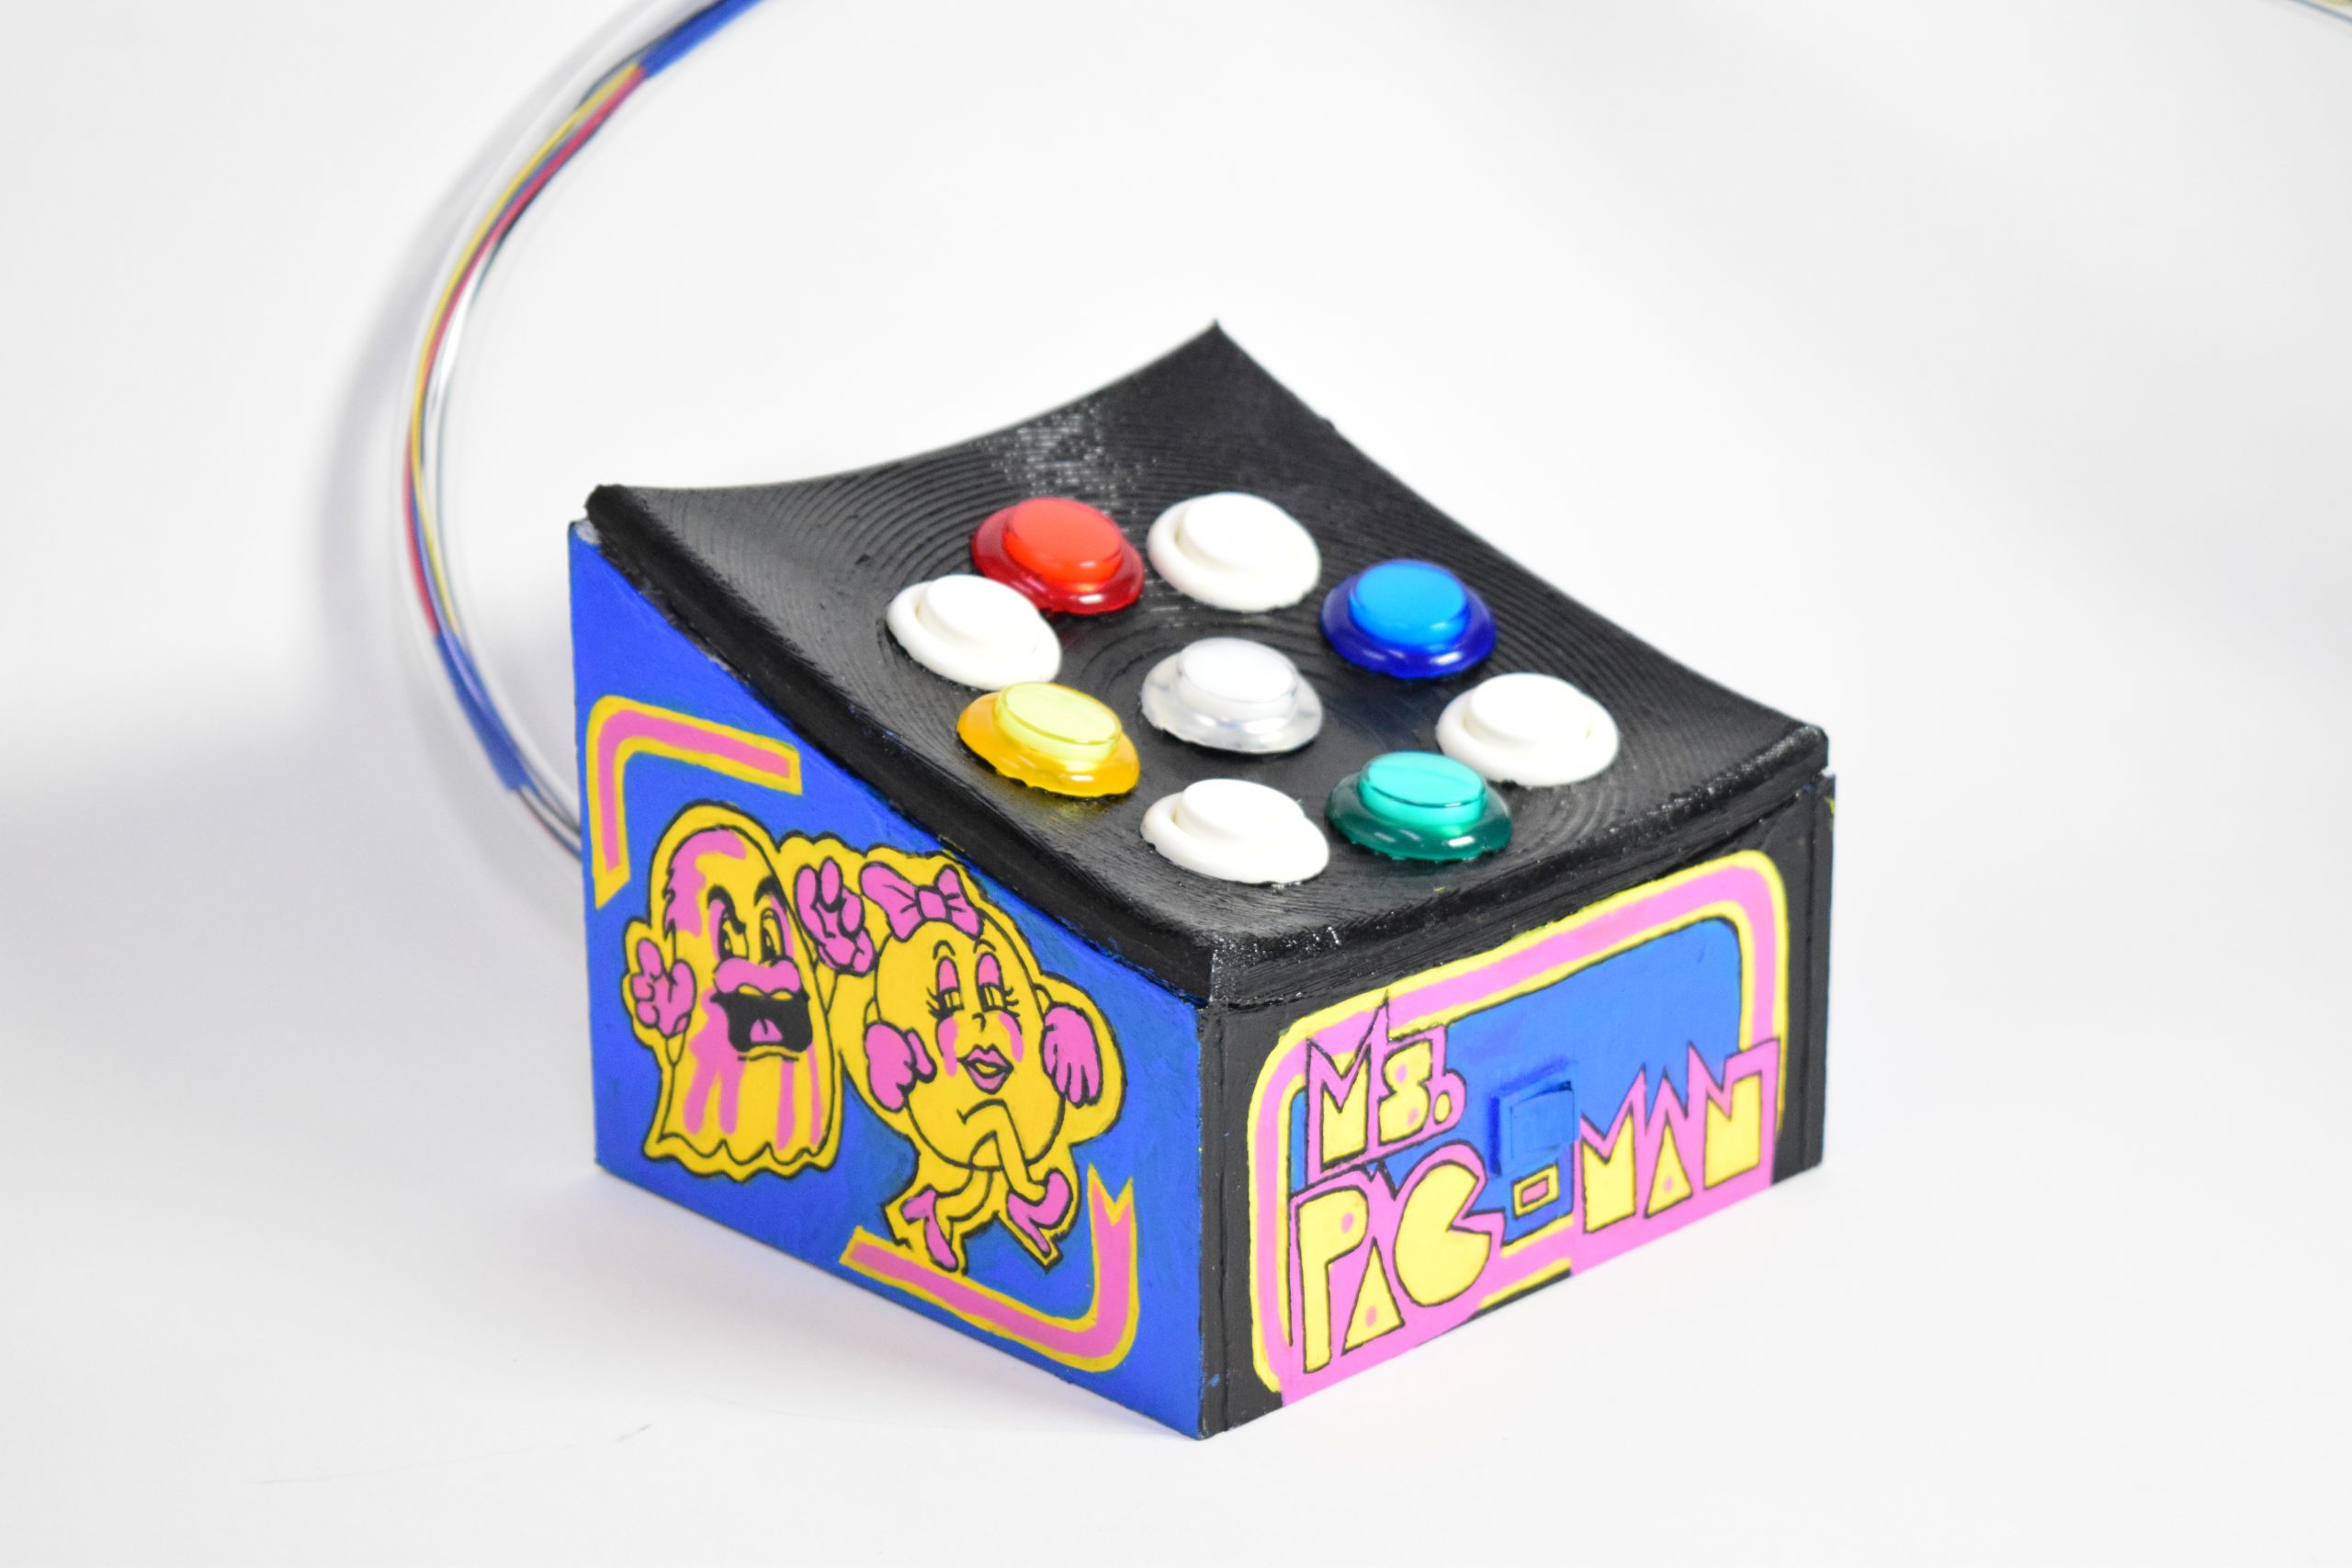
perspective view of the arcade keyboard
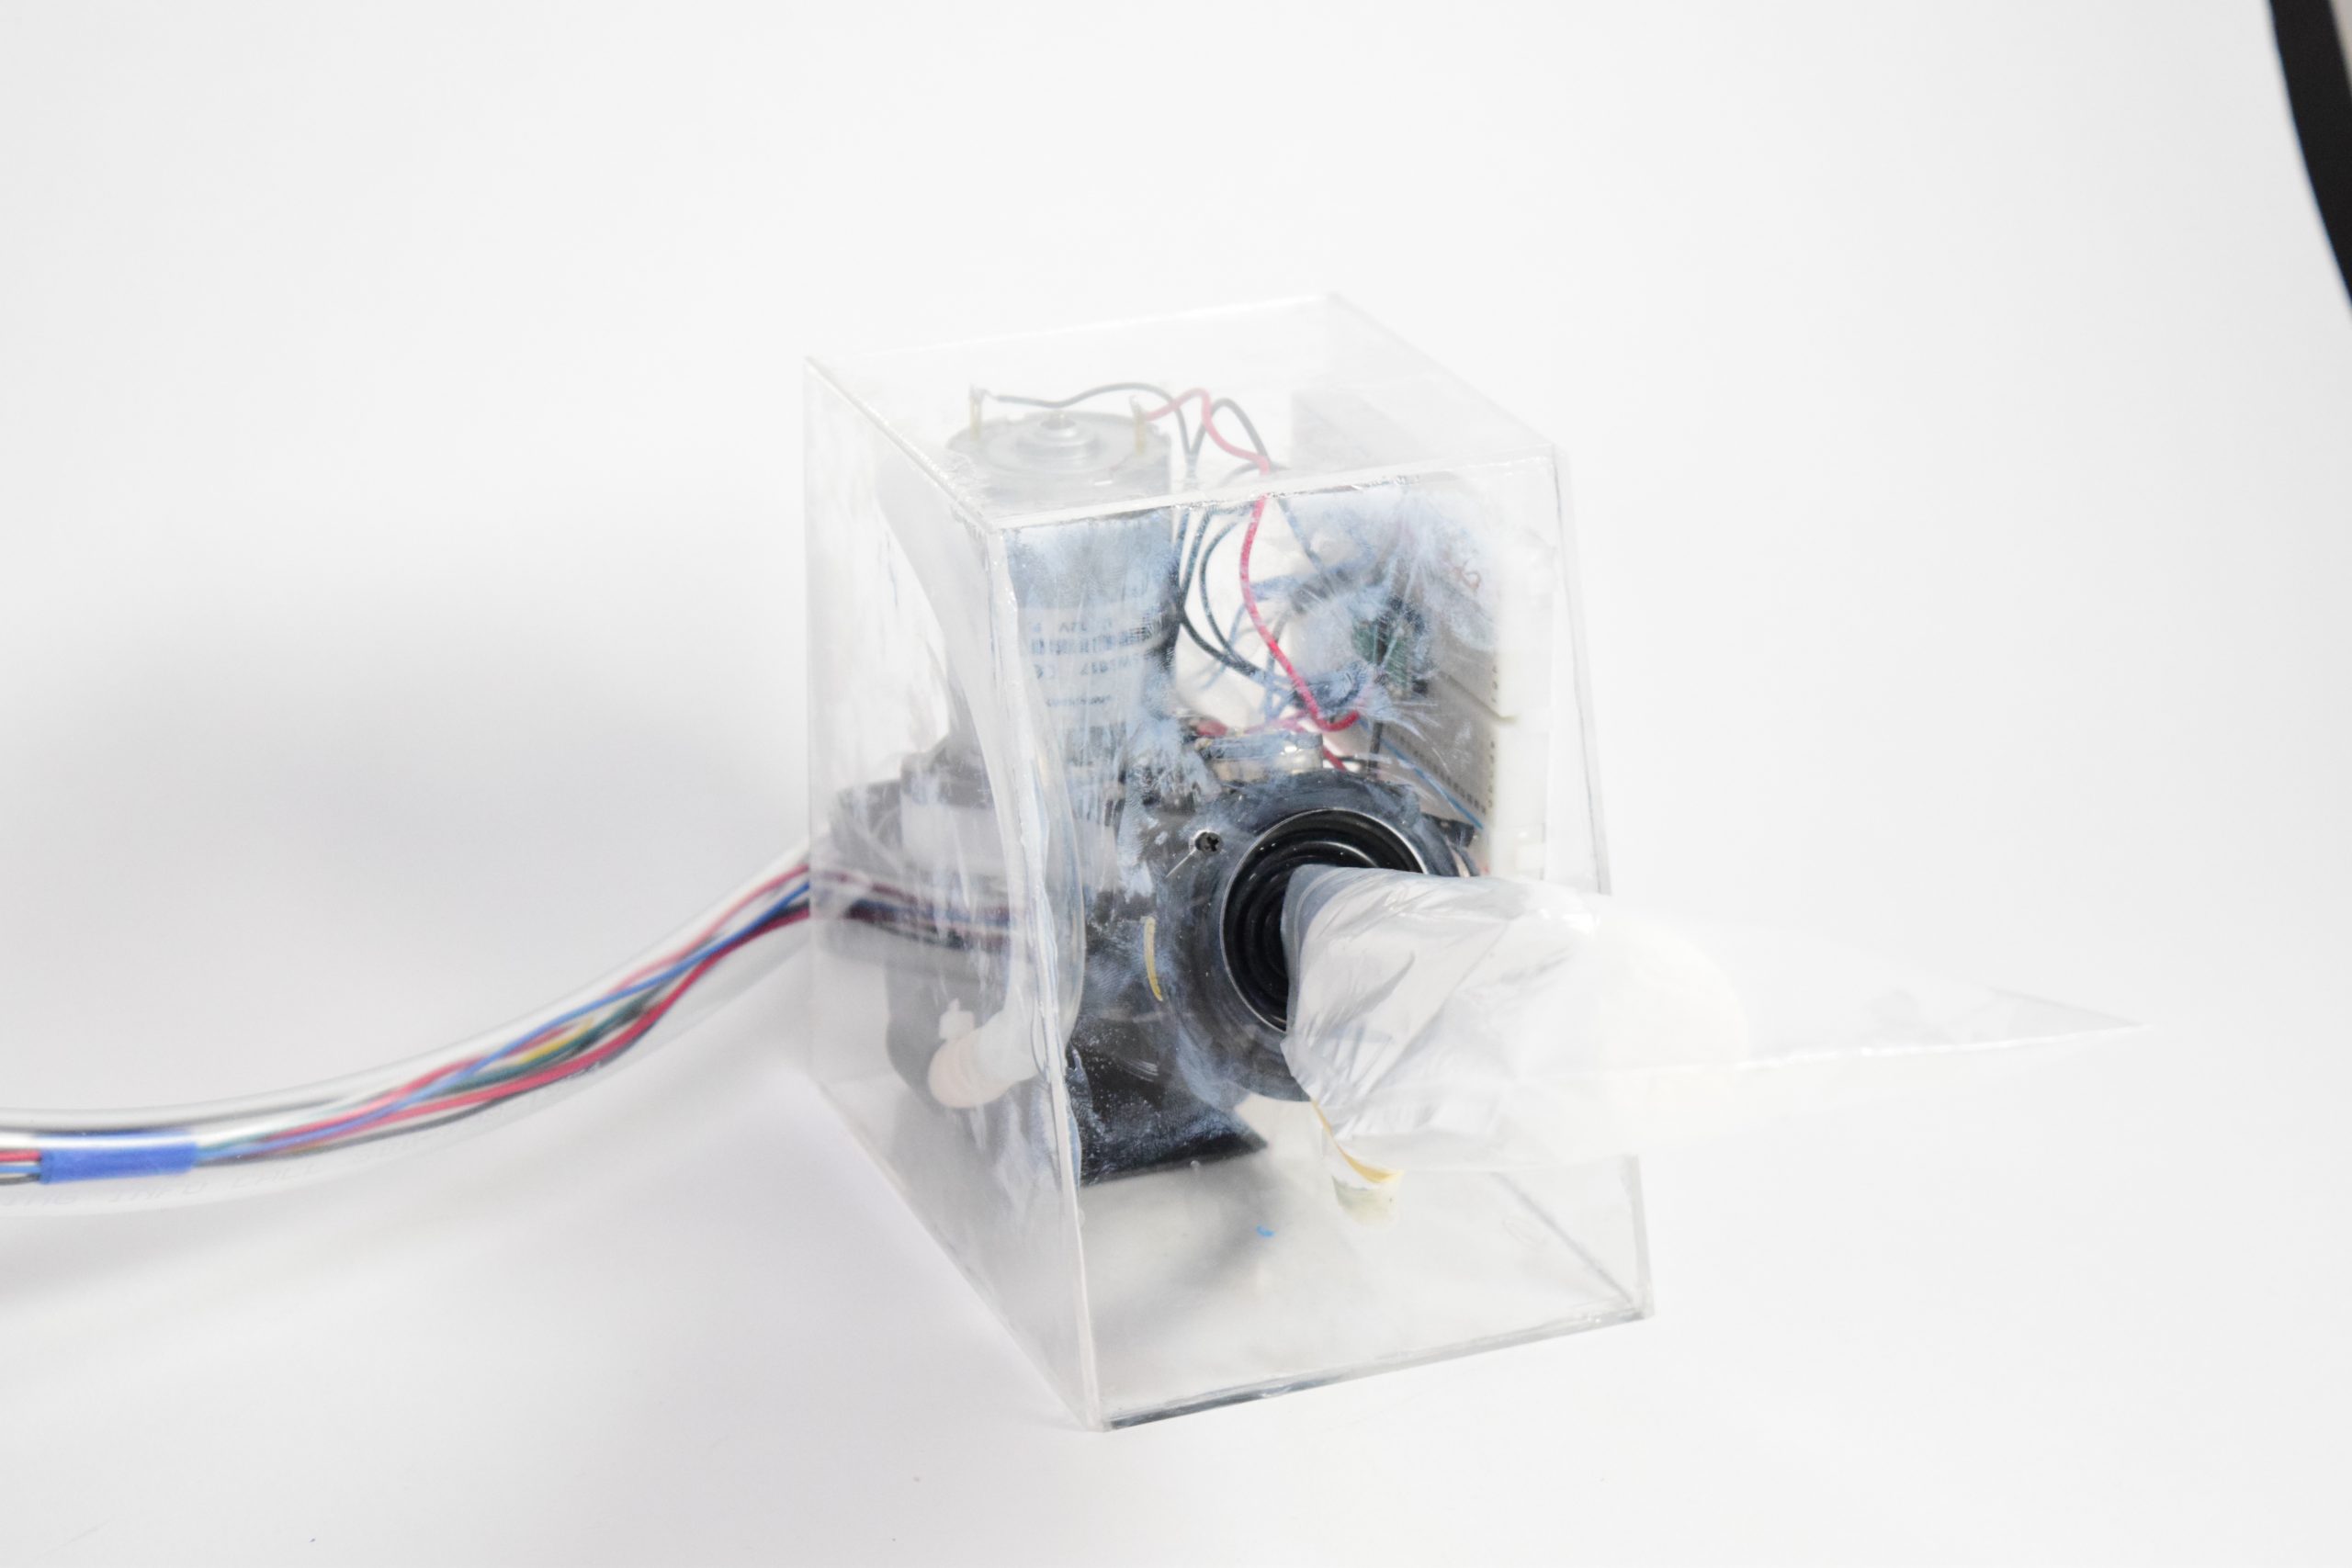
perspective view of the inflatable joystick
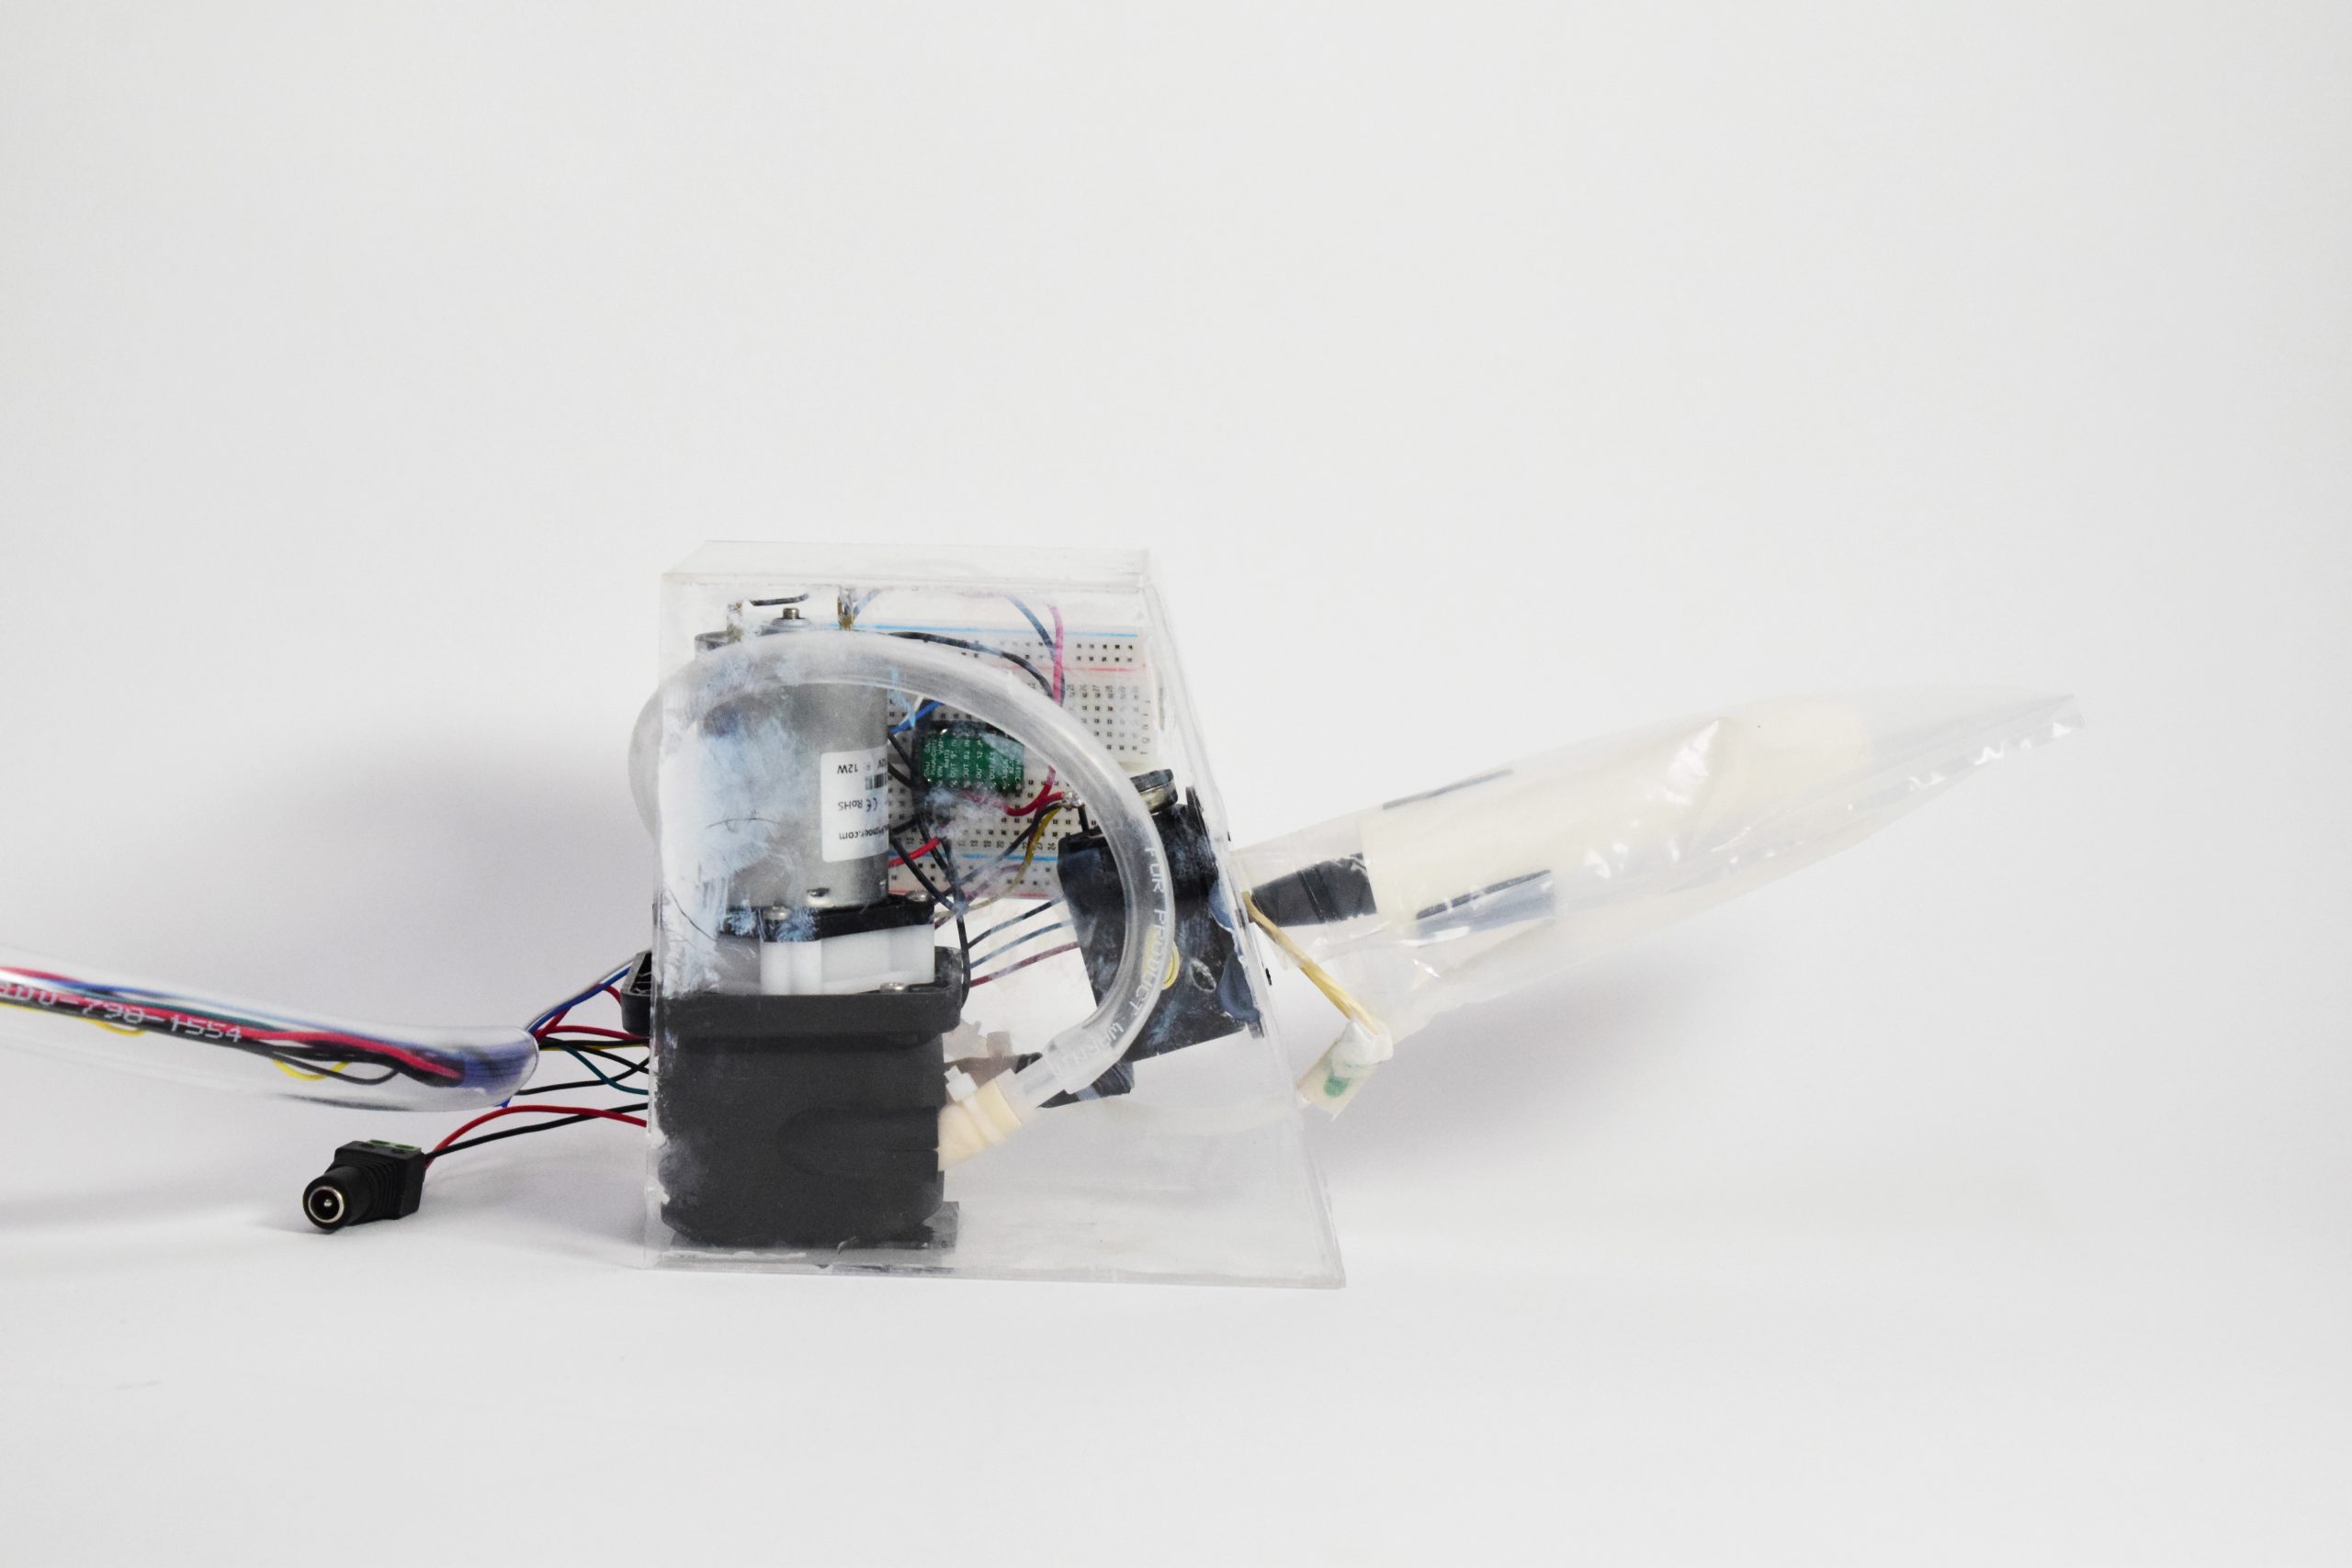
side view of the joystick
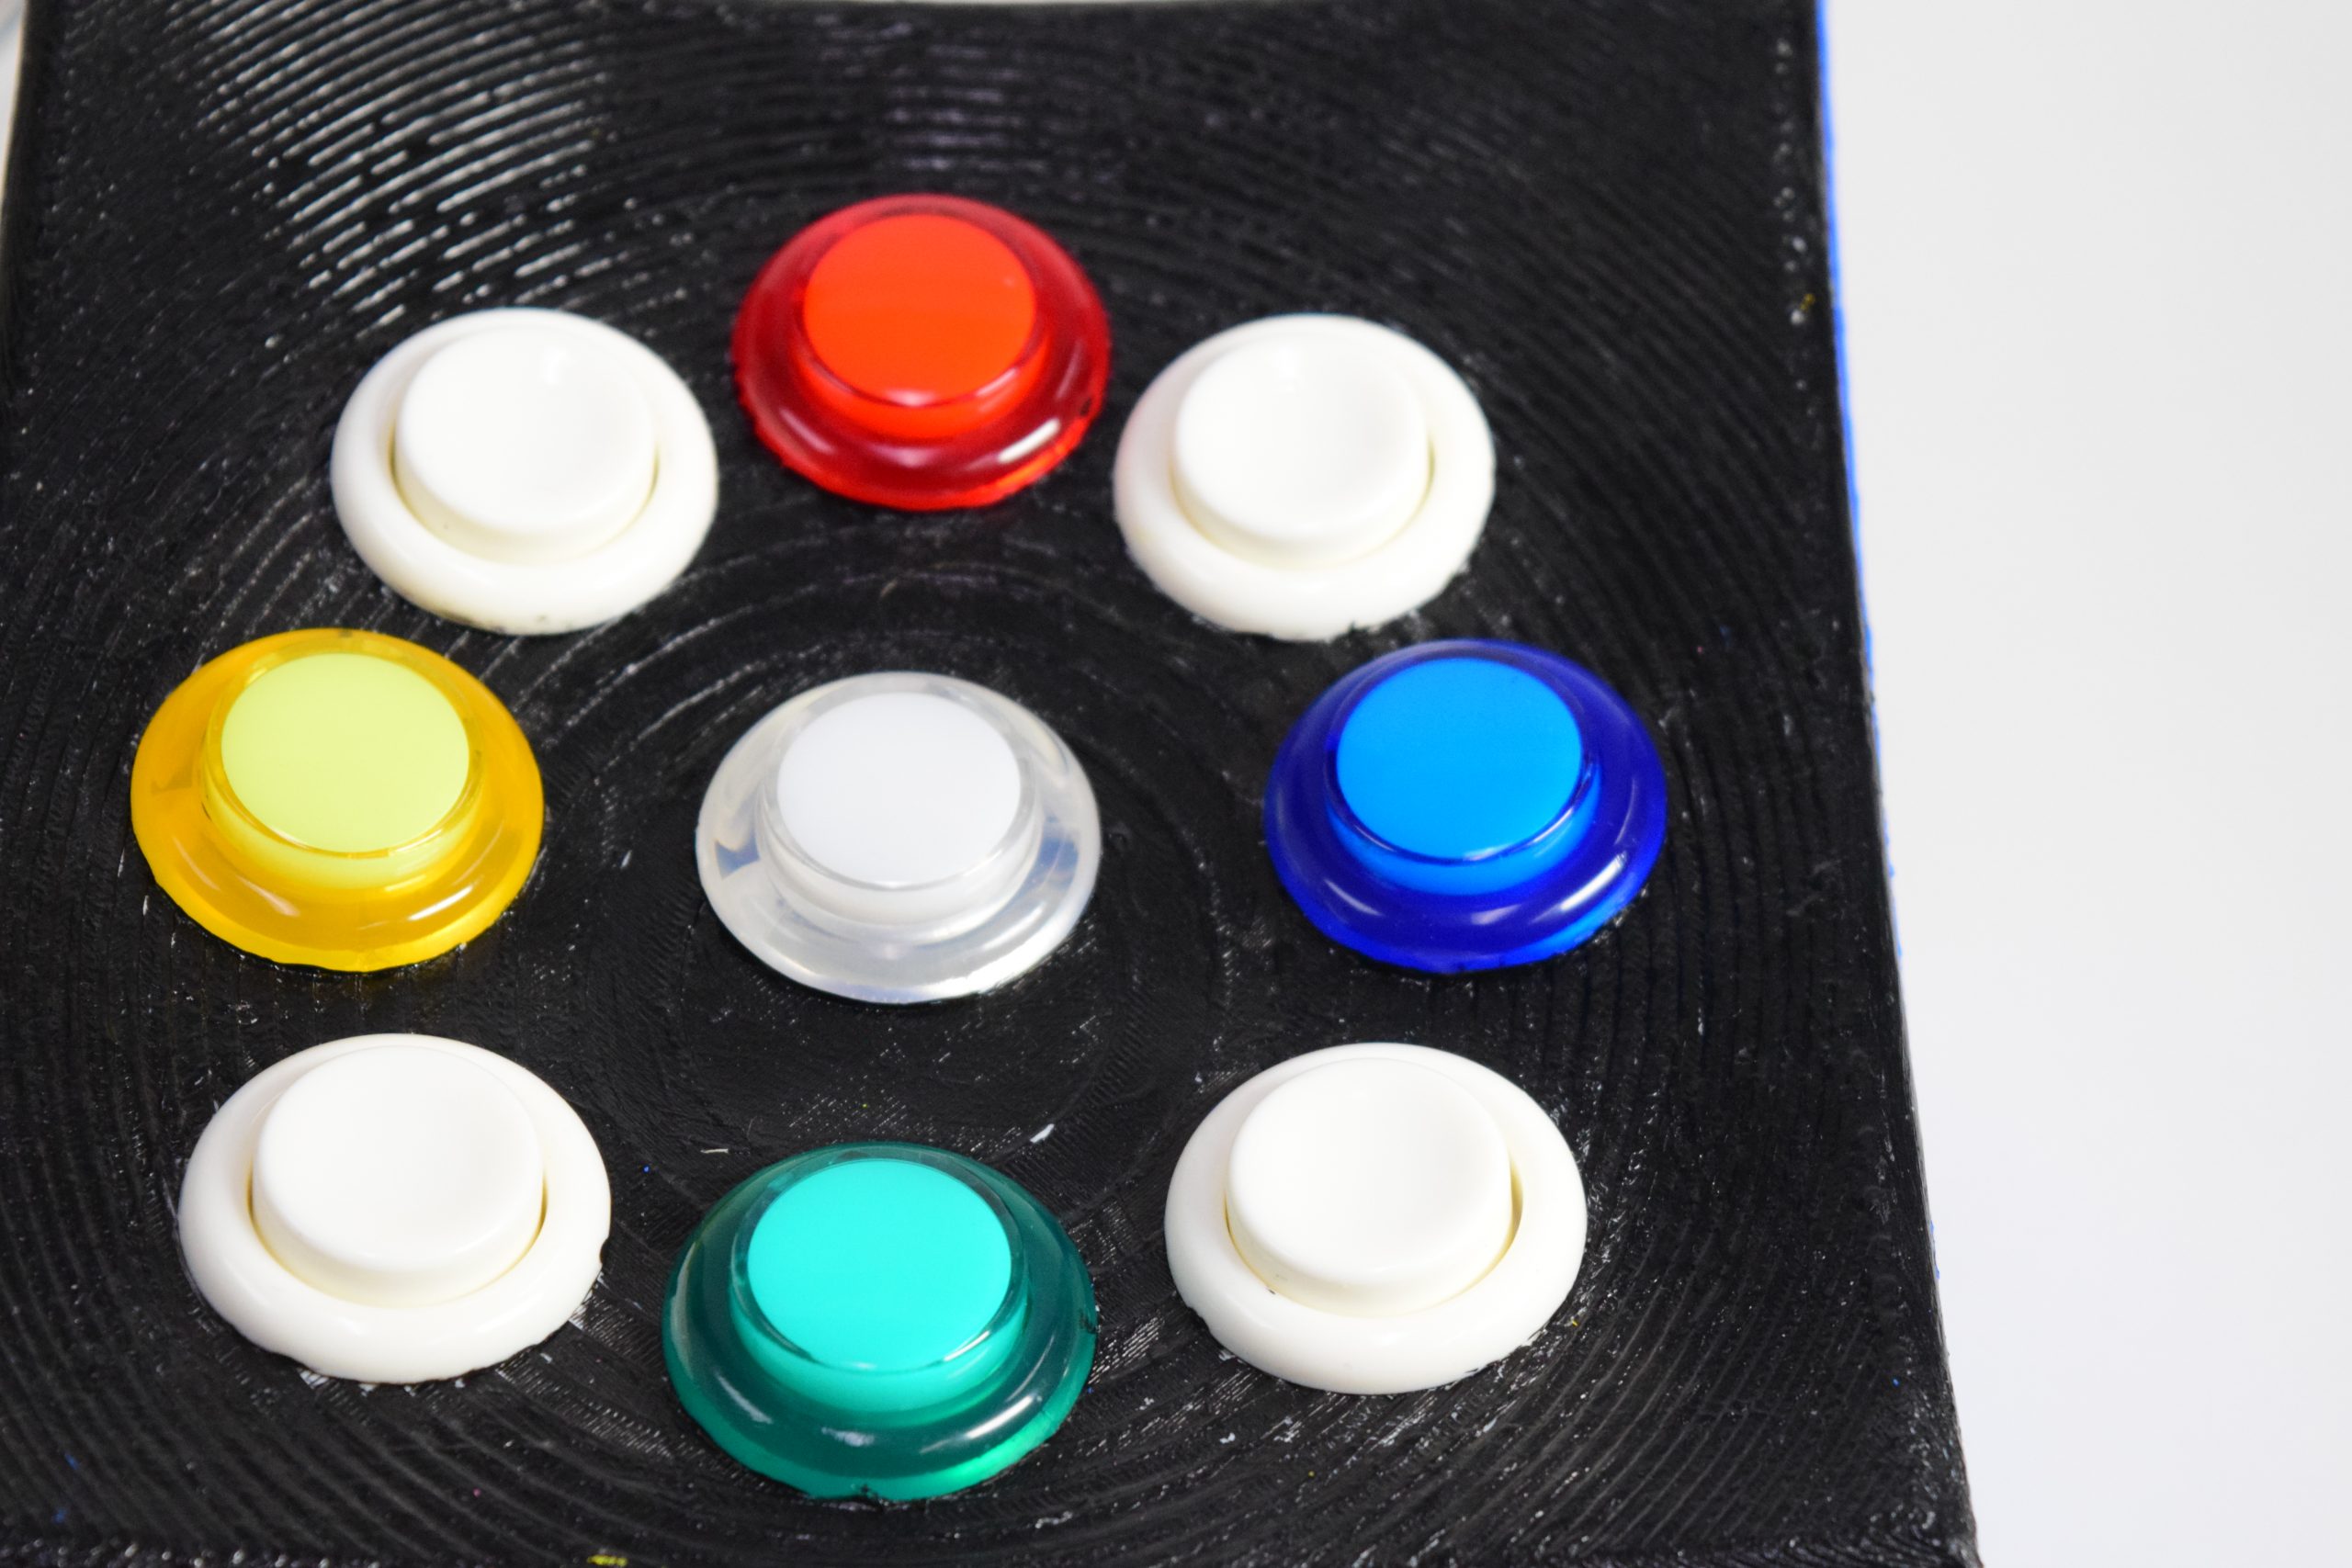
detail view of the convex 3d printed shell and led buttons
c. Narrative Sketch
When Kim wants to play a game on her laptop, she plugs in the USB-C cable into her laptop and presses the on switch. She knows the gaming device is up and running once the LED arcade buttons light up. She then controls the joystick with her right hand and uses the keyboard with her left hand. When she wants to release her hand from the joystick she presses the bottom left button on the keyboard. This button activates the air pump which pumps air into the joystick for 20 seconds. Once the joystick is inflated, Kim is able to easily remove her hand from the joystick. Then when Kim wants to use the joystick again she can press the bottom left button on the keyboard to deflate it. When Kim is done playing games she presses the switch off and unplugs the USB-C cable from her laptop.
Prototype and Process
This prototype was created to answer the design question of how each feature meets Kim’s needs and how we should change it to her convenience. The goal for our prototype was to create a works like prototype, focusing on the electronics and individual parts of the system performing the mechanisms we ideated.
Our prototype consisted of three different features, the joystick, the keyboard and the inflatable mechanism. The joystick was a functioning joystick that controlled the laptop cursor, the keyboard focused on the placement of the buttons and the ease of use for Kim and the inflatable mechanism tested its functionality for Kim’s use.
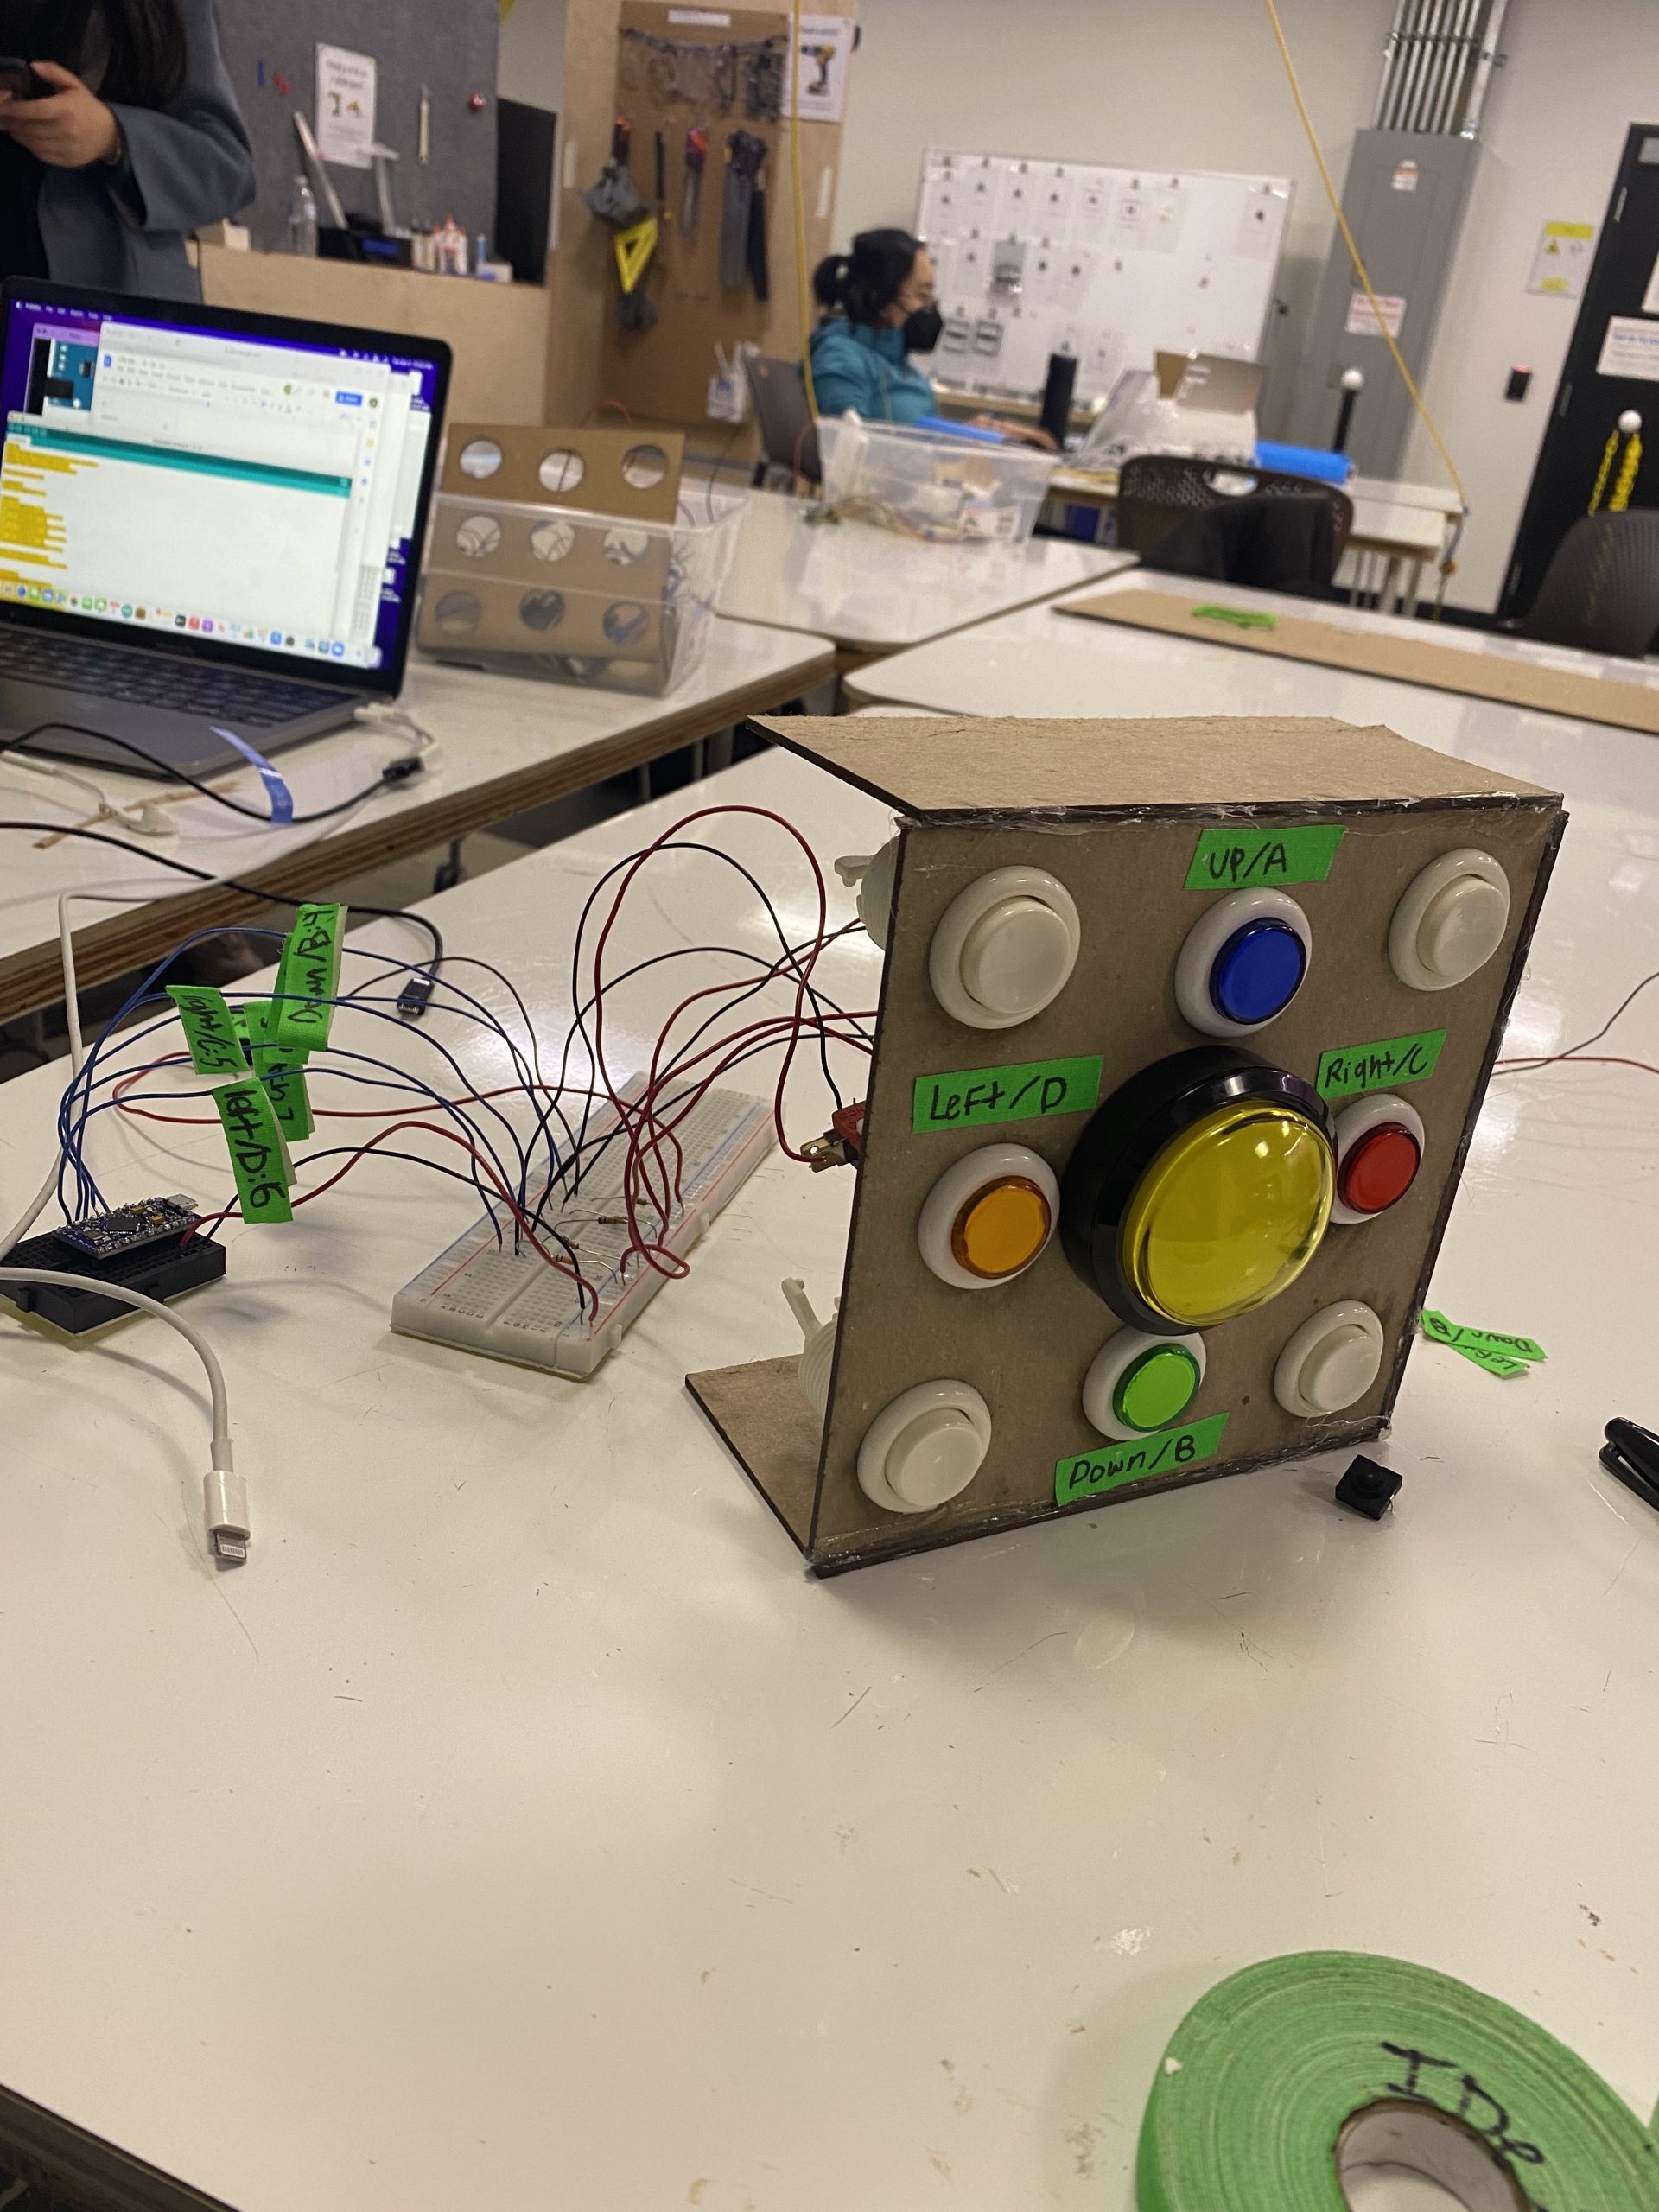
This is the first iteration of the keyboard. The labels show the letters the buttons were originally mapped to test and debug

wiring and testing the joystick on the Arduino micro
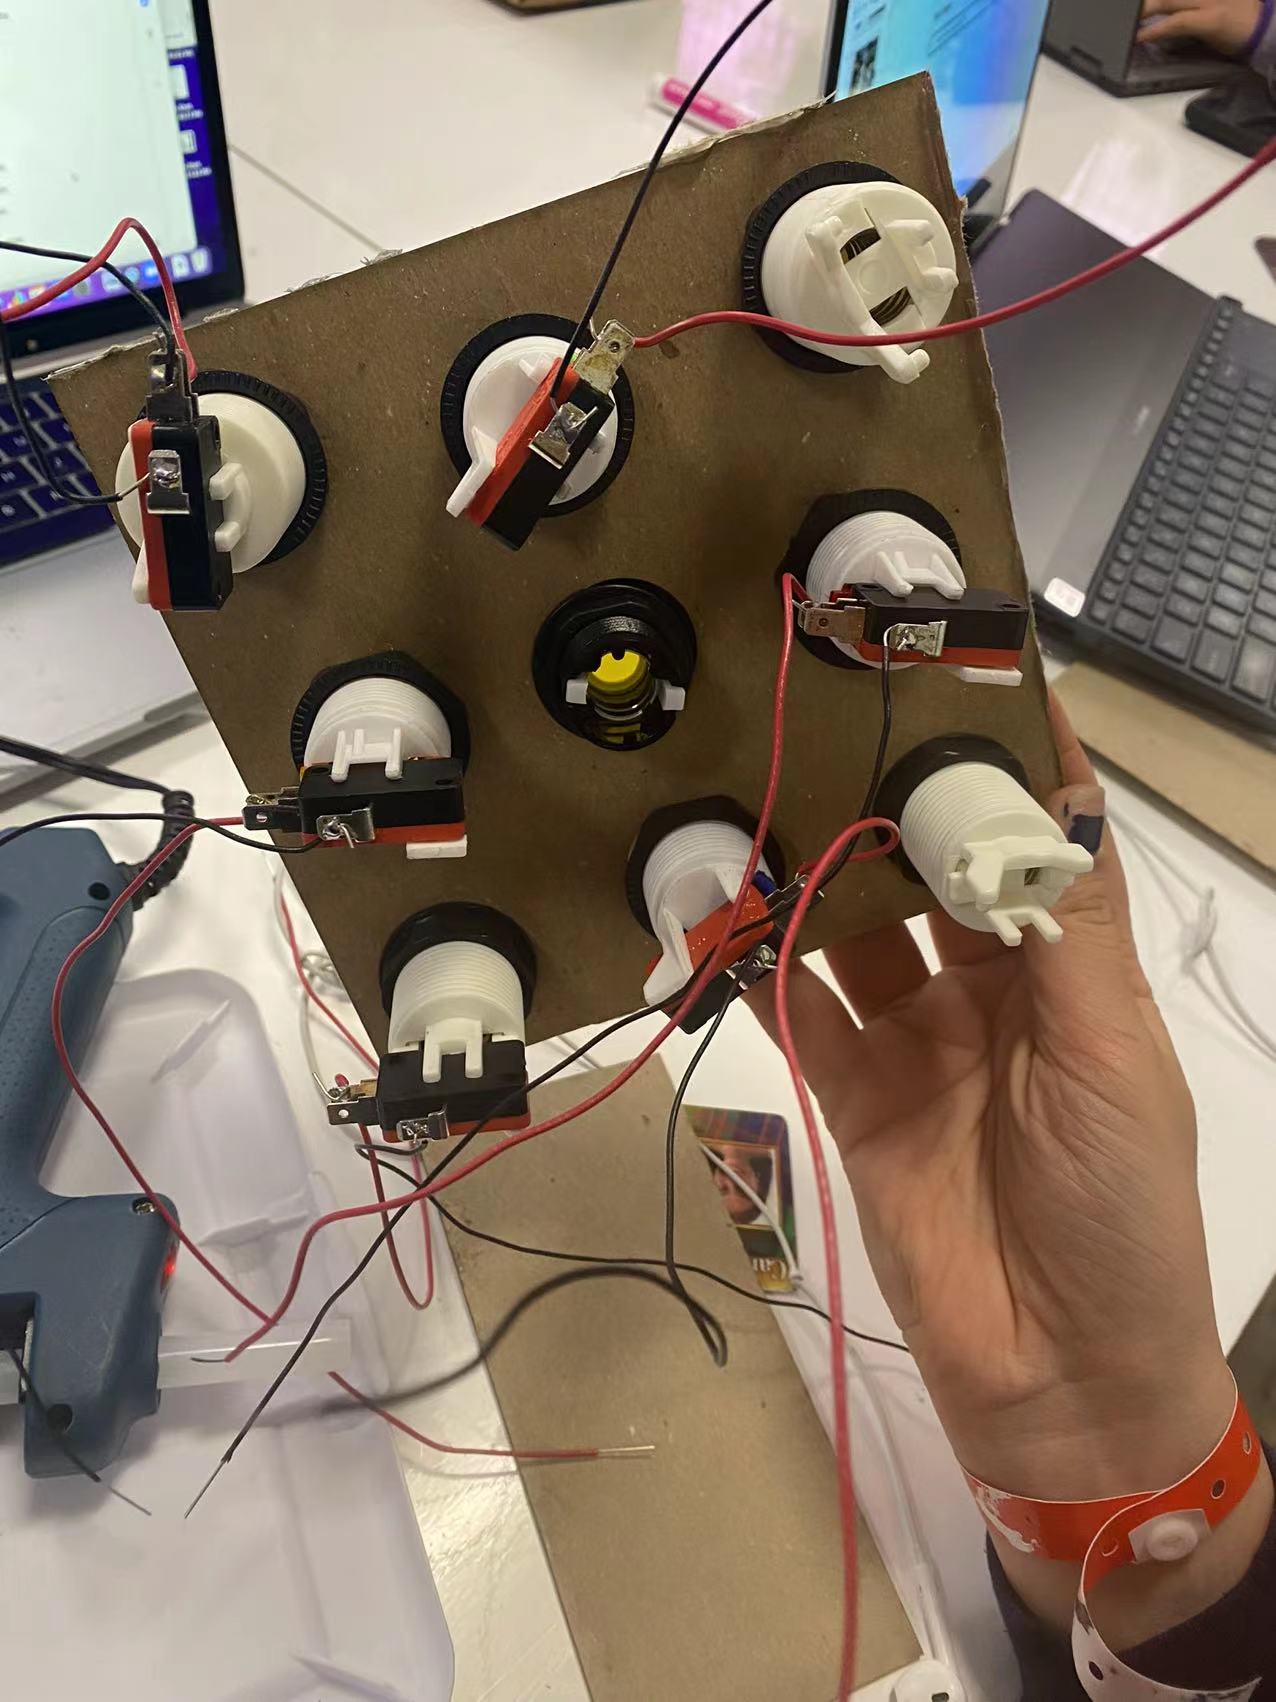
back side wiring for the arcade button keyboard
The prototype was effective in identifying areas of improvement for our design. Our initial keyboard iteration had a leveled surface where all the buttons laid flat. We had Kim test this design by playing a game so we can observe what adjustments to make. Kim was elated to see the colorful arcade buttons however her discomfort was evident when trying to navigate the buttons. She struggled with where to place her hand and some buttons seemed inconvenient to reach. Moving forward we wanted to experiment with the keyboard’s ergonomics to optimize comfort and usability for Kim. From Kim’s feedback we redesigned the keyboard to have a curvature on its surface and changed the layout of the buttons.
The joystick we used for our prototype was a small Arduino joystick from the physical computing lab. Our goal was to get the code and joystick to work for the prototype so moving forward we could experiment with its size, shape, and orientation. The prototype was functional in its control over the laptop. We could not receive much feedback on its current design from Kim since it was a functional prototype. However, we did have Kim grasp different sized objects with her right hand so we could gain a better understanding on the ideal shape for the joystick.
The third component to our prototype was the inflating mechanism. We designed a separate device to demonstrate the inflating and deflating concept for the joystick. This device consisted of an air pump, tubing, and a balloon. Kim tested if this mechanism was effective in releasing her hand so we could understand what size and shape would be ideal moving forward. From our observation and Kim’s feedback the balloon was effective but the air pump was too slow. Moving forward we sought out different air pumps that could pump air at a faster rate and experimented with more durable materials than a balloon.
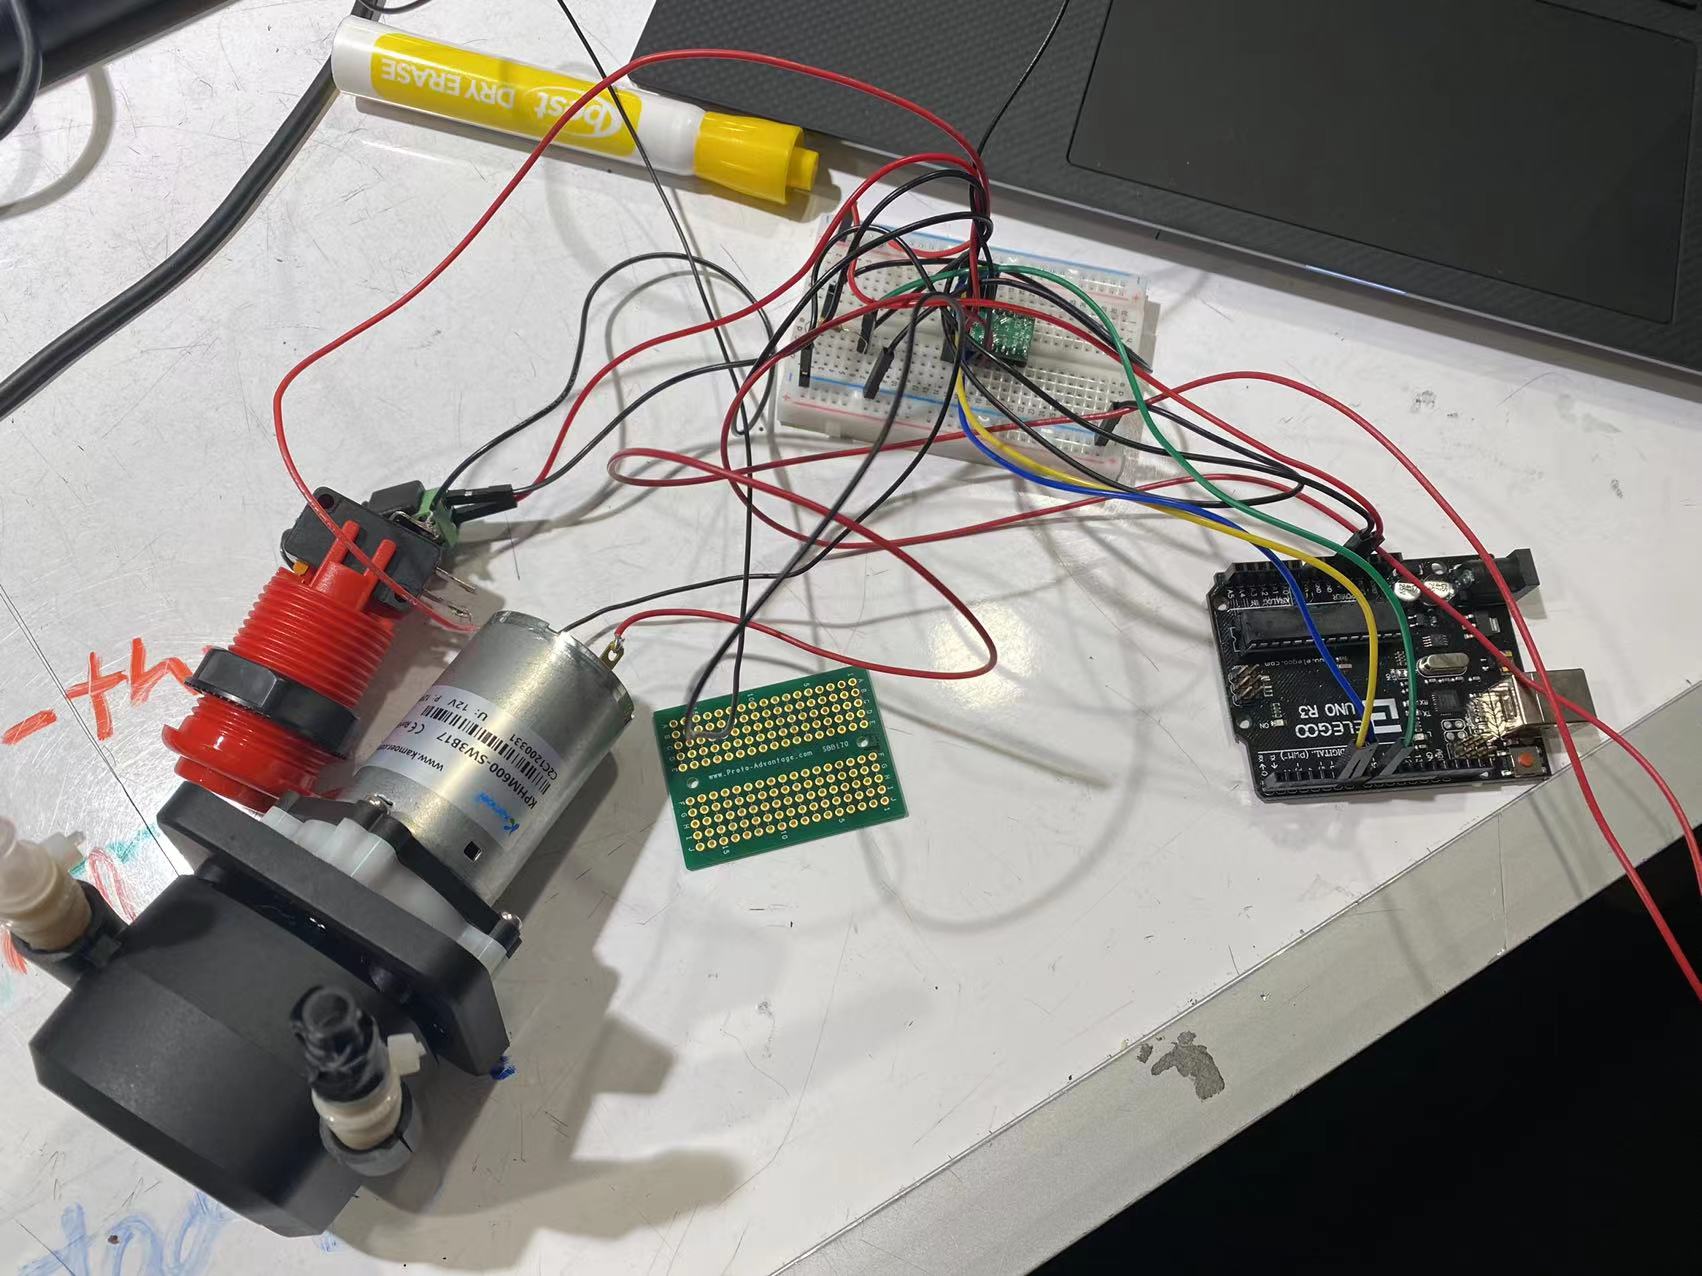
figuring how to transit to a larger air pump

testing the fitting of airbag and joystick extension
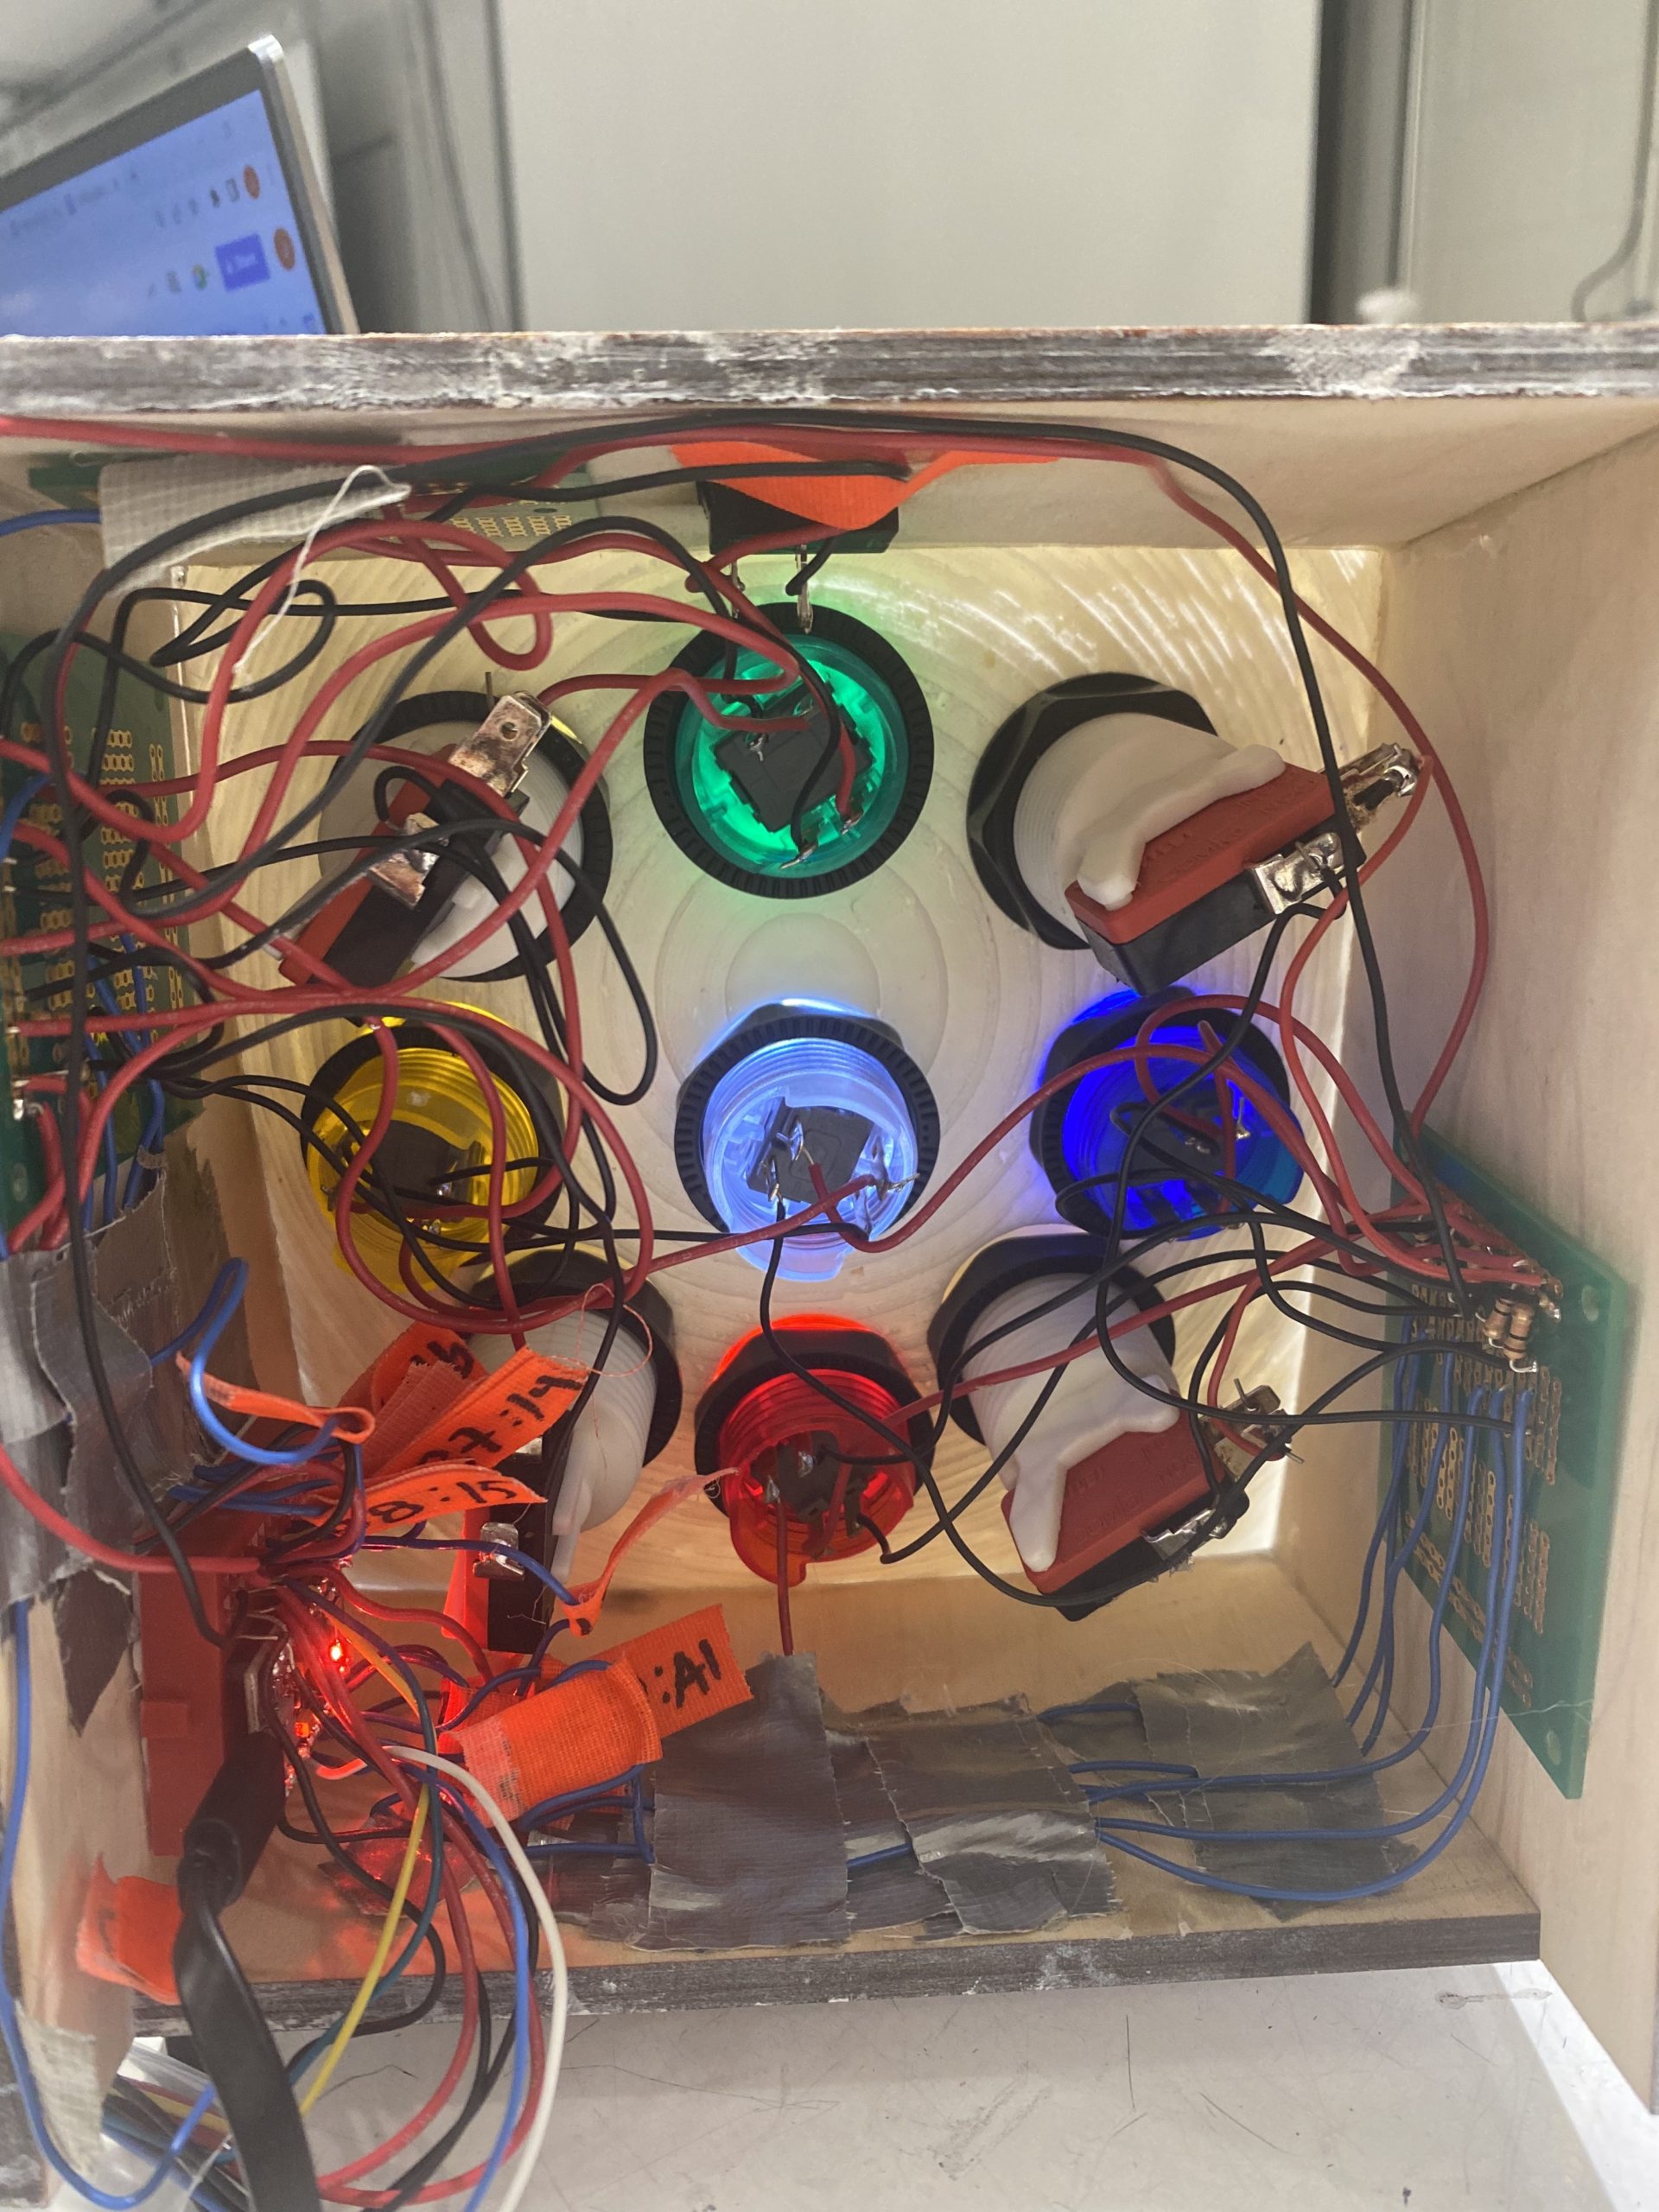
This image shows all of the wires that had to be connected to the Arduino. We used tape to label the pin each wire should be connected to keep the wires organize in case they became detached.
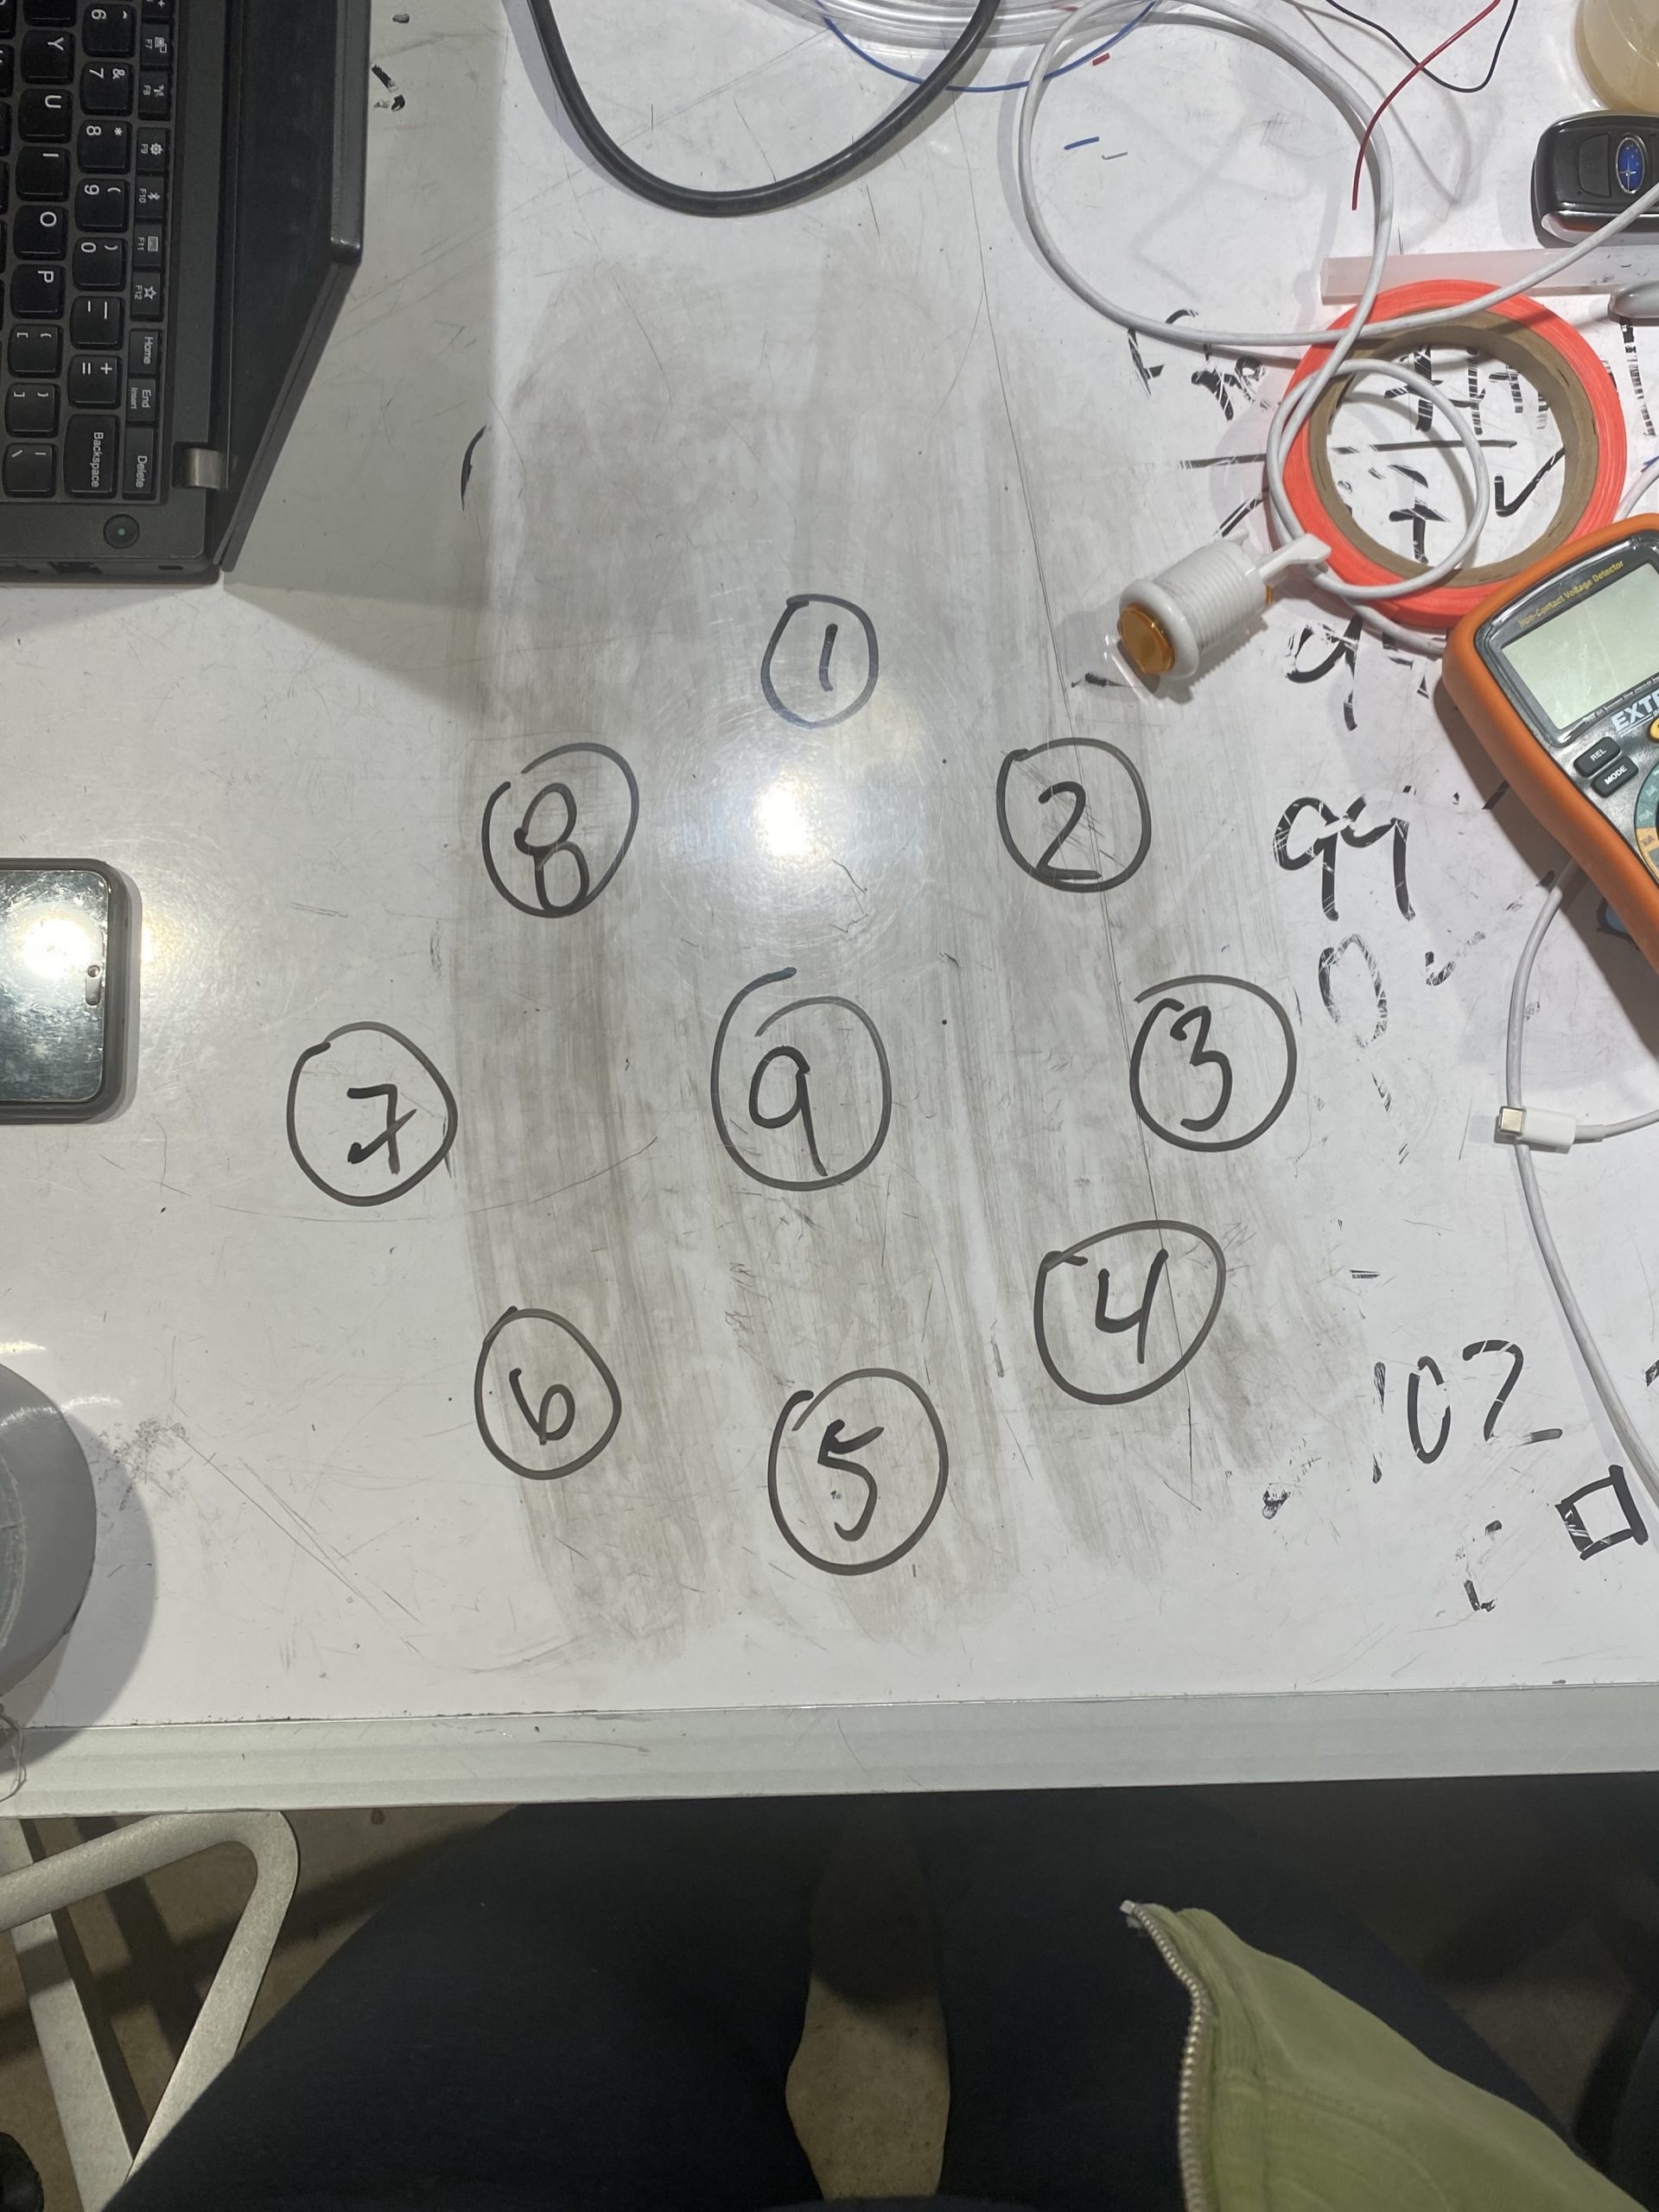
This diagram represents the layout of the buttons and the number we assigned to each one of them to stay organized during the debugging process.
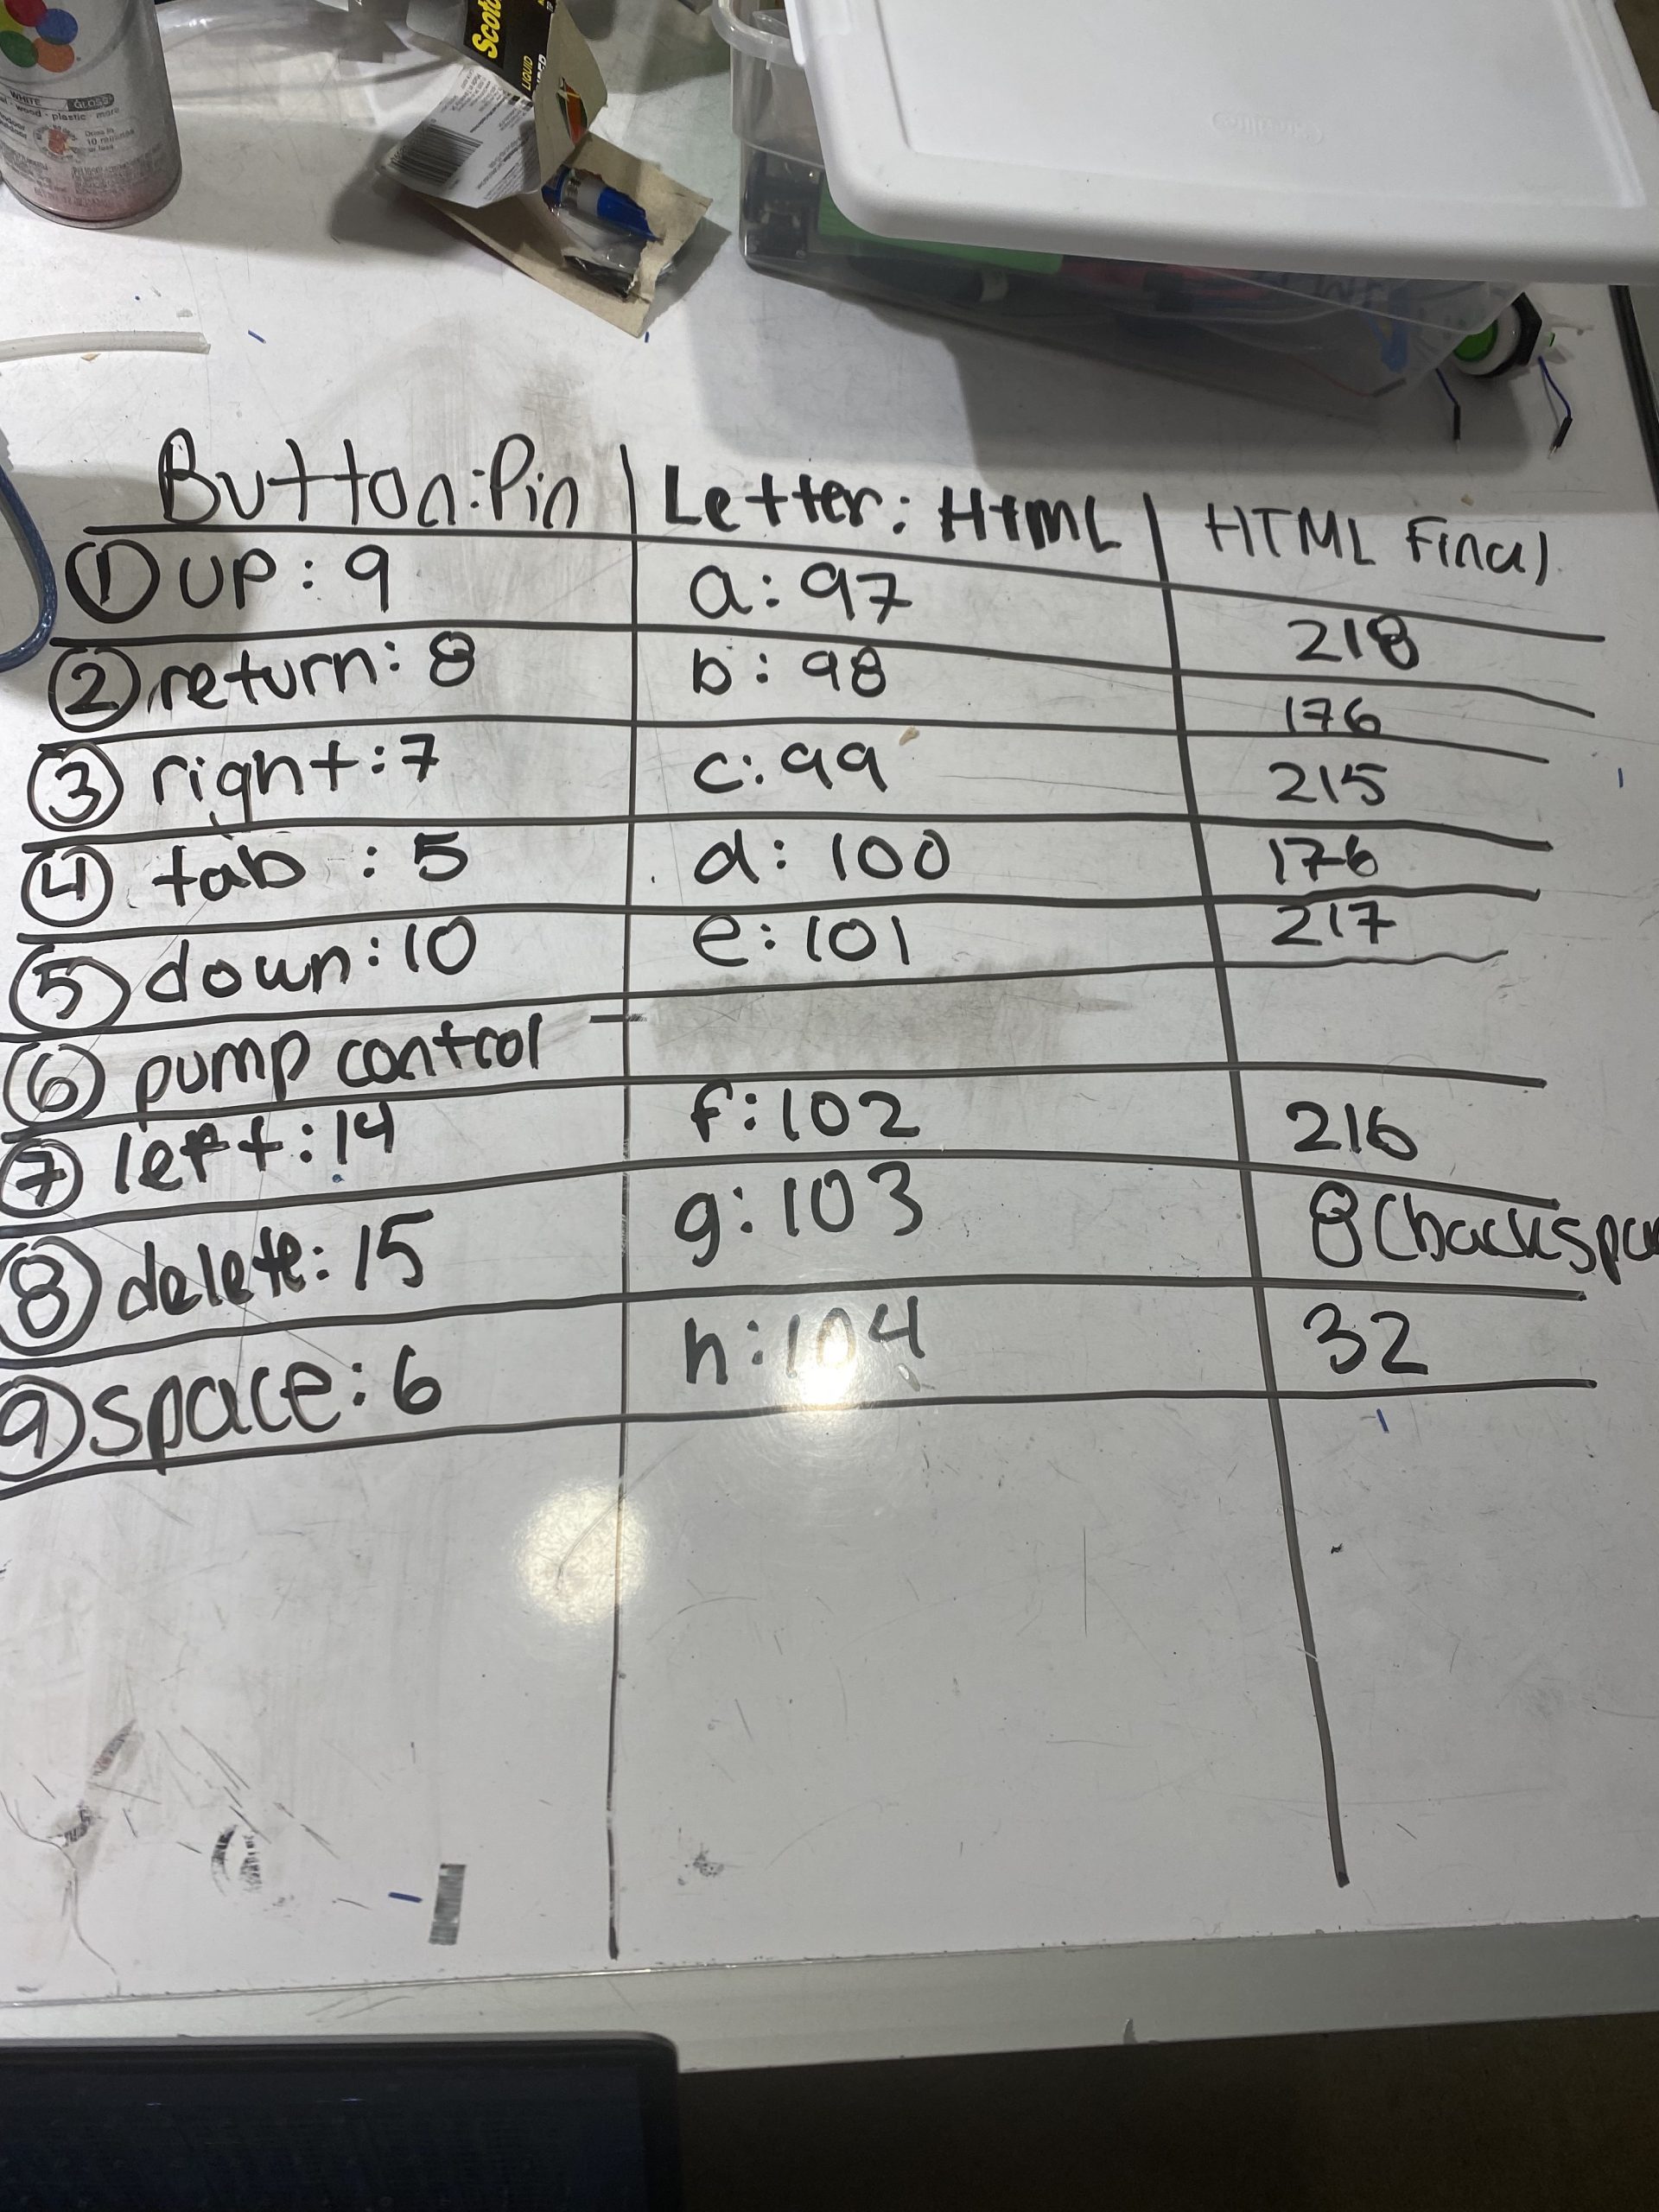
The two images above were diagrams we created for the debugging process. We created a system to test each button and ensure its code and wiring was correct

One of the final iterations o the keyboard with the convex surface prior to being painted.
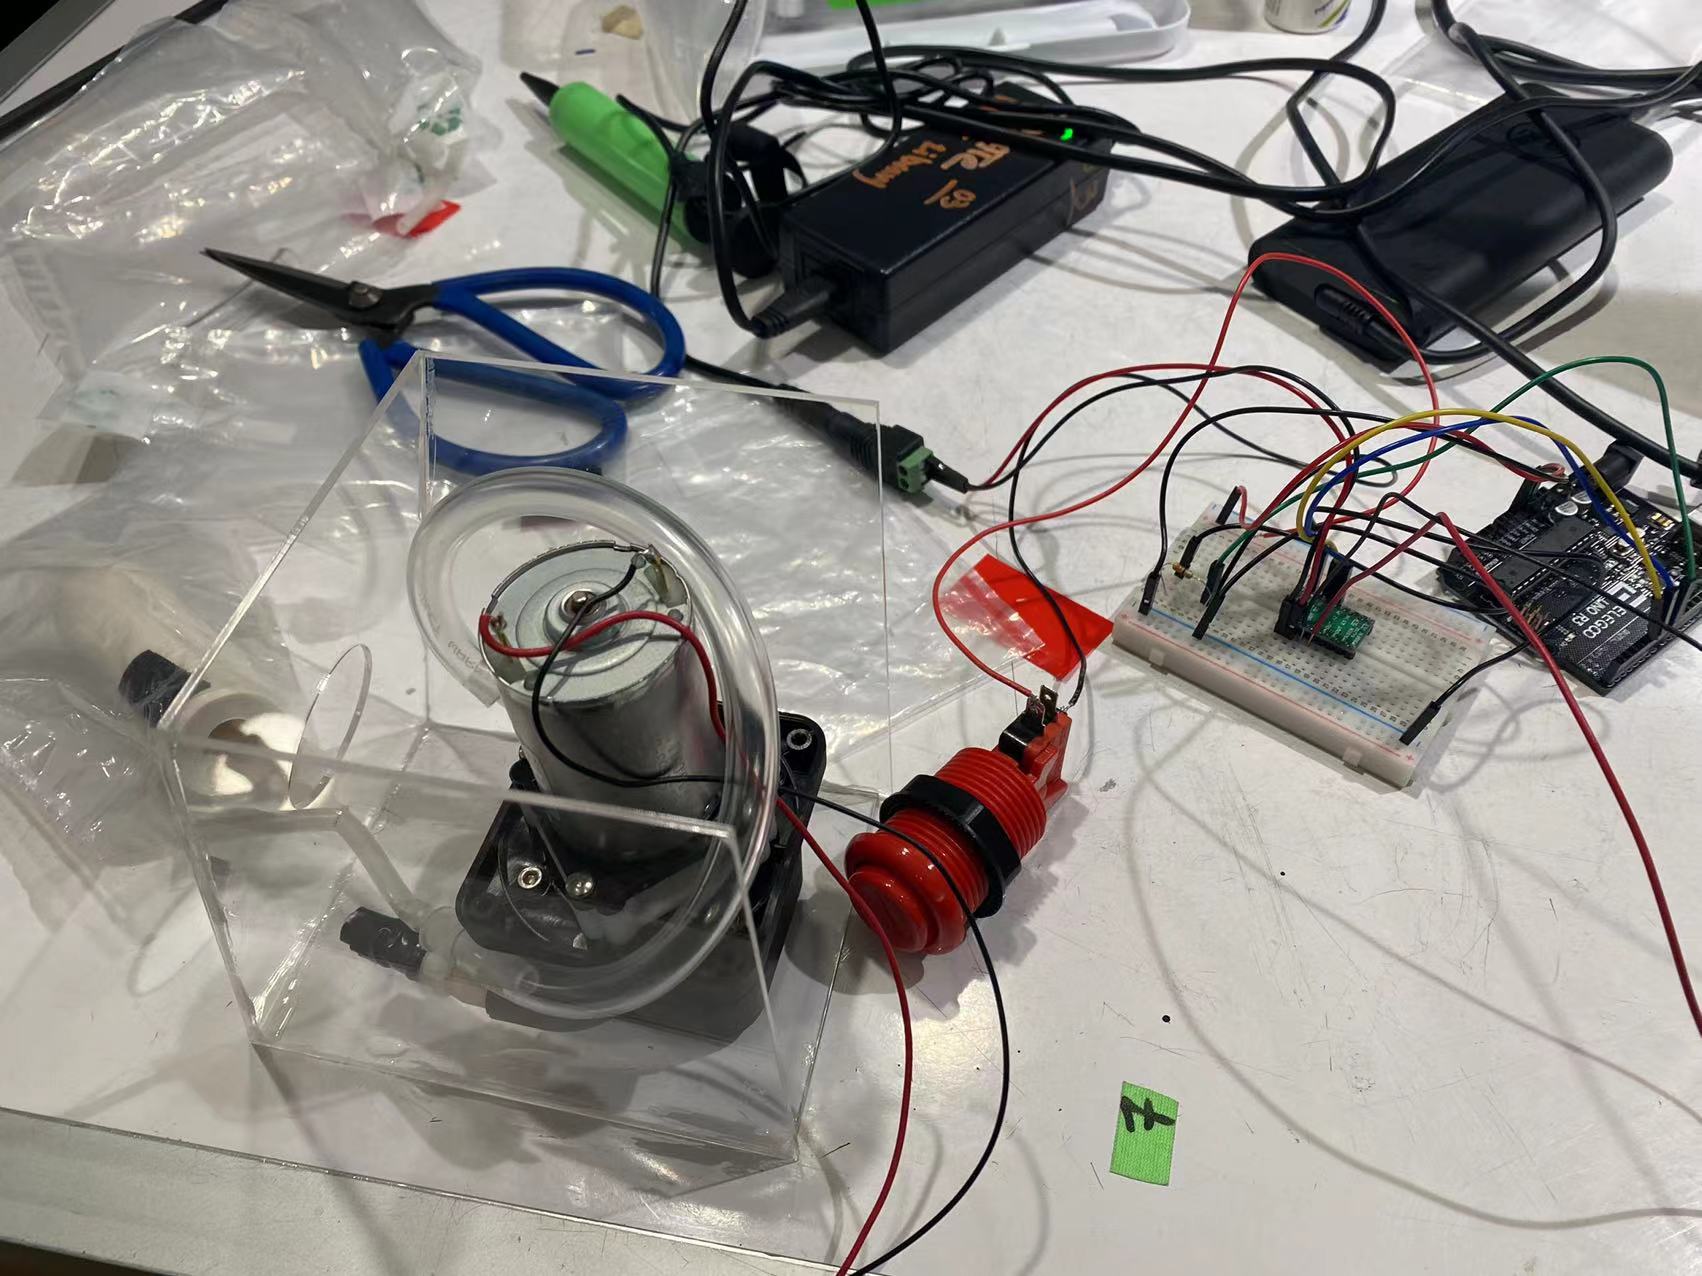
testing the new air pump with the Arduino uno
The early prototyping stages of this project were focused on creating a device that works. After we developed a functioning keyboard, air pump and joystick we shifted our focus to the ergonomics. After the prototype critique and user testing we had many new ideas on how to improve the overall design to increase comfort and accessibility. We wanted to experiment with the size and shape of the keyboard. We drew inspiration from different keyboards we saw online and created a new model with a curved surface. In addition to redesigning the keyboard, we wanted to find a more durable joystick to use. With a more durable joy-stick we were able to model a 3-D printed shell personalized to Kim’s preferences that was easier for her to grip. Throughout the redesign process we had many conversations with Kim to receive more feedback on these new ideas. This bore fruit as we added contour lines on it to ensure that her hand does not slide off and we decided to include the factor of visual appeal to the keyboard.
To improve the user interface of the device we wanted to add a visual indicator to signal to the use the device is on. Our initial idea was to add an LED strip around the perimeter of the keyboard that would light up when Kim switched the device on. Then we learned there are arcade buttons that had LED lights we decided to move forward with these instead. In our final iteration of the project we programmed the LED buttons to light up when the device is on.
The inflatable mechanism went through multiple revisions. After the prototype critique we wanted to create a more durable and faster inflatable mechanism. We considered using water instead of air to pump it but decided air would be a wiser choice since we are dealing with electronics. We consulted Professor Zach about experimenting with other materials instead of a balloon such as casting a silicon bag which would be soft and would avoid issues where the air leaks out. To pursue this option, we met with Professor Garth and spent a class discussing this with him. However, he said the main difficulty would be to cast the silicon bag in the shape we wanted as the silicon gel would have to be constantly rotated in all directions to create our preferred shape. He suggested we adopt any existing product that serves the same purpose and this helped us in fixating on inflatable plastic bags that have a compartment with them. This was perfect as it properly wrapped around the joystick and inflated to the required volume for Kim’s needs.
There were a couple of issues during the development of the final product. Our first 3d print of the curved surface was not strong and was disintegrating so, we printed another with a thicker width to ensure structural integrity. One of the potentiometers of the joystick broke so only one axis worked for the joystick. We had to buy another one post the final presentation. Our schedule was delayed by a few days due to the revisions in our design as there were products like the joystick and the buttons that had to be ordered online. A few days before the final presentation, the micro-Arduino’s port broke while we were testing it which was stressful and we required a replacement.
Gantt Tracking
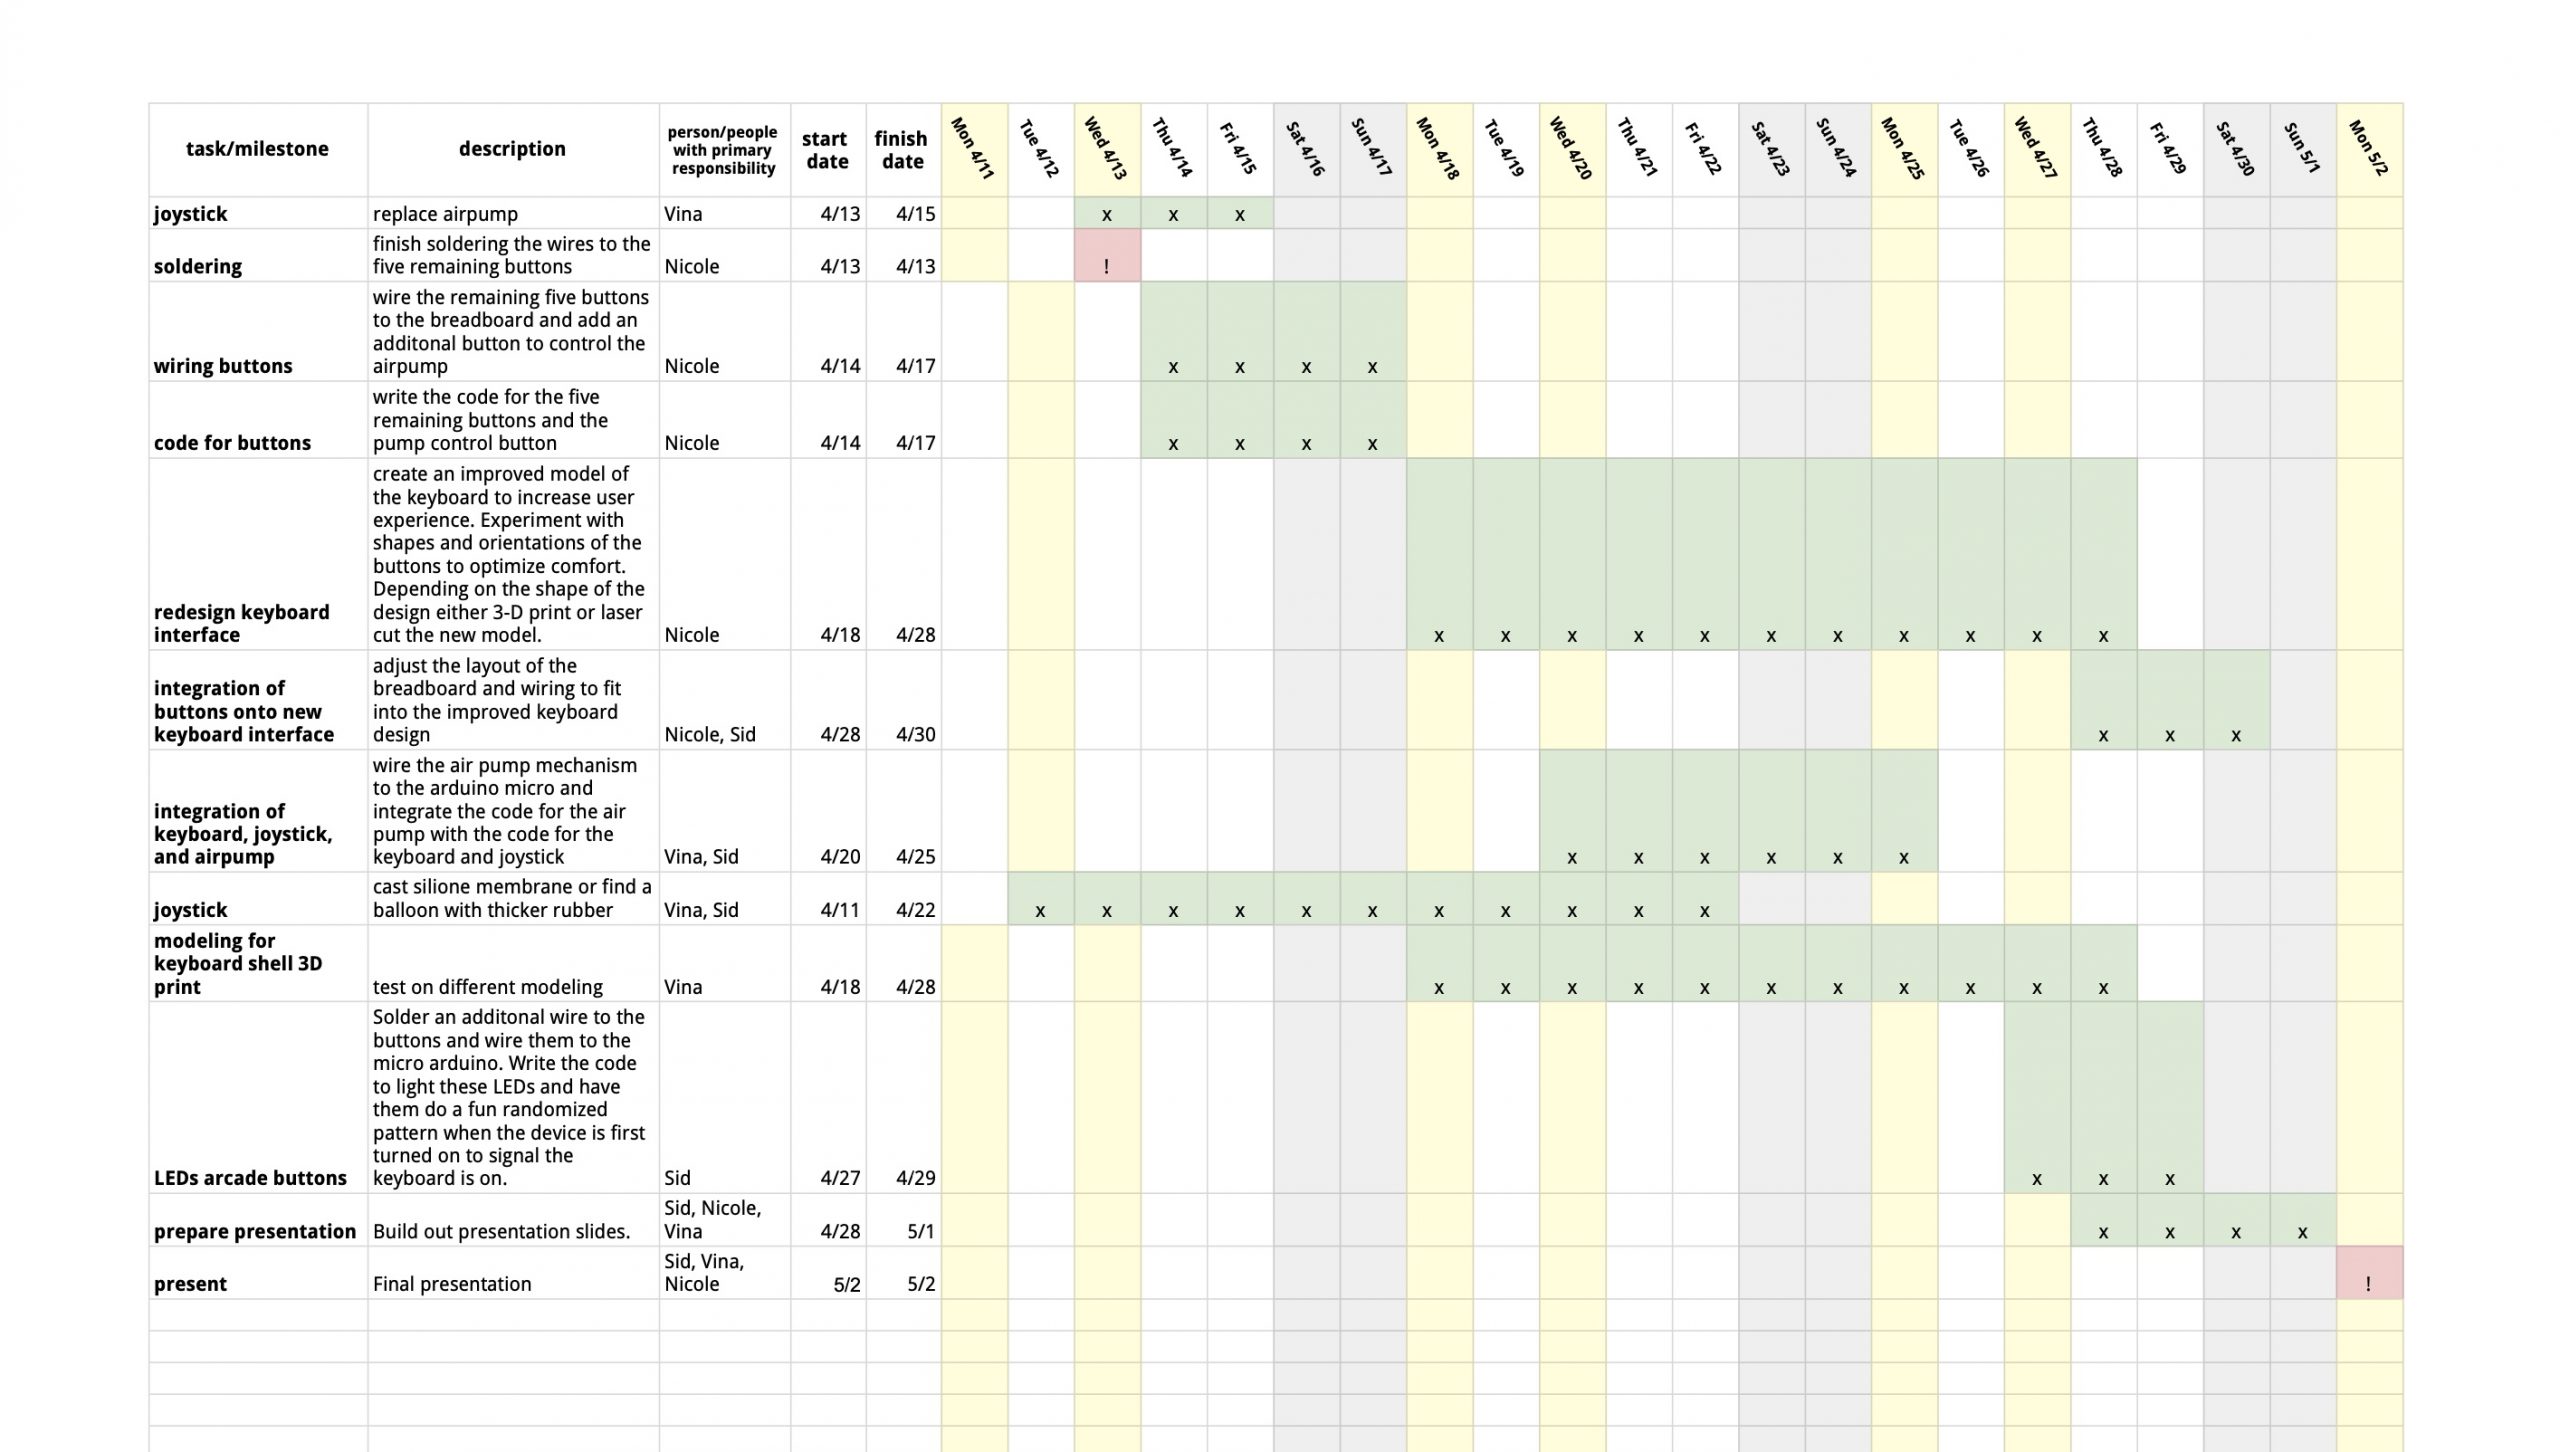
This is the Gantt chart we used to plan and track our progress throughout the assignment. Even though we tried to follow it diligiently, we could not plan for certain problems that occurred. Some unforeseen challenges like the micro Arduino breaking set us behind schedule and the 3-D print deforming. However, it was useful to have this schedule to reference to make sure we were maximizing our work time and knew what tasks to complete next.
Conclusions
The final critique provided us with a lot of valuable feedback and new perspectives on the direction and potential for the mouse and gaming machine. When we first sketched the inflatable pump, we were all skeptical about its feasibility. In the end, we were happy to develop a mechanism that accomplished what we imagined. Even though this idea shows promise there is a lot of potential for improvement. One common issue that was raised about the pneumatic pump bag was “Pneumatics are slightly leaky” and “Pneumatic pump/bag on lever fragile to pinholes”. We were concerned about the longevity of the air bag and the pipe connections into the air bag but we opted to proceed with it to ensure the completion of a workable project. However, we did note that for further considerations of the project, we would explore other materials and better pneumatic fittings for the inflatable mechanism.
We spent the latter of this project working to improve the keyboard’s design, specifically its shape and layout. The feedback from the critique opened our eyes to other aspects of the design that can be refined. One person mentioned that the wires that connected the joystick and keyboard looked messy. In the future we would hope to have the keyboard and joystick be connected wirelessly. A wireless connection would improve the aesthetic and usability of the gaming device. Another piece of criticism we received was about the lack of labels on the buttons. Including labels would improve the user interface of the keyboard. Another design critique was that, “The clear box is a little messy with acrylic cement”. One of the critiquers gave us feedback with regard to the motive of using a clear acrylic box for the mount of the joystick and our rationale for glueing it together with acrylic cement instead of screws. We chose the acrylic box to display the inner mechanism which added to the overall aesthetic of the project however, the acrylic cement smudged the clarity of the acryclic build in certain places. This would be an area of improvement for further versions of the same project.
Designing for other people is a very rewarding experience. We all enjoyed working with Kim to create a device she was excited to use and could help her in her everyday life. Kim may have physical limitations but she does not allow it to inhibit her lifestyle. She has so many hobbies and interests I think we all felt inspired to do more of what we love after talking to her. It felt so special to have the opportunity to create a device that can make Kim’s hobbies and interests more accessible to her. The world is not designed for people with disabilities so it was rewarding to make Kim something that was for her. Seeing Kim smile and laugh using the gaming device made all the work we put in worth it.
The timeline of this project gave each of us exposure to the product design process. From the interview to the final product it is rewarding to see how much we accomplished in a short amount of time. For some of us, it was our first experience designing for a client. It was challenging at times to design for some one else when they are not present. We had to make decisions that we believed were in our client’s best interest but sometimes it felt like a guessing game. The feedback we did receive from Kim gave us direction and propelled us forward throughout the project. It felt like most of our ideas were hers and it was our responsibility to make them come to life. Compared to the last assignment the pressure of designing for a client weighs much heavier than designing for yourself. We not only wanted to deliver a working project but also a project that met Kim’s expectations. In the end we were able to develop a product that our client enjoyed using however with more user testing and feedback it could be improved.
Technical details
Schematic and block diagram

Code
- the project title,
- (optionally) your names,
- a description (short or long) of what the code does,
- any description of pin mapping that would be useful to somebody else trying to recreate your work,
- appropriate credit to any code source that you incorporated into your project, and
- (optionally) a license notice (i.e. copyright, CC BY-SA 4.0, the MIT License, release it to the public domain, or just follow your heart). If you have written code that you wish to keep strictly proprietary for any reason, please speak with the instructor about an exception to this documentation requirement.
//Gaming Keyboard and Mouse

//This code controls the air pump, keyboard, and joystick. When the user turns the switch on the LED buttons turn on. There are 9 buttons on the keyboard and the code maps each of the buttons to a key. When the code reads the buttons as high then the code presses the key it is mapped to. After the button is done being pressed the code then reads the button pin as low and releases the key that was being pressed. This ensures that the key is only pressed once when the button is pressed once. The code for the joystick takes in the inputs from the potentiometer along the x and y axis and outputs a direction the computer mouse should move in. The code for the air pump inflates air when the bottom left button on the keyboard is pressed. The next time this button is pressed the air pump deflates the air bag surrounding the joystick.

/*
Pin Mapping:
Arduino Micro Pin | type   | description
------------------|--------|------------
A1                  Output   LED

A2                  Input    Joystick X axis

A3                  Input    Joystick Y axis

2                   Input    Switch(controlled whether the keyboard was on or off)

3                   Output   Pump

4                   Output   Pump

5                   Input    Button(controls shift key)

6                   Input    Button(controls space key)

7                   Input    Button(controls right arrow key)

8                   Input    Button(controls return key)

9                   Input    Button(controls up key)

10                  Input    Button(controls down arrow key)

14                  Input    Button(controls left arrow key)

15                  Input    Button(controls delete key)

16                  Input    Button(controls if pump is on or off)


*/


//https://docs.arduino.cc/tutorials/micro/keyboard-press


#include <Keyboard.h>
#include <Mouse.h>

//on button
//switch
const int onButton = 2;

//buttons
//LED BUTTONS
const int upButton = 9;
int previousupButtonState = LOW;
const int downButton = 10;
int previousdownButtonState = LOW;
const int rightButton = 7;
int previousrightButtonState = LOW;
const int leftButton = 14;
int previousleftButtonState = LOW;
const int spaceButton = 6;
int previousspaceButtonState = LOW;
const int shiftButton = 5;
int previousshiftButtonState = HIGH;
const int returnButton = 8;
int previousreturnButtonState = HIGH;
const int deleteButton = 15;
int previousdeleteButtonState = HIGH;

//LED
const int LED = A1;


//constants for air pump control
const int pumpButton = 16;
int buttonState = HIGH;//pump input
const int PUMP1 = 3;
const int PUMP2 = 4;
bool pressVal = false;
bool AIRIN = 0;
bool pumpOn = false;
unsigned long timecount = 0;//this is to check whether the pump is on Periodically

//Constants for joystick control
//  pin numbers for switch, joystick axes, and LED:
const int xAxis = A2;         // joystick X axis
const int yAxis = A3;         // joystick Y axis
// parameters for reading the joystick:
int range = 12;               // output range of X or Y movement
int responseDelay = 5;        // response delay of the mouse, in ms
int threshold = range / 4;    // resting threshold
int center = range / 2;       // resting position value
 // whether or not to control the mouse
bool mouseIsActive = false;
int lastSwitchState = LOW;


void setup() {
   pinMode(onButton, INPUT);
   pinMode(LED, OUTPUT);
   pinMode(upButton, INPUT_PULLUP);
   pinMode(downButton, INPUT_PULLUP);
   pinMode(leftButton, INPUT_PULLUP);
   pinMode(rightButton, INPUT_PULLUP);
   pinMode(spaceButton, INPUT_PULLUP);
   pinMode(shiftButton, INPUT_PULLUP);
   pinMode(returnButton, INPUT_PULLUP);
   pinMode(deleteButton, INPUT_PULLUP);
   pinMode(pumpButton, INPUT_PULLUP);
   pinMode(PUMP1, OUTPUT);
   pinMode(PUMP1, OUTPUT);

   Mouse.begin();
   Keyboard.begin();
   Serial.begin(9600);
}

void loop() {
  //code for the keyboard
//Serial.println(" working");
Serial.println(digitalRead(onButton));
if (digitalRead(onButton) == HIGH){
  digitalWrite(LED, HIGH);
//upbutton:218/UP
  int upbuttonState = digitalRead(upButton);
   //replaces button press with UP arrow
  if (upbuttonState == HIGH && previousupButtonState == LOW) {
     Keyboard.press(218);
     //delay(50);
   }
  if (upbuttonState == LOW && previousupButtonState == HIGH) {
    Keyboard.release(218);
    delay(50);
  }
   previousupButtonState = upbuttonState;

//downbutton:217/DOWN
  int downbuttonState = digitalRead(downButton);
   if (downbuttonState == HIGH && previousdownButtonState == LOW) {
     Keyboard.press(217);
     delay(50);
   }
  if (downbuttonState == LOW && previousdownButtonState == HIGH) {
    Keyboard.release(217);
    delay(50);
  }
   previousdownButtonState = downbuttonState;

//right button:215/RIGHT
  int rightbuttonState = digitalRead(rightButton);
   if (rightbuttonState == HIGH && previousrightButtonState == LOW) {
     Keyboard.press(215);
     delay(50);
   }
  if (rightbuttonState == LOW && previousrightButtonState == HIGH) {
    Keyboard.release(215);
    delay(50);
  }
   previousrightButtonState = rightbuttonState;

//leftbutton:216/LEFT
  int leftbuttonState = digitalRead(leftButton);
   if (leftbuttonState == HIGH && previousleftButtonState == LOW) {
     Keyboard.press(216);
     delay(50);
   }
  if (leftbuttonState == LOW && previousleftButtonState == HIGH) {
    Keyboard.release(216);
    delay(50);
  }
   previousleftButtonState = leftbuttonState;


//spacebutton: 32
  int spacebuttonState = digitalRead(spaceButton);
   if (spacebuttonState == HIGH && previousspaceButtonState == LOW) {
     Keyboard.press(32);
     delay(50);
   }
  if (spacebuttonState == LOW && previousspaceButtonState == HIGH) {
    Keyboard.release(32);
    delay(50);
  }
   previousspaceButtonState = spacebuttonState;

//shiftbutton:224
  int shiftbuttonState = digitalRead(shiftButton);
   if (shiftbuttonState == LOW && previousshiftButtonState == HIGH) {
     Keyboard.press(224);
     delay(50);
   }
  if (shiftbuttonState == HIGH && previousshiftButtonState == LOW) {
    Keyboard.release(224);
    delay(50);
  }
   previousshiftButtonState = shiftbuttonState;


//returnbutton:176
  int returnbuttonState = digitalRead(returnButton);
   if (returnbuttonState == LOW && previousreturnButtonState == HIGH) {
     Keyboard.press(176);
     delay(50);
   }
  if (returnbuttonState == HIGH && previousreturnButtonState == LOW) {
    Keyboard.release(176);
    delay(50);
  }
   previousreturnButtonState = returnbuttonState;


//deletebutton:BACKSPACE(8)
  int deletebuttonState = digitalRead(deleteButton);
   if (deletebuttonState == LOW && previousdeleteButtonState == HIGH) {
     Keyboard.press(8);
     delay(50);
   }
  if (deletebuttonState == HIGH && previousdeleteButtonState == LOW) {
    Keyboard.release(8);
    delay(50);
  }
   previousdeleteButtonState = deletebuttonState;

}
if (digitalRead(onButton) == LOW){
  digitalWrite(LED, LOW);
}


//code for pump
  buttonState = digitalRead(pumpButton);
  if (pumpOn == true){
    if (millis()-timecount > 30000){
      pumpOn = false;
      digitalWrite(PUMP1,LOW);//turn motor off
      digitalWrite(PUMP2,LOW);
    }
  }
  if (buttonState == LOW ){
    Serial.println("the pumpbutton is pressed");
    timecount = millis();
    pumpOn = true;
    if(pressVal == false){
      pressVal = true;
      digitalWrite(PUMP1,HIGH);//turn motor on, starts inflating
      digitalWrite(PUMP2,LOW);
    }
    else {
      pressVal = false;
      digitalWrite(PUMP1,LOW);//turn motor on, starts deflating
      digitalWrite(PUMP2,HIGH);
    }
  }

//Code for the joystick

  int switchState = digitalRead(onButton);
  // if it's changed and it's high, toggle the mouse state:
  if (switchState != lastSwitchState) {
    if (switchState == HIGH) {
      mouseIsActive = !mouseIsActive;
    }
  }
  // save switch state for next comparison:
  lastSwitchState = switchState;

  // read and scale the two axes:
  int xReading = readAxis(xAxis);
  int yReading = readAxis(yAxis);

  // if the mouse control state is active, move the mouse:
  if (mouseIsActive) {
    Mouse.move(xReading, yReading, 0);
  } else {
     //else the mouse button is not pressed:
    // if the mouse is pressed, release it:
    if (Mouse.isPressed(MOUSE_LEFT)) {
      Mouse.release(MOUSE_LEFT);
    }
  }

  delay(50);


}// end of the code

int readAxis(int thisAxis) {
  // read the analog input:
  int reading = analogRead(thisAxis);

  // map the reading from the analog input range to the output range:
  reading = map(reading, 0, 1023, 0, range);

  // if the output reading is outside from the rest position threshold, use it:
  int distance = reading - center;

  if (abs(distance) < threshold) {
    distance = 0;
  }

  // return the distance for this axis:
  return distance;
}