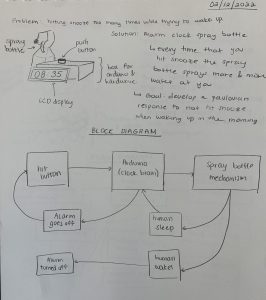
My project 2 was an alarm clock specifically meant for taking naps and incentivizing you to not hit the snooze button.
- Here is the machine in action, spraying water out as the snooze button is hit.
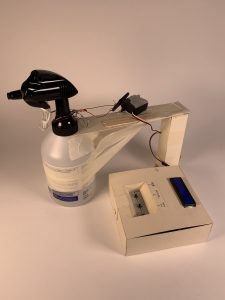
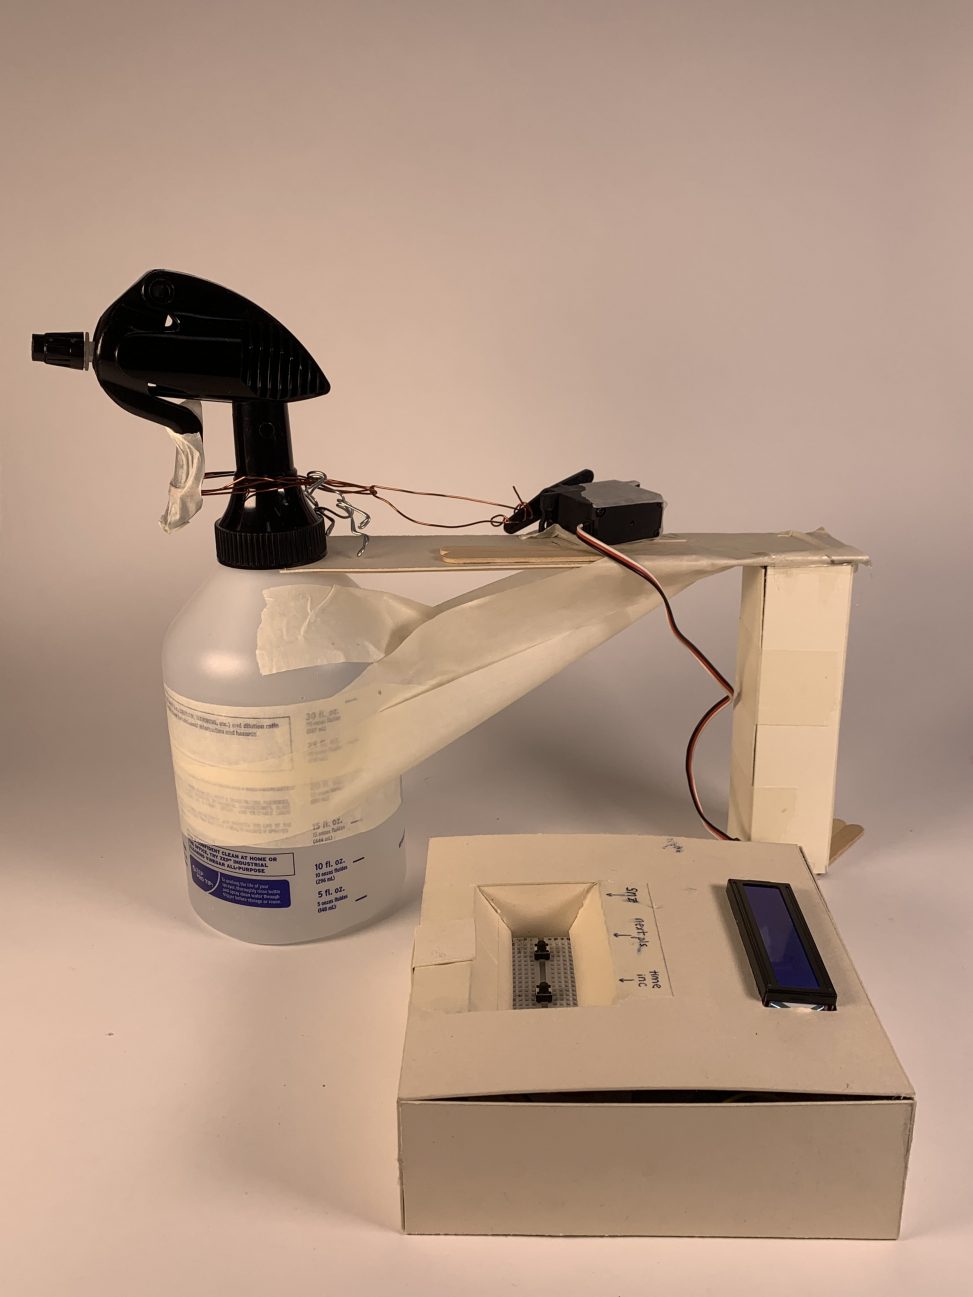
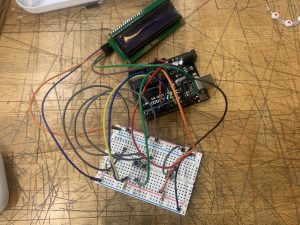
Here you can see all of the components of the machine, primarily being the main box with all of the electronic components as well as the spray bottle mechanism with the servo motor bridge
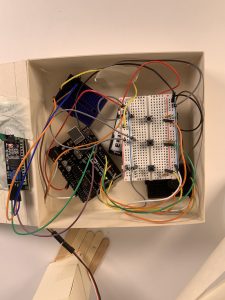
Here is a view of the inside circuitry, where you can mostly see the breadboard, which lies on top of the battery pack, and the hook up to the LCD display in the lid.
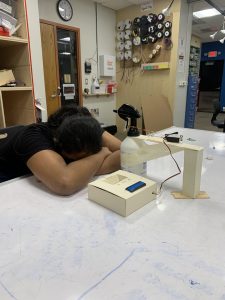
Here’s a view of how I would intend to use the machine, probably laying head down on my studio desk with the spray bottle over my head to spray me.
Process Images and Review
Above I show the earliest part of my design process: where I first came up with the idea for “The Anti-Snooze Machine”! At this point I had not yet decided how I was going to actually cause the spray bottle mechanism to spray water, but I was thinking of having it held down and then a servo motor hitting it to push the lever. However, because of the amount of error that could be incurred with finding the angle for that, instead I decided to use a pulling motion instead with some wire.
This is my project in the early stages of the design process, when I was making my prototype. At this point I had to decide how I was going to move through the functions of my alarm clock function. I decided that having three different buttons would be the easiest way for me to assign the different functionalities to them and also make the user interface not as dependent on the same hardware. I actually ended up adapting from a four button format to having a three button format, incorporating a “next” button to help me move through different functions with my code.

When facing the final assembly of my different parts, I wanted to create a clean exterior that wouldn’t be annoying to figure out for someone who is just waking up. Since I needed a solid backing on my buttons so they can be pressed fairly aggressively, I decided to keep them on the breadboard and instead use the casing to hold the wires down the sides. I found it to be more affected carving down into the box to create the opening to the buttons instead of bringing them up to the surface.
Some design decisions that I might have made in retrospect include getting a stronger servo or pulling mechanism so there was less uncertainty with the spray mechanism working. Furthermore, I wish I had a cleaner looking outside portion for the spray bottle instead of a more pieced-together hold for it.
Discussion
During the final critique for this project, I feel like I had a few highs and a few points of improvement that could have been made. For instance, many people liked the design of my box, which held the power source, arduino, and other wiring components. Specifically, people said that they “love the design of the box” and that it was “really well thought out”. I was really happy to hear that the design of the final product was clean and well appreciated since I wasn’t able to get those parts laser cut as I had originally intended to do. On the other hand, it was pointed out in my feedback that for one person, “as a chronic snooze button presser, [they] could see [them]self getting used to the water spray” and that it would be beneficial to vary the consequences of hitting the snooze button. With this in mind, I would consider adding different levels of alarm, maybe changing the volume to increase as the snooze count increases. I would try incorporating more complex consequences, like launching a soft foam ball or something along those lines, but it was also pointed out to me that “it would be cool if the box and water spray bottle were incorporated into one form so it takes up less space on the desk”. The design is a little bulky as it is, so I would have to adjust the components to make it take up less space or avoid adding a lot of different parts. In light of the positive feedback and despite the negative feedback, I was overall very pleased with the way that my project came out; it was very mechanically demanding to get all of the parts assembled together and I think I did the best I could with putting them into one form. I think I could have been a little more consistent moving across the whole piece, making it out of the same material instead of changing the spray bottle mechanism material from pulp board to tape and popsicle sticks. All in all, I think I found that my strong points in the design and development process were the aesthetic appeal of the final product and getting through the software component of the design, but I think I was lacking when it came to the mechanical build and should have thought to compromise on the initial design that I had to create a more consistently functional final product. I think that the next time that I go through a similar process, I should be more flexible in getting to my final product and adjusting the ideas I had for the mechanical parts to overall work better. For this project in particular, I think if I were to create another iteration I would try out different ways of triggering the spray mechanism so that it functions more consistently.
Technical Information
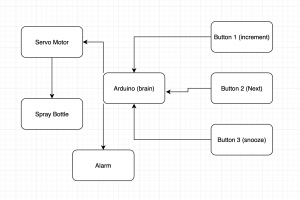
Block Diagram
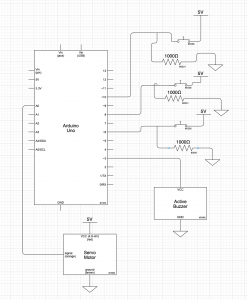
Schematic Diagram
//The Anti-Snooze Machine
//Shreeja Harisrikanth
//This code makes it so the arduino recieves transmission from the
//buttons and is able to count the amount of time that has passed
//and then tells the servo when to move and activate the spray bottle
//
//Pin A0 is the servo pin
//Pin 3 is the buzzer pin
//the time incrementing button is pin 6
//the next function button is pin 8
//the snooze button is pin 10
//
//I used professor Robert Zacharias's code to set up my LCD display


//Here I import the necessary libraries for implementing my other
//functions and parts
#include <Wire.h>
#include <LiquidCrystal_I2C.h>
LiquidCrystal_I2C screen(0x27, 16, 2);
#include <Servo.h>


//Here I establish the servo and buzzerpins, two components that are
//recieving input instead of sending it to the arduino
Servo servoMotor;
const int SERVOPIN = A0;
const int BUZZERPIN = 3;

//This is the LCD code that I used from the given example to
//program the writing it does
byte frowny[] = {
  B00000,
  B11011,
  B11011,
  B00000,
  B00000,
  B01110,
  B10001,
  B00000
};


//Here I establisht the buttons that are being used,
//including one that I later eliminated
const int TIMEINCBUTTON = 6;
const int NEXTBUTTON = 8;
const int NEXTBUTTON2 = 4;
const int SNOOZEBUTTON = 10;


//These are the integers that I use to keep track of
//the amount of time passed, current time, and number of
//times that the snooze button has been hit
int hourCount = 0;
int minCount = 0;
int snoozeCount = 1;
unsigned long lastTime;


//These are the set of boolean values that I rely on to
//help me cycle through the different functions, such as
//the time values being set and whether snooze has been hit
//or not
boolean hourSet = true;
boolean minSet = false;
boolean timerSet = false;
boolean alarm = false;


//In the setupo I establish each of the pins as inputs and ourputs
//and also create the baseline values I want for each of my counts
void setup() {
  int hourCount = 0;
  int minCount = 0;
  int snoozeCount = 1;
  unsigned long lastTime;

  boolean hourSet = true;
  boolean minSet = false;
  boolean timerSet = false;

  pinMode(TIMEINCBUTTON, INPUT);
  pinMode(NEXTBUTTON, INPUT);
  pinMode(NEXTBUTTON2, INPUT);
  pinMode(SNOOZEBUTTON, INPUT);
  pinMode(BUZZERPIN, OUTPUT);


  //Here I begin to display what the user would have as instructions
  //onto the LCD display screen
  Serial.begin(9600);

  Serial.println("click the time button to increase hours");
  Serial.println("Click the next button to increase minutes");

  screen.init();
  screen.backlight();
  screen.home();

  //Here I set the servo baseline and serial
  servoMotor.attach(SERVOPIN);
  Serial.begin(9600);
  servoMotor.write(0);
  delay(1000);
}

void loop() {
  screen.print("increase hours");

  //Depending on the boolean value that is given, there will be a
  //different set of functions that are being looped through, starting
  //with the incrementing of the hours wanted, then minutes, and
  //then moving onto the actual timing portion

  while (timerSet == false) {
    while (hourSet == true) {
      int timeinc = digitalRead(TIMEINCBUTTON);
      int nextbutton = digitalRead(NEXTBUTTON);
      //Taking in the reading of the button to tell when its being pushed

      //Changing the display to show the number of hours input
      if (timeinc == HIGH) {
        hourCount++;
        Serial.print("hours: ");
        Serial.println(hourCount);
        screen.setCursor(0, 1);
        screen.print("hours: ");
        screen.print(hourCount);
        delay(150);
      }

      //if moving on (next button being hit) then it goes onto telling
      //the user that they should increase MINUTES now
      if (nextbutton == HIGH) {
        delay(250);
        hourSet = false;
        Serial.println("next button hit, set minutes now");
        screen.home();
        screen.print("set minutes   ");
        delay(1000);
      }
    }

    minSet = true;

    //As long as the minutes are still being set, the display will show the values
    while (minSet == true) {
      int timeinc = digitalRead(TIMEINCBUTTON);
      //Serial.print("minutes: ");
      if (timeinc == HIGH) {
        minCount ++;
        Serial.print("minutes: ");
        Serial.println(minCount);
        screen.setCursor(0, 1);
        screen.print("minutes: ");
        screen.print(minCount);
        delay(150);
      }

      //Here is the portion of code that was originally going to help me
      //cycle through functions and test buttons
      int nextbutton2 = digitalRead(NEXTBUTTON);

      if (nextbutton2 == HIGH) {
        //Serial.println("test");
        minSet = false;
        timerSet = true;
        lastTime = millis();
        Serial.println("Minutes set. Timer starts now");
        screen.home();
        screen.print("timer started    ");
        delay(1000);
      }

    }

  }

  //After the timer is set, the counter starts
  while (timerSet) {
    int sleepyTime = hourCount * 10000 + minCount * 1000; //hours changed to 10 seconds and minutes changed to seconds for testing purposes
    screen.home();
    screen.print("Sleepy time    ");

    //This finds and displays the number of seconds passed
    if (snoozeCount == 1) {
      Serial.println((millis() - lastTime) / 1000);
      screen.setCursor(0, 1);
      screen.print("sec passed: ");
      screen.print((millis() - lastTime) / 1000);
      delay(1000);
    }

    //This makes it so that there is a display change when the alarm goes off
    if (((millis() - lastTime) >= sleepyTime) && snoozeCount == 1) {
      //Serial.println("alarm goes off");
      screen.home();
      alarm = true;
      screen.print("ALARM! AWAKE!");
      //delay(2000);

    //While the alarm is supposed to be going off, this makes the active
    //buzzer activate
      while (alarm == true) {
        digitalWrite(BUZZERPIN, HIGH);
        delay(1000);
        digitalWrite(BUZZERPIN, LOW);
        delay(1000);
        int snoozle = digitalRead(SNOOZEBUTTON);
        if (snoozle == HIGH) {
          alarm = false;
          lastTime = millis();
        }
      }

      //resets the time count
      lastTime = millis();
    }

    //After the snooze button is hit, there is a set 10 second increment
    //before the alarm goes off again. This is for testing, otherwise it
    //would be minutes

    if (snoozeCount > 1 && alarm == false) {
      int snoozeTime = 10000; //snoozes for 10 min -- adjusted to 10 seconds for now
      Serial.println((millis() - lastTime) / 1000);
      screen.home();
      screen.print("snoozin      ");
      screen.setCursor(0, 1);
      screen.print("time snzd: ");
      screen.print((millis() - lastTime) / 1000);
      screen.print("     ");

      delay(1000);


      //This set of code checks whether the snooze time has been reached and
      //also activates the alarm print and sound
      if (millis() - lastTime >= snoozeTime) {
        Serial.println("alarm goes off pt 2");
        screen.home();
        screen.print("ALARM! AWAKE!");
        alarm = true;
        while (alarm == true) {
          digitalWrite(BUZZERPIN, HIGH);
          delay(1000);
          int snoozle = digitalRead(SNOOZEBUTTON);
          if (snoozle == HIGH) {
            alarm = false;
          }
          digitalWrite(BUZZERPIN, LOW);
          delay(1000);
          snoozle = digitalRead(SNOOZEBUTTON);
          if (snoozle == HIGH) {
            alarm = false;
          }
        }


        lastTime = millis();
      }
    }

    //This reads whether the snooze button is being pressed or not
    int snoozle = digitalRead(SNOOZEBUTTON);


    //here I create a change in the display such that it says
    //what is happening, a thought process of the actions it takes

    if (snoozle == HIGH) {
      alarm = false;
      Serial.println("alarm turned off");

      Serial.println("snooze button hit");
      //delay(1000);
      screen.home();
      screen.home();
      screen.print("sprayed ");
      screen.print(snoozeCount);
      screen.print(" times");
      delay(1000);

      //This loop makes it so the spray bottle is squeezed
      //according to the number of times taht the snooze
      //has been pressed
      for (int i = 1; i <= snoozeCount; i++) {
        Serial.println("spray bottle");
        servoMotor.write(180);
        delay(2000);
        servoMotor.write(0);
        delay(2000);
      }
      snoozeCount++;
      delay(500);
    }

    if (NEXTBUTTON == HIGH) {
      timerSet = false;
      hourSet = true;
      minSet = false;
    }

  }
}