
For Project 2, I created a checklist that rewards me for establishing good habits.
Photos and Videos
Overall Photo
The candy funnel seen without candy.
The candy funnel seen with candy.
Internal Wiring
Process Images
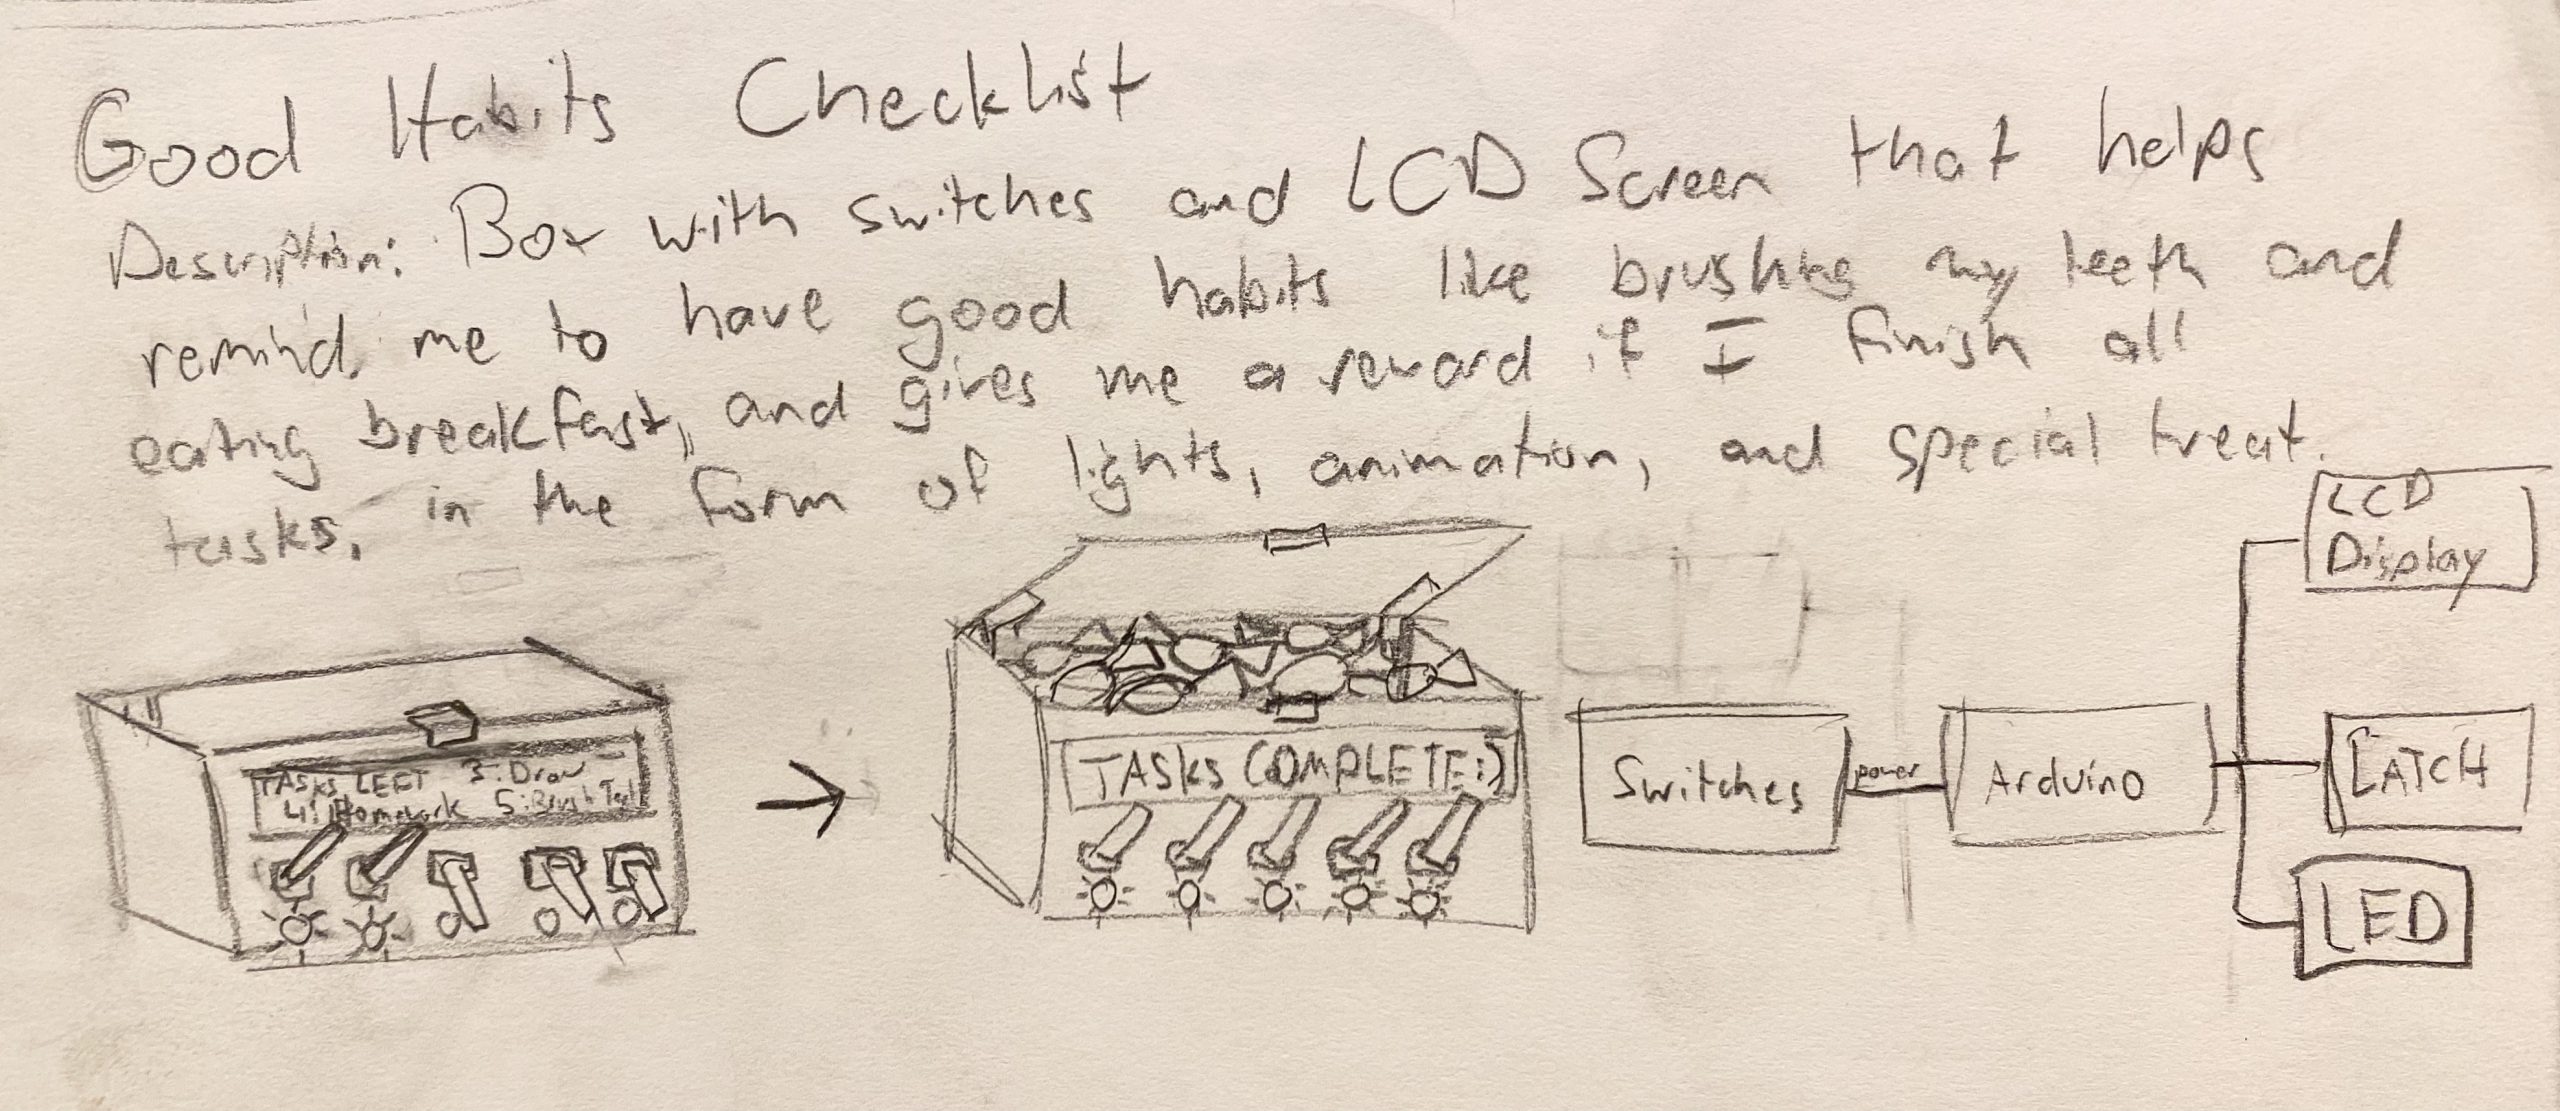
Above is my initial design idea of the Good Habits Checklist. In the initial design, candy was stored in a compartment and once all 5 switches were flipped, a servo would turn a latch, allowing me to open the compartment. Another thing to note was that the display and switches were on the side of the box, which is different from my final design.
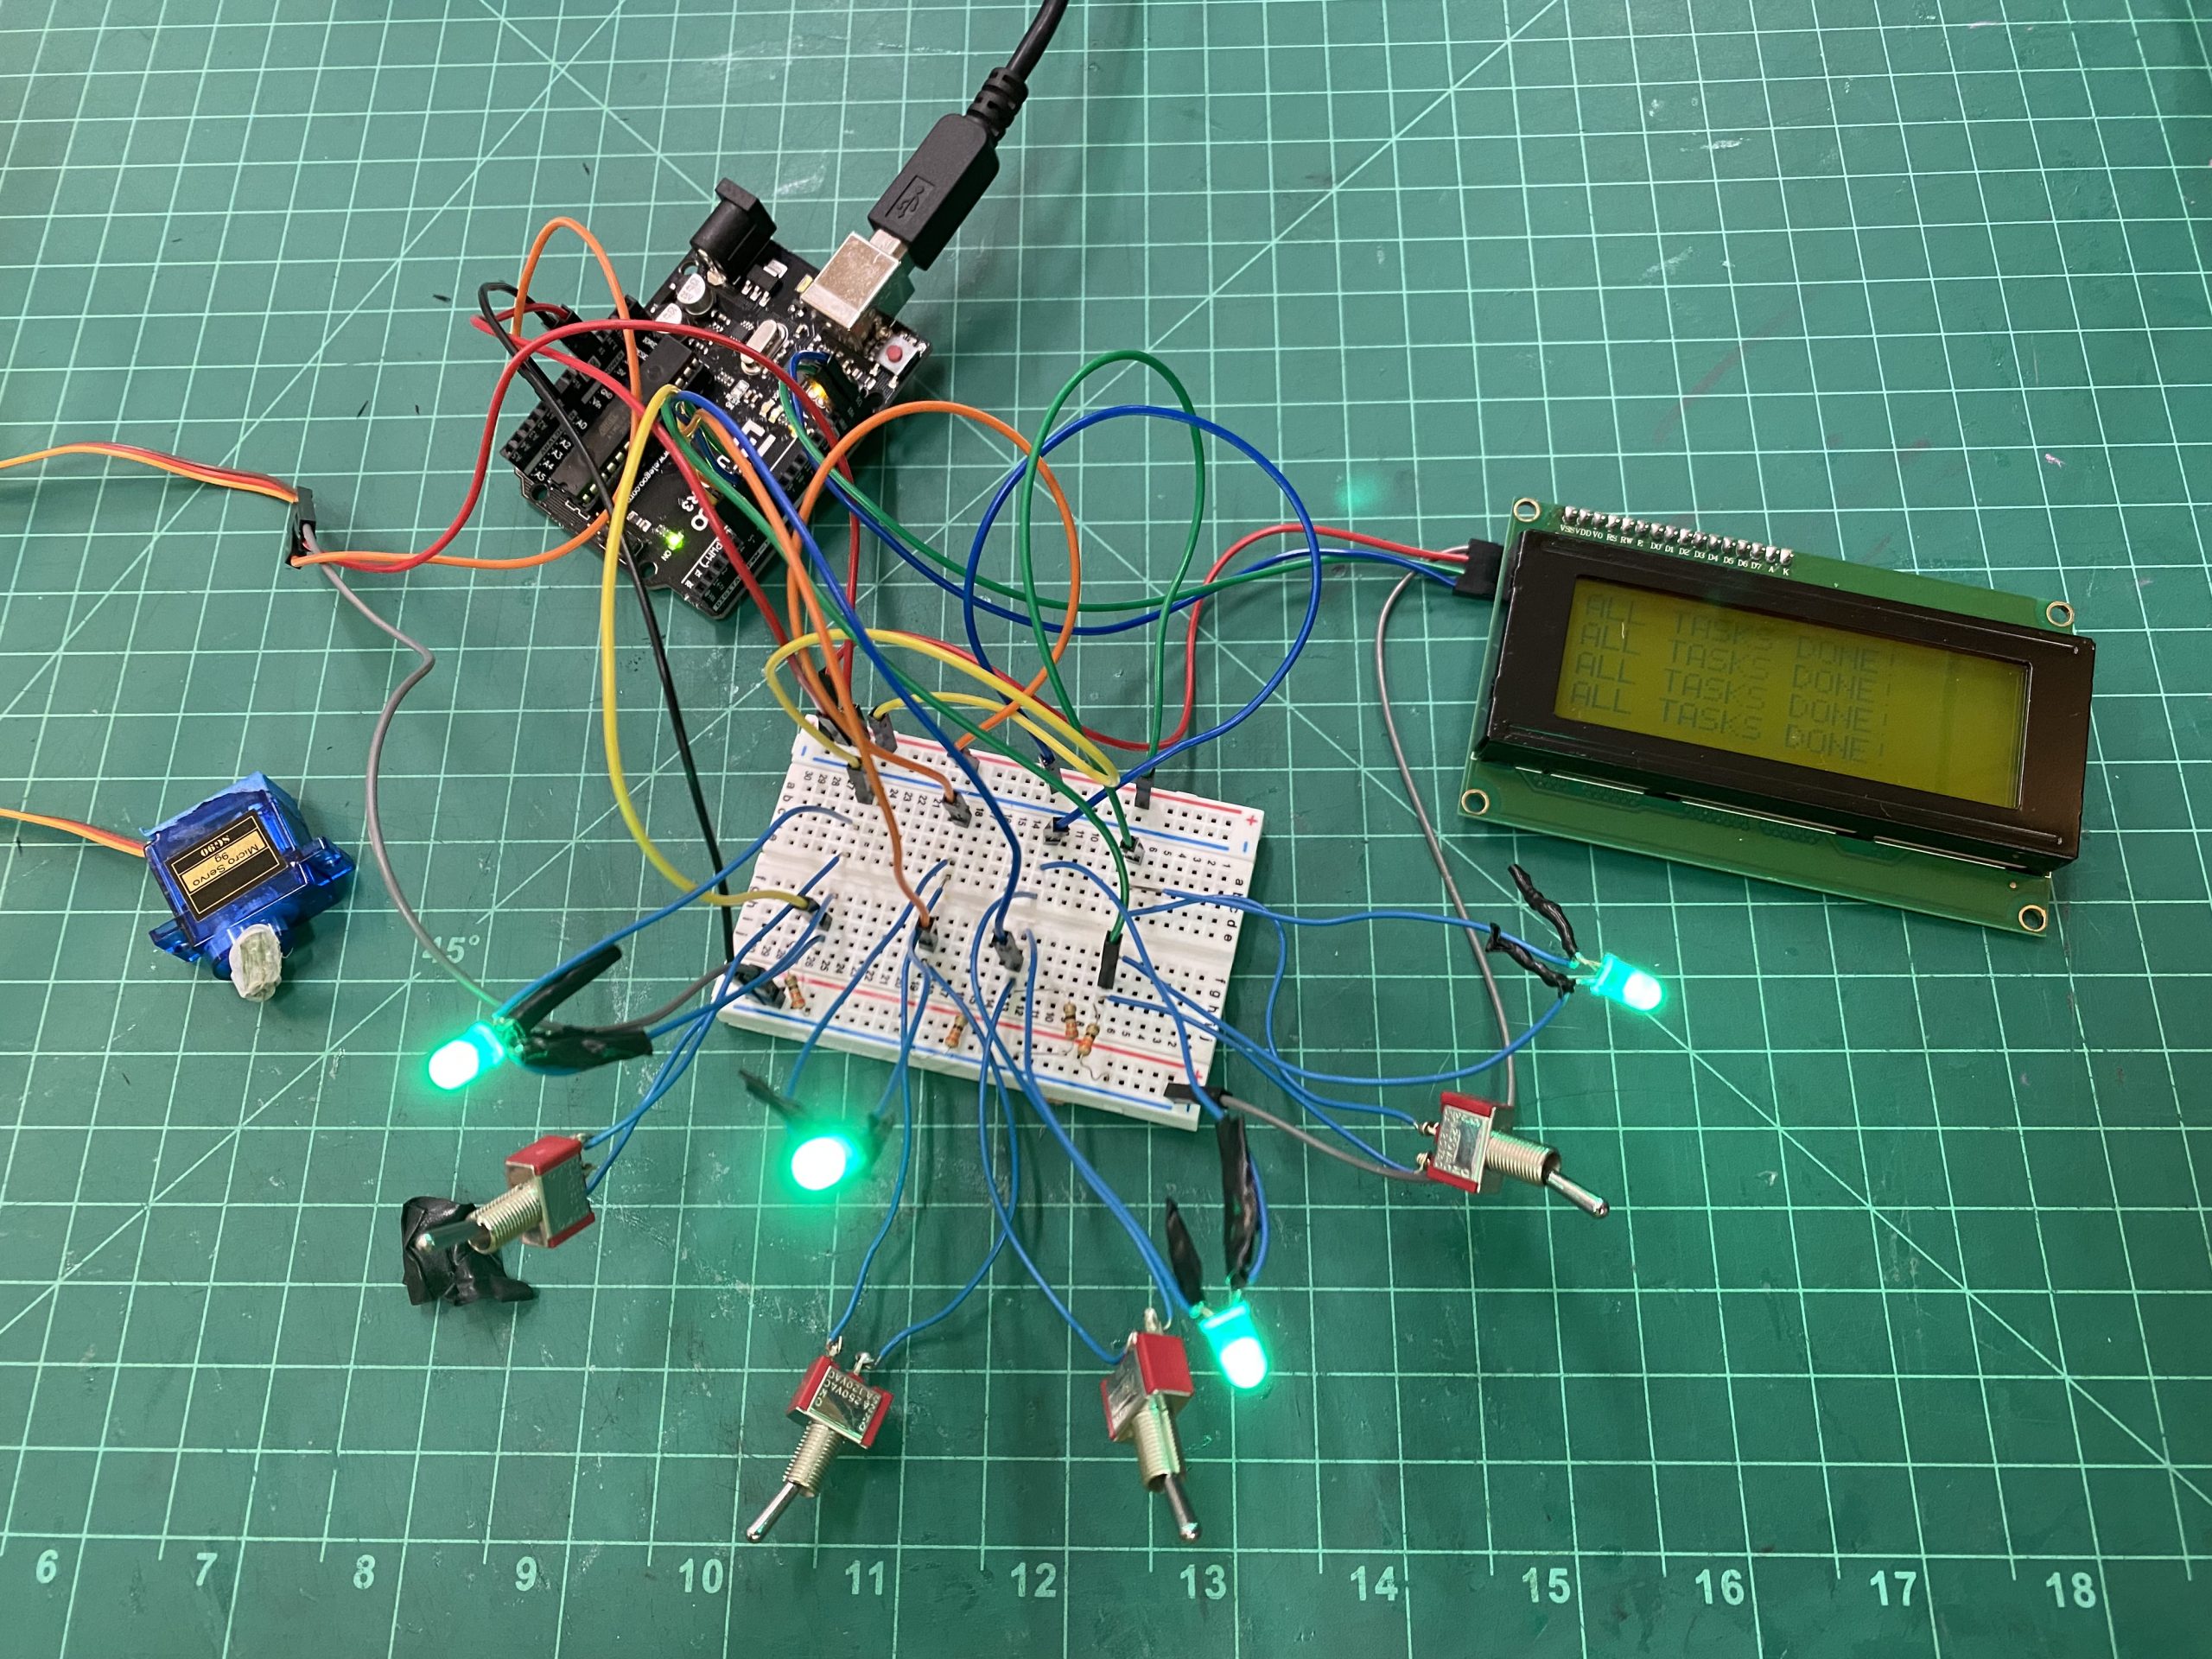
Above shows my first prototype. As you can see, I focused on getting the wiring and display before moving on to the exterior box. I switched the number of tasks from 5 to 4 to fit onto the display effectively but did not change much of the design concept at this point.
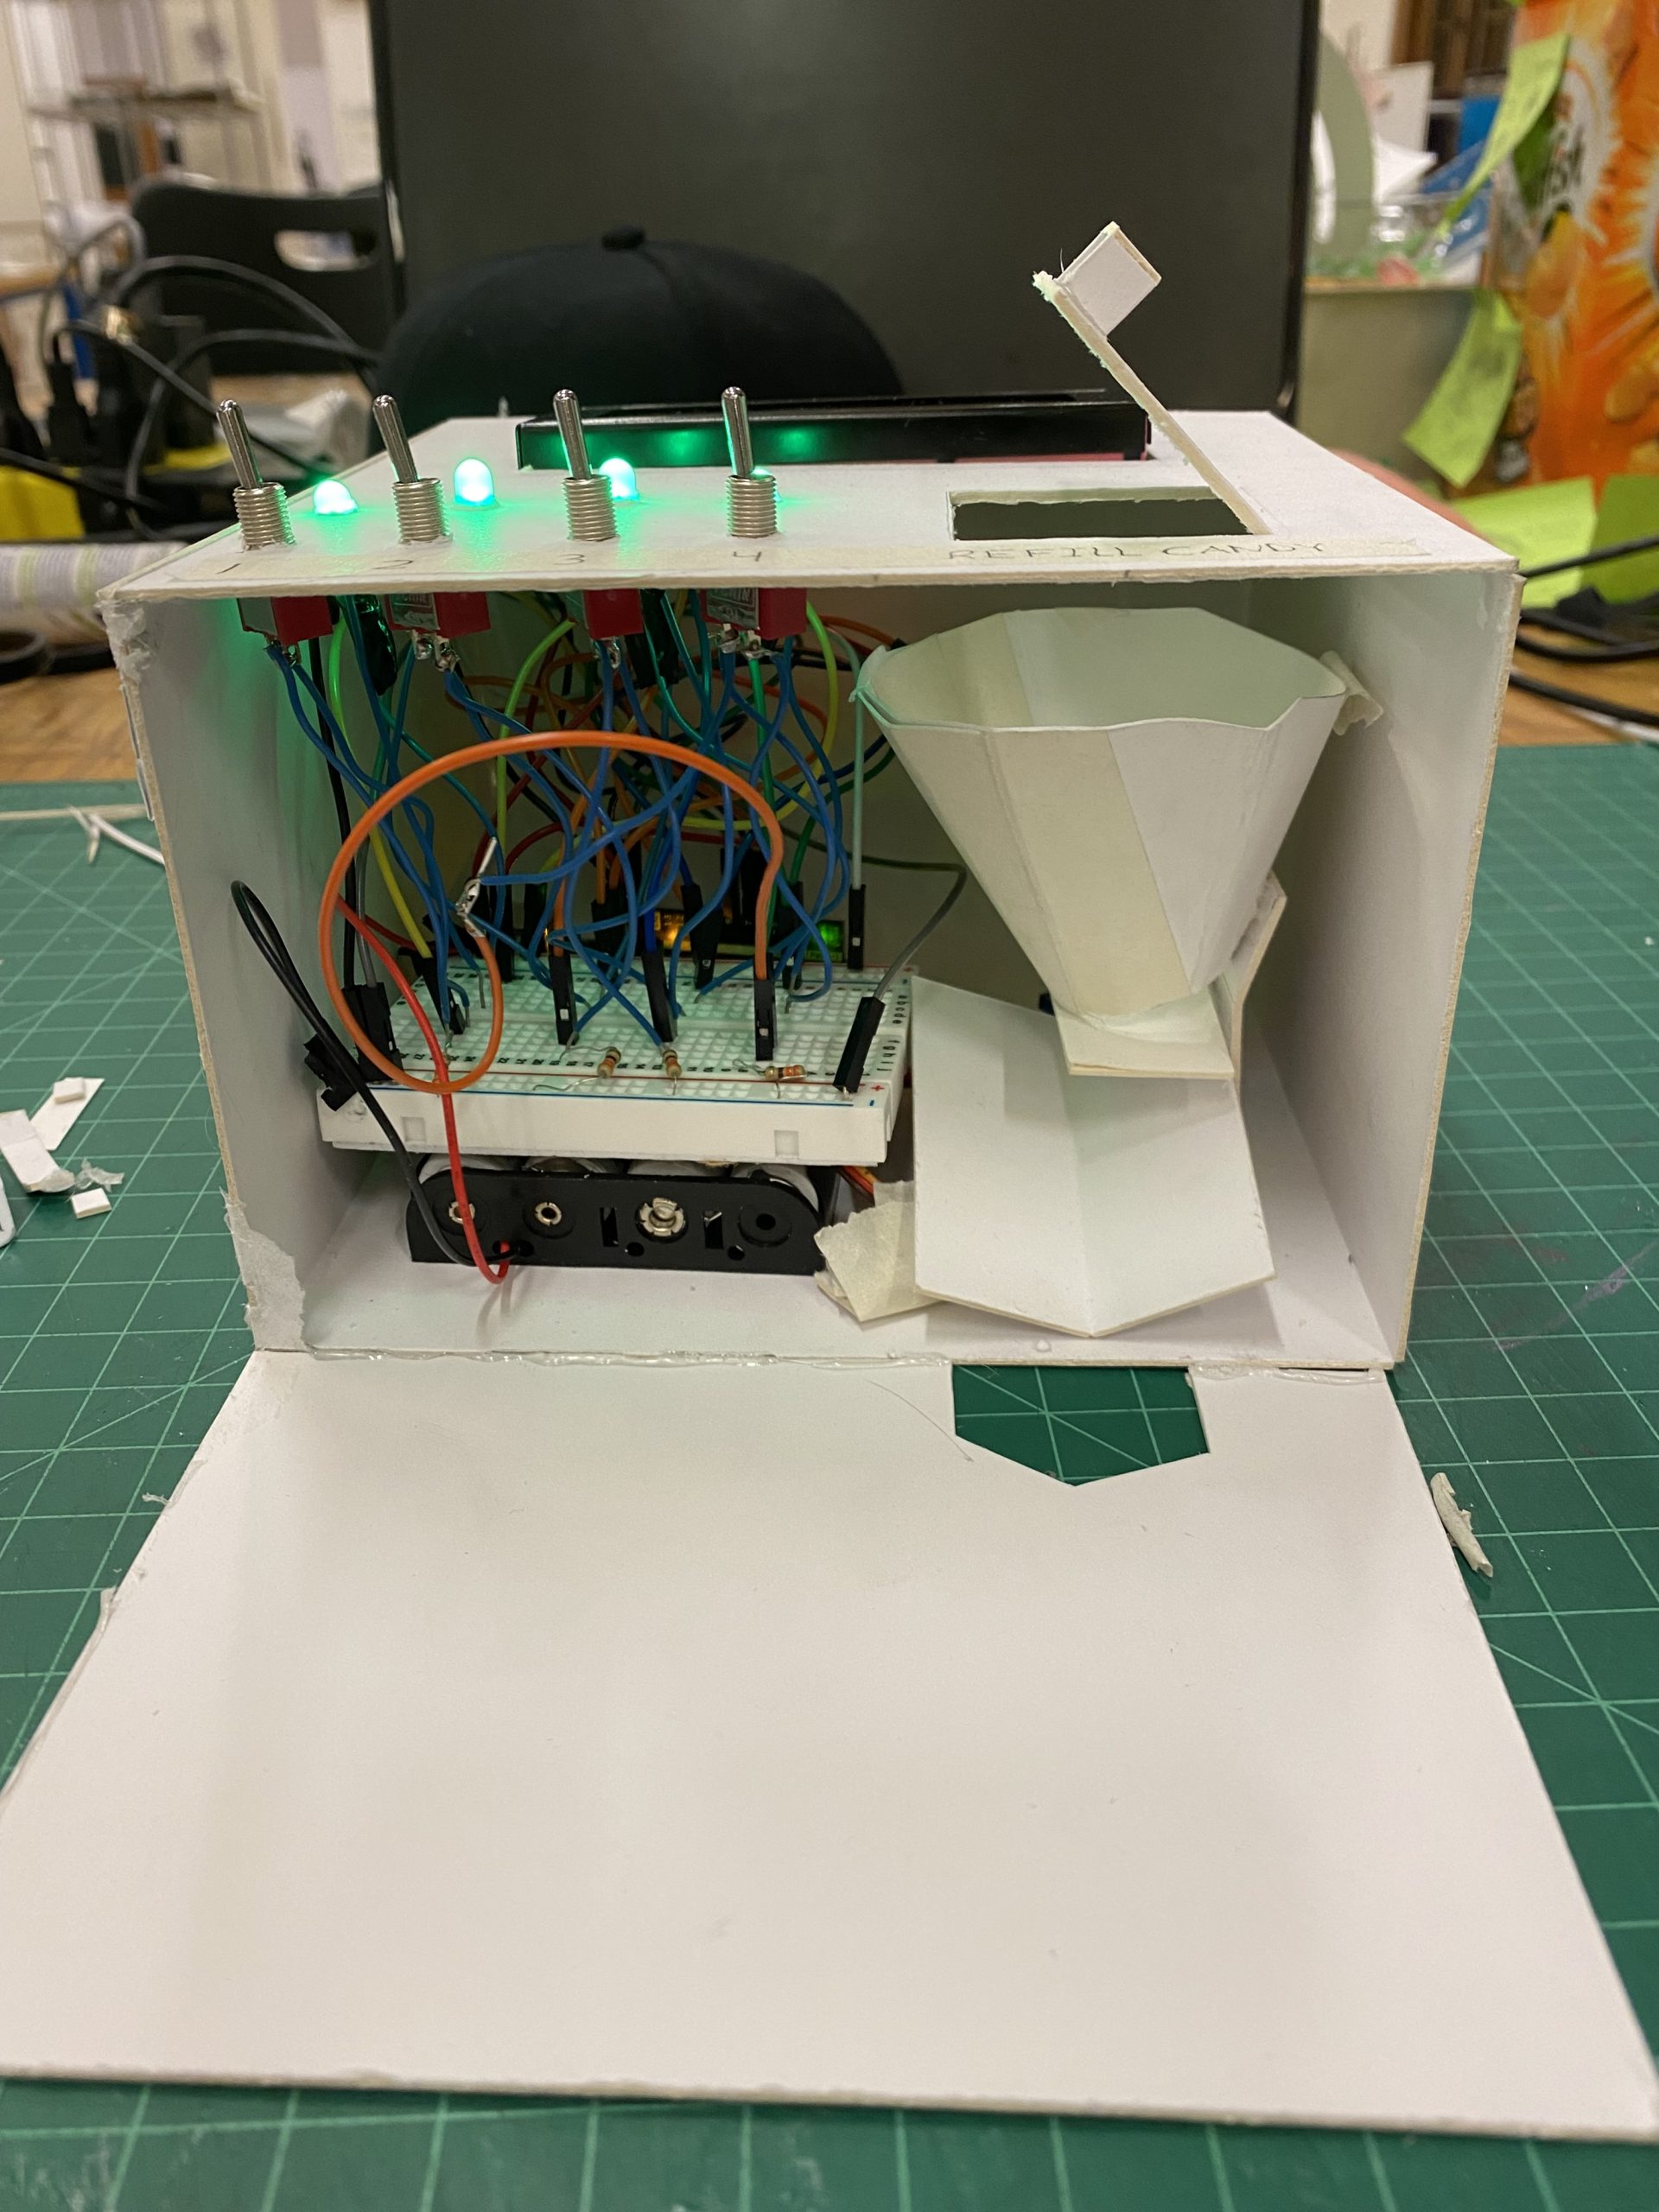
Shown above is when I began to fit all of my components into the box. This is where the initial design changed the most. After presenting my prototype, other students gave me the idea to create a dispensing mechanism for the candy. I was still able to use the servo that releases candy from a funnel by turning out of the way for a short period of time. Getting the correct timing to dispense a reasonable amount of candy was difficult. Having this new mechanism also allowed me to put the display, switches and LEDs on top of the box. Because I am tall and tower above most tables even when sitting, this allows me to more easily see the display and flip the switches.
Discussion
Overall, I believe that my final critique went well and that I achieved what I set out to do. It was very rewarding to get positive feedback about my candy dispensing system. One student commented that, “I think the candy dispensing is exciting and looks like it functions really well.” Although creating a candy dispenser was not my idea, as I explained in the Process Images section, I thought my idea of the funnel and servo motor was a clever solution. I do, however, wish it was a little more consistent with the number of skittles that come out. Right now, it usually dispensing around 3 skittles but can dispense 1 to 5. Furthermore, students commented how the skittles are launched out onto the desk and can go very far. One student advised me to, “Add a holder for the treats once they’re dispensed.” This is a great idea because it ensures that skittles do not go onto the floor or get dirty from the table. In the end, I truly believe that this will be a useful thing for me to use every day and develop good habits. I am happy with the design and function of the project, but I still plan to fix all the issues explained above. I plan to go back and add a candy holder, tweak the dispenser so it is more consistent, and put an on/off switch so that the batteries do not run out as fast. Then I can get the most out of using the Good Habits Checklist.
Technical Information
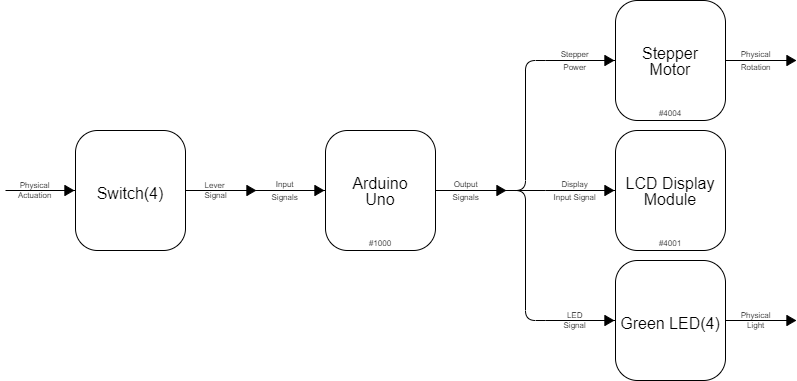
Block Diagram
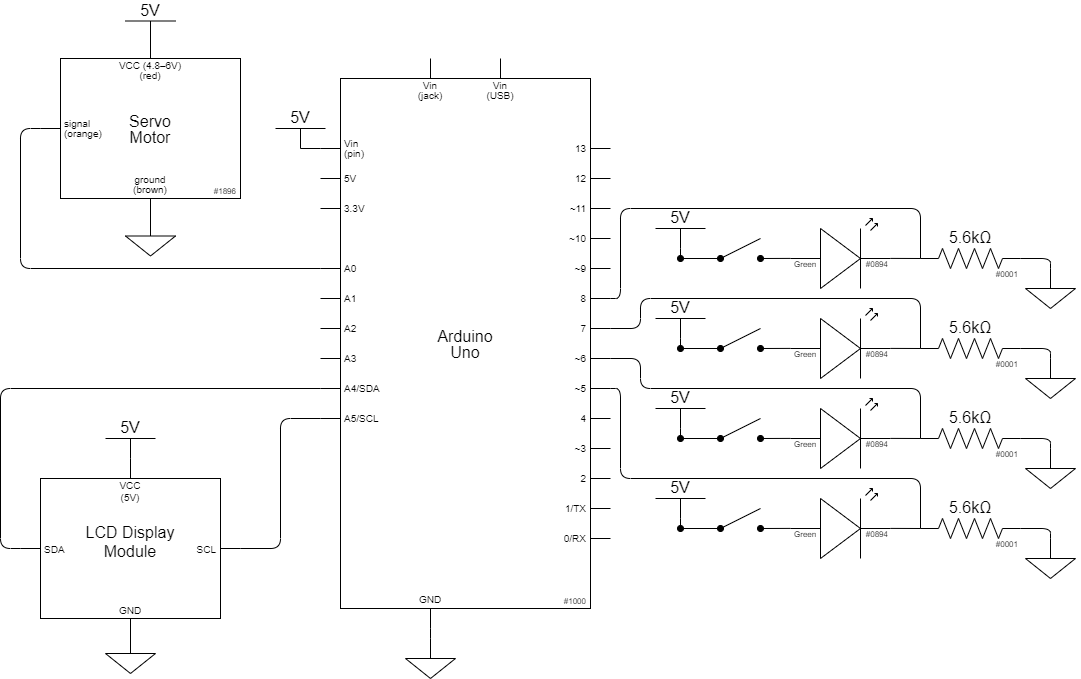
Schematic Diagram
/*
   The Good Habits Checklist

   Tristan Hineman

   Description:
    This program is designed to display daily tasks and read if LEDs are on or off. When an LED is on, the LCD Display will show that the correlated task is completed. When it reads that all LEDs are on, it displays that all tasks are done and turns a servo motor to release candy once.
   Pin Mapping Table:

   Arduino pin | description
   ------------|-------------
   A0            Servo Motor

   5             LED 1
   6             LED 2
   7             LED 3
   8             LED 4

   SDA           SDA pin, LCD Display
   SCL           SCL pin, LCD Display
*/

//Libraries
#include <LiquidCrystal_I2C.h>
#include <Servo.h>
Servo servoMotor;
//Setup to LCD display
LiquidCrystal_I2C screen(0x27, 20, 4);

//Creates and saves a special character that is a check mark
byte customChar[] = {
  B00000,
  B00000,
  B00001,
  B00011,
  B10110,
  B11100,
  B01000,
  B00000
};

//Pin for LEDs
const int led1Pin = 5;
const int led2Pin = 6;
const int led3Pin = 7;
const int led4Pin = 8;

//Pin for servo motor
const int servoPin = A0;

//Variable to run servo motor only once when all LEDs are on
boolean hasRun = false;

void setup() {

  //Pin setup
  pinMode(servoPin, OUTPUT);
  pinMode(led1Pin, INPUT);
  pinMode(led2Pin, INPUT);
  pinMode(led3Pin, INPUT);
  pinMode(led4Pin, INPUT);

  //LCD screen initialization
  screen.init();
  screen.backlight();
  screen.home();
  Serial.begin(9600);

  //Variable for check mark
  screen.createChar(check, customChar);
}

void loop() {

  //Attaching library to servo pin
  servoMotor.attach(servoPin);

  //Variable to set servo position
  int servoPos;

  //Variables to read if LEDs are on
  int led1Read;
  int led2Read;
  int led3Read;
  int led4Read;

  //Read and print if LEDs are on
  led1Read = digitalRead(led1Pin) ;
  Serial.print(led1Read);
  led2Read = digitalRead(led2Pin) ;
  Serial.print(led2Read);
  led3Read = digitalRead(led3Pin) ;
  Serial.print(led3Read);
  led4Read = digitalRead(led4Pin) ;
  Serial.println(led4Pin);


  //Displaying text when all LEDs are on
  if (led1Read == 0 && led2Read == 0 && led3Read == 0 && led4Read == 0) {
    screen.setCursor(0, 0);
    screen.print("ALL TASKS DONE!  ");
    screen.setCursor(0, 1);
    screen.print("ALL TASKS DONE!");
    screen.setCursor(0, 2);
    screen.print("ALL TASKS DONE!");
    screen.setCursor(0, 3);
    screen.print("ALL TASKS DONE!");

    //Using hasRun variable to move the servo motor only once
    if (hasRun == false) {
      servoMotor.write(90);
      delay (100);
      servoMotor.write(180);
      hasRun = true;
    }
  }
  else {
    hasRun= false;
    servoMotor.write(180);
    //Displaying the task and an X when the LED 1 is off
    if (led1Read == 1) {
      screen.setCursor(0, 0);
      screen.print("1)Eat Breakfast:X");
    }

    //Displaying the task and a check mark when the LED 1 is on
    else {
      screen.setCursor(0, 0);
      screen.print("1)Eat Breakfast:");
      screen.write(check);
    }

    //Displaying the task and an X when the LED 2 is off
    if (led2Read == 1) {
      screen.setCursor(0, 1);
      screen.print("2)Exersize:X      ");
    }

    //Displaying the task and a check mark when the LED 2 is on
    else {
      screen.setCursor(0, 1);
      screen.print("2)Exersize:      ");
      screen.setCursor(11, 1);
      screen.write(check);
    }
    //Displaying the task and an X when the LED 3 is off
    if (led3Read == 1) {
      screen.setCursor(0, 2);
      screen.print("3)Homework:X     ");
    }

    //Displaying the task and a check mark when the LED 3 is on
    else {
      screen.setCursor(0, 2);
      screen.print("3)Homework:      ");
      screen.setCursor(11, 2);
      screen.write(check);
    }

    //Displaying the task and an X when the LED 4 is off
    if (led4Read == 1) {
      screen.setCursor(0, 3);
      screen.print("4)Brush Teeth:X");
    }

    //Displaying the task and a check mark when the LED 4 is on
    else {
      screen.setCursor(0, 3);
      screen.print("4)Brush Teeth:");
      screen.write(check);
    }
  }
}