1. Introduction
The topic of our final project is to design and build a device for our client with physical difficulties. We get to understand our client’s needs by interviewing and project progress meetings during the 6-week project period and keep improving our product according to information we got from conversations and feedback from the client. Our client is Haleigh, and here is the documentation of our first interview: Interview with Haleigh. Haleigh has difficulties moving and twisting her hands and fingers freely, and she doesn’t have enough grip to hold utensils as well as paintbrushes; she loves painting. Based on this information, we built a wearable device that can hold and rotate utensils for her.
2. Final Product
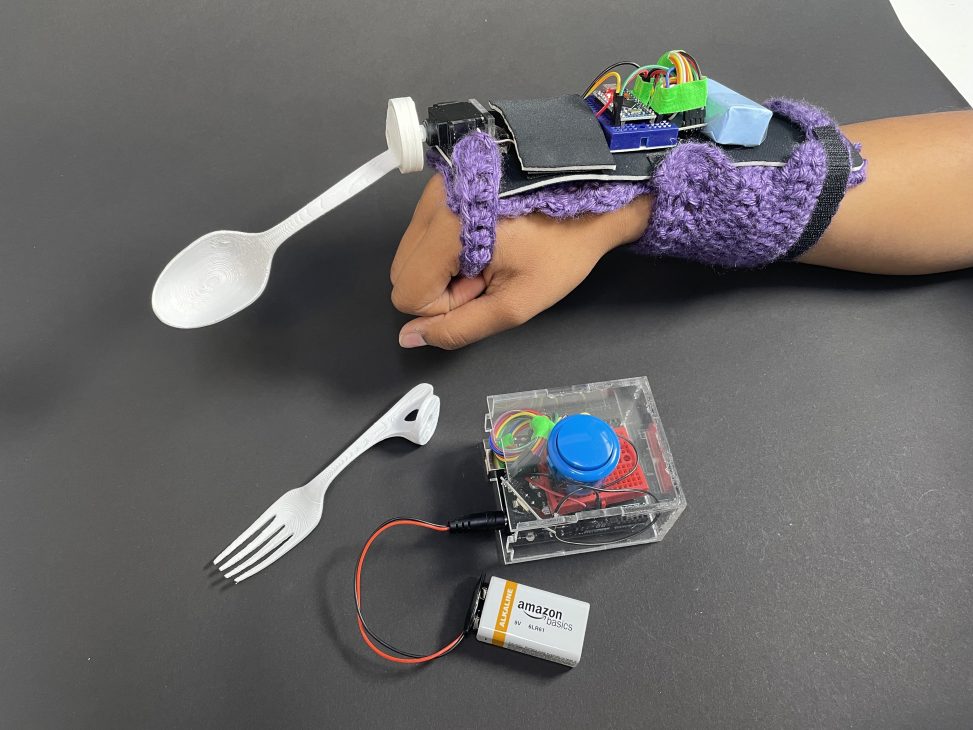
The wearable device we built is a wristband that carries the electronics and a servo motor with a connector to hold and drive different utensils. We crocheted the wristband with light purple yarn to ensure it’s light-weighted and comfortable for our client; and yes, purple is Haleigh’s favorite color. We also choose Velcro to tighten and loosen the wristband thus reducing the wearing difficulty. The utensils and pastel holder are designed, and 3D printed based on our client’s preferred position and rotational angles. To make the control most uncomplicated, we created a discrete button to trigger the utensil rotation, so Haleigh can use one of her hands to use a utensil and control the rotation with another hand.

Utensil Holder with A Spoon
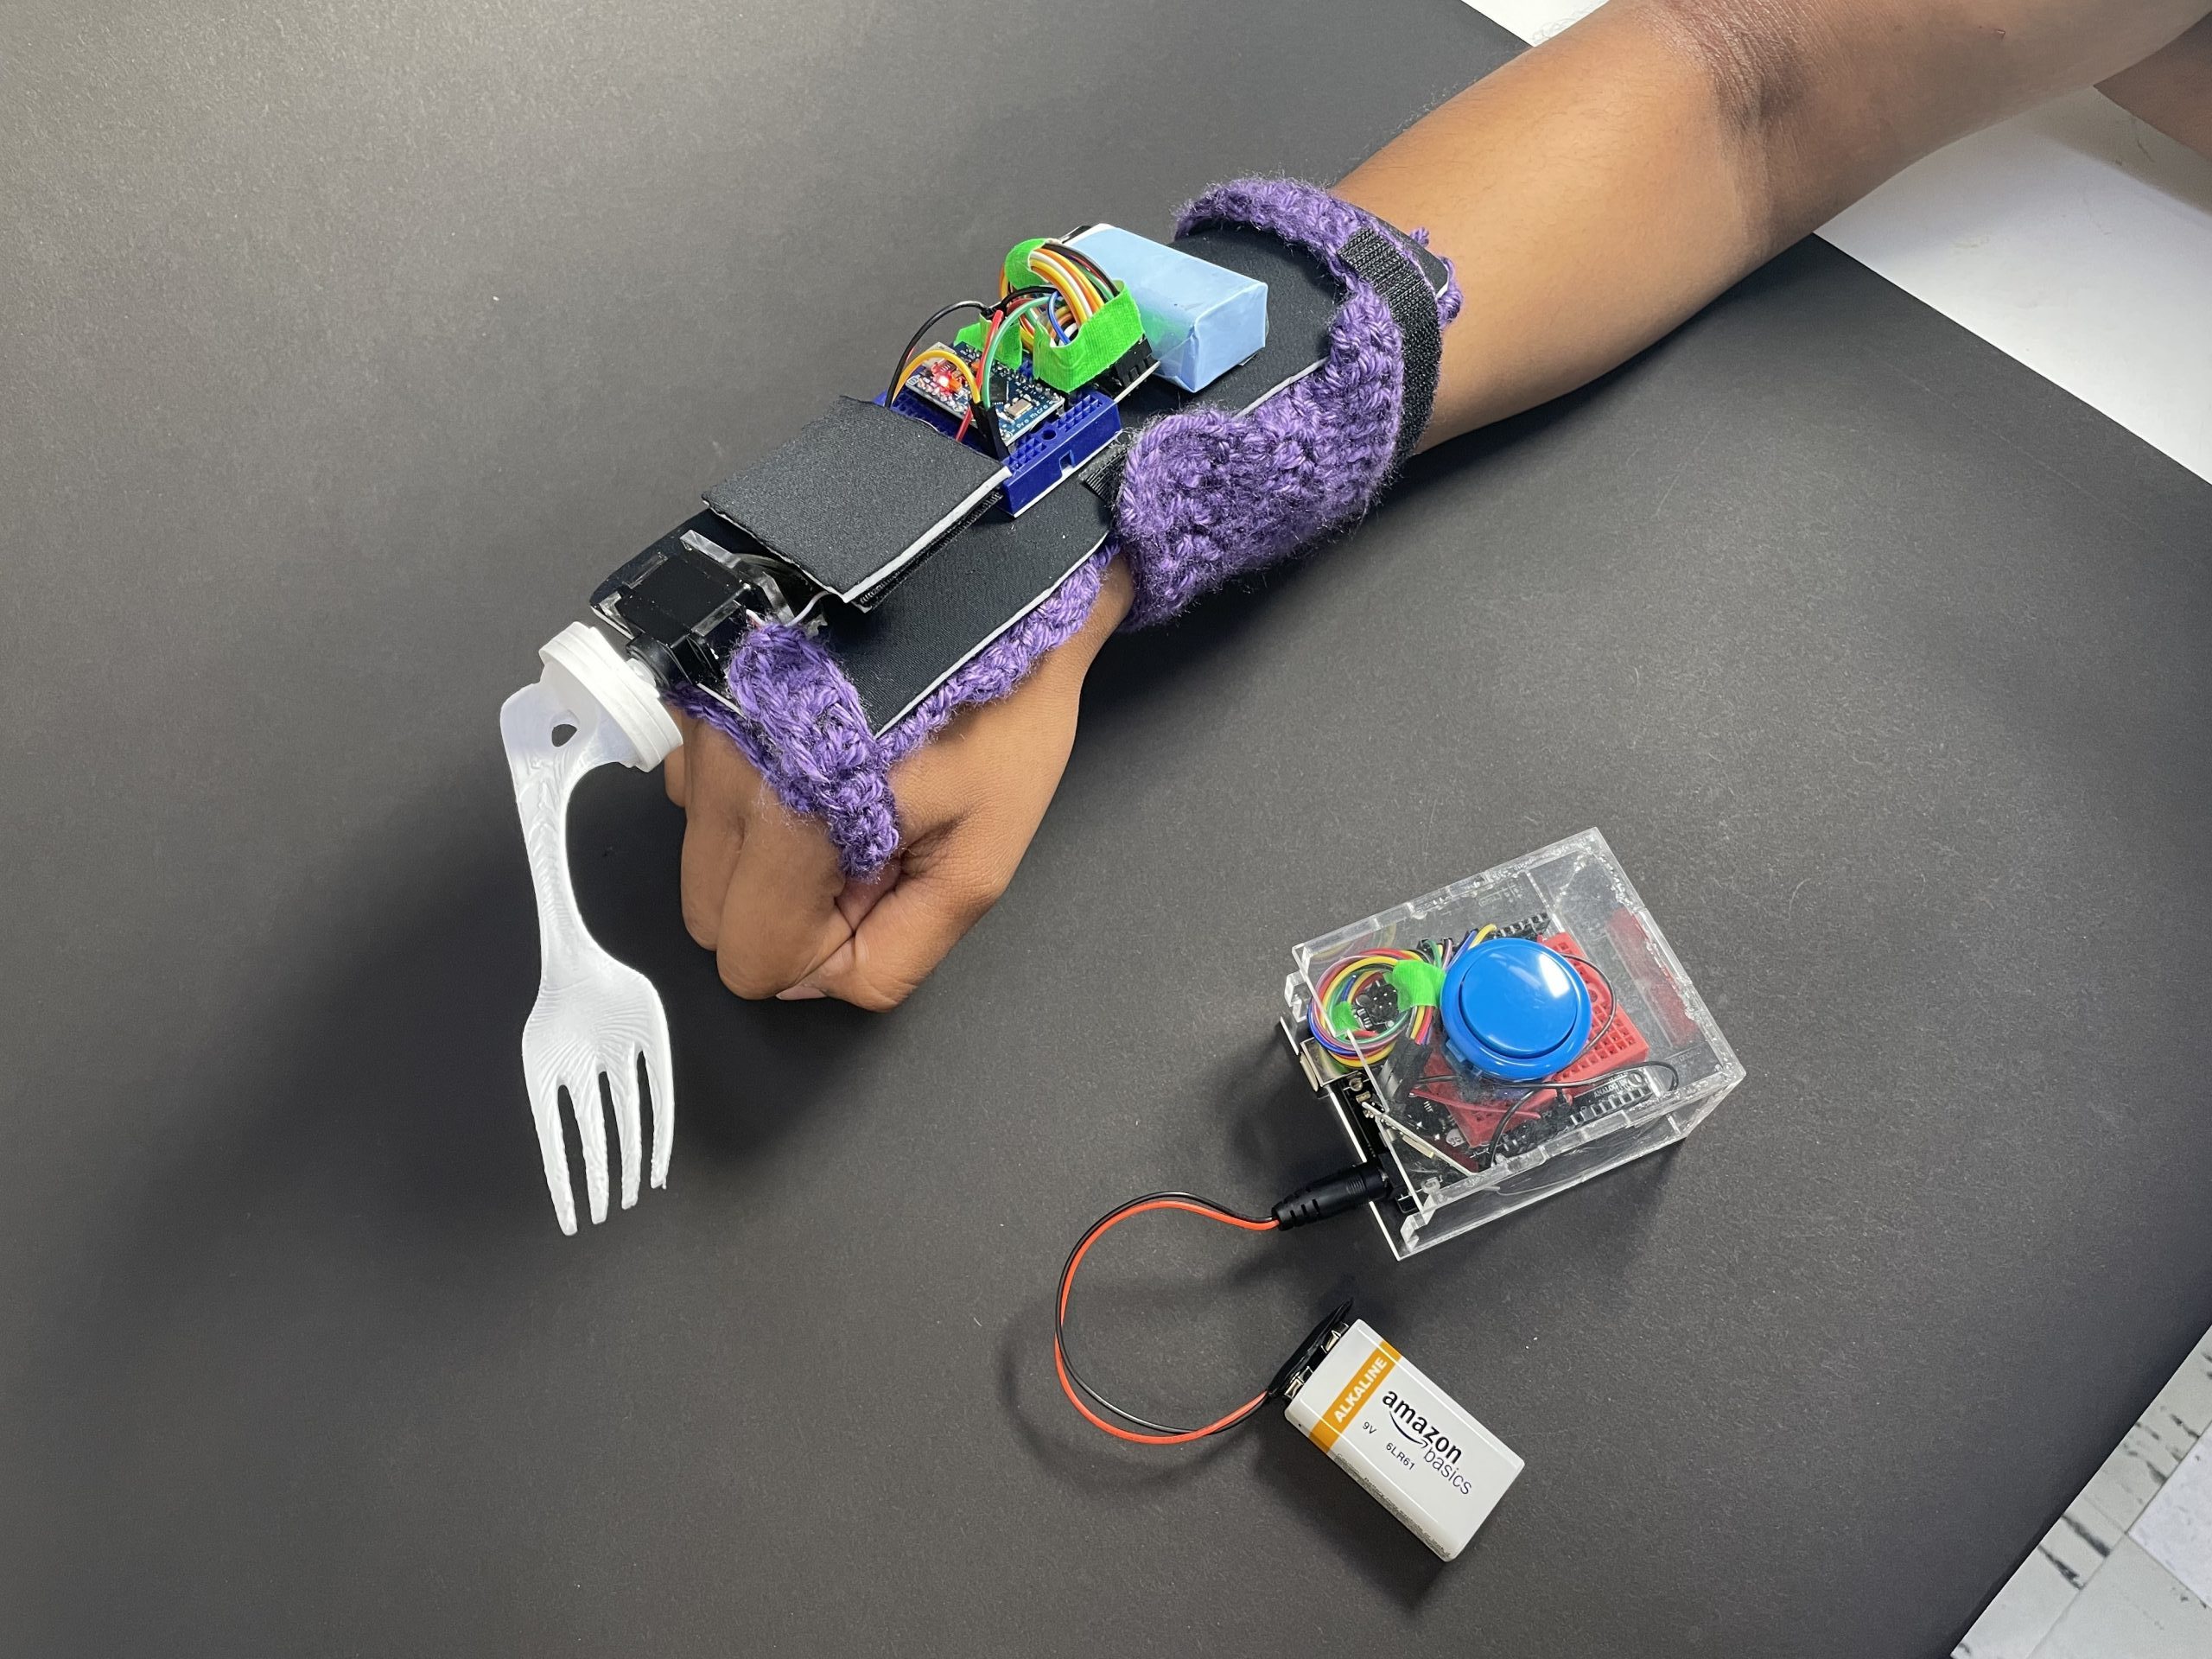
Utensil Holder with A Fork
Whenever Haleigh is, for example, eating a meal, her mother would easily be able to attach the velcro wrist straps on the device and then serve her the food. While before Haleigh mostly ate with her hand, which is still difficult due to her limited wrist movement, with the device she would able to relax more. She would be able to change between the spoon or fork fixtures depending on what she’s eating and be able to have her meal mostly by herself if she so chose to. Every time she hits the button, the servo motor would consistently rotate the utensil towards the food and then towards her, allowing her to eat with more ease.
3. Prototypes and Modifications
3.1 Prototyping
After the first interview, we proposed three essential question for our project:
- Wearable part – How to make the wristband easy to ware, comfortable, but also sturdy enough to hold devices and utensils;
- Electronic part – How to select a proper sensor to convert the change of pose to some data, and how the data can use to control the movement of utensils;
- Utensil part – How to create a universal connector that fits different utensils and connect them.
We discussed these questions and came up with an initial idea sketch:

Prototyping Sketch
Based on our client’s way of holding things and her grip, we proposed a glove-like design with multiple supports: writs, palm, and curlicue for the wristband. Such a method helps to average dispense the gravity of devices and electronics to the whole hand; the wristband could be knitted.
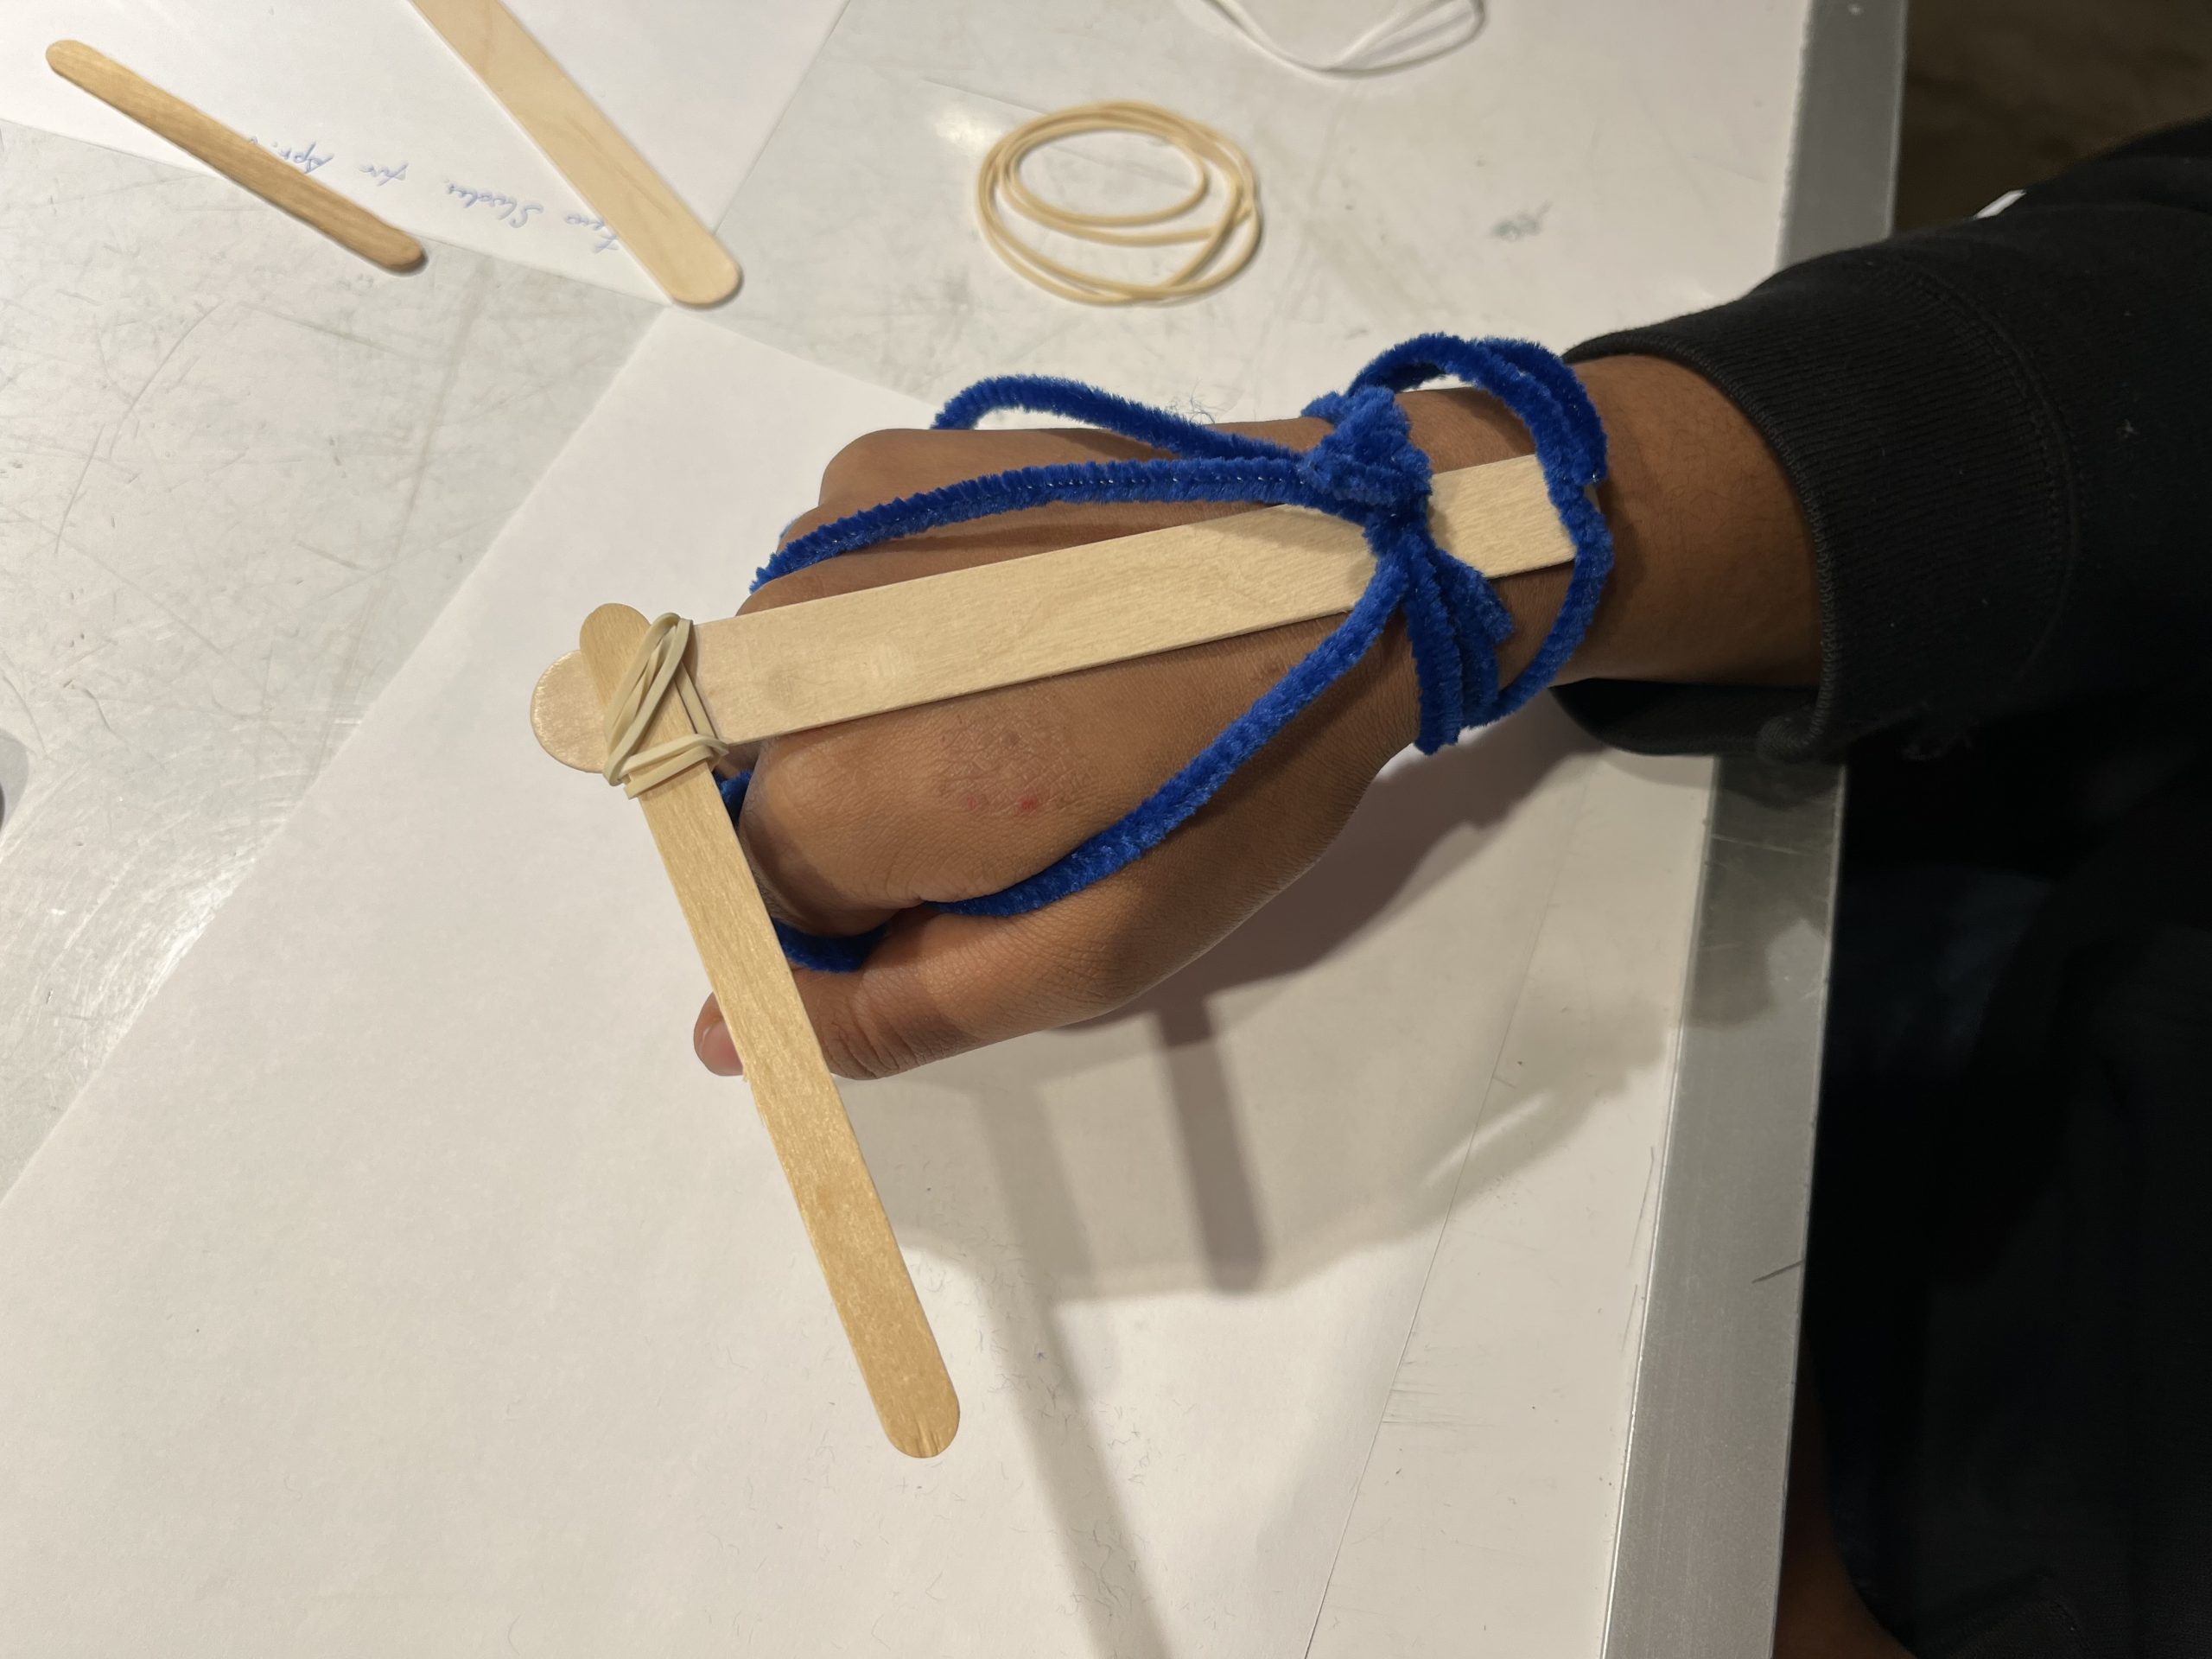
Prototyping – Wristband
For the utensil, we first designed a box-like holder for the disposable tableware – the user can just stab the tail of utensils into the holder, and the holder could fix the utensil by friction and magnetism. However, because of lacking consideration of the size of the magnets, we failed to install magnets to the utensils. Still, we found that the friction could be enough to hold every tableware (made of plastic, not metal).
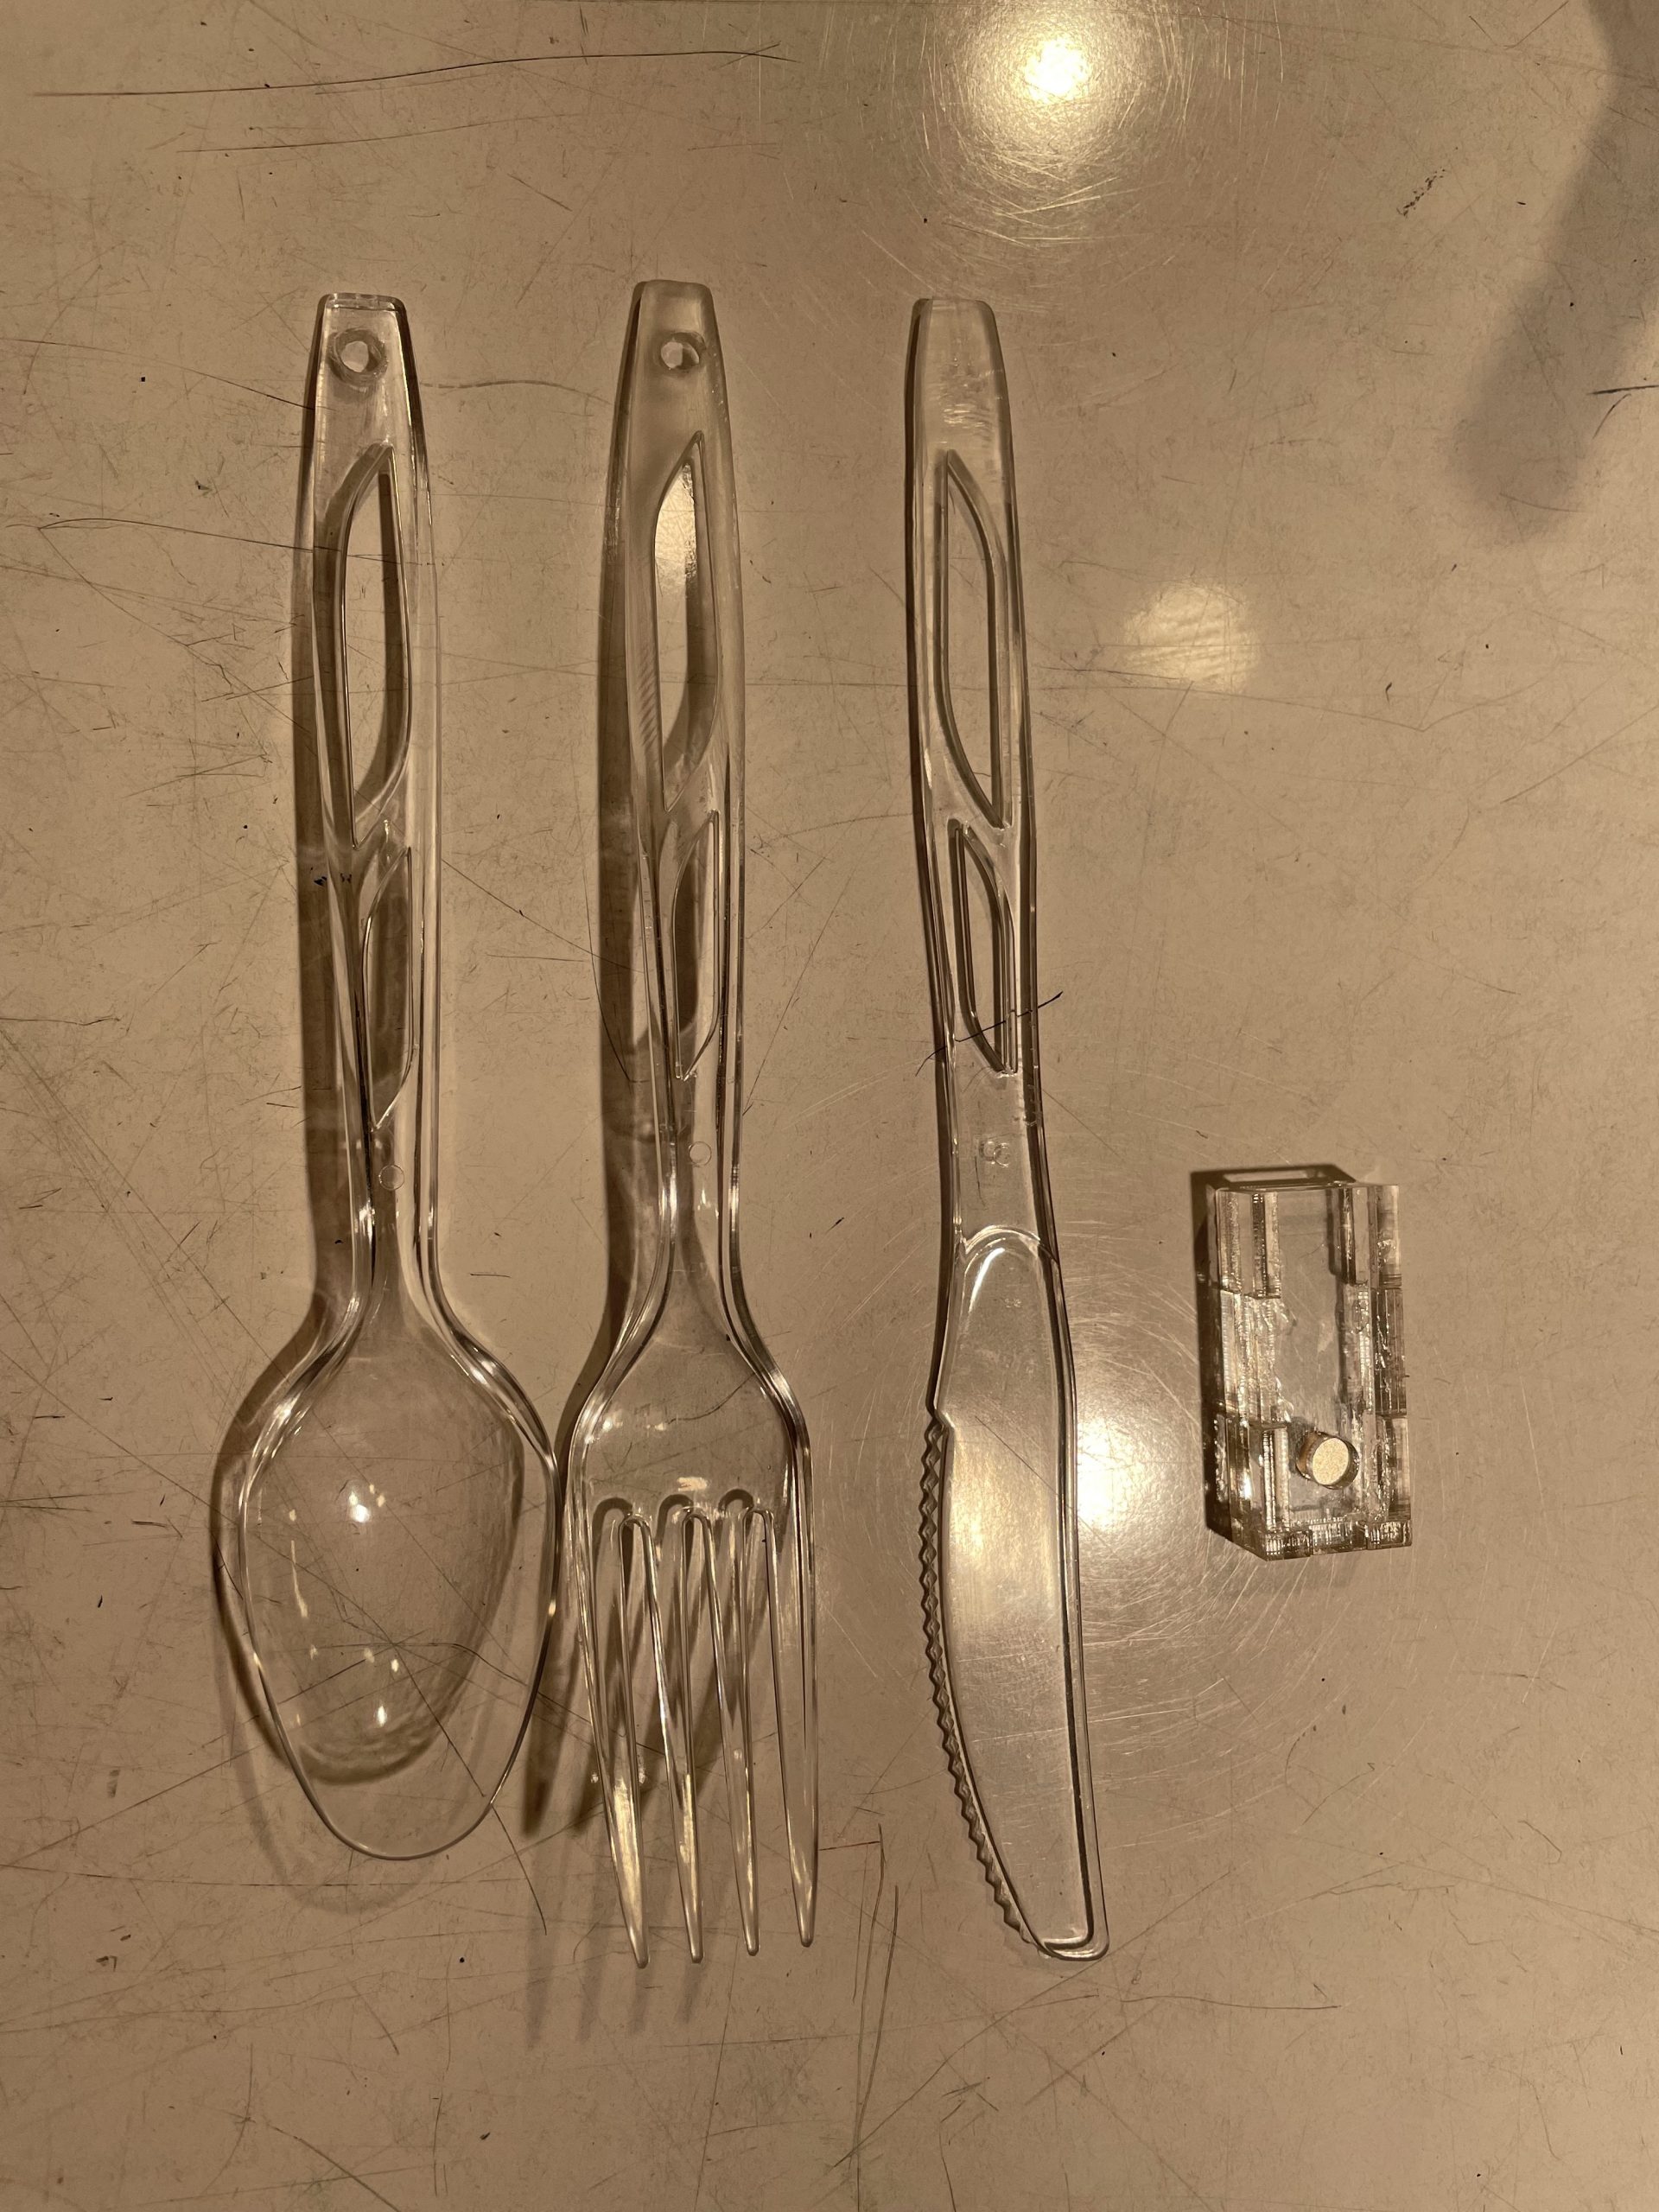
Prototyping – Utensil Holder
At the end of the prototyping phase, we put parts together and created a rough version of our utensil holder.
The First Prototype
The prototype enables us to check the feasibility of our design. The fun part is that all three parts – electronics, wristband, and utensil holder – work somewhat well as a whole; the wristband can hold the electronics, the electronics can drive the utensils, and the utensil and its hold aren’t too heavy for the servo. Then we brought this initial product to the first critic presentation to get more feedback about potential improvements to our design.
We got very constructive and helpful suggestions from out client and critics during the prototype presentation:
- Wristband: The wristband can be knitted with thinner yarn, making the band lighter and better ventilated. It’s better to make the wristband cover the whole back of the hand to avoid any hard part making the hand uncomfortable. We can still use a cushion to support the device, as the knitting part is too soft to mount electronics and servo.
- Utensils: The angle of utensils should be well considered because now we are using the utensil differently: utensils like forks and spoons should somewhat curve towards the mouth. So, we should consider designing utensils instead of using disposable ones.
- Electronics: The accelerometer is too sensitive to the gesture changes, which might lead to unwilling utensil rotations. We could go with more accessible solutions like using a button to control spoon and fork motions. We could separate the button from the wristband so that our client could use the product more accessible. We could establish wireless communications between the button and electronics on the wristband.
3.2 Interim Modifications
Based on the feedback from the prototype critic, we redesigned the wristband, electronics, and utensils (and the holder). We then invite our client to the Hunt Library again to see if our modifications fit her gestures and needs.
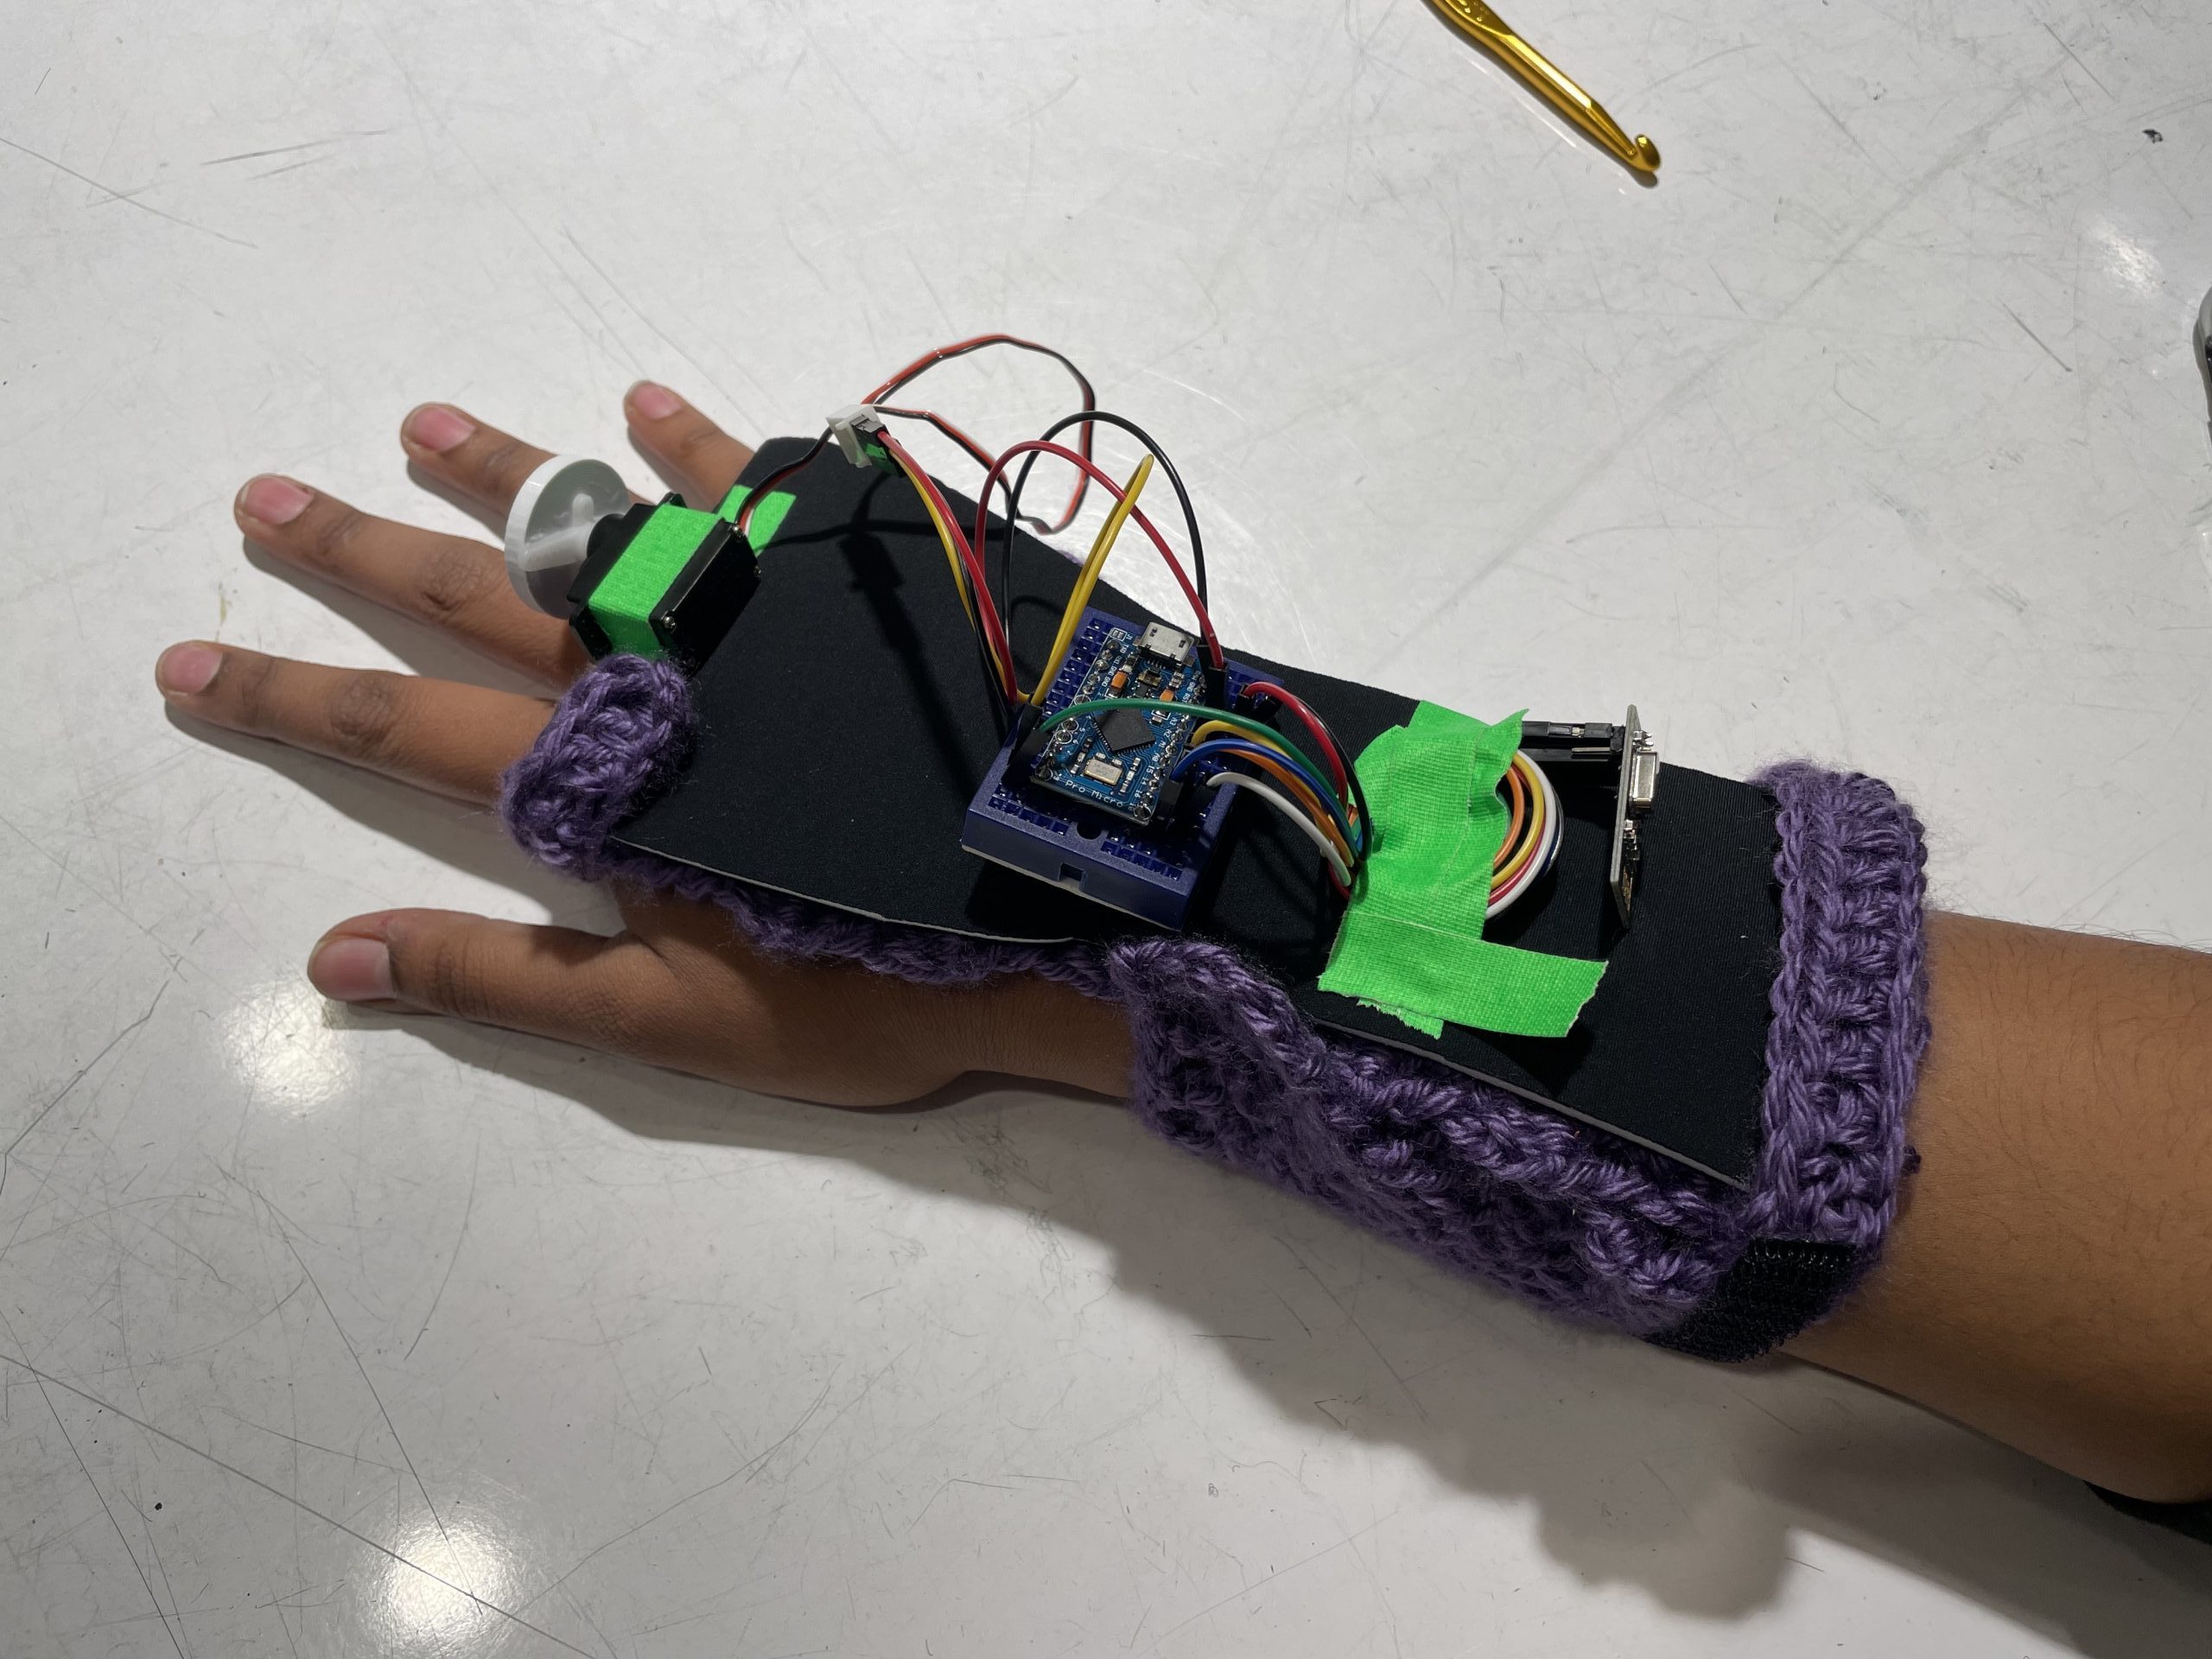
We did a significant improvement on lightness and softness for the wristband part. Still, it’s not sturdy enough – it’s not perfectly wrapping around the hand, so the device on it might move around unwillingly and frequently. So we decide to redesign the belt to make tighten the wristband.
Interim Modification – Wearing the Wristband

Interim Modification – the Wristband Front
Interim Modification – the Wristband Back
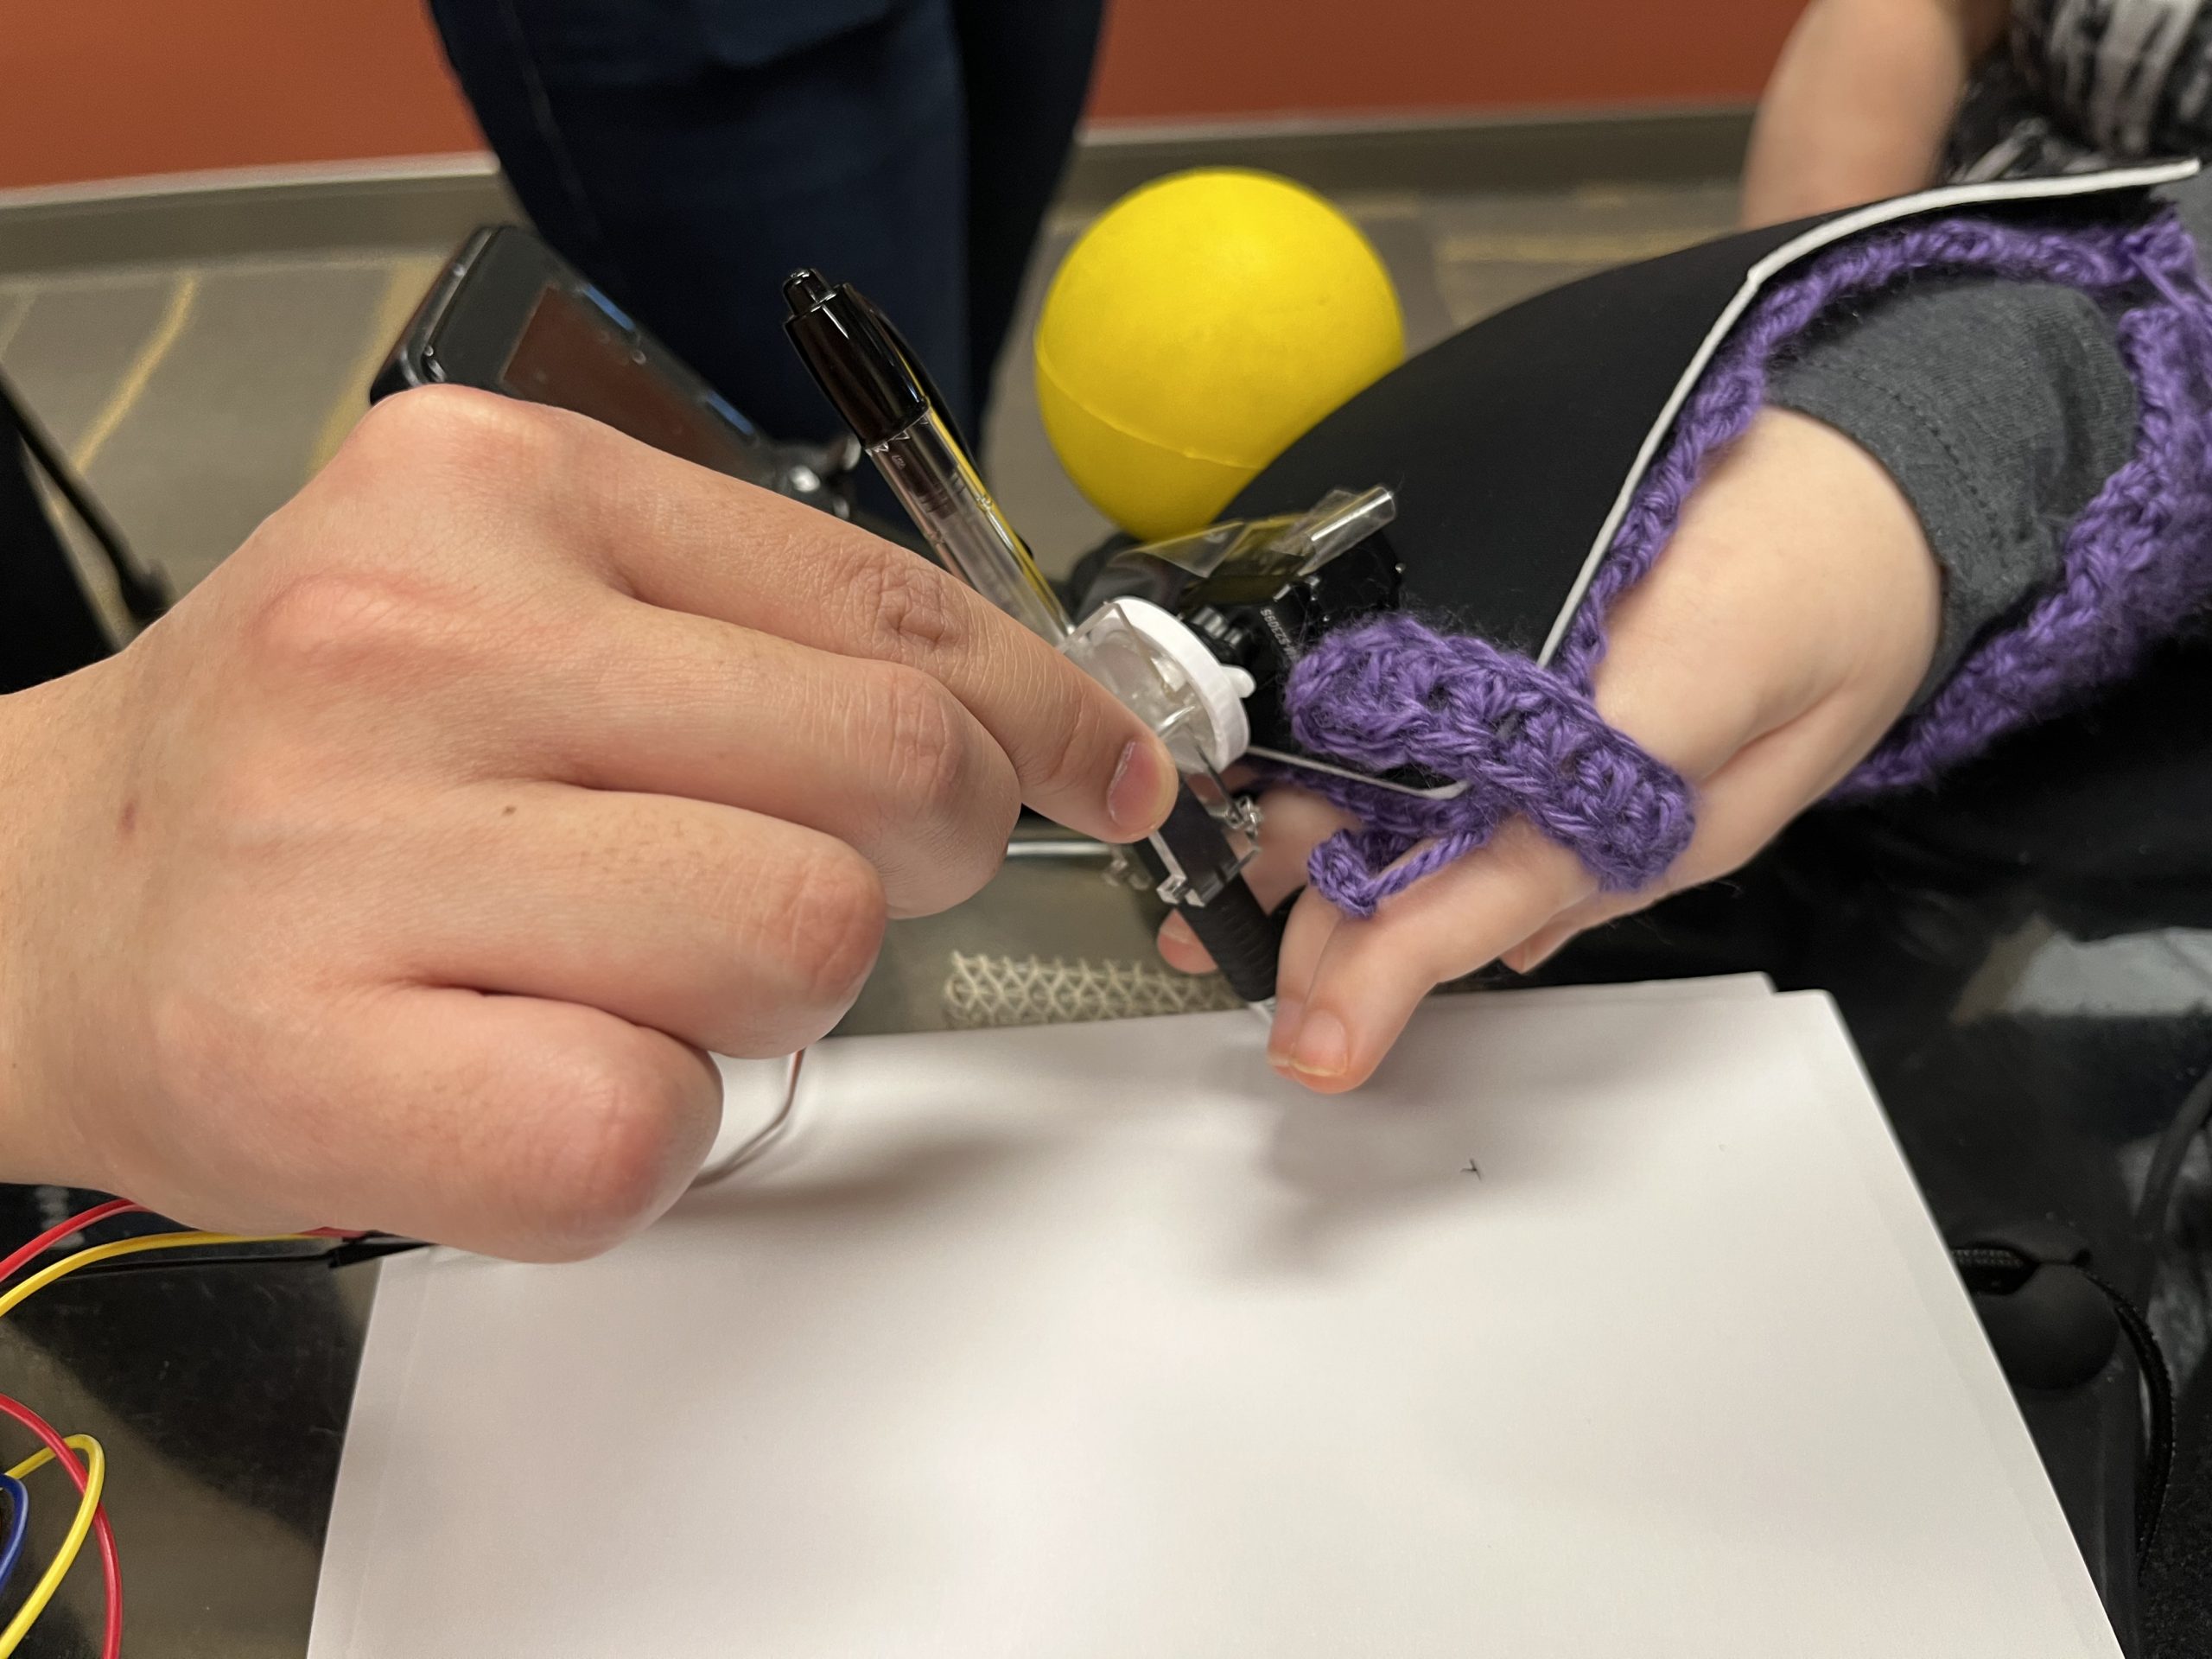
The button is working pretty well; the cap is large enough for our client, and the communication between the button and utensil servo seems established, although disconnection happens sometimes. The next step for the button is to design a container for it.
Interim Modification – the Control Button
Interim Modification – the Pastel Holder Angle
3.3 Finalize the Product
With the interim modifications, we used our last week to make final improvements to our design. We mounted electronics onto the wristband, assembled things, did some final tests, and finished the project.
Final Modifications
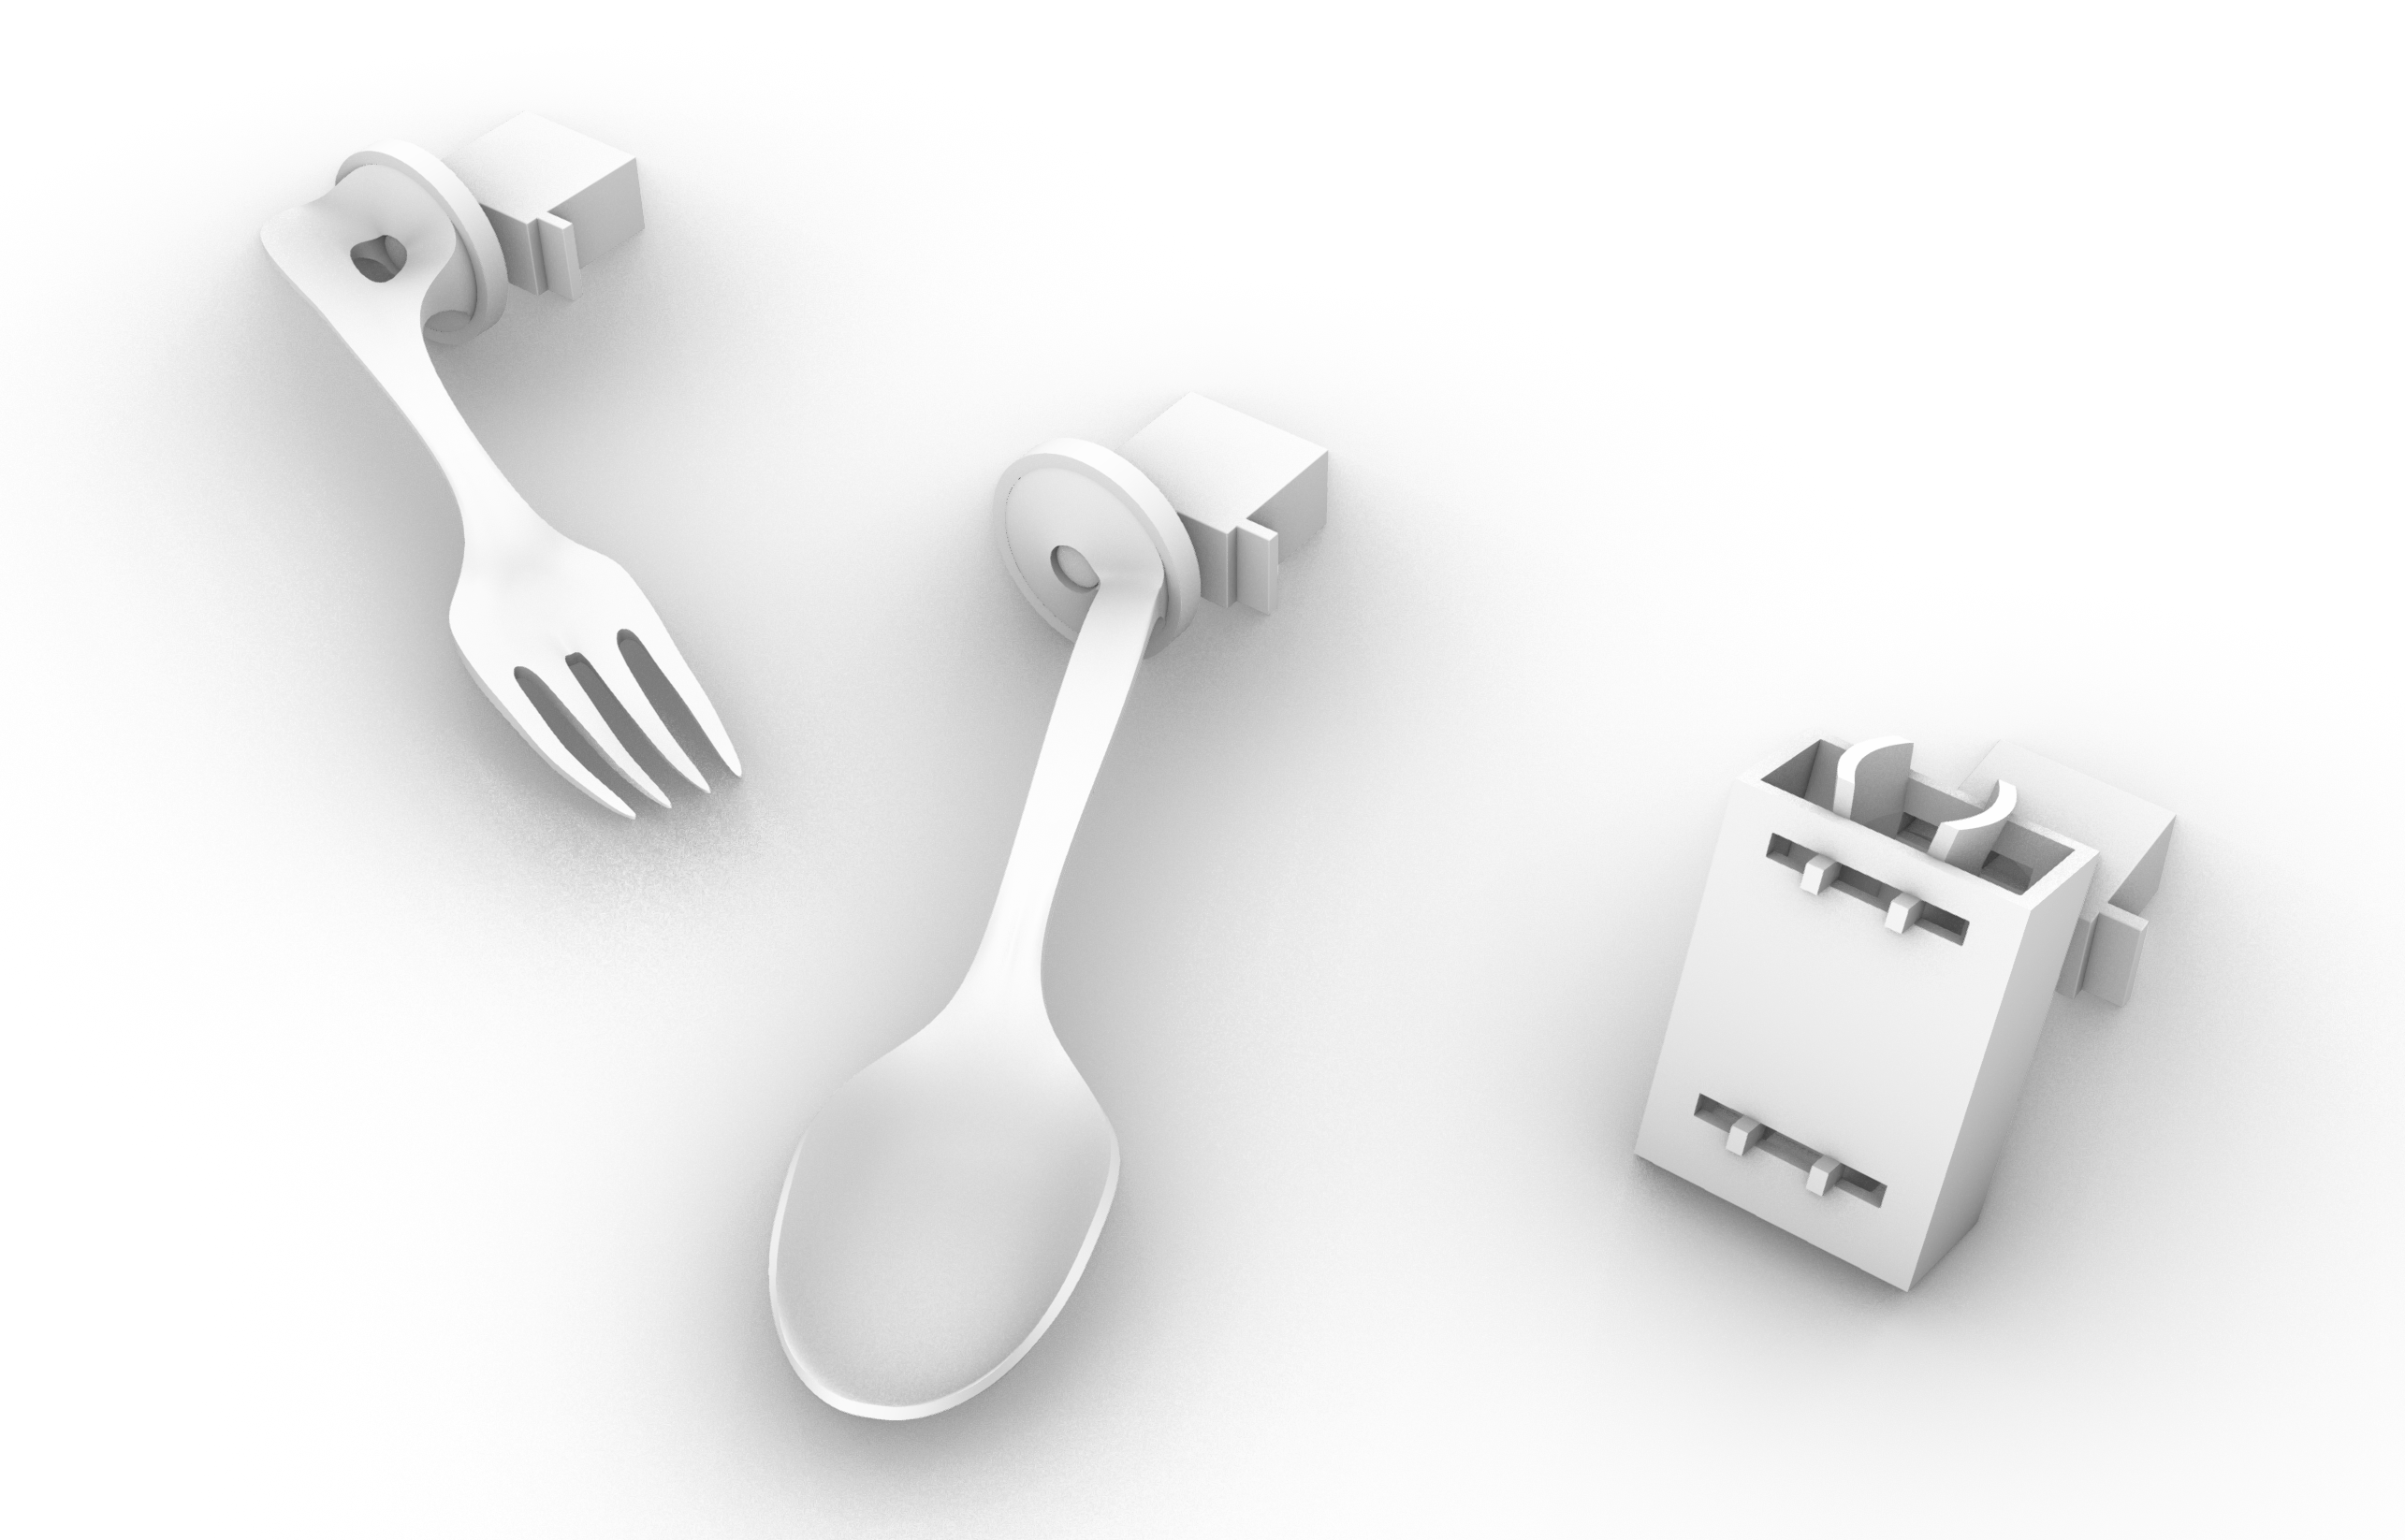
Utensil Holder Redesign

Final Product
4. Conclusion and Lesson Learned
From the final critique, there were many things that we discussed with both the reviewers and with Haleigh that we could look at to further improve the project. For instance, one point that one of the reviewers brought up with us and on the written feedback sheet was how “[we] could have pushed further with liquid and food protection – a removable, washable cover would have helped polish [it] off”. Another reviewer had also commented that “the 3d printed utensils should be reconsidered” as “the material may not be entirely safe for use with foods”. While the food safety of the project was something that we had considered, given the form of our project and how we had to go about making the specific parts and their shapes, it was difficult to find a way to implement them given our budget and resources. A solution to this that we wish we looked more into was trying to make primarily holders that would be able to perform the same task but with any utensil the same way we made the universal writing implement holder. Another reviewer brought up how it would be better “if the wrist piece had a little sleeve that could contain the electronic pieces”. This is an easy solution which we feel we could accomplish with either another piece of the foam that there currently is or with an additional crochet piece, either of which could be attached with velcro. Another one of the comments that were made by the reviewers was that they were “worried [the device] will turn while on her wrist”, which is something we think that we addressed in our meetings with Haleigh and the customizations that we were able to make to make it as suited to her as possible.
Overall, despite the numerous points for reconsideration that there are to be considered in evaluating our project, we still were able to learn a lot through this experience of working with a person with a disability. Designing for another client as opposed to ourselves, it was very interesting going about the process of taking into consideration a different set of needs and restrictions which are outside of our own experiences. It surprised us how we had to translate the movements and abilities based on how Haleigh would be able to approach the same tasks. It was interesting to re-evaluate the way that we did something that is almost second nature to us, like eating with a fork and spoon and how these motions can be applied to the way Haleigh can move.
Looking at the project overall, we would go about choosing different materials for the attachments and also consider how to go about making the attachments more universal. Given an unlimited amount of time and resources, our main priority would be to making the attachments food safe and try increase the flexibility of the structure for both comfort and lightening the weight.
5. Technical Details


/*
  Utensil Holder
*/
/*
  This code is for the button, which enables it to remotely control the motor
*/
/*
  Hardware Pinout Connection
  Arduino Uno        nRF24L01
       3.3V ---------- VCC
       GND ----------- GND
       7  ------------ CE
       8  ------------ CSN
       11 ------------ MOSI
       12 ------------ MISO
       13 ------------ SCK
________________________________________
  Arduino Uno         Button
       GND ---------- negative
       2  ----------- positive
*/

#include <Wire.h>
#include <SPI.h>
#include <nRF24L01.h>
#include <RF24.h>

const int buttonPin = 2; // the number of the pushbutton pin
int buttonState = 0;
const byte address[6] = "00001";

RF24 radio(7, 8); // CE, CSN

void setup() {
  pinMode(buttonPin, INPUT_PULLUP);
  Serial.begin(9600);
  Wire.begin();
  radio.begin();
  radio.openWritingPipe(address);
  radio.setPALevel(RF24_PA_MIN);
  radio.stopListening();
}

void loop() {
  buttonState = digitalRead(buttonPin);
  Serial.println(buttonState);
  radio.write(&buttonState, sizeof(buttonState));
}
/*
  Utensil Holder
*/
/*
  This code is for the motor, which enables it to be controlled by the button
*/
/*
  Hardware Pinout Connection
  Arduino Pro Micro        nRF24L01
          VCC -------------- VCC
          GND -------------- GND
          9  --------------- CE
          10  -------------- CSN
          16 --------------- MOSI
          14 --------------- MISO
          15 --------------- SCK
________________________________________
  Arduino Pro Micro       Servo Motor
          VCC -------------- VCC
          GND -------------- GND
          8  --------------- signal
*/

#include <Servo.h>
#include <Wire.h>
#include <SPI.h>
#include <nRF24L01.h>
#include <RF24.h>

int buttonState = 0;
int tracker = 1; //tracking which direction we want the motor to rotate
int btn_prev = buttonState; //track the last buttonState to avoid multiple count of signal
const byte address[6] = "00001";

RF24 radio(9, 10); // CE, CSN
Servo myservo;

void setup() {
  pinMode(buttonPin, INPUT_PULLUP);
  myservo.attach(8);
  Serial.begin(9600);
  Wire.begin();
  radio.begin();
  radio.openReadingPipe(0, address);
  radio.setPALevel(RF24_PA_MIN);
  radio.startListening();
  btn_prev = 1;
  myservo.write(90);
}

void loop() {
  if (radio.available())
  {
    radio.read(&buttonState, sizeof(buttonState));
    Serial.println(buttonState);
    if (buttonState == LOW && btn_prev == 1) {
      if (tracker == 1) {
        for (double pos = 90; pos <= 180; pos += 0.5) { //rotate from 90 to 180 degrees
          myservo.write(pos);
          delay(15);  // waits 15ms for the servo to reach the position
        }
        tracker = -tracker;
      }
      else {
        for (double pos = 180; pos >= 90; pos -= 0.5) { //rotate from 180 to 90 degrees
          myservo.write(pos);
          delay(15);
        }
        tracker = -tracker;
      }
    }
  }
  btn_prev = buttonState;
}