sapeck-Hatching

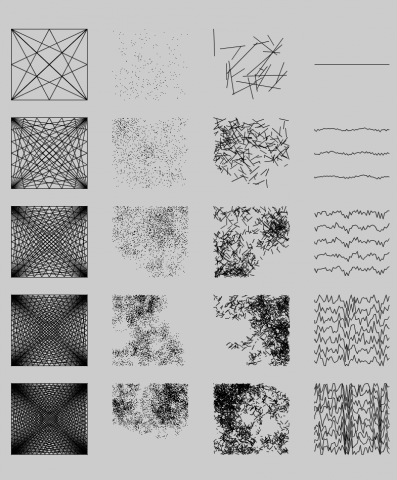
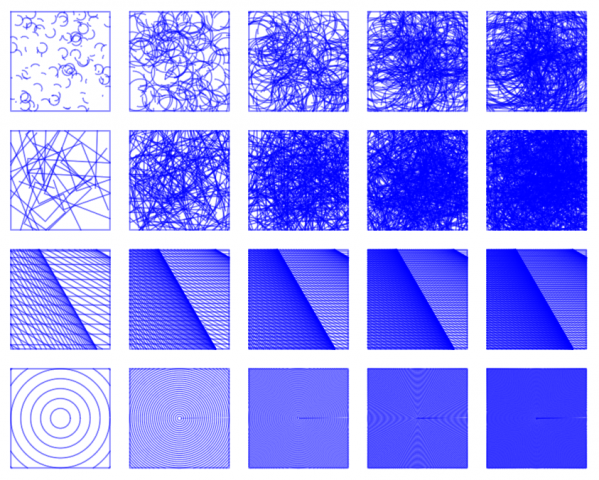
The first method plays with the vsketch point drawing method and drawing many circles at close offsets to create a new stroke. The second method is the same point but on a Perlin grid. The third method is the built-in vsketch hatching method. The fourth method was an experiment in using occult and many layers of circles. Each layer has occult run individually, with circles added randomly to each layer. The best surprise was with how well the circle-stroke (the first method) works. The Axidraw is extremely precise and able to draw these tiny circles. The very close, overlapped circles look like a new stroke. I was also surprised how vpype optimized the circles into some longer strokes in the Perlin grid.

frog-Hatching

In my hatching methods, I tried a few different strategies using randomness and lines.

I’m interested in scalability and parametric systems, so I tried a few different methods with these properties – my first hatching method simply uses tighter and tighter angled intersections to create darker values.

For two of my methods, I had a point move around the canvas in a controlled fashion with differing parameters. From here, I stored the point and made used the points in different ways.

Finally, I’m really interested in signals and the aesthetics of plotted oscillations and noise, so I plotted a sum of cosines with scaling.

Hatching Studies:

Screencap:

SVG:

aahdee – Hatching

There’s two svgs as I used PEmbroider

I used PEmbroider for the last one. This assignment was one of the easiest and the most fun for me. For the second one, I used some tiling techniques to ensure that I didn’t draw the same line twice. I also wrote the best switch statement of my life for that one. I used the techniques of ordered randomness for the third one to ensure that the crosses are balanced and gives an effect of increasing shading.

The code is below the continue reading.

Continue reading “aahdee – Hatching”

dinkolas-Hatching

An eye generator: https://preview.p5js.org/dinkolas/present/f1BgPMhnl

I took this as an opportunity to really start developing my drawing code base, in which I implemented pretty much everything on my own, besides rendering lines, which is done with Pixi.js. The cropping to squares is more elaborate than it looks, and I will soon have the capability to do boolean operations with arbitrary objects. This didn’t leave me quite as much room to experiment with hatchings as I would’ve wanted, but I still learned from designing these. One of the biggest challenges was convincingly filling at a given percent darkness. The first approximation treated each line as being 1 unit thick, so if there was 100 square units of space, then there would need to be 30 units of length of line to fill 30% darkness. However, depending on different patterns, this 30 units either felt too dark or too light for 30%. I imagine more experimentation will give a better intuition for this. The most interesting one to me was the eyeball hatching, which ended up taking the longest to plot due to lots of small details. I suspect that much of this detail could’ve been removed without impacting the final look, so getting detail on the right scale would be good.

gabagoo-Hatchin

I experimented with Python drawing tools for the first time. Since vpype is much more modular than p5.js, I was able to tap into my existing python knowledge. In particular, using Numpy’s ndarrays made programming incredibly easy. Furthermore, I also used Shapely’s clipping function to crop my work into the grid cells. My use of matrix operations, particularly in the third row, were surprising and unintended. The rotation transformations were relative to each line’s centroid, and as a result, the hatching looks like a plane with depth. Some of the drawbacks of shapely, is that many of the p5.js primitives I was used to using, were not available to me and I had to implement them myself.

lsh-hatching


This week I crashed and burned a little. I had originally intended to attempt the exercises in Julia using the Luxor wrapper for Cairo, but let myself get swept up in the excitement around VSketch, and therefore switched to Python a little late in the game. VSketch was working mostly great for the first two rows in my matrix, but when I hit the third row I began getting errors related to maximum number of geometry on screen. For some reason as geometry increased, issues began popping up that were mutating variables I was not even interacting with. I tried to extract the logic so I could work row by row, but the script was a little too messy to reasonably refactor. I should have fallen back to what I know (JavaScript). VSketch is a ton of fun to work in and I would love to keep exploring it, but this was probably not the right time.

miniverse – hatching

My sketched hatchings

Here’s my hatching SVG

The first row is diagonal lines with a little randomization

The second row is a space filling curve called a hilbert curve. This curve has 8^8 points. To produce gradations the points are rendered with a certain probability this functionally limits the amount of points and makes the curve less dense. There are multiple good sources to learn more about the hilbert curve from.

https://www.fundza.com/algorithmic/space_filling/hilbert/basics/index.html

^ this link provides a good recursive solution for the curve. The first two arguments to the function  they code describe  the top left point from where the curve begins. The next four detail how the curve  expands to the bottom and to the right.

The last row is multiple sin and cos waves added together to produce a more complex curve and then stacked at a certain spacing. The spacing edits the gradation.


Vpype! at the end I used this CLI to run some optimizations

here’s a good command to run after producing svgs.

vpype read FILE_NAME.svg linemerge linesort linesimplify write --center OUT_FILE_NAME.svg

spingbing-Hatching

With the first and third designs, I found that it was actually more difficult than I thought it would be to accurately depict the percentages, as sometimes the tweaks I made would end so that the darkness would increase exponentially instead of linearly like how I wanted it to. The second hatch looks more like a pattern or a tile than a hatch, as the attention is drawn more towards the flower shape that resulted from the overlapping circles than it is towards the changes in value. The fourth hatch would have been more hatch-like and less tile-like if the spaces between the squares were even, but after spending too much time on it I decided to reroute and add randomness, as seen in the fifth. This is in fact me giving up, but I think I like the random one better anyway (whether that be because it made my life easier or because I actually appreciate the aesthetic, I do not know).