Zapotec Rugs- Marissa McAfee

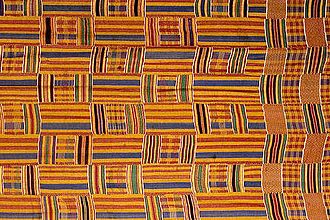
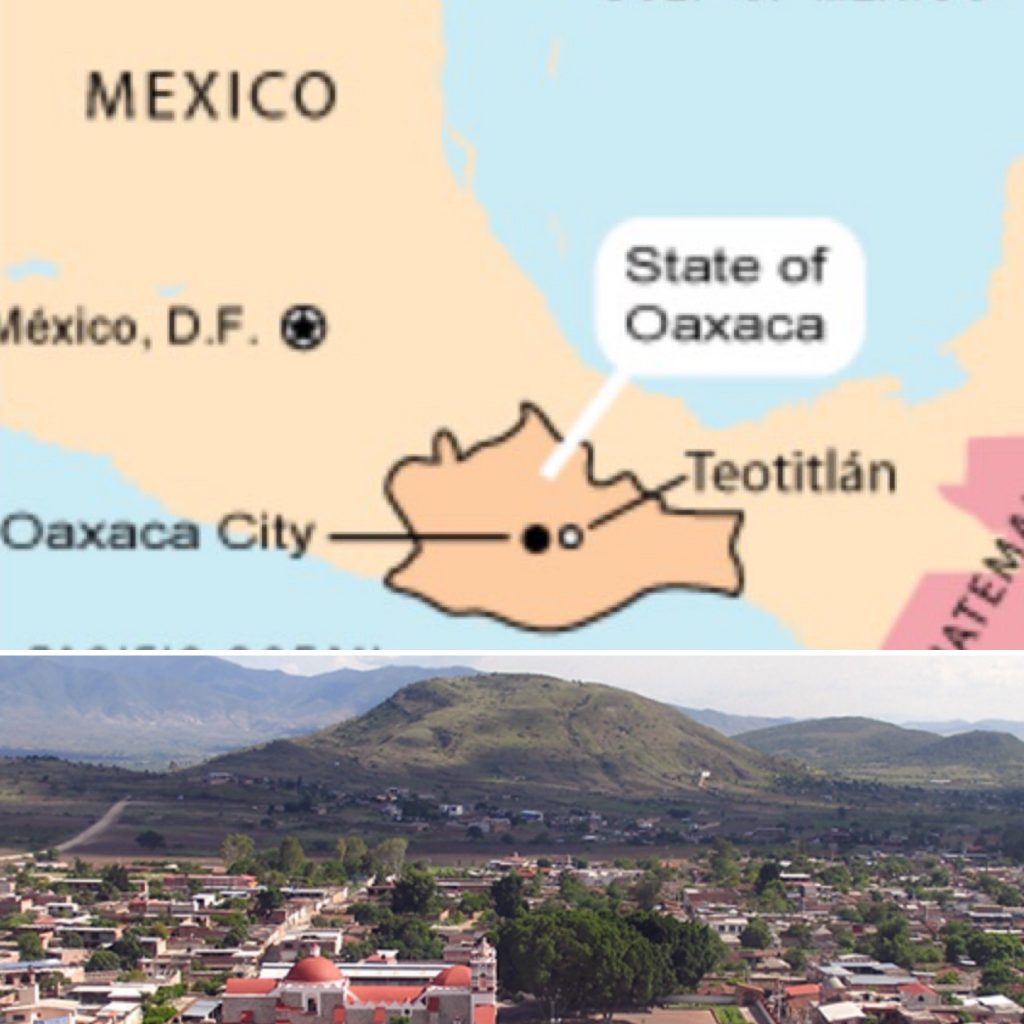
Zapotec rugs are traditionally handmade and wool-woven in a foot loom in the village of Teotitlan del Valle located just outside of Oaxaca City in Mexico. The The Zapotecs surrendered peacefully to the Spainish like most cities in the Central Valley, and foot-looms and sheep wool were integrated into Zapotec culture which allowed them to create bigger and bulkier rugs and tapestries. Teotitlan’s weavings became internationally famous in the 1950’s with the arrival of foreign tourism. As sales rose, entire families became involved in the weaving process and the community shifted from predominantly farming to weaving. In the present day, there are still many artisan families the carry on this tradition of producing hand woven rugs and specializing in natural dyes. 

One of the most notable characteristics of Zapotec rugs are the rich colors. The Central Valley is rich in vegetal and animal dyes, and the Spanish brought along salts and oxides that are used as a color toners and fixatives to enrich native natural dyes. With the natural dye workshop coming up, I was drawn to this particular traditional textile. The dyeing process is long and involved, but it’s also cooperative, and the results are stunning.

Among the natural dyes available in Oaxaca, the cochineal is the most renowned. The cochineal is made from an insect that lives and feeds on cacti and produces carminic acid which can be extracted from its body and eggs to make carmine dye.

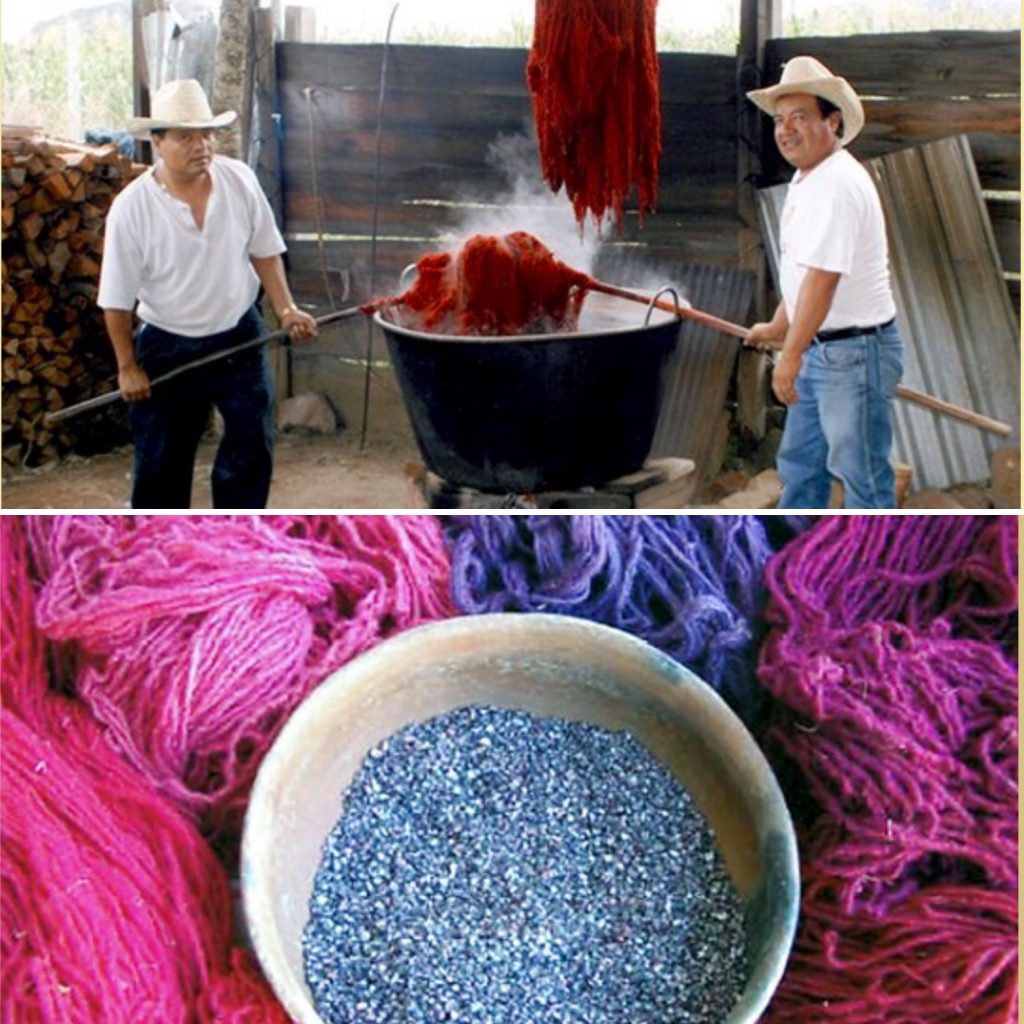
Other classic natural dyes used to color the wool include: the cempasuchil flower for yellow shades, indigo for blue hues, pecan bark and walnut husks for brown, and huisache pods for black. Natural acids (lemon juice for example) and heat are also strategically used to draw out the desired shade of color for the dyed wool.

Zapotec rug patterns are drawn out beforehand, and traditional patterns feature glyphs, fretwork animals, and idols taken from the archeological remains of the village church. The designs represent Teotitlan’s history and culture, and overtime, they have even come to incorporate Navajo patterns or reflect famous paintings. Zapotec rugs are a statement piece and testimony to family and history.

References:

https://www.mexican-folk-art-guide.com/zapotec-rugs.html#.X4XRPhNKiYU

https://www.monarchandmallard.com/notes-from-the-road/handwoven-rugs-of-oaxaca

Mending Project- Marissa

Transforming my plain brown sweater with mending is still an ongoing project, but I’m learning more and more along the way. When considering the placement for the second hole, I thought about how I use sweaters and about which areas tend to experience the most wear and tear. Even though I am the one fabricating the holes to mend, I’ve decided to strategically place them in spaces that emphasize the sweater’s functionality.

I put the sweater on and lived in it for a little bit, and I marked areas that I found received the most action either through tugging, bunching, or rubbing with a sharpie. Some of these included my elbow, sleeve cuff, shoulder, and left hip. I want to highlight each of these areas with darning to give them personality, and so for my second mending, I went for a larger elbow patch.

Mended elbow and sleeve with embroidery floss

I stuck with using embroidery floss because that worked well, and I experimented with threading different string counts through my needle to make thinner stitches. I also played with changing color halfway through the patch to attempt to create a subtle gradient. I like the visual effect a dark purple running stitch transitioning into a lighter purple as the shape of the patch narrows.

I am sticking with choosing colors that starkly contrast the dark brown sweater, and I enjoy the texture darning provides. It is still challenging to hold the fabric in place while running stitches, and I might find a better way to keep the shape that doesn’t involve sticking a mason jar in the sleeve. This will be especially helpful as I move into other areas of the sweater.

I was surprised by the organic feeling and quality of the mended patches. I’ve found that they move and morph into the rest of the fabric in very interesting ways. Their appearance changes while I wear the sweater, and it will be exciting to see how my view changes over time.

Mending in Progress- Marissa

I am inspired by Celia Pym’s sweater mending projects and how she transforms articles of clothing with darning. I went thrifting this past weekend for the most unassuming sweater I could find. I plan to cut various sized holes and embellish this brown/black knit sweater with bright and colorful woven patches.

First hole before and after adding a bright pink warp

I cut a small hole on the sleeve to try darning out for the first time. The embroidery thread worked well with the sweater fabric. To avoid sewing the back of the sweater, I put a mason jar in the sleeve to hold the shape.

Finished sleeve trial darning

I definitely want to experiment with making the weaving section more visible for other patches, but I think that will be size dependent. I’m excited to see how I can continue to turn this sweater into a unique, expressive, and wearable piece.

Tapestry Weaving- Marissa

This project was challenging for me, but I’m proud of myself for finishing this piece. I used this tapestry weaving to experiment with various stitch techniques and textures, and I learned a lot along the way.

Completed weaving affectionally called “The Rag”

The cardboard loom itself caused the biggest challenges with retaining even tension throughout the weaving. This was a source of a lot of frustration, but I learned to adjust and adapt my weaving and even embrace my mistakes.

Textured close-up

I made impulsive color decisions during my weaving process, but eventually I settled on seven colors to alternate between for variety. I was surprised that changing the color was sometimes enough to emphasize different stitch techniques or even to just make the plain weave sections more interesting.

I experimented with interlocking the weft and using two colors in tandem to create vertical stripes. I also experimented with adding textured elements with added rya knots and soumak stitches. The rya knots sort of fell out when I cut my warp strings to remove my piece from the loom, but I was able to use the simple knot finishing technique to salvage the fringe effect.

Even though the weaving process was frustrating for me at times, taking breaks and returning to my tapestry gave me a fresh head to try to incorporate different stitches to make it more exciting. It felt like returning to an in-progress essay. I would unweave entire sections much like deleting paragraphs as I was trying to make my weaving feel more unified and coordinated.

An alternative view of The Rag 🙂

Since this piece was solely experimental, I have also been surprised by the interpretations I’ve received from my peers so far. One of my friends said it reminded her of a geological cross section, and that provided me with a different perspective on my work that I appreciated.

My piece has grown on me because it’s reflective of my artistic process, and I did get more comfortable as I worked through it. This final image shows how I’ve been playing with displaying my tapestry. I’m inspired by El Anatsui and how his metal cloths change with every installation, and so far I enjoy how bunching my tapestry creates fun waves.

Beginning the Tapestry- Marissa

Trial and error in the makings of a yarn tapestry

I had issues ensuring that my cardboard loom had even tension. I had to redo the warp for a few inches, but it’s working fine now.

My latest issue is that I made the mistake of weaving an entire section of color while attempting to interlock two yarn wefts. This divided my loom and made it impossible for me to use the center warp to weave the other half. The picture above is what it looks like now as I’m currently “un-weaving” the rest of the orange so that I can try again 🙂

I’m excited to incorporate more techniques, textures, and fabric types as I progress through my tapestry.

Textiles Based Artwork- Marissa

El Anatsui, Taago, 2006, Aluminum & Copper Wire, 82 x 124″

My mind has still been focused on repurposing materials for creating textile based artwork, and I remembered this particular piece from a museum visit I took a few years ago.

El Anatsui is a Ghanaian artist who uses found materials such as bottle caps, recycled aluminum commercial packaging, and copper wire, and to fabricate giant shimmering sheets that he calls “cloths.” These cloths are incredible to see in person, and they command the space in the room. They appear both sturdy and soft, and the pliability of the materials used enable the cloths to change how they appear with each new installation in galleries.

I love that his work is bold and contemporary but still firmly anchored his traditional culture. As a modern artist, El Anatsui still recalls 1,000-year-old traditions of strip-woven cloth made by the men in West Africa. An image of Ghanaian kente cloth for reference is displayed below. This particular metal cloth “Taago” feels comforting like a blanket, and the dips and folds create a very interesting pattern of movement that I enjoy. I also appreciate the way he carefully chose his materials for their “usefulness” and value.

Deeper Dive Into Improv Weaving

By: Marissa McAfee

I initially struggled with deciding how to begin this deeper dive because I had a bunch of undeveloped exciting ideas running rampant after completing my smaller explorative pieces. I decided to take a walk to clear my head to try to flesh out some of my ideas, and I ended up picking flowers along the way. As I admired the colors and shapes of the flowers, the concept for my first weaving bloomed.

I decided to craft a loom out of branches using string to tie the frame. I knew that I wanted to use the different flowers I picked as the weft, so my next challenge was finding a suitable warp.

Tree branch loom with dead grass warp fastened together with string and packing tape

I came across a pile of dead fibrous husks that marked the remnants of a grassy bush, and I decided to use these as the warp because as a material they provided the right amount of rigidity for weaving delicate flowers. The sticks were light enough to secure to the loom with packing tape.

Conceptually, I loved the idea of weaving the living and dead plants together. They were complementary opposites. The warp is hard, brittle, and dead while the weft is soft, flexible, and colorful. There’s a duality in the materials, and I needed both to complete the weaving.

Marissa McAfee, The Fates, 14 Sep 2020. Mixed Media

The warp ended up working extremely well, and I love how it acts as a skeleton providing support for the weaving. The lush and living weft fit snugly through the dry bone framework, but I did encounter challenges with the fragility of the flowers. I had to adapt to the different stem and leaf types and learn when to be gentle and when to be more forceful. The evolution of this piece was something unexpected. I took steps back and decided to add more layers of textures to create depth. The inchworm that I found on one of the purple flowers was also something unexpected!

**Side note: I’ve also decided to photograph this weaving daily to capture its gradual decay. I’m hoping it’s able to communicate an even deeper message when everything has turned dry and ghostly 🙂

Materials Used: flowers, branches, dead grass sticks, string, packing tape

Decay over a week
Mortality

Inspiration for my second piece came from wanting to combine my painting experience with the new weaving techniques I’ve been exploring. I wanted to create something unlike anything I’ve ever done before, and this piece really took me out of my comfort zone.

For my weft material, I painted a self-portrait on a scrap piece of canvas I found behind my desk. I used the backing of a frame left behind in my apartment as the loom. I struggled with deciding what to use as my warp material because I wasn’t quite sure what features I wanted to emphasize in the portrait. I initially wanted to use paintbrushes as the warp, but the size wasn’t right, and I didn’t have enough. I settled for string and wrapped the frame, but then I decided to rotate the canvas so that it was a more interesting diamond shape. Satisfied with this composition, I began the painting and deconstructing process.

I had never painted a self-portrait before, and I found it difficult. I was able to let go of my fears and hesitations and work through it, however, because I knew I was going to cut it into wefting strips. I was no longer afraid of “messing up.” Creating and then separating a representation of myself was a surprising and interesting process.

I was pleasantly surprised by the result because I never fully knew what to expect from the finished weaving. I didn’t really have a clear end goal for this project, but I’m really happy that I stepped out of my comfort zone to complete it. I’m excited to grow and further challenge myself as an artist.

Marissa McAfee, Dissociation, 14 Sep 2020. Mixed Media

Materials Used: string, canvas, acrylic paint, picture frame backing

Oh, I also baked a bonus weaving this week and wove the lattice of a pie!

Improvisational Weaving- Marissa

I made my first weaving using two extra photographs that didn’t make my photo wall. I picked these two in particular to weave together because they were both images of the sky just taken at different times of the day. The first is a photo of the stars that I took at an astronomy village, and the second is a photo of a sunset at the beach.

glossy photographs woven together and taped to cardboard for support

When I cut the photos into strips, I became more aware of the different textures and colors found throughout the scenes. After noticing these differences, I decided to weave the photos “out of order.” The middle strip features the rougher water texture from the sunset picture, and I think it provides a nice contrast with the smoother clouds in the starry night image. I was surprised to notice more characteristics of my photos as I converted them into my warp and weft materials.

foraged branch woven with twine and synthetic ivy

I had the idea of weaving natural and synthetic objects together, so I went outside to grab a branch as a loom. I cut a strand of fake ivy to use as the weft, and I chose twine as the warp because it was easy to maneuver the plastic leaves through it.

I was surprised by the flexibility of the branch, but it was actually helpful in wrapping the warp and weaving the weft. The leaves made it difficult to avoid weaving through the back side of the warp, but overall they provided a fun extra element to the piece.

I think it would be interesting to hang this particular weaving like a mobile. That would provide a unique way of viewing the piece, give a little bit of movement, and help to accentuate the natural forms of the branch. The process of making this piece has further sparked ideas for how to alter weavings after their construction.

two letters woven together and held in place with duct tape on a paper bag

This piece was really fun to make! My friend responded to my last letter to her from this past summer, and I was able to weave our conversation together. There were differences between the paper types that made the strips uneven, so this weaving is not as compact as the one made with photographs, but the unevenness has grown on me. I debated cutting the excess letter weft to start new strips below the one prior like I did with the photographs, but I instead decided to fold the strip on the end to make it feel more continuous. This decision contributed more to the gaps in my weaving, but I still like the way it flows.

I struggled with getting my letter to stay in place evenly as the warp, so I switched from using regular tape to duct tape . I was also hoping that some of our sentences would perfectly align, but that wasn’t really the case. Still, our different handwriting, ink color, and paper texture made the final product really interesting as a whole. I think the weaving captures the exchange and our voices well, and it gave me an opportunity to play with more conceptual ideas.