Ode to E-Tower Homies – maddie

Bunny, Penguin, Cat

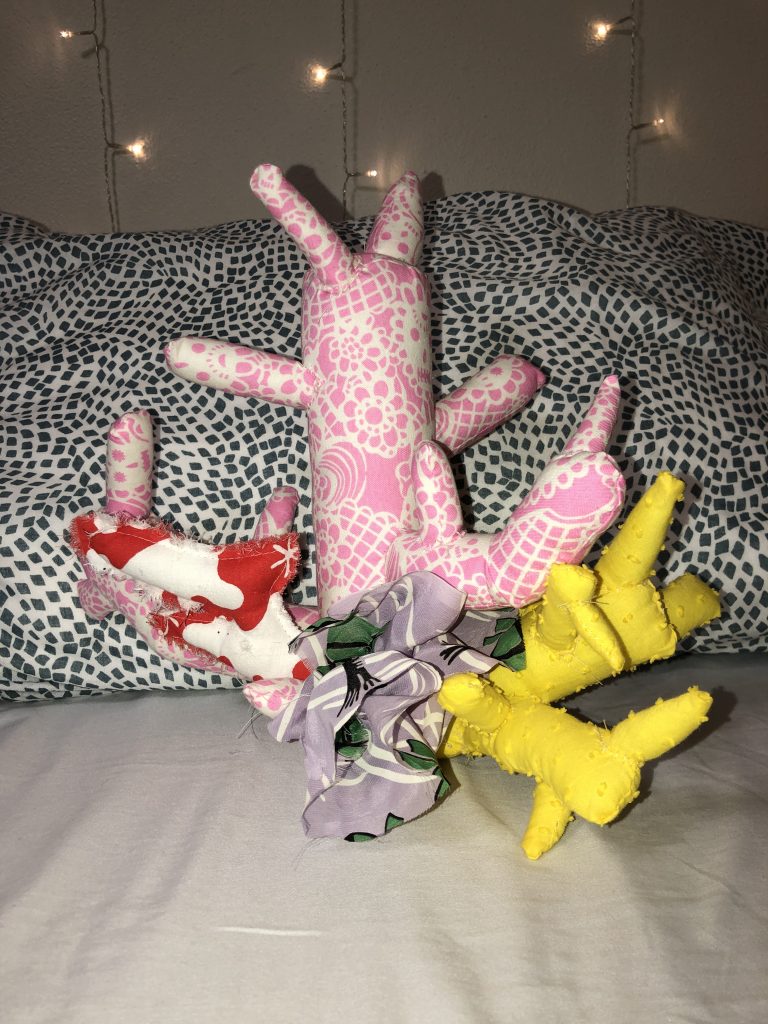
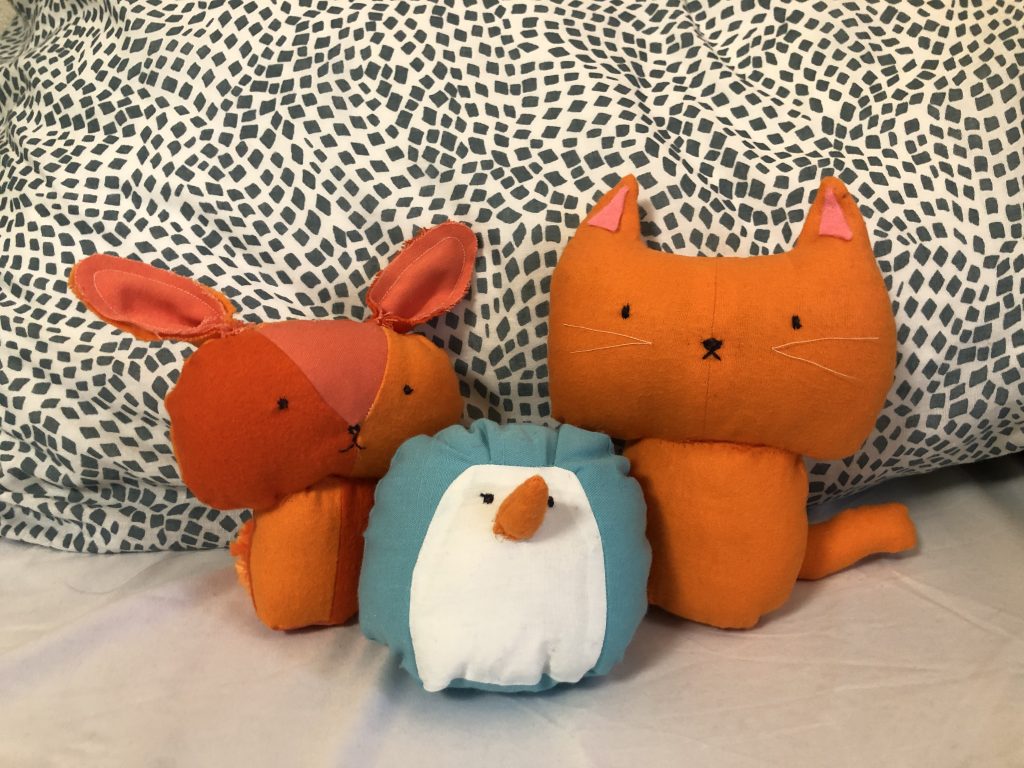
These are the completed stuffed animals for my project :)) For my final project, I made stuffed animals for the three closest friends I have made this semester in my dorm. Since we are all splitting up after this semester, in the sense that we won’t live in the same building, I decided to make these as a thank you and parting gift for the end of the semester.

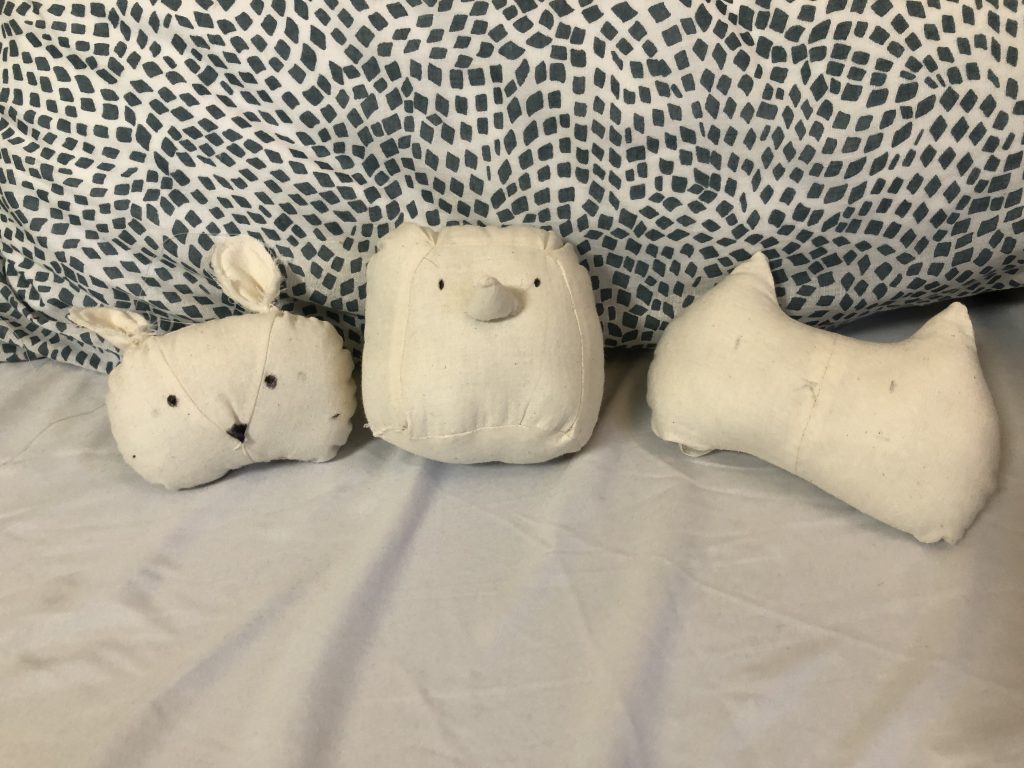
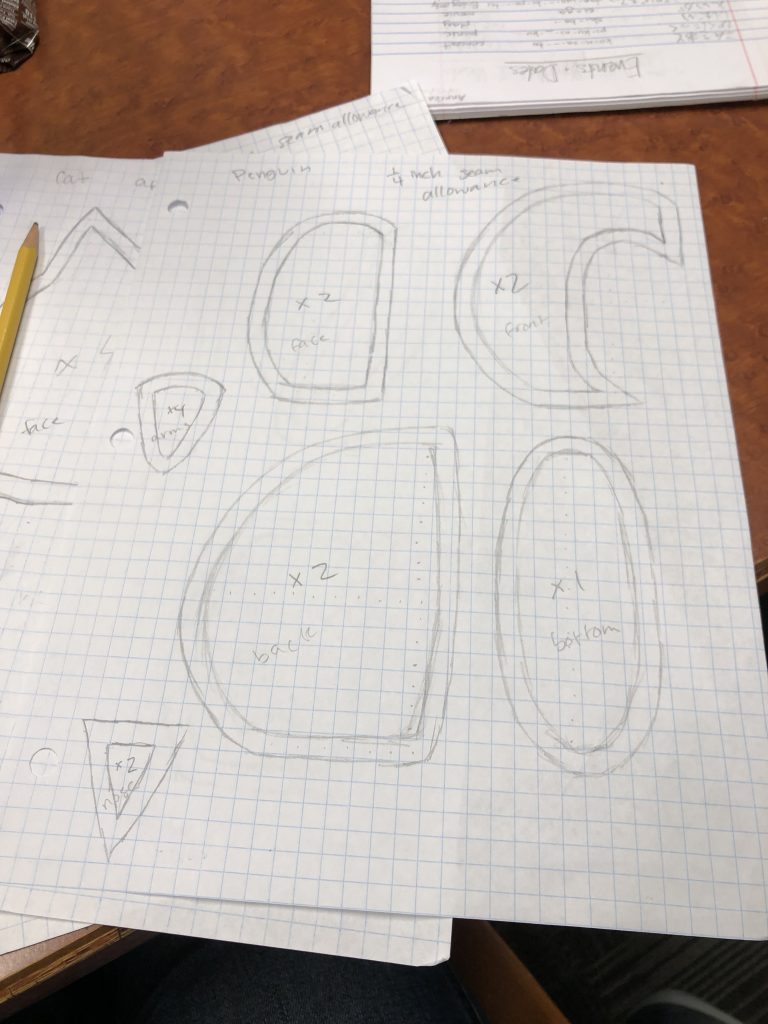
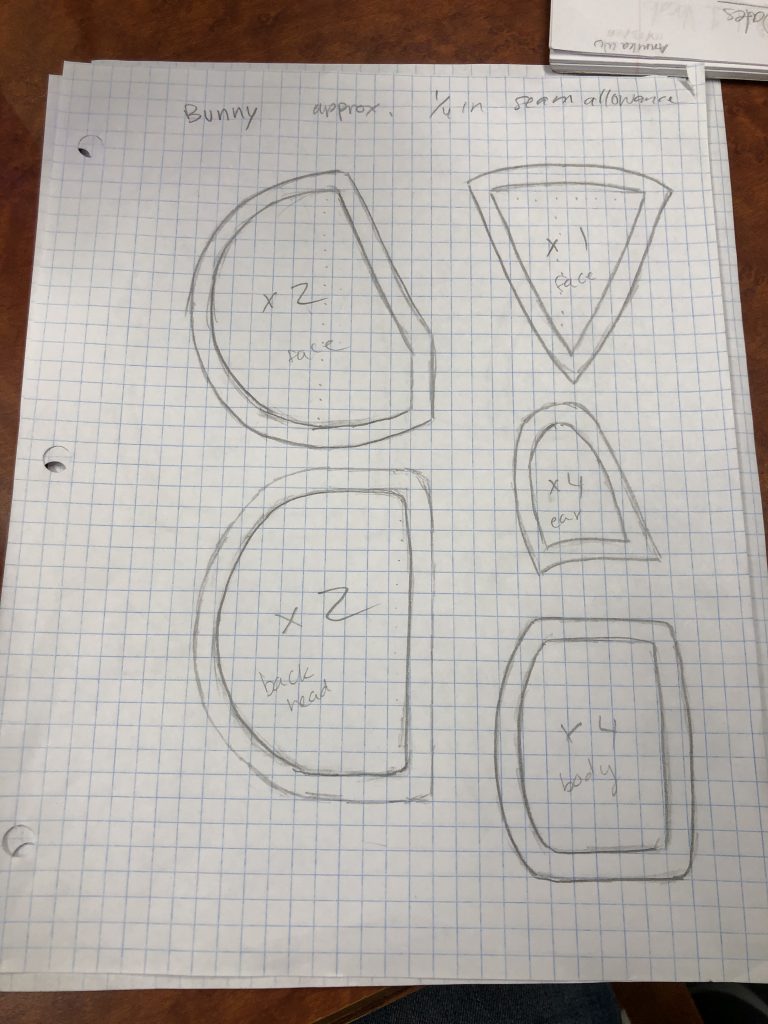
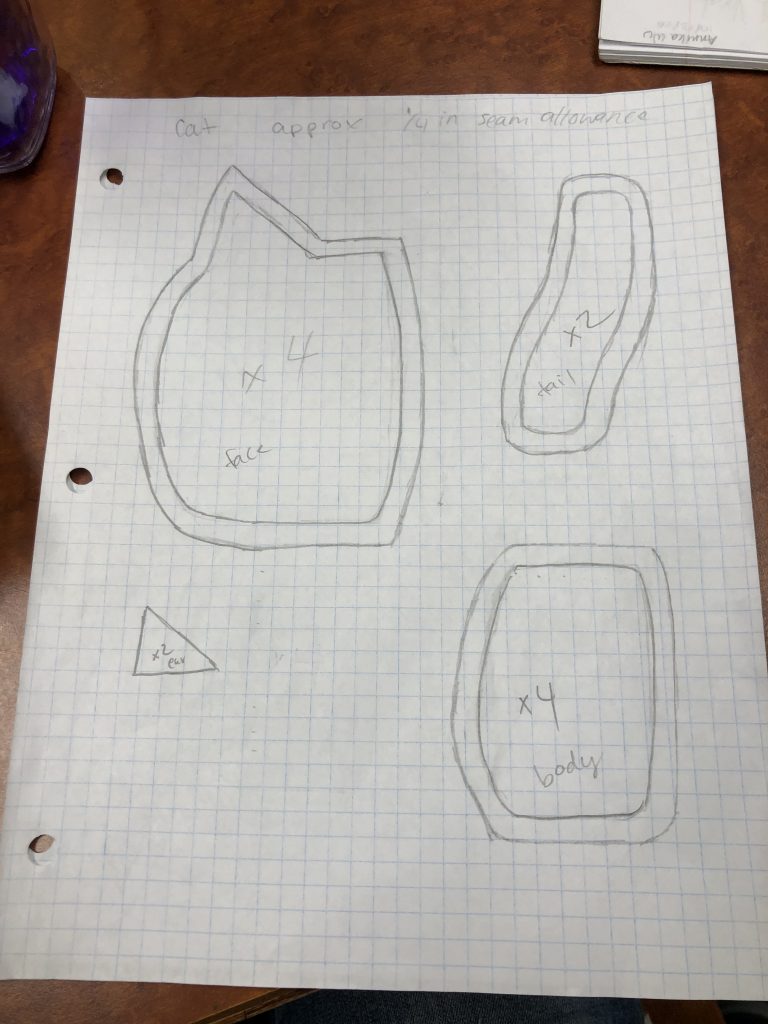
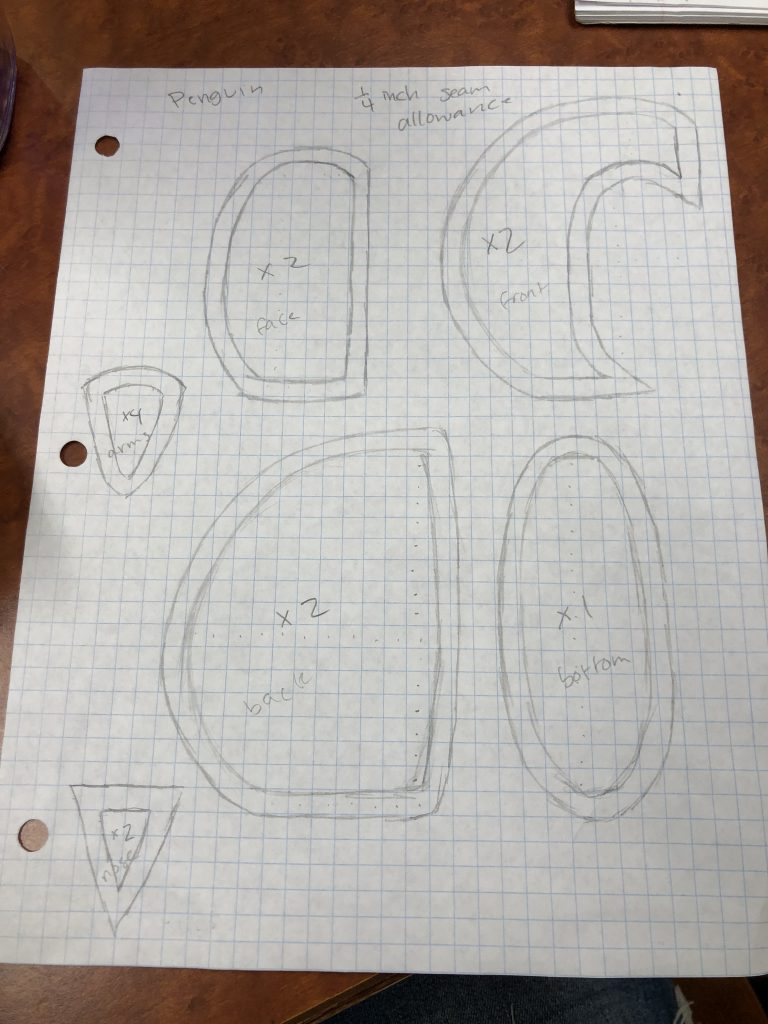
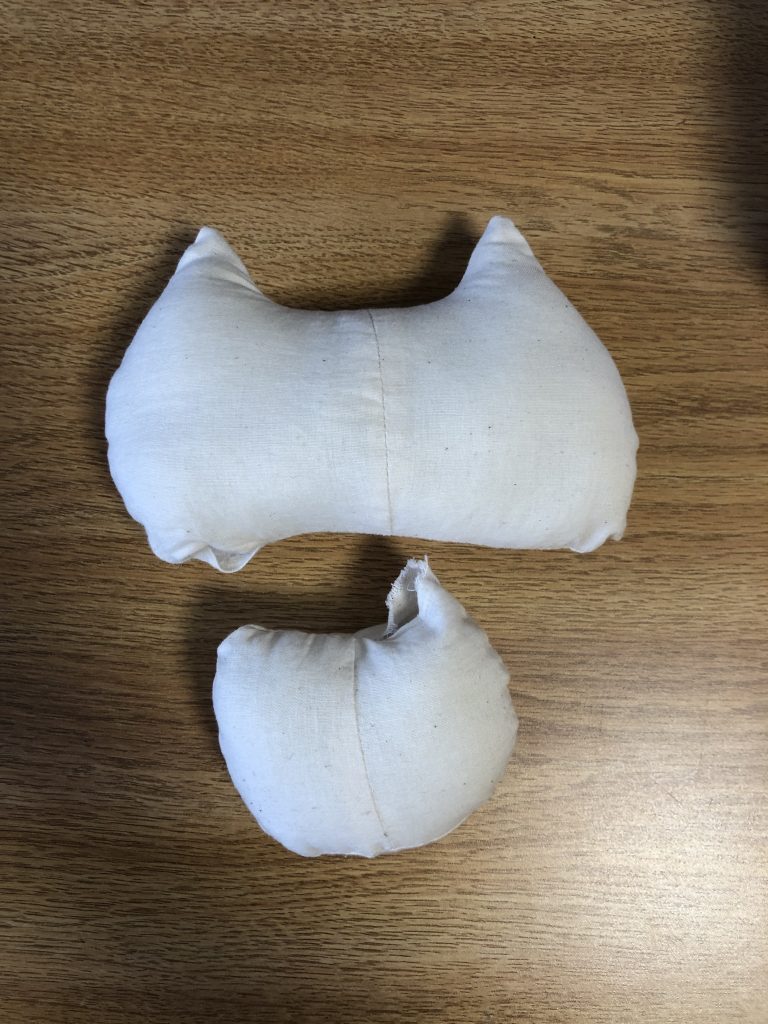
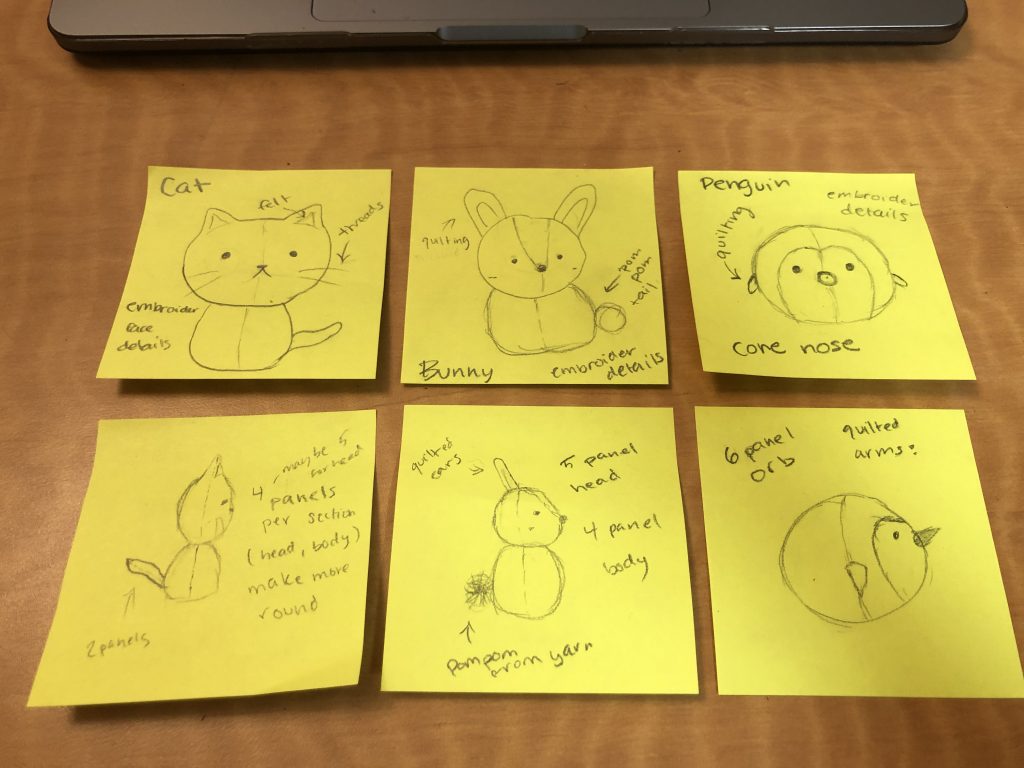
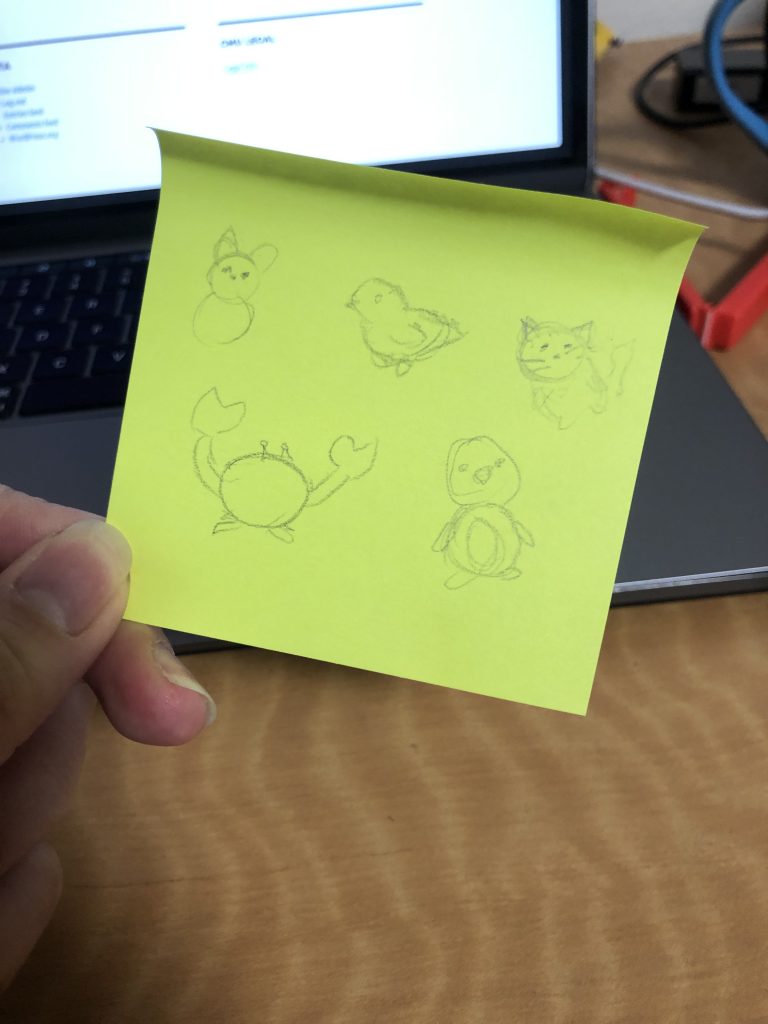
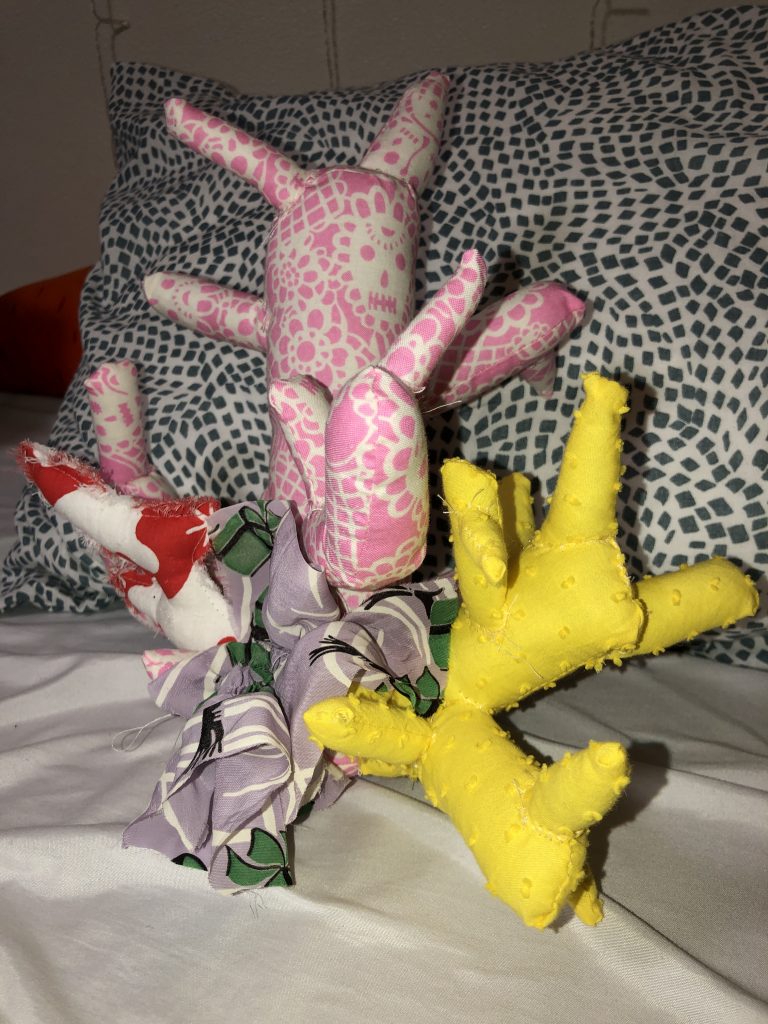
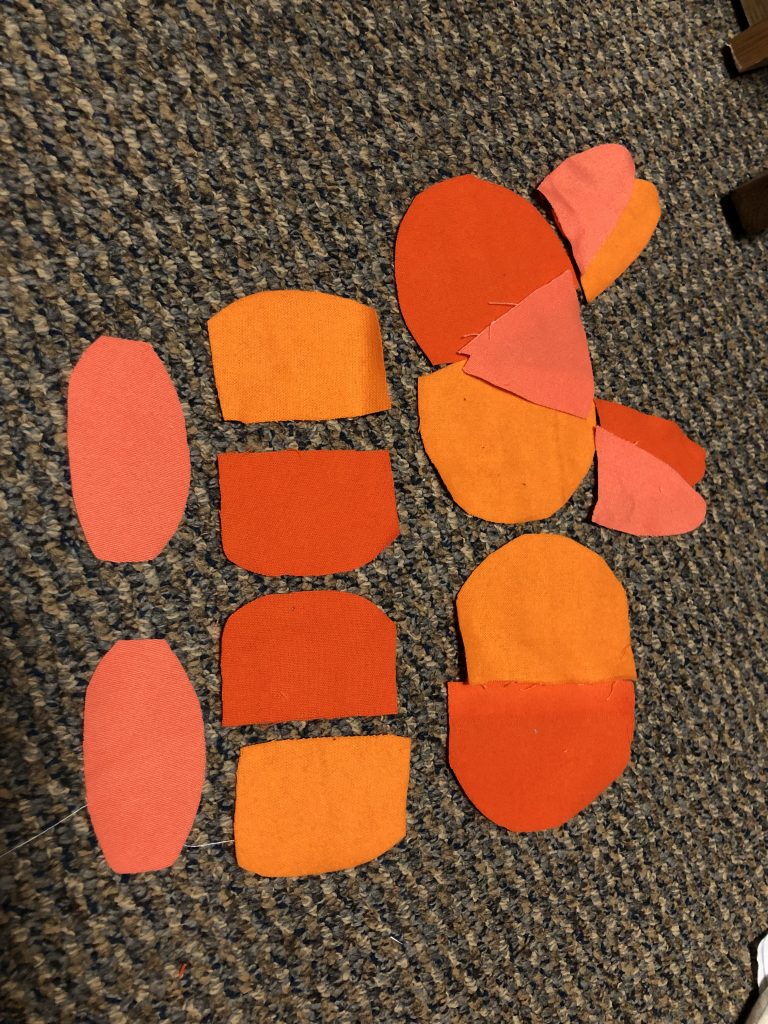
These were the models that I made in experimentation process. For the heads, the original patterns I made turned out pretty well. For the final versions, I just made minor adjustments to the width of the cat head and the size of the bunny ears. For the bodies, I had to make many adjustments to how I sewed them together. I originally planned to have four panels and then one circle on the bottom, but that ended up making a weird indent and corners at the top, so I tried making four panels and a circle/oval for top and bottom. I also experimented with adjusting the dimensions of the body to make them more proportional to the heads. The last adjustment I tried was making the head/body out of two panels instead of four by cutting the pattern on a folded edge.

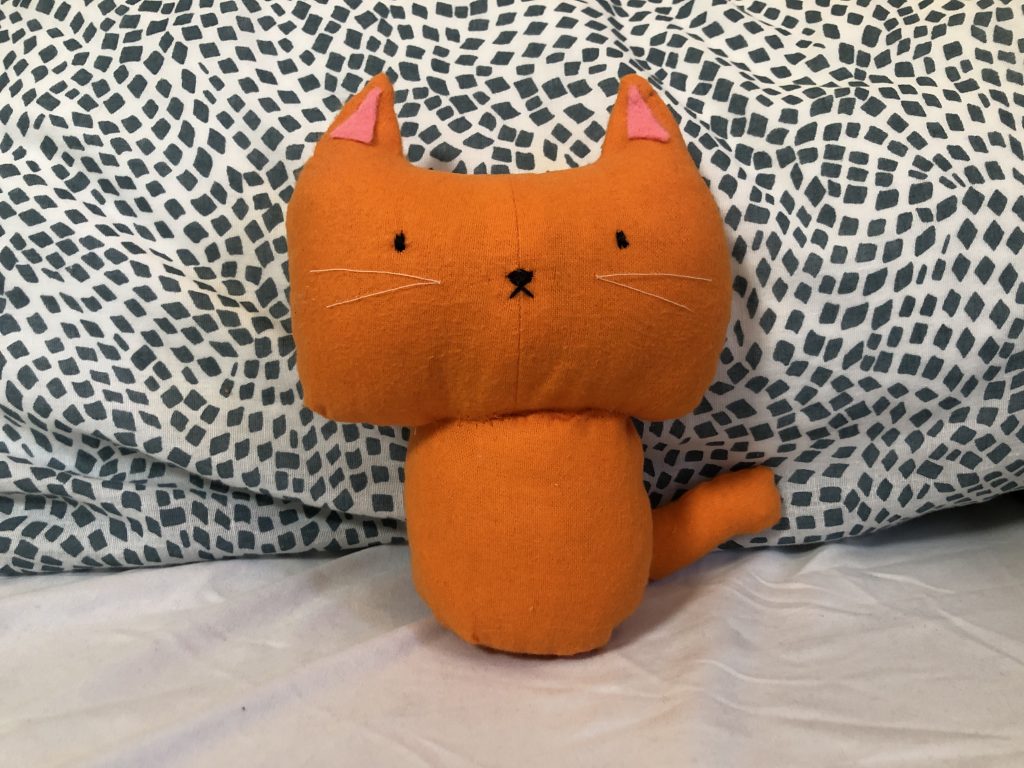
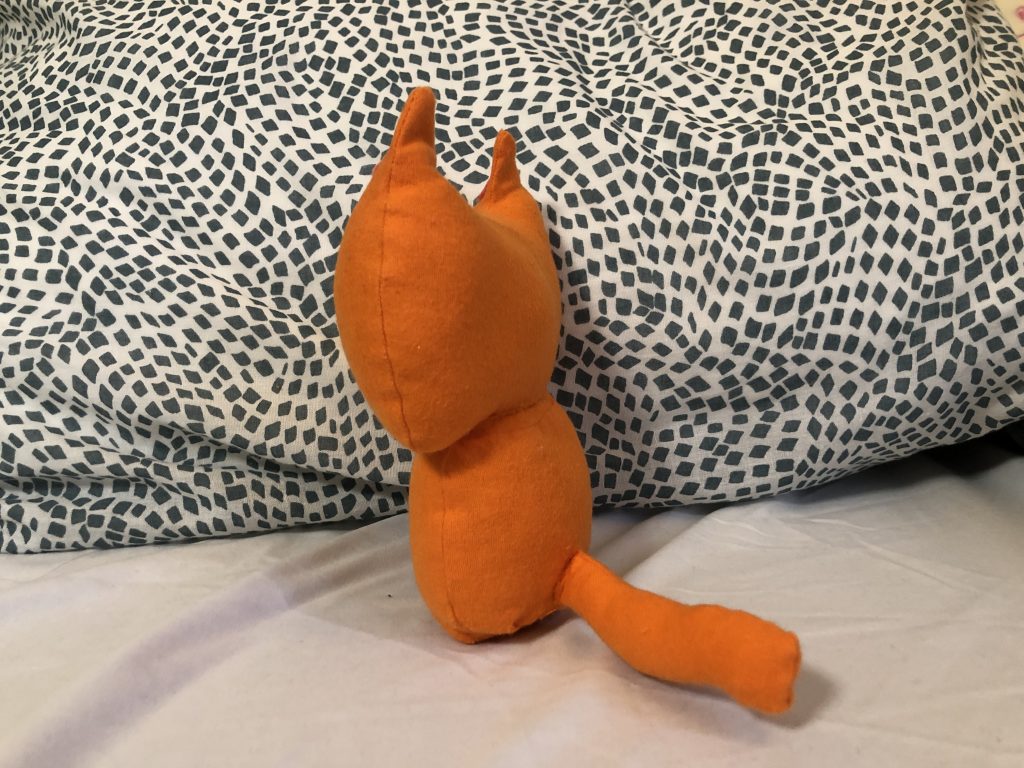
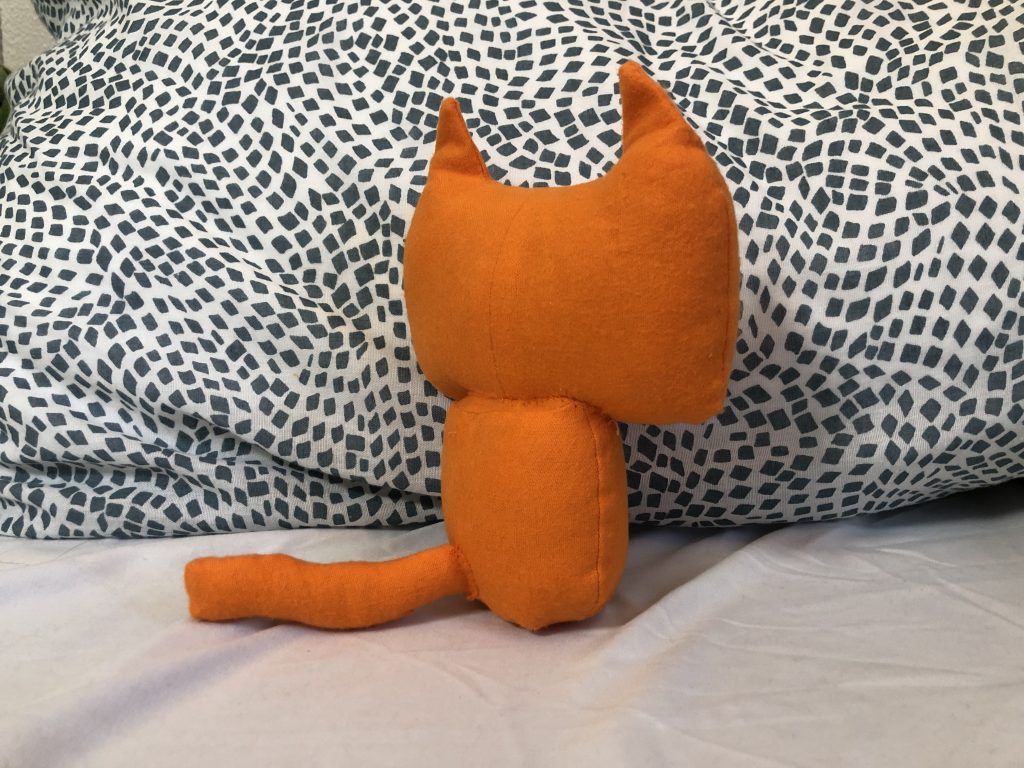
I think that the cat came out most like my original sketch for the design. I intended for it to look like a simple, recognizable orange cat. For this stuffy, I made the head using four panels. I sewed the two halves together of the face together and pressed the seams, then sewed the front and back together, then stuffed it. For the body, I used two panels and then two ovals to make a more tube like structure and then stuffed it. For the tail, I just cut two wavy rectangles and sewed them together then stuffed it and attached it to the body. Since the head didn’t have an oval at the bottom, it didn’t quite fit on the body, so it looks a little bit like it is slouching. Finally, I added face details with embroidery and used iron on adhesive to attach the ears. My biggest challenge with this stuffed animal was making the head and body proportional to each other because originally, the head was much wider and it looked weird.

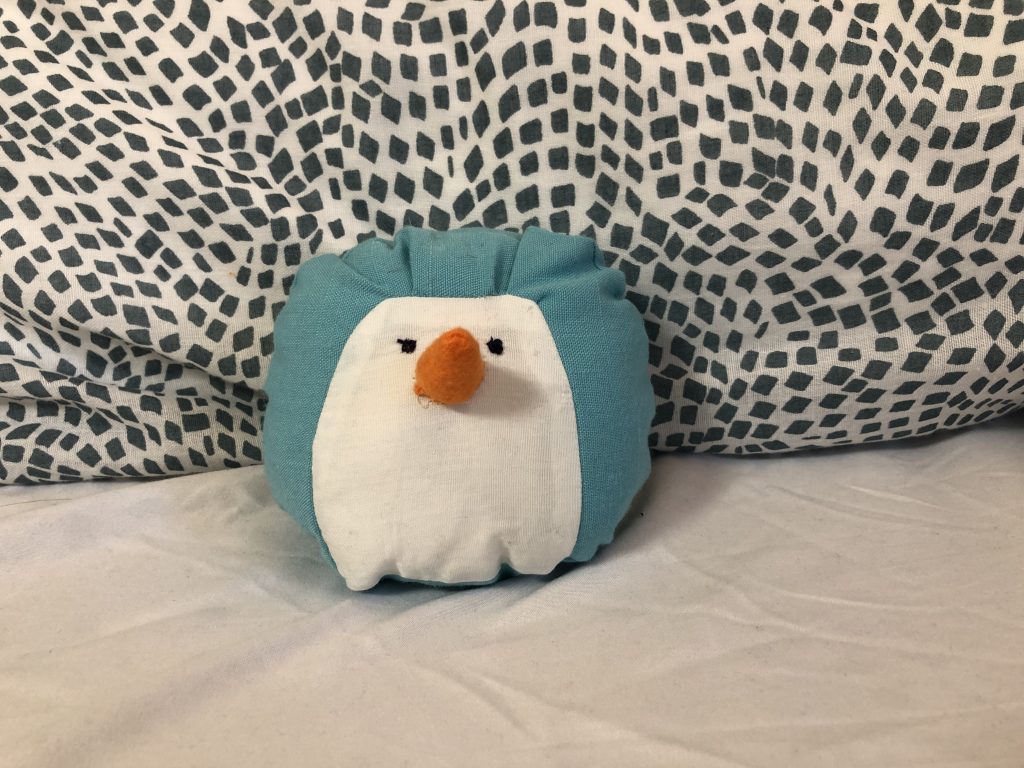
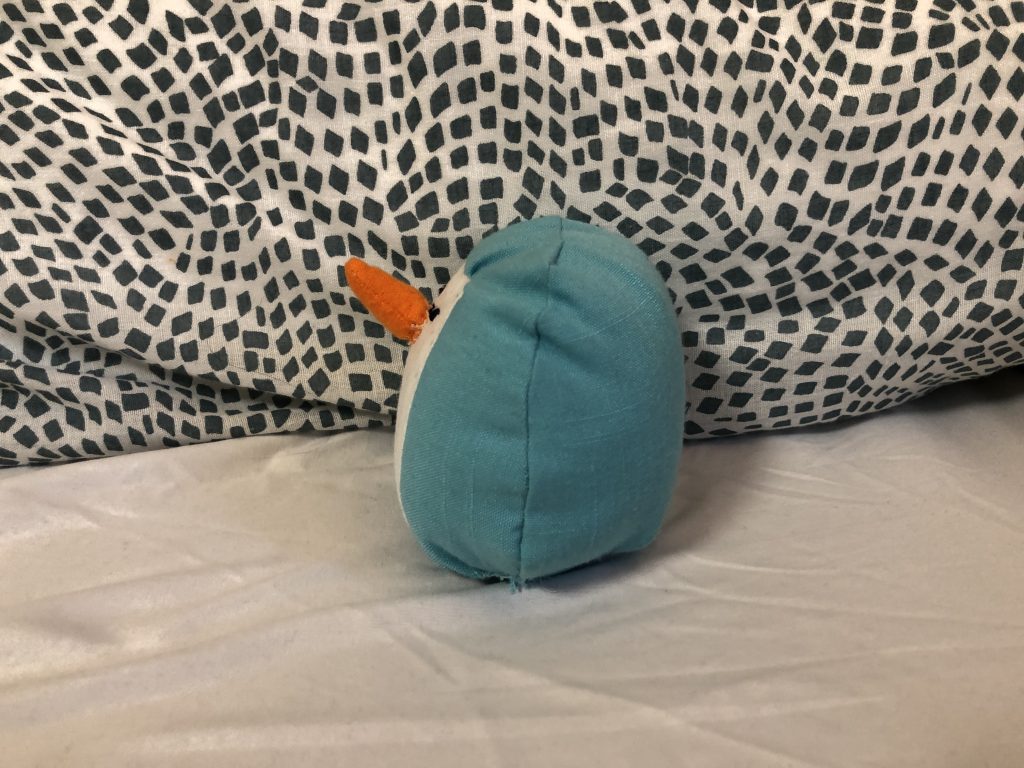
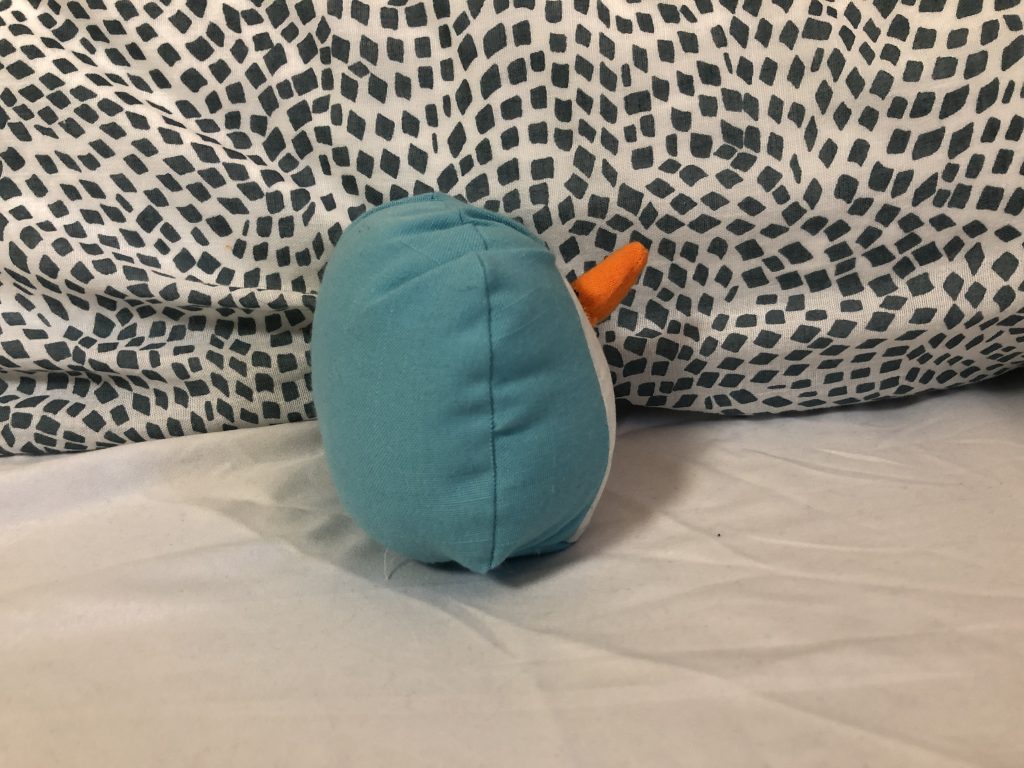
The penguin, initially, was challenging to design the pattern because I wanted to have more of the v shape at the top of the face, but after trying many times, I decided it was too difficult. After changing the pattern to just have a flat top, it was very quick to sew the final product and add the nose and details since this was just one blob while the other two stuffed animals were ~3 blobs. I think that I would have wanted to make this slightly bigger but I didn’t have enough fabric to scale it up.

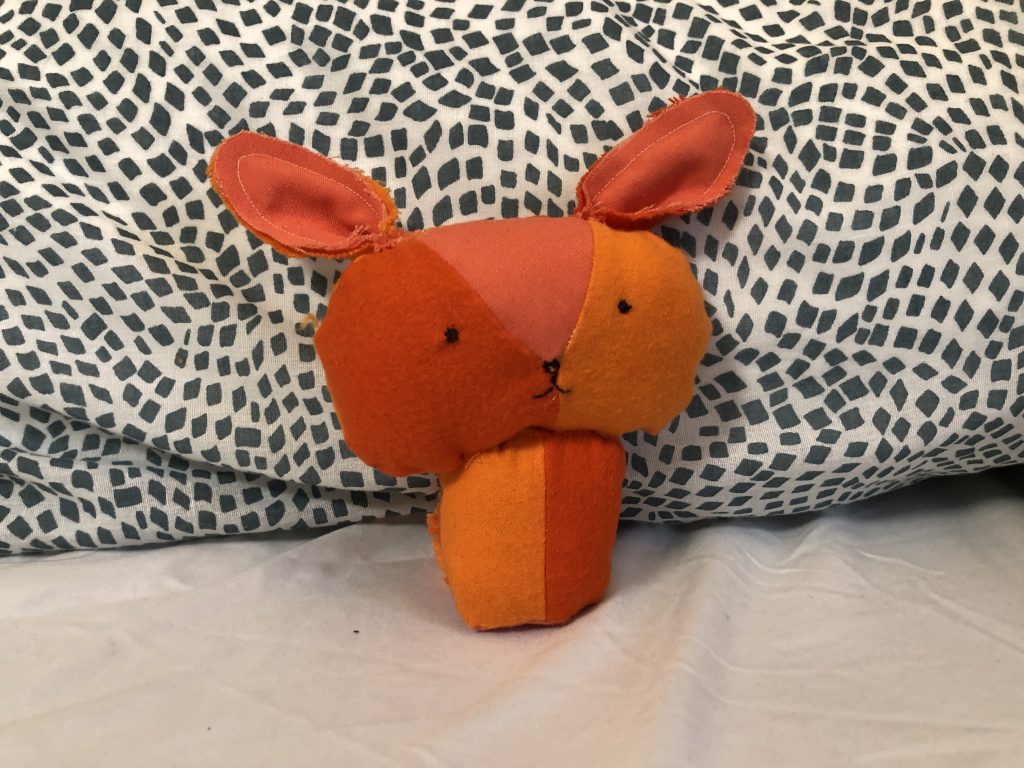
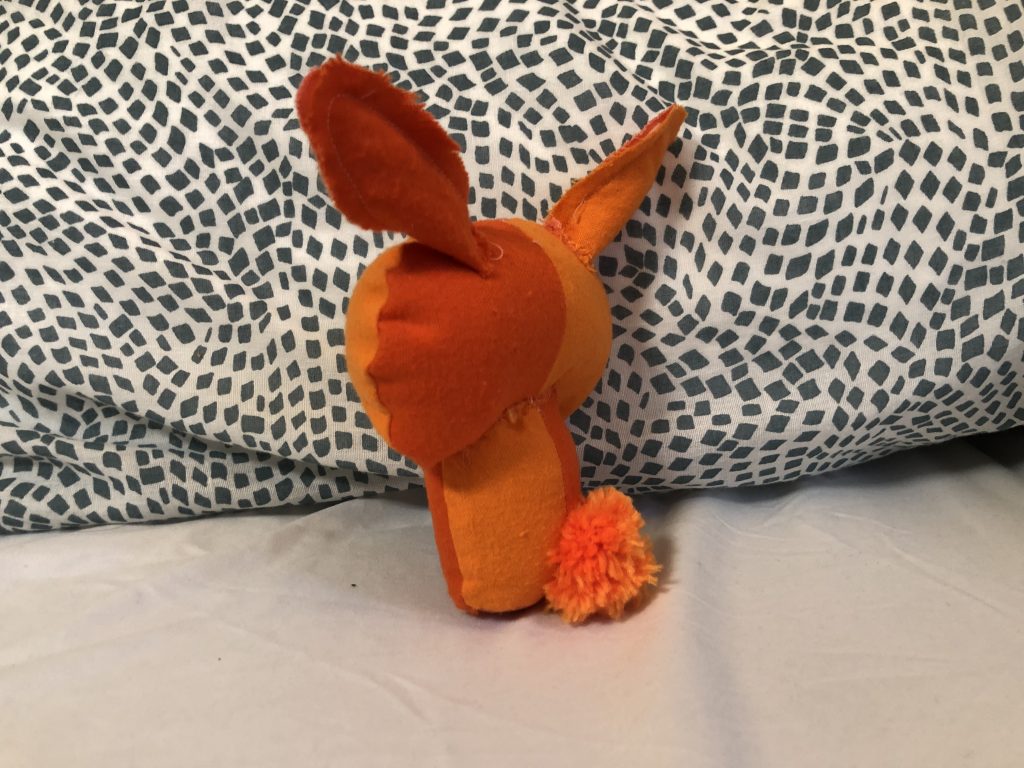
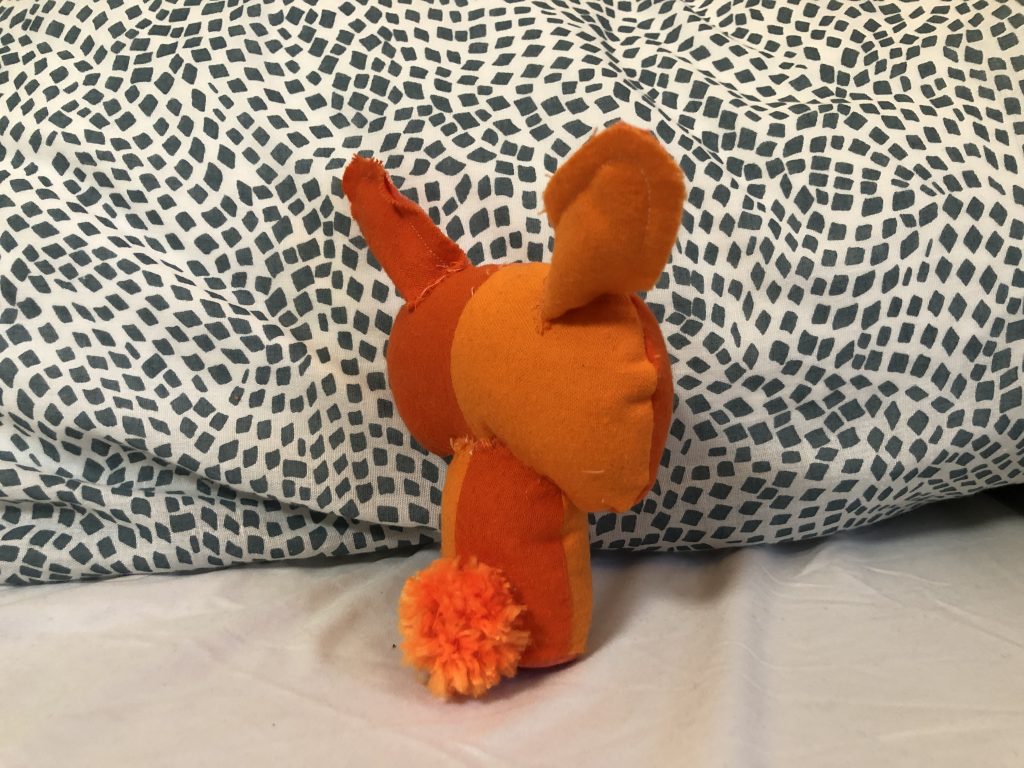
The bunny is definitely my favorite out of the three. My original intention was to make the bunny out of plain white muslin fabric, but I decided to experiment with color blocking instead and used three shades of orange/red to make an alternating pattern.

In my model, I didn’t really like the way I had connected the ears so I tried sewing them into the head before flipping it inside out, but I couldn’t figure it out without changing the pattern completely, so I had to stick with the original way. I finished the final details with embroidery, but I think I preferred the bunny before I added a face. Then I made an orange pom pom and attached it to the back as a fluffy tail.

I am very happy with the way that these turned out and I hope that my friends like them!

independent project update – maddie

So far, I have worked on sketching all of my patterns. I used graph paper with 1/4 inch squares so it was easy to add on seam allowance. I started to make some test pieces of the cat, but after doing that I feel like the head is too wide / the body is too small so I am going to work on adjusting the pattern. I think I will just make the body slightly wider so it is more proportional to the head. I had a little bit of trouble figuring out if I should sew the head and body together before or after stuffing, and decided that it would be easiest to sew together after it’s stuffed since it is an abnormal shape.

digital repeat pattern – maddie

Historical pattern

For my digital repeat pattern, I am interrupting a historical pattern. The pattern above, found in the Met collection, was the inspiration for my pattern. By taking central elements from this historical pattern, I was able to create a similar pattern.

This is the final swatch / block design for my pattern. To “interrupt” the historical pattern, I took key elements like the fish, the waves, and the splashes and added a boat and a person. I added a boat because of the history in mythology of giant sea creatures endangering fishermen and destroying boats.

For the final swatch, I combined these two patterns that I had previously created so that there is more variety throughout the pattern. The pattern on the left is featured essentially the same and the pattern on the right was partially mirrored to create more balance between the two.

sample for print

Once patterned, I put a darker background so that the light pastels pop more. I chose to use a light color scheme to mimic the original historic pattern. I didn’t make the waves a solid color so that the darkness could be seen more and bring out the contrast with the lightness much more.

larger scale of pattern

I wanted to make the two patterns more offset from each other, but I found that making the block offset did not work when I went to create a pattern. I also had a little bit of trouble trying to fill some of the blank space in the top right corner of the swatch. In the end, I added another little splash in the corner to fill the negative space. Overall, I am happy with how the pattern turned out :))

Project proposal – Maddie

Create a proposal about the direction you are your project.  Include in your proposals the following: three developed sketches or collages of your idea, a paragraph that states the core concept, a paragraph that articulates your choice of materials, and a practical timeline for your project. Create a blog post for your proposal for Nov. 24 in category labeled Independent Project.

For my final project, I plan to make small stuffed animals for my friends. I have asked each of them what their favorite animal is and sketched out concept drawings for a cat, a bunny, and a penguin. Since we are nearing Thanksgiving and the holiday season, I want to show my appreciation for my friends by making these and giving the stuffed animals as gifts to them. Throughout this project, I will learn how to design patterns for 3D objects, continue improving my machine and hand sewing skills, and learn about some methods of applique.

For materials, I will be using a variety of fabrics that I have on hand. The cat will use red and orange fabric for the main head and body, the bunny will use the bleached muslin fabric, pink felt for the ear details, and white yarn for the pompom tail, the penguin will use bleached muslin and blue fabric for the body as well as orange for the beak/nose. The black felt will be used to make eyes and other face details as well as black embroidery floss. Not pictured, I will also use some of the quilt batting to make the ears for the bunny and the arms for the penguin because it will add some structure without fully stuffing those parts.

Timeline:
11/30 – Finish patterns
12/6 – Finish main bodies
12/8 – Finish final details
12/8-12-10 – Final presentations / critiques

Beginning Repeat Patterns – Maddie

These were the two digital repeat patterns that I made for the beginning portion of the project. I chose to go with the first prompt which was about interrupting historical patterns.

Historical pattern

This is the historical pattern that I based my components of the pattern off of. I redrew the fish and the waves with some of the splashes so that I captured the main elements, but added some of my own as well. I added a little sail boat and a person with their arms up. In the patterns my intention was to make it look like the boat is sailing towards to giant fish and the person tossed in the air and within grasp of the fish. There are many historical tales of sea monsters that attack fishermen so I thought that I would implement that into my repeat pattern.

These were my drawings before I did the image trace in Adobe Illustrator. Once I put the image into Illustrator, I made copies of some of the waves and the small circle so that I could add them to the texture of the pattern. I intended for this to be on a dark background, so some of the colors are very light and hard to see on the white art board.

Digital Repeat Pattern – Maddie

https://www.metmuseum.org/at/collection/search/53674?searchField=All&sortBy=Relevance&ft=textile&offset=200&rpp=20&pos=202

This textile that I found from the Met museum collection has a repeating pattern of the fish and the waves. This is an 18th century textile of Chinese or Japanese culture. I chose this as my inspiration because I really enjoy the movement of the waves and the details on the fish. At the bottom there also appears to be an edge pattern that its pretty interesting.

Elysian Field https://www.flavorpaper.com/wallpaper/patterns/handscreened/elysian-fields

This wallpaper designed by Dan Funderburgh was found on the Flavor Paper website. The design is an intricate mix of carnivorous plant and bats instead of robins and typical flowers. I really like that the designer changed the elements of a typical floral pattern to use unexpected elements that you wouldn’t really notice unless you were paying close attention.

Encoded Cloth from the Future p3 – Maddie

For my project, I imagined the future pretty unrealistically from a fantastical point of view. I imagined that we may reach a point where people can live underwater and we as humans start an underwater civilization. Living underwater created endless possibilities of marine life. For my encoded cloth, I decided to create a coral like plush.

This is the finished product! I picture this as a toy / plush that a young child may have because it has many small limbs that are good for grabbing/holding. Even though some may look like spikes, everything is very soft 🙂 My intention was to create three different types of “coral” using three different techniques, but towards the end I decided to make a fourth coral to make the whole project bigger. I wanted to experiment with using different fabric textures and patterns to make the coral feel more lively and playful, as a stuffed animal would.

This was the first coral that I made using the technique of sewing and stuffing many small parts and then hand stitching them all together. I found that this create the most solid, coral like structure because it was easiest to make the limbs protruding in multiple directions. However, this was the most time consuming because I had to hand sew each stuffing hole closed and then attach the pieces together.

This was the second coral piece, I made it by sewing two pieces of fabric wrong sides together. Then I distressed the edges by shredding with the point of the seam ripper to create a fluffy fringe texture. I also attempted to make small holes and pull out some pieces of stuffing to create little wispy pieces that added to the fluffy texture but I found that to be too difficult to put all over the piece. This piece didn’t exactly simulate the coral shape as well as the previous piece but the texture adds to the overall varying texture of the entire piece.

This was the third piece that I made. I made this by taking small arc piece and sewing two lines of basting stitches without locking them. Then I gathered the fabric by pulling the threads so that I got ruffled pieces of fabric which I then sewed together to form one big ruffled mass. I had a little bit of trouble sewing everything together because the ruffles made it hard to find where the edges were and keep track of where I was sewing. I ended up missing a few spots and having to go over them again to ensure that all the ends were incorporated into the mass. This simulated more of an anemone shape which is an essential part of marine life and coral reefs.

This was the last piece that I added on using the same technique as the yellow coral. It is the largest of the four pieces and I feel like when I sized up the pieces, they weren’t proportioned exactly correctly. This resulted in the piece looking more cactus like, but once I put all the pieces together I think it still gave off the coral feel. Since this was a larger piece for the central tube, I closed the ends with circle pieces so that it stood more structured instead of tapering into a straight closed end. This was a little challenging as well since the circle was fairly small and difficult to sew together. I also experimented a little bit with darts for some of the larger protruding pieces so that they bent up instead of just sticking straight up.

Overall, I am very happy with how it turned out and the many textures that were created. The way it all comes together makes it feel very coral like and it reminds me of childhood stuffies 🙂

encoded cloth p2 – maddie

  1. robots that play instruments by mimicking motions of past players
  2. mood changing lights
  3. vr workplace
  4. self cleaning shoes
  5. color changing textiles
  6. clothes that can quickly be tailored
  7. air filtering mask fashion
  8. autonomous public transport
  9. biomass energy
  10. temperature controlled clothes/outerwear
  11. war over water
  12. green buildings
  13. vertical gardens
  14. enclosed large scale agriculture
  15. small scale agriculture? –> single household
  16. no more cars
  17. teleportation
  18. ai artists
  19. enlarged art with robots
  20. soft monuments –> giant plushies
  21. fast global communication
  22. underwater communities
  23. plarn knit bags
  24. automatic building risers
  25. fully diverse communities
  26. moving bridges
  27. moving staircases
  28. giant dogs
  29. underwater vacations
  30. life in space
  31. smart glasses
  32. contacts with tech
  33. sound chips in head
  34. no trees –> all burned
  35. burnt landscapes
  36. synthetic gardens
  37. many skylights
  38. auto brightness lights
  39. rain filtering
  40. trash mountains taller than Mt. Everest
  41. unstainable shirts
  42. underwater paths
  43. walk on ocean floor
  44. commoditized air like in the lorax
  45. super shrinking/growing
  46. trash compacting robot ai like wall e
  47. restickable stickers / non permanent stickers
  48. robotic swimming / swim assist in deep water
  49. teleportation
  50. avg life expectancy +10 years
  51. faster space travel
  52. green fuel sources
  53. space fashion
  54. among us becomes real life – in space ship with imposters
  55. communicate with pets
  56. indoor household gardens
  57. auto care robots for gardens / agriculture
  58. convertible shoes
  59. color changing cars
  60. expandable cars
  61. real hoverboard
  62. holographic travel – like vr but in the real world without physically traveling??
  63. no one leaves the house ever again
  64. cloning dead people
  65. dead people ai?
  66. personal theme music playing in ear
  67. robots that do hair
  68. holographic performances
  69. dream projecting
  70. life simulator with people/places/things from own life
  71. secret entrances
  72. magnet cars – like maglev train but cars?
  73. giant butterflies
  74. wings for humans
  75. vr in more video games
  76. virtual conversation with life size screens – feels like you’re really talking to them
  77. flood damage to homes
  78. people stranded in floods
  79. better prosthetics
  80. snowing ash from fires
  81. smoky/hazy skies
  82. no single use containers/packaging/etc.
  83. dead coral reefs
  84. permanent makeup
  85. endless protests
  86. free music streaming to all
  87. giant tablets
  88. cure to cancer
  89. still in COVID-19 pandemic in 2030
  90. no pandemic but still wear masks because everyone is scared of germs
  91. houses integrated with nature
  92. giant tree houses!!
  93. rainforests rebuilt
  94. rainforests destroyed
  95. giant pandas extinct
  96. large igloos in winter
  97. enlarged snowflakes
  98. ice travel
  99. very elevated houses
  100. california burnt to a crisp

encoded cloth p1 – maddie

To be completely honest, I wasn’t sure whether I was optimistic or worried about the future when I was thinking about what 2030 would look like. Really, my confusion stemmed from the uncertainty surrounding the current climate crisis. Will we resolve the climate crisis by 2030? or will the world turn into an apocalyptic horror story? If we resolve the go carbon neutral, what new technologies could we create? and on the other hand, if we continue to rely on fossil fuels what damage from climate change will we be left with? “Realistic” can’t truly be realistic because nobody knows what will happen.

As much as I wanted to be optimistic, I had to create a combination of sorts that represented how I saw the future.

This is what I sketched for my image of the future. While it doesn’t show the full scope of things, I imagine that we will have new technology and some form of solution to the climate crisis, but I think that the solution will come too late and the effects of climate change will be present. For one, there will be a rise in sea levels and many cities will be flooded, resulting in the building of elevated buildings, railways, and roads. However, there will still be many marginalized communities that will be left to suffer the consequences of the floods and other natural disasters. People will be too distracted by the illusions of new technology and green energy sources that they will ignore those that need help.

Milan: Bosco verticale (vertical garden) | Oppla

The new tech I imagined is the implementation of green buildings and vertical gardens. Since a lot of the fertile land may be destroyed by natural disasters and wild fires, we may have to transition to other forms of agriculture and greenery. I also hope that in the future we have better public transportation systems, possibly the implementation of autonomous routes for public transit and electric trains/subways. It’s hard to see in the drawing, but I imagine the sky will be an apocalyptic orange/yellow color similar to how the sky was in California during the big wildfires. I also imagine that the air would be very thick and hazy.