Improvisational Weaving – Deeper Dive

For the Deeper Dive assignment, I decided to go for 3 medium sized weaves. They all use found materials that respond to a greater motif of reuse of common or unwanted materials to make something beautiful.

Materials: Old takeout container, baker’s twine, white twine, somen noodles, linguine pasta

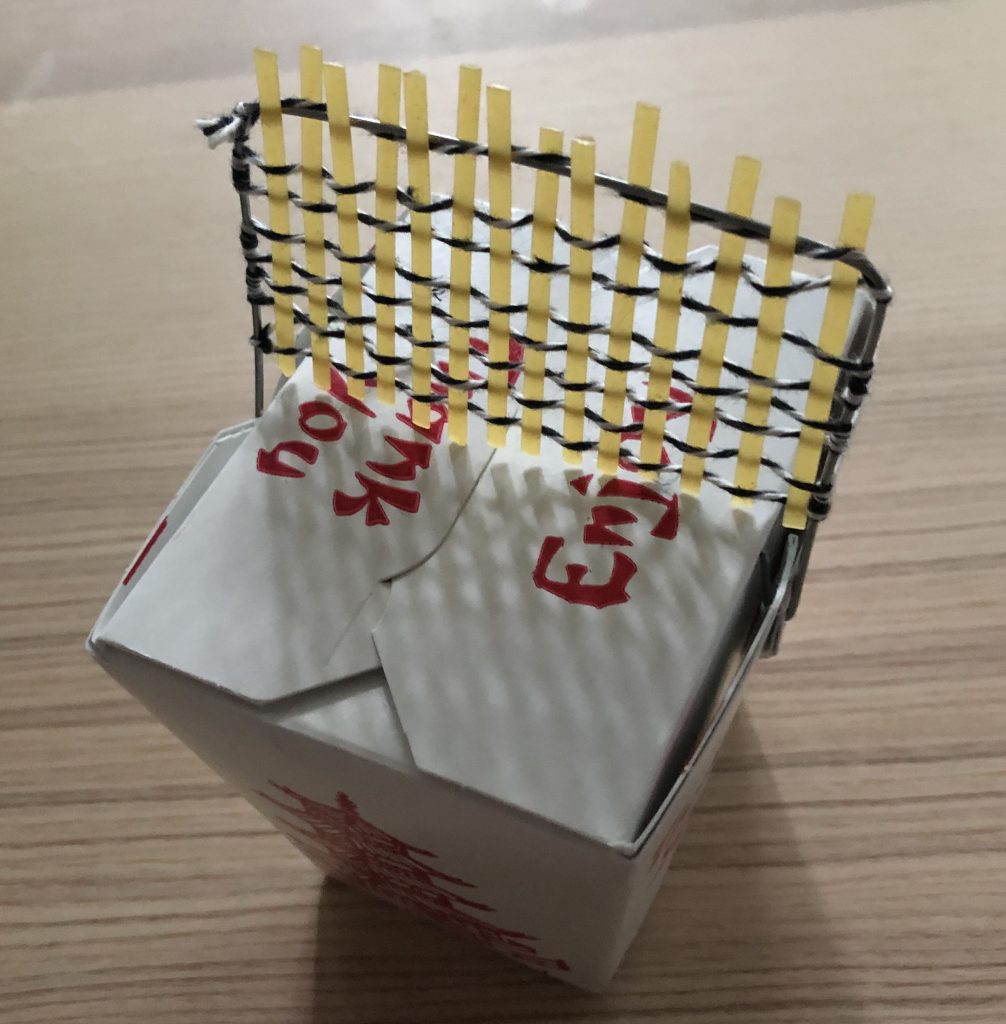
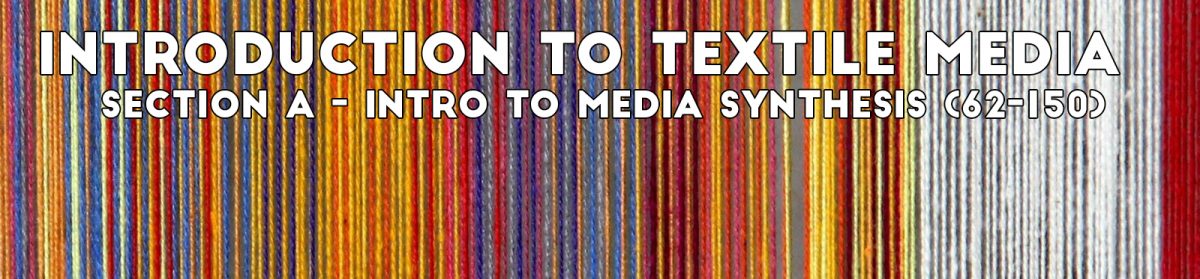
This first one is about noodles- the loom is an old plastic take out container that I grabbed out of our recycling pile. I chose baker’s twine as the warp, which I had trouble with trying to stay because of the slippery nature of the plastic container. So I made little incisions on the container for the warp to stay in, every 1/4″. For the weft, I used uncooked somen noodles, a string that was the same color, and uncooked linguine pasta. I wanted it to look like I used both uncooked and cooked noodles, but through string. I also tried to weave a more triangular shape instead of always weaving completely across.

Materials: old egg carton, fishing wire, dried baby’s breath, weeds, white twine

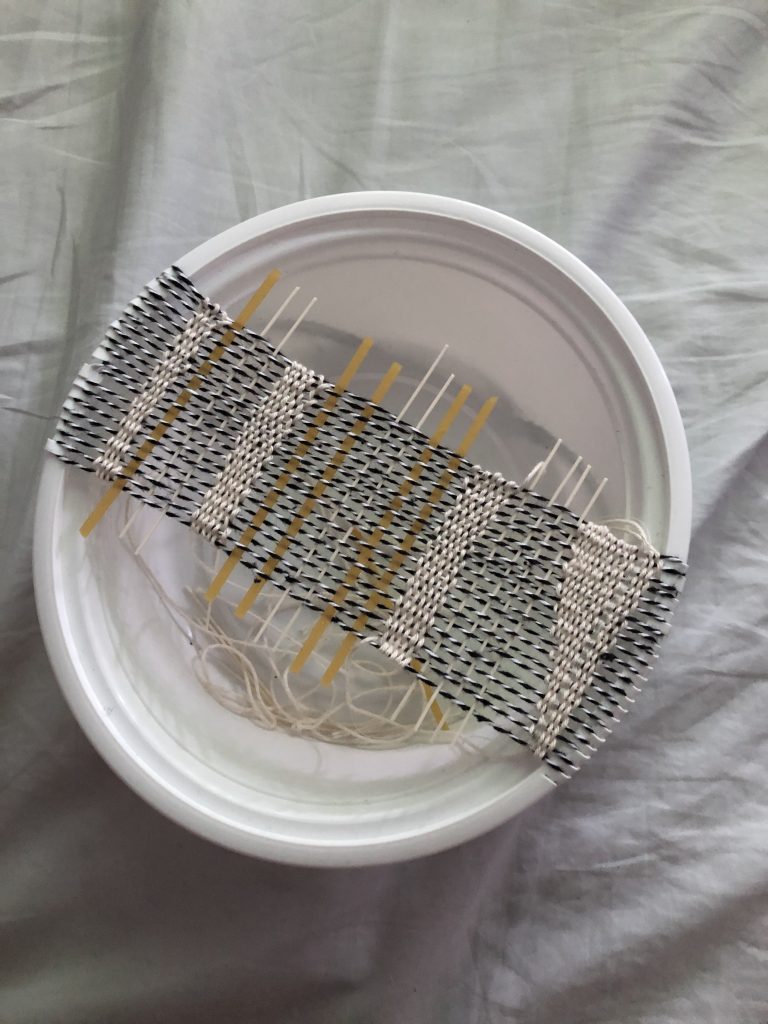
This second weave is about using old unwanted materials. The loom is an old egg carton I grabbed from my house’s recycling pile, and I cut into it to keep the warp in place. The warp is fishing wire I had from an old project, and it is supposed to be reminiscent of plastic recycling. As for the warp, I used dried flowers, something that people pick as beautiful but in turn kills the flowers and they eventually wilt and dry, and you throw them out, as well as weeds I found outside, and off-white string. But I wanted to show how you can make something beautiful out of things whose functions you no longer have a need for.

Materials: first aid kit container, old disposable mask, cotton swabs

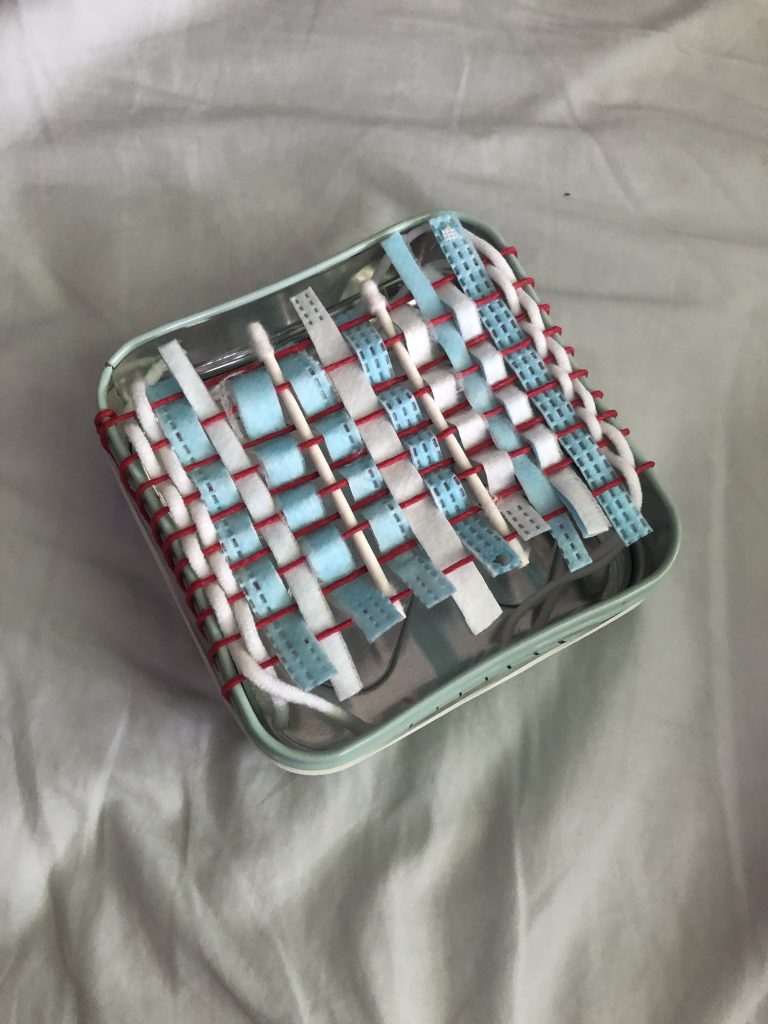
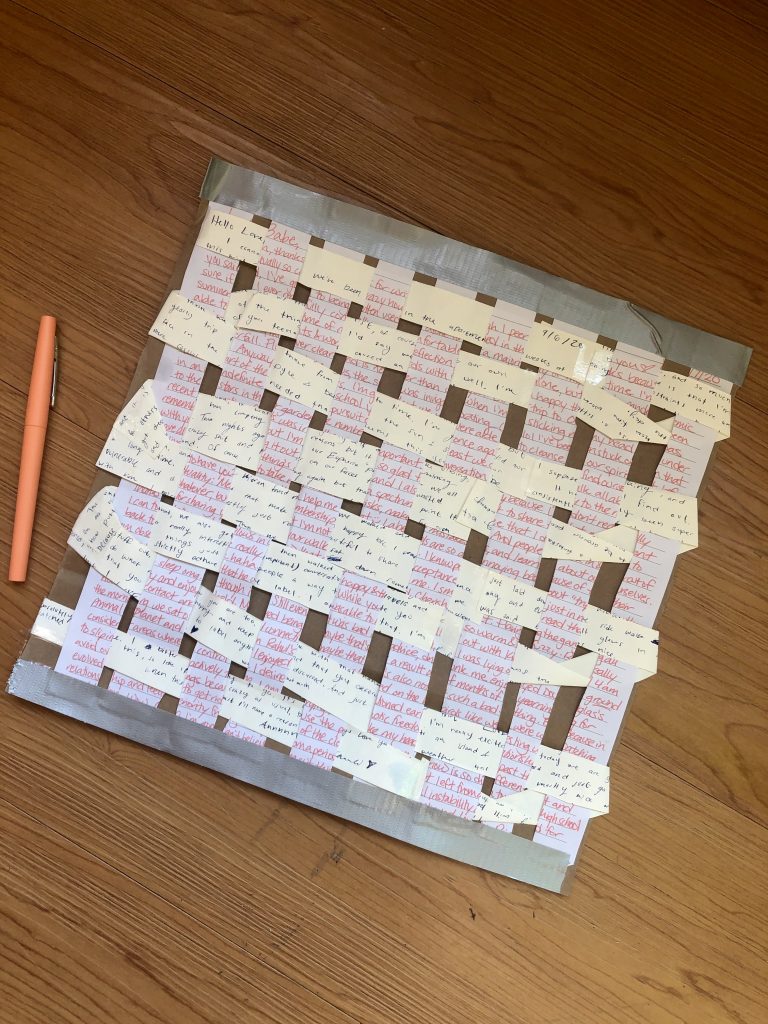
For my last weave, I used a medical theme. The box itself is the container for my first aid kit, which usually holds bandages and ointments, I am using as the loom. I used red string as the warp, red usually being the color of emergency or first aid. For the weft, I pulled the ear loops off of a used disposable face mask, and then also cut it up into strips. In addition, I also used cotton swabs, which is used for aid.

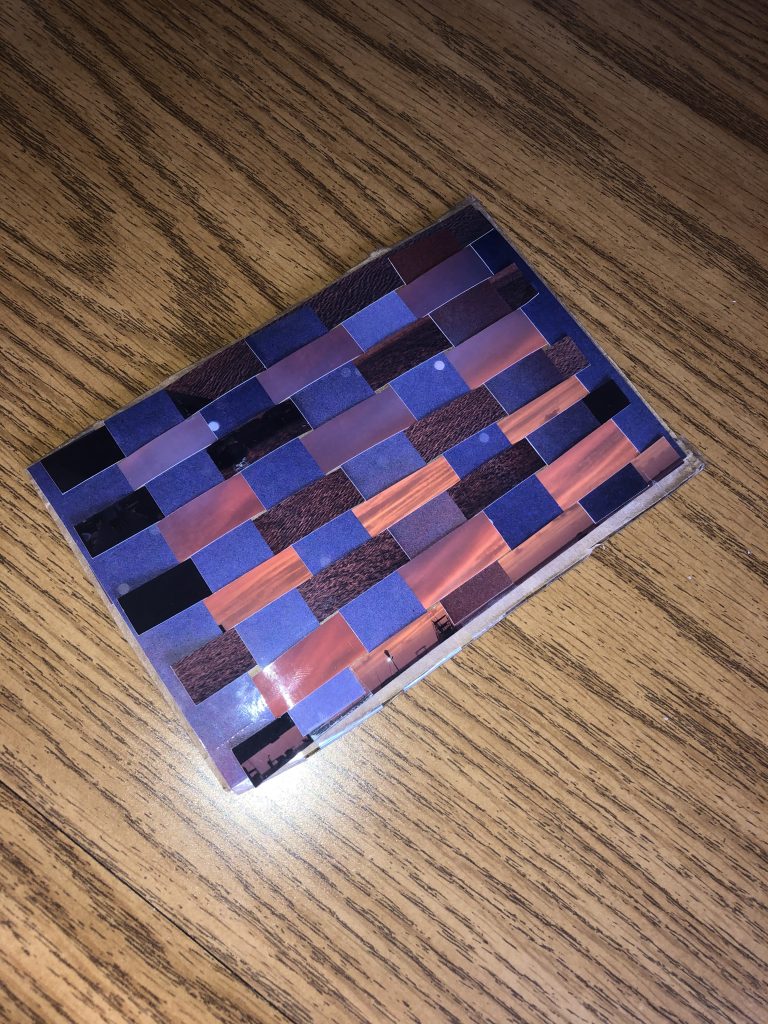
In general, I tried to use a mix of soft and hard materials as warps in all of the weaves. In previous explorations, I noticed that hard materials leave a large spacing in between each warp, so I mixed in the soft materials between them to keep the gaps from being too big. I was pretty happy with how they turned out in the end, including the color schemes that came out of it!

Improvisational Weaving Part 3: Deeper Dive

For the deeper dive section of the Improvisational Weaving project, I decided that I wanted to continue experimenting with different materials and play with the effects of my weaving. I created a loom by taping six chopsticks together in the shape of a triangular prism. I had a lot of difficulty doing this and it didn’t turn out exactly how I pictured it but multiple factors played into that. For one, one pair of chopsticks was longer than the other two pairs, so the triangles couldn’t have equal angles. I also found it very difficult to tape the chopsticks together and some continued to slide up and down while I was weaving. I knew that I didn’t really have enough of any material in my room to weave with so I decided to use left over plastic bags to make plastic yarn, aka “plarn”. To do this, I cut the bag into strips to get thin rings, then I tied them together to have one very long ball of “plarn”. There were a few challenges I ran into using “plarn” for weaving. First, because the plastic is such a thin material, I found that the more I pulled it to increase the tension, the more it stretched and the thinner it became. This made the warp very loose and hard to keep in place. Second, I tried to warp in each plane separately and then move to the next plane, but towards the end, it was difficult to warp the material around the other sections. This made the warp very inconsistent in number of rows and distance between other rows. Finally, since the “plarn” is made from loops, it got a bit confusing trying to figure out which strands of warp to weave the weft through. I decided that I would experiment with this and did some areas where I went between the entire loop and some between the individual strands of the loop. Overall, I experimented most with the tightness of the weave, some sections were very tight and others were pretty loose. This made unique textures in the weave and left some areas more open and some more closed. The final result looked like a tent of sorts and the trash theme made me think of WALL-E 🙂

Improvisational Weaving – Part 3 – Jasmine Lee

For my deeper dive, I chose to complete one large weaving. For part 2 of the assignment last week, I was able to explore using colors, different types of threads, and different types of looms. I decided to take it a step further this week in terms of color choices, fabric choices, texture, and composition.

A rectangular weaving of woven mint twine, white satin ribbon, cream cotton lace, and brown linen strips, interlocked within a warp of white and grey tulle on a wooden frame.
Full weaving.
Close-up of the previous weaving, with the different materials used shown layered vertically upon each other.
Close-up of an edge of the weaving.
A second close-up of the previous weaving, showing the materials tousled and entangled with one another.
Close-up of the center of the weaving.

In this weaving, I chose colors that would go well together. Since the frame was a light tan, I chose the cream lace to complement it. I also included the woven mint twine and linen ribbons to incorporate more texture. There was a nice contrast between the looser weave of the twine, and the tight weave of the linen ribbon. The white satin ribbon was also chosen to brighten up the colors of this piece, with the smooth, shiny texture of it intentionally contrasting against the rougher, natural materials. The satin helped marry the more natural strips of fabric with the synthetic tulle that was used as the underlying structure. Tulle, seeming delicate but deceivingly strong, was use to tie the ends of the strips with one another. The places where they were knotted were left uncut, to allow the viewer to see more of the process within the piece.

Opacity was also something I explored in this piece. In certain areas, I would use more tulle. On the other side, I would use rougher, opaque materials. As I switched this up, row by row, it created a nice pattern where light would shine through in different parts.

A white, green, beige, and brown weaving is propped up against a window. Ambient light shines through the horizontal ribbons of white, while shadow is created by the darker material in the weaving.
Same weaving, propped up against a window.
Vertical ribbons of light and shadow, created by actual ribbons of white, green, cream, and beige.
Close-up of the same weaving (propped against a window).

The materials used in this piece all have a backstory to them. I bought the tulle when I was first learning to sew, and it was used in the first thing I made. The lace was taken off a shirt passed down by my aunt, and the various ribbons were given by a friend of my mom’s who passed them on when she heard about my interests.

Something I would like to work on after this piece, is to better explore the different ways I can keep a warp on a loom. I would have loved for this piece to seem unattached to the frame on all four sides, with the only strands keeping it on in the four corners.

Materials: 20×16 canvas (wooden frame only), white tulle, gray tulle, white satin ribbon, mint woven twine, beige linen ribbon, cream cotton lace

Improvisational Weaving- Marissa

I made my first weaving using two extra photographs that didn’t make my photo wall. I picked these two in particular to weave together because they were both images of the sky just taken at different times of the day. The first is a photo of the stars that I took at an astronomy village, and the second is a photo of a sunset at the beach.

glossy photographs woven together and taped to cardboard for support

When I cut the photos into strips, I became more aware of the different textures and colors found throughout the scenes. After noticing these differences, I decided to weave the photos “out of order.” The middle strip features the rougher water texture from the sunset picture, and I think it provides a nice contrast with the smoother clouds in the starry night image. I was surprised to notice more characteristics of my photos as I converted them into my warp and weft materials.

foraged branch woven with twine and synthetic ivy

I had the idea of weaving natural and synthetic objects together, so I went outside to grab a branch as a loom. I cut a strand of fake ivy to use as the weft, and I chose twine as the warp because it was easy to maneuver the plastic leaves through it.

I was surprised by the flexibility of the branch, but it was actually helpful in wrapping the warp and weaving the weft. The leaves made it difficult to avoid weaving through the back side of the warp, but overall they provided a fun extra element to the piece.

I think it would be interesting to hang this particular weaving like a mobile. That would provide a unique way of viewing the piece, give a little bit of movement, and help to accentuate the natural forms of the branch. The process of making this piece has further sparked ideas for how to alter weavings after their construction.

two letters woven together and held in place with duct tape on a paper bag

This piece was really fun to make! My friend responded to my last letter to her from this past summer, and I was able to weave our conversation together. There were differences between the paper types that made the strips uneven, so this weaving is not as compact as the one made with photographs, but the unevenness has grown on me. I debated cutting the excess letter weft to start new strips below the one prior like I did with the photographs, but I instead decided to fold the strip on the end to make it feel more continuous. This decision contributed more to the gaps in my weaving, but I still like the way it flows.

I struggled with getting my letter to stay in place evenly as the warp, so I switched from using regular tape to duct tape . I was also hoping that some of our sentences would perfectly align, but that wasn’t really the case. Still, our different handwriting, ink color, and paper texture made the final product really interesting as a whole. I think the weaving captures the exchange and our voices well, and it gave me an opportunity to play with more conceptual ideas.

Improvisational Weaving

In each project I tried to use different tools in order to play with weaving softer and different textured materials.

My first project was with yarn, a cup and twine to weft in a circular pattern. This was more traditional than the other with the exception of the cup as a loom. It was difficult to get my hand through the tiny spaces, which I again found to be challenge when I was weaving my scarves through my pencil in the later project. However I think It was pretty successful because my twine didn’t really slip after utilizing tape.

The easiest project was with the paper and for that one I tried to play with different widths of paper to see if it added a visual affect to the project. The paper weaving project was alot easier to accomplish and took the least amount of time gathering and setting up. I at first did try to use Olivia’s method with the ruler to place the paper, but that didnt work too well so I opted for taping the paper down to my desk.

My third project used scarves, pencils and tape to create the loom, warp and weft. The biggest challenges were weaving the scarves through the pencils and also spacing the pencils out evenly while making sure they don’t move. I think the scarves I used were too big for the spacing I left in between the pencils. I wanted to play with different patterns on a very similar fabric but it did not work well with the use of pencils and tape.

Improvisational Weaving- Sunjana Kulkarni

When working on the three weavings, I decided to utilize the tissue box, pen-holder, twine, and thread I had originally discovered in my scavenger hunt. In addition, along with a few other warping and wefting materials, I later discovered a miniature statue of a figure with a raised arm and a lowered arm, so I wanted to see if I could exploit the space between the arms to create a loom.

The easiest weaving to create was the tissue box cloth weaving. I first tried experimenting with wefting with a taped-together paper towel strip, however, given how tight the strings were on the loom, I discovered that it was not ideal to do so as the taped-sections kept getting caught as I was sliding the strip through the strings. I then decided to use a large strip of cloth as it was consistently thin at all points, making it very easy to slide through the strings. I’d used twine for the warping as well. This weaving took about an hour to do, including the experimentation, and below is the final result.

A slightly harder weaving to create was the pen-holder weaving. When looking at the pen-holder, I had the idea to warp it using elastic hair ties, which I stretched taut over the hole of the pencil holder. As for wefting, I knew I had to use an extremely thin material, as the hole was very small, so I chose white thread, and used a needle to push the thread through the warp elastics. This was tricky because the thread was so fine that I had to pay extra attention to make sure I wasn’t making a mistake with wefting, and I had to pull a large amount of thread through the ends of the loom because I wasn’t sure how much I’d ultimately need, making it easy to tangle the thread. Below is the final result after 20-30 minutes.

Finally, the most difficult weaving, and the most interesting one, was my statue weaving. I spent about 45 minutes figuring out how to warp across the arms of the statue, and I’d first attempted to cover just the left shoulder portion. However, since I wanted to use the hair tie elastics for warping because of the tautness they brought to the loom, the elastics kept sliding off when I tried wrapping them around just the bent arm. In addition, I discovered that thread wasn’t an ideal wefting material for this loom because there was so much space between the elastics, and I would need too much thread to cover a relatively large space, making it easy to make a mistake. After much trial and error, I discovered that I should stretch the elastics over the right portion of the statue and pinpointed individual places where I knew they wouldn’t slip, and I used twine for wefting. Below is my finished result.

Overall, I discovered that the ‘ideal’ thickness for a weft material and warp material are relative to the size of the “hole” or space in the loom, and that the weft material should be equivalent to or thinner than the thickness of the warp material so that it can more easily be wefted and errors can be spotted easier. I also discovered twine to be a versatile item for both warping and wefting, and I discovered I enjoy working with finer materials on smaller weavings, rather than with thicker or larger materials on a larger loom.

Improvisational Weaving – Elle Smith

My first weavinng uses a tape roll as a loop and I wove on both sides, experimenting with technique on various places.

The weft on the top side is embroidery floss and on the bottom side is yarn that I made thicker by looping it in to a starter chain.

I find it really interesting how different each of the sides looks, based off the thickness or weaving technique.

The next weaving uses a book as a loom with the warp and weft made from magazine page slices.

I found this the most challenging weaving since the strips varried in width, this somehow lead the weaving to take on a shape different from the book cover

My final weaving was using a pencil tray as a loom with yarn as the warp and pens as the weft

The warp on this was really tense after putting in one pen, and it was exceptionally hard to weave in any more pens.

Improvisational Weavings – Jesse Wallace

For this assignment, I chose to take inspiration from one of my favorite parts of my apartment – my posters. I have an extremely large poster collection and I use their colors on my wall to brighten my day and add some fun to wherever I am living. Because of that, when it was brought up that paper can be woven together in this class, I knew from the start that I should weave two posters together. I chose two that have bright and contrasting colors(pink and blue) so that the new Double Poster™ would look extra bright. The result was awesome and I cannot wait to put this new piece on the wall with my normal posters.

I also chose to do a similar course of action for my next weaving. My roommates and I are making an album wall of printed album covers from our favorite musicians. I took the two extra ones that printed(“The Big Day” by Chance the Rapper and “Vikings” by New Politics) and I wove them together as well. I then chose to use the extra photo paper to add some spice to the back half of the paper I was working on. Finally, I used the paper to write my roommate a letter!

Finally, I wanted to use my 3D printer to add to the project, so I decided to print a miniature loom and weave that using a friend’s string. Its only about 1inx2in, and it’s super cute! It was also really rewarding to make because I combined my MechE line of work with IDeATe.

Improvisational Weavings — Rachel Lu

For my first weave, I used the handle of an old take out box as the loom, and following the food theme, I used baker’s twine for the warp, and linguini pasta as the weft. Due to the thickness of the pasta, this was the tightest I could get the pasta next to each other. The more pasta I added, the more taut it got. At some point, one in the middle broke, so I had to pull it out, but it was too tight to put back in, so I had to take the rest out and redo it. In retrospect, I think it would be more interesting if I also used like spaghetti as well and alternated them. (I had to throw this out though because it turns out there was still rice in the box..)

For my second weave, I used a small picture frame as the loom, baker’s twine as the warp, and paint brushes as the weft. Due to the thickness of the paint brushes and the tightness of the warp, this weave ended up very spaced out as well. I was also trying to get the warping technique down. I wrapped it five times in the top, and then spaced it out to 7 towards the bottom.

For my third weave, I wanted to try a circular weave. I used a cup as the loom, embroidery floss for the warp, and a cloth head wrap as the weft. It was hard at first because the string kept moving around, and it made it hard to see which one was next, but after the first round, it got easier! I really like how this one is not spaced out like the last two because I used a soft weft, and the last two were hard ones. The cloth also puffed up slightly to cover the embroidery floss in most cases. It seems almost flowery, like a hydrangea?

Improvisational Weavings – Jasmine Lee

From my pile of found materials, I decided to choose three different kinds of looms. I ended up using a square box lid, a toilet paper tube, and a pringles can lid. For my warp, I ended up using white thread because my objects were pretty small in size. For my weft, I used found yarn, plastic string, polyester thread, and embroidery floss. I also attempted to use wire, but found that it kept bending undesirably because it had been curled into a spool for so long.

Materials: toilet paper tube, yellow and blue polyester thread, white cotton thread, tape

Intended Effects/Challenges: I wanted to have a grid of different colors overlaying each other, but it was extremely hard to keep the threads in place and perpendicular form each other.

Surprises: The smooth polyester thread refused to stay in place so I had to constantly keep pushing the weft down. When I let it stay loose and cut back on the tension, it created nice repetitive curving patterns.

Materials: pringles can lid, embroidery floss, white cotton thread

Intended Effects/Challenges: I had the idea of poking holes in the lid so the warp threads would stay where they were supposed to go. I had the intention of creating a mandala-like weaving.

Surprises: The embroidery floss piled up on each other as I wove and had thickness to it. I ended up with a thick weaving with a soft texture than the 2d pattern I expected.

Materials: box lid, yarn, plastic string, white cotton thread

Intended Effects/Challenges: The white thread was hard to keep in place, so spacings had to be fixed at the end (when the weaving was more stable). I intended to create a plaid pattern, but as the spaces become tighter, it became harder and harder to insert the weft.

Surprises: The colors worked together better than I expected.