Processing (p5js)
Processing is a programming system for learning how to code within the context of the visual arts. It is well-suited to rapid prototyping of interactive graphics and idiosyncratic user interfaces. The language was originally implemented using Java, but has now been adapted to JavaScript in the p5js system. Programs in this system are called ‘sketches’ and run within a normal web browser. Code may be edited locally or using an online editor. As a result, sketches are easy to host online.
Pausch Bridge p5js Example
The following p5js sketch was developed by Nick Diamant as a prototype for an online Pausch Bridge animation loop editor. Special thanks to Nick for contributing this code.
The sketch shown below can be tested live in your browser by following this link.

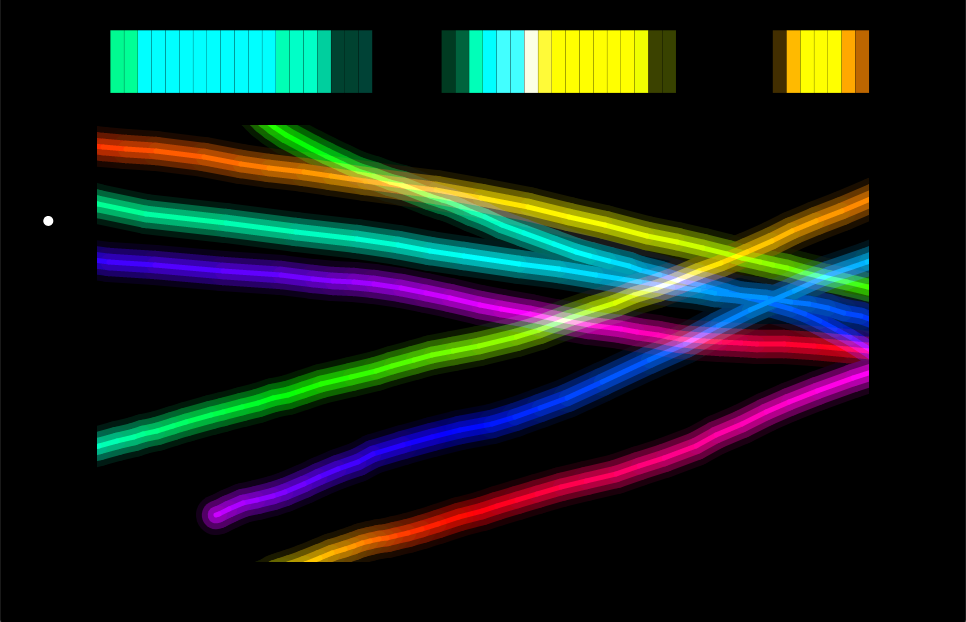
Screenshot of a custom ‘piano-roll’ loop editor for Pausch Bridge animation written in JavaScript using p5js. Dragging the mouse through the main canvas area draws colorful linework. This graphic content is interpreted as an animation which plays row by row from top to bottom. The left playbar shows a moving dot indicating the current playback position. At the top is the output preview with a row of rectangles representing the 57 lighting element groups of the bridge. Pressing any key will offer to save the image to a local PNG file which can be subsequently processed into video for the bridge.
Downloads
The sketch and the p5js runtime can be downloaded as the zip package Pausch01.zip.
Please note that not all browsers will load the index.html file from a local drive due to security protections. (On my computer, FireFox works, Safari mostly works, but Chrome does not.) If you have trouble running it, please consult the Get Started page; you could either upload the sketch.js file into the online editor or set up a local server.
Pausch01/sketch.js code
  1// Loop editor for the Pausch Bridge lighting system written using p5js
  2// (https://p5js.org/).  This implements a 'piano roll' drawing canvas in which
  3// each row can be sequenced out to the 57 lighting groups of the bridge.  The
  4// preview playback continuously loops through the image as it is drawn.
  5//
  6// Original version by Nick Diamant <ndiamant@andrew.cmu.edu>,
  7// downloaded from https://editor.p5js.org/dinkolas/sketches/Ai9tqWsYU
  8
  9// Changes:
 10
 11// 2021-03-26:  garthz@cmu.edu
 12//		added comments to the code
 13//		added the keyPressed implementation to save the image
 14
 15// -------------------------------------------------------------------------------------
 16let N = 300;  // Number of video frames in the loop.
 17let w = 57;   // Width of the preview display, e.g. number of lighting groups on bridge.
 18let row = 0;  // Playhead index, current frame of loop.
 19let h = 0;    // Current hue index for drawing brush.
 20
 21function setup() {
 22    createCanvas(windowWidth, windowHeight);
 23    frameRate(30);
 24    background(0);
 25}
 26
 27function windowResized() {
 28    resizeCanvas(windowWidth, windowHeight);
 29    background(0);
 30}
 31
 32function keyPressed() {
 33    // fetch the 'piano roll' portion of the canvas
 34    pixels = get(width * 0.1, height * 0.2, width * 0.8, height * 0.7)
 35    pixels.save('Pausch01', 'png');
 36}
 37
 38function draw() {
 39
 40    // Draw a new line segment whenever the mouse button is pressed.  The color
 41    // continuously cycles through hues.  Four overlapping segments are drawn with
 42    // varying width to create a soft edge effect.
 43    if (mouseIsPressed) {
 44	h = (h + 1) % 100;
 45	colorMode(HSB, 100);
 46	blendMode(LIGHTEST);
 47	for (let i = 0; i < 4; i++) {
 48	    strokeWeight(map(i, 0, 3, 40, 5));
 49	    stroke(h, 100, map(i, 0, 3, 10, 100));
 50	    line(mouseX, mouseY, pmouseX, pmouseY);
 51	}
 52    }
 53
 54    // Clear the margins to black all around to leave space for the playbar and preview pane.
 55    blendMode(BLEND);
 56    noStroke();
 57    fill(0);
 58    rect(0, 0, width, height * 0.2);
 59    rect(0, 0, width * 0.1, height);
 60    rect(width * 0.9, 0, width * 0.1, height);
 61    rect(0, height * 0.9, width, height * 0.1);
 62
 63    // Draw the playhead dot moving vertically in the playbar.
 64    let rowYCoord = map(row, 0, N - 1, height * 0.2, height * 0.9);
 65    colorMode(RGB, 100);
 66    noStroke();
 67    fill(100);
 68    ellipse(width * 0.05, rowYCoord, 10, 10);
 69
 70    // Read back the canvas image pixels and extract the currently playing row into an array.
 71    let colors = [];
 72    loadPixels();
 73    let d = pixelDensity();
 74    let y = floor(rowYCoord);
 75    for (let i = 0; i < w; i++) {
 76	let x = floor(map(i, 0, w - 1, width * 0.1, width * 0.9));
 77	//4 * ((y * d + j) * width * d + (x * d + i));
 78
 79	let p = 4 * ((y * d) * width * d + (x * d));
 80	let r = pixels[p];
 81	let g = pixels[p + 1];
 82	let b = pixels[p + 2];
 83	colors.push({
 84	    r: r,
 85	    g: g,
 86	    b: b
 87	});
 88    }
 89
 90    // Redraw the preview pane at the top with rectangles representing the
 91    // bridge lighting colors using the color data extracted from the currently playing row.
 92    for (let i = 0; i < w; i++) {
 93	let x = map(i, 0, w - 1, width * 0.1, width * 0.9);
 94	let c = colors[i];
 95	noStroke();
 96	fill(c.r, c.g, c.b);
 97	rect(x, height * 0.05, width * 0.8 / w, height * 0.1);
 98    }
 99
100    // Advance the playhead.
101    row = (row + 1) % N;
102}