Message in a Bottle
Jarrek Holmes, Joshua Danzig
Abstract
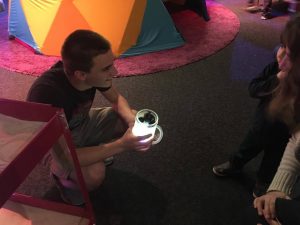
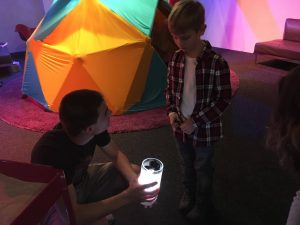
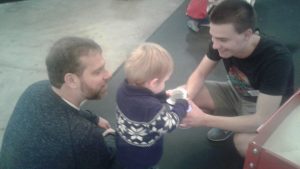
The goal of Message in a Bottle was to provide an interactive exhibit where children could listen to and record messages in a tactile experience. We wanted to create a project that was engaging, inspired wonder, and highlighted communication and social connectivity. At the final presentation, we were able to achieve these goals by having an internally wired jar that could record and play back messages, while also being able to save those message by closing the lid. The best interactions occurred when children realized their own voice was coming from the jar, that moment of “My voice is in there!” and then sharing that experience with others around them.
Objectives
We had a primary goal of inspiring wonder in children, and sub-goals of creating an aesthetic environment, inspiring social connectivity, and achieving the technical successes required to assemble the physical bottle. This leads to a few critical project features that we leveraged to achieve these goals. The first was the jar itself; by having a tactile object that could be interacted with, had beautiful and intriguing lighting elements, and ‘wonderous’ functionality we were able to create moments where children could share something captivating with their friends. The second keystone feature is the cart. By having a cart full of sand, jars, and interesting light patterns we were able to draw children’s attention and begin the entire interaction. The more complete and aesthetic the project looked, the easier it was to bring in and retain a child’s attention. This contributed directly to our goals, because it was crucial for creating that aesthetic environment and creating a situation where social connectivity could occur.
Implementation
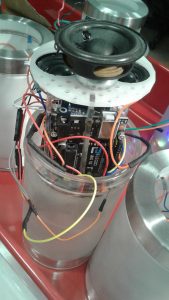
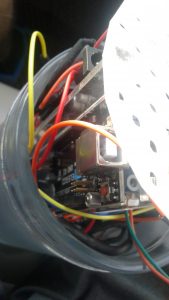
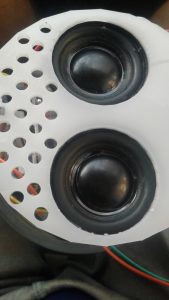
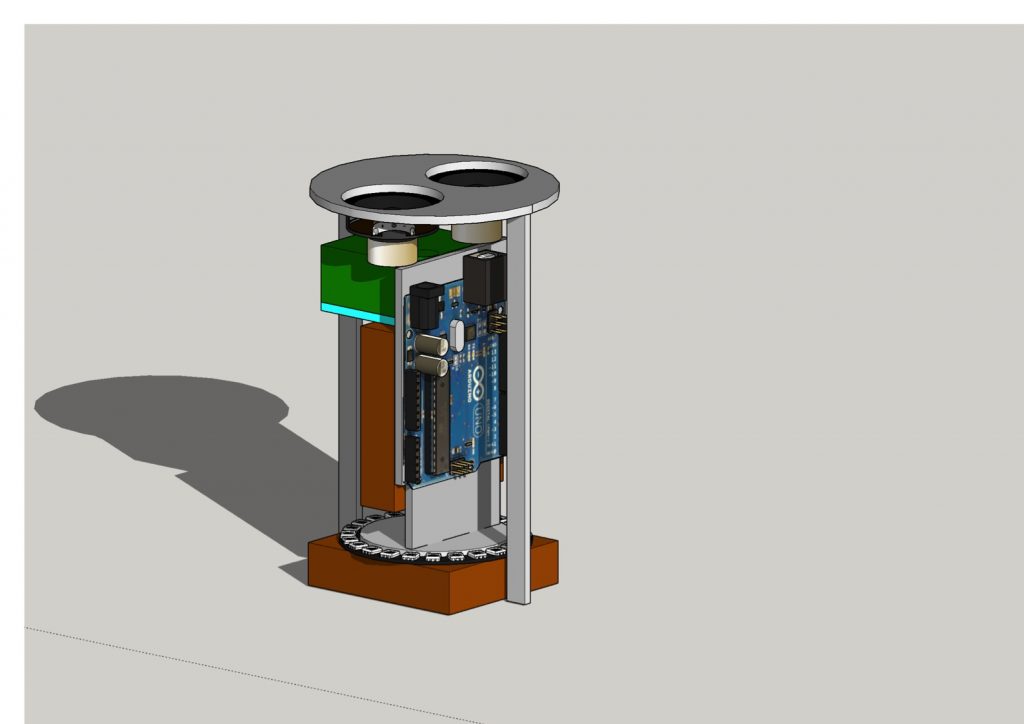
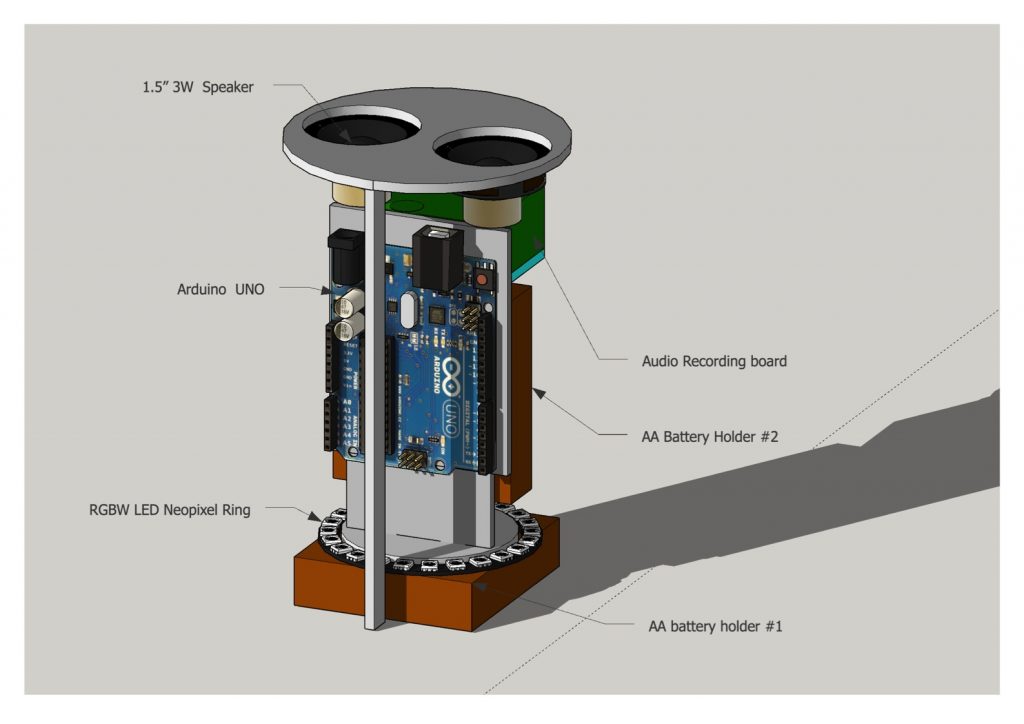
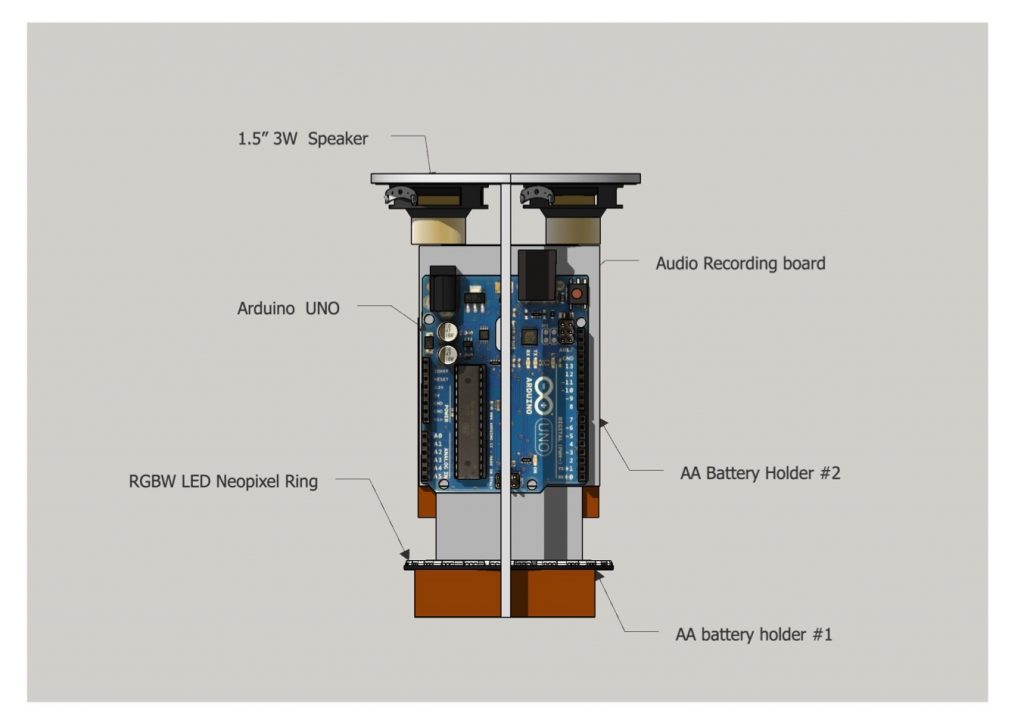
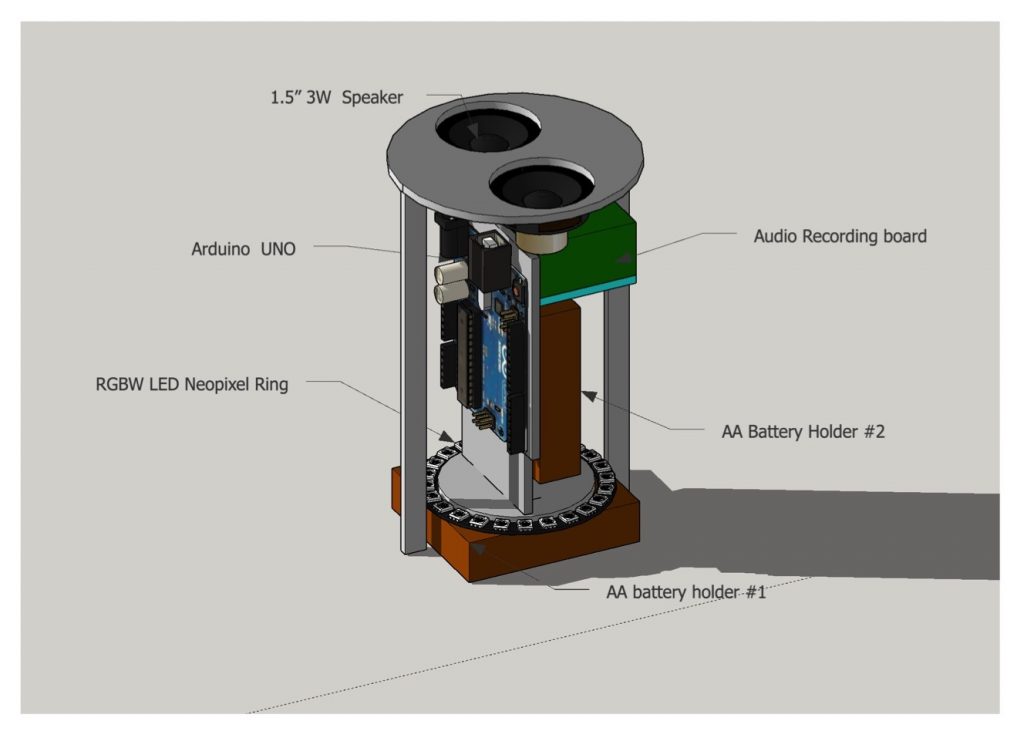
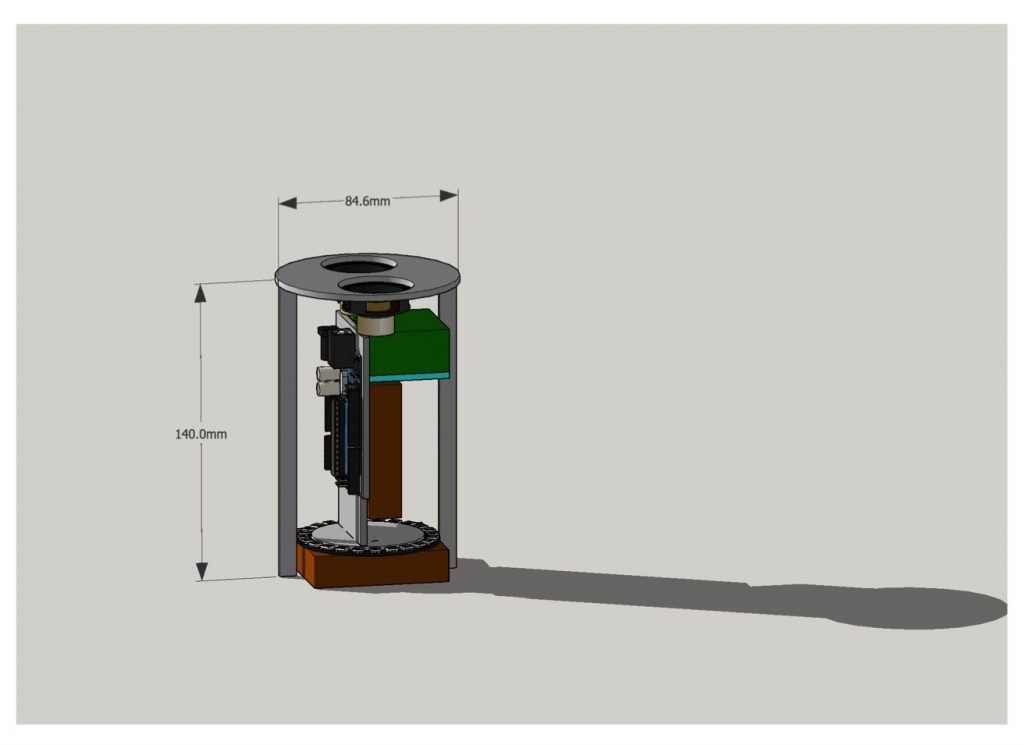
There were a number of critical design choices that we made that supported the objectives of our project. The first was to have jars be independent from one another, giving children the opportunity to pick up and move the jars around without any wires or other hindrances. This ended up being beneficial to the project, but extremely difficult to achieve. As one can see from our CAD drawings attached below, although the jars were large, space issues played a major role in the frustrations we experienced assembling the entire project. There was a lot of hardware (battery packs, Neopixel rings, arduino, speakers, microphone, etc.) and having each jar have all of those components inside was simply difficult to pull off. The second major design choice we made was behavioral when we decided to staff the project instead of allowing children to interact autonomously. This resulted in the two of us approaching children and parents and asking them to interact with the exhibit. When children did begin the experience, however, we were able to explain the nuances of the project and facilitate that moment of “My voice is in there!” much better than when the project was autonomous. This choice did take away from a child’s sense of accomplishment from discovering the jars’ functionality on their own, but we saw many more successful interactions when we staffed the project than during autonomous interaction. The final critical design choice was, once again, the cart itself. The cart allowed us to move the project around the museum space or station ourselves in a single location and allow children to approach us. Each experience had positives and negatives. Moving the cart around meant that we needed to approach museum-goers to truly get an interaction, but allowed us to interact with children in a number of different settings. Stationing the cart meant we were approached more often, but it limited our ability to spread messages from one side of the museum to the other. Ultimately, these three critical design choices supported our ultimate objectives, and each contributed positives and negatives to the overall experience.
Outcomes
There were a number of successful outcomes to our project. The central success factors revolve around a number of interactions where children were excited to hear their own voice echoed out of the jar. One child shouted their name in the jar half a dozen times, just to hear it repeated back to them. Another pulled their parent over to listen a message she had saved. As well, our final project had a beach aesthetic that was quite successful. The lights were beautiful in the darkness of the hallways, and the sand immediately attracted the attention of museum guests. Finally, our project was able to generate moments of social connectivity when children would share with their parents or other children a message they had saved or an echo of their own voice. Having increased the volume of the jar from the first iteration was extremely successful since it was able to capture a room’s attention and bring about more interaction.
Nevertheless, there were a number of outcomes that weren’t as desired. We had attempted an extremely ambitious project, with an initial goal of nine fully functional jars. This meant that we had to order an enormous amount of parts and had to attempt to assemble nine units concurrently. Because of this, we a) weren’t able to complete as many jars as hoped for and b) were unable to test the jars adequately before launch. This meant that we had button malfunctions during the actual presentation, losing at least one interaction to the hardware issue. We were also using untested hardware, which meant that, as we assembled the jars, we found new, unexpected problems. For example, the speakers we had been using had a lot of static, and it diminished the experience. Museum goers sometimes struggled to hear their echoes, and the sound wasn’t always pleasing.
Regardless, of the multitude of successes and failure, we learned a lot, both technically and in terms of project management and assembly.
Contribution
Jarrek:
- Complete software development, from start to finish.
- Circuitry work by bread-boarding prototypes, researching new hardware data sheets, and creating wiring configuration for final project.
- Ancillary work on fabrication (e.g. soldering, crimping, laser cutting)
- Primary lead on documentation
Josh:
- Primary fabrication work, both digital and physical (e.g. developing CAD drawings, laser cutting pieces)
- Final project assembly by affixing pieces, building wire harnesses, and arranging final project
- Hardware research and acquisition
Video
Additional Photos
Child Interactions:
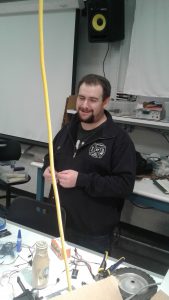
Getting ready, morning of project demo!

Jar Internals
CAD Drawings
Project Code
Primary jar programming
1 2 3 4 5 6 7 8 9 10 11 12 13 14 15 16 17 18 19 20 21 22 23 24 25 26 27 28 29 30 31 32 33 34 35 36 37 38 39 40 41 42 43 44 45 46 47 48 49 50 51 52 53 54 55 56 57 58 59 60 61 62 63 64 65 66 67 68 69 70 71 72 73 74 75 76 77 78 79 80 81 82 83 84 85 86 87 88 89 90 91 92 93 94 95 96 97 98 99 100 101 102 103 104 105 106 107 108 109 110 111 112 113 114 115 116 117 118 119 120 121 122 123 124 125 126 127 128 129 130 131 132 133 134 135 136 137 138 139 140 141 142 143 144 145 146 147 148 149 150 151 152 153 154 155 156 157 158 159 160 161 162 163 164 165 166 167 168 169 170 171 172 173 174 175 176 177 178 179 180 181 182 183 184 185 186 187 188 189 190 191 192 193 194 195 196 197 198 199 200 201 202 203 204 205 206 207 | #include <Adafruit_NeoPixel.h>#ifdef __AVR__#include <avr/power.h>#endif#define PIN 3int rec = 6;int pl = 7;&nbsp;int break_beam = 2;boolean has_recording = false;long long just_spoke;Adafruit_NeoPixel strip = Adafruit_NeoPixel(60, PIN, NEO_GRB + NEO_KHZ800);void setup() {Serial.begin(9600);pinMode(rec, OUTPUT);pinMode(pl, OUTPUT);pinMode(break_beam, INPUT);#if defined (__AVR_ATtiny85__)if (F_CPU == 16000000) clock_prescale_set(clock_div_1);#endif// End of trinket special code&nbsp;strip.begin();strip.show(); // Initialize all pixels to 'off'just_spoke = millis();}void record(){Serial.println("Recording");long time = millis();digitalWrite(rec, HIGH);theaterChase(strip.Color(127, 0, 0), 100); // ReddigitalWrite(rec, LOW);Serial.println("Stop Recording");}void speak(){Serial.println("Speaking");delay(1000);digitalWrite(pl, HIGH);rainbow(10);digitalWrite(pl, LOW);Serial.println("Stop Speaking");just_spoke = millis();}void loop() {if(has_recording and digitalRead(break_beam)){speak();if(!digitalRead(break_beam)){has_recording = true;}else{has_recording = false;}}else if(!has_recording and digitalRead(break_beam) and millis() > just_spoke + 1000){record();has_recording = true;}else if(!digitalRead(break_beam) and millis() < just_spoke + 1000){has_recording = true;}else if(has_recording){int brightness = 0;float my_time = millis() % 2000;if (my_time > 1000){brightness = map(millis() % 1000, 1000, 0, 0, 180);}else{brightness = map(millis() % 1000, 0, 1000, 0, 180);}colorWipeNoWait(strip.Color(brightness, brightness, brightness, 255));}else{Green(); // Red}}void rainbow(uint8_t wait) {uint16_t i, j;for(j=0; j<256; j++) {for(i=0; i<strip.numPixels(); i++) {strip.setPixelColor(i, Wheel((i+j) & 255));}strip.show();delay(wait);}}// Slightly different, this makes the rainbow equally distributed throughoutvoid rainbowCycle(uint8_t wait) {uint16_t i, j;for(j=0; j<256*5; j++) { // 5 cycles of all colors on wheelfor(i=0; i< strip.numPixels(); i++) {strip.setPixelColor(i, Wheel(((i * 256 / strip.numPixels()) + j) & 255));}strip.show();delay(wait);}}//Theatre-style crawling lights.void theaterChase(uint32_t c, uint8_t wait) {for (int j=0; j<10; j++) { //do 10 cycles of chasingfor (int q=0; q < 3; q++) {for (uint16_t i=0; i < strip.numPixels(); i=i+3) {strip.setPixelColor(i+q, c); //turn every third pixel on}strip.show();delay(wait);for (uint16_t i=0; i < strip.numPixels(); i=i+3) {strip.setPixelColor(i+q, 0); //turn every third pixel off}}}}//Theatre-style crawling lights with rainbow effectvoid theaterChaseRainbow(uint8_t wait) {for (int j=0; j < 256; j++) { // cycle all 256 colors in the wheelfor (int q=0; q < 3; q++) {for (uint16_t i=0; i < strip.numPixels(); i=i+3) {strip.setPixelColor(i+q, Wheel( (i+j) % 255)); //turn every third pixel on}strip.show();delay(wait);for (uint16_t i=0; i < strip.numPixels(); i=i+3) {strip.setPixelColor(i+q, 0); //turn every third pixel off}}}}void colorWipeNoWait(uint32_t c) {for(uint16_t i=0; i<strip.numPixels(); i++) {strip.setPixelColor(i, c);}strip.show();}void Green(){strip.setPixelColor(0, 0, 5, 0);strip.setPixelColor(1, 5, 0, 0);strip.setPixelColor(2, 0, 0, 5);strip.setPixelColor(4, 0, 5, 0);strip.setPixelColor(5, 5, 0, 0);strip.setPixelColor(6, 0, 0, 5);strip.setPixelColor(8, 0, 5, 0);strip.setPixelColor(9, 5, 0, 0);strip.setPixelColor(10, 0, 0, 5);strip.setPixelColor(12, 0, 5, 0);strip.setPixelColor(13, 5, 0, 0);strip.setPixelColor(14, 0, 0, 5);strip.setPixelColor(16, 0, 5, 0);strip.setPixelColor(17, 5, 0, 0);strip.setPixelColor(18, 0, 0, 5);strip.setPixelColor(20, 0, 5, 0);strip.setPixelColor(21, 5, 0, 0);strip.setPixelColor(22, 0, 0, 5);strip.setPixelColor(24, 0, 5, 0);strip.setPixelColor(25, 5, 0, 0);strip.setPixelColor(26, 0, 0, 5);strip.setPixelColor(28, 0, 5, 0);strip.setPixelColor(29, 5, 0, 0);strip.setPixelColor(30, 0, 0, 5);strip.show();}// Input a value 0 to 255 to get a color value.// The colours are a transition r - g - b - back to r.uint32_t Wheel(byte WheelPos) {WheelPos = 255 - WheelPos;if(WheelPos < 85) {return strip.Color(255 - WheelPos * 3, 0, WheelPos * 3);}if(WheelPos < 170) {WheelPos -= 85;return strip.Color(0, WheelPos * 3, 255 - WheelPos * 3);}WheelPos -= 170;return strip.Color(WheelPos * 3, 255 - WheelPos * 3, 0);} |
‘Dummy’ jars programming
1 2 3 4 5 6 7 8 9 10 11 12 13 14 15 16 17 18 19 20 21 22 23 24 25 26 27 28 29 30 31 32 33 34 35 36 37 38 39 40 41 42 43 44 45 46 47 48 49 50 51 52 53 54 55 56 57 58 | int led1 = 3;int led2 = 5;int led3 = 6;int brightness1 = 0;int brightness2 = 50;int brightness3 = 125;int fadeAmount1 = 5;int fadeAmount2 = 7;int fadeAmount3 = 3;void setup() { pinMode(led1, OUTPUT); pinMode(led2, OUTPUT); pinMode(led3, OUTPUT);}void loop() { if(millis() % 6000 &lt; 2000){ analogWrite(led2, 0); analogWrite(led3, 0); if(millis() % 2000 &lt; 1000){ brightness1 = map(millis() % 1000, 0, 1000, 0, 255); } else{ brightness1 = map(millis() % 1000, 0, 1000, 255, 0); } analogWrite(led1, brightness1); } else if(millis() % 6000 &lt; 4000){ analogWrite(led1, 0); analogWrite(led3, 0); if(millis() % 2000 &lt; 1000){ brightness2 = map(millis() % 1000, 0, 1000, 0, 255); } else{ brightness2 = map(millis() % 1000, 0, 1000, 255, 0); } analogWrite(led2, brightness2); }else{ analogWrite(led2, 0); analogWrite(led1, 0); if(millis() % 2000 &lt; 1000){ brightness3 = map(millis() % 1000, 0, 1000, 0, 255); } else{ brightness3 = map(millis() % 1000, 0, 1000, 255, 0); } analogWrite(led3, brightness3); }} |
Leave a Reply
You must be logged in to post a comment.