Griffin Tang & Jai Madisetty
Abstract
Our final project aimed to take the classic and simple game of Plinko and make it more engaging through kinetic systems. We chose Plinko because our previous projects produced the finding that kids love suspense, and the bulk of playing Plinko is waiting in suspense for the outcome.
Objectives
Throughout the semester, we learned several lessons about what kids find appealing in interactions, and these lessons informed our design decisions.
We also learned from previous projects that kids are more confident engaging with controls that they can understand quickly and have precedent for in the real world.
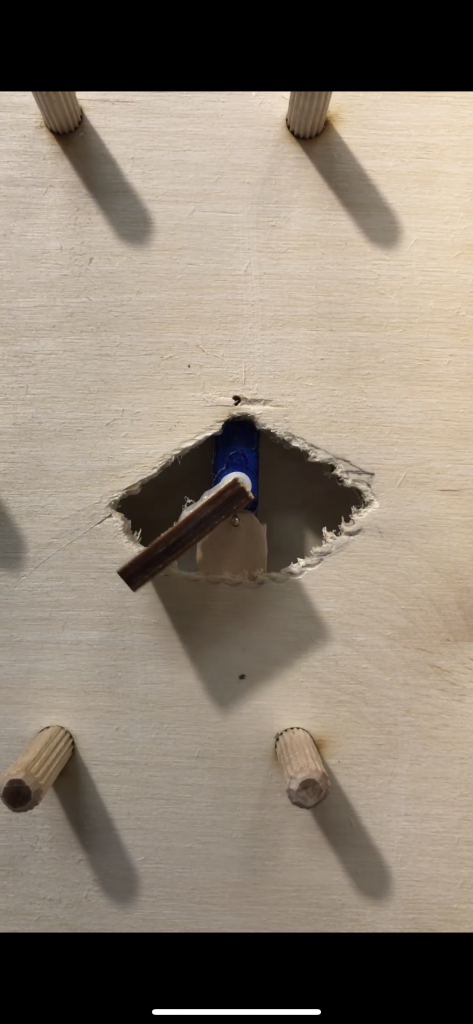
We also learned that kids love motion and learning timing, this is why we added two sweeping obstacles in the middle of the pegboard.
Implementation
As per the lessons learned, we wanted our game to begin with a physical input, which took the form of a hammer action that kicks off the game by launching the disc into the pegboard. We initially had the direction react to where the puck was coming from, but found that it took some time for the kids to understand what was happening.
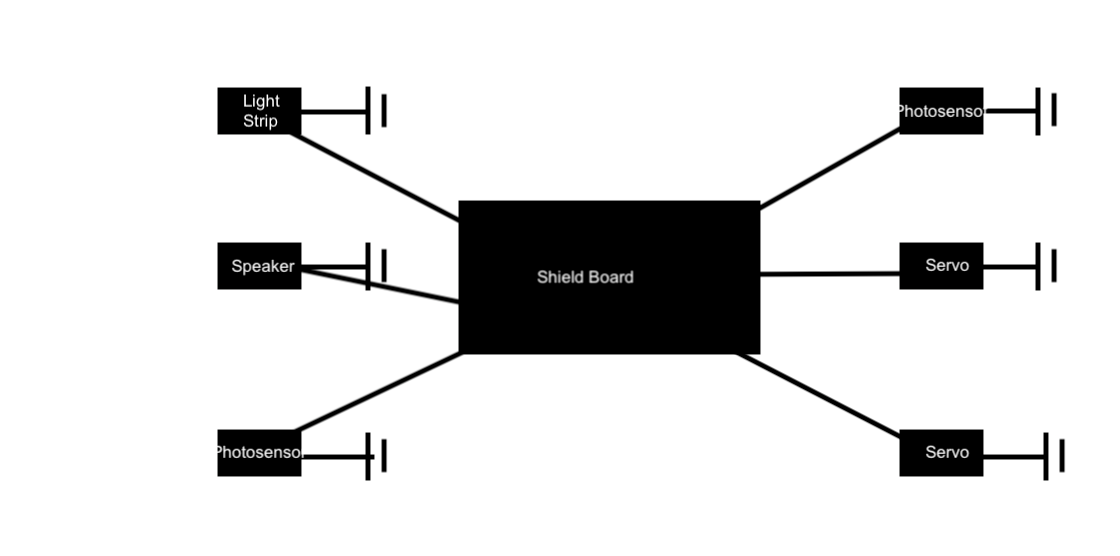
When considering the system’s response to outcomes we looked at many possibilities and found that sound was great, but hard to keep consistently audible in hectic environments. We opted for the light strip with a sound accompaniment such that it would not be environmentally dependent, but also because it has a very large and alluring presence and a lot of adaptabilities.
Outcomes
We had a lot of fun at the museum. It was really interesting to see the different ways the children interacted with our project. One child was obsessed with the hammer mechanism. There was one child who didn’t understand that the spring-hammer system and instead of releasing the hammer after pulling it back, pushed the hammer back to hit the disk. Another child was intrigued by the tone playing, and inserted the disk from the bottom so that it would always play a sound.
We were able to retain the children who interacted with machine for a lot longer than our first iteration. We also did not have any of our pieces break off which we were a little concerned about given we used a considerable amount of superglue.
Unfortunately, towards the end of the trip, part of our hammer mechanism broke. Additionally, we ran short of time and were not able to implement a mist maker with our machine. Such a device would have been of great appeal to children.
Future Work
With more time, we definitely would have wanted to refine the form factor both aesthetically and in terms of mechanical robustness. We would’ve liked to add more color to the board itself; however, the plain wood gives the board a more suitable, old-fashioned look. Additionally, we relied on superglue A LOT. With more time, we would have definitely looked to reduce the amount of superglue used.
We would have also wanted to create more dramatic outcomes and possibly more interesting obstacles amidst the pegs. In addition to having the lights stop flashing and a tone playing, we would have liked to add misters that release mist whenever the disks pass over the photoreceptor.
Contributions
Jai handled the bulk of the Plinko board fabrication while Griffin did the bulk of the electronics and the hammer mechanism. We both made it to the exhibition.
Project Video
Photo Documentation


Citations
https://github.com/adafruit/Adafruit_NeoPixel
Supporting Material
Source Code
#include <Servo.h>
#include <Adafruit_NeoPixel.h>
#ifdef __AVR__
#include <avr/power.h> // Required for 16 MHz Adafruit Trinket
#endif
#define PIN 13 // On Trinket or Gemma, suggest changing this to 1
// How many Neopixelss are attached to the Arduino?
#define NUMpixels 60 // Popular Neopixels ring size
#define DELAYVAL 20 // Time (in milliseconds) to pause between pixelss
Adafruit_NeoPixel pixels(NUMpixels, PIN, NEO_GRB + NEO_KHZ800);
const int speakerPin = 11; //Mosfet pin
const int pr1 = A0;
const int pr2 = A1;
Servo serv1;
Servo serv2;
//What we want:
//If no puck or slot 2, servo nuetral
//If puck in slot 1, servo blocks slot one path
//If puck in slot , servo blocks slot three path
//If
int block1 = 0;
int neutral = 90;
int block3 = 180;
int delayt = 800;
int delays = 1200;
int servPos = -180;
int servMax = 180;
int servMin = 0;
int servThresh = 3;
int servDir = 0;
int servSpeed = 1;
#define c 3830 // 261 Hz
#define d 3400 // 294 Hz
#define e 3038 // 329 Hz
#define f 2864 // 349 Hz
#define g 2550 // 392 Hz
#define a 2272 // 440 Hz
#define b 2028 // 493 Hz
#define C 1912 // 523 Hz
#define R 0
int melody1[] = { C, b, g, C, b, e };
int melody2[] = { R, C, c, g, a, C };
int beats1[] = {16, 16, 16, 8, 8, 16};
int beats2[] = { 32, 16, 16, 16, 8, 8 };
int MAX_COUNT = sizeof(melody1) / 2; // Melody length, for looping.
// Set overall tempo
long tempo = 10000;
// Set length of pause between notes
int pause = 1000;
// Loop variable to increase Rest length
int rest_count = 100; //<-BLETCHEROUS HACK; See NOTES
// Initialize core variables
int tone_ = 0;
int beat = 0;
long duration = 0;
void setup() {
// put your setup code here, to run once:
pinMode(speakerPin,OUTPUT);
pinMode(pr1, INPUT);
pinMode(pr2, INPUT);
serv1.attach(8);
serv2.attach(7);
Serial.begin(9600);
while (! Serial);
Serial.println("BEGIN");
#if defined(__AVR_ATtiny85__) && (F_CPU == 16000000)
clock_prescale_set(clock_div_1);
#endif
// END of Trinket-specific code.
pixels.begin(); // INITIALIZE Neopixels strip object (REQUIRED)
}
void setServPos(){
if (servPos < servMin + servThresh){ // if within 0-10 (coming left) go right
servDir = 1;
}
else if (servPos > servMax - servThresh){ // if within 170-180 (coming right) go left
servDir = 0;
}
if (servDir == 0){
servPos -= servSpeed;
}
else if (servDir == 1){
servPos += servSpeed;
}
serv1.write(servPos);
serv2.write(servPos);
//delay(5);
}
void playTone() {
long elapsed_time = 0;
if (tone_ > 0) { // if this isn't a Rest beat, while the tone has
// played less long than 'duration', pulse speaker HIGH and LOW
while (elapsed_time < duration) {
digitalWrite(speakerPin,HIGH);
delayMicroseconds(tone_ / 2);
// DOWN
digitalWrite(speakerPin, LOW);
delayMicroseconds(tone_ / 2);
// Keep track of how long we pulsed
elapsed_time += (tone_);
}
}
else { // Rest beat; loop times delay
for (int j = 0; j < rest_count; j++) { // See NOTE on rest_count
delayMicroseconds(duration);
}
}
}
void playMelody(int dif){
if (dif == 1){
for (int i=0; i<MAX_COUNT; i++) {
tone_ = melody1[i];
beat = beats1[i];
duration = beat * tempo; // Set up timing
playTone();
// A pause between notes...
delayMicroseconds(pause);
}
}
else{
for (int i=0; i<MAX_COUNT; i++) {
tone_ = melody2[i];
beat = beats2[i];
duration = beat * tempo; // Set up timing
playTone();
// A pause between notes...
delayMicroseconds(pause);
}
}
}
void checkHit(){
if (analogRead(pr1) < 250){
//tone(speakerPin,1000);
pixels.fill(pixels.Color(0, 150, 0));
pixels.show();
playMelody(1);
}
else if (digitalRead(pr2) == LOW){
//tone(speakerPin,1500);
pixels.fill(pixels.Color(0, 0, 150));
pixels.show();
playMelody(0);
}
}
void loop() {
setServPos();
noTone(speakerPin);
pixels.clear();
//Serial.println(analogRead(pr1));
checkHit();
if (analogRead(pr1) > 250 && analogRead(pr2) > 250){
rainbowFade2White(0,1, 0);
//pixels.fill(pixels.Color(100, 100, 100));
}
pixels.show();
}
void rainbowFade2White(int wait, int rainbowLoops, int whiteLoops) {
int fadeVal=0, fadeMax=100;
// Hue of first pixel runs 'rainbowLoops' complete loops through the color
// wheel. Color wheel has a range of 65536 but it's OK if we roll over, so
// just count from 0 to rainbowLoops*65536, using steps of 256 so we
// advance around the wheel at a decent clip.
for(uint32_t firstPixelHue = 0; firstPixelHue < rainbowLoops*65536; firstPixelHue += 256) {
setServPos();
for(int i=0; i<pixels.numPixels(); i++) { // For each pixel in strip...
checkHit();
// Offset pixel hue by an amount to make one full revolution of the
// color wheel (range of 65536) along the length of the strip
// (strip.numPixels() steps):
uint32_t pixelHue = firstPixelHue + (i * 65536L / pixels.numPixels());
// strip.ColorHSV() can take 1 or 3 arguments: a hue (0 to 65535) or
// optionally add saturation and value (brightness) (each 0 to 255).
// Here we're using just the three-argument variant, though the
// second value (saturation) is a constant 255.
pixels.setPixelColor(i, pixels.gamma32(pixels.ColorHSV(pixelHue, 255, 255 * fadeVal / fadeMax)));
}
pixels.show();
delay(0);
if(firstPixelHue < 65536) { // First loop,
if(fadeVal < fadeMax) fadeVal++; // fade in
} else if(firstPixelHue >= ((rainbowLoops-1) * 65536)) { // Last loop,
if(fadeVal > 0) fadeVal--; // fade out
} else {
fadeVal = fadeMax; // Interim loop, make sure fade is at max
}
}
}
CAD Files
Electronic Schematics
Leave a Reply
You must be logged in to post a comment.