Exercise: Programmed Puppet
This exercise is still being updated and revised for Fall 2024.
In this exercise we will design and fabricate a simple puppet incorporating an electric DC gearmotor and microcontroller. The overall project objective is enabling narrative movement for storytelling. The technical objective is controlling interactively controlled movement in software.
Objectives
The overall objective of this exercise is to design and fabricate a freestanding device with a microcontroller program to accept user input and actuatesa puppet using a DC gearmotor. The performance of the puppet will blend autonomous and controlled behavior.
The goals of this exercise are that you should be able to:
Design and fabricate an object which exhibits expressive movement, which we call a puppet.
Reliably mount a DC gearmotor in an assembly.
Design a single-bit sensor interface.
Program a blend of automous and reactive behavior in CircuitPython.
Laser-cut parts, assemble, test, and iterate.
Sample Parts
TBD.
Sample Circuit

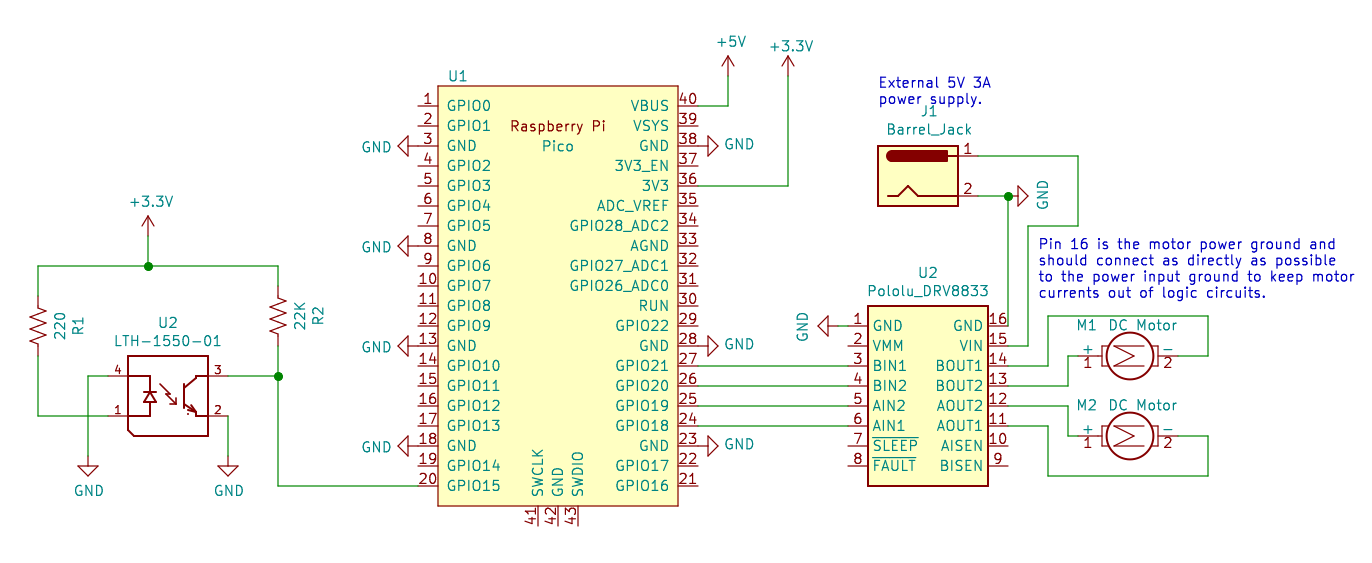
Sample motor driver and sensor circuit. Note that any four GPIO pins may be used to control the DRV8833 dual motor driver. Please be careful with the power wiring, motor voltages can destroy the Pico.
The photointerrupter must be powered from the 3.3V supply on pin 36 to limit the Pico input voltages. Please note that the R2 bias resistor value can be changed to modify the sensitivity; if the moving gate isn’t triggering the sensor, then a higher resistance value will increase the response from a weaker reflection. It is also possible to read the photoreflector using an analog input.
Sample Code
Sample code for driving a DC motor output: DC Motor Examples - Raspberry Pi Pico.
Sample code for reading a digital input: Digital Input/Output Examples - Raspberry Pi Pico.
Deliverables
Live in-class demo of your device.
A short report posted to the shared drive including:
a short text statement reviewing your intent and outcomes
one or more photos
a brief video
your SolidWorks files