Chuck Li, Mariana Rodriguez, and Kofi Som-Pimpong
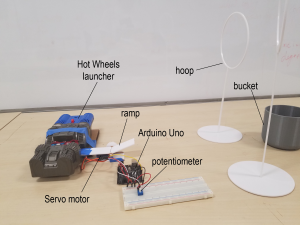
If you think this is a regular Hot Wheels game, think again! While Flight of the Furious uses the usual toy car launcher and plastic track of yore, its ramp moves up and down thanks to a motor. Kids ages 7 and up can adjust the ramp’s pitch with the potentiometer knob to aim at a field of hoops and buckets. Whoever lands the car in the far bucket first, wins!

Learning Goals
For Kids
- Through a fun, hands-on game, kids will gain intuition on kinematics, especially projectile motion, launch angles, horizontal versus vertical velocity, etc.
- Kids can learn about how software and hardware work together to make electronic toys work. They’ll get a glimpse at Arduino code and how changing parameters changes motor speeds, etc.
For Adults
- See basic kinematic equations in action, and watch the parabola of the car’s flight trajectory.
- Troubleshoot the ramp’s and obstacles’ dimensions to optimize the launch path.
- Understand how kids learn by doing.
Operation Info
To use, simply:
- Set up the hoops and buckets at your desired distances. The bucket is the ultimate goal and should be the furthest from the ramp.
- Turn on the launcher; choose between High and Low speeds.
- Turn on the Arduino to turn on the Servo motor.
- Adjust to the desired ramp height by turning the potentiometer knob (gives a range between 0-90 degrees).
- Take aim, and launch!
Safety Notes
- As a precaution, make sure only one car launches at a time.
- Keep hands and loose clothing away from the launcher’s wheels.
- Play in an open, spacious area with no one standing in the launch direction.
Fabrication
Adjustable Ramp
- Laser-cut acrylic
- Modeled in SolidWorks
- Joints are snug finger joints
- File: Cuts
Starting Ramp
- 3D-printed with the NVBot NVPro using PLA filament
- Modeled in Solidworks
- File: ramp2
Circuitry
- Arduino Uno Elegoo connected to laptop with a USB cable
- Servo motor
- Potentiometer
- Breadboard

Hoops
- Laser-cut acrylic
- Modeled in Solidworks
Bucket
- 3D-printed with the NVBot NVPro using PLA filament
- Modeled in Solidworks
Launcher & Cars
- Pre-mades
- Approximately $30 total
Extensions
There are many more possibilities for the toy, including:
- Designing and building a case with knobs that gives a child a user interface s/he can control
- Hooking up Servo motors to the hoops so they can also move back and forth, providing a greater challenge
- Opening up the hardware and software side of the toy so older kids (ages 10 and up) can code the ramp and/or hoops to move at different speeds and tempos
- Make a split ramp with two “heads” that also move
